
Review: 928 Intl. aluminum radiator
 02-11-2008, 05:11 PM
#76
Pro
Join Date: Nov 2003
Location: Boston
Posts: 747
Likes: 0
Received 0 Likes
on
0 Posts
I didn't take any pics during the project but here is a picture of a C&R (thanks in advance to Motorsports for use of photo; let me know if you want me to take it down) with quick and ugly photoshop job showing what tabs were removed or trimmed. I probably trimmed more than was needed but the final fit was very good, comparable to the factory radiator.
I used a Dremel tool with cutting wheel and grinder attachments, didn't take long at all to do the trimming.
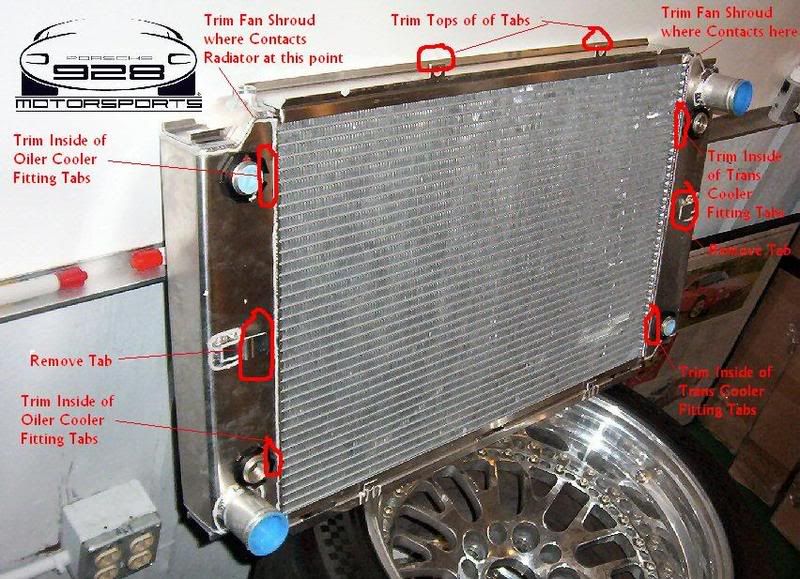
Removal of the large aluminum side tabs for >'87 cars was described in the directions that came with the radiator. After test fitting the fan shroud outside of the engine compartment I decided to trim the oil cooler and trans cooler inlet and outlet tabs closest to the middle portion of the radiator because the fan shroud was contacting them and couldn't move any closer to the radiator, creating about a half-inch gap. I removed minimum required amount from these steel tabs to accommodate the shroud, which then fit nearly flush with the radiator. I then cut about 3/8" off of the top 2 tabs to enable the shroud to sit that much lower on the radiator to minimize hood clearance issues and make for a better fit. There was still plenty of tab left to accept the speed-nuts (which I didn't have so temporarily substituted generic fasteners). Note that these top tabs are supposed to fit into notches in the fan shroud and are not exposed after assembly. I also trimmed a bit of plastic off of the fan shroud so that it would sit snuggly against the top of the radiator where the shoulders of the radiator came into contact with it, which let the fan shroud sit that 3/8" or so lower from trimming those top tabs.
So based on several responses here, it looks like its possible to fit the shroud without some or all of the above trimming. But I have to say that based on my experimenting with the fit and doing these modifications in stages, I was able to get a much better fit in my car than I would have had without taking these extra steps. The bottom line and most important thing is that we are all quite satisfied with the product and the way it works and fits in our cars.
A big THANK YOU to 928 International (along with C&R) for creating and selling this great product, as well as a shout out to all our vendors who make enjoying these cars possible.
 02-11-2008, 05:50 PM
#77

My Devek radiator failed just out of warranty because it was epoxied. I had read about such problems, and asked whether the one they were selling me was a newer brazed unit. They said yes it was, and when I looked at it that seemed to be the case. It was an optical illusion, as the epoxy was perfectly clear and looked like metal.
:
:
Where is the epoxy? Is it the yellow stuff on the sides? Do you think it could be fixed like the one that 928intl sells?
What if I took it apart and had it welded?
02-11-2008, 06:09 PM
#78
Addict
Rennlist Member
Rennlist Member
Join Date: Oct 2003
Location: Gone. On the Open Road
Posts: 16,467
Received 1,623 Likes
on
1,060 Posts
Chris beat me to it with the full description. Below are two quick pics of the C&R installed in Chris' car. The first shows the shroud slipped over the (cut-down) tabs and resting almost perfectly. Note that the 'nipple hose' is at the same level as the top of the shroud. The second shows an example - if you look closely - of the two tabs on the retaining collar that Chris trimmed to allow the shroud to rest flush against the radiator.
02-11-2008, 06:43 PM
#79
Basic Sponsor
Rennlist
Site Sponsor
Rennlist
Site Sponsor
Chris,
Thanks for the overview.
We had no clearance issue at all - apart from re-orintation of the PS reservoir as the hoses were in the wrong position to start with.
The only issue/concern was the small hose and how it was in a higher position and came very close to the hood. We need a right angle connection at that point.
I will check and see if the shroud is sitting flush on the rad like in your picture.
Now you are telling me that I should have read the instructions first 8>).
__________________

Does it have the "Do It Yourself" manual transmission, or the superior "Fully Equipped by Porsche" Automatic Transmission? George Layton March 2014
928 Owners are ".....a secret sect of quietly assured Porsche pragmatists who in near anonymity appreciate the prodigious, easy going prowess of the 928."
Does it have the "Do It Yourself" manual transmission, or the superior "Fully Equipped by Porsche" Automatic Transmission?
George Layton March 2014928 Owners are ".....a secret sect of quietly assured Porsche pragmatists who in near anonymity appreciate the prodigious, easy going prowess of the 928."
02-11-2008, 07:15 PM
#80
Addict
Rennlist Member
Rennlist Member
Join Date: Oct 2003
Location: Gone. On the Open Road
Posts: 16,467
Received 1,623 Likes
on
1,060 Posts
If the nipple is sticking up too high after you're 'done' with the install I would urge inspecting the bottom bumpers with an inspection mirror. You cannot see the front of the bumper (that's the part closest to the A/C condensor) with your eye if the radiator is in place. In fact your eye - looking at the back of the bumper - will tell you that the rad is sitting on it. But, with an inspection mirror placed so that you can see the left-side bumper from the side and a helper holding the radiator in it's final position you may see that the side tank's bottom bracket is ridding on the bumper and not seated around it. This was the case with Chris' install. But, once he trimmed a few mm from the front of the bumper the radiator was able to settle on the bumpers.
One thing we noticed on Chris' car was that the bottom bumpers were offset. The right-side (p-side on LHD) was closer to the condenser than the left side. The right side bumper needed more trimming.
One thing we noticed on Chris' car was that the bottom bumpers were offset. The right-side (p-side on LHD) was closer to the condenser than the left side. The right side bumper needed more trimming.
02-11-2008, 07:54 PM
#82
Rennlist Member
What did you do with the rad Dave? I have an older Devek one as well, and was planning on polishing it up and using it since I had it tested, and it tested fine. I was NOT going to use the oil coolers in the sides, and just the rad itself.
Where is the epoxy? Is it the yellow stuff on the sides? Do you think it could be fixed like the one that 928intl sells?
What if I took it apart and had it welded?
Where is the epoxy? Is it the yellow stuff on the sides? Do you think it could be fixed like the one that 928intl sells?
What if I took it apart and had it welded?
 02-12-2008, 11:55 AM
#83
Addict
Rennlist
Site Sponsor
Rennlist
Site Sponsor
Join Date: Jan 2003
Location: Green Bay Wisconsin
Posts: 951
Likes: 0
Received 0 Likes
on
0 Posts
Todd, here in Green Bay, removed the plastic end tanks from his radiator and fabricated aluminum tanks that he welded to the factory core. He also lowered his radiator to make room for his supercharger configuration so he changed the location of some of the mounting points and fittings.
From what I understand, is it the seals on the end tanks that are the major failure? Correct me if I am wrong. I don't know how much work it would be but it is possible we could make new end tanks out of aluminum and weld them to the factory core.
One thing I should mention is when Todd took his apart about one half of the passages going across the radiator were clogged with crap. He spent a lot of time blowing air back and forth, along with solvent, to get them all cleared out. There was a small leak on the end tank when he bought the car so it looks like the PO used a lot of stop leak which ultimately clogged the radiator.
The main reason I bring all this up is if you are considering one of my supercharger kits the thicker radiator might have some interference with the air intake box. Some guys have installed my kit with a Devek radiator and had some fitment issues with the sc installation. They somehow worked around it but I can't remember exactly what they had to do.
Just an FYI.
Last edited by Tim Murphy; 02-12-2008 at 03:10 PM.
02-12-2008, 12:07 PM
#84
Addict
Rennlist Member
Rennlist
Site Sponsor
Rennlist Member
Rennlist
Site Sponsor

Tim you know I have never actually looked at one of your supercharger kits and never installed one so I do not consider myself qualified to comment or review it....does that seem fair ?
02-12-2008, 01:33 PM
#85
Under the Lift
Lifetime Rennlist
Member
Lifetime Rennlist
Member
The right side tank (the hotter side) cracks and it can swell and distort when heated a bit too high. Mine did that when I couldn't quite keep the temp down in open road racing in high summer heat due to a failed WOT switch. Aluminum side tanks would help.
02-12-2008, 02:06 PM
#86
Addict
Rennlist Member
Rennlist
Site Sponsor
Rennlist Member
Rennlist
Site Sponsor
I am not sure how much time and effort (money) I would want to invest in a 10-20 year old radiator core fabricating and welding on alloy tanks.
02-12-2008, 03:09 PM
#87
Addict
Rennlist
Site Sponsor
Rennlist
Site Sponsor
Join Date: Jan 2003
Location: Green Bay Wisconsin
Posts: 951
Likes: 0
Received 0 Likes
on
0 Posts
Point is, I'm sure there are a lot of partially clogged radiators out there causing overheating problems. Add a sc system to one that is marginal will push it over the edge and you will have problems. A new radiator is a good idea in my opinion.
Instead of making the entire statement/comment in my previous post I should have just asked the question; How much further back towards the engine does the new radiator sit vs the stock one? If it does sit back further, can the mounting be easily modified so it doesn't have to sit back as far? Moving the radiator forward will interfere with the current front fan I have for the Stage3 kits but I can get around that by using a different fan, as long as I know up front that the radiator is an aftermarket one.
02-12-2008, 06:31 PM
#88
Instructor
Join Date: May 2007
Location: Burbank, CA
Posts: 112
Likes: 0
Received 0 Likes
on
0 Posts
I bought and installed a Devek radiator on my 89 auto more than 4 years and 60k miles ago; the car has been to Willow Springs Raceway several times; it is the car whose speedo was photo'd at 160mph (with 17" wheels - more like 165) which it has done on several runs to Las Vegas. I live in SoCal so the air is ued regularly during summer - I have never had any problems (although there was some wiggling, cursing and modifying to install). Maybe I got one of the "newer" radiators from Devek? Don't know, but, knock on wood, it has, and is working great.
03-15-2008, 01:18 AM
#89
Burning Brakes

Join Date: Sep 2006
Location: Myrtle Beach, South Carolina
Posts: 1,203
Likes: 0
Received 0 Likes
on
0 Posts
....How much further back towards the engine does the new radiator sit vs the stock one? If it does sit back further, can the mounting be easily modified so it doesn't have to sit back as far? Moving the radiator forward will interfere with the current front fan I have for the Stage3 kits but I can get around that by using a different fan, as long as I know up front that the radiator is an aftermarket one.
How about it, can anyone tell me how much further in toward the front of the engine the posterior surface of this radiator sits compared to stock the way you guys have installed it?
Also could the trimming and fitting procedures be adjusted to let the radiator sit back from the engine enough to accommodate the supercharger kit and let the encroachment take place on the front side where Tim can provide a different fan to make it all fit?
Thanks!!
03-15-2008, 03:56 PM
#90
Addict
Rennlist Member
Rennlist Member
Join Date: Oct 2003
Location: Gone. On the Open Road
Posts: 16,467
Received 1,623 Likes
on
1,060 Posts
Also could the trimming and fitting procedures be adjusted...