
Changing Motor Mounts Tomorrow
 12-09-2007, 11:40 AM
#31
Chronic Tool Dropper
Lifetime Rennlist
Member
Lifetime Rennlist
Member

Dwayne--
Wal-Mart sells the larger stands at stores here in the basin. Also H-F, and many online sources. There was a thread here on Rennlist in the last year that discussed some of the options. Like you, I live on shaky ground, so it's not just wind that's a risk. The 6-ton stands will allow you a few more inches of height, but more important they offer a larger footprint. The overturning effort for the small stands is something in the 100# lateral range, meaning that you can pull sideways on the car (or lean on it) with 100# and potentially have it move. Once it starts to move, the required effort becomes less until you have maybe 5 inches of lateral displacement. Then the gravity takes over and the car is on the ground. It can get real ugly in a hurry. I've had the experience of finding a guy pinned under a car whan a jack rolled, after his screaming wife notified the neighborhood. Stands are better, but all these methods have their limitations of course.
Your pictures remind me that I have a whole lot of cleaning and detailing to do under the car. When I did motor monts and gasket a couple years ago, the cleaning was not nearly as complete as your pictures show. My hands were so dirty I had to burn them before coming into the house... Keep up the good work, and all the good pictures.
 12-09-2007, 12:39 PM
#32
Three Wheelin'
Thread Starter
Join Date: Sep 2007
Location: Ridgecrest, California
Posts: 1,363
Likes: 0
Received 146 Likes
on
30 Posts
 12-09-2007, 01:56 PM
#33
Under the Lift
Lifetime Rennlist
Member
Lifetime Rennlist
Member
There's a bracket on the water pump??  If it's the one I think you are talking about, I've seen it in other pictures posted here for lifting the engine. I thought to myself "Cool, I can do this with one support bar!" So before I started, I went out to see if I could find it on our '84. I couldn't find it so figured it was only available on newer 928s and went with the 2 support approach since the lift points are on opposites sides of the engine and at opposite ends of the engine. Do all 928's have this center lift point at the water pump??
If it's the one I think you are talking about, I've seen it in other pictures posted here for lifting the engine. I thought to myself "Cool, I can do this with one support bar!" So before I started, I went out to see if I could find it on our '84. I couldn't find it so figured it was only available on newer 928s and went with the 2 support approach since the lift points are on opposites sides of the engine and at opposite ends of the engine. Do all 928's have this center lift point at the water pump??Anyway, the first time I did this, I used two attachment points on the front of the motor - the right side front engine lift hook and a big bolt on the alternator/power steering pump cassette. You're only lifting a portion of the motor weight, as the rear is supported by the drivetrain. I eventually got a 500KG engine support for $70 delivered off eBay - WAY overkill! The thing is huge but it certainly does the job.
Anyway, I don't wnat to detract from your accomplishment. You did a helluva good job here.
12-09-2007, 01:58 PM
#34
Three Wheelin'
Thread Starter
Join Date: Sep 2007
Location: Ridgecrest, California
Posts: 1,363
Likes: 0
Received 146 Likes
on
30 Posts
Here's some pics from the progress made late yesterday on the MM mods and initial reinstall.
I used a dremel tool to cut the pin off the top of the new MM - went quickly.
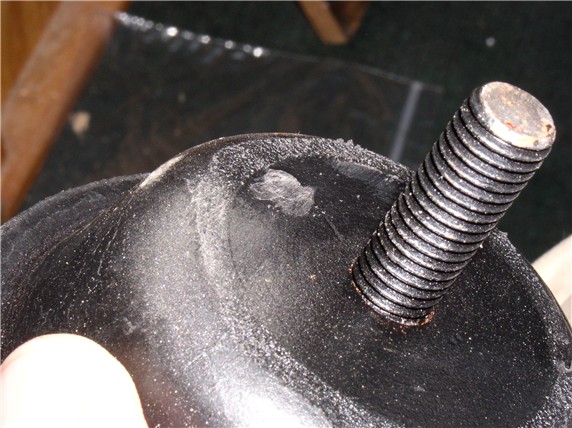
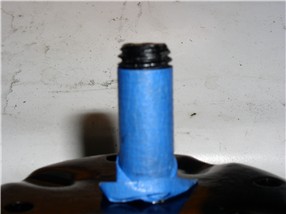
Next, I measured about 3/16" and taped the new MM lower stud so it would be the same length as the original. The first one I used a grinding wheel to grind it down - took about 15 minutes. The second I used the dremel - took about 5 minutes.
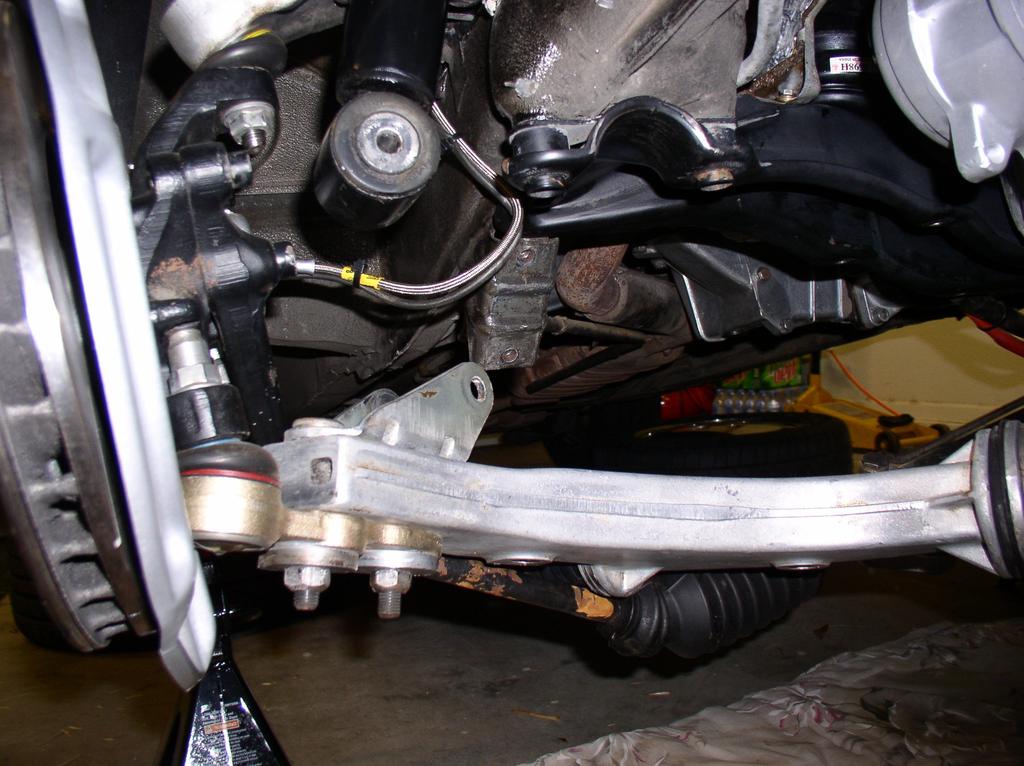
When I began the reinstallation, it started with bolting the top MM bracket to the top MM stud and torquing it down to 62ftlb. Then getting the crossmember back into position with the heat shields still attached. After struggling with it for about 20 mintues with no progress, I decided to disconnect the passenger lower control arm from the lower shock mount and remove the sway bar as well. After that, the crossmember was in position in about 5 minutes with no hassles.
With the cross member close to position, I tilted it back toward the rear enough to insert/place the motor mounts (with bottom plate) bottom studs through the hole in the crossmember. This was the same way I took the MM out from the crossmember. I kept the bottom plate lined up by aligning the pin hole in the bottom plate with the alignment hole in the crossmember. Then put the washers and 19MM nut on just enough to keep the MM from coming out.
At this point, I'm still holding up the crossmember. Next I maneuvered the crossmember with mounts attached up to the mounting holes in the engine block and placed the 17MM and 13MM bolts in and hand tightened. Now the crossmember was held up and I could work on getting other bolts aligned and installed while everything was loose.
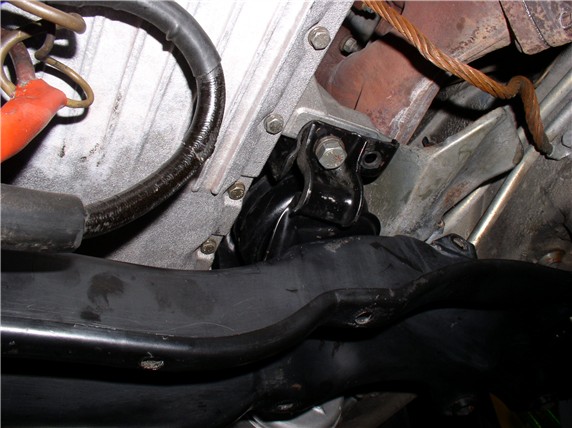
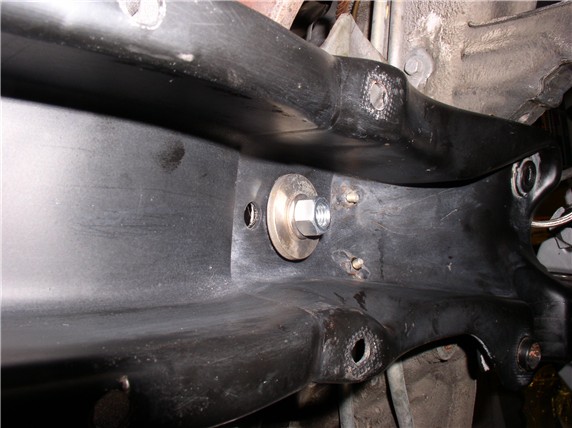
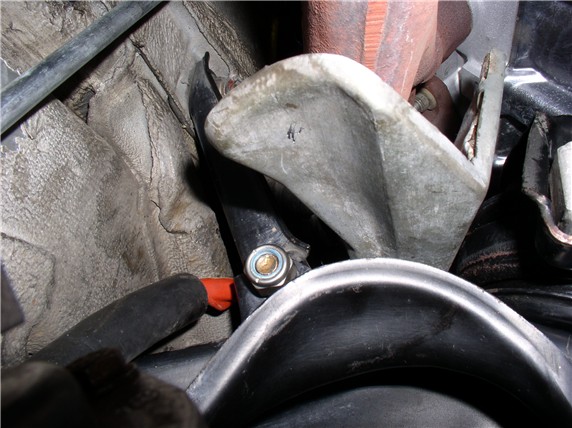
Next, I installed the INFAMOUS crossmember support bracket 19MM bolt. I think the key to getting these back in is to do it when everything is nice and loose. The driver's side when in without a hitch - just pushed it in by hand. The passenger side needed a slight pull with the prybar to line the holes and a few taps with the hammer and it went right in. I did not torque these down yet.
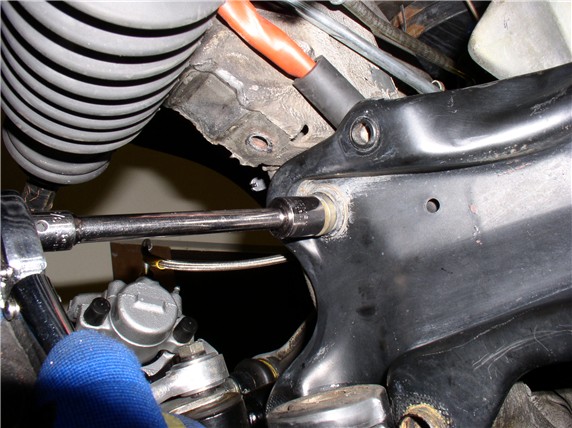
Then I placed the 17MM crossmember to frame bolts (one at each end) and hand tightened. Then I went back and torqued the bolts in. Started with the MM bracket to engine block 17MM (33ftlb) and 13MM (17ftlb).
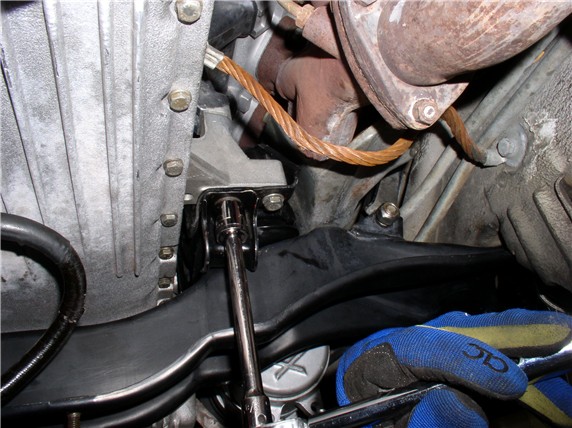
Next, I torqued the crossmember to frame 17MM bolts (one at each end - 33ftlb).
And finally, I torqued the crossmember support bracket 19MM bolts (62ftlb).

That's as far as I got last night. So far, time on task working on disassembly and reinstallation only has been about 6.5 hours. Three more hours on top of that for cleaning and setting up the grinder. Now it's about 10:00am and I'm heading out to get the lower control arm back in and continue reinstallation.
I used a dremel tool to cut the pin off the top of the new MM - went quickly.
Next, I measured about 3/16" and taped the new MM lower stud so it would be the same length as the original. The first one I used a grinding wheel to grind it down - took about 15 minutes. The second I used the dremel - took about 5 minutes.
When I began the reinstallation, it started with bolting the top MM bracket to the top MM stud and torquing it down to 62ftlb. Then getting the crossmember back into position with the heat shields still attached. After struggling with it for about 20 mintues with no progress, I decided to disconnect the passenger lower control arm from the lower shock mount and remove the sway bar as well. After that, the crossmember was in position in about 5 minutes with no hassles.
With the cross member close to position, I tilted it back toward the rear enough to insert/place the motor mounts (with bottom plate) bottom studs through the hole in the crossmember. This was the same way I took the MM out from the crossmember. I kept the bottom plate lined up by aligning the pin hole in the bottom plate with the alignment hole in the crossmember. Then put the washers and 19MM nut on just enough to keep the MM from coming out.
At this point, I'm still holding up the crossmember. Next I maneuvered the crossmember with mounts attached up to the mounting holes in the engine block and placed the 17MM and 13MM bolts in and hand tightened. Now the crossmember was held up and I could work on getting other bolts aligned and installed while everything was loose.
Next, I installed the INFAMOUS crossmember support bracket 19MM bolt. I think the key to getting these back in is to do it when everything is nice and loose. The driver's side when in without a hitch - just pushed it in by hand. The passenger side needed a slight pull with the prybar to line the holes and a few taps with the hammer and it went right in.
I did not torque these down yet.Then I placed the 17MM crossmember to frame bolts (one at each end) and hand tightened. Then I went back and torqued the bolts in. Started with the MM bracket to engine block 17MM (33ftlb) and 13MM (17ftlb).
Next, I torqued the crossmember to frame 17MM bolts (one at each end - 33ftlb).
And finally, I torqued the crossmember support bracket 19MM bolts (62ftlb).
That's as far as I got last night. So far, time on task working on disassembly and reinstallation only has been about 6.5 hours. Three more hours on top of that for cleaning and setting up the grinder. Now it's about 10:00am and I'm heading out to get the lower control arm back in and continue reinstallation.
12-09-2007, 01:59 PM
#35
Basic Sponsor
Rennlist
Site Sponsor
Rennlist
Site Sponsor
Those MM's are Anchor and you may want to check them to make sure they are solid.
Shake them and if you hear a sloshing noise they are hydraulic and filled with a water/glycol mix.
If they do not slosh they are solid and you are good to go.
The newer MM's have the pin on the top to stop the large washer rotating during assembly as per the stock ones. You can do without it though. The bottom pin needs to be cut off as you say. Also on the Anchors the studs are way longer than they need to be so cut them down to stock size. All easier to do when the MM's are out of the car.
Nice job 8>)
__________________

Does it have the "Do It Yourself" manual transmission, or the superior "Fully Equipped by Porsche" Automatic Transmission? George Layton March 2014
928 Owners are ".....a secret sect of quietly assured Porsche pragmatists who in near anonymity appreciate the prodigious, easy going prowess of the 928."
Does it have the "Do It Yourself" manual transmission, or the superior "Fully Equipped by Porsche" Automatic Transmission?
George Layton March 2014928 Owners are ".....a secret sect of quietly assured Porsche pragmatists who in near anonymity appreciate the prodigious, easy going prowess of the 928."
12-09-2007, 02:01 PM
#36
Under the Lift
Lifetime Rennlist
Member
Lifetime Rennlist
Member
Dwayne:
You're very fast and thorough at the same time. I'm just thorough. I wish you were closer by. I think we'd have a great time wrenching together!
You're very fast and thorough at the same time. I'm just thorough. I wish you were closer by. I think we'd have a great time wrenching together!
12-09-2007, 02:04 PM
#37
Three Wheelin'
Thread Starter
Join Date: Sep 2007
Location: Ridgecrest, California
Posts: 1,363
Likes: 0
Received 146 Likes
on
30 Posts
Thanks, Roger. I remember reading a previous post (I believe by you) about shaking the MM to determine solid or not so I definitely gave them a shake when I received them and I couldn't hear anything - I'm assuming they are solid. THANKS for the tip.
12-09-2007, 02:06 PM
#38
Basic Sponsor
Rennlist
Site Sponsor
Rennlist
Site Sponsor
No slosh = solid.
Great job and awesome thread. This will serve as another great writeup for others later.
Thanks for taking the time to post.
Great job and awesome thread. This will serve as another great writeup for others later.
Thanks for taking the time to post.
12-09-2007, 02:08 PM
#39
Three Wheelin'
Thread Starter
Join Date: Sep 2007
Location: Ridgecrest, California
Posts: 1,363
Likes: 0
Received 146 Likes
on
30 Posts
YES! YES!! Two wrenches are better than one! I'm pretty remote here in the desert but would enjoy the wrenching together. I need to google on alamo, ca....
12-09-2007, 04:11 PM
#40
Addict
Rennlist Member
Rennlist Member
Great job and what a great looking clean undercarriage.
My MM looked a little better than yours (before) and it made a huge difference on the way the car felt, I think you will be pleased!
Hard to tell for sure but it looks like your steering rack bushings are cracked around the edges, have you considered changing them?
My MM looked a little better than yours (before) and it made a huge difference on the way the car felt, I think you will be pleased!
Hard to tell for sure but it looks like your steering rack bushings are cracked around the edges, have you considered changing them?
12-09-2007, 06:30 PM
#41

Thanks for the documentation and photos. I'm envious that everything is so clean under there. I just left Rogers place and doing the same thing on an '80 Euro. There is so much muck and grime under there, I went through 50 pairs of latex gloves.
Thanks for sharing.
Thanks for sharing.
12-09-2007, 07:01 PM
#42
I am also in the middle of this job as well as oil pan gasket. I used a 4x4 setup a bit more simple and only supported at the front on the water pump lift point. I just wrapped a chain around the 4x4 and around that water pump loop and bolted the chain together with a bold with large washer.
Very easy and used this setup on water cooled VWs for many years when pulling transmission from front drive GTI and Rabbit.
I am taking my time on this--waiting on the oil pan stud kit from 928MS right now. Also putting the GTS baffle kit to the oil pan while I am there.
Very easy and used this setup on water cooled VWs for many years when pulling transmission from front drive GTI and Rabbit.
I am taking my time on this--waiting on the oil pan stud kit from 928MS right now. Also putting the GTS baffle kit to the oil pan while I am there.
12-09-2007, 10:44 PM
#43
Three Wheelin'
Thread Starter
Join Date: Sep 2007
Location: Ridgecrest, California
Posts: 1,363
Likes: 0
Received 146 Likes
on
30 Posts
Great job and what a great looking clean undercarriage.
My MM looked a little better than yours (before) and it made a huge difference on the way the car felt, I think you will be pleased!
Hard to tell for sure but it looks like your steering rack bushings are cracked around the edges, have you considered changing them?
My MM looked a little better than yours (before) and it made a huge difference on the way the car felt, I think you will be pleased!
Hard to tell for sure but it looks like your steering rack bushings are cracked around the edges, have you considered changing them?
12-09-2007, 10:57 PM
#44
Rennlist Member
Dwayne, separate issue, would you happen to have pics of the antisway bar links? Mine might be flipped or turned wrong on the drivers side and I can't seem to find a reference picture to compare against. Knew I should have labled it.
12-09-2007, 11:16 PM
#45
Addict
Rennlist Member
Rennlist Member
Afshin, you have an eye for detail. Actually I did change them this summer when I took the engine out. The tattered edges are the remnants of the thin lip of rubber that got in the way when I crimped the edges down - the other side of the bushing was already crimped so the thin rubber lip is still in tack. THANKS for the comment.
Looking forward to getting your impression after you've had a chance to take it out for a spin with the new MM's.