When you click on links to various merchants on this site and make a purchase, this can result in this site earning a commission. Affiliate programs and affiliations include, but are not limited to, the eBay Partner Network.
So whats the benefit of this part of the conversion? When I did mine on my old one I didn't mess with this part. Just removed some snap rings and the piston washers on the shaft. Also clamped the lines and filled with bearing grease.
the on-center slop in the power steering rack is because those 2 pistons are allowed to move. the pistons move as the wheel turns initially, which opens/closes fluid valves to help the rack move one way or another.
by preventing those pistons from moving you are eliminating that slop.
the on-center slop in the power steering rack is because those 2 pistons are allowed to move. the pistons move as the wheel turns initially, which opens/closes fluid valves to help the rack move one way or another.
by preventing those pistons from moving you are eliminating that slop.
Ah thank you that make sense. What size washers should we use? So we just use washers and tighten up that bolt?
the on-center slop in the power steering rack is because those 2 pistons are allowed to move. the pistons move as the wheel turns initially, which opens/closes fluid valves to help the rack move one way or another.
by preventing those pistons from moving you are eliminating that slop.
I know that�s the theory, but not sure about in practice. Before the depower attempt, I had the car off and reached in through the window to turn the steering wheel while looking at the tires. As far as I could tell, there was ZERO slop/delay in the rotation of the wheels in response to slight turns of the steering wheel. Perhaps with the fluid still in the rack this impacts things, but I don�t think so. That is, these spool valves move what, a fraction of a mm, that�s hardly the reason for any major slop in my opinion.
Having said that, I did put a washer 1.5 mm thick plus the spool valve just in case, i.e., I don�t want to do this again.
It's been a while since i actually had these parts in my hands but i recall the shim thickness (and stock piston travel) to be around 4mm maybe more.
you can grab the steering wheel and rock it an inch or so back and forth on center before the wheels do much of anything (yes they will slightly wiggle doing this but not as directly as with the shims).
A few years ago I de-powered my steering rack and I used washers under the "t-bar" on the rotary valve similarly to the person in the video linked above, using all the official torque specs when available and the proper torque specs based on fastener class and size when specs were not available.
At a recent autocross during a slalom going from turning right to turning left the steering wheel felt like it hit a stop and wouldn't turn any farther when I was trying to turn left and a I had to come to a full stop.
After the event I took apart my steering rack and found that the bolt had broken similarly to how it broke for the person in the video that was linked earlier. And it broke with the locking tab/washer still attached and the bottom half of the bolt still fully threaded in. I just wanted to put out a warning that it seems like this problem is not just caused by improper assembly, and there may actually be quite significant forces on this little bolt when the rack is de-powered.
I will be attempting to use the depowered rack again, this time I will be using solid shims instead of the stack of washers under the original caps and I will be using a 12.9 screw with threadlocker, instead of the original with the lock tab.
I ended up welding mine to reduce the slop/looseness as an alternative to shimming the "tbar".
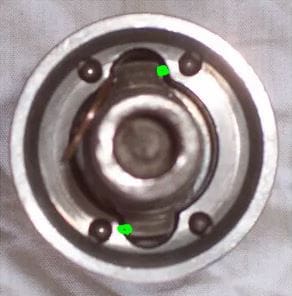
I removed all tbar bolts and washers from the valve body and spot welded the "ears" of the torsion shaft to the body as shown here (green dots, I put my ground clamp on the pinion gear):
Looking from above as shown and twisting the steering shaft you will see the "ears" moving inside the body - this is the thin torsion shaft twisting - which opens and closes the valves on the tbar. By fusing this to the body, you can eliminate that twisting (this is where the looseness of a depowered rack comes from and can also be solved by shimming the tbar). No shims or washers or anything like that. Completely removed the "tbar" and all associated bolts and hardware. I did not want to chance anything backing out and binding in the valve body (safety issue as highlighed in the previous post #185).
You can test how well the shimming (or welding) worked by putting the valve body in a vice (using wood to clamp the pinion gear) and twisting the splined shaft with a vice grip (dont mess up the splines, I used some paper between the splines and vice grips). You should not be able to twist a properly fused/shimmed system and the dog ears inside (where the green dots are) should not deflect at all.
Doing this mod greatly increased the feel, turn-in and overall tightness/responsiveness over a normal depowered rack without these modifications.
Last edited by walfreyydo; 05-31-2022 at 04:04 PM.
Quite timely as I'm hoping to put in my de-powered rack back in after I manage to wrestle out the old one. In terms of the welding in your picture, is there a reason why you only did the green dots, why not do two more? Right now I just put in the shims.
Also, how to you get the piece off the top that covers the area in your picture? It kind of seems like it could be wedged up or twisted off, but nothing seems to work for me.
You could definitely put in two more spot welds (4 total). I didnt because it was hard to get my TIG (all I have) electrode down in there, and it felt pretty secure just welding the two spots. It would probably be easier with a longer MIG wire to get down in there (or maybe flux core?). I had problems getting good shielding with the TIG, but I think its good enough. If those welds fail at some point, I will definitely go in and do 4 spots. If the welds fail, the only implication will be re-introduction of the looseness/play. There shouldnt be any safety issue.
If you pop the cap off, secured by 3 bolts, youll see some washers and a bearing along with a race secured to the splined shaft. Youll have to remove all of those. I gently pried with a screw driver little by little making my way around, to get the race off. Once that is off youll see the dog ears as shown in my screenshot. After that you can remove the entire valve body (although you could weld it in place if youve already removed the tbar/valves/springs). It takes a little working the valve body since the pinion gear twists, the valve body must also be removed with an upward twisting motion. You will also want to be sure you mark the position of the valve body before removing so you can re-align it when re-installing. The position of the valve body (splined shaft where your steering shaft bolts to) is critical to having your steering wheel be centered, since it is directional (has the notch in it for the pinch bolt). Just make sure you take note of all the stuff you remove and the order they go back in.
Once everything is reinstalled, make sure everything is seated correctly, moves and turns smoothly and there is no binding, otherwise your steering will be very tight and not return to center (or not turn at all). Its important there is not too much pressure on the bearing and race - which can happen if things arent seated correctly. Sometimes getting the pinion gear to seat correctly while also getting it to line up where it was originally can take a few tries and may take a gentle tap or two with a rubber mallet. Since you have to twist while you reinstall, it can be somewhat challenging to get it lined up to its original marked position.
Last edited by walfreyydo; 06-02-2022 at 11:18 AM.
So pry along the red arrow (obviously all around and not just the two spots).
Thanks for all the details about assembly, some of those are not well documented. Thankfully the rack I'm modifying is a spare one I purchased so when I get the original one out I can compare the alignment of the various pieces.
As for welding, I only have flux core, so I guess we'll see how that goes. Good point that if these welds fails it'll only introduce slop and not fail the whole steering.
Yes and I actually used two screwdrivers opposite from each other. Pry gently and work your way around evenly little by little, you dont want it to get crooked. Try to get under that lip if you can. Smaller screwdrivers work well. It should come off rather easily and not require a ton of force. Thats the race I was talking about. Once that sleeve is gone you will see down into where the dog ears are.
Once finished, you want to reinstall everything in the reverse order they came off. Youll still need the bearings, washers and race back in place when you reinstall, making sure the race if fully seated - if its not, the outer cap wont seat correctly.
I think flux core should be fine considering its self shielded. Just get a good glob in there and make sure it fuses to the dog ears and the valve body. Im not sure the type of filler will matter or not (ie stainless filler vs mild steel filler).
Last edited by walfreyydo; 06-03-2022 at 10:35 AM.
Any thoughts on running the 1983 style manual rack in an 86 P951? 944 347 011 00 as the quicker 944 347 015 00 doesn�t seem to be available anywhere. Some have mentioned that they are not as durable especially with track curbing, and the rack easily bends (internally)� and it�s better to run the de-powered rack?
doesn't make any sense - all the guts of a manual rack are the same size as those in a power rack (the tie rods are the same thickness, the rack itself is a roughly 1" diameter solid steel bar just like the PS rack...if you can bend a steering rack i think you crashed.
 04-16-2021, 10:27 PM