
944 Turbo Mini Restoration
 02-13-2019, 04:54 PM
#16
Instructor
Thread Starter
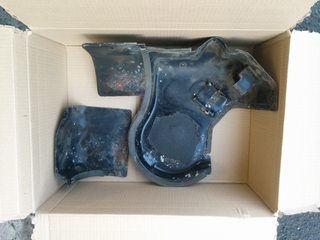
Hi Dan - it was indeed in need of replacement as it was rock solid and flat and broke into pieces when I removed it!
Phew - quite a bit of progress since last time and also some delays where wrong parts were supplied (incorrect bolts) and bad weather.
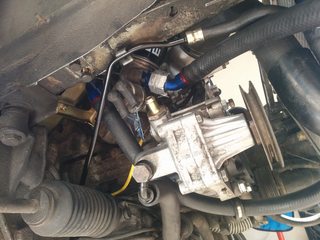
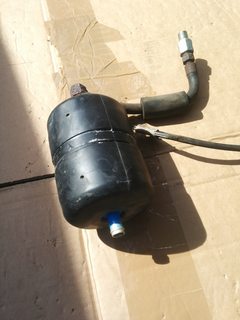
So recap of the last update I'd got the turbo removed so I could remove the air oil separator (AOS) and clean up the area and replace the seals.
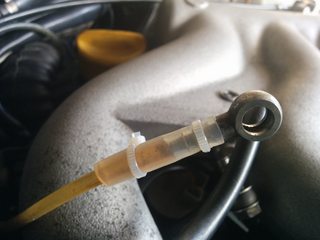
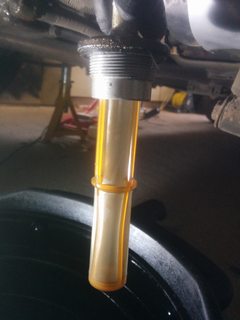
OPRV seals were completely solid and flat! and broke apart when I removed them. The good sign was that the oil that the oil that was within the external oil cooler, lines and OPRV was all a nice normal oil colour as you can see from the picture above, so I'm hoping my assumption is true about the oil contamination being either condensation from 4 years of sitting or a bit of fuel from someone flooding the engine.
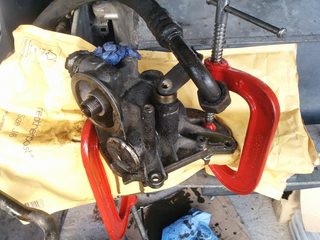
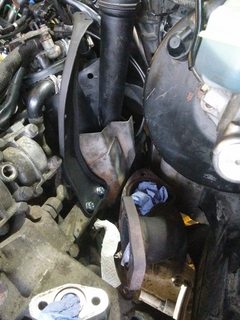
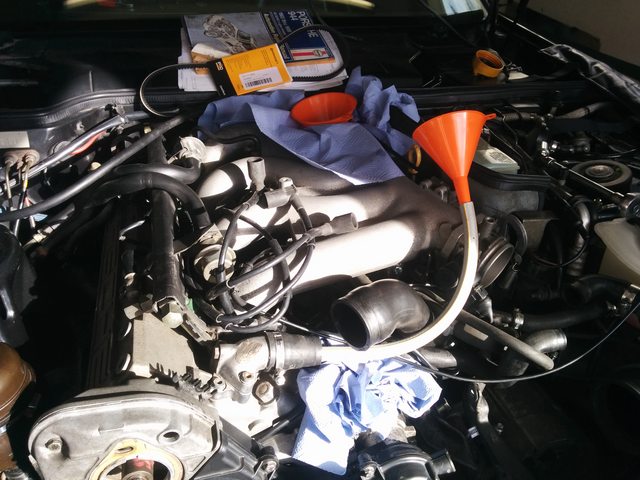
The oil cooler lines were stuck solid and impossible to remove whilst the oil filter housing was on the engine so I used the metal bumper reinforcement as a temporary work bench and clamped the housing down so I could get my adjustable wrench on the hose fittings.
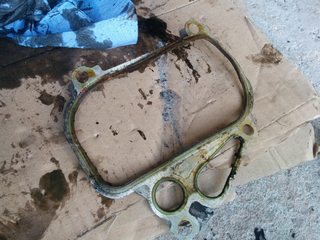
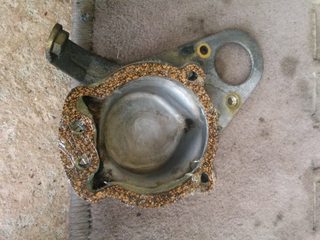
The original? oil filter housing seal was ok apart from some damage to the top possibly caused from the heat off the exhaust headers? I had a new identical gasket to replace it.
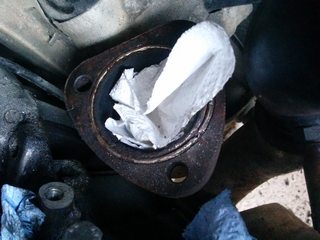
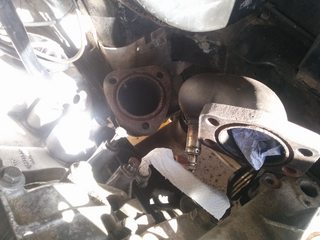
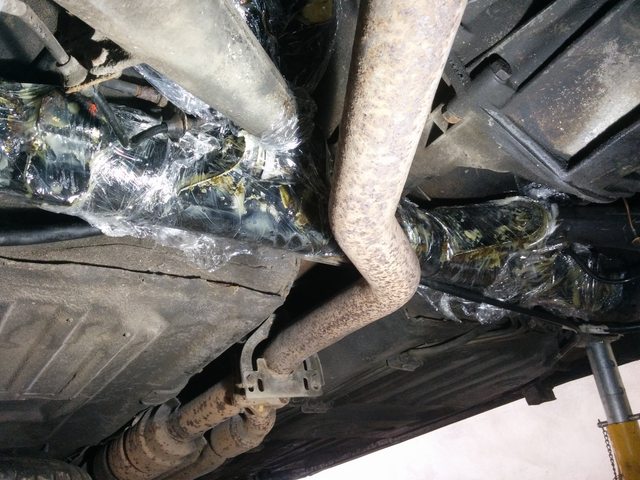
The goddamn sealing rings that are used on the turbo downpipe were an absolute pain to remove, I tried lots of penetrating fluid and bashing a screwdriver into the edge to try and lever it out or spin it free. In the end a good 5-10 minutes of heat from my new rothenberger blow torch and some map gas and it just popped right out!
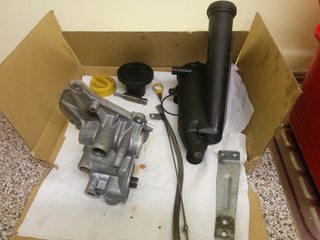
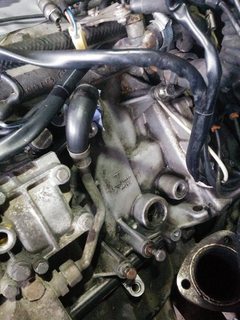
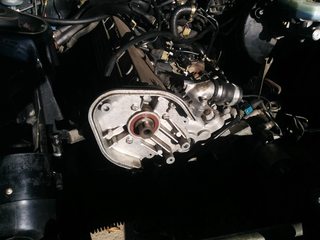
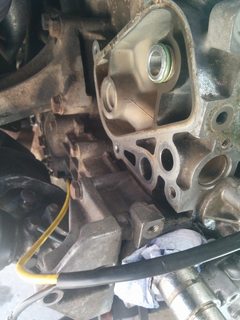
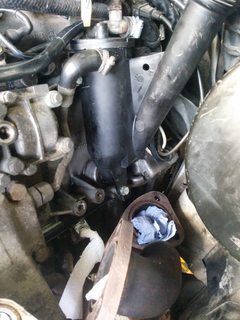
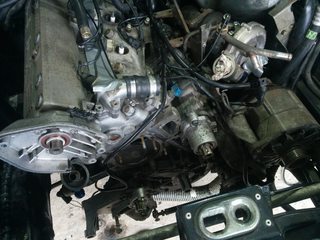
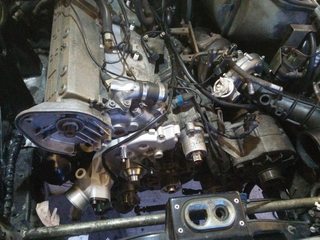
I also had a growing collection of dirty parts in boxes so whilst it was crap outside I spent a few hours cleaning them in my parts washer in the utility room. I also cleaned up the side of the engine that houses the AOS as it was covered in thick tar like oil and got it as clean as I could. Also cleaned up the front of the engine especially around the oil pump housing - I don't think the crankshaft seal has ever been replaced on this motor. I also replaced the large o-ring on the top of the air oil separator that seals the main chamber, the existing o-ring was flat and rock solid.

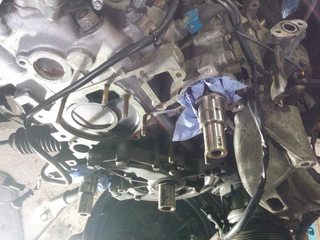
Got the upper balance shaft and camshaft seals installed.
Cleaned up the oil filter housing area and fitted the internal tube with new seals.
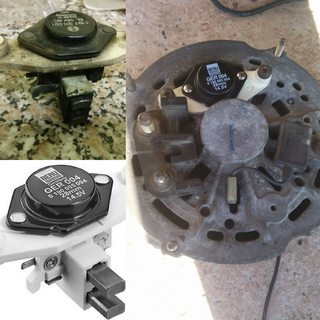

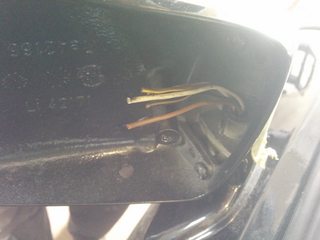
Thought it might be a good idea to change the voltage regulator in the alternator seeing as I had it removed from the car. It was incredibly fortitous as you can see from the picture the brushes were completely worn out and probably would have caused me a problem shortly after getting the car running again! I also repainted the inlet manifold support as it was completely stripped and starting to rust. Used some Simoniz engine enamel and cured it in the oven for 1.5 hours.
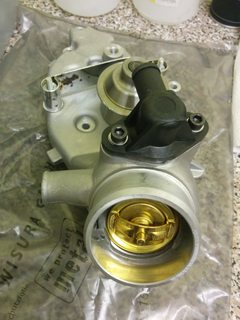
Got the water pump prepared for fitting with a new main thermostat (I reused the turbo thermostat), cleaned up the snap ring.
Got the oil filter housing and AOS reinstalled and then realised that I'd been supplied incorrect bolts! 30mm instead of 25mm. Didn't have any issues with the oil filter housing but when I came to try and install the AOS and heat shields quickly realised something was wrong. So now I have to wait for the correct size bolts to arrive...
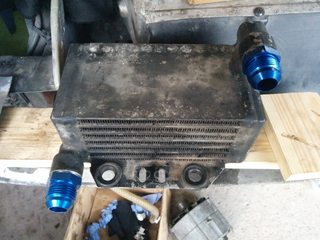
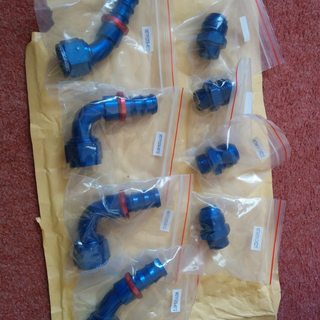
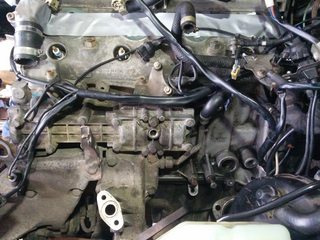
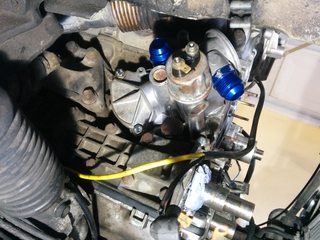
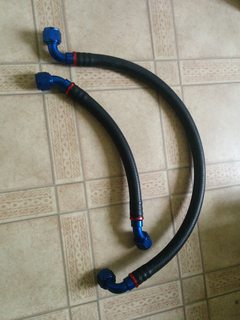
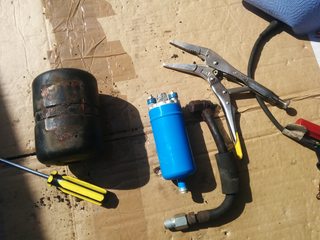
Whilst waiting I've managed to replace the rear camshaft seal, change the spark plugs and test fit the external oil cooler with some new AN-12 fittings.
I've gone for NGK BPR6ES plugs which are the standard recommended copper plugs for the Turbo engine. I've read that fancy platinum plugs or multi electrode plugs can cause problems with Turbo engines. And whose to argue when these standard copper plugs are so cheap!
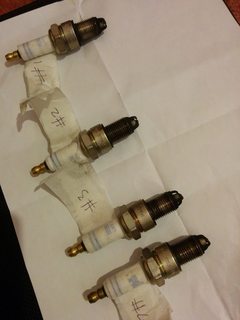
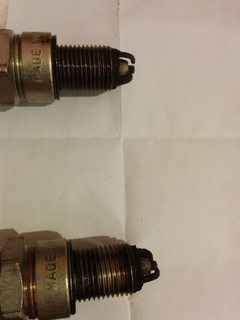
Looking at the condition of the plugs I took out (BERU Ultra-X) it looks like the fueling etc was OK and no indications of any problems... if anything cylinder 1 (bottom of 2nd picture) looks like it was running a little rich.
So at last I can see some light at the end of the tunnel, mostly just bolting things back on from here and getting the pump, belts and tensioners back on.
Looking forward to starting her up!
Phew - quite a bit of progress since last time and also some delays where wrong parts were supplied (incorrect bolts) and bad weather.
So recap of the last update I'd got the turbo removed so I could remove the air oil separator (AOS) and clean up the area and replace the seals.
OPRV seals were completely solid and flat! and broke apart when I removed them. The good sign was that the oil that the oil that was within the external oil cooler, lines and OPRV was all a nice normal oil colour as you can see from the picture above, so I'm hoping my assumption is true about the oil contamination being either condensation from 4 years of sitting or a bit of fuel from someone flooding the engine.
The oil cooler lines were stuck solid and impossible to remove whilst the oil filter housing was on the engine so I used the metal bumper reinforcement as a temporary work bench and clamped the housing down so I could get my adjustable wrench on the hose fittings.
The original? oil filter housing seal was ok apart from some damage to the top possibly caused from the heat off the exhaust headers? I had a new identical gasket to replace it.
The goddamn sealing rings that are used on the turbo downpipe were an absolute pain to remove, I tried lots of penetrating fluid and bashing a screwdriver into the edge to try and lever it out or spin it free. In the end a good 5-10 minutes of heat from my new rothenberger blow torch and some map gas and it just popped right out!
I also had a growing collection of dirty parts in boxes so whilst it was crap outside I spent a few hours cleaning them in my parts washer in the utility room. I also cleaned up the side of the engine that houses the AOS as it was covered in thick tar like oil and got it as clean as I could. Also cleaned up the front of the engine especially around the oil pump housing - I don't think the crankshaft seal has ever been replaced on this motor. I also replaced the large o-ring on the top of the air oil separator that seals the main chamber, the existing o-ring was flat and rock solid.
Got the upper balance shaft and camshaft seals installed.
Cleaned up the oil filter housing area and fitted the internal tube with new seals.
Thought it might be a good idea to change the voltage regulator in the alternator seeing as I had it removed from the car. It was incredibly fortitous as you can see from the picture the brushes were completely worn out and probably would have caused me a problem shortly after getting the car running again! I also repainted the inlet manifold support as it was completely stripped and starting to rust. Used some Simoniz engine enamel and cured it in the oven for 1.5 hours.
Got the water pump prepared for fitting with a new main thermostat (I reused the turbo thermostat), cleaned up the snap ring.
Got the oil filter housing and AOS reinstalled and then realised that I'd been supplied incorrect bolts! 30mm instead of 25mm. Didn't have any issues with the oil filter housing but when I came to try and install the AOS and heat shields quickly realised something was wrong. So now I have to wait for the correct size bolts to arrive...
Whilst waiting I've managed to replace the rear camshaft seal, change the spark plugs and test fit the external oil cooler with some new AN-12 fittings.
I've gone for NGK BPR6ES plugs which are the standard recommended copper plugs for the Turbo engine. I've read that fancy platinum plugs or multi electrode plugs can cause problems with Turbo engines. And whose to argue when these standard copper plugs are so cheap!
Looking at the condition of the plugs I took out (BERU Ultra-X) it looks like the fueling etc was OK and no indications of any problems... if anything cylinder 1 (bottom of 2nd picture) looks like it was running a little rich.
So at last I can see some light at the end of the tunnel, mostly just bolting things back on from here and getting the pump, belts and tensioners back on.
Looking forward to starting her up!
 02-13-2019, 07:08 PM
#17
Drifting
Wow man!
Your exhaust ring story brings back bad memories. Take a look at these pics: https://photos.app.goo.gl/RtPJi1WrEzwprXgR6
Now, imagine doing the same to the still-in-car downpipe connection.
Yep--I don't have a torch lol
Your exhaust ring story brings back bad memories. Take a look at these pics: https://photos.app.goo.gl/RtPJi1WrEzwprXgR6
Now, imagine doing the same to the still-in-car downpipe connection.
Yep--I don't have a torch lol
02-14-2019, 02:22 AM
#18
Rennlist Member
Excellent thread! Starting to think about tackling the AOS seals on my car along with all the other while you're in there's.
I hate to ask and a naive question for sure since i've never tried but with all the effort to get to the AOS seals if you had to do it over would you consider pulling the motor for a more complete engine rebuild?
Trying to assess plans with my car, TIA.
I hate to ask and a naive question for sure since i've never tried but with all the effort to get to the AOS seals if you had to do it over would you consider pulling the motor for a more complete engine rebuild?
Trying to assess plans with my car, TIA.
02-14-2019, 09:57 AM
#19
Drifting
Good question re: pulling the motor
I went nine years without any bigger issues. Then, this past year: clutch (throwout bearing issue but changed it all incl. crank seal), thermostat housing seals, AOS seals, failed emissions that was fixed by pulling the head + cleaning all the carbon and obviously reassembling with a new HG, Idle Control Valve + vacuum lines (remove intake--again), starter.... probably missing something.
I can totoally see a new oil pan gasket soon which would include rod bearings, balance shaft seals, and probably any other piece of rubber or paper.
If I could rewind to last December when I first heard that throwout bearing going, realizing all I've done laying on my back under awkward conditions just this year, I'd have pulled the engine and worked on a stand 100%.
Just my two cents. Seems when it rains, it pours.
Plus, as all these seals and parts were assembled at the same time period, they are obviously reaching their end of life roughly the same time. It's hard to admit, but it's true
02-14-2019, 06:02 PM
#20
Instructor
Thread Starter
Wow man!
Your exhaust ring story brings back bad memories. Take a look at these pics: https://photos.app.goo.gl/RtPJi1WrEzwprXgR6
Now, imagine doing the same to the still-in-car downpipe connection.
Yep--I don't have a torch lol
Your exhaust ring story brings back bad memories. Take a look at these pics: https://photos.app.goo.gl/RtPJi1WrEzwprXgR6
Now, imagine doing the same to the still-in-car downpipe connection.
Yep--I don't have a torch lol
Excellent thread! Starting to think about tackling the AOS seals on my car along with all the other while you're in there's.
I hate to ask and a naive question for sure since i've never tried but with all the effort to get to the AOS seals if you had to do it over would you consider pulling the motor for a more complete engine rebuild?
Trying to assess plans with my car, TIA.
I hate to ask and a naive question for sure since i've never tried but with all the effort to get to the AOS seals if you had to do it over would you consider pulling the motor for a more complete engine rebuild?
Trying to assess plans with my car, TIA.
02-14-2019, 11:59 PM
#21
Rennlist Member
Good question re: pulling the motor
I went nine years without any bigger issues. Then, this past year: clutch (throwout bearing issue but changed it all incl. crank seal), thermostat housing seals, AOS seals, failed emissions that was fixed by pulling the head + cleaning all the carbon and obviously reassembling with a new HG, Idle Control Valve + vacuum lines (remove intake--again), starter.... probably missing something.
I can totoally see a new oil pan gasket soon which would include rod bearings, balance shaft seals, and probably any other piece of rubber or paper.
If I could rewind to last December when I first heard that throwout bearing going, realizing all I've done laying on my back under awkward conditions just this year, I'd have pulled the engine and worked on a stand 100%.
Just my two cents. Seems when it rains, it pours.
Plus, as all these seals and parts were assembled at the same time period, they are obviously reaching their end of life roughly the same time. It's hard to admit, but it's true
I went nine years without any bigger issues. Then, this past year: clutch (throwout bearing issue but changed it all incl. crank seal), thermostat housing seals, AOS seals, failed emissions that was fixed by pulling the head + cleaning all the carbon and obviously reassembling with a new HG, Idle Control Valve + vacuum lines (remove intake--again), starter.... probably missing something.
I can totoally see a new oil pan gasket soon which would include rod bearings, balance shaft seals, and probably any other piece of rubber or paper.
If I could rewind to last December when I first heard that throwout bearing going, realizing all I've done laying on my back under awkward conditions just this year, I'd have pulled the engine and worked on a stand 100%.
Just my two cents. Seems when it rains, it pours.
Plus, as all these seals and parts were assembled at the same time period, they are obviously reaching their end of life roughly the same time. It's hard to admit, but it's true
No plans to sell the car and it's not a daily driver so time isn't an issue. Little short on space but working on that too.
In my 10+ years of ownership i've gone through and replaced or removed most of the easily accessible engine accessories, vac and water lines, fuel lines, regulator and damper, oil lines and dual coolers, cam gaskets, venturi delete, idle control valve, water pump and belt maintenance. Most of that is pretty straight forward and I haven't had to dig any deeper into the motor though I'm seeing signs of pan gasket, possibly a rear main seal and definitely AOS seals. Clutch measurement is low but hasn't really changed over the years and 65K miles i've added (currently at 125k). Anyway, appreciate the advice. Planning to drive the car this coming season but the following I may try and tackle a major overhaul. Of course once the transmission is down it's a great time to install rear coilovers and polybronze bushings....funny how things can spiral.
dlknight: Good luck getting things buttoned back up and keep the pics coming!
03-04-2019, 07:55 PM
#22
Instructor
Thread Starter
Evening Folks - Only me!
Yes and I have been a very busy
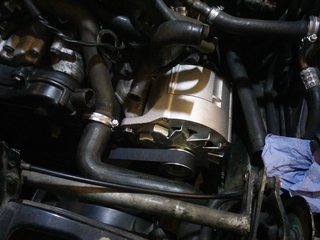
First off I got the repainted intake manifold support fitted and then spent a day re-fitting the turbo, alternator and finally the new water pump.
After this I made up some new oil cooler pipes after studying a post over on rennlist and used some AN-12 fittings and 19mm fuel / oil hose and got the oil cooler fitted up to the oil filter housing.
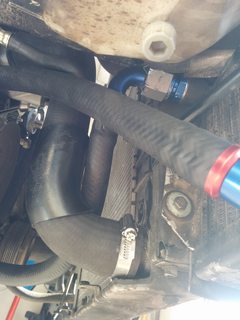
Whilst I was in there I quickly realised my existing lower radiator hose was past its best as it had a worn out flat spot where it had been rubbing up against the frame rail. Got a quality replacement from carparts4less for �9!!! can't complain and it fits much better than the previous hose and doesn't rub up against the frame rail. The only issue with it was it didn't come with the plastic reinforcement to protect against the power steering pump. So I cut the one off the old hose and cable tied it to the new hose.
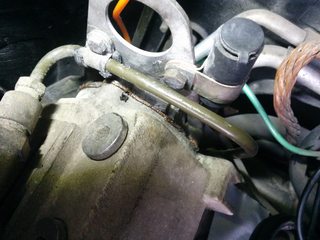
When dismantling the engine bay I had found that the vacuum tube going to the KLR computer had got very brittle and snapped off the banjo fitting. I was having nightmares about crawling under the dashboard trying to replace the vacuum tube and then had an idea to use a piece of silicone tube which I had laying around to create a sleeve to attach it back onto the banjo fitting. It was the perfect size and created a very tight fit which I secured with some cable ties (no boost leaks!!!)
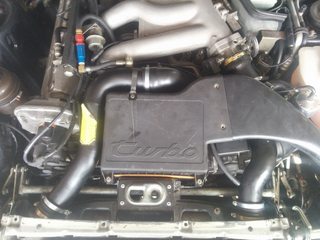
I then spent a boat load more hours getting the inlet manifold, fuel rail, ignition leads and some cooling hoses reattached.

It was starting to look more like the engine bay should do!
Next was a big job but one I was looking forward to - getting the belts and pulleys installed. I rechecked the existing pulleys that I had previously thought to reuse and quickly made the decision to replace both the timing belt tensioner pulley and the idler pulley for both belts. The balance belt tensioner still felt good so have reused.
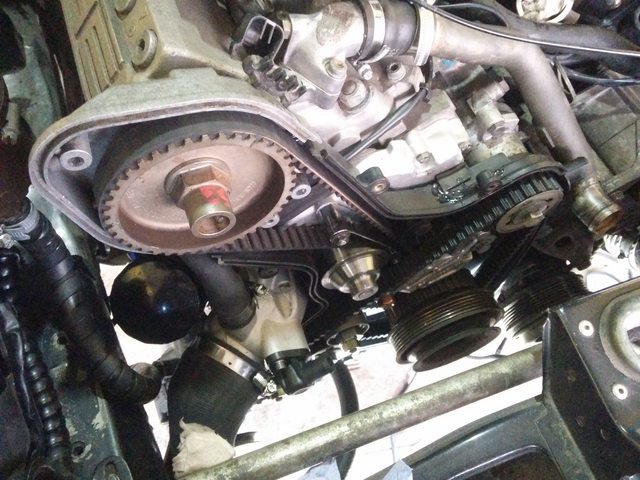
I checked and double checked that the crank and cam were at TDC - very much OCD but I didn't want to make a mistake at this point as it could have been disastrous. I then turned the engine over several times to convince myself that the timing was spot on and there were no issues.
You might also notice the epoxy on the timing belt cover, my existing cover was broken into two pieces so after I'd cleaned it up I stuck it together using some Araldite (great stuff).
Setup the belts as per the factory workshop manual and clarks garage.
I used the auto tensioner to set the timing belt tension and made sure that I "woke up" the spring by gently rocking the arm back and forth with the special balance shaft gear tool. I then used both the 90 degree twist method and turning the water pump pulley method to verify the tension. I will also be purchasing the gates tension tool to double check but I'm pretty confident it is within the tolerances and isn't too tight or too slack. I could just move the water pump pulley with moderate force and both hands.
And that brings us up to Saturday - all my hopes and dreams were that Saturday would be the day I could at least turn over the engine and listen to it once more!
Started off my filling her up with oil and water (just plain water to start as I am going to flush out the cooling system and then refill with Comma G48). Found a great method for filling up the coolant channels in the block, stuffing a section of hose pipe into the top connection with a funnel at the other end. I filled with water until it came out of the top tube and then reconnected the top radiator hose. Then continued filling with water through the expansion tank (this proved to be the perfect way to bleed and fill as I found out later on).
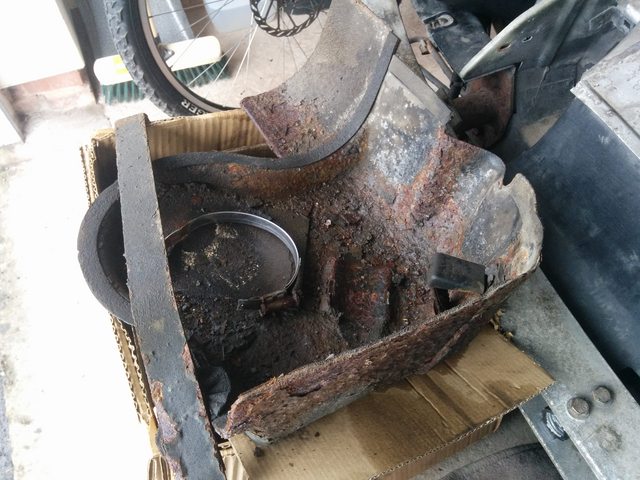
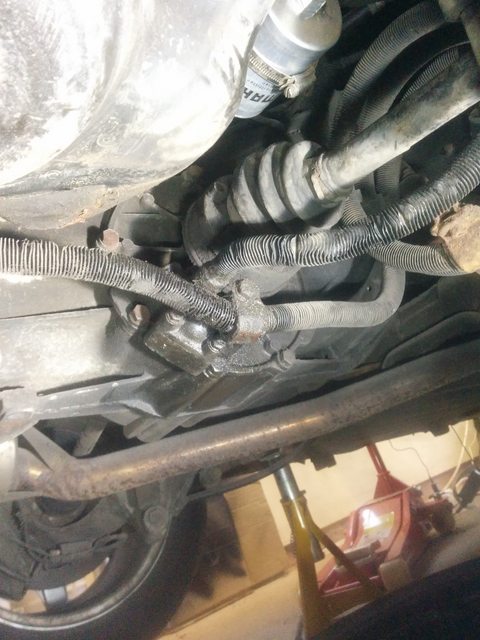
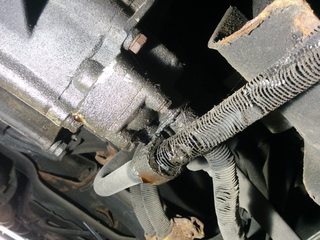
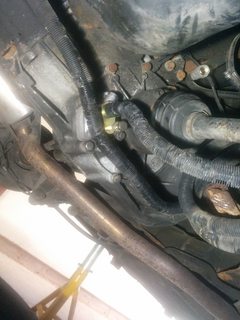
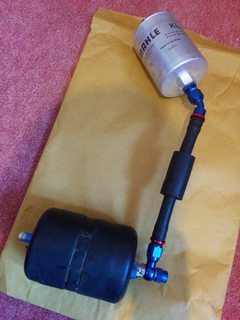
Next jobs were refitting the starter motor, draining the fuel tank, checking the fuel strainer and changing the fuel filter. I had a little bit of a downer though when getting under the back of the car. Found significant corrosion on the fuel tank bottom cover, oil cooler supports and also the gearbox cross member. The corrosion appears to have been caused by a fuel leak from the outlet hose on the fuel strainer. When I removed the bottom cover the hose clip snapped off due to corrosion and the hose just popped off. I'm so glad I checked all this as it would have been a pretty bad problem. So I've thrown out the old fuel tank bottom cover and plan on replacing it with a good used one (the inspection panel is NLA). The hose from the fuel pump to the filter is also in need of replacement as is the check valve on the pump. I'm hoping I can salvage the fuel pump as it does work so just needs new fittings. I'm also going to get the gearbox cross member replaced - the gearbox mount was replaced in 2011 so I'm hoping that is salvageable either as it is or with the epoxy treatment I've seen a few other owners use.

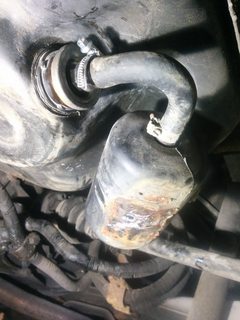
Above I temporarily rigged up the fuel pump to the tank using new hose clips after replacing the fuel strainer seal. This will all be sorted properly before driving the car and is only for an engine test.
Yes and I have been a very busy
First off I got the repainted intake manifold support fitted and then spent a day re-fitting the turbo, alternator and finally the new water pump.
After this I made up some new oil cooler pipes after studying a post over on rennlist and used some AN-12 fittings and 19mm fuel / oil hose and got the oil cooler fitted up to the oil filter housing.
Whilst I was in there I quickly realised my existing lower radiator hose was past its best as it had a worn out flat spot where it had been rubbing up against the frame rail. Got a quality replacement from carparts4less for �9!!! can't complain and it fits much better than the previous hose and doesn't rub up against the frame rail. The only issue with it was it didn't come with the plastic reinforcement to protect against the power steering pump. So I cut the one off the old hose and cable tied it to the new hose.
When dismantling the engine bay I had found that the vacuum tube going to the KLR computer had got very brittle and snapped off the banjo fitting. I was having nightmares about crawling under the dashboard trying to replace the vacuum tube and then had an idea to use a piece of silicone tube which I had laying around to create a sleeve to attach it back onto the banjo fitting. It was the perfect size and created a very tight fit which I secured with some cable ties (no boost leaks!!!)
I then spent a boat load more hours getting the inlet manifold, fuel rail, ignition leads and some cooling hoses reattached.
It was starting to look more like the engine bay should do!
Next was a big job but one I was looking forward to - getting the belts and pulleys installed. I rechecked the existing pulleys that I had previously thought to reuse and quickly made the decision to replace both the timing belt tensioner pulley and the idler pulley for both belts. The balance belt tensioner still felt good so have reused.
I checked and double checked that the crank and cam were at TDC - very much OCD but I didn't want to make a mistake at this point as it could have been disastrous. I then turned the engine over several times to convince myself that the timing was spot on and there were no issues.
You might also notice the epoxy on the timing belt cover, my existing cover was broken into two pieces so after I'd cleaned it up I stuck it together using some Araldite (great stuff).
Setup the belts as per the factory workshop manual and clarks garage.
I used the auto tensioner to set the timing belt tension and made sure that I "woke up" the spring by gently rocking the arm back and forth with the special balance shaft gear tool. I then used both the 90 degree twist method and turning the water pump pulley method to verify the tension. I will also be purchasing the gates tension tool to double check but I'm pretty confident it is within the tolerances and isn't too tight or too slack. I could just move the water pump pulley with moderate force and both hands.
And that brings us up to Saturday - all my hopes and dreams were that Saturday would be the day I could at least turn over the engine and listen to it once more!
Started off my filling her up with oil and water (just plain water to start as I am going to flush out the cooling system and then refill with Comma G48). Found a great method for filling up the coolant channels in the block, stuffing a section of hose pipe into the top connection with a funnel at the other end. I filled with water until it came out of the top tube and then reconnected the top radiator hose. Then continued filling with water through the expansion tank (this proved to be the perfect way to bleed and fill as I found out later on).
Next jobs were refitting the starter motor, draining the fuel tank, checking the fuel strainer and changing the fuel filter. I had a little bit of a downer though when getting under the back of the car. Found significant corrosion on the fuel tank bottom cover, oil cooler supports and also the gearbox cross member. The corrosion appears to have been caused by a fuel leak from the outlet hose on the fuel strainer. When I removed the bottom cover the hose clip snapped off due to corrosion and the hose just popped off. I'm so glad I checked all this as it would have been a pretty bad problem. So I've thrown out the old fuel tank bottom cover and plan on replacing it with a good used one (the inspection panel is NLA). The hose from the fuel pump to the filter is also in need of replacement as is the check valve on the pump. I'm hoping I can salvage the fuel pump as it does work so just needs new fittings. I'm also going to get the gearbox cross member replaced - the gearbox mount was replaced in 2011 so I'm hoping that is salvageable either as it is or with the epoxy treatment I've seen a few other owners use.
Above I temporarily rigged up the fuel pump to the tank using new hose clips after replacing the fuel strainer seal. This will all be sorted properly before driving the car and is only for an engine test.
03-04-2019, 07:57 PM
#23
Instructor
Thread Starter
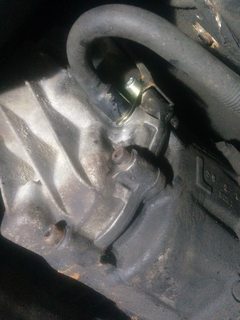
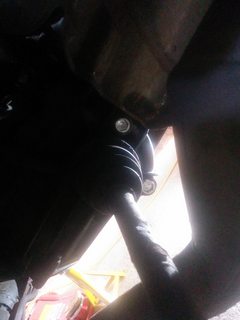
Whilst I was under the car sorting the fuel system I found an oil leak that appears to be coming from the oil cooler seals where it enters the gearbox. I'm hoping that the cooler tube it self is intact as it pretty much looks like the fluid is coming directly from the seal. I did do a quick search on aftermarket coolers and can see that Bert at the former Berlyn Services produces a direct fit after market cooler but it is pretty expensive (but still cheaper than Porsche) at �400. So I'm going to try the cheap fix first and replace the seals and change the gearbox oil.
And then I moved on to the good bit!
First off I removed the fuel pump fuse and also the DME relay so that the fuel pump would stay off and no spark. I also hadn't yet connected the distributor cap or coil lead.
I turned the engine over on the started a for a good few minutes with no sign of any oil pressure. I was beginning to think I'd done something wrong but kept perservering and eventually after checking the oil level a couple of times the needle started to creep up slowly at first and then shot up to full pressure
With this excitement under my belt I replaced the fuel pump fuse and DME relay and then connected the final pieces (which seemed to take an age). Getting the boost pipes and air box back on along with the distributor rotor and cap etc.
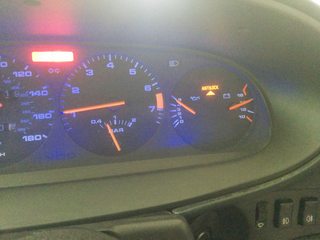
Took 30 seconds or so of cranking to get the fuel rail primed and then she fired straight up and into a very smooth fast idle!!!!
Video of startup to follow shortly!
And then I moved on to the good bit!
First off I removed the fuel pump fuse and also the DME relay so that the fuel pump would stay off and no spark. I also hadn't yet connected the distributor cap or coil lead.
I turned the engine over on the started a for a good few minutes with no sign of any oil pressure. I was beginning to think I'd done something wrong but kept perservering and eventually after checking the oil level a couple of times the needle started to creep up slowly at first and then shot up to full pressure
With this excitement under my belt I replaced the fuel pump fuse and DME relay and then connected the final pieces (which seemed to take an age). Getting the boost pipes and air box back on along with the distributor rotor and cap etc.
Took 30 seconds or so of cranking to get the fuel rail primed and then she fired straight up and into a very smooth fast idle!!!!
Video of startup to follow shortly!
03-04-2019, 07:59 PM
#24
Instructor
Thread Starter
Quite a bit of smoke / steam to start with (it was white) but started to clear up after I had it running outside for about 30 minutes and got it up to temperature and let the thermostats open and fans come on. I then opened the top bleed screw after the fans turned off and it bled the coolant perfectly after a few seconds. Topped up the coolant tank and then inspected for leaks.
Only drip I had was coming from the water pump gasket and was pretty slow so I'm hoping that the heat cycle sorted that out if not I will snug down the bolts when I change out the water for coolant.
Also I have a charging issue so either I cocked something up when I installed the new regulator or my alternator needs a bit more TLC so I'm going to have to get that out and sort it out.... grrrrrr.... yes the alternator is a pig to get at on the turbo.
Well I have a break for a couple of weeks so hopefully will be able to tackle the alternator, fuel system bits and gearbox cross member when I get back.
I'm going to get the fuel tank cover / cross member blasted and powder coated and also tackle the rust under the back.
I'm think then some POR15, hammerite over the top and then a good spraying of dinitrol. I'm also going to extend this treatment into the front wheel arches and under the belly pans.

If anyone has any advice feel free to shout out!
03-06-2019, 02:38 AM
#26
Rennlist Member
Congratulations on getting your car fired up, sounds good and a great feeling i'm sure.
Few things to tidy up but that's always the case, keep us posted and enjoy.
Few things to tidy up but that's always the case, keep us posted and enjoy.
04-22-2019, 06:43 PM
#27
Instructor
Thread Starter
So I've been on holiday and then been mega busy and I've completed quite a lot on the 944
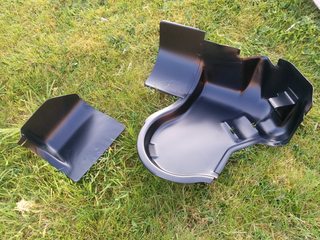
When I got back from holiday I had a parcel waiting for me containing a new (used) fuel tank cradle from a local breaker
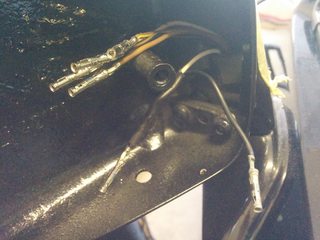
I also spent half an hour wiring up the passenger side door mirror correctly after the incumbent decided to try and connect everything using spade connectors... I sourced the correct connectors for the stock plastic wiring terminals from CPC - https://cpc.farnell.com/amp-te-conne...awg/dp/CN10009 for 26p each!
1-166101-9 from TE Connectivity (AMP Type III+ series socket contact - size 16)

I then tackled the defective alternator and after reading various topics I found this link the most useful - http://audi.humanspeakers.com/alternator.htm
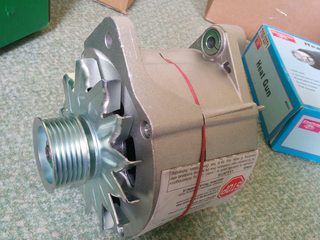
After reading that I concluded that the rectifier / diodes had failed and I could either try and rebuild it with parts off the internet or purchase a reconditioned one from carparts4less for just shy of �200 after discount and return of the deposit (�60). I was very impressed with the service - Lucas do the rebuilds for them, I got a rebuilt Bosch alternator in a Lucas box with a test certificate print-out showing the actual test results from the alternator in the box. Everything has been replaced and it looks brand new so well chuffed and it also fixed my problem and showed a healthy voltage when running!

Tested my headlight washers, all was working fine after I remembered that the headlights have to be on for them to function...
Put the power steering belt back on and filled up the reservoir with Halfords finest Dexron III and the good news is there were no leaks from my rebuilt pump! :thumbs:
Then I was completed on the engine itself, replaced all the hose clamps on the turbo piping with brand new ones.
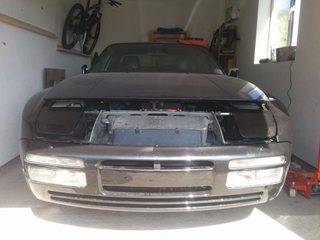
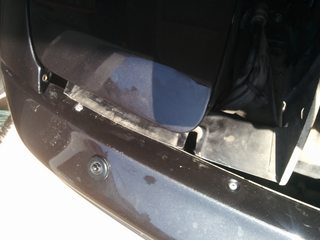
I then had a look at mounting the front bumper, couple of issues here, I found a random metal strip in the back of the car when I got it back but managed to work out it was the rail that the headlight washer hose attaches to under the top of the bumper cover. So I got that riveted back on and then noticed that the bottom of the headlight buckets is very tight against the top of the bumper cover. I might have to carefully straighten and lift the lip on the front of the headlight buckets before I refit the badge panel (that is back with the paint shop as I found they hadn't painted the bottom edge that sits on the top of the bumper cover.
This week I booked a week off and tackled some more jobs and started to look at the mess of the fuel pump piping and cradle etc. Got the pump off the car and then managed to get the corroded mess of the banjo bolt and non-return valve off with a pair of vice grips (these are seriously the best tool I've ever bought). The pump fortunately is fine with a little aluminum corrosion but nothing serious. I then realised I'd had a brain fart and ordered a non-return valve for a Bosch 044 pump, along with the wrong size AN adapter for the fuel filter and the thread is to big for the standard pump, so I'm waiting for a new one from Porsche as I couldn't find the right part anywhere else.
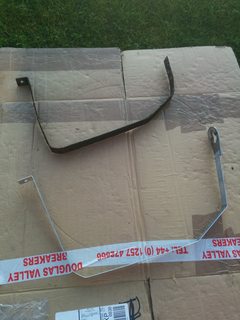
After not being happy spending �100+ for a new fuel tank cradle strap I bought some aluminum strip and made my own using one piece salvaged from the old strap.
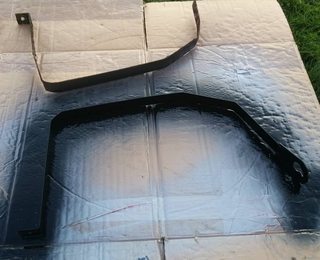
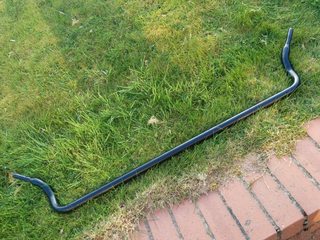
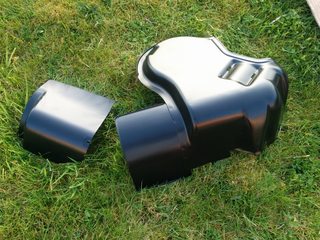
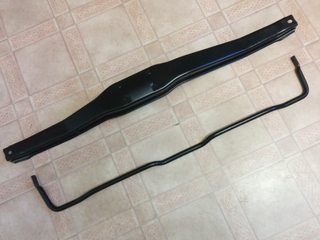
In the meantime I'd dropped off my front anti roll-bar and the used fuel tank cradle at the local powder coating firm and picked them up -
Finally today thanks to Stuart over on the PCGB forum I got some Millers CRX LS 75W90 NT+ gear oil and set about draining the gearbox and replacing the oil cooler seals at the pump and on the rear case. The oil seal on the pump looks to be the culprit of my leak as the cooler pipe was very loose in the o-ring and could be rocked back and forth. Appears to be a lot tighter now with a new o-ring, the bracket was pretty toast so waiting for a new one from Porsche.
Also fitted new drain plugs in the gearbox.
So now I'm waiting for some parts so I can get the fuel pump plumbed back in and then finish tidying up.
When I got back from holiday I had a parcel waiting for me containing a new (used) fuel tank cradle from a local breaker
I also spent half an hour wiring up the passenger side door mirror correctly after the incumbent decided to try and connect everything using spade connectors... I sourced the correct connectors for the stock plastic wiring terminals from CPC - https://cpc.farnell.com/amp-te-conne...awg/dp/CN10009 for 26p each!
1-166101-9 from TE Connectivity (AMP Type III+ series socket contact - size 16)
I then tackled the defective alternator and after reading various topics I found this link the most useful - http://audi.humanspeakers.com/alternator.htm
After reading that I concluded that the rectifier / diodes had failed and I could either try and rebuild it with parts off the internet or purchase a reconditioned one from carparts4less for just shy of �200 after discount and return of the deposit (�60). I was very impressed with the service - Lucas do the rebuilds for them, I got a rebuilt Bosch alternator in a Lucas box with a test certificate print-out showing the actual test results from the alternator in the box. Everything has been replaced and it looks brand new so well chuffed and it also fixed my problem and showed a healthy voltage when running!
Tested my headlight washers, all was working fine after I remembered that the headlights have to be on for them to function...
Put the power steering belt back on and filled up the reservoir with Halfords finest Dexron III and the good news is there were no leaks from my rebuilt pump! :thumbs:
Then I was completed on the engine itself, replaced all the hose clamps on the turbo piping with brand new ones.
I then had a look at mounting the front bumper, couple of issues here, I found a random metal strip in the back of the car when I got it back but managed to work out it was the rail that the headlight washer hose attaches to under the top of the bumper cover. So I got that riveted back on and then noticed that the bottom of the headlight buckets is very tight against the top of the bumper cover. I might have to carefully straighten and lift the lip on the front of the headlight buckets before I refit the badge panel (that is back with the paint shop as I found they hadn't painted the bottom edge that sits on the top of the bumper cover.
This week I booked a week off and tackled some more jobs and started to look at the mess of the fuel pump piping and cradle etc. Got the pump off the car and then managed to get the corroded mess of the banjo bolt and non-return valve off with a pair of vice grips (these are seriously the best tool I've ever bought). The pump fortunately is fine with a little aluminum corrosion but nothing serious. I then realised I'd had a brain fart and ordered a non-return valve for a Bosch 044 pump, along with the wrong size AN adapter for the fuel filter and the thread is to big for the standard pump, so I'm waiting for a new one from Porsche as I couldn't find the right part anywhere else.
After not being happy spending �100+ for a new fuel tank cradle strap I bought some aluminum strip and made my own using one piece salvaged from the old strap.
In the meantime I'd dropped off my front anti roll-bar and the used fuel tank cradle at the local powder coating firm and picked them up -
Finally today thanks to Stuart over on the PCGB forum I got some Millers CRX LS 75W90 NT+ gear oil and set about draining the gearbox and replacing the oil cooler seals at the pump and on the rear case. The oil seal on the pump looks to be the culprit of my leak as the cooler pipe was very loose in the o-ring and could be rocked back and forth. Appears to be a lot tighter now with a new o-ring, the bracket was pretty toast so waiting for a new one from Porsche.
Also fitted new drain plugs in the gearbox.
So now I'm waiting for some parts so I can get the fuel pump plumbed back in and then finish tidying up.
04-28-2019, 07:40 PM
#28
Instructor
Thread Starter
Some more wrenching this weekend!
Managed to get the rear anti roll bar and cross member out after alot of wiggling and rotating. Was a pig of a job trying to get the fuel filter mount off the cross member as the nuts on the rubber bobbins had completely turned into a blob of rust... somehow I managed to jam on a smaller size socket and they came undone!
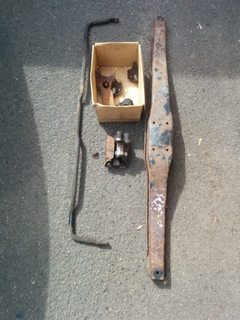
Same technique was used to get the main cross member bolts out from the chassis rails as the bolt heads were badly corroded.
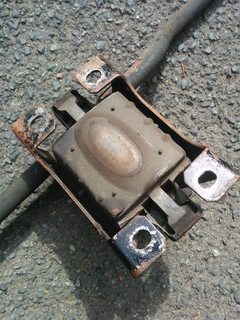
Transmission mount still looks good - had it replaced in 2011 and about 20k miles ago. I'm going to have a go at the polyurethane rubber mod to make sure it lasts a good deal longer (https://rennlist.com/forums/944-turb...ion-mount.html).
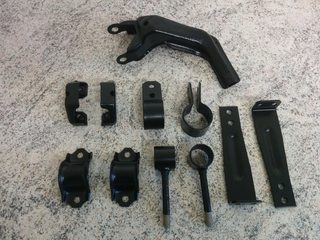
All these bits (except the transmission mount) are going to the powder coaters tomorrow for blasting and coating - matt black unless there are some better suggestions?
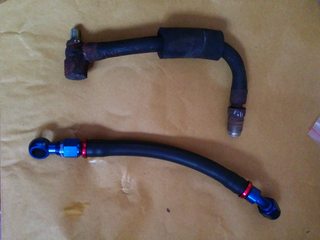
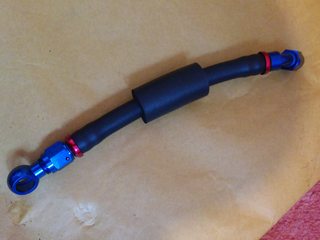
New non-return check valve arrived from Porsche for the fuel pump so I finished up the custom fuel hose I was making to replace the worn out original.
Investigated the ABS fault and found that the ABS computer was loose on its mountings (including the earth cable). Then found the ABS fuse was blown so have replaced that - haven't had chance to get the ignition on to check if it is fixed yet though with the car up in the air and missing the fuel system.
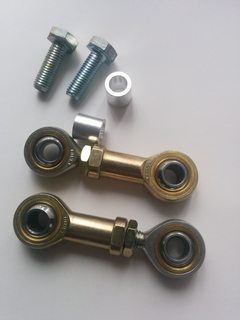
Dug out my "new" rear drop links which have been sat in a box for 10 years after I purchased them from @Serge944 (originally for my old 944S but never got fitted). These will go on when I get the ARB back from the powder coaters.
Managed to get the rear anti roll bar and cross member out after alot of wiggling and rotating. Was a pig of a job trying to get the fuel filter mount off the cross member as the nuts on the rubber bobbins had completely turned into a blob of rust... somehow I managed to jam on a smaller size socket and they came undone!
Same technique was used to get the main cross member bolts out from the chassis rails as the bolt heads were badly corroded.
Transmission mount still looks good - had it replaced in 2011 and about 20k miles ago. I'm going to have a go at the polyurethane rubber mod to make sure it lasts a good deal longer (https://rennlist.com/forums/944-turb...ion-mount.html).
All these bits (except the transmission mount) are going to the powder coaters tomorrow for blasting and coating - matt black unless there are some better suggestions?
New non-return check valve arrived from Porsche for the fuel pump so I finished up the custom fuel hose I was making to replace the worn out original.
Investigated the ABS fault and found that the ABS computer was loose on its mountings (including the earth cable). Then found the ABS fuse was blown so have replaced that - haven't had chance to get the ignition on to check if it is fixed yet though with the car up in the air and missing the fuel system.
Dug out my "new" rear drop links which have been sat in a box for 10 years after I purchased them from @Serge944 (originally for my old 944S but never got fitted). These will go on when I get the ARB back from the powder coaters.
04-28-2019, 07:49 PM
#29
Drifting
[QUOTE=dlknight;15804839]matt black unless there are some better suggestions?
[QUOTE]
Looking good! Sometimes matt black ends up grey and for that reason people select glossy
[QUOTE]
Looking good! Sometimes matt black ends up grey and for that reason people select glossy
05-11-2019, 04:20 PM
#30
Instructor
Thread Starter
Been cracking on over the last couple of weekends and got a fair chunk more done! Day off tomorrow and over to Petrolicious driver's meet at Bicester Heritage - say hello if you are there I will be in the 911 (X879HEU).
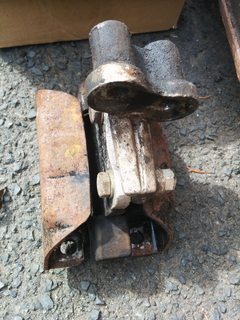
So I sent a load of parts off to the powder coaters and one of the clamps from the gearbox oil cooler bracket was so badly corroded I decided that my only choice was to make my own replacement as Porsche no longer stocks it.
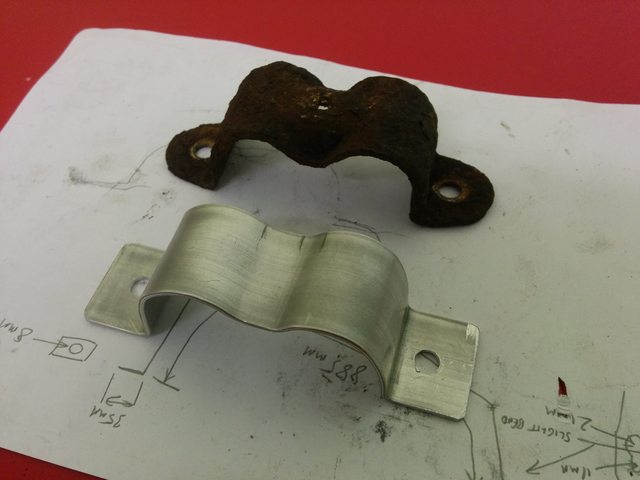
Made it up from the bit of aluminium strip I had left from the fuel tank strap. I also used to of the oil proof hose I bought for the engine oil cooler hoses to make the rubber inserts that clamp over the oil cooler pipe.
One mod of been meaning to make for a long time is to make a semi-permanent fix to the PITA wiper mechanism in the 944 where the drives side linkage has a habit of popping off (most often during heavy rain). I won't be driving in rain on purpose if I can help but doesn't hurt to have everything working. Most common method I've read is to drill a 3mm hole through the ball joint and secure it with a couple of washers and a split pin.
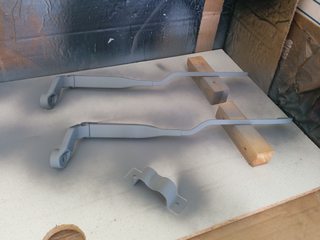
Whilst I was doing that I was also getting high on paint fumes in the utility room, painting a couple of smaller bits and also the wiper arms which I'd prepped using varying degrees of paper mostly back to bare metal. Gave them a couple of coats of primer and then a few coats of trim black.

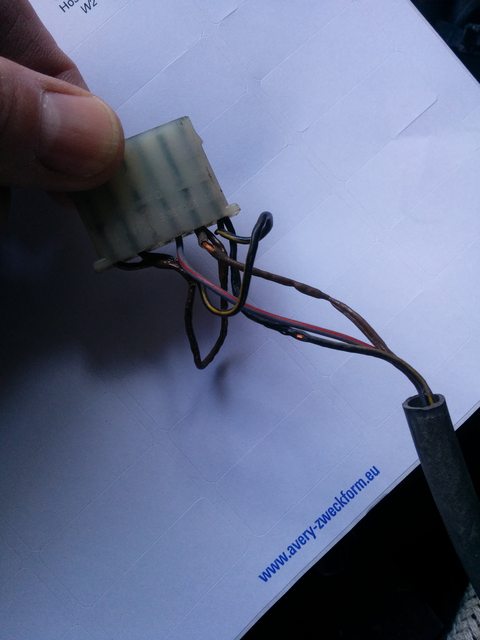
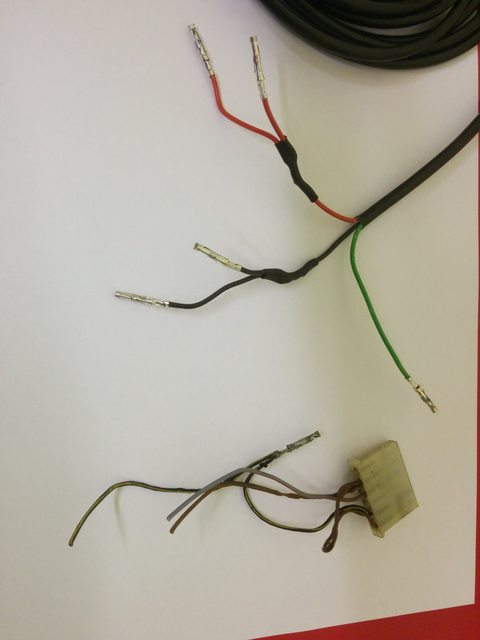
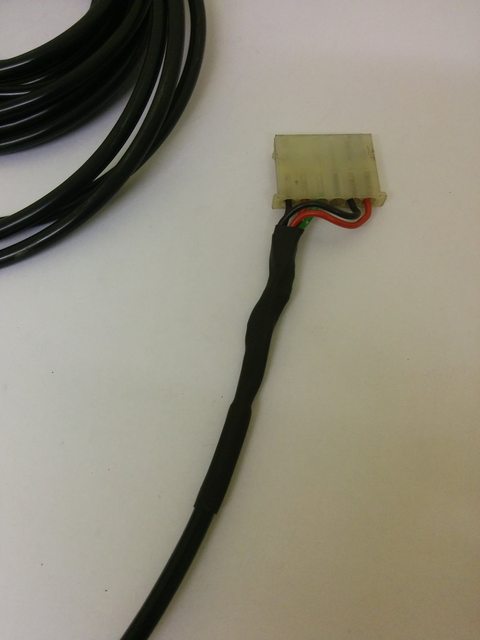
Found another mess whilst I was sorting out the wipers - the heated washer jet wires weren't very tidy and one of them wasn't connected so I removed the gaffer tape that SVP had stuck on them and found they had just tied the wires together! AND then I found something scary... as they had tied the wires together they had been shorting and the entire loom for the heated washer jets is melted as far as I can tell the entire length. So I've made up a new loom but it isn't going to be easy finding where it terminates under the fuse box in the spaghetti of wires.So until I get that done I will take out the fuse for the heated rear window circuit to isolate the wires.
EDIT: The heated washer jets feed off the wiper motor circuit so for now I've taken out the fuse for the wiper motor (it is labelled heated washer jets as well in the fuse box). Looks like I can remove the old postive wire (black / yellow) where it begins at the wiper motor wiring connector in the front scuttle. Then the brown wire is just a negative earth so I shouldn't need to trace that one all the way under the dash, will just find the closest earthing point and take the new wire to it.

Thursday I got the bits back from the powder coaters and I also made up the new loom for the washer jets.
Today I started treating the rust under the rear chassis - just to get it tidy enough to refit everything that has been reconditioned. I plan on doing this properly in the future when I drop the gearbox and rear axle.
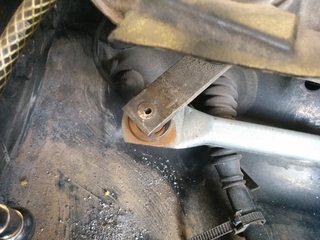
I got a load of products from Bilt Hamber for this and started off by wire brushing all the loose rust and flaky paint from the torsion bar and rear cross member mounting points.

I then used some heavy duty degreaser (the screwfix one) to clean the torsion bar and mounting points before washing it down with soapy water and drying with paper towels and finally a heat gun, you can already see an improvement on the metal!

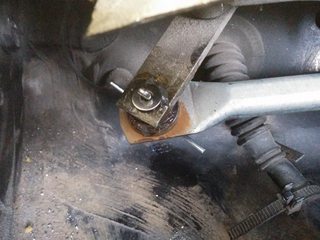
Next I applied the Deox Gel from Bilt Hamber liberally as best I could with a paint brush. I decanted some into a plastic beaker first as it was easier to work with it under the car. It doesn't stick as well as I was expecting to wasn't able to get a thick coating on. I then covered it with cling film as I plan on leaving it at least 24 hours to work it's magic.
Next time I will be cleaning down the gel, drying it all off and applying a coating of the Electrox primer. Not sure yet what I'm going to use as the top layer.
So I sent a load of parts off to the powder coaters and one of the clamps from the gearbox oil cooler bracket was so badly corroded I decided that my only choice was to make my own replacement as Porsche no longer stocks it.
Made it up from the bit of aluminium strip I had left from the fuel tank strap. I also used to of the oil proof hose I bought for the engine oil cooler hoses to make the rubber inserts that clamp over the oil cooler pipe.
One mod of been meaning to make for a long time is to make a semi-permanent fix to the PITA wiper mechanism in the 944 where the drives side linkage has a habit of popping off (most often during heavy rain). I won't be driving in rain on purpose if I can help but doesn't hurt to have everything working. Most common method I've read is to drill a 3mm hole through the ball joint and secure it with a couple of washers and a split pin.
Whilst I was doing that I was also getting high on paint fumes in the utility room, painting a couple of smaller bits and also the wiper arms which I'd prepped using varying degrees of paper mostly back to bare metal. Gave them a couple of coats of primer and then a few coats of trim black.
Found another mess whilst I was sorting out the wipers - the heated washer jet wires weren't very tidy and one of them wasn't connected so I removed the gaffer tape that SVP had stuck on them and found they had just tied the wires together! AND then I found something scary... as they had tied the wires together they had been shorting and the entire loom for the heated washer jets is melted as far as I can tell the entire length. So I've made up a new loom but it isn't going to be easy finding where it terminates under the fuse box in the spaghetti of wires.
EDIT: The heated washer jets feed off the wiper motor circuit so for now I've taken out the fuse for the wiper motor (it is labelled heated washer jets as well in the fuse box). Looks like I can remove the old postive wire (black / yellow) where it begins at the wiper motor wiring connector in the front scuttle. Then the brown wire is just a negative earth so I shouldn't need to trace that one all the way under the dash, will just find the closest earthing point and take the new wire to it.
Thursday I got the bits back from the powder coaters and I also made up the new loom for the washer jets.
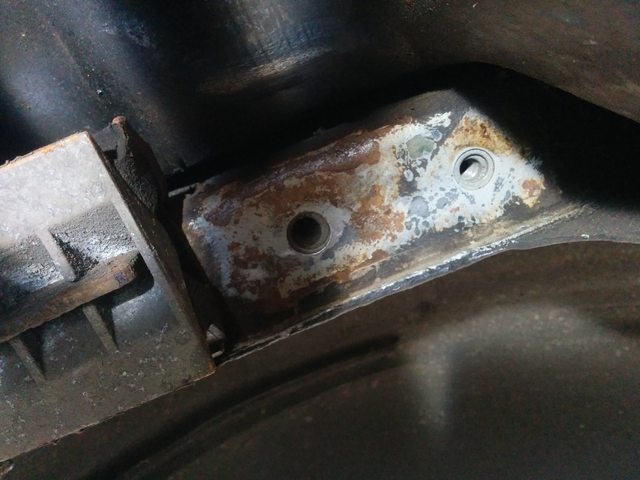
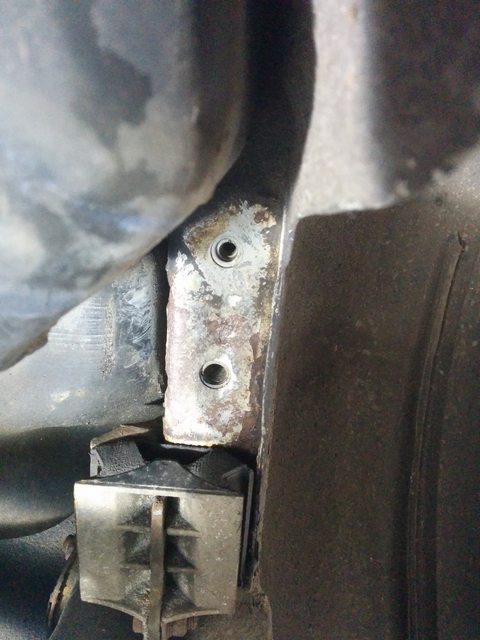
Today I started treating the rust under the rear chassis - just to get it tidy enough to refit everything that has been reconditioned. I plan on doing this properly in the future when I drop the gearbox and rear axle.
I got a load of products from Bilt Hamber for this and started off by wire brushing all the loose rust and flaky paint from the torsion bar and rear cross member mounting points.
I then used some heavy duty degreaser (the screwfix one) to clean the torsion bar and mounting points before washing it down with soapy water and drying with paper towels and finally a heat gun, you can already see an improvement on the metal!
Next I applied the Deox Gel from Bilt Hamber liberally as best I could with a paint brush. I decanted some into a plastic beaker first as it was easier to work with it under the car. It doesn't stick as well as I was expecting to wasn't able to get a thick coating on. I then covered it with cling film as I plan on leaving it at least 24 hours to work it's magic.
Next time I will be cleaning down the gel, drying it all off and applying a coating of the Electrox primer. Not sure yet what I'm going to use as the top layer.
Last edited by dlknight; 05-25-2019 at 07:57 AM.