944 Turbo Mini Restoration
 07-05-2019, 10:29 AM
#46
Instructor
Thread Starter
Well I certainly don't trust those push-fit hoses / fittings anymore, will take a look at my original Porsche hoses over the weekend and possibly refit them. I guess the alternative is get some made up with crimp fittings or use braided hose and fittings.
 07-05-2019, 10:48 AM
#47
Rennlist Member
Add some Oetiker clamps over the fitting and they'll be fine.
The bending of the rubber hose in a relatively small radius in that location may have contributed to the hose blowing off.
I've been running push-on fittings (with clamps) for years without issue.
Bat Inc. carries them on the push-on fittings page...https://www.batinc.net/#PRODUCTS
The bending of the rubber hose in a relatively small radius in that location may have contributed to the hose blowing off.
I've been running push-on fittings (with clamps) for years without issue.
Bat Inc. carries them on the push-on fittings page...https://www.batinc.net/#PRODUCTS
07-05-2019, 11:10 AM
#48
Rennlist Member
07-05-2019, 12:43 PM
#49
Instructor
Thread Starter
Add some Oetiker clamps over the fitting and they'll be fine.
The bending of the rubber hose in a relatively small radius in that location may have contributed to the hose blowing off.
I've been running push-on fittings (with clamps) for years without issue.
Bat Inc. carries them on the push-on fittings page...https://www.batinc.net/#PRODUCTS
The bending of the rubber hose in a relatively small radius in that location may have contributed to the hose blowing off.
I've been running push-on fittings (with clamps) for years without issue.
Bat Inc. carries them on the push-on fittings page...https://www.batinc.net/#PRODUCTS
 - you reckon I will be OK to clean it all up and use some of these clamps to ensure it won't happen again then?
Do you use the single or double ear clamps?
07-05-2019, 03:43 PM
#50
Rennlist Member
They also make a crimp collar for hose ends which look real nice but a little more cost and involvement.
Page 8 in this pdf...https://irp-cdn.multiscreensite.com/...ed/ahosend.pdf
Be sure you're using the correct hose for the style of hose ends.
The following users liked this post:
dlknight (07-05-2019)
07-06-2019, 12:32 AM
#52
Rennlist Member
07-06-2019, 05:45 AM
#53
Instructor
Thread Starter
Yes I was already thinking about the fuel hose - I'm going to clamp it with some ear type clips, I think that was fine though as the hose was very tight over the fitting, but still installing some clips. The more I think about it I think the hose on the oil cooler failed because of the heat, it gets very hot in that area due to the exhaust manifold and rubber gets very pliable / soft when hot so guess it just got so hot that is was pliable enough to work loose by itself under 2-3 bar. It would have been just around the time that the oil had reached engine temp too so guess the thermostat would have just opened and let the hot oil into those lines for cooling.
08-02-2019, 10:55 AM
#54
Instructor
Thread Starter
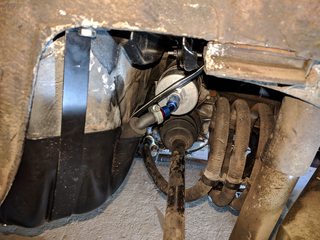
Well I managed to remove those aftermarket bits of rubbish from the oil cooler and inspected my original Porsche OE oil cooler hoses - the top line with the solid section looked OK apart from the fact the flexible piece is stuck onto the solid section (not that it matters unless I wanted to separate them). Refitted the top section after much fiddling, cursing and getting pretty frustrated.
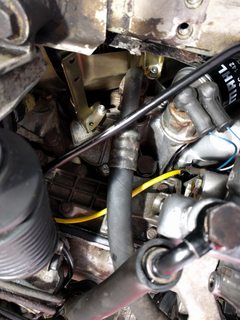

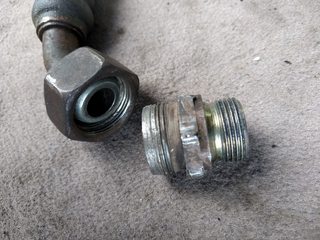
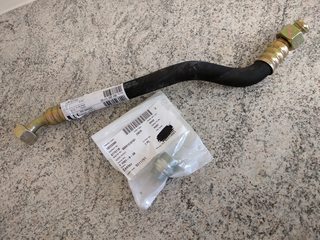
Now I turned my attention to the lower pipe and found that the adapter that attaches to the oil filter housing was seized onto the pipe. Took it to the local garage and they managed to undo it in a vice but the threads were so corroded that they had disintegrated on both the pipe fitting and the adapter. So as I was in a hurry and not in the mood to mess around with trying to get another custom hose made I bit the bullet and ordered a replacement from Porsche for a crazy price (had to wait for the hose and adapter to ship from Germany).
I have similar AN fittings with push-fit hose on the fuel pump to filter line so I put some hose clips on those as a precaution - will probably replace with the genuine hose at some point but this should be good for now (no extreme heat here).
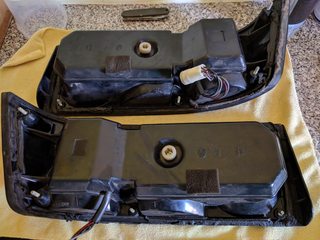
So I took it for the MOT last Friday and the indicator stopped working on the way (I had a spare but hadn't got around to fitting it) so replaced that on Friday evening (managed to get it out without having to remove the entire bumper which was lucky.
The internals of the indicator were badly corroded due to the seal failing some time ago and letting in water. Looking on PET2 there doesn't appear to be a part number listed for the seals in the indicators unfortunately. The spare I got off ebay for peanuts and it is in nearly new condition compared to my grubby old one!
Been watching the Bilstein shock absorbers on Amazon for some time waiting for the price to drop and it hit my purchase criteria so picked those up.

Only issue from the MOT was some wear on the edge of one of the front tyres and the CO / HC is a lot higher than normal so I'm currently investigating a fueling issue.
I've ruled out the DME temperature sensor which I checked yesterday evening and was performing within specification, so my next test will be to check the fuel pressure at the rail to determine if the FPR has gone bad. Only problem is they no longer appear to be available (mine is the later threaded connection versus the push fit connection on the earlier FPRs), I guess I could retrofit the older style push-fit hose if I need to get an FPR of the older type.
http://www.clarks-garage.com/pdf-manual/elect-19.pdf
Ambient temp (approximately 17.6C) = 2.85 k-ohms
Engine at first white line (80C) = 267 ohms
I also cleaned the AFM wiring connector as suggested by someone on tipec - the blades did look pretty dirty and I got quite a lot of dirt off with some Deox Gel and several cotton buds, also the spring on the connector wasn't located correctly so also sorted that and now holds on more securely.
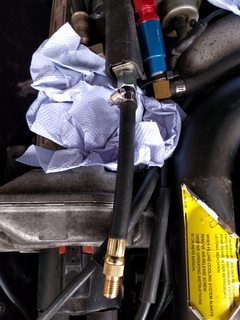
Ordered a cheap fuel pressure test kit from Amazon - will see what adaptors come with it but as I said above I may be sending this back and making my own if none of the adaptors are correct size.
US PRO 20pc Petrol and Diesel Fuel Pump Pressure Tester Meter Kit Set 0 - 1...
Also picked up a vacuum tester seeing as it was only �12 and will test for leaks.
Now I turned my attention to the lower pipe and found that the adapter that attaches to the oil filter housing was seized onto the pipe. Took it to the local garage and they managed to undo it in a vice but the threads were so corroded that they had disintegrated on both the pipe fitting and the adapter. So as I was in a hurry and not in the mood to mess around with trying to get another custom hose made I bit the bullet and ordered a replacement from Porsche for a crazy price (had to wait for the hose and adapter to ship from Germany).
I have similar AN fittings with push-fit hose on the fuel pump to filter line so I put some hose clips on those as a precaution - will probably replace with the genuine hose at some point but this should be good for now (no extreme heat here).
So I took it for the MOT last Friday and the indicator stopped working on the way (I had a spare but hadn't got around to fitting it) so replaced that on Friday evening (managed to get it out without having to remove the entire bumper which was lucky.
The internals of the indicator were badly corroded due to the seal failing some time ago and letting in water. Looking on PET2 there doesn't appear to be a part number listed for the seals in the indicators unfortunately. The spare I got off ebay for peanuts and it is in nearly new condition compared to my grubby old one!
Been watching the Bilstein shock absorbers on Amazon for some time waiting for the price to drop and it hit my purchase criteria so picked those up.
Only issue from the MOT was some wear on the edge of one of the front tyres and the CO / HC is a lot higher than normal so I'm currently investigating a fueling issue.
I've ruled out the DME temperature sensor which I checked yesterday evening and was performing within specification, so my next test will be to check the fuel pressure at the rail to determine if the FPR has gone bad. Only problem is they no longer appear to be available (mine is the later threaded connection versus the push fit connection on the earlier FPRs), I guess I could retrofit the older style push-fit hose if I need to get an FPR of the older type.
http://www.clarks-garage.com/pdf-manual/elect-19.pdf
Ambient temp (approximately 17.6C) = 2.85 k-ohms
Engine at first white line (80C) = 267 ohms
I also cleaned the AFM wiring connector as suggested by someone on tipec - the blades did look pretty dirty and I got quite a lot of dirt off with some Deox Gel and several cotton buds, also the spring on the connector wasn't located correctly so also sorted that and now holds on more securely.
Ordered a cheap fuel pressure test kit from Amazon - will see what adaptors come with it but as I said above I may be sending this back and making my own if none of the adaptors are correct size.
US PRO 20pc Petrol and Diesel Fuel Pump Pressure Tester Meter Kit Set 0 - 1...
Also picked up a vacuum tester seeing as it was only �12 and will test for leaks.
08-19-2019, 07:10 PM
#55
Instructor
Thread Starter
Only me!
So I've been working hard trying to solve my rich mixture and also sort out an intermittent loss of power (car doesn't feel as punchy as it used to at WOT 100% of the time).
As above I started off with checking the DME temp sensor.
I also went throught all my old MOTs and put the CO data into a table for reference -
Date Mileage CO % vol HC
17/03/2008 147294 0.49 51
18/05/2009 157164 0.512 61
08/05/2010 167141 0.597 55
14/05/2011 178494 0.11 55
12/05/2012 190364 1.746 53
10/06/2013 201814 2.43 140
22/05/2014 204929 0.432 55
26/07/2019 205058 3.104 165
I had an issue with a rich idle in 2013 when the car was with Promax and I seem to remember they replaced all the vacuum lines and also disconnected the O2 sensor (sticking the correct bridge plug in its place to make the DME run in open loop). This appears to have sorted it but now it is back with a vengeance!
Checked the fuel pressure using my cheap pressure gauge from Amazon with an adaptor off ebay -
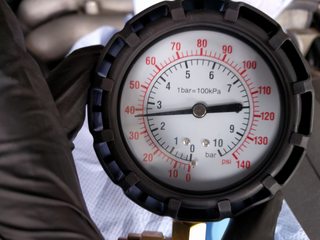
With the Fuel Pump jumpered and the engine not running = 2.6 bar
With the engine running = 2.2 bar
Leakdown test it held 2.4 bar for 20 minutes after the fuel pump was shut off
I also removed the fuel rail and put each of the injectors into a container to ascertain if one or more were leaking, I pressurized the system via the fuel pump and then switched it off and left it for a good 2 hours and all of the containers were dry apart from a tiny bit of dampness in injector #1 container but that may have just been a bit of oil that was on the o-ring.
I also removed the vacuum lines from the FPR and FPD and they were bone dry with no fuel dribbling out or in the line.
After my brief test drive I thought the car needed a pair of engine mounts so I ordered a pair at eye-watering cost. After checking my existing ones against specification and then trying over the course of 2-3 evenings to remove the drivers side mount I gave up. There is not enough room to remove both of the top bolts from the mount on the Turbo due to the exhaust manifolds. So they will have to wait until such time as I either have the engine out or the exhaust manifold removed.
I changed the air filter and went for another drive and although it drove OK it still smelt very rich and hesitated a little (tiny bit). Car did boost fine and several times shot off like I remember :grin:
So next on the list was to check the AFM after some pointers from the guys on tipec who had similar issues with their Turbos.
BINGO! :thumbs: I found an issue with the AFM when it was fully open at maximum air flow the voltage dropped completely moving from about 99% to 100% open and was repeatable. I'm guessing this is the cause of the intermittent power loss at WOT. I got my trusty pencil eraser out and cleaned the track on the potentiometer. Also gave the metal contacts a good clean with some 5000 grit paper and it was fixed and now reporting highest voltage at fully open and increased gradually with no flat spots between 0-100%. The air temp sensor also checked out OK reporting the correct k-ohms for the ambient temperature (2.17 k-ohms).
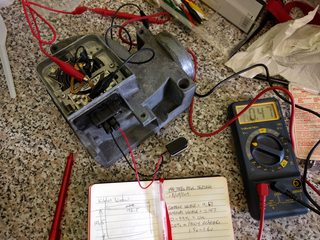
I used the testing guide from Clarks Garage which utilises a 9v battery for power source -
http://www.clarks-garage.com/shop-manual/elect-22.htm
Next jobs I have is to fit a new Bosch O2 sensor I ordered from Opie Oils, test the TPS (Throttle Position Sensor) and adjust the idle mixture on the AFM.
If I still have an issue then I will suspect the injectors and get them sent off for testing and refurb.
So I've been working hard trying to solve my rich mixture and also sort out an intermittent loss of power (car doesn't feel as punchy as it used to at WOT 100% of the time).
As above I started off with checking the DME temp sensor.
I also went throught all my old MOTs and put the CO data into a table for reference -
Date Mileage CO % vol HC
17/03/2008 147294 0.49 51
18/05/2009 157164 0.512 61
08/05/2010 167141 0.597 55
14/05/2011 178494 0.11 55
12/05/2012 190364 1.746 53
10/06/2013 201814 2.43 140
22/05/2014 204929 0.432 55
26/07/2019 205058 3.104 165
I had an issue with a rich idle in 2013 when the car was with Promax and I seem to remember they replaced all the vacuum lines and also disconnected the O2 sensor (sticking the correct bridge plug in its place to make the DME run in open loop). This appears to have sorted it but now it is back with a vengeance!
Checked the fuel pressure using my cheap pressure gauge from Amazon with an adaptor off ebay -
With the Fuel Pump jumpered and the engine not running = 2.6 bar
With the engine running = 2.2 bar
Leakdown test it held 2.4 bar for 20 minutes after the fuel pump was shut off
I also removed the fuel rail and put each of the injectors into a container to ascertain if one or more were leaking, I pressurized the system via the fuel pump and then switched it off and left it for a good 2 hours and all of the containers were dry apart from a tiny bit of dampness in injector #1 container but that may have just been a bit of oil that was on the o-ring.
I also removed the vacuum lines from the FPR and FPD and they were bone dry with no fuel dribbling out or in the line.
After my brief test drive I thought the car needed a pair of engine mounts so I ordered a pair at eye-watering cost. After checking my existing ones against specification and then trying over the course of 2-3 evenings to remove the drivers side mount I gave up. There is not enough room to remove both of the top bolts from the mount on the Turbo due to the exhaust manifolds. So they will have to wait until such time as I either have the engine out or the exhaust manifold removed.
I changed the air filter and went for another drive and although it drove OK it still smelt very rich and hesitated a little (tiny bit). Car did boost fine and several times shot off like I remember :grin:
So next on the list was to check the AFM after some pointers from the guys on tipec who had similar issues with their Turbos.
BINGO! :thumbs: I found an issue with the AFM when it was fully open at maximum air flow the voltage dropped completely moving from about 99% to 100% open and was repeatable. I'm guessing this is the cause of the intermittent power loss at WOT. I got my trusty pencil eraser out and cleaned the track on the potentiometer. Also gave the metal contacts a good clean with some 5000 grit paper and it was fixed and now reporting highest voltage at fully open and increased gradually with no flat spots between 0-100%. The air temp sensor also checked out OK reporting the correct k-ohms for the ambient temperature (2.17 k-ohms).
I used the testing guide from Clarks Garage which utilises a 9v battery for power source -
http://www.clarks-garage.com/shop-manual/elect-22.htm
Next jobs I have is to fit a new Bosch O2 sensor I ordered from Opie Oils, test the TPS (Throttle Position Sensor) and adjust the idle mixture on the AFM.
If I still have an issue then I will suspect the injectors and get them sent off for testing and refurb.
08-29-2019, 08:57 AM
#56
Instructor
Thread Starter
Well I've been busy again tinkering :floor:
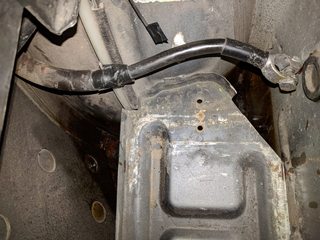
I forgot to mention before I also changed the high pressure power steering line as it appeared to be dripping from the crimped end that attaches to the pump. Got a cheaper reproduction hose from http://www.powersteeringstore.co.uk/ hope it holds out as long as the original Porsche item.
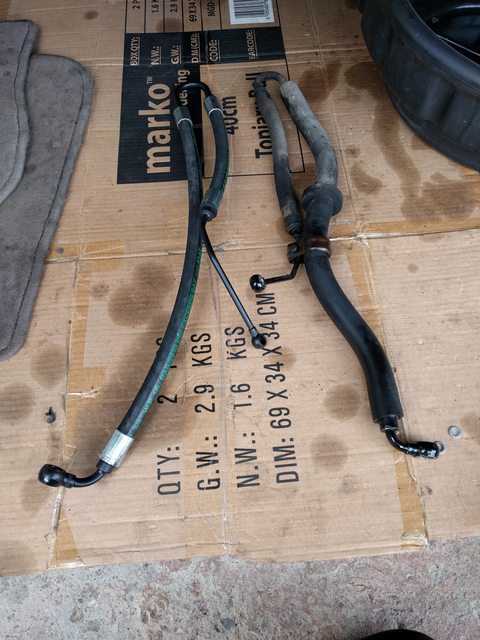
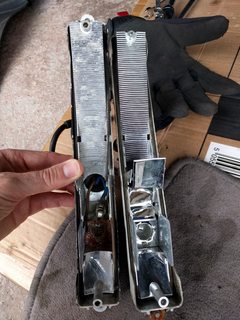
New one on the left, old one on the right.
Next job was testing out the throttle position sensor and luckily it tested OK - although I did find a procedure someone else had done to take it apart and clean the internals. New one runs several hundred pounds from Porsche!
http://www.arnnworx.com/catalog/inde...id=2&chapter=1
http://www.clarks-garage.com/shop-manual/fuel-06.htm
DME readings
Closed = 1 Ohm (0 - 10 Ohms)
Open = infinity
KLR readings
Closed = 0.57 k-ohms (320 - 670 ohms)
Fully Open = 4.07 k-ohms (2.7 - 4.7 Kohms)
I noticed on my most recent adventure (did a local loop of about 20 miles) that the fumes in were coming in from the exhaust. Usually on the 944 this is because of the seals around the boot area. I knew the boot seal was good as I replaced this earlier on and also the boot lock seal was new. The incompetent guy that messed up the other jobs had refitted the tail lights and I decided to remove them as I guessed that they may require proper sealing. My suspicions were confirmed when I found that the original butyl seals were still on (in places) and a few small strips of new butyl seal had been added but there were gaps all around the lights! Absolute cow boy material.... so I cleaned off all the old butyl strips and purchased some new butyl strip and also some neoprene sealing strip (6mm x 10mm). Once the lights were cleaned up the neoprene sealing strip did a great job and I checked that it was a very snug fit into the light aperture in the rear. Hoping that has sorted the fumes problem out, I've also ordered a new bonnet seal in case I have a slight leak in the engine bay.
Next jobs are to replace the O2 sensor (got a Bosch universal one) and then check the idle mixture setting is correct.
I've also started repainting the rear wiper arm which I forgot about when I did the front ones!
TTFN
I forgot to mention before I also changed the high pressure power steering line as it appeared to be dripping from the crimped end that attaches to the pump. Got a cheaper reproduction hose from http://www.powersteeringstore.co.uk/ hope it holds out as long as the original Porsche item.
New one on the left, old one on the right.
Next job was testing out the throttle position sensor and luckily it tested OK - although I did find a procedure someone else had done to take it apart and clean the internals. New one runs several hundred pounds from Porsche!
http://www.arnnworx.com/catalog/inde...id=2&chapter=1
http://www.clarks-garage.com/shop-manual/fuel-06.htm
DME readings
Closed = 1 Ohm (0 - 10 Ohms)
Open = infinity
KLR readings
Closed = 0.57 k-ohms (320 - 670 ohms)
Fully Open = 4.07 k-ohms (2.7 - 4.7 Kohms)
I noticed on my most recent adventure (did a local loop of about 20 miles) that the fumes in were coming in from the exhaust. Usually on the 944 this is because of the seals around the boot area. I knew the boot seal was good as I replaced this earlier on and also the boot lock seal was new. The incompetent guy that messed up the other jobs had refitted the tail lights and I decided to remove them as I guessed that they may require proper sealing. My suspicions were confirmed when I found that the original butyl seals were still on (in places) and a few small strips of new butyl seal had been added but there were gaps all around the lights! Absolute cow boy material.... so I cleaned off all the old butyl strips and purchased some new butyl strip and also some neoprene sealing strip (6mm x 10mm). Once the lights were cleaned up the neoprene sealing strip did a great job and I checked that it was a very snug fit into the light aperture in the rear. Hoping that has sorted the fumes problem out, I've also ordered a new bonnet seal in case I have a slight leak in the engine bay.
Next jobs are to replace the O2 sensor (got a Bosch universal one) and then check the idle mixture setting is correct.
I've also started repainting the rear wiper arm which I forgot about when I did the front ones!
TTFN
09-23-2019, 03:47 PM
#57
Instructor
Thread Starter
So first weekend of September I more or less finished the major work! :thumbs:
Got the new Bilstein rear shock absorbers fitted (this was by far one of the easiest jobs on the whole car).
Used a little technique I read on another forum to cable tie the spanner to the shock absorber so the nut on the inside of the shock didn't spin when undoing the bolt.
I then fitted the side bump strips (after referring to the workshop manual to get the correct height measurement from the bottom edge of the door).
Gave the tailpipe a thorough polishing!
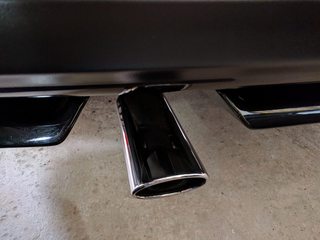

Along with the rest of the car!


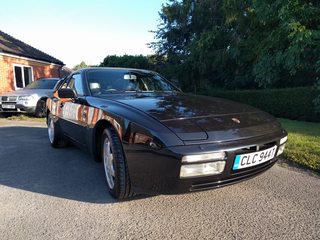


Outdoor pictures were taken just before heading off to the Shelsley Walsh Breakfast Club. I've been out since for some spirited drives and the car is running great at the moment.
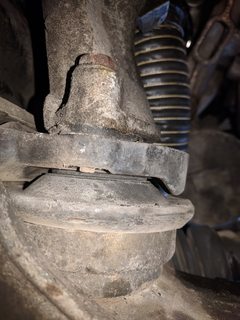
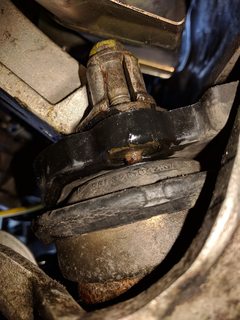
I have very slight play on the drivers side front wheel when held at 12 and 6 oclock, so need to investigate the cause of that but otherwise great!
Got the new Bilstein rear shock absorbers fitted (this was by far one of the easiest jobs on the whole car).
Used a little technique I read on another forum to cable tie the spanner to the shock absorber so the nut on the inside of the shock didn't spin when undoing the bolt.
I then fitted the side bump strips (after referring to the workshop manual to get the correct height measurement from the bottom edge of the door).
Gave the tailpipe a thorough polishing!
Along with the rest of the car!
Outdoor pictures were taken just before heading off to the Shelsley Walsh Breakfast Club. I've been out since for some spirited drives and the car is running great at the moment.
I have very slight play on the drivers side front wheel when held at 12 and 6 oclock, so need to investigate the cause of that but otherwise great!
The following 2 users liked this post by dlknight:
Dan Martinic (09-23-2019),
finally! (09-23-2019)
06-05-2020, 06:30 PM
#58
Instructor
Thread Starter
Been awhile 
Yesterday I fitted a new throttle cable and then spent several hours in the most uncomfortable position I could find trying to fathom why there was so much slack in the cable... In the end I worked out that the metal "stop" on the back of the pedal mechanism frame was slightly bent and allowing the pedal to return to a resting position further than it should. Managed to get a pair of channel lock pliers to fit on to it after removing the pedal arm completely and bend it back to shape. I was then able to adjust the new throttle cable with minimal slack :bounce: happy days finished the job by adjusting the throttle stop plastic bolt so that it will prevent cable stretch.
Also the protective nipple / cap on the end of the throttle cable is an absolute b**** to remove and reattach so you can slot the cable on to the inlet manifold bracket.
Today I set about investigating the cause of my exhaust fumes issue in the cabin - before anyone makes suggestions I've already done the following -
I tested the rear hatch seal using a piece of A4 paper at various points around the seal to make sure there was no significant gap when the hatch was closed, I also inspected the edge with a torch whilst the hatch was closed (you can see the seal compressed between the hatch and body). Noticed one small area above the exhaust wasn't compressed as well as the rest so massaged the seal slightly and re-checked fitment.
I then checked the gear stick gaiter and inner boot and found the inner boot has several holes so have ordered a new replacement in case the fumes are coming from the centre tunnel.
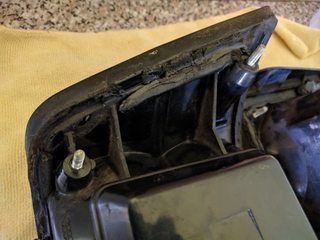
I then checked the fitment of the bonnet seal again using a piece of A4 paper to check for any significant gap between the bonnet and the seal.
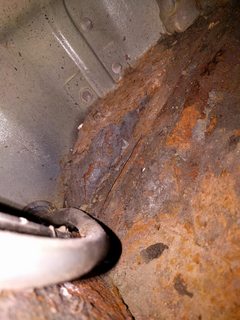
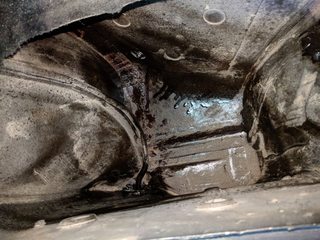
Then I grabbed my can of Dynax S50 anti-corrosion wax and gave both rear cubbies (battery removed) and the inside of both outer sills a good coating (something I've been meaning to do for ages).
The area under the battery tray is pretty grotty but I'm hoping it will hold up for now at least.

I've added checking / testing / bypass of the catalytic convertor to my list of jobs as I've noticed that the engine bay is very hot after going on a drive (coolant temps stay within the safe region) also wondering if the fumes could be symptoms of cat failure and getting intermittent power loss. That will be a job for the winter possibly as I can also get the following jobs done at the same time -
Yesterday I fitted a new throttle cable and then spent several hours in the most uncomfortable position I could find trying to fathom why there was so much slack in the cable... In the end I worked out that the metal "stop" on the back of the pedal mechanism frame was slightly bent and allowing the pedal to return to a resting position further than it should. Managed to get a pair of channel lock pliers to fit on to it after removing the pedal arm completely and bend it back to shape. I was then able to adjust the new throttle cable with minimal slack :bounce: happy days
finished the job by adjusting the throttle stop plastic bolt so that it will prevent cable stretch.Also the protective nipple / cap on the end of the throttle cable is an absolute b**** to remove and reattach so you can slot the cable on to the inlet manifold bracket.
Today I set about investigating the cause of my exhaust fumes issue in the cabin - before anyone makes suggestions I've already done the following -
- Replaced sunroof seals (genuine)
- Replaced rear hatch seal (ebay)
- Resealed tail-lights to body using neoprene gasket
- New hatch lock seal
- Sealed holes in rear cubbies and wheel well with correct grommets
- Sealed any other holes (number plate screws) with gaffer tape
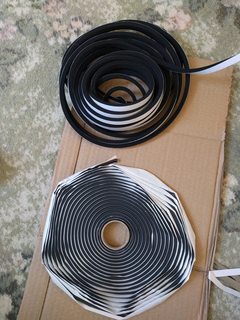
- Replaced bonnet seal (genuine)
I tested the rear hatch seal using a piece of A4 paper at various points around the seal to make sure there was no significant gap when the hatch was closed, I also inspected the edge with a torch whilst the hatch was closed (you can see the seal compressed between the hatch and body). Noticed one small area above the exhaust wasn't compressed as well as the rest so massaged the seal slightly and re-checked fitment.
I then checked the gear stick gaiter and inner boot and found the inner boot has several holes so have ordered a new replacement in case the fumes are coming from the centre tunnel.
I then checked the fitment of the bonnet seal again using a piece of A4 paper to check for any significant gap between the bonnet and the seal.
Then I grabbed my can of Dynax S50 anti-corrosion wax and gave both rear cubbies (battery removed) and the inside of both outer sills a good coating (something I've been meaning to do for ages).
The area under the battery tray is pretty grotty but I'm hoping it will hold up for now at least.
I've added checking / testing / bypass of the catalytic convertor to my list of jobs as I've noticed that the engine bay is very hot after going on a drive (coolant temps stay within the safe region) also wondering if the fumes could be symptoms of cat failure and getting intermittent power loss. That will be a job for the winter possibly as I can also get the following jobs done at the same time -
- Injectors cleaned
- Turbo reconditioned / replaced
06-05-2020, 08:37 PM
#59
Drifting
I will bet that your fumes are from a leaky header. The seal between the hood and HVAC area is supposed to keep the fumes out. If you drive with windows open, no seal there lol
07-24-2020, 05:12 AM
#60
Instructor
Thread Starter