When you click on links to various merchants on this site and make a purchase, this can result in this site earning a commission. Affiliate programs and affiliations include, but are not limited to, the eBay Partner Network.
Golf tees is the classic vacuum line plug solution, I usually put a bit of silicone sealer on it to assure a good seal. Then the zip tie would be belt/suspenders/safety pin security I guess.
The valve to the sound symposer only opens when you press the exhaust button. I have the valve controller, and this is the data I recorded revving out the car to 8k on each setting
Exhaust button on, valve controller disabled: 96DB
Exhaust button on, valve controller enabled: 96 DB
Just turn the exhaust valve off, and the sound symposer is disabled. If the symposer plugged is quieter than just keeping the exhaust button closed, it'll probably be marginal.
Originally Posted by dnimi123
I have the CG valve controller. I ll test this and see. Thx. I still wouldnt mind going back in to the engine bay at some point and unplugging the thing as well...
@dnimi123 Did you testing confirm GeaTeaTrea's finding with the CG valve controller ?
The OE manufacturer for the components has been unresponsive sad to say, we keep pinging them but we are but small fish apparently. So, we're thinking about putting together a little assortment pack together with what is readily available out there on the market, with some feedback from you guys of course.
Here are my thoughts, and did you guys that have done it already find anything else you'd like to be a part of it?
Two 1 - 1/8" Expansion Plugs
Two Vacuum Line Plugs (or a Golf Tee haha)
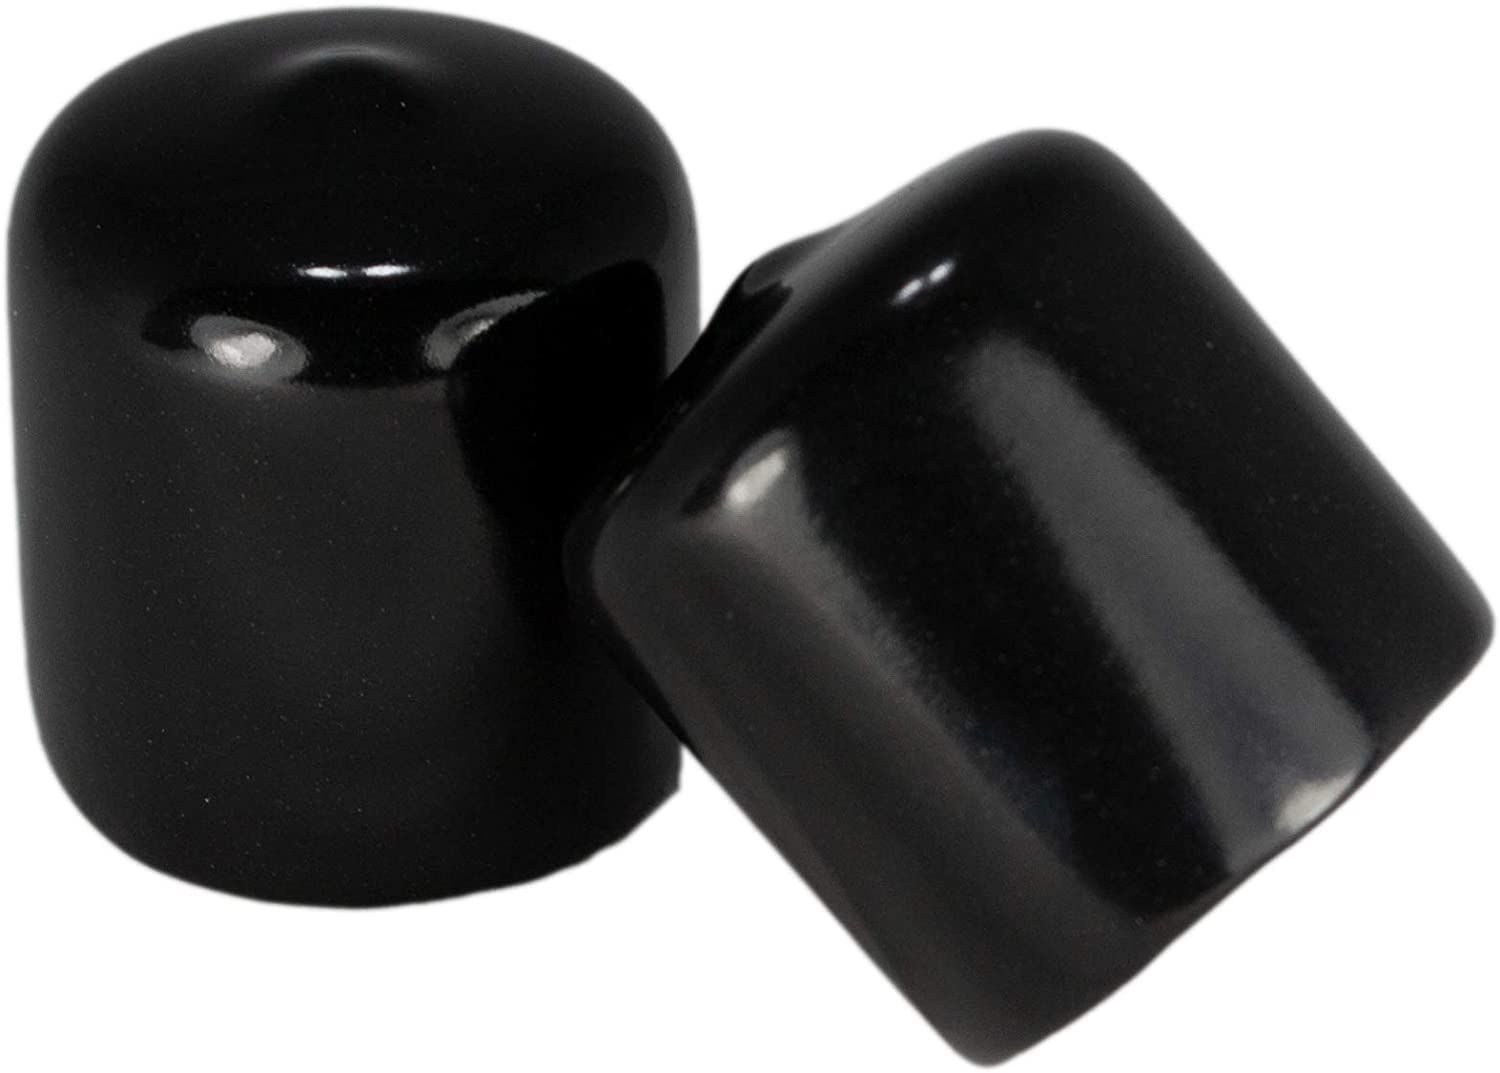
Two Vacuum Caps
Also, what do you guys think of using a rubber end cap either by itself or after installing the expansion plugs? I haven't measured the OD of the fittings that the vacuum plugs typically go in, but should be something we can buy an assortment of for people to try out with the rest of the kit.
Regards,
John Gaydos
__________________ SOUL PERFORMANCE PRODUCTS Quality Exhaust Solutions, Fair Pricing, and Outstanding Service
John Gaydos- Owner, Performance Specialist
Cell - (484) 883-6197 johng@soulpp.com
It's always great to have someone do the leg work and compile those inexpensive parts that can be hard to track down. I mean, I would pay a few dollars extra for that service. I'd also love to see a summary of the various options. I know it's in this thread, but perhaps putting the summary in the first or second post and keep it updated. Something like:
There are 3 ways you can disable your Interior Sound Symposer:
1) remove and plug vacuum line. That's all.
2) fuse removal (**was that an option or was that from another model, I forget)
3) remove and plug the sound tube
a) this can be done in a few ways, yada yada
4) A combination if the above.
Something like the above. You get the idea. And then you can say: "Our $20 kit contains the plus and instructions to do all of the above." (With Dynomat being optional and not included.)
The OE manufacturer for the components has been unresponsive sad to say, we keep pinging them but we are but small fish apparently. So, we're thinking about putting together a little assortment pack together with what is readily available out there on the market, with some feedback from you guys of course.
Here are my thoughts, and did you guys that have done it already find anything else you'd like to be a part of it?
Two 1 - 1/8" Expansion Plugs
Two Vacuum Line Plugs (or a Golf Tee haha)
Two Vacuum Caps
Also, what do you guys think of using a rubber end cap either by itself or after installing the expansion plugs? I haven't measured the OD of the fittings that the vacuum plugs typically go in, but should be something we can buy an assortment of for people to try out with the rest of the kit.
Regards,
John Gaydos
A few comments...
I only used one vacuum plug and found that the neoprene mounting tab from my CTEK charger (packaging box) was perfect with the bulge in the middle offering the perfect seal and even had a nice top on it to seal the deal!
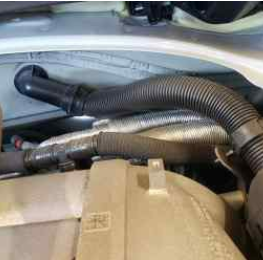
The 1-1-1/8" expanding plugs worked like a charm fore sealing the firewall opening and the opening to the intake plenum, as for the dust plugs you have pictured, probably not necessary but may keep the connections where the expansion plugs are clean for future re-assembly if required.
It's always great to have someone do the leg work and compile those inexpensive parts that can be hard to track down. I mean, I would pay a few dollars extra for that service. I'd also love to see a summary of the various options. I know it's in this thread, but perhaps putting the summary in the first or second post and keep it updated. Something like:
There are 3 ways you can disable your Interior Sound Symposer:
1) remove and plug vacuum line. That's all.
2) fuse removal (**was that an option or was that from another model, I forget)
3) remove and plug the sound tube
a) this can be done in a few ways, yada yada
4) A combination if the above.
Something like the above. You get the idea. And then you can say: "Our $20 kit contains the plus and instructions to do all of the above." (With Dynomat being optional and not included.)
Did I oversimplify it? Miss much?
I second this suggestion^
Thanks John Gaydos for chasing this. I�m looking forward to this modification and associated improvements.
I only used one vacuum plug and found that the neoprene mounting tab from my CTEK charger (packaging box) was perfect with the bulge in the middle offering the perfect seal and even had a nice top on it to seal the deal!
The 1-1-1/8" expanding plugs worked like a charm fore sealing the firewall opening and the opening to the intake plenum, as for the dust plugs you have pictured, probably not necessary but may keep the connections where the expansion plugs are clean for future re-assembly if required.
We only used one vacuum plug and cap as well, but boy are those buggers tiny and hard to find if you drop one in an engine bay haha. They're inexpensive, might as well include a spare just in case. Thanks for the insight on the other bits!
OK, I will skip the part where you have to gain open access to the engine compartment...
Hello,
What is the size of the hole between the engine area and the driving cabin? 1��?
My goal would be to install a flat rubber lip gasket to pass the Cargraphic controller valve antenna through.
Thanks.
What is the size of the hole between the engine area and the driving cabin? 1��?
My goal would be to install a flat rubber lip gasket to pass the Cargraphic controller valve antenna through.
Thanks.
One of the other RL members might have this information, I know that at least one removed the plastic fitting that goes through the metal firewall pictured above, I didn't do that. In my process I left that fitting and installed the 1" expanding plug to see the plastic right-angled tube without removing it.
Regarding the CG antenna, most of us have in the trunk area and thus far I haven't heard of issues with the remote control either with the included remote or for those of us who programmed it to the Homelink buttons.
Additionally, I just had a thought, the CG controller could be mounted in the cabin and the control harness passed through the firewall opening... hmmmm
Additionally, I just had a thought, the CG controller could be mounted in the cabin and the control harness passed through the firewall opening... hmmmm


 07-30-2021, 10:42 AM


")
 !!
!!