When you click on links to various merchants on this site and make a purchase, this can result in this site earning a commission. Affiliate programs and affiliations include, but are not limited to, the eBay Partner Network.
The 12V lithium (LFP) starter battery’s failures are well documented on this forum. ABL Auto Parts (Rennlist user @kingstone ) recently developed a kit to convert the troublesome lithium battery to the time-proven AGM battery. He posted the development process here: https://rennlist.com/forums/cayenne-...-solution.html
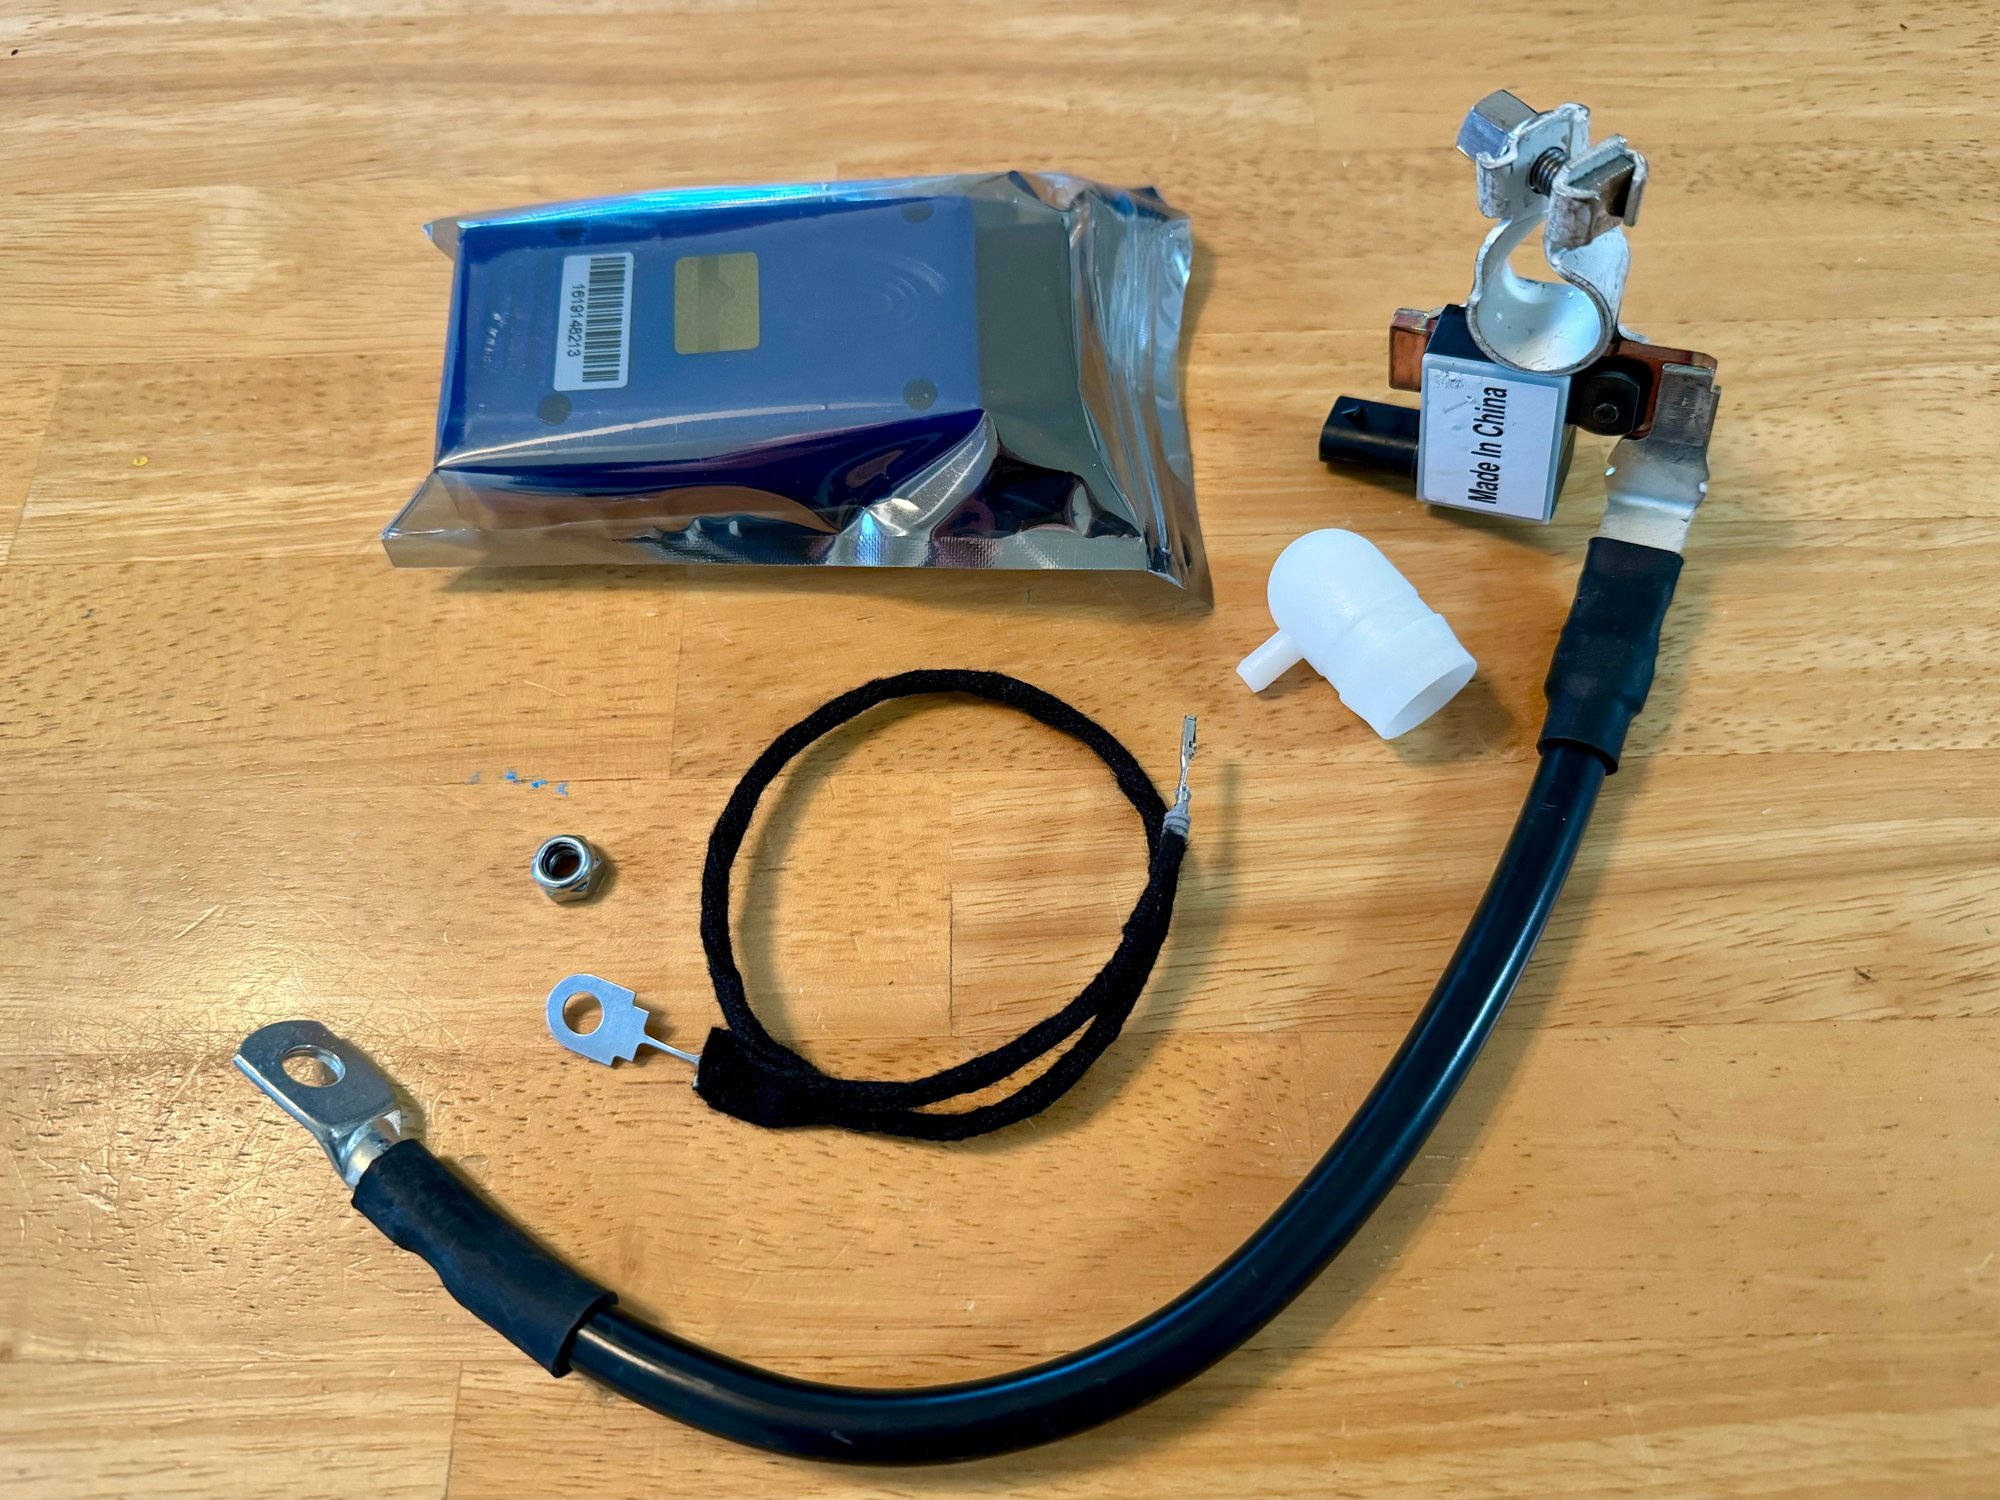
The kit includes all the parts and a coding dongle needed for the conversion. Kit available for $459 here: https://www.allbuylow-autoparts.com
Note: You supply the AGM battery. You’ll need a type H8 AGM battery rated for 92 Ah or more. I purchased an Everstart Platinum AGM at Walmart for $179. It is manufactured by Johnson Controls, the same folks who manufacture Varta batteries for Porsche. This battery is essentially the same as the OEM battery installed in 2024 Cayennes.
One could argue that the Varta has a “special sauce” that makes it better than the Everstart. I don’t really care. It’s a 92Ah AGM battery with a 4 year warranty that I can replace at any of the thousands of Walmarts around the country for 179 bucks. https://www.walmart.com/ip/EverStart...50-RC/40647529
Anyone that can handle a wrench and a socket set can install this kit. I took several hours spread out over a few days working with tech support to figure out the installation. With the lessons learned, I could do it in about an hour now. My pain is your gain. Since this tutorial is geared for a novice, I’ll get down in the weeds with the instructions.
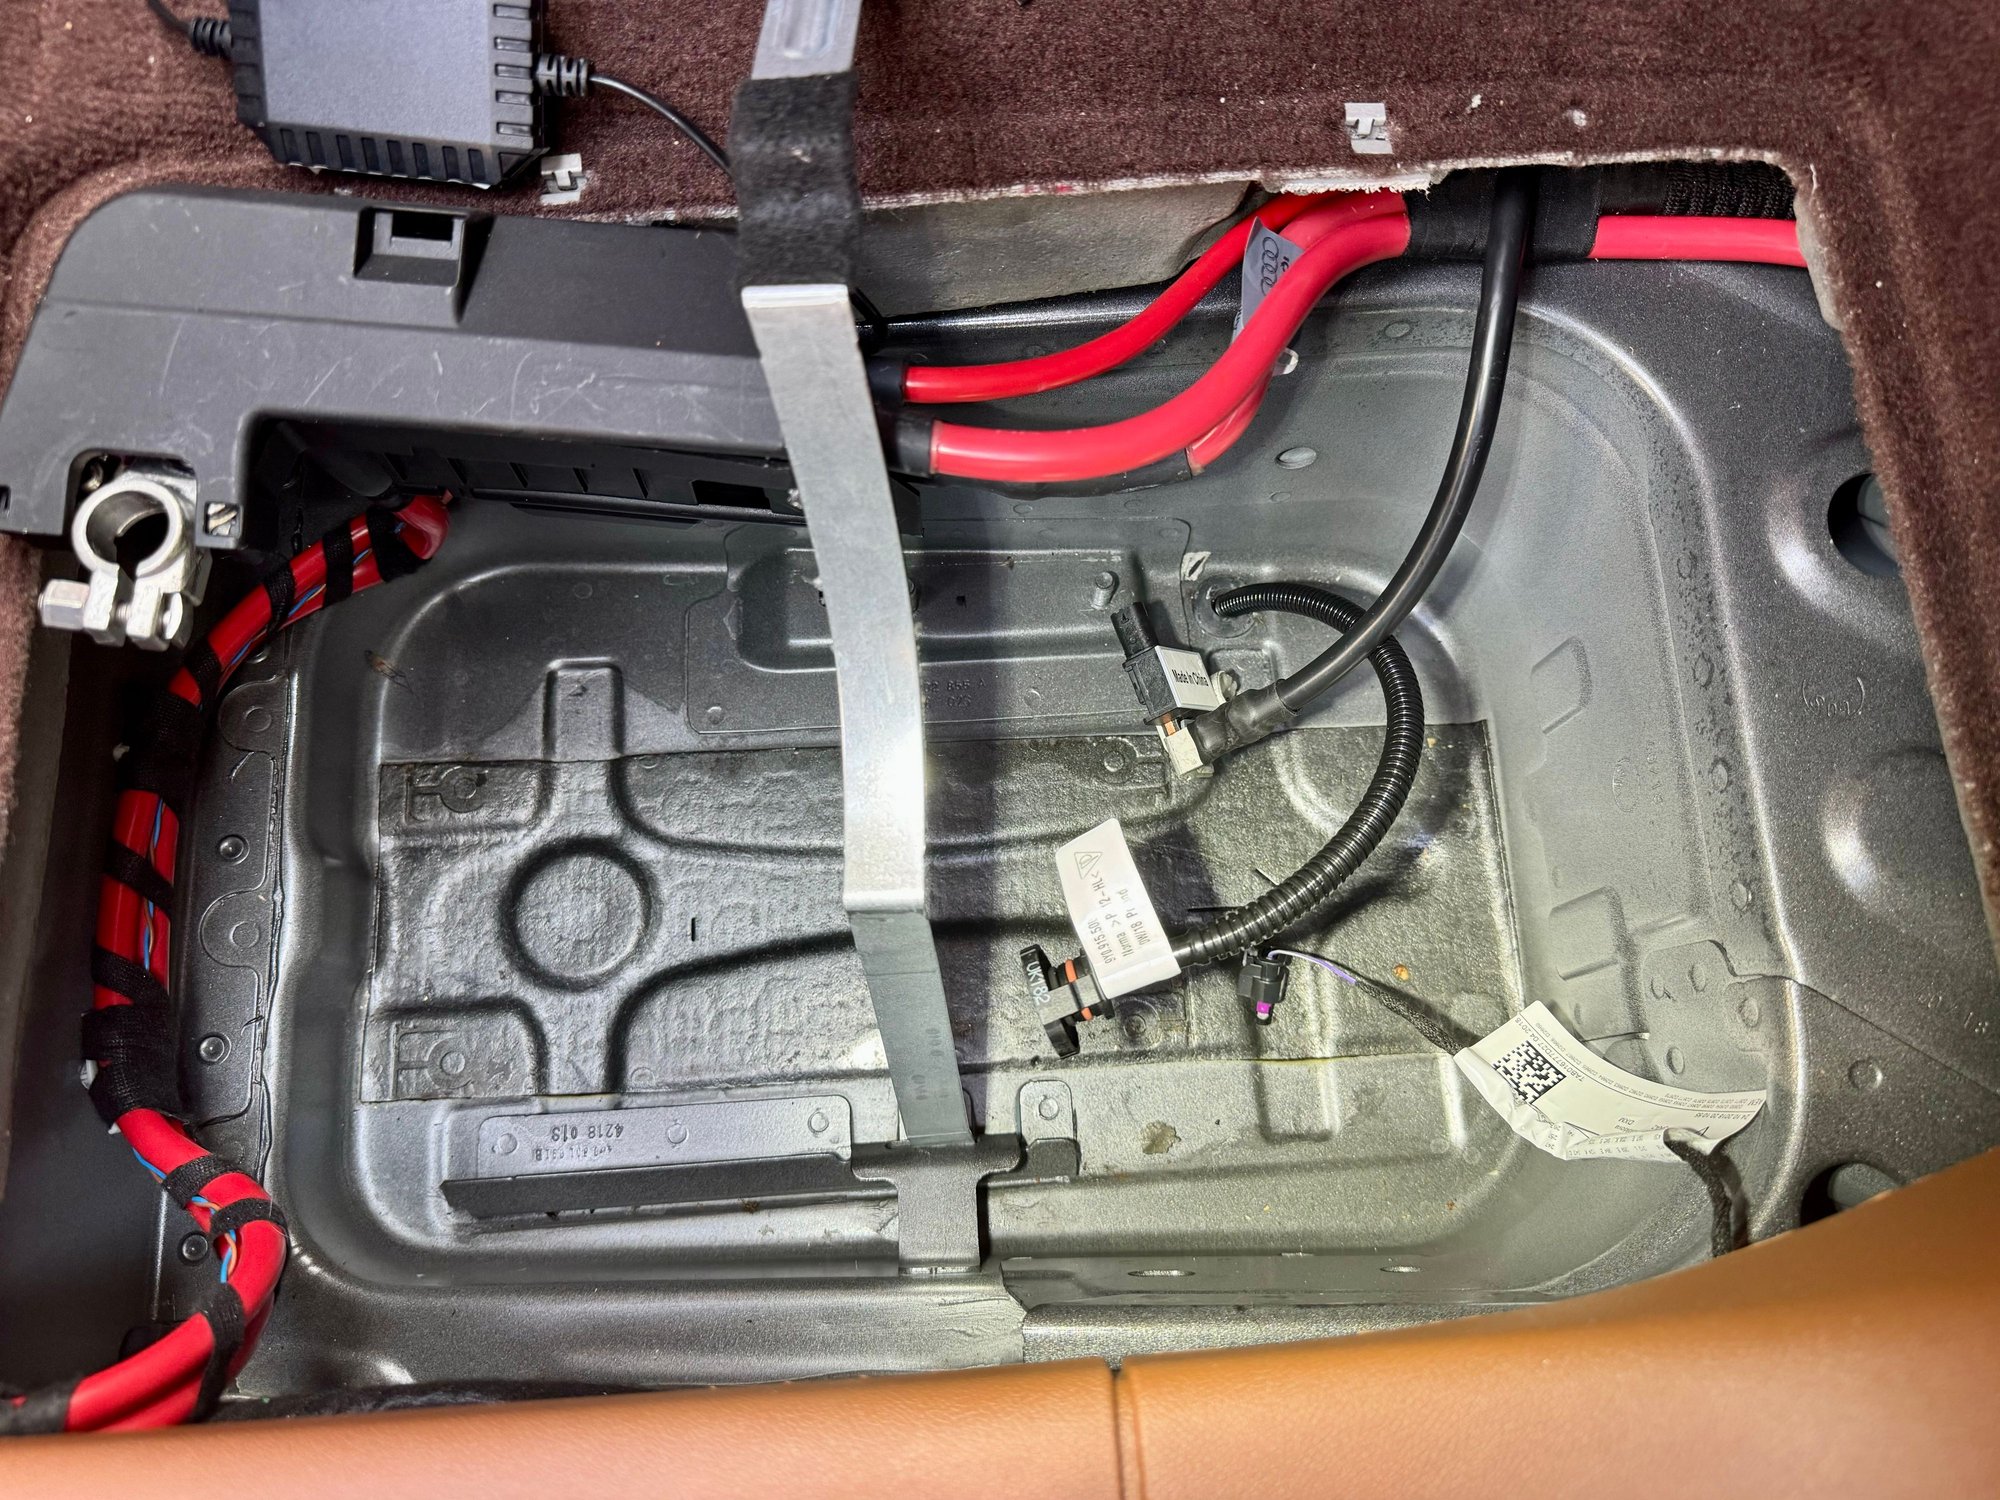
First, access the battery compartment. It is located under the passenger floor. (I told you it was for novices!)
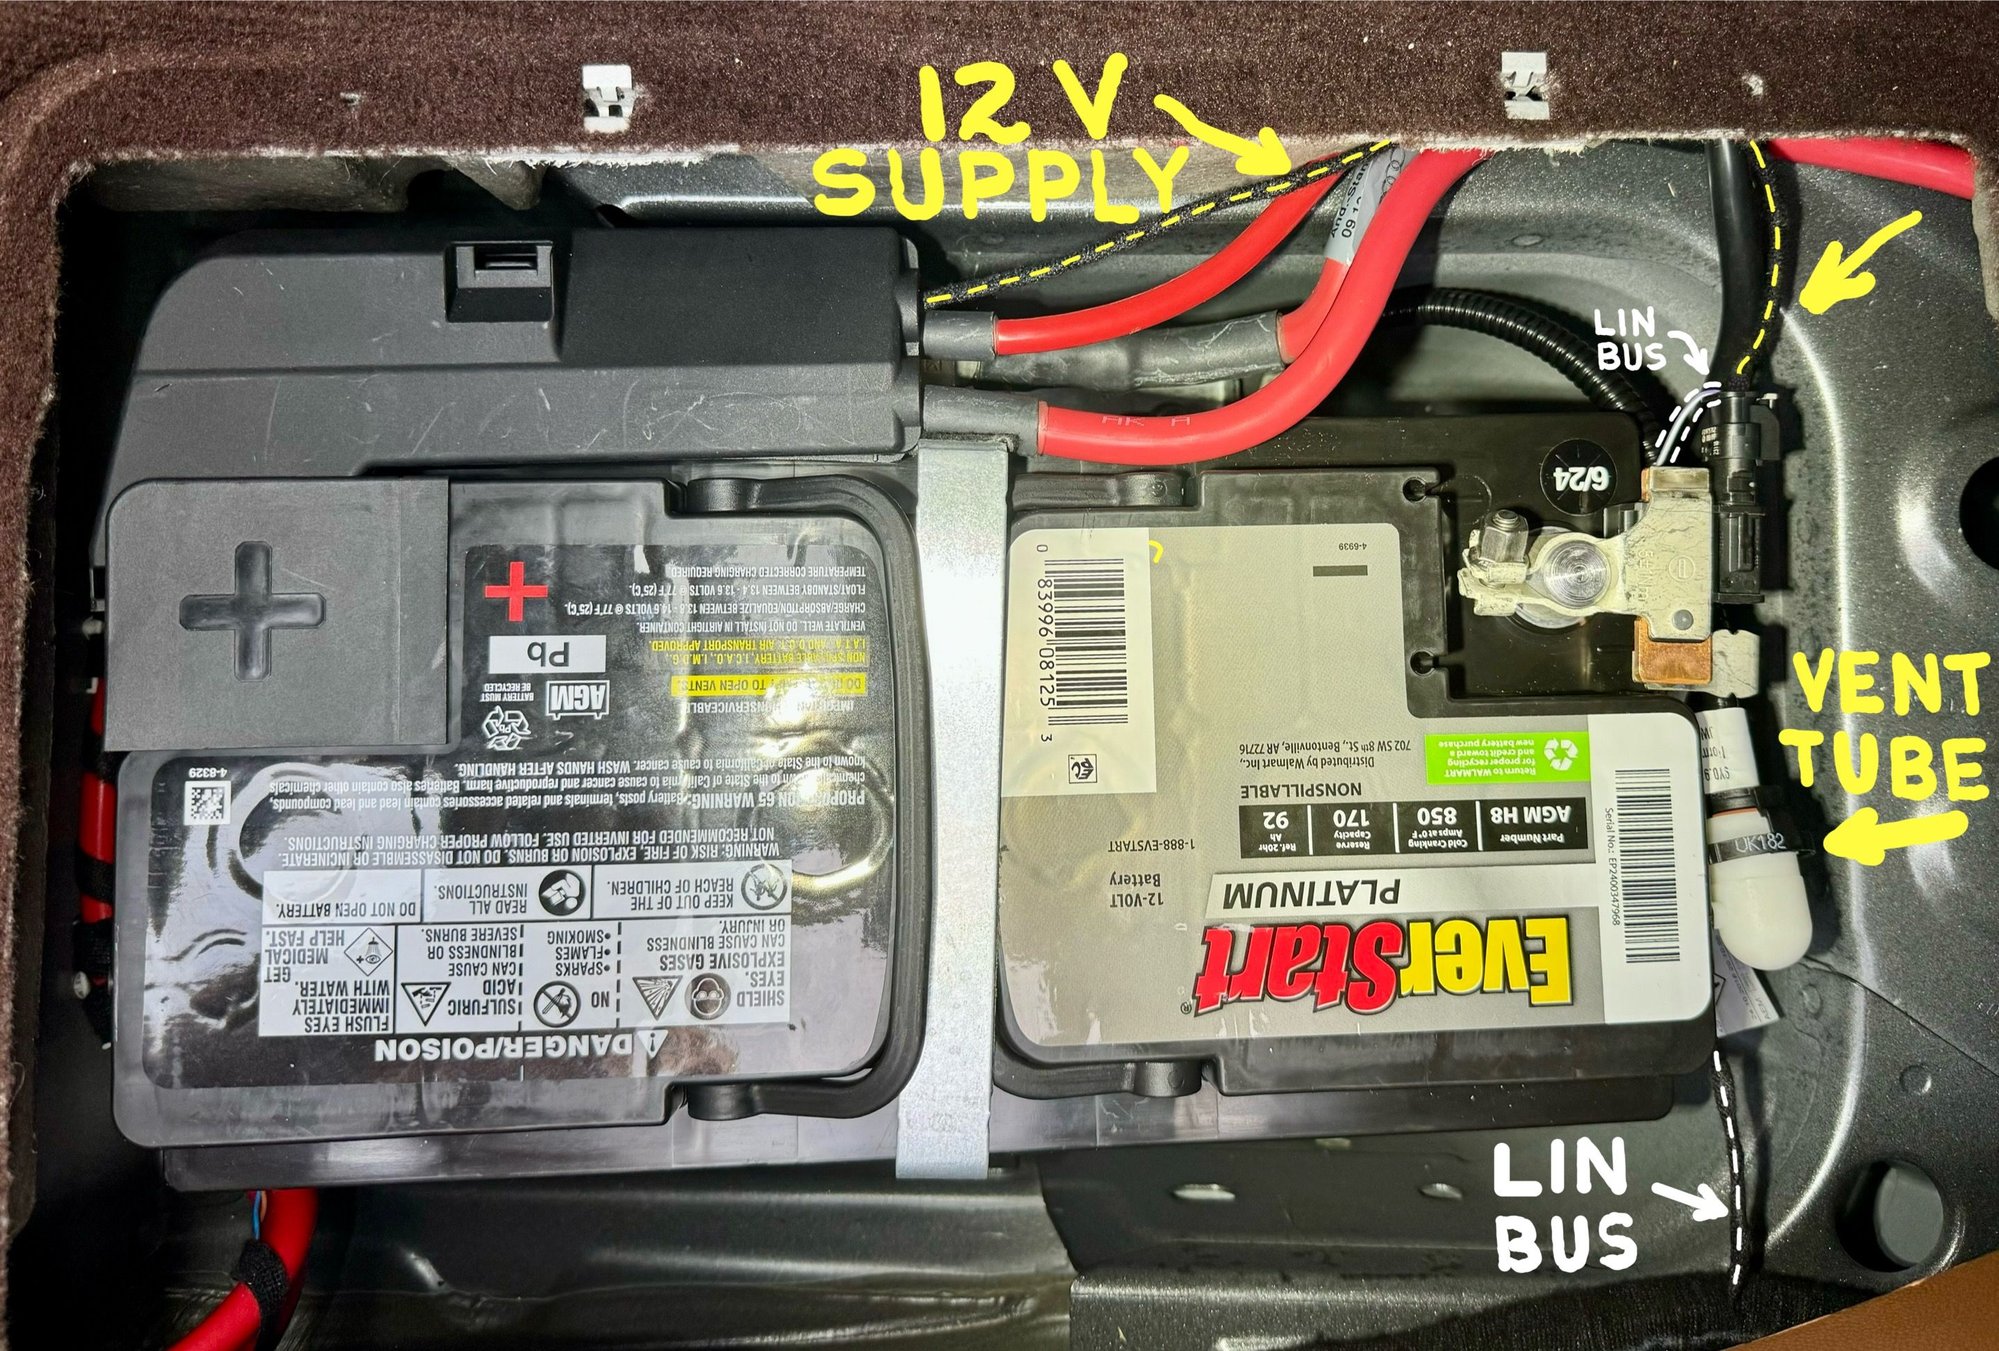
And there it is! I marked a few of the components we’ll be dealing with:
The first step is to disconnect the negative cable from the battery terminal. That renders the battery safe from short circuits. Use a 10mm wrench on the nut.
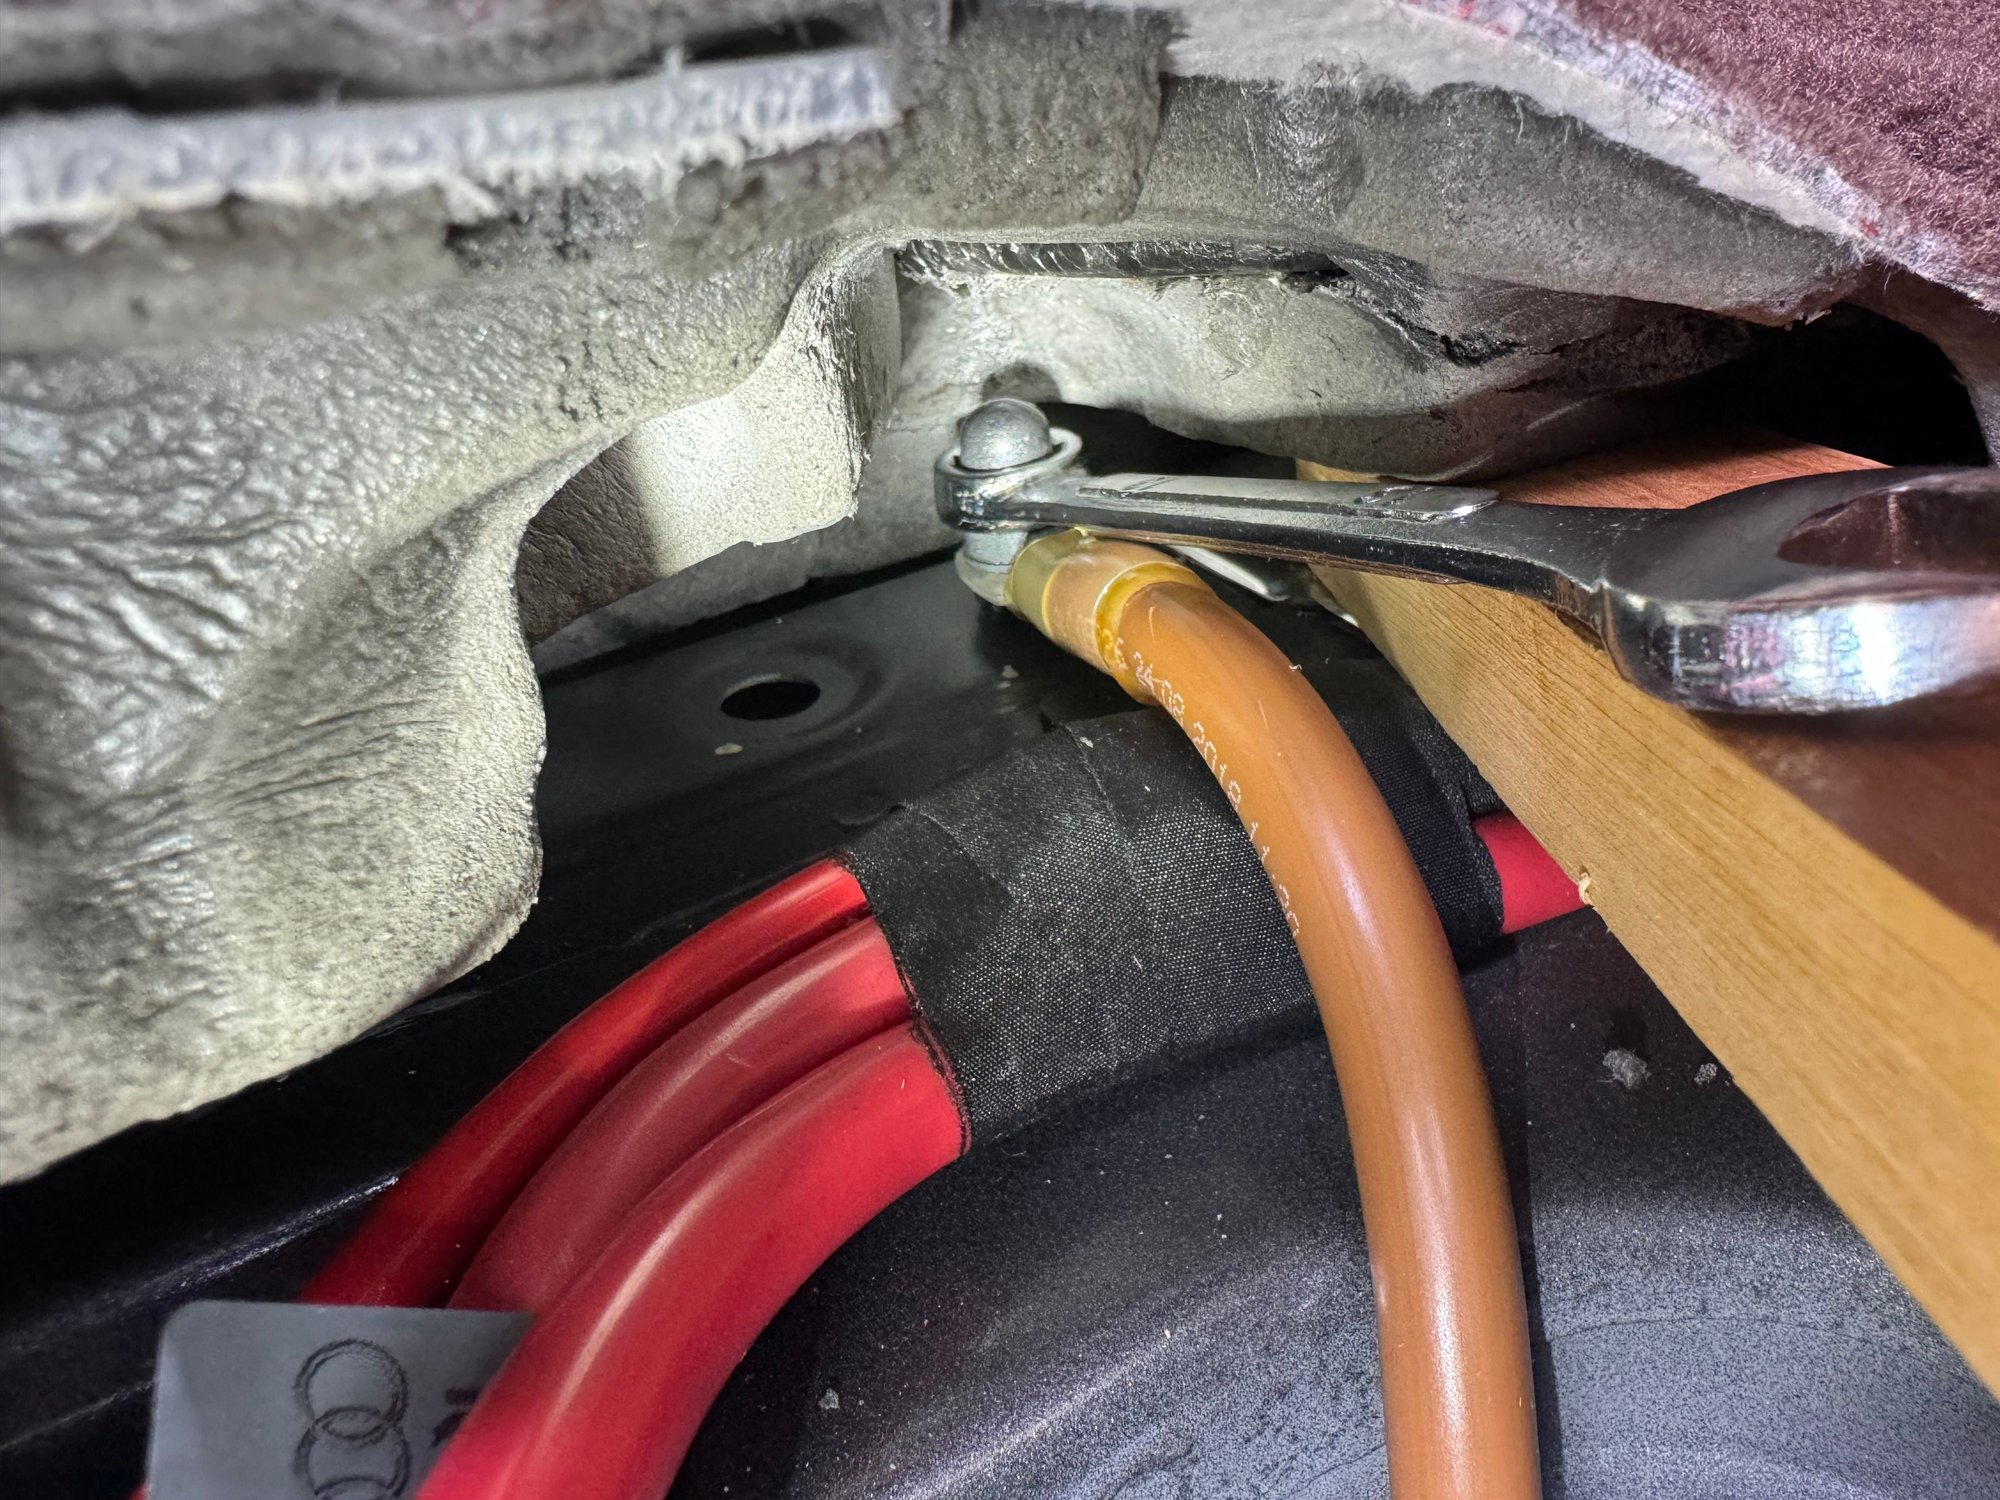
Next, remove the negative cable. This was my first obstacle. The cable disappears under the carpet. Where is the cable connection? How do I remove the carpet? Good news. I found that I could just lift up the carpet to expose the negative cable connection — it is within reach of a box wrench.
I propped up the carpet with an old piece of 1 x 2 and a torpedo level. Anything similar should work just fine. Be sure to space the props far enough from each other to give your wrench adequate turning room.
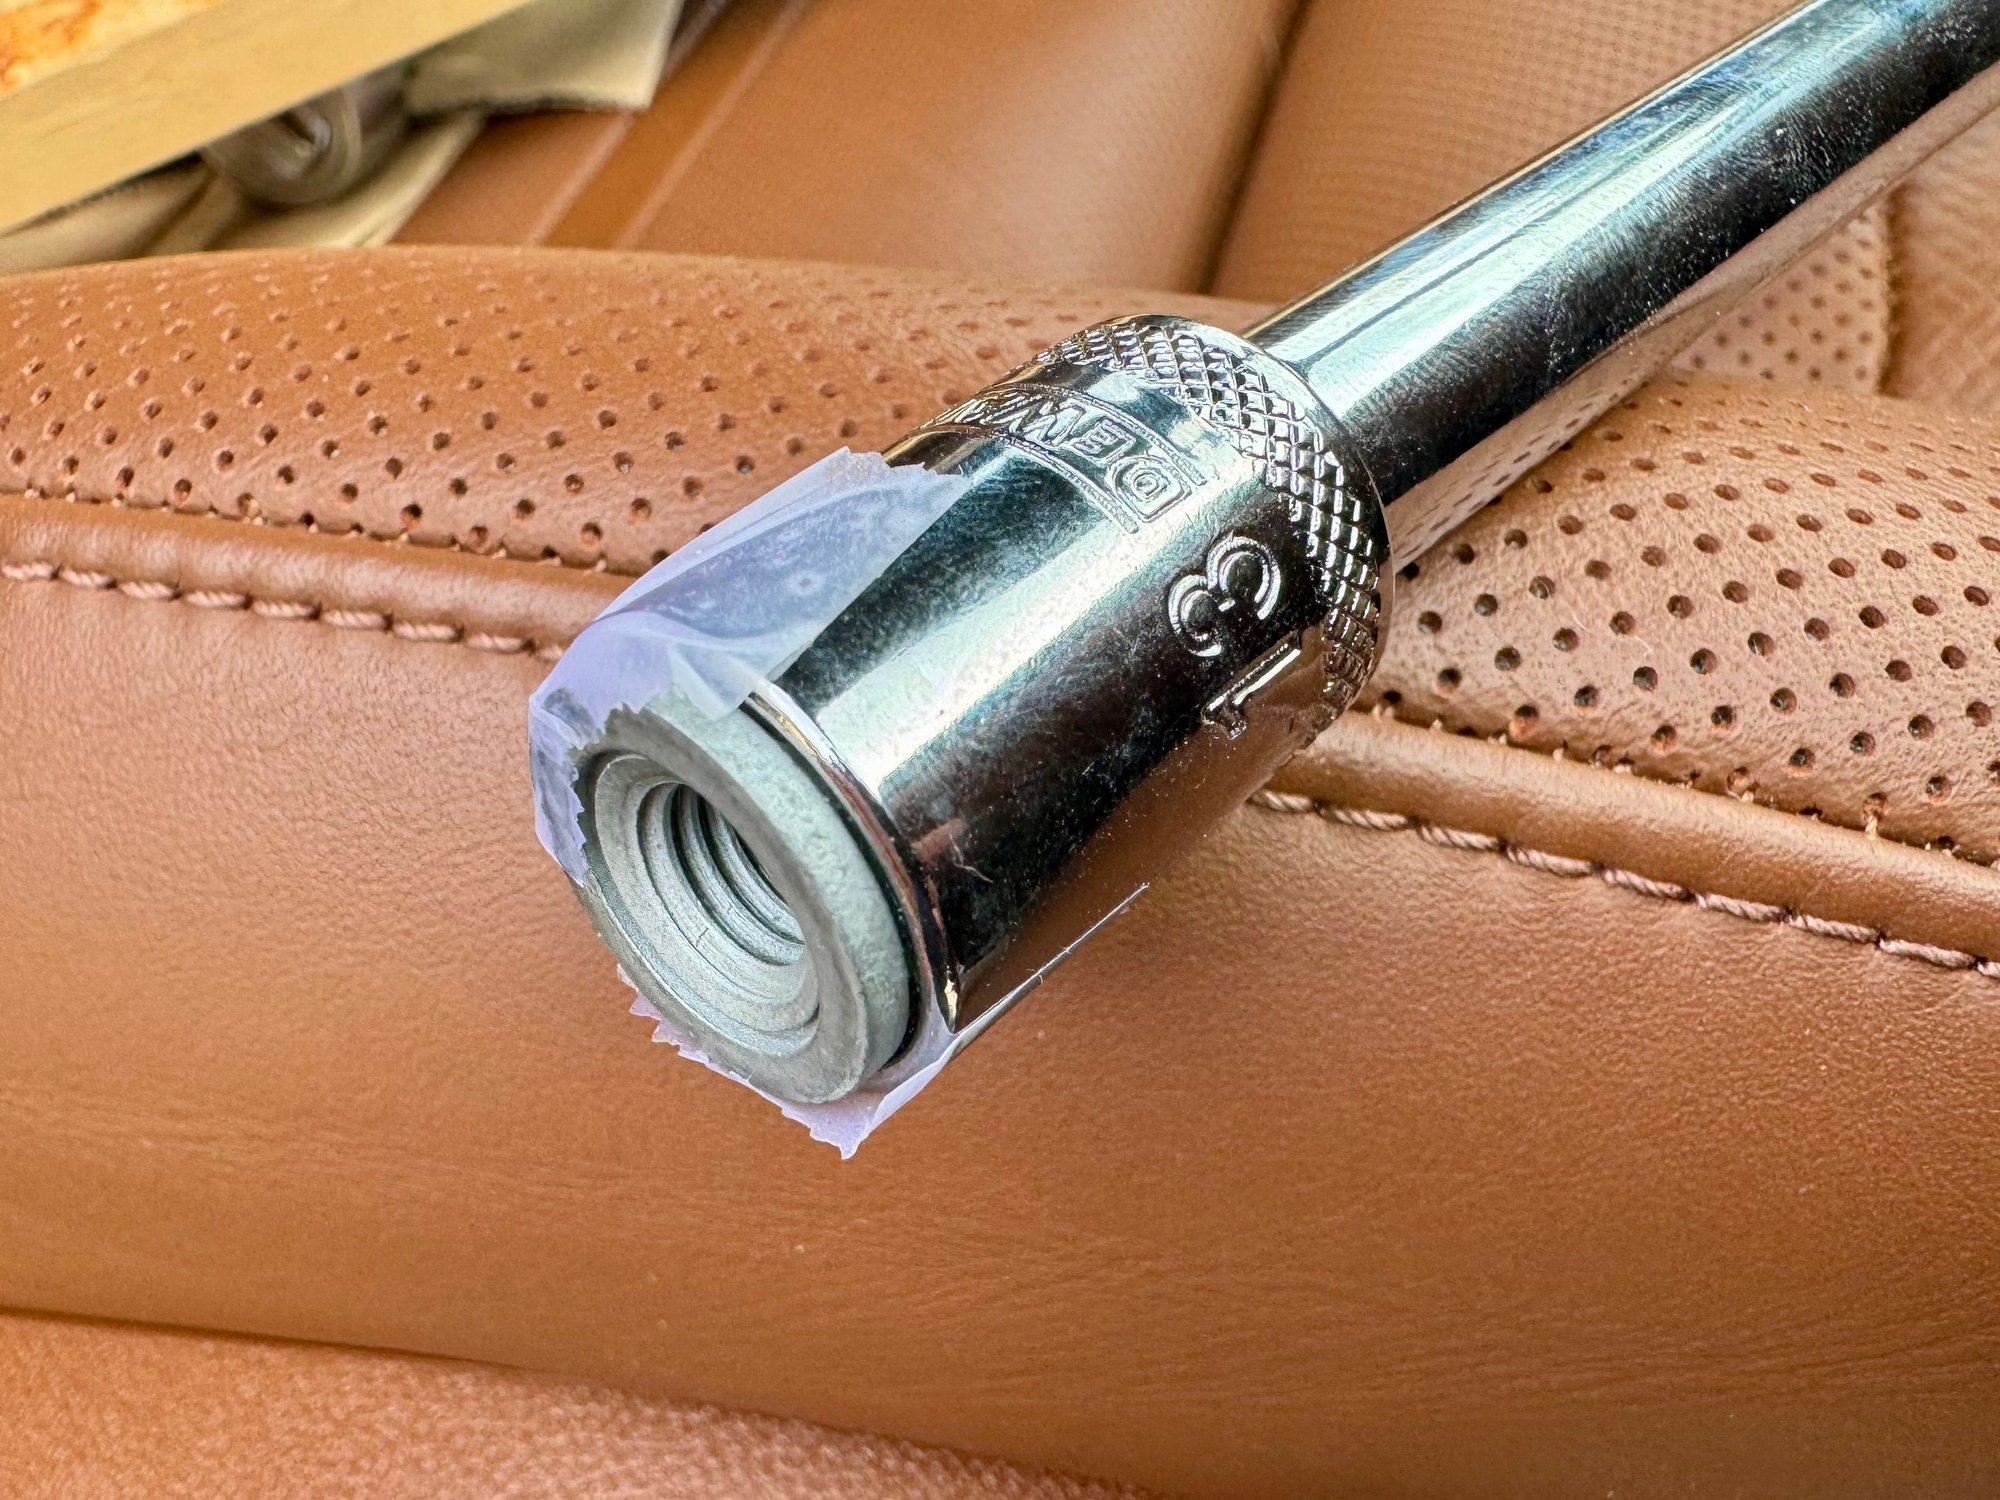
Remove the acorn nut using a 13mm box wrench. A ratcheting box wrench would have made the job much easier.
Install the negative cable supplied with the kit.
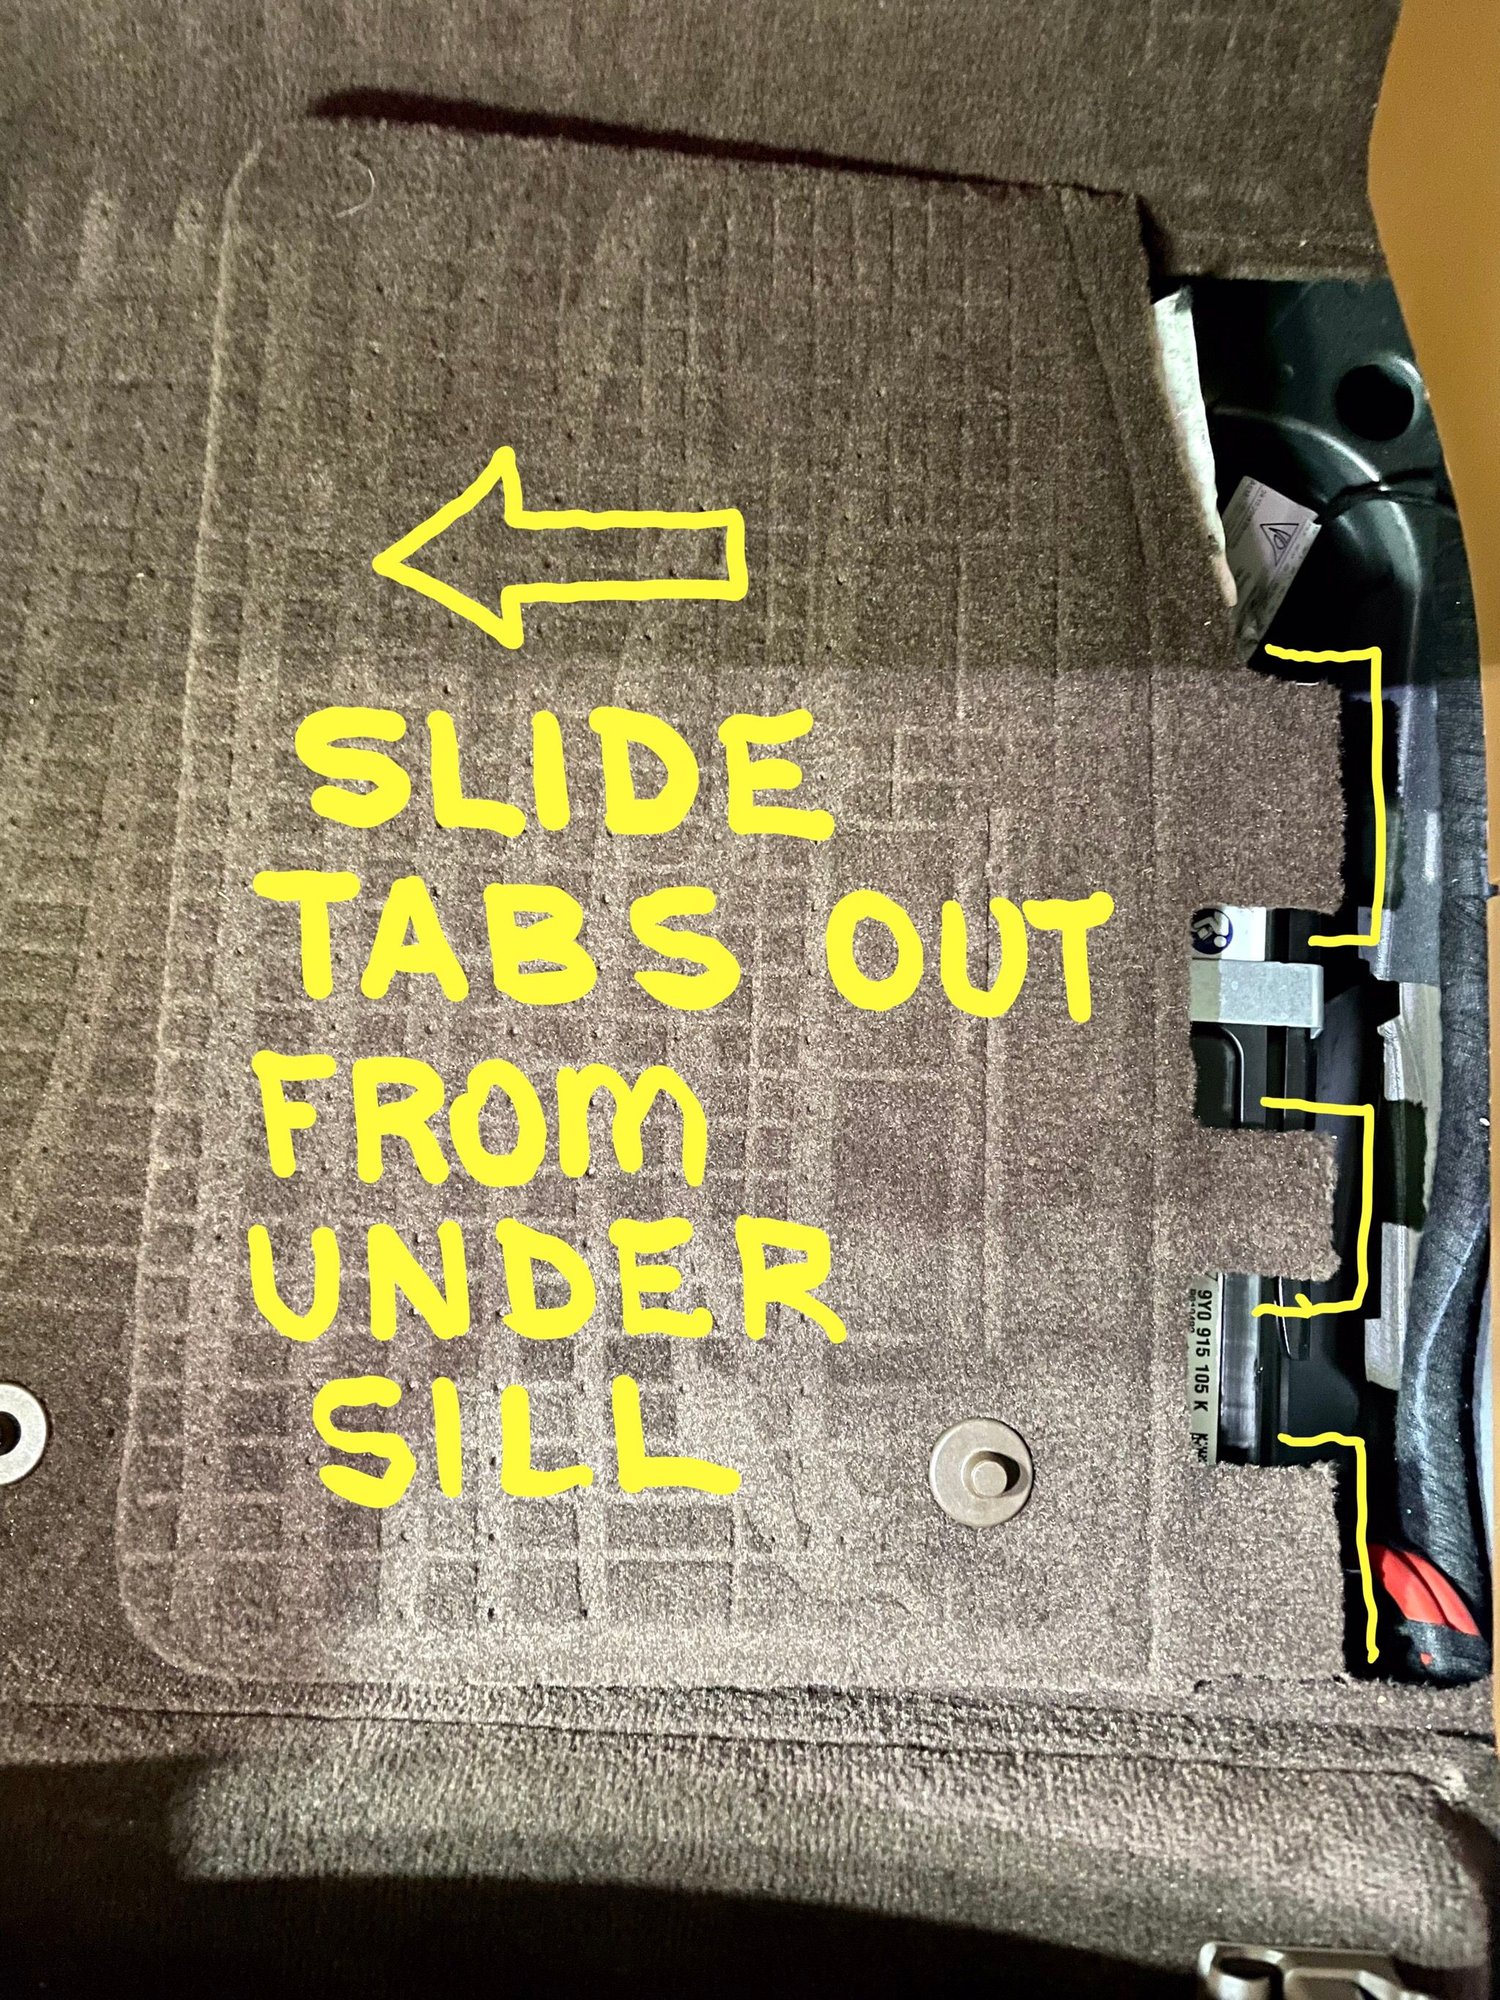
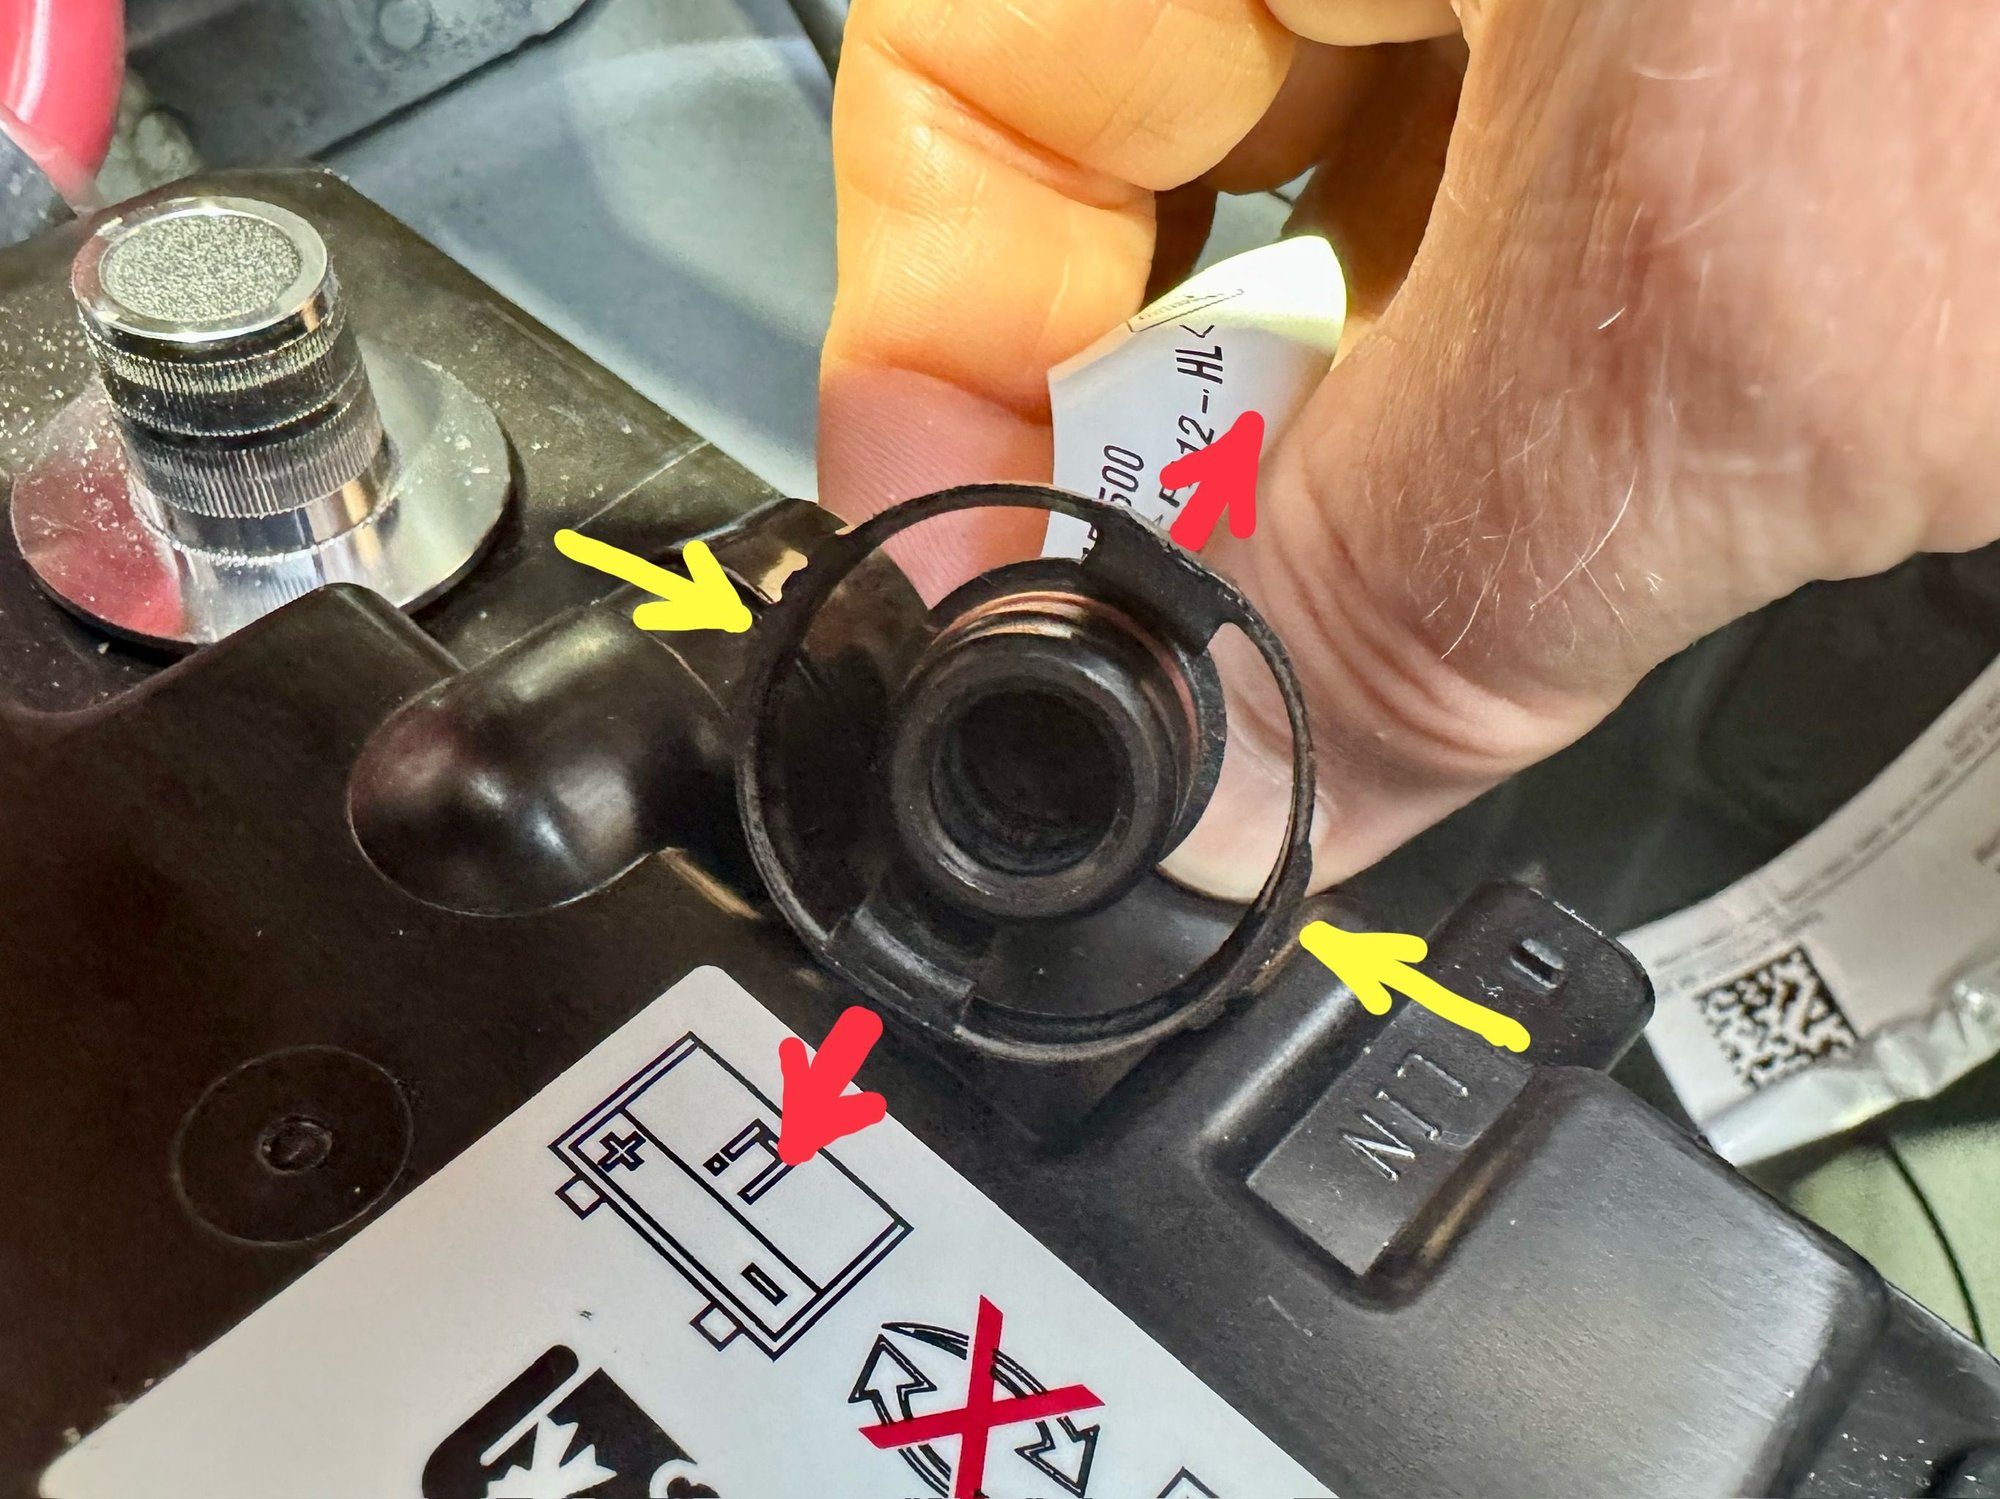
Next, start disconnecting components from the battery. The LIN connector has a locking tab (outlined). Slide the tab as depicted below, then pull the connector off the battery.
Remove the vent line by squeezing the ring around the connector as depicted to release the locking tabs. Pull the connector off the battery.
Squeezing at the yellow arrows causes the locking tabs to retract (red arrows).
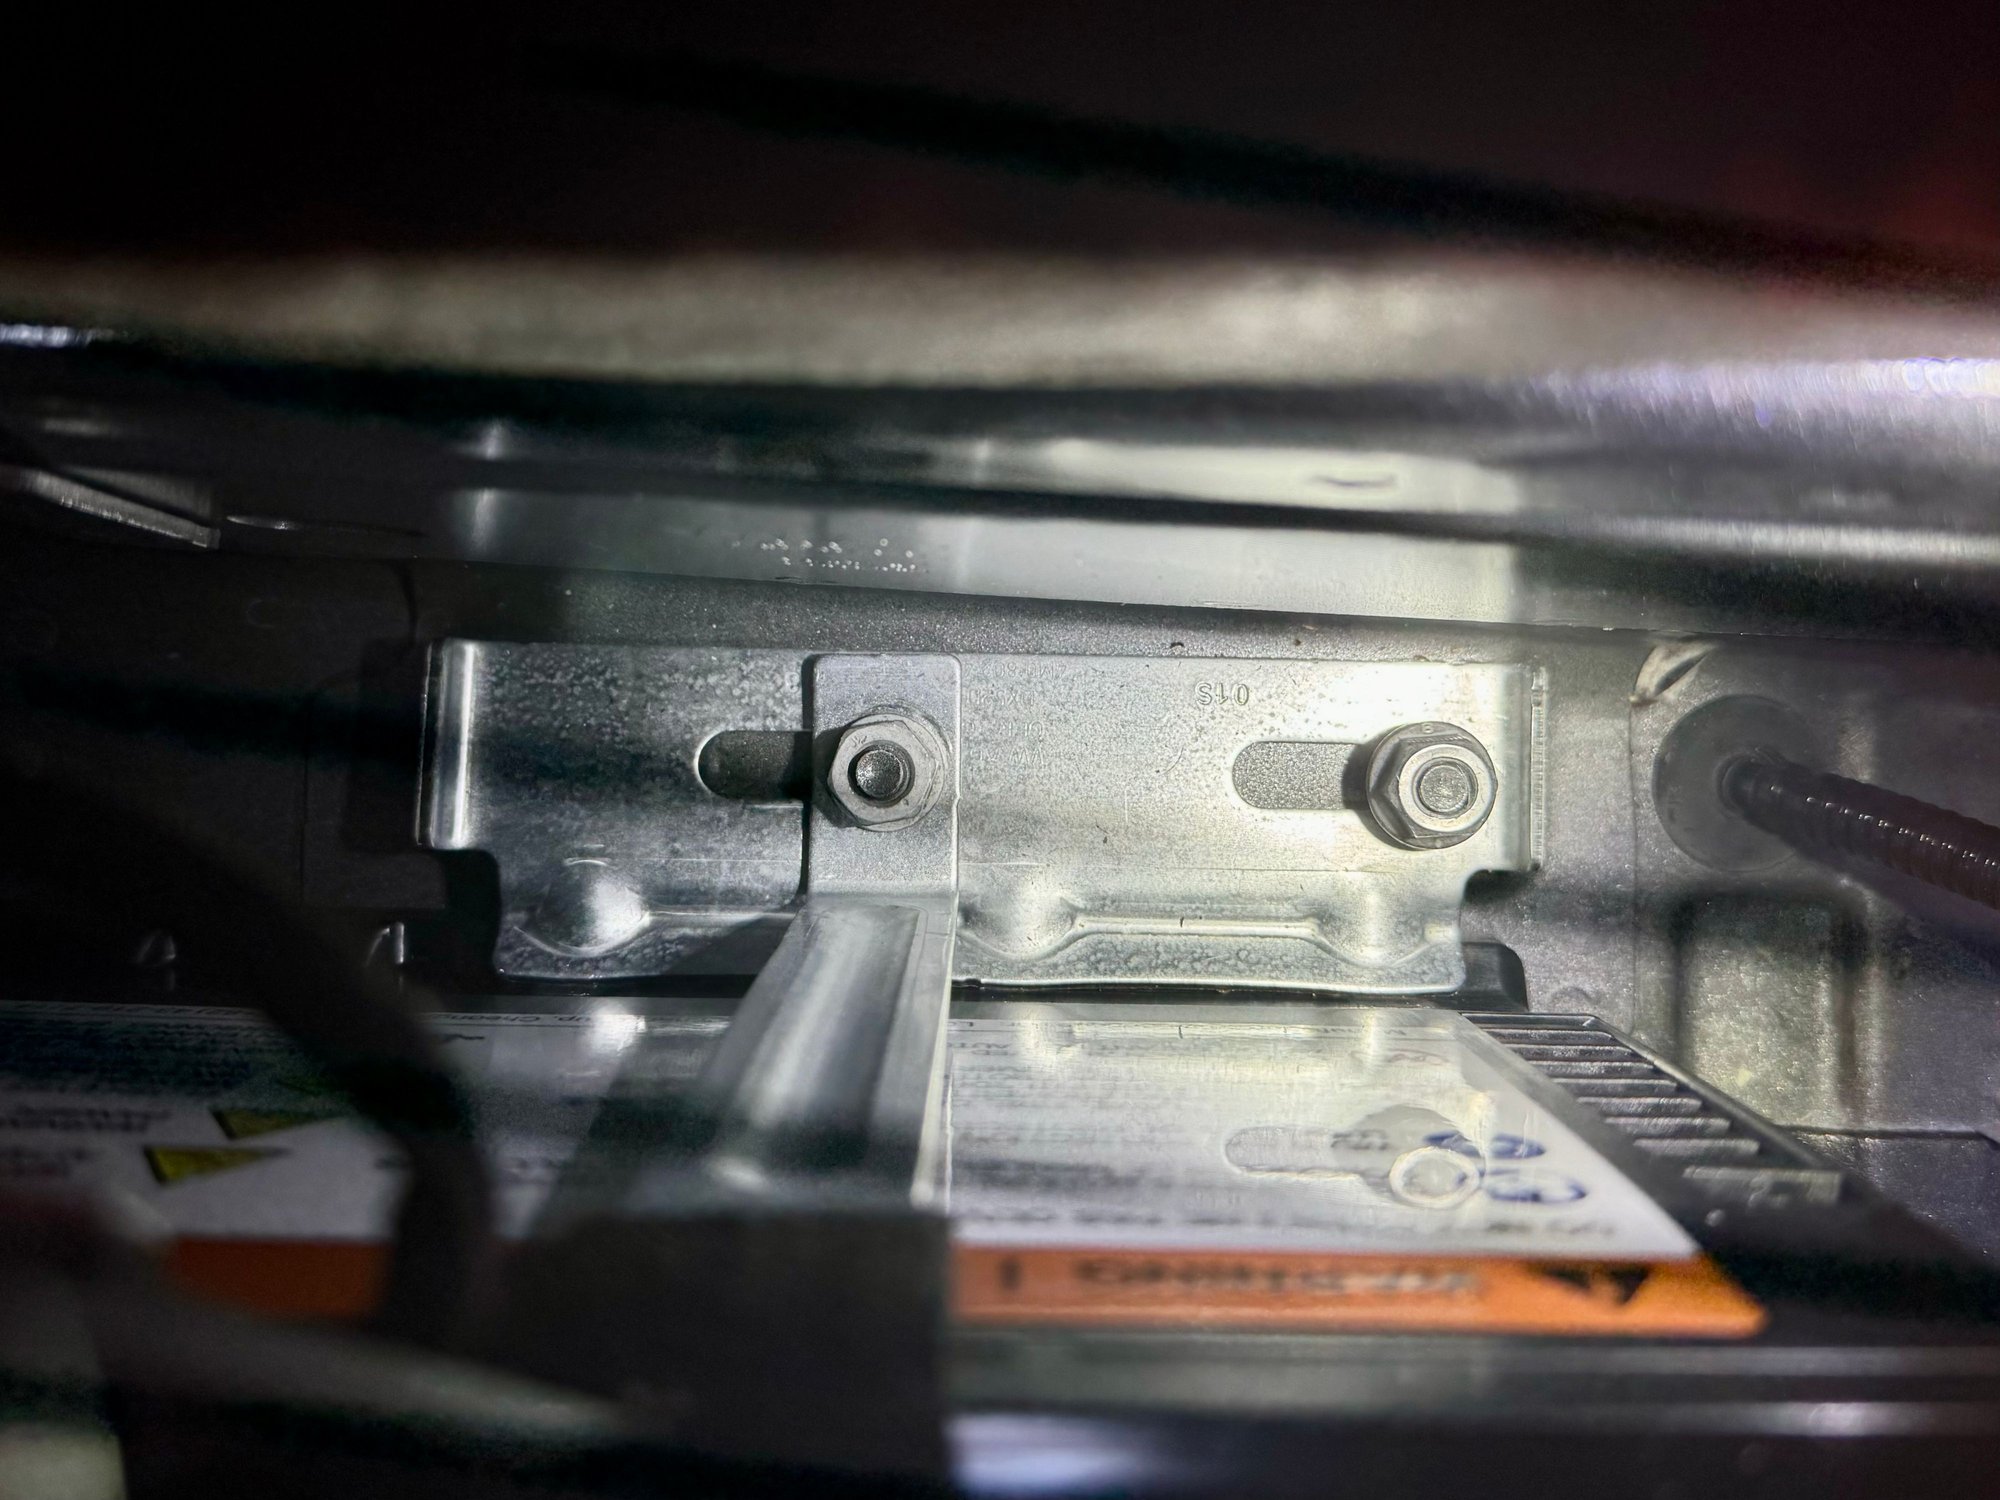
Remove the positive cable using a 10mm wrench on the nut. Move the cable aside so as to allow access to the hold-down clamp nuts. Remove the nuts using a 13mm socket and a 10” extension. Note that the nut on the left (aft in relation to the vehicle front) also secures the hold-down strap. Remove the clamp and pull back the hold-down strap. Remove the battery.
Your battery compartment should look something like this:
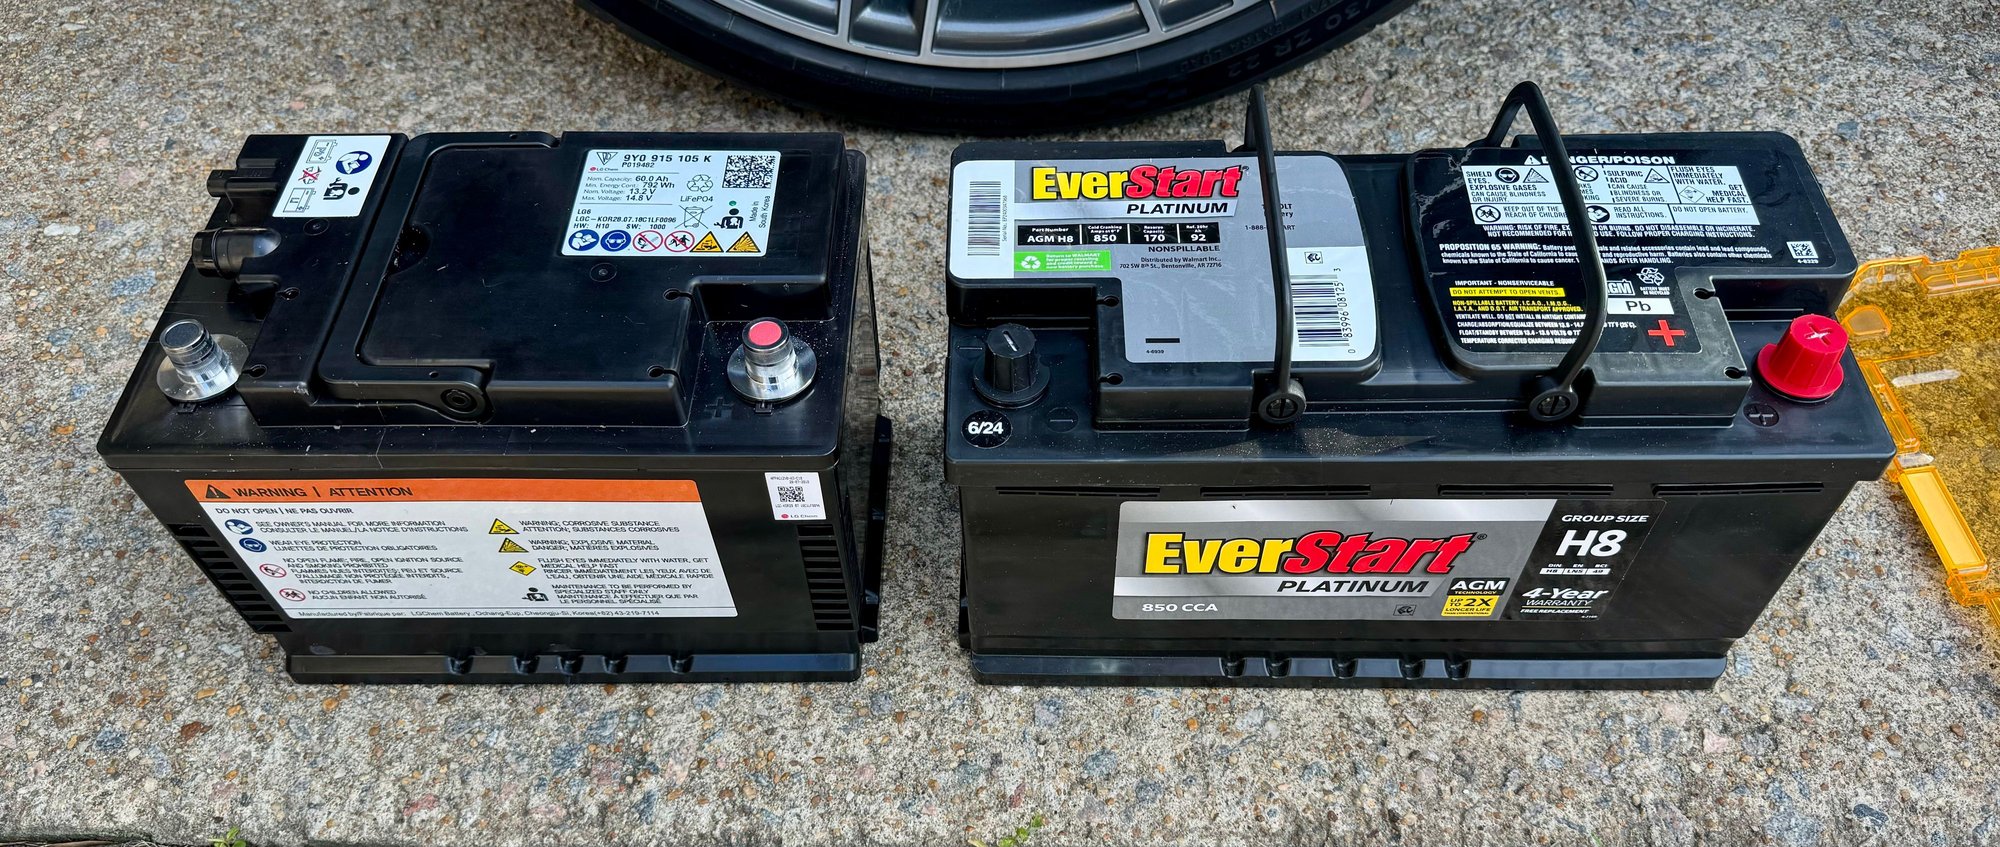
Here are the two batteries side-by-side for comparison. The H8 AGM battery is the same height and width but is several inches longer than the lithium battery. No worries — it fits just fine in the battery compartment.
Install the AGM battery into the battery compartment. Be sure to keep the plastic caps on the terminals for now.
Install the battery hold-down strap and the hold-down clamp.
This is a little tricky. When installing the nuts, you may wish to try this handy tip: Use some tape to secure the nuts in the 13mm socket. There isn’t enough room to fit your fingers down the side of the battery. You’ll need to use the socket to install the nuts and the tape keeps the nut secure.
Next tip: before tightening the nuts, test fit the positive cable to the battery terminal. The cable has very little play — you must move the battery (fore and aft relative to the front of the vehicle) to make the cable fit. Once verified, tighten both nuts. I didn’t know the torque value so I used German torque — G�tentite.
Now for the part that gave me trouble and resulted in several day’s delay — wiring the 12V wire to the LIN connector. Luckily, I’ve got lots of pictures and it should go smoothly for you.
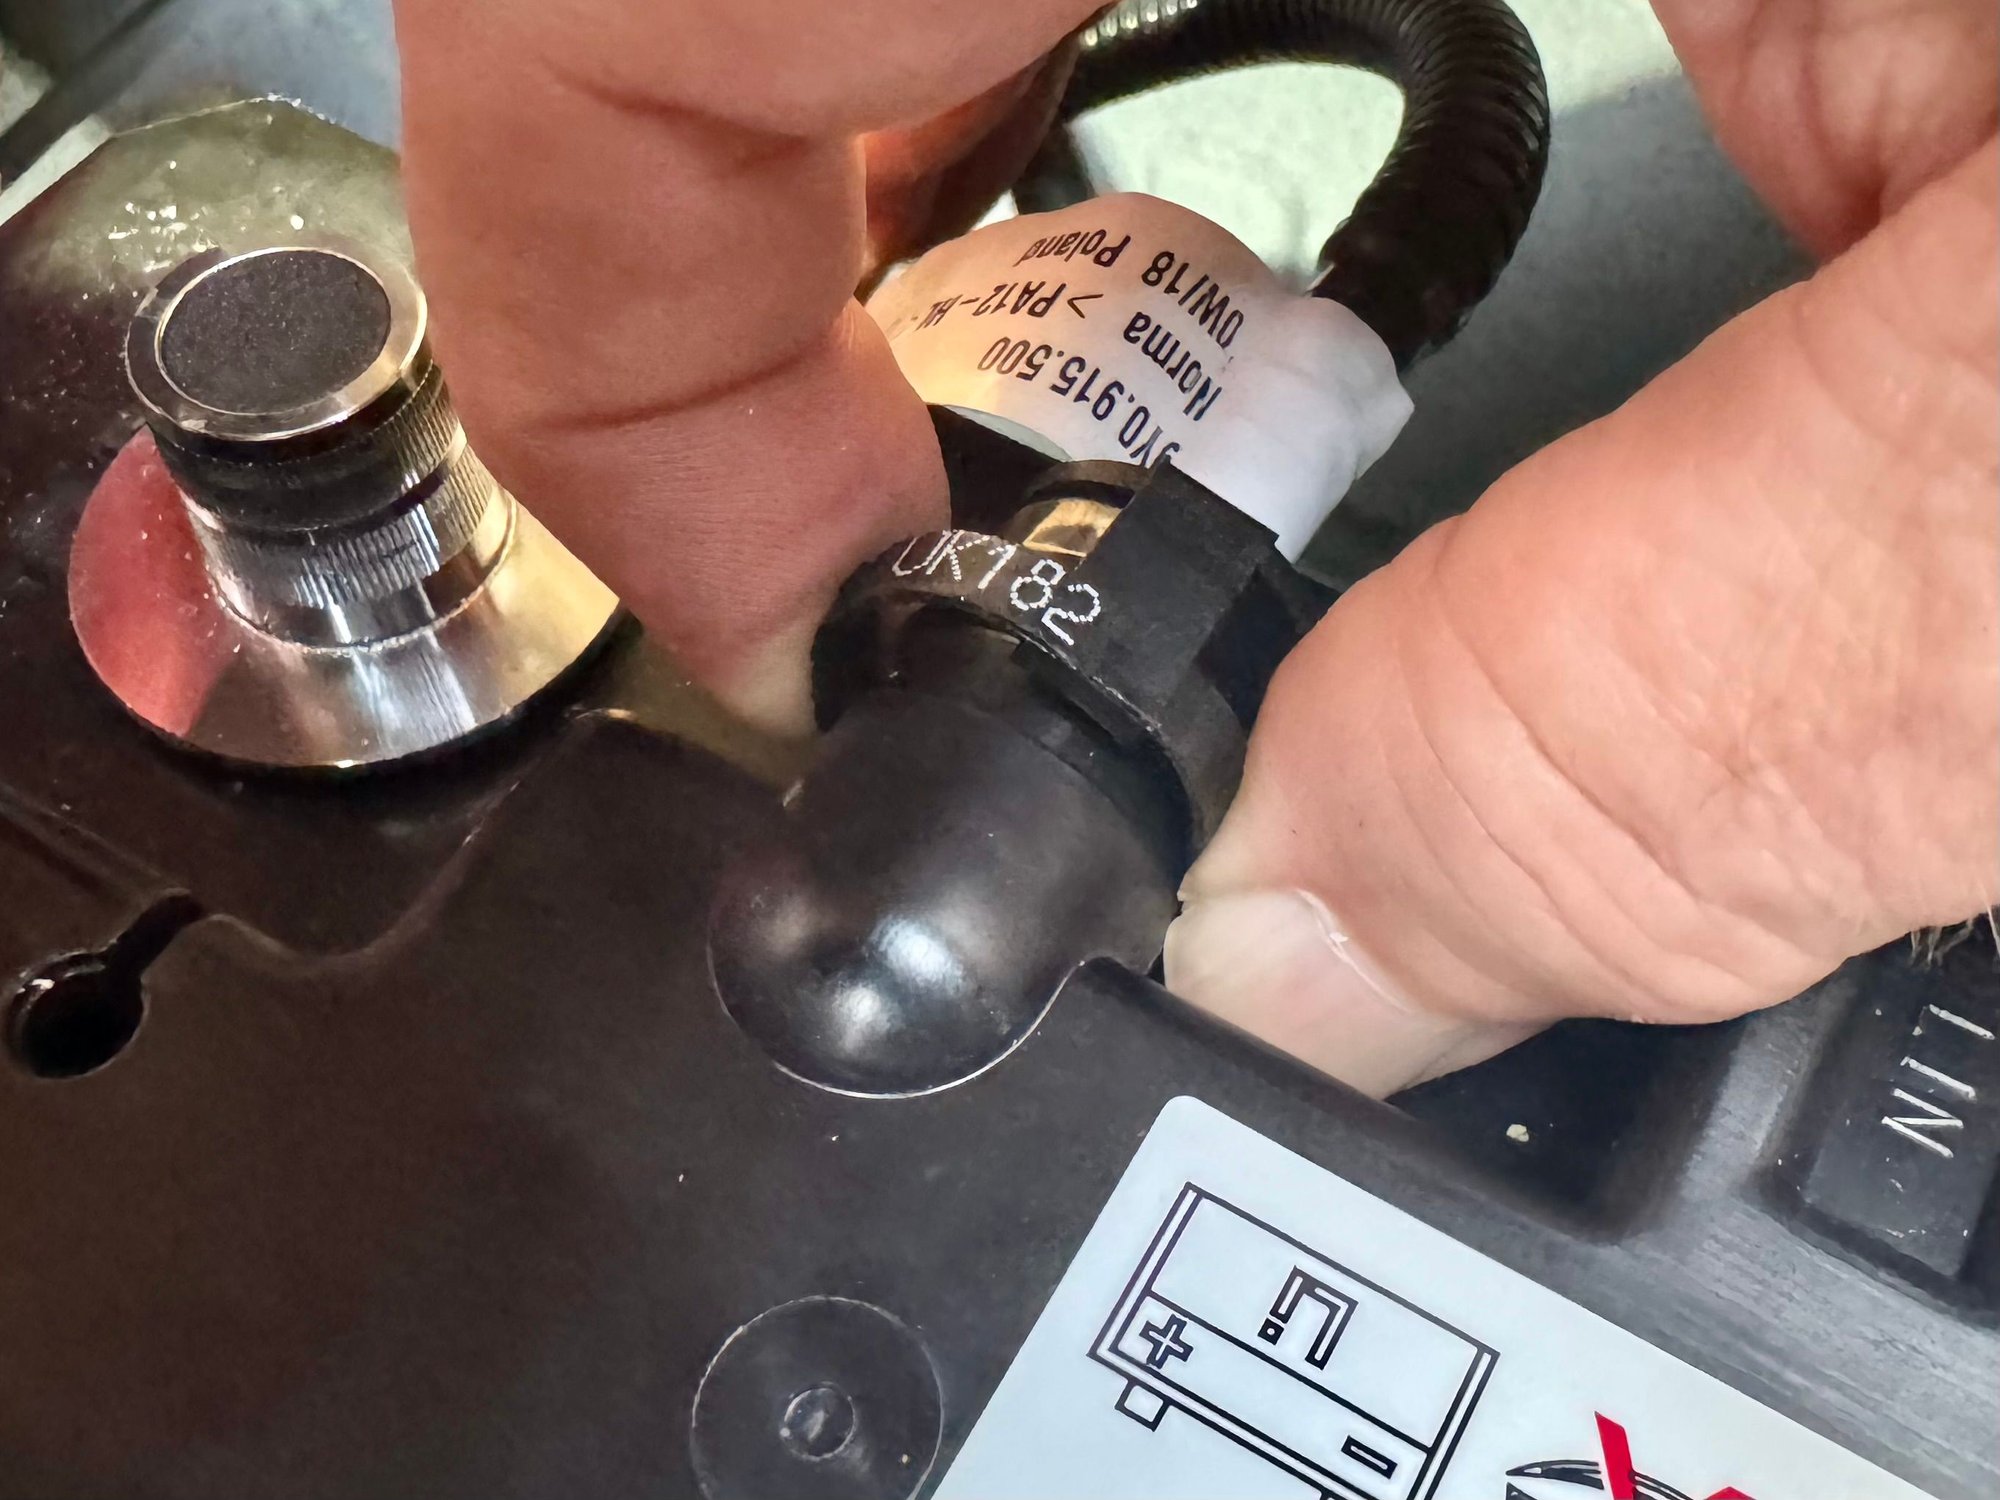
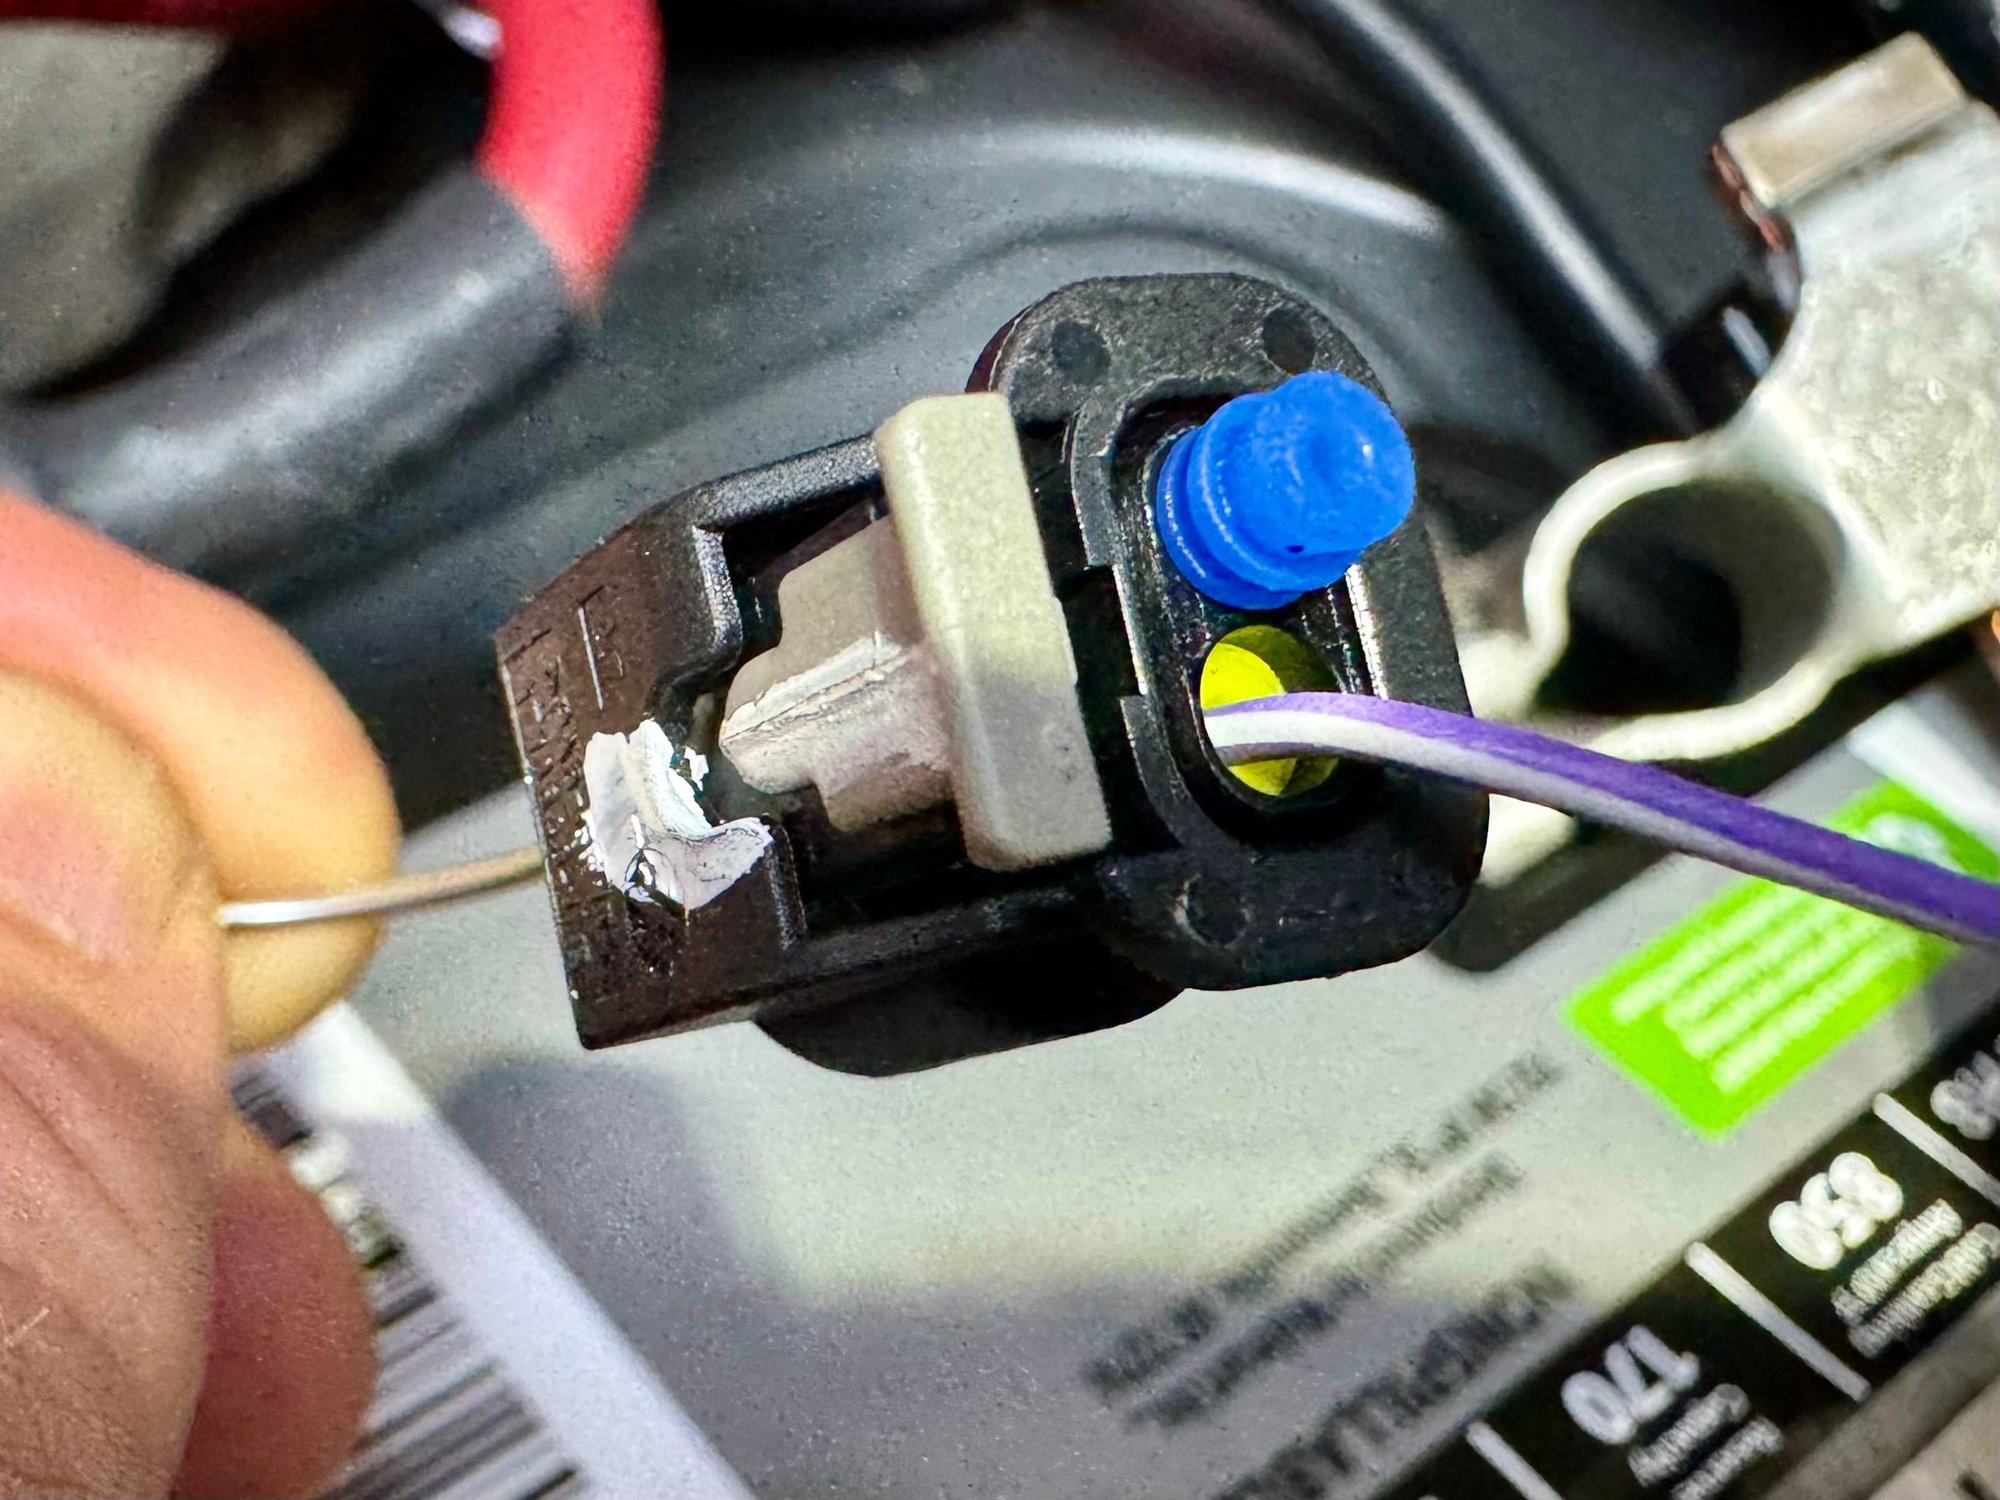
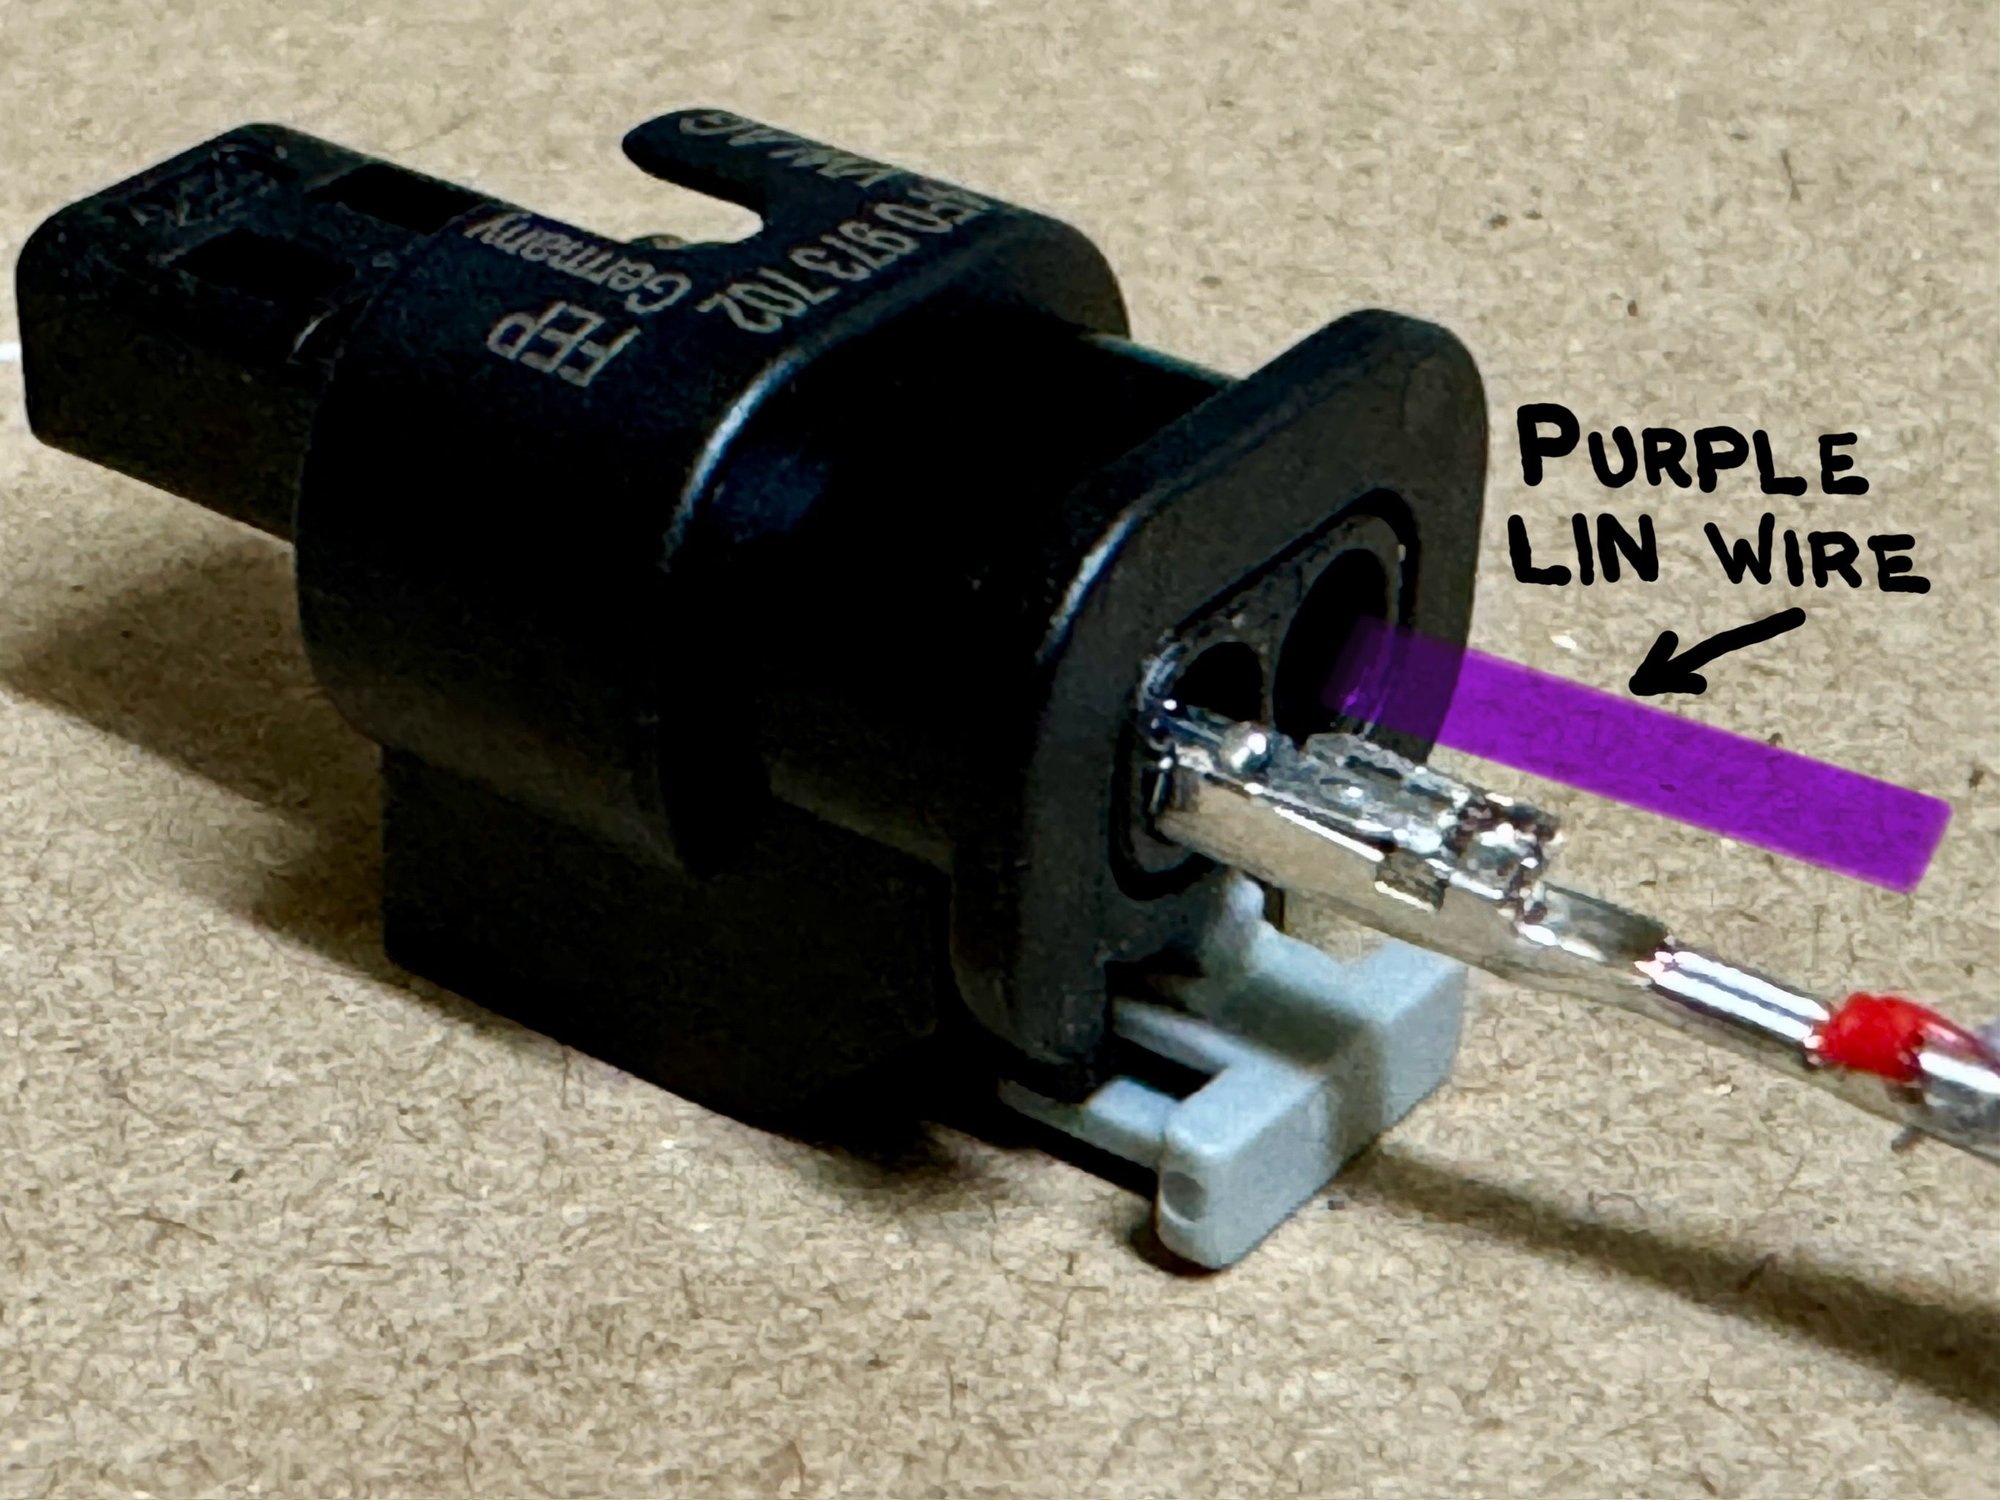
Here’s the 2-pin LIN connector. It comes from the factory with just one purple LIN wire. The second pin has a blue gasket that has to be removed. Push it out as pictured, below. I used a straightened out old key ring that dealers use to attach a tag to your key fob during servicing. A paper clip works, as well. The gasket slides out easily.
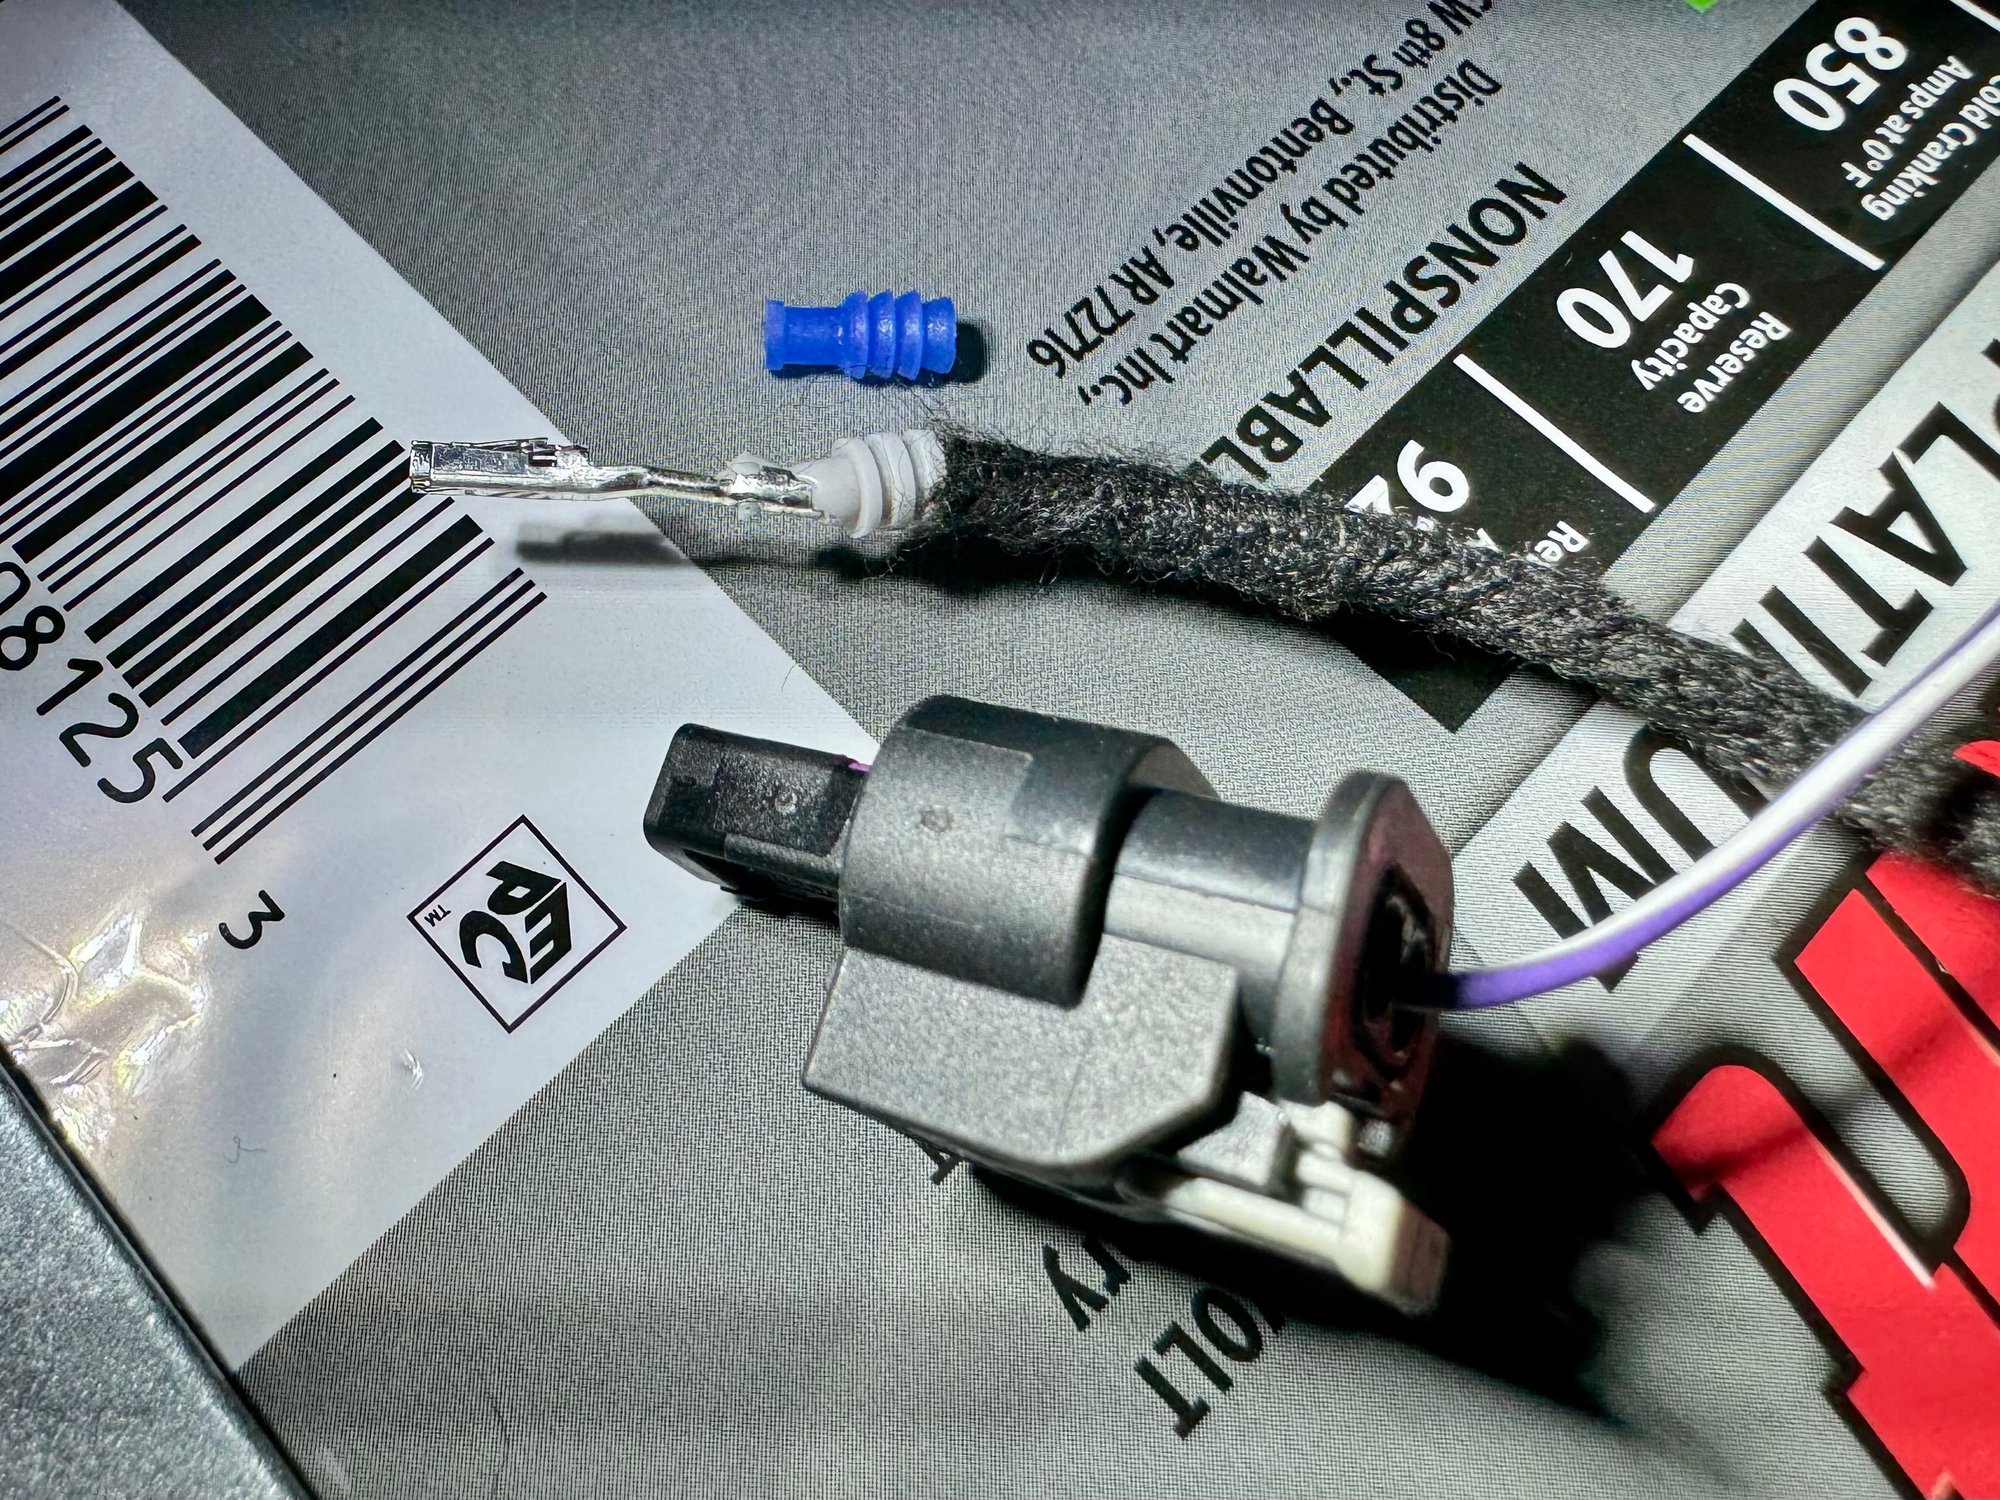
Here’s the blue gasket after removal pictured next to the other end of the 12V supply wire. The 12V pin (with gray gasket) slides into the 2-pin connector in place of the blue gasket you just removed.
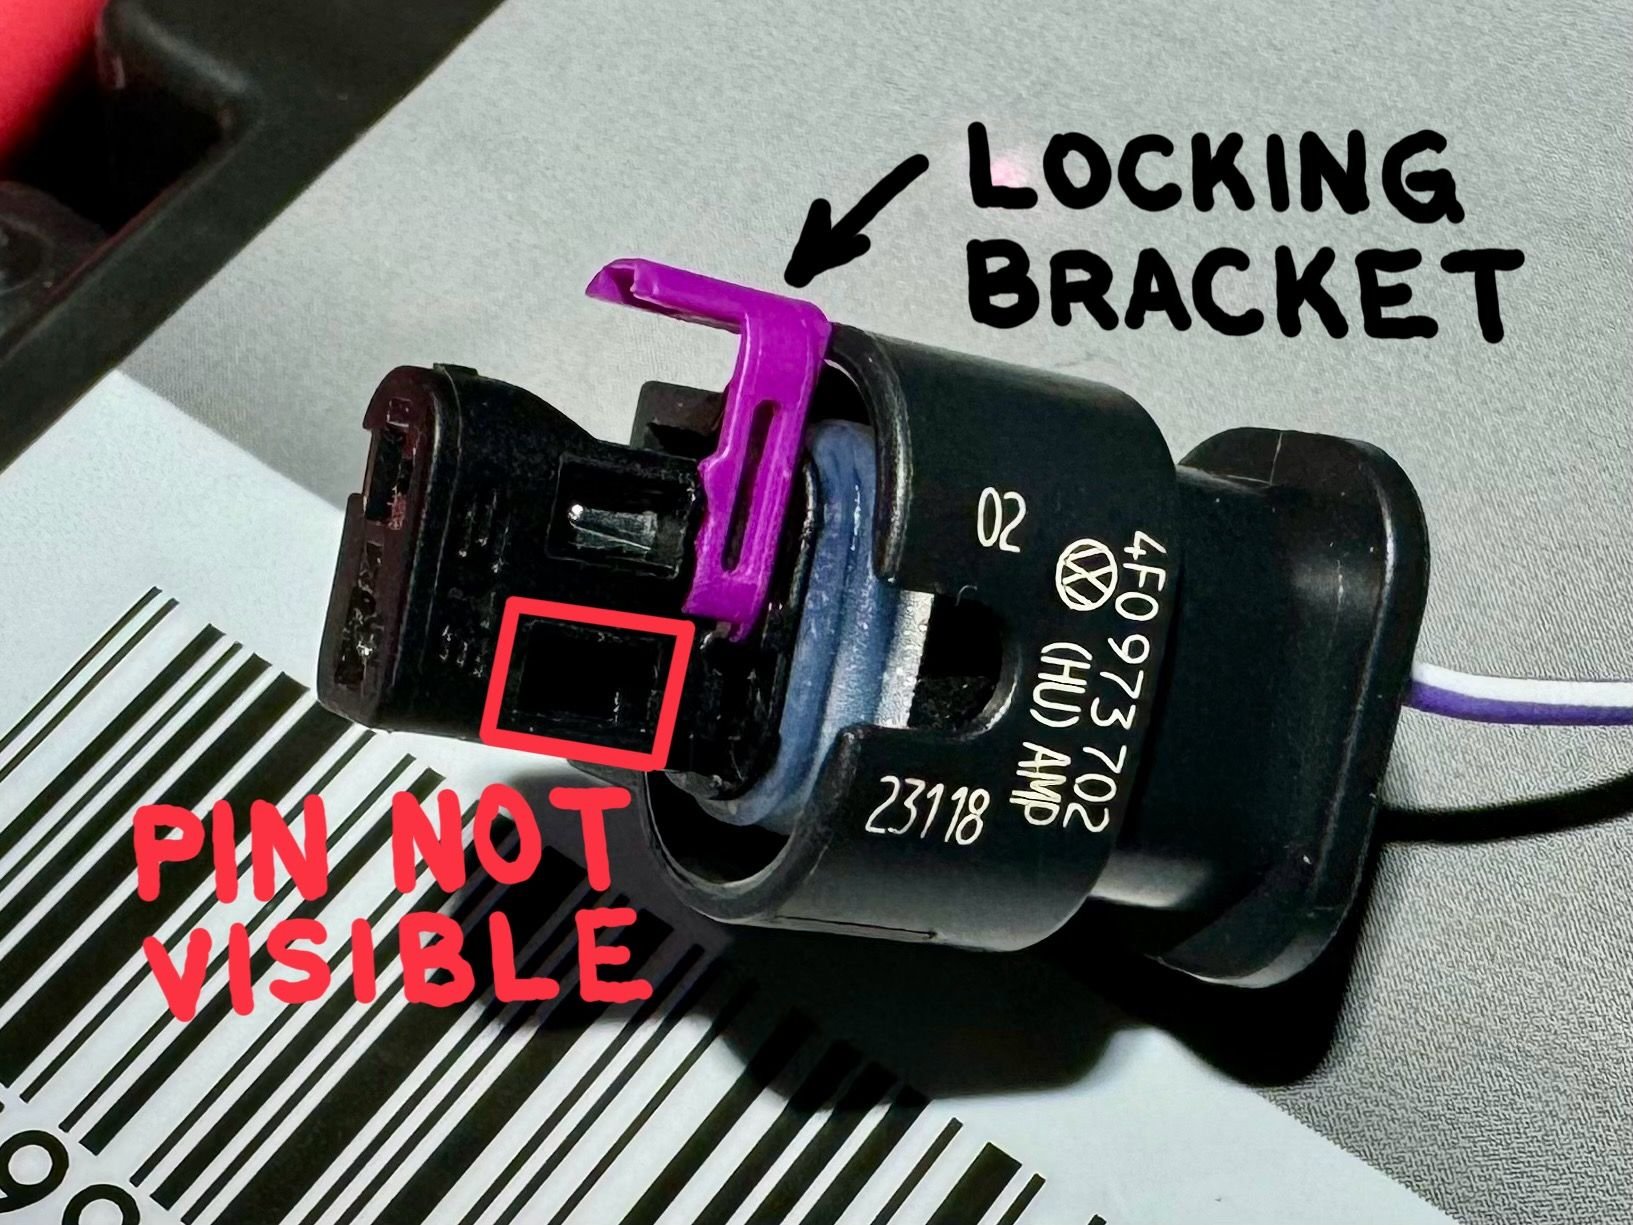
The LIN connector has a purple locking bracket. You must remove the bracket prior to installing the 12V pin. Thanks for that tip kingstone!
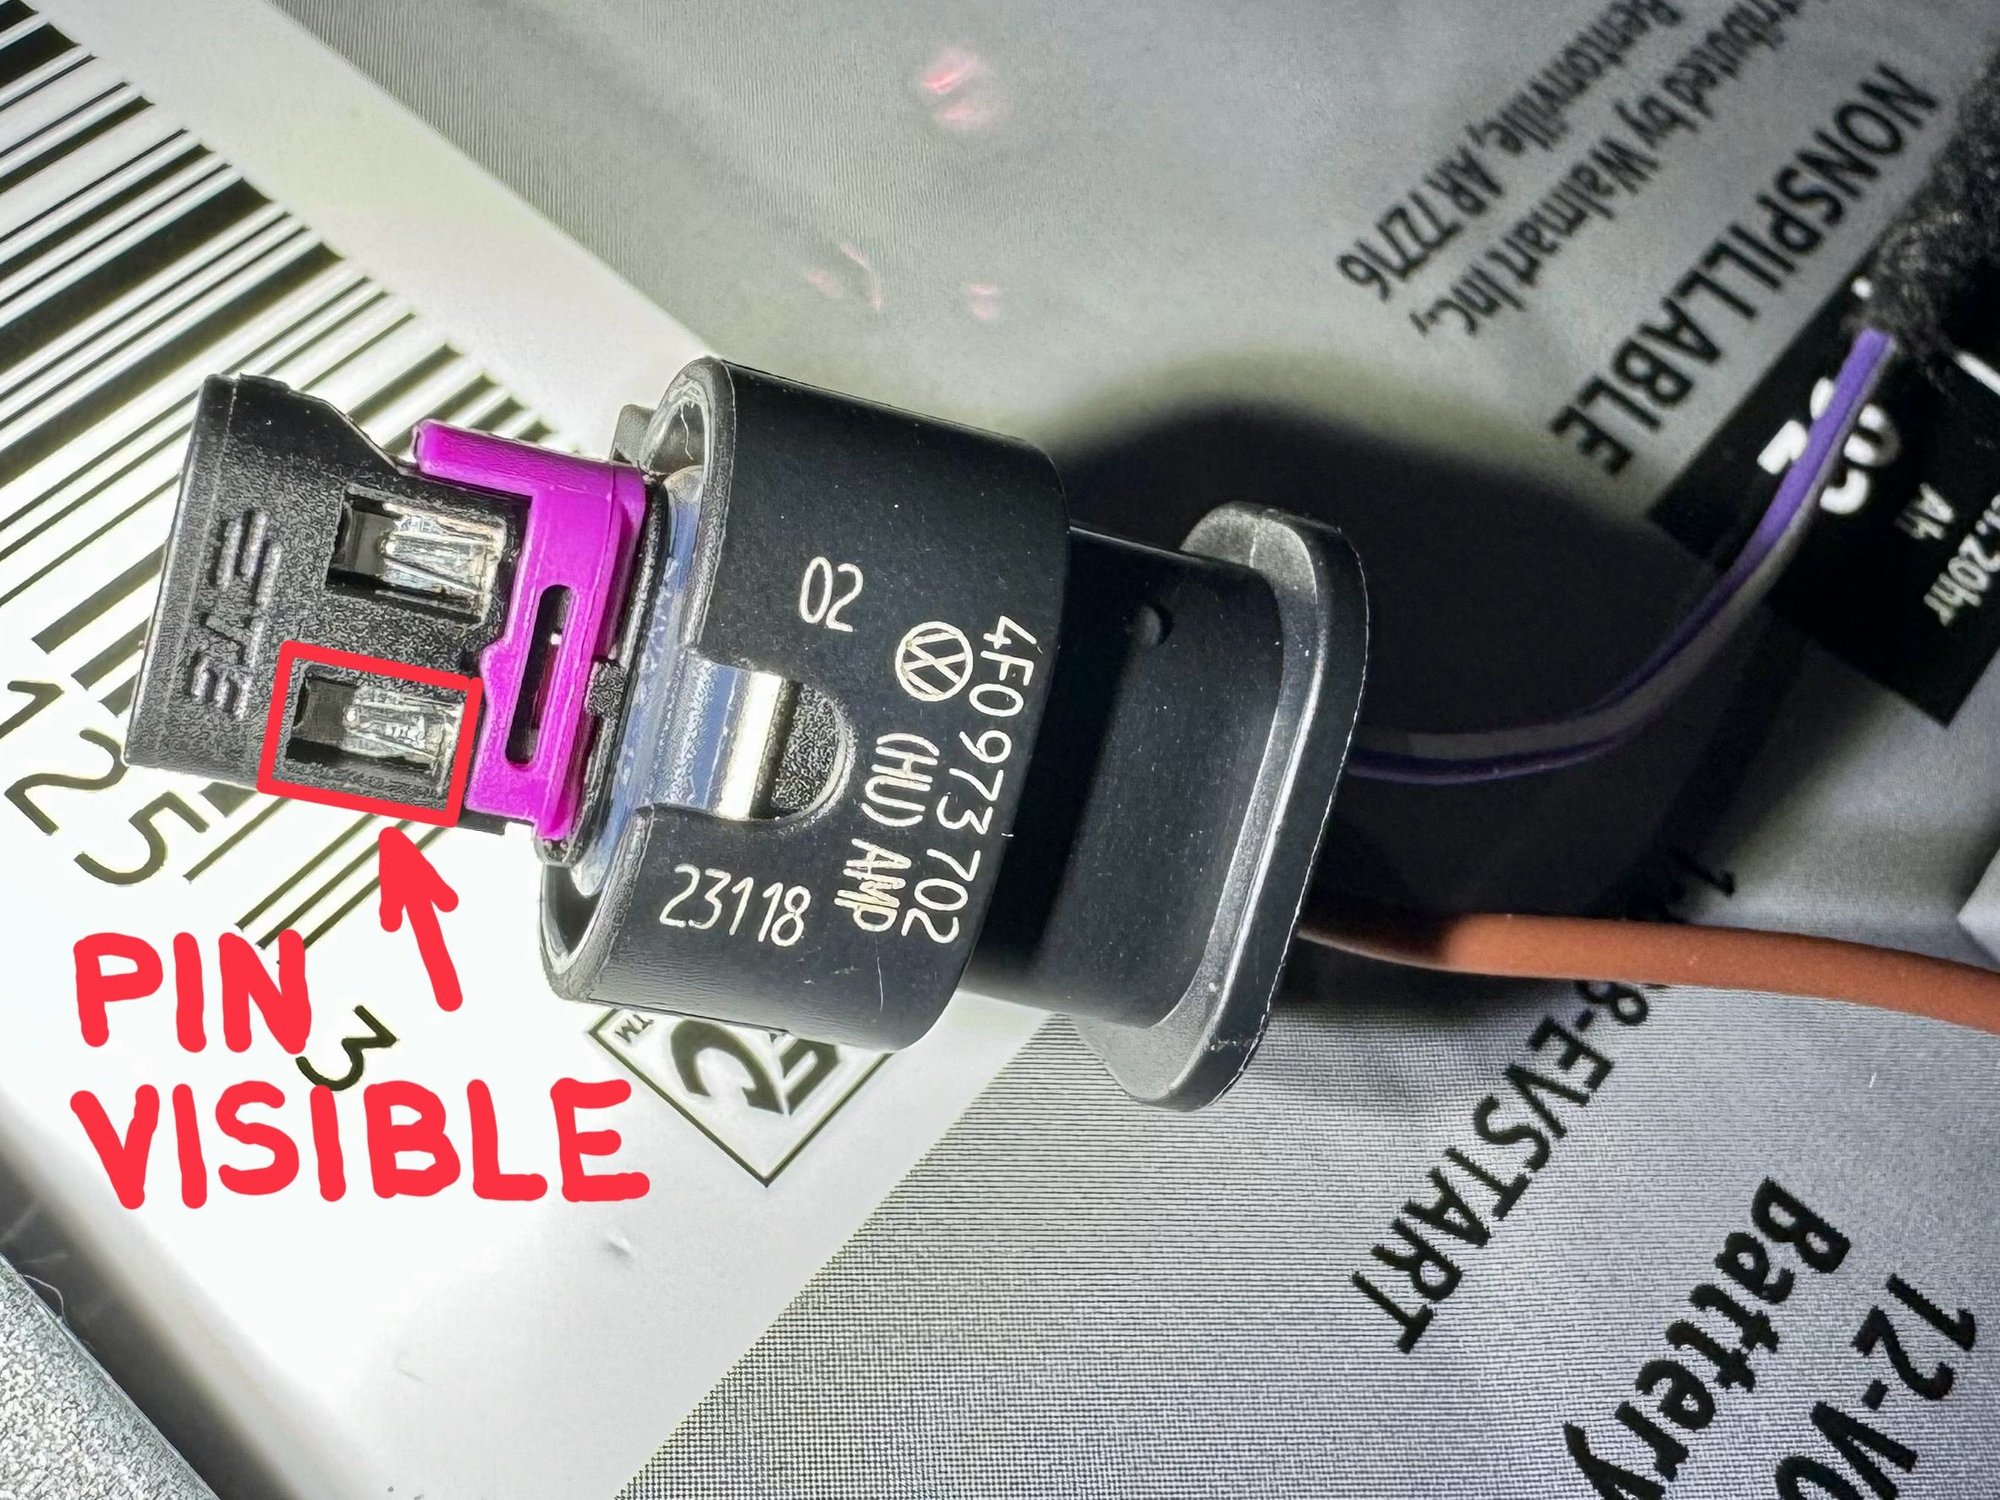
This shows the purple locking bracket partially removed. I removed it completely to install the 12V pin. Note the window where the pin will install. You must push the pin completely in so that the window is fully filled with the pin.
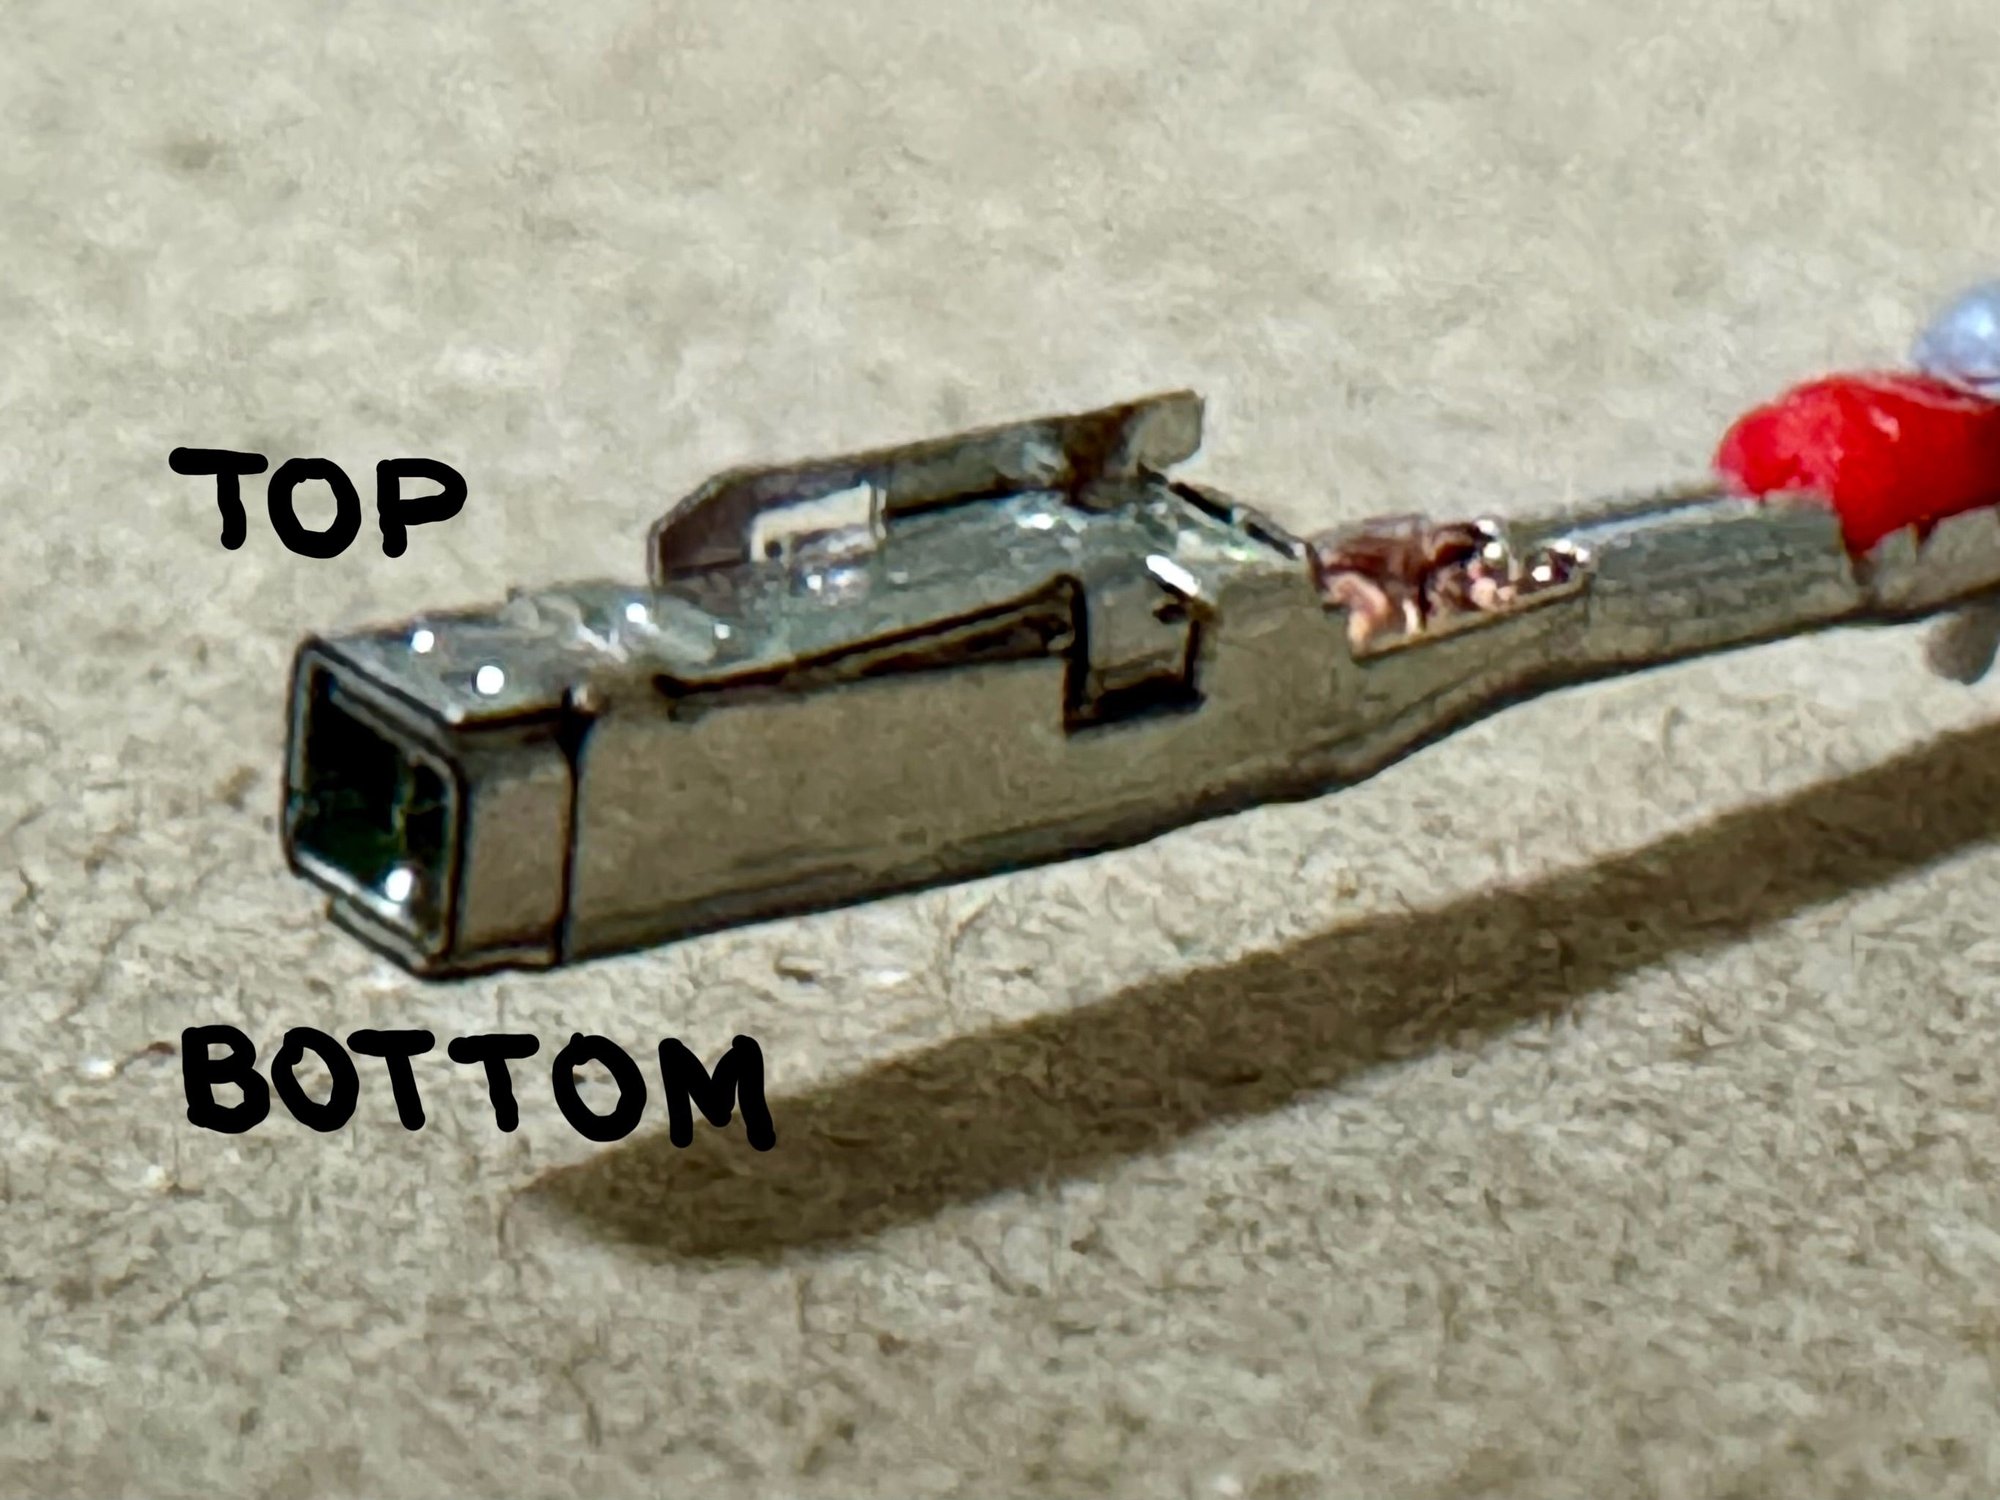
The pin is square and only fits one way into the connector. If you rotate the pin 90 or 180 degrees and try and force it, the pin will not fully insert and you will not get 12V supplied to the LIN bus. This will cause the dongle coding to fail. You will also bend the 12V pin and render it unusable. Since it caused me so much trouble, I’ll do a deep dive to save you the trouble:
The pin has a top and a bottom. Study the pin closely.
The picture below depicts the proper pin orientation for insertion into the LIN connector. Note the correct orientation of the pin; top facing up. If the pin is properly oriented, it should slide in fully without much resistance. You should feel a click when the locking tab engages.
If you force it as I did, you will ruin the 12V pin. Solution: order a new connector on
and scavenge one of the pins from that connector. Splice the Amazon pin into the 12V wire supplied with the kit. Good to go!
New 12V pin installed correctly and fully seated in the window. Purple locking bracket reinstalled. Note the brown wire from the replacement connector. I spliced it into the black 12V wire supplied with the kit.
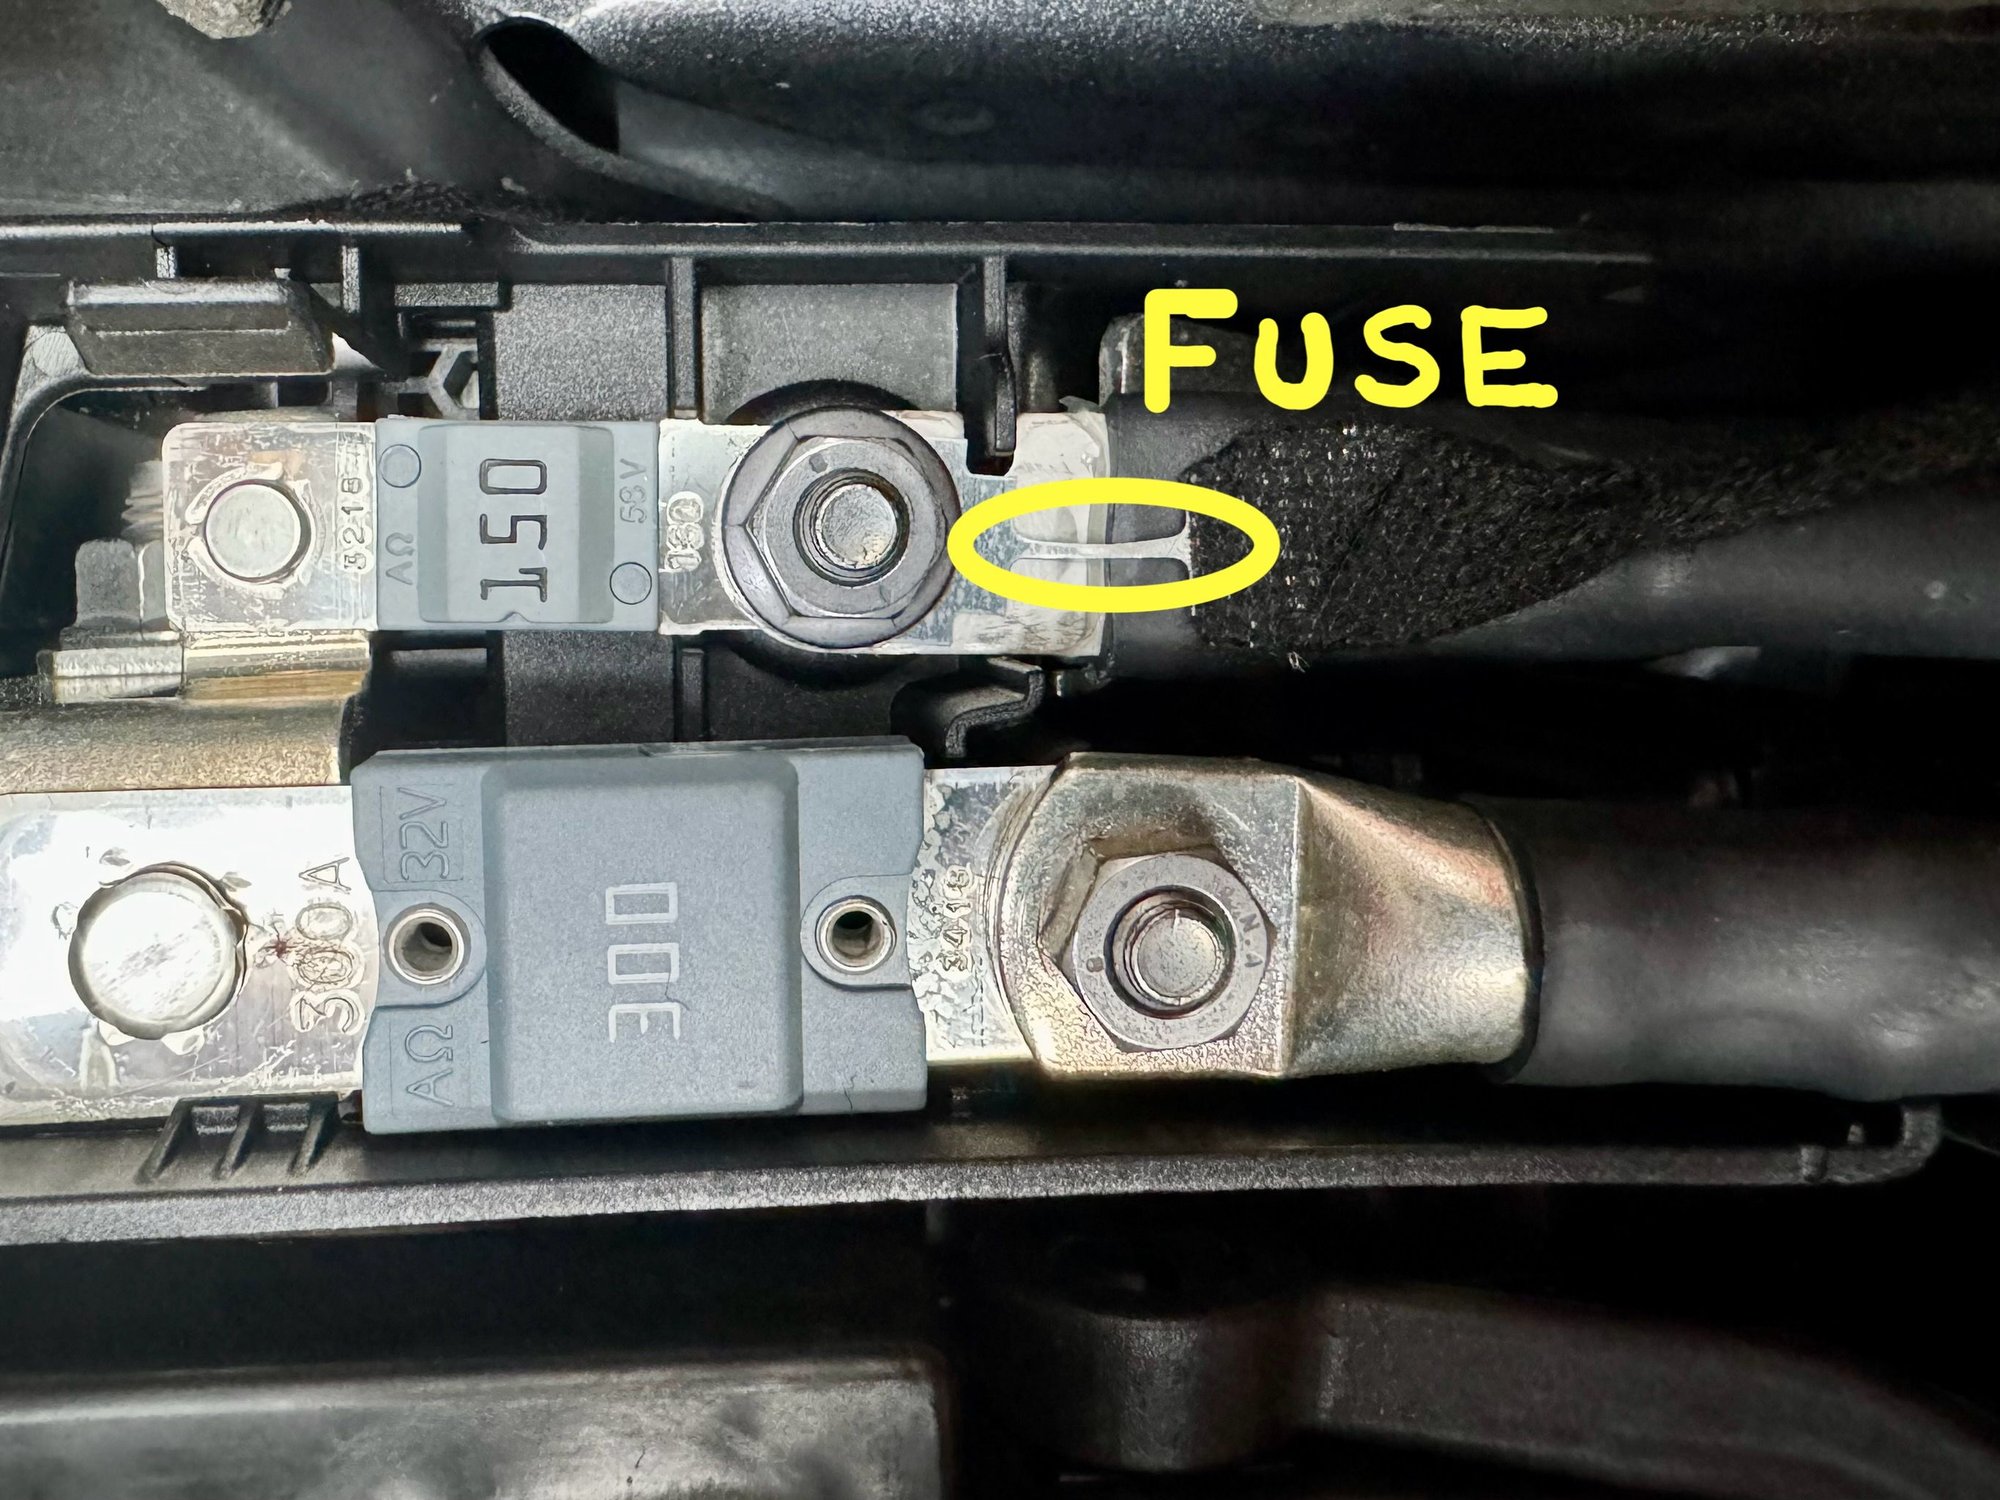
Connect the other end of the 12V wire to the 150 amp fusable link on the positive battery cable. Remove the nut on the connector, install the 12V wire’s ring connector on the lug, and reinstall the nut. No need to use the nut provided with the kit.
Be careful with the ring connector. The integrated fuse seems delicate — don’t bend it.
Connect the positive cable to the positive terminal on the battery. You double checked the fit before you tightened the battery hold-down clamp, didn’t you? Hmm? (My pain, your gain).
Connect the negative cable to the negative battery terminal.
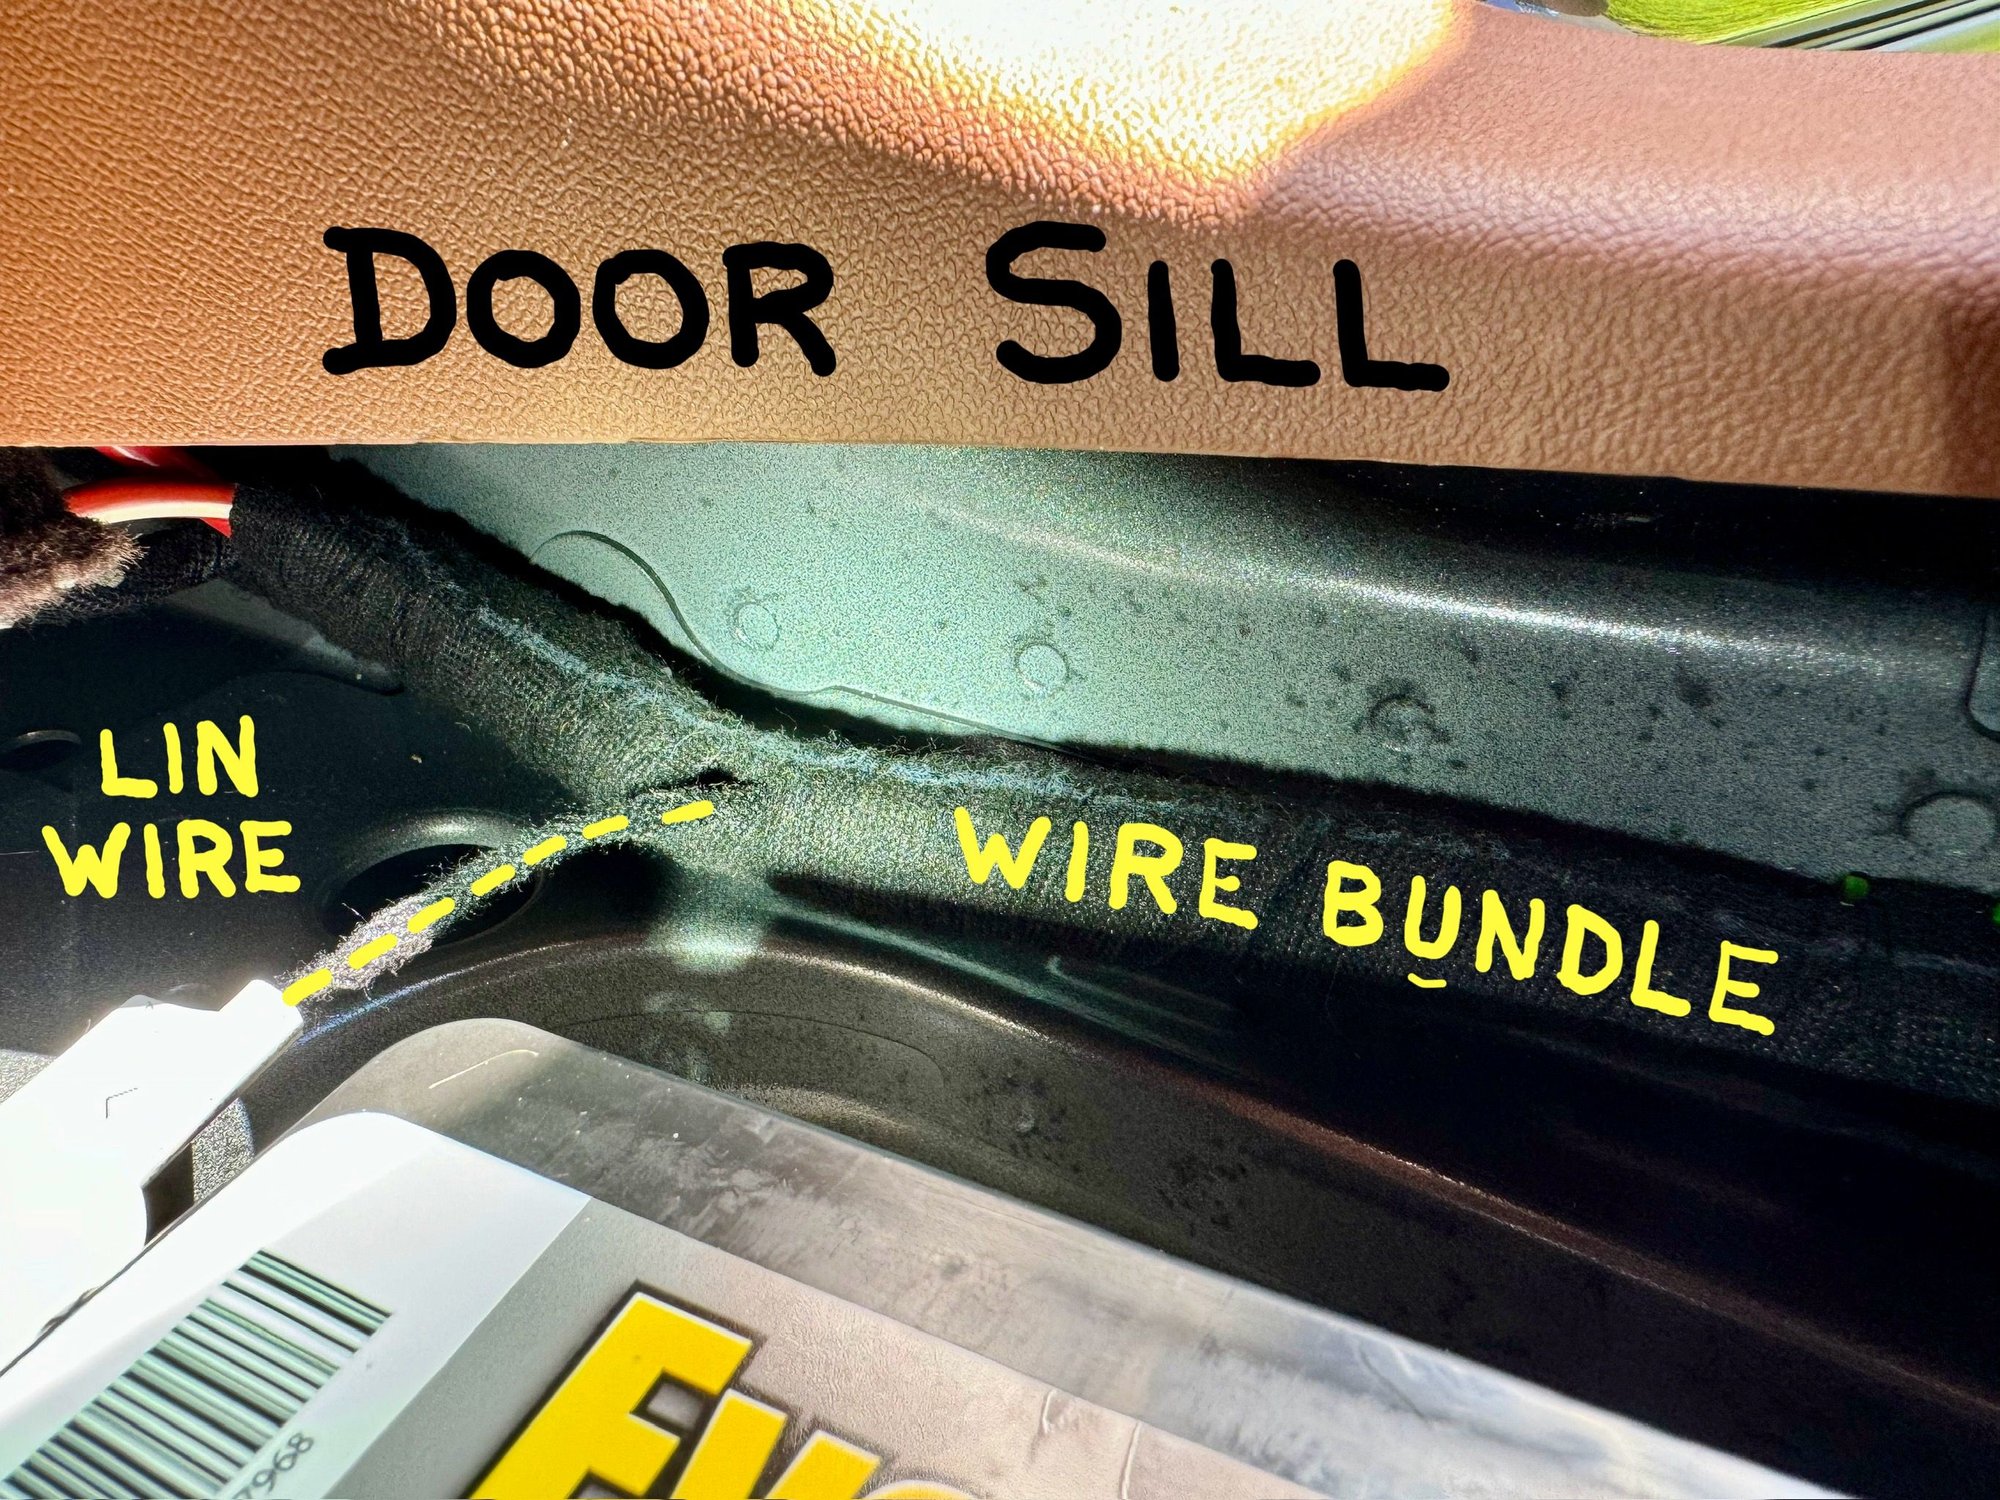
Connect the LIN connector to the LIN port on the negative battery cable terminal.
My LIN wire just barely reached the port on the kit’s negative terminal. I gained about a half inch by pulling the cable bundle running along the door sill away from the door sill.
If that isn’t enough, you can pop the cable bundle tie off the door sill to get additional LIN wire length. I avoided cutting and splicing the LIN wire, as I don’t know if a splice will affect the data transmission on the LIN bus.
Connect the vent tube to the vent adapter (white plastic piece supplied with the kit). Insert the male end of the vent adapter into the female vent fitting on the battery. Double-check the vent tube fitting on the bottom of the battery compartment. It is just a friction fit and might have pulled loose. (My pain, your gain).
If all went well, your battery compartment should look something like this:
Start your Cayenne and be prepared for some malfunction notifications. This is expected and will be fixed with the coding dongle.
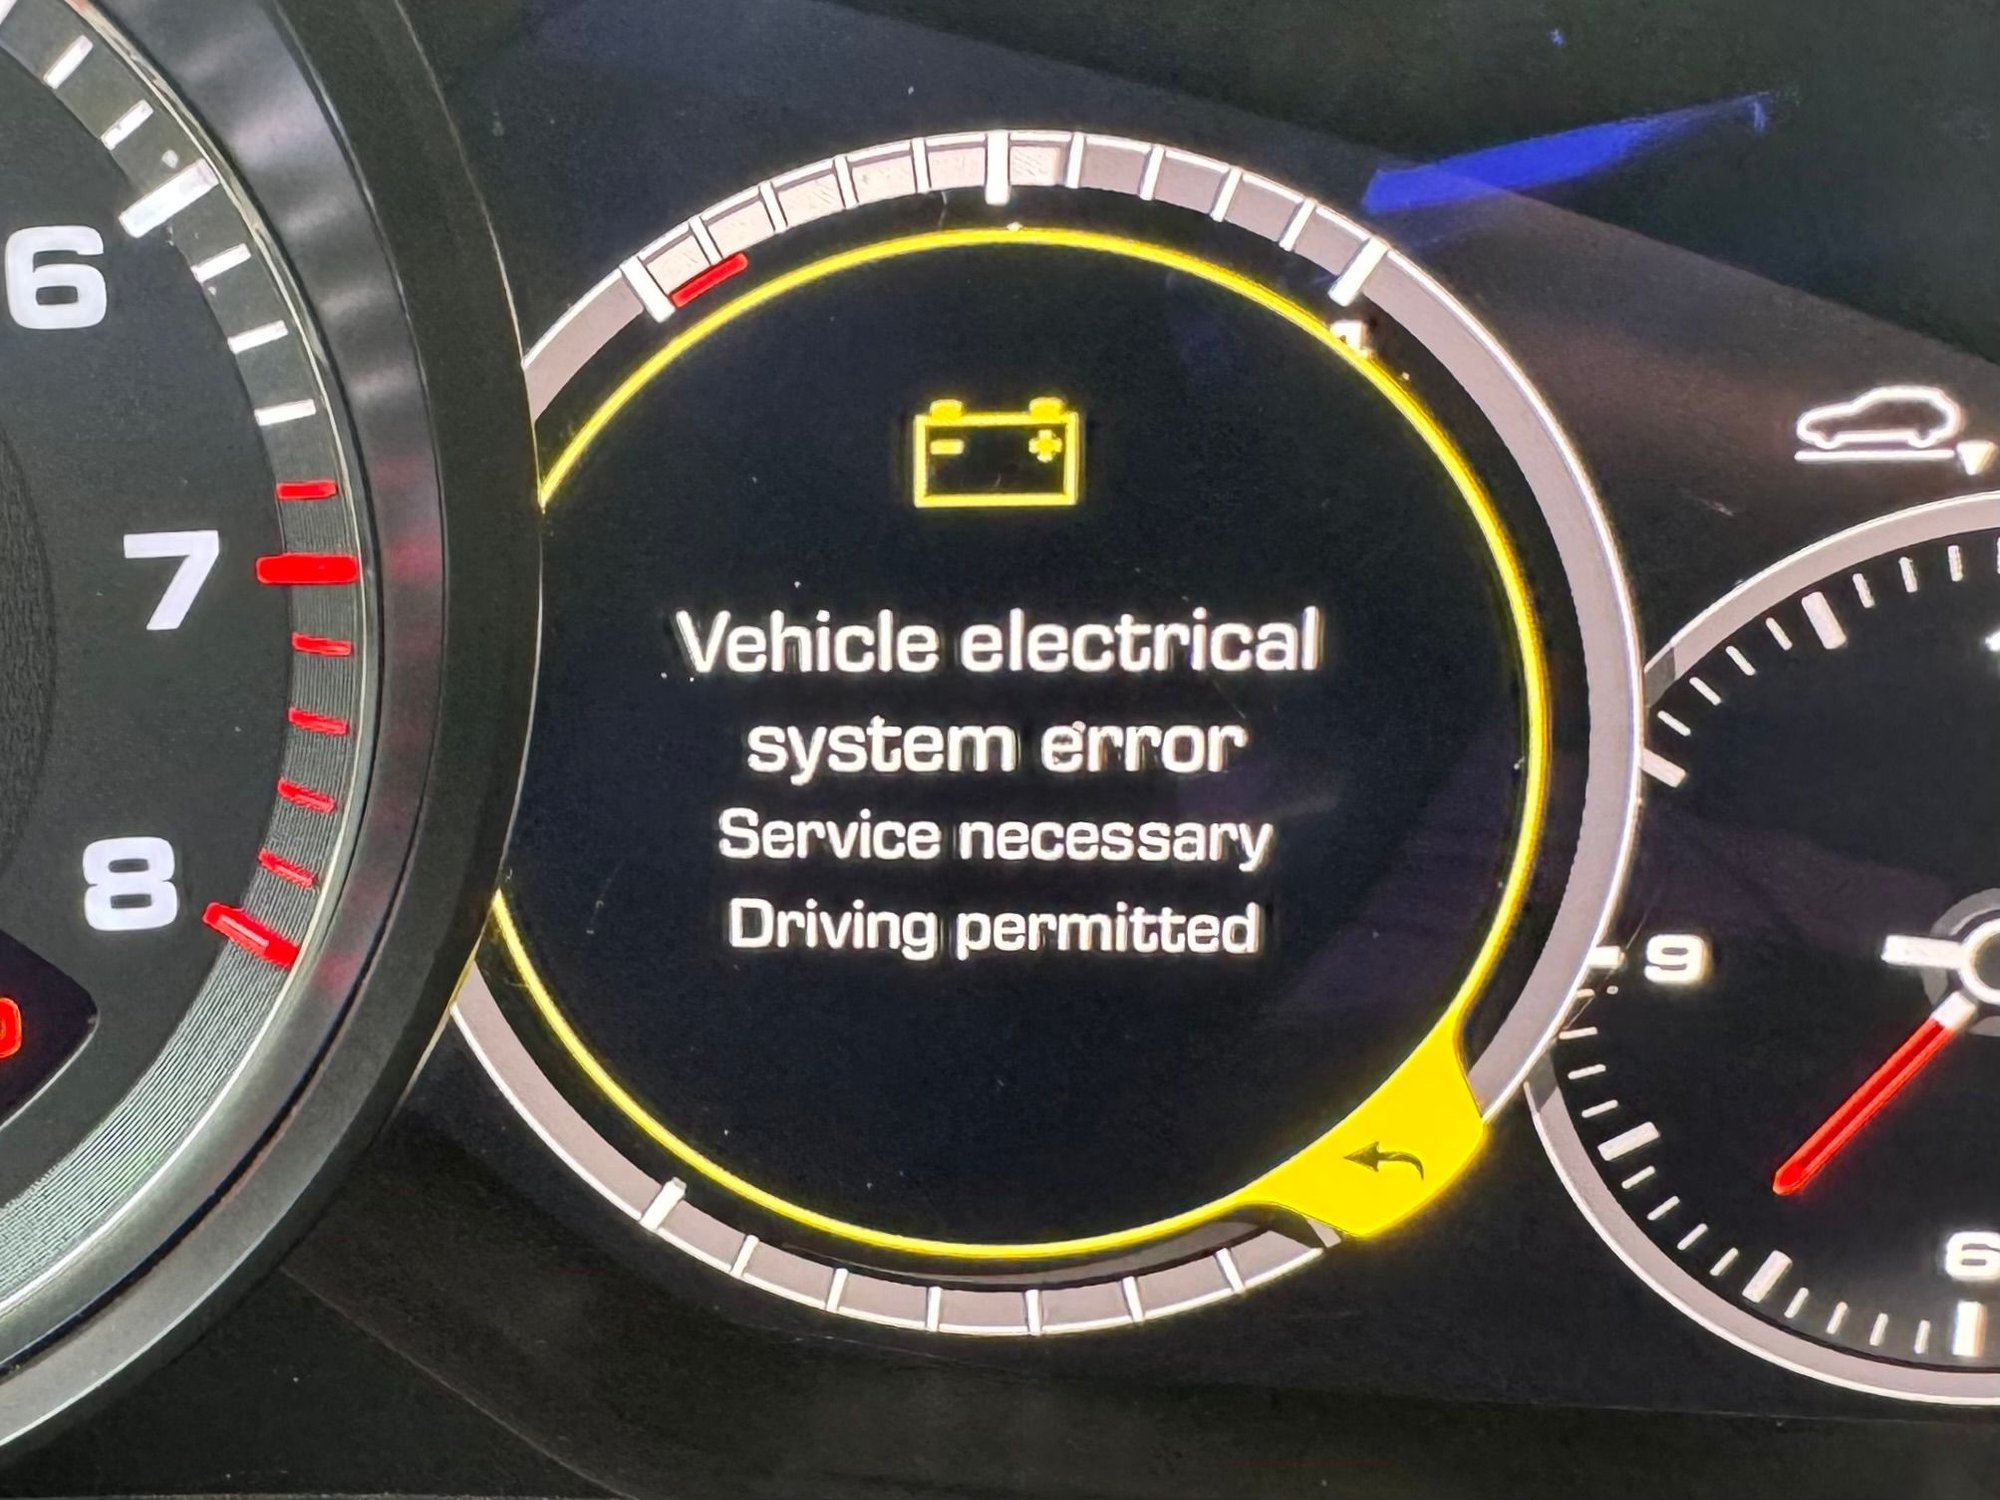
IMPORTANT: Verify you have a voltage reading on your instrument cluster. If your gauge shows dashed lines as depicted below, you have a bad 12V wire connection to the LIN connector. (My pain, your gain).
After verifying a good battery voltage reading, turn off the engine.
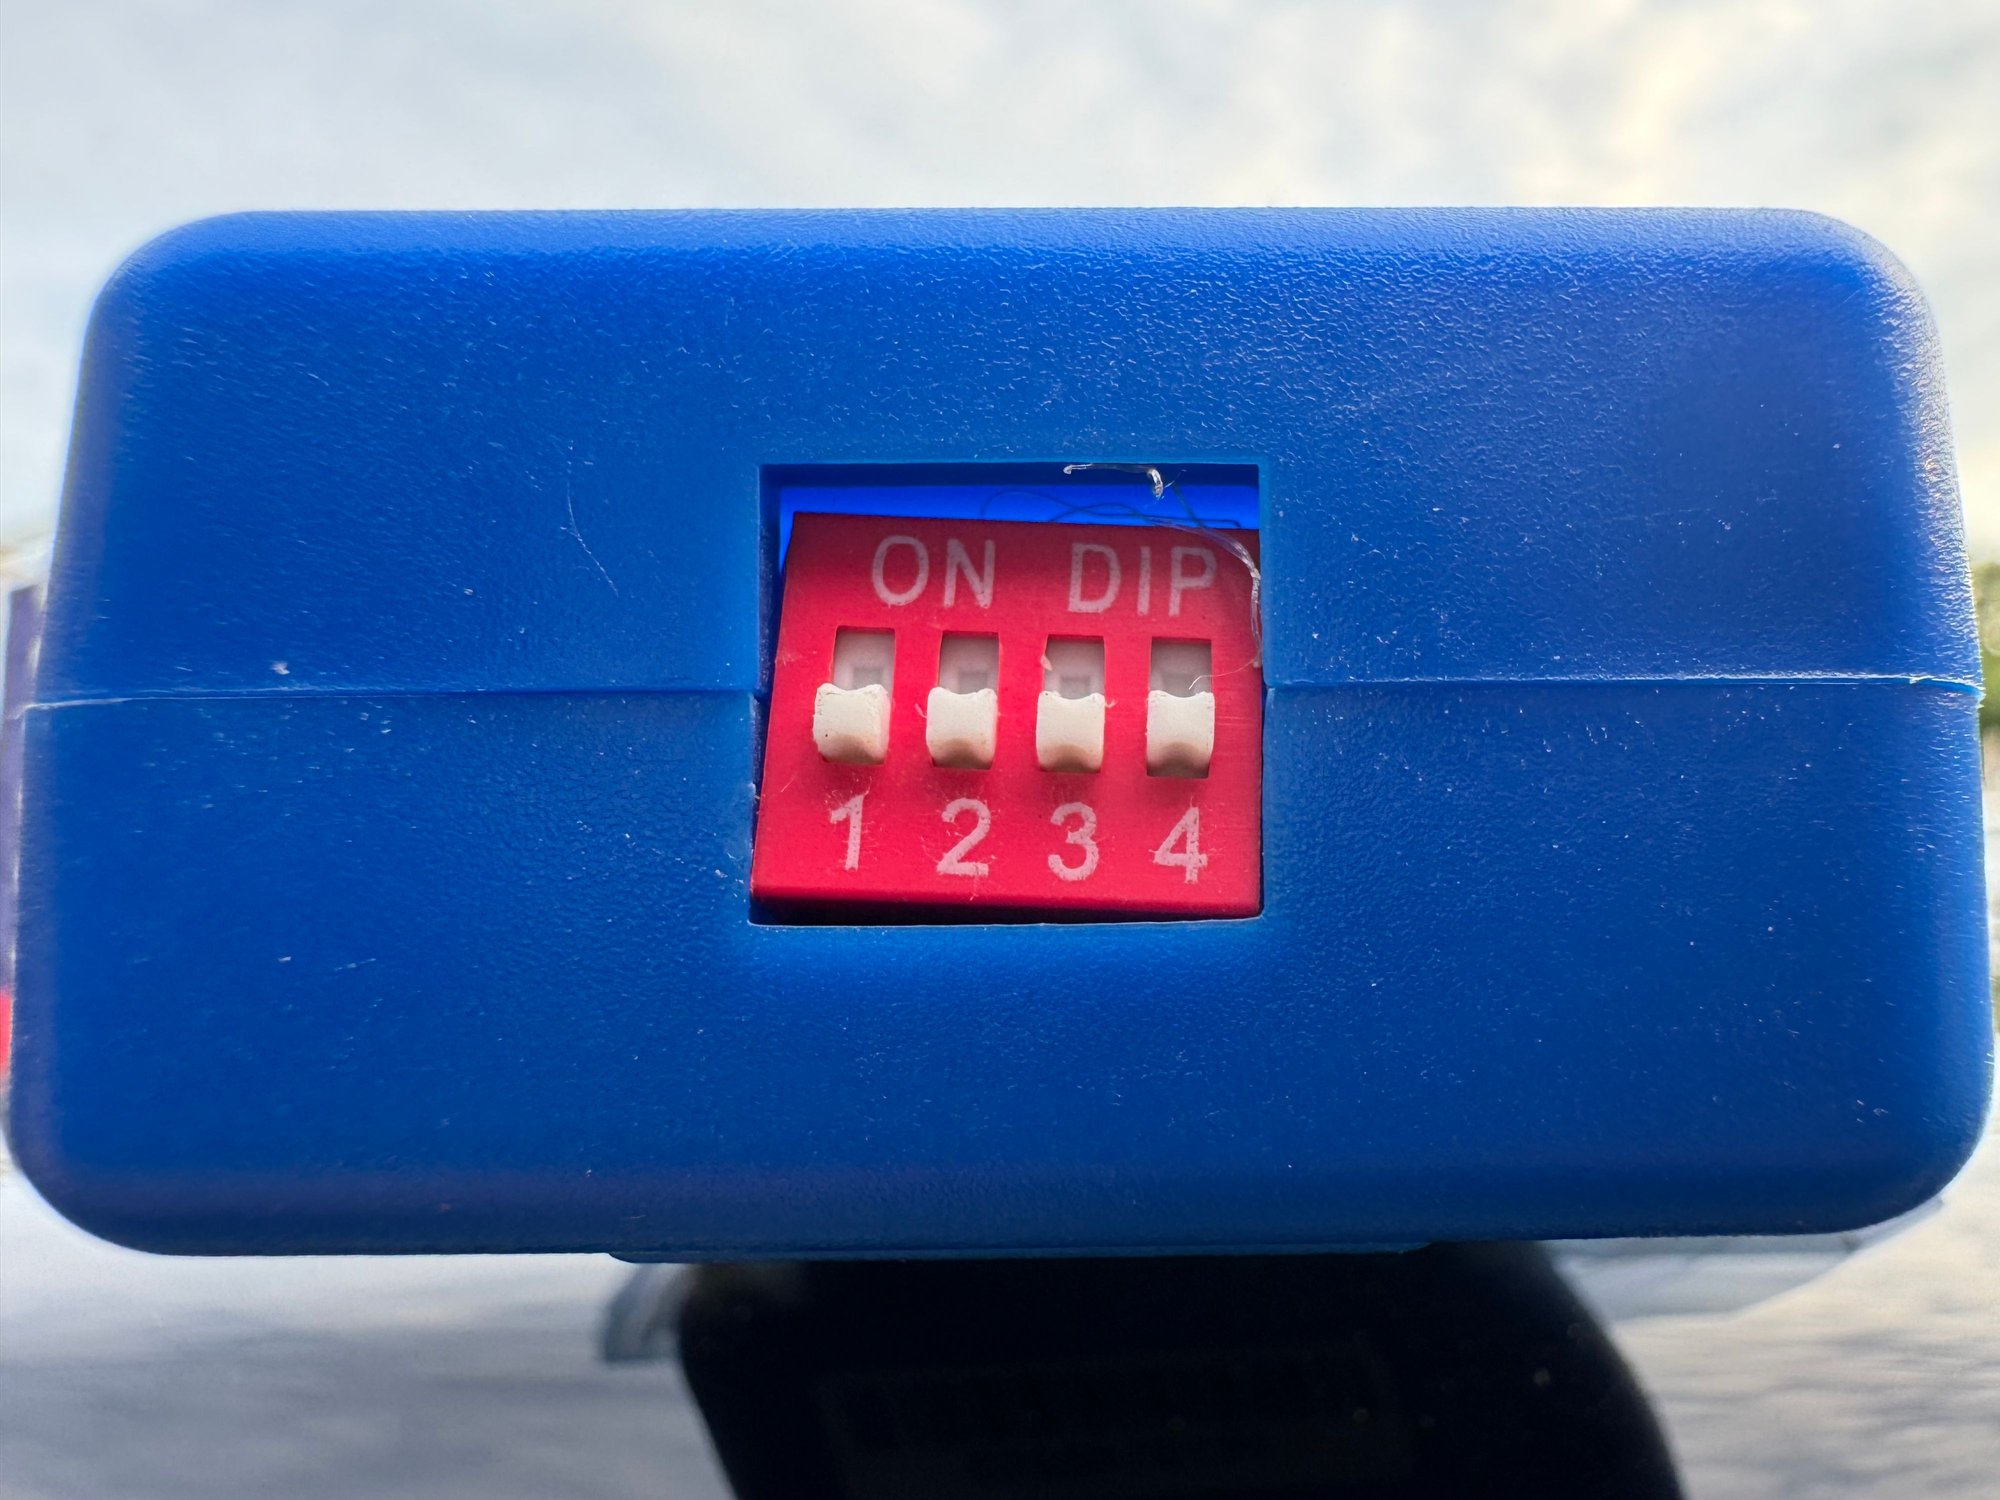
Grab the coding dongle. Be sure to check that the dip switches are in the proper positions as depicted:
Turn the key nub to the first position, i.e. the accessory position. Your instrument panel should be on.
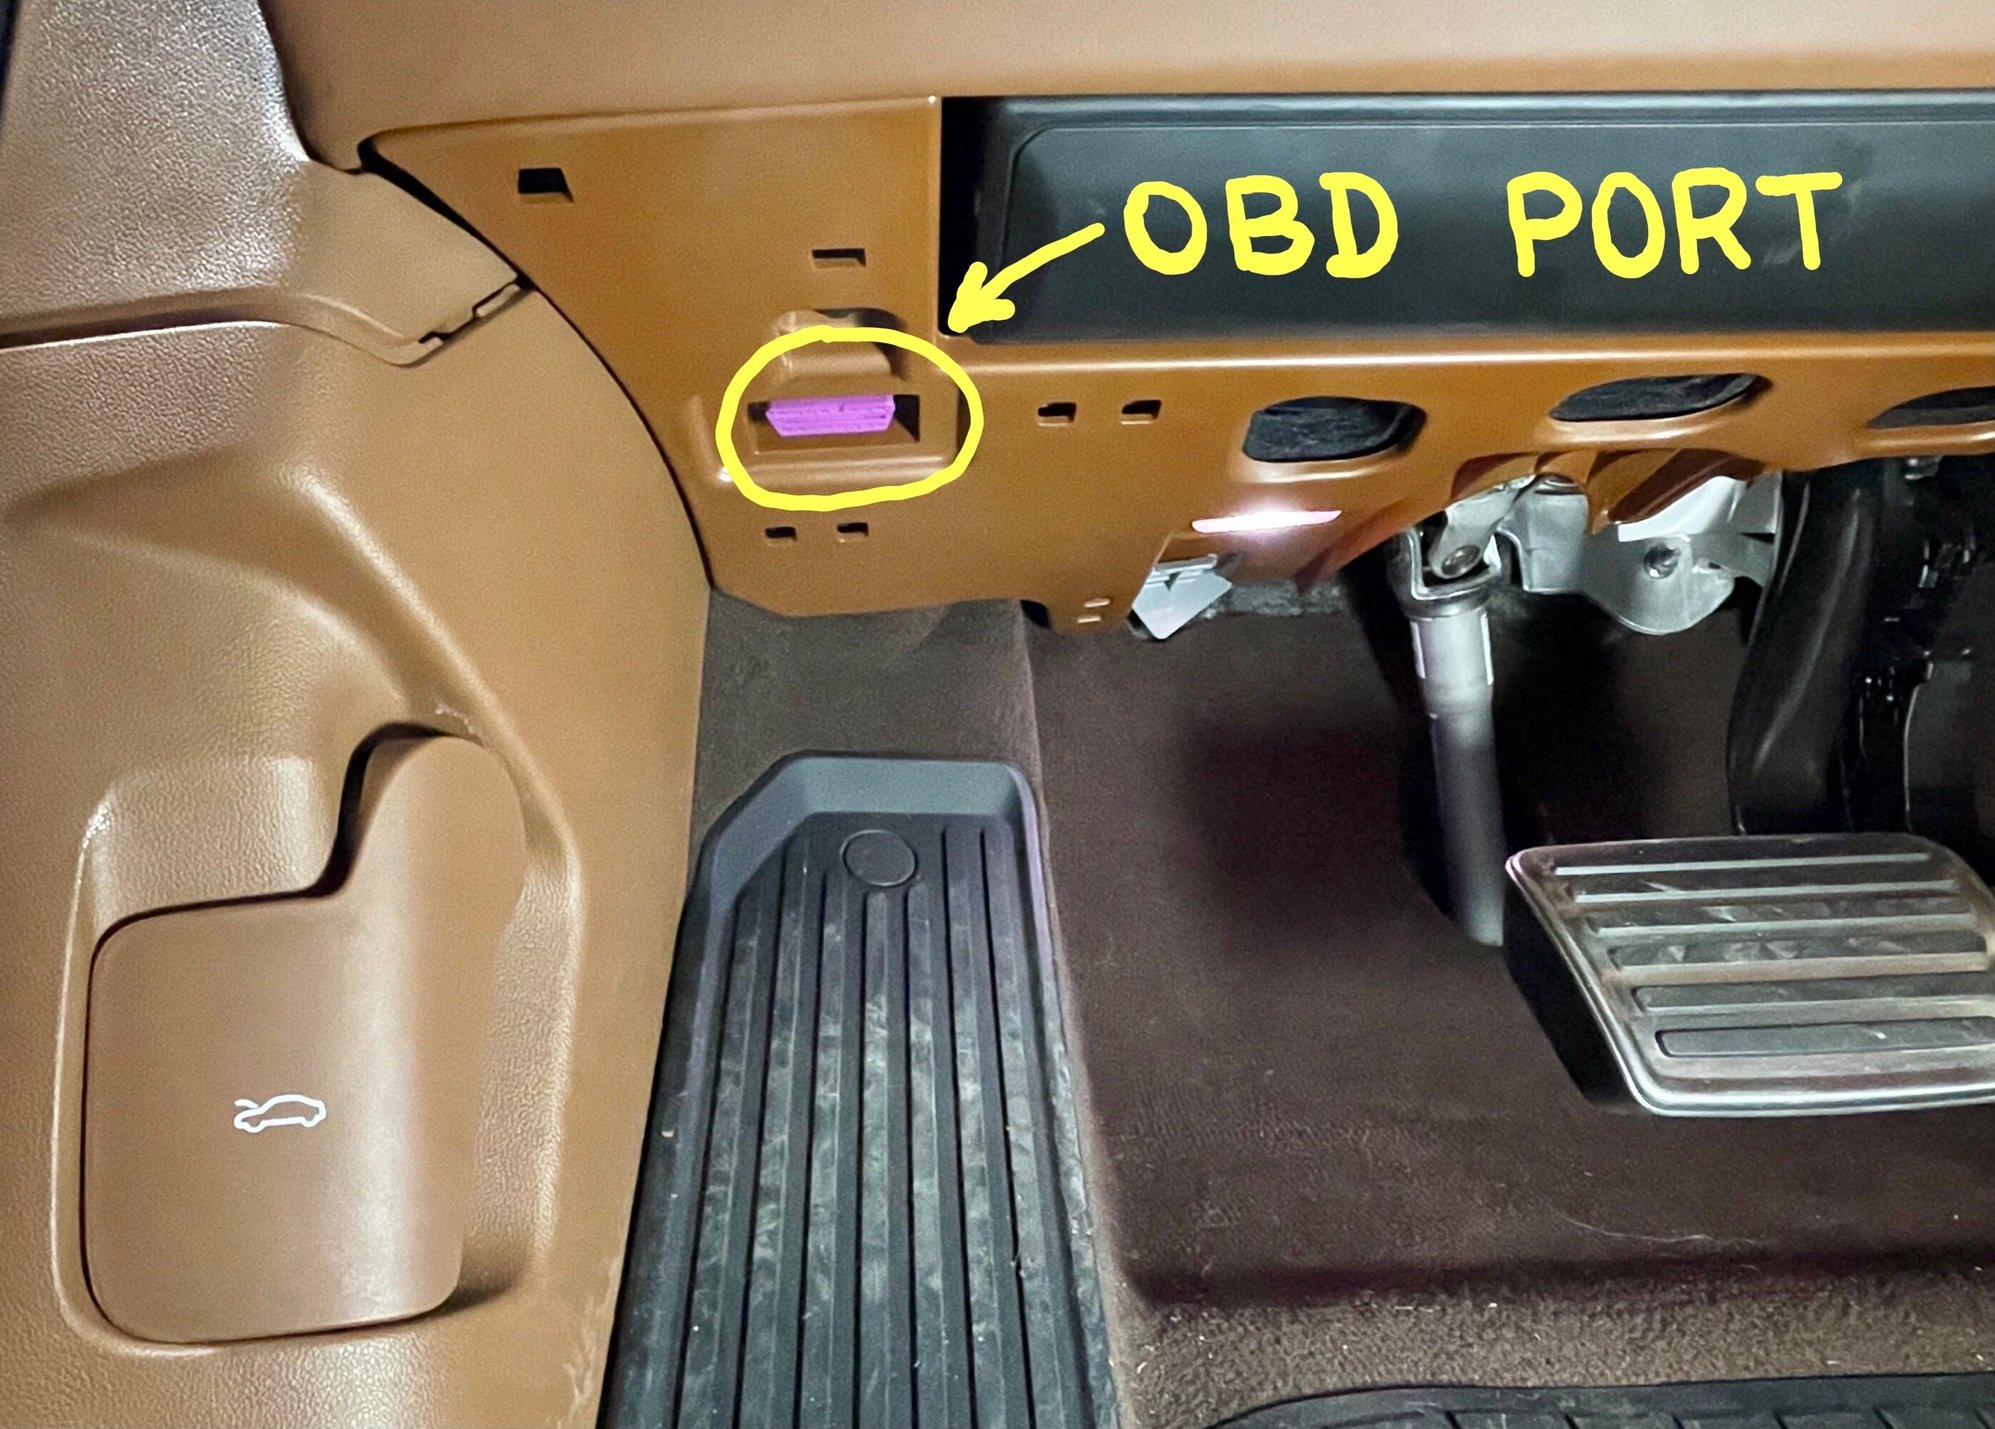
Insert the dongle into the OBD connector located under the dash above the drivers dead pedal. If all goes well, after about 10 seconds the dongle will beep about 5 or 6 times. Remove the dongle, start the car and verify the malfunction notifications no longer illuminate.
Take her for a test drive, allow the engine to warm up, and verify the Start-Stop functions correctly. Your voltmeter will indicate higher voltage than you are accustomed to; 14.4V or higher. This is normal for lead-acid battery chemistry.
That’s it — you just saved a bunch of money and now have a reliable battery!
Next step: If you have a CTEK Lithium battery charger, you’ll need a charger compatible with AGM batteries. If you have a Porsche Charge-O-Mat Pro or NOCO Genius, simply change the setting from Lithium to AGM.
Outstanding post!!! Excellent write-up accompanied by seemingly impossible photo angles and captions! I hope I never need this, but if I do, this is my go-to post!
Great as always @Schnave ! Thank you. Three questions:
1. How long do you expect this job to require, if no mistakes are made? Starting from the time all parts are in hand.
2. What does the "my pain your gain" comment mean? Did you have a problem that needed to be fixed?
3. Would you agree that making the AGM swap should be done when the car no longer is covered by manufacturer's or CPO warranty, to avoid denied warranty coverage issues with the dealer?
1. Installation time: i took quite a while since I had to figure out carpet removal (ultimately not required) and dealing with that pesky 12V LIN connector. Plus I frequently paused to take lots of photos.
With all the painful lessons learned, I could do again in about an hour. Give yourself a couple hours. That should leave a little time for a mid-job beer break once the lithium battery is removed.
2. My pain, your gain: The job spanned several days, primarily due to that 12V LIN connector. Had I known the dashed lines on the battery voltage gauge indicated a bad 12V LIN connection, I would have saved LOTS of time.
Finding the negative cable connection was time consuming. I went down the wrong road of trying to remove the passenger floor carpeting. I finally lifted the carpet and found the connector within reach of a box wrench. Duh! Other little things like the AGM battery positioning to fit the positive cable were minor but time consuming. I noted each of my mistakes with “My pain, your gain” as a call out for possible problem areas.
The installation instructions on the vendors web site are worth a read to get a general overview. It lacks the details and photos of this tutorial, particularly regarding the LIN connector and negative cable removal. The vendor, kingstone, is updating the instructions to address my comments in another thread.
3. If you have ANY electrical problems, Porsche will likely blame the battery conversion and the fix will be on your dime. If your lithium battery dies while under warranty, see if Porsche will replace it for free. If not, weigh the hefty cost of a lithium battery over the savings of this kit verses the possibility of a warranty denial on future electrical problems.
Wow, that is a massive benefit to the Cayenne community. Awesome Schnave!
Now for the sour part... where the heck is the Seller in all of this? I don't see any "thanks" or a pat on the back for your time and effort for that product. I hope they will be offering you a reimbursement for what you paid for the product, or some form of thanks. You brought alot of value to them and assisted the Rennlist community big time.
To be fair, this was a group effort, with the seller contacting the chinese vendor to create a product for north america, and Schnave using his knowledge and experience to be the first to test the prototype product..
Great work from both of them with a huge win to all the affected Porsche community, with useless Porsche just dirty profiteering from their defective Lithium LiFePO4 batteries, their defective programming that damaged the batteries that were advertised to last 10 years, and overcharging for labor and parts.
Last edited by PorscheACC; 06-09-2024 at 06:26 PM.
Thanks for the sentiments antigravity. The seller graciously acknowledged my suggestions for improving the installation instructions in another thread. I’m grateful to kingstone for taking the time (and financial risk) to develop this conversion kit.
Yes, I was the first customer and had some installation issues due to my own inexperience with pinning electrical connectors. More detailed installation instructions would have helped but I think this tutorial fills in most of the blanks.
Looking forward to others contributing their own installation experiences and suggestions for improvements.
Thanks for the sentiments antigravity. The seller graciously acknowledged my suggestions for improving the installation instructions in another thread. I�m grateful to kingstone for taking the time (and financial risk) to develop this conversion kit.
Yes, I was the first customer and had some installation issues due to my own inexperience with pinning electrical connectors. More detailed installation instructions would have helped but I think this tutorial fills in most of the blanks.
Looking forward to others contributing their own installation experiences and suggestions for improvements.
My Kingstone LiFePO4 battery conversion to AGM battery kit is on its way to my house..
I'll be using Schnave's installation notes/observations, using the Kingstone's shipped kit installation instructions, and will be creating a YouTube video of my installation process..
Hopefully, we can have this battery conversion down to a straight forward and clear installation process..
Thanks to Kingstone, Schnave, and Antigravity for all their continuous help on this Porsche problematic/expensive/defective Lithium battery 9Y0 Cayenne model issue that is/has affecting/affected a large number of Cayenne owners.
To be fair, this was a group effort, with the seller contacting the chinese vendor to create a product for north america, and Schnave using his knowledge and experience to be the first to test the prototype product..
Great work from both of them with a huge win to all the affected Porsche community, with useless Porsche just dirty profiteering from their defective Lithium LiFePO4 batteries, their defective programming that damaged the batteries that were advertised to last 10 years, and overcharging for labor and parts.
Sorry for not acknowleding all who participated. I'm was just looking at this from a perspective that if the Seller brings a product to market and promotes it, then doesn't seem to be around to do what Schnave did, or have it already done with images and a good manual, then its not very cool, but that is coming froma strictly business perspective. Please note I understand Antigravity can benefit from this product also, and that is great, but do I fell like recommending a product where the company doesn't have it all together yet? You can imagine how a person who is not familiar with doing something like this would have big trouble without images, and clear instructions from the Seller. You guys are all very knowledgeable, but what about the regular person? Anyway didn't want to offend those who are participating, just want to see a product that is solid, well packed with clear instruction hitting the market.
Last edited by Antigravity; 06-10-2024 at 02:02 PM.
Reason: spelling
Sorry for not acknowleding all who participated. I'm was just looking at this from a perspective that if the Seller brings a product to market and promotes it, then doesn't seem to be around to do what Schnave did, or have it already done with images and a good manual, then its not very cool, but that is coming froma strictly business perspective. Please note I also understand Antigravity can benefit from this product also, and that is great, but do I fell like recommending a product where the company doesn't have it all together, yet put it out there? You canb imagine how a person who is not familiar with doing something like this would have big trouble without images, and clear instruction from the Seller. You guys are all very knowledgeable, but what about the regular person? Anyway didn't want to offend those who are participating, just want to see a product that is solid, well packed with clear instruction hitting the market.
Antigravity, maybe you can comment on which of your Lithium batterie's models can be reliably used with this kit, and what advantages the owners can gain from your products..
My kit is on the way, and hopefully wIll be arriving soon.
We are rooting for Kingstone's early work and early prototype to become the first feasible solution for all Porsche owners affected by Porsche�s defective Lithium batteries and defective programming issue that causes their Lithium LiFePO4 batteries to fail early and thus needing to be replaced at the owners cost.. with some small exceptions..
Porsche left its owners to rot and pay dearly for Porsche�s own defective Lithium battery products/programming..
After Schnave's first early prototyping test/installation, which proved that the AGM product solution was feasible, it will just take several more installation feedbacks to refine the quality of the installation parts and installation documentation.
Being the first actual working product solution in about 5 years, I don't mind the first product growing teeth pains, since Kingstone product solution feasibility is already a reality.
We need to be aware that Porsche could have easily implemented a solution for all affected Porsche owners, but they chose to ignore this defective battery issue, not to do anything about it, not even release an updated fixed battery part solution, no feedback to all affected owners, and worse, Porsche deeply profiting from it.
I will be hopefully posting about my installation experience soon together with a YouTube installation video that may help others..
Last edited by PorscheACC; 06-10-2024 at 01:00 PM.
Antigravity, maybe you can comment on which of your Lithium batterie's models can be reliably used with this kit, and what advantages the owners can gain from your products..
.
While our Lithium Batteries have worked fine in all makes of Automobiles and as a direct replacement for an AGM Battery. I am not familiar enough with this product to claim our battery would work perfectly with this and the Porsche system at this time. The problem is not really on the battery side because we have proven out that the Lithium can work as a direct replacement for AGM equipped cars. The problem is more just testing to make sure not flags will come up because the Porsches have a very sensitive system in terms of voltage requirements or the system will throw a flag. While we are working fine in the 911 variants, and most every brand be it SUVs, Sports Cars or simple Passenger cars, we have not tested in Cayenne's at all, so I have no data to make a claim of reliability or how the system works. I assume the product does not change any charging profile but somehow manipulates the reading of voltage to the Car, which seems innocuous enough, but I also know the first thing we will hear from a Dealer that sees the system with an aftermarket Lithium Battery is is "YOU CAN"T PUT AN AFTERMARKET LITHIUM BATTERY IN A PORCHE", which will scare the daylights out of most Cayenne owners, then we will get the pushback and then have to tell the dealer to stop lying... and so the vicious circle goes.
The benefits of our battery would be the built-in Wireless Jump Starting, and the longer life since the battery uses Lithium and has an advanced BMS protection system to prevent damage from over-discharge and other factors. The massive weight loss will not be so important in a large SUV. The cost would also be much higher compared to an AGM, which for the Sports Car crowd they don't mind so much because they are getting the Lightweight benefit and built-in Jump Starting. So the Cost Benefit for the average Cayenne owner my not be as high. We are now selling extremely well into the SUV/Truck market for the Wireless built in Jump Starting feature, but it is more on the Off-road circles who really desire that since they go off-road and camping and don't want to be stranded. The Soccer Moms/Pops probably haven't not heard of us so much and don't really care about that. Hope that explains it. Let me know if any questions.
Last edited by Antigravity; 06-11-2024 at 12:42 PM.
While our Lithium Batteries have worked fine in all makes of Automobiles and as a direct replacement for an AGM Battery. I am not familiar enough with this product to claim our battery would work perfectly with this and the Porsche system at this time. The problem is not really on the battery side because we have proven out that the Lithium can work as an direct replacement for AGM equipped cars. The problem is more just testing to make sure not flags will come up because the Porsches have a very sensative system in terms of voltage requirements or the system will throw a flag. While we are working fine in the 911 varients, and most every brand be it SUVs, Sports Cars or simple Passenger cars, we have not tested in Cayennes at all, so I have no data to make a claim of reliability or how the system works. I assume the product does not change any charging profile but somehow manipulates the reading of voltage to the Car, which seem inoccuous enough, but I also know the first thing we will hear from a Dealer that sees the system with an aftermarket Lithium Battery is is "YOU CAN"T PUT AN AFTERMARKET LITHIUM BATTERY IN A PORCHE", which will scare the daylights out of most Cayenne owners, then we will get the pushback and then have to tell the dealer to stop lying... and so the vicious circle goes.
The benefits of our battery would be the built-in Wireless Jump Starting, and the longer life since the battery uses Lithium and has an advanced BMS protection system to prevent damage from over-discharge and other factors. The massive weight loss will not be so important in a large SUV. The Cost would also be much higher compared to an AGM, which for the Sports Car crowd they don't mind so much because they are getting the Lightweight benefit and built-in Jump Starting. So the Cost Benefit for the average Cayenne owner my not be as high. We are now selling extrememly well into the SUV/Truck market for the Wireless built in Jump Starting feature, but it is more on the Off-road circles who really desire that since they go off-road and camping and don't want to be stranded. The Soccer Moms/Pops probably haven't not heard of us so much and don't really care about that. Hope that explains it. Let me know if any questions.
Thanks for the information Antigravity..!!
Just to understand the Antigravity batteries choices/properties for the Cayenne model:
1. What Antigravity battery model will be installable on our Cayenne 9Y0's?
2. What is the average designed/expected working number of years for the battery battery model.?
3. What is the amperage specs for the above battery model, that will need to be used for battery registration?


 06-09-2024 | 01:55 AM