When you click on links to various merchants on this site and make a purchase, this can result in this site earning a commission. Affiliate programs and affiliations include, but are not limited to, the eBay Partner Network.
nwGTS, I had a 2012 GTS... black with aero kit like yours I tracked a lot. I did the GT3 brake swap as well but back in 2012. I didn't have any issues with the stock hard brake lines though. gT3 caliper direct bolt on and I used 997 350mm OEM Turbo rotors. I wanted GiroDsc but ended up taking the car back to stock and selling it.
Great mod for sure. I used Pagid Yellow RS29 front but to get better brake bias and have the car brake flatter rather than nose dive I was set Pagid Black RS14 in the rear. Worked like a charm as the rear end didn't lift up at all under braking.
Thanks to your post, I just subscribed, as well. Kept Excellence though, either/or never crossed my mind.
You obviously found the "Prototyp" and #1 issues, so your "lifetime quest" was short-lived.
You'll enjoy 000! Though, I think you mixed up that it was not me but jglaze who posted the pic of the three issues. The search continues for Vol 1 and Prototyp.
Originally Posted by mdrums
nwGTS, I had a 2012 GTS... black with aero kit like yours I tracked a lot. I did the GT3 brake swap as well but back in 2012. I didn't have any issues with the stock hard brake lines though. gT3 caliper direct bolt on and I used 997 350mm OEM Turbo rotors. I wanted GiroDsc but ended up taking the car back to stock and selling it.
Great mod for sure. I used Pagid Yellow RS29 front but to get better brake bias and have the car brake flatter rather than nose dive I was set Pagid Black RS14 in the rear. Worked like a charm as the rear end didn't lift up at all under braking.
Hi again, Mike! I saw you jumped into a 991.1 GTS. What a great move. We exchanged emails back in 2015 when I first got the car if you remember and most of these mods are still based off that exchange and your reco to touch base with BGB.
Funny you mention the mix of pads. I just added RS29s to the front today and swapped in RS14 and 350mm Girodiscs in the rear.
After the GT2 ducts go on, we would have been near clones.
If anyone has a source for more Issue 001s, please let me know too, will you?
Seriously, thank you�all of you�for subscribing!
While Issue 001 is totally sold out, copies of the Prototyp issue are still available via the "Contact Us" form at 000magazine.com. We'll be happy to add your name to the list for a possible reprint of 001, as we may do a second print run with a detail change to denote it as such.
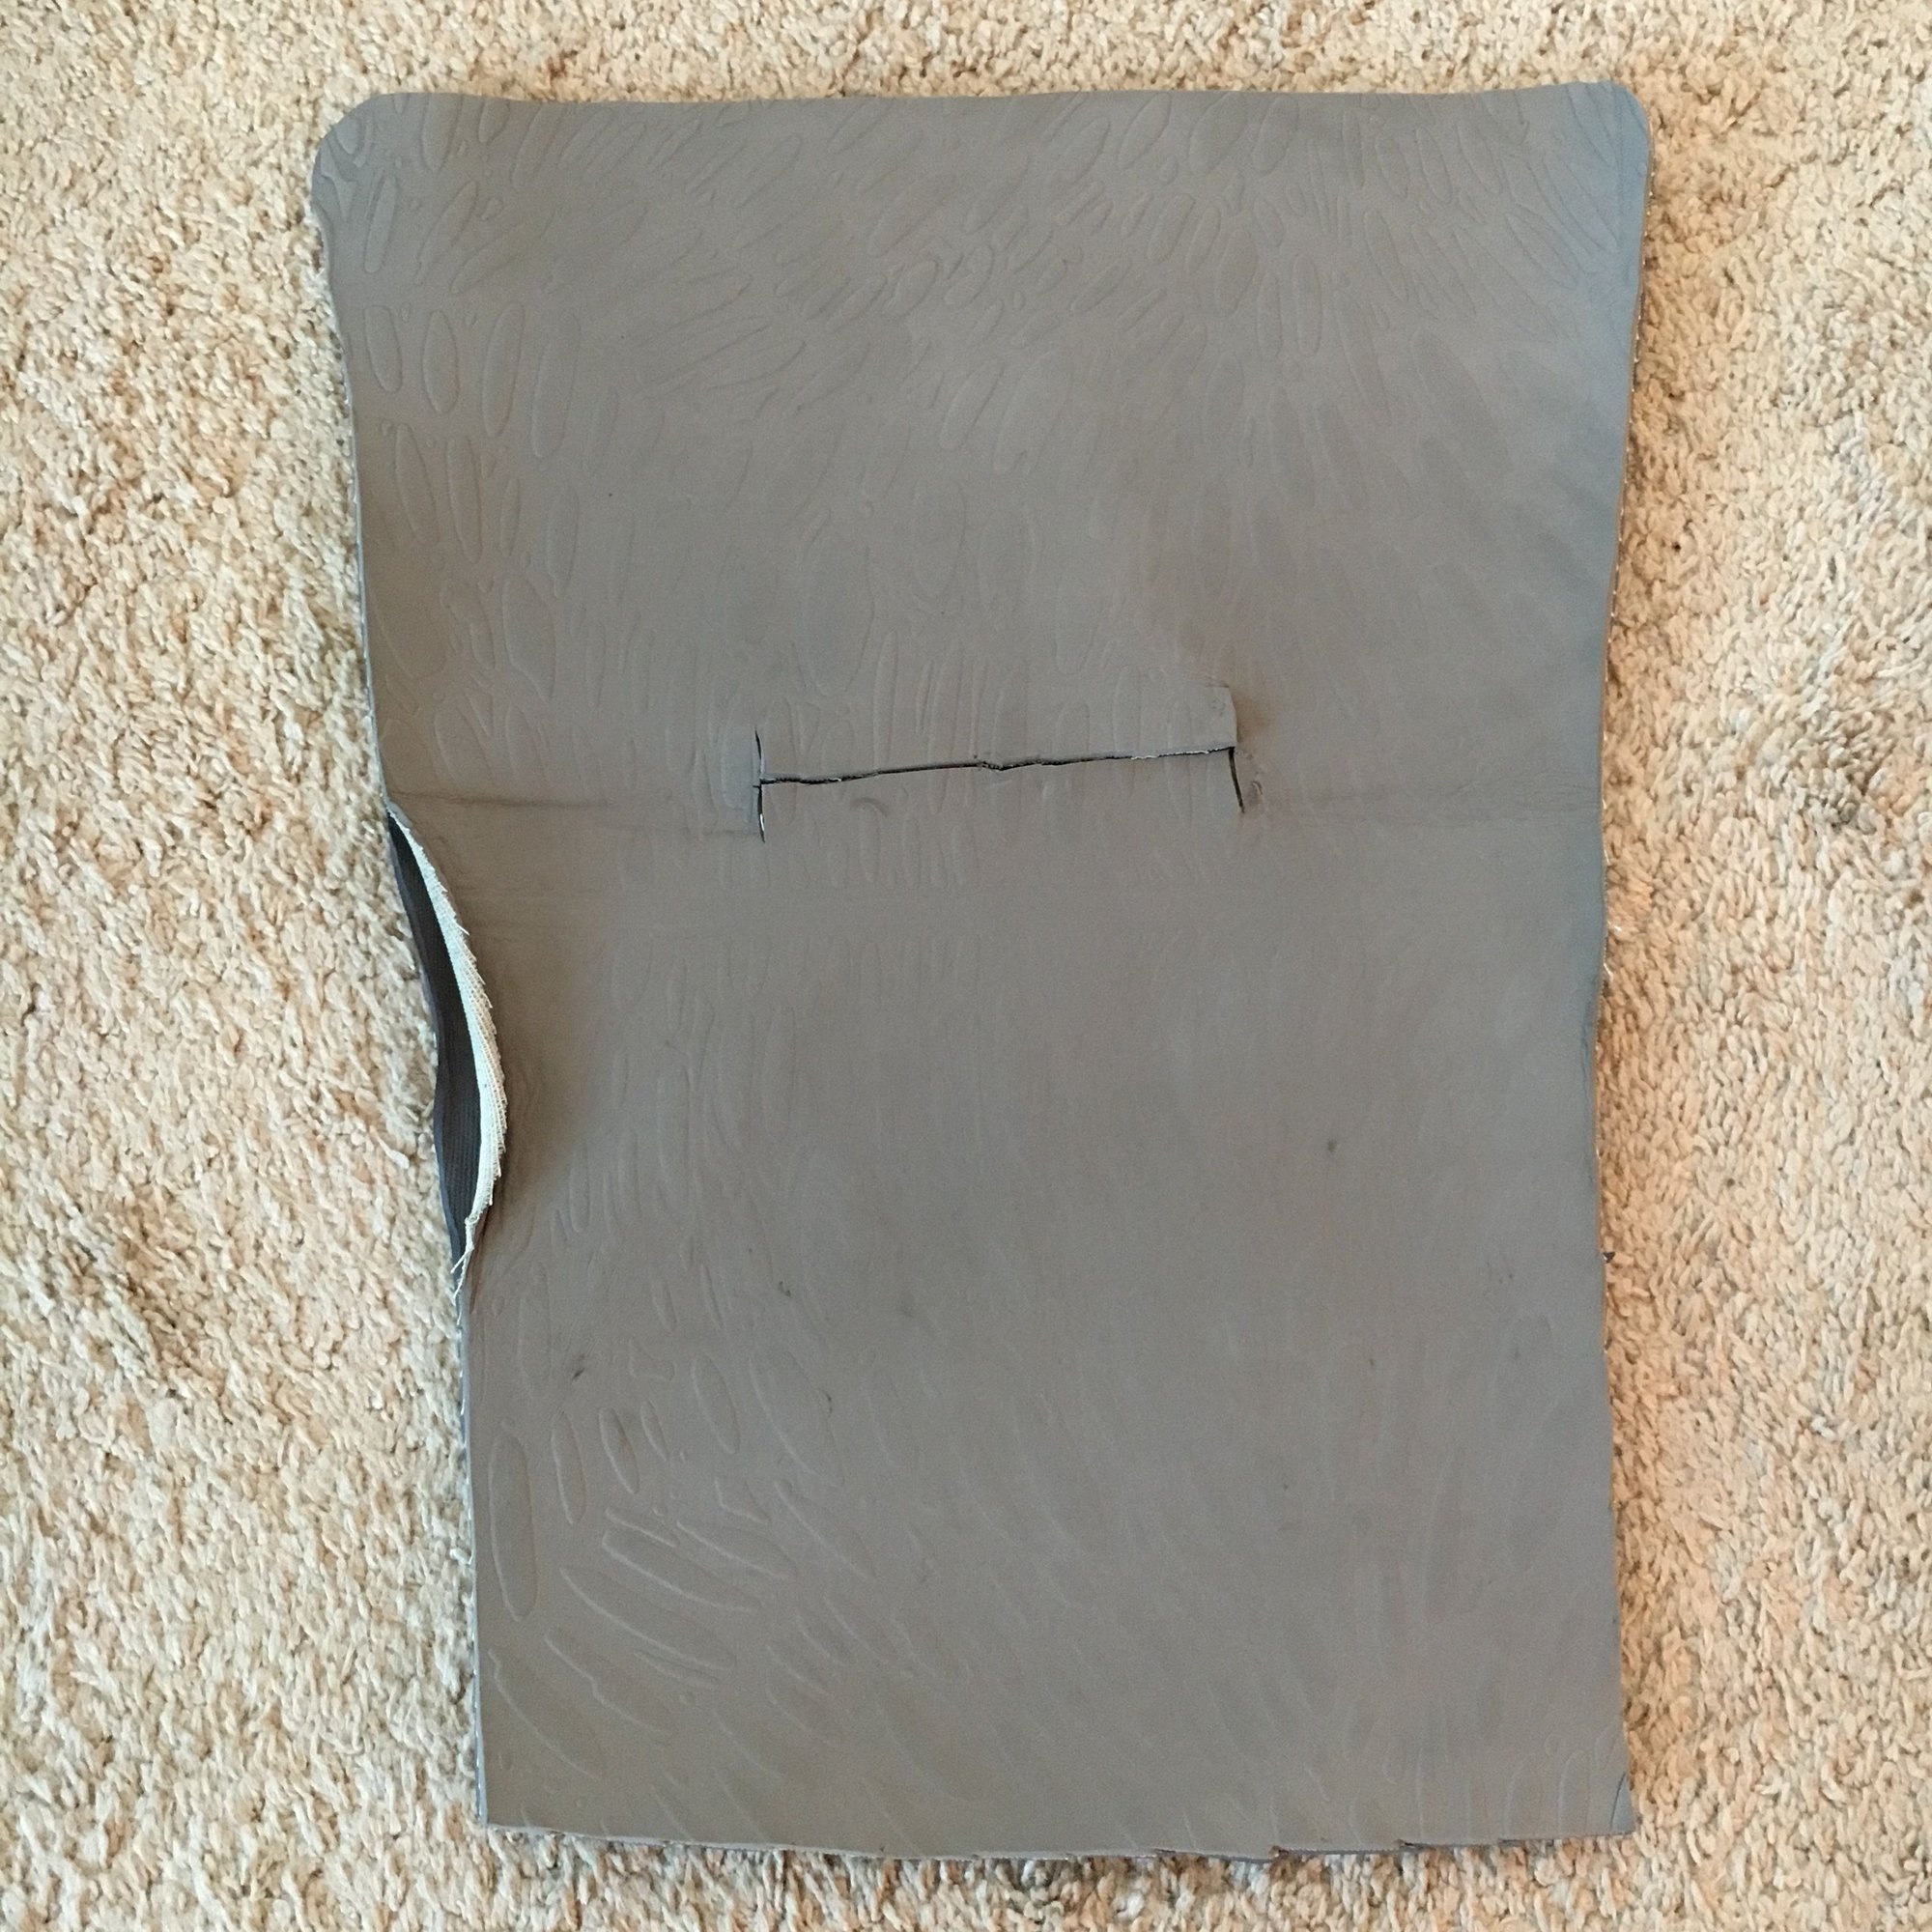
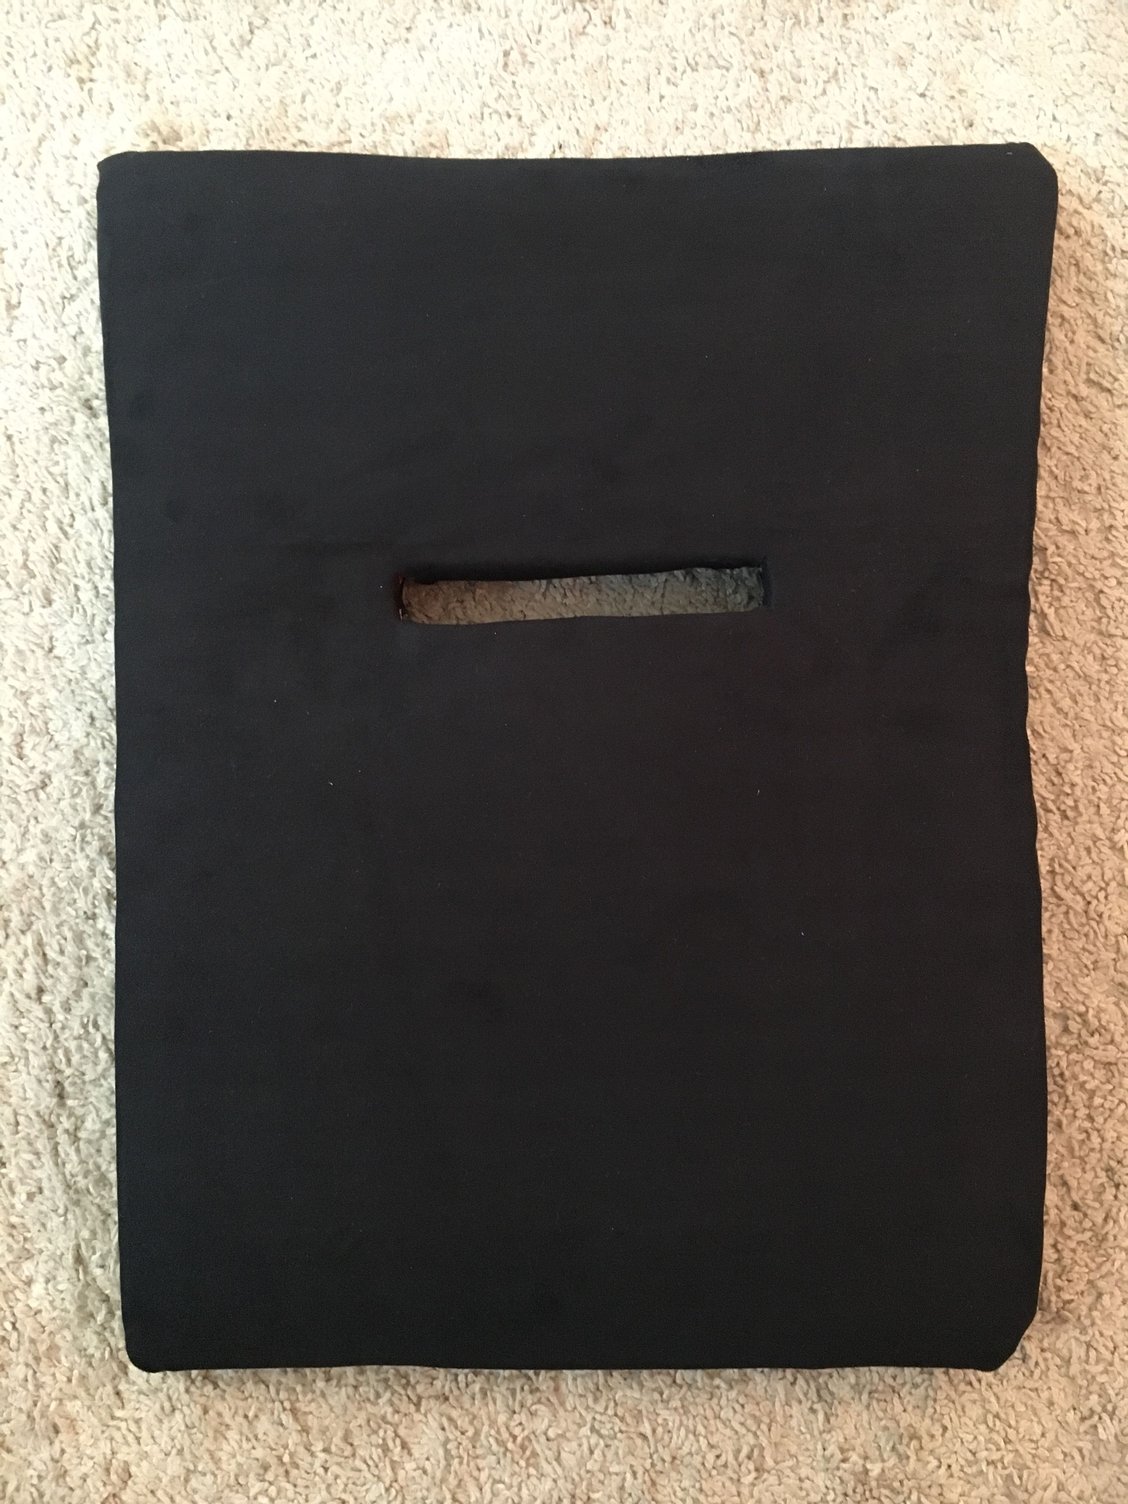
A lower seating position has been an elusive goal during my ownership. Removing the seat cushions from the GT2 seats seemed to be the only option. It worked! For about fifteen minutes until my lower extremities fell asleep. Sitting on hard carbon fiber was just not for me. So I cut up my wife's yoga mat (sorry honey) and had a quick and effective solution. It sure didn't look pretty though.
I needed something better. So I called up my upholstery guy (doesn't everyone have one?) and his quote was just fine but I couldn't find the time to get over there.
Amazon to the rescue with a yard of alcantara and my wife's other yoga mat (sorry honey).
I have enough material to make four more of these. So we'll see how this one fares through a few track days and I'll revise version 2 here as I see it wear. Certainly looks the part.
My next pair of posts will again focus on braking mods. This time in the cooling department. I changed to GT3 front fenders and GT2 ducting along with additional rear GT3 ducting that came on the 997.2 GT3.
I'm a bit out of order here starting with the rear. The pics of the front didn't turn out since I was literally working in the dark in my parking garage. I'll pop a wheel this weekend and take pics for that post.
There are only two pieces and two screws per side so you'd think this would be easy, but retrofitting on a slightly different model is never straightforward. Additionally, as many have stated in the 997 GT3 forum, this was a post-build design by the GT department. Rear ducting like this was not on the 997.1 GT3 but was added to the 997.2 GT3 after software brake biasing for the GT3 models was changed necessitating additional rear cooling. The engineers did a good job with what they had but there are many posts and threads about these ripping off or not fitting at all on bone stock GT3s.
The issue is that the ducts attach to the LCA which means they move with the LCA and orient themselves as it does. When the wheel carrier is in full hanging, extended position the LCA moves such that the top of the duct strikes the lower part of the wheel carrier knuckle. If this happens too abruptly, it snaps the bracket holding the duct to the LCA. Moreover, you can't install these without compressing the suspension because of the same reason.
Of course I didn't know any of this before installing these. It seriously looks like it's the easiest thing in the world and should take 5 minutes. On a 997.2 GT3 it does. On a 997.1 GT3 only trimming of the brake rotor shield is required. On my GTS, it took a solid 90 minutes total for me wheels on to wheels off. I did know that the brake rotor shield needs to be trimmed a bit and that was pretty straight forward if not physically straining with the car just on jack stands and without removing the rotor and caliper.
So, let's get to it.
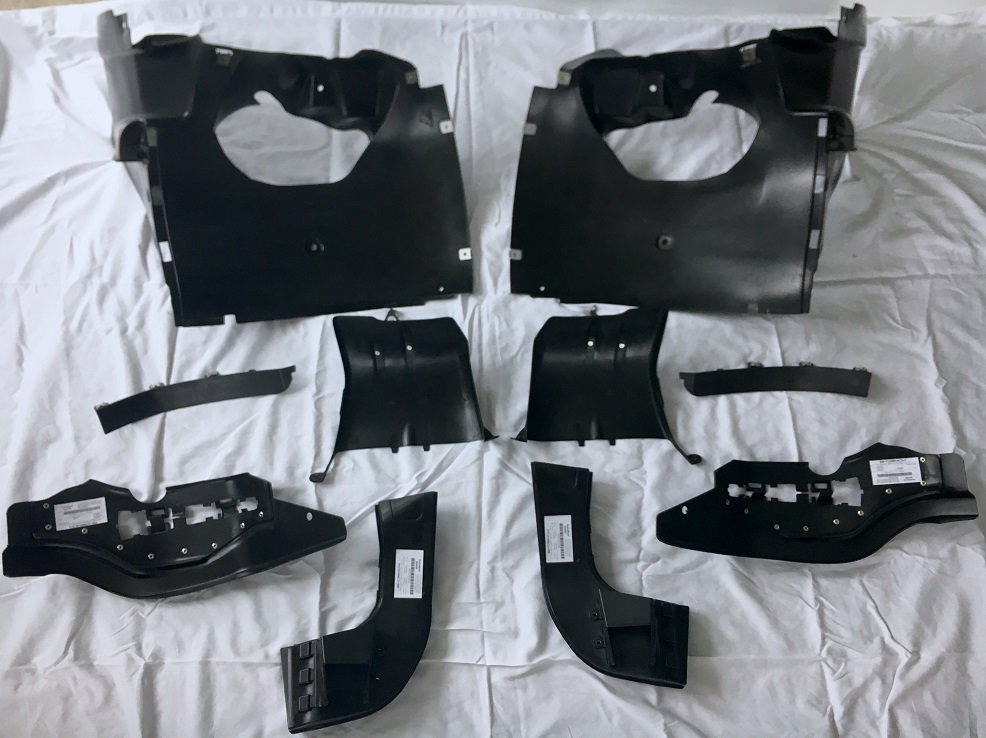
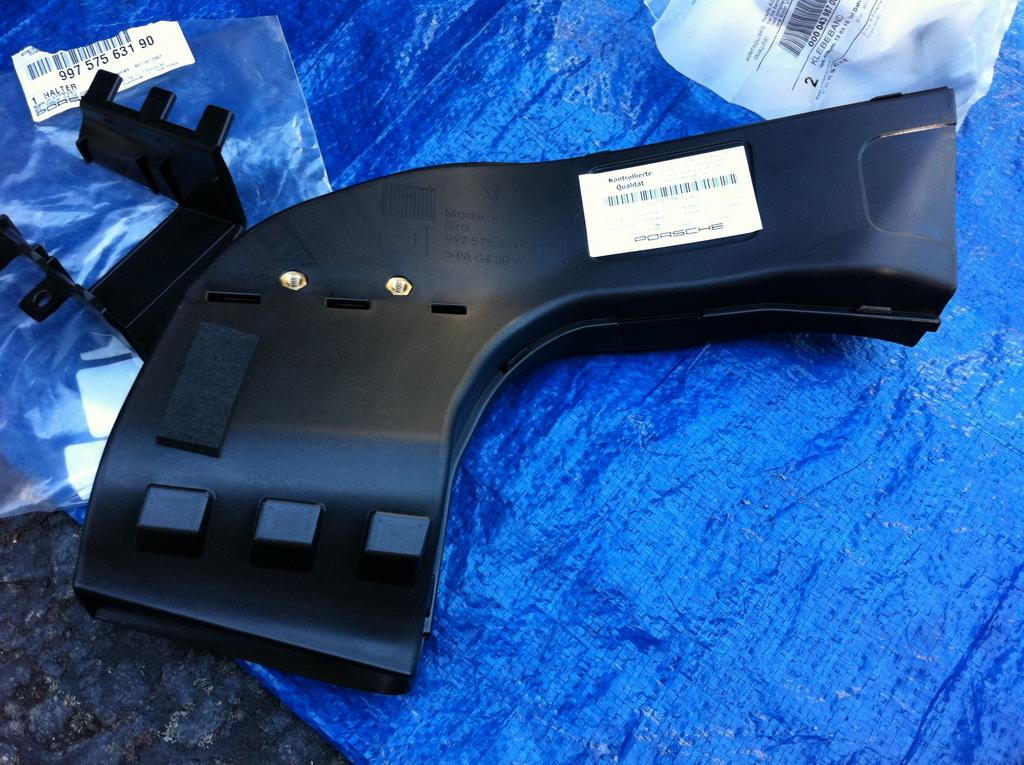
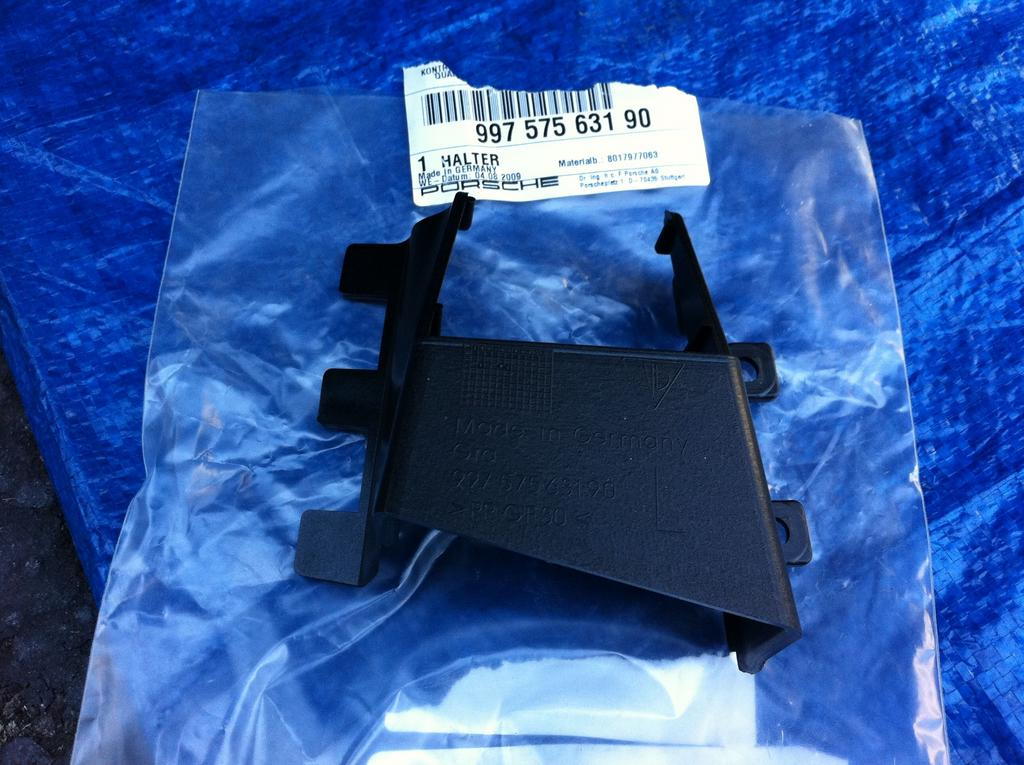
Here are the parts that went on:
Up top we have GT3 Fender Liners with ducting and spoilers directly beneath. Rear GT3 ducts with brackets already attached are lower center flanked by front GT2 brake ducts. A whole lotta plastic.
Here are pics of the individual items (not my pics):
The top bracket has 'ribs' on the inside that i needed to file down for the bracket to extend low enough to get the screws started. I also nipped the top part of the bracket so it could flex a bit more to fit. Then I just jacked up the carrier, inserted the screws and tightened them. I fully tightened the inboard screw but only tightened the outboard screw halfway or the bracket would have snapped. The pegs on each side will keep it secure and I used red loctite on the engaged threads so it won't back out.
The first side I did took me over an hour to figure out. The second side was 20 minutes doing all the mods first (filing, trimming, etc).
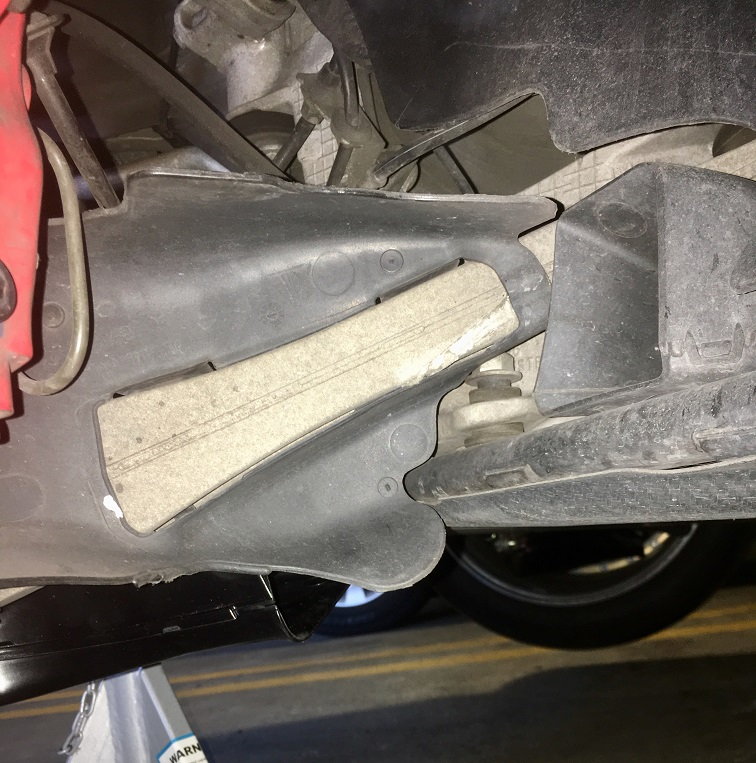
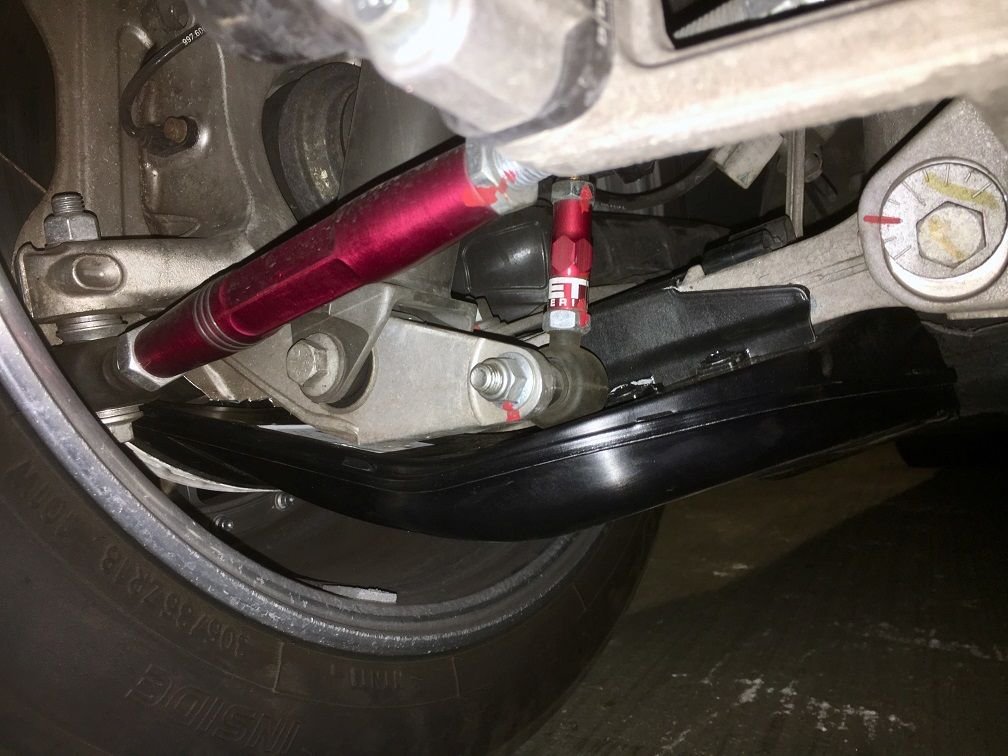
Passenger side: Just below this sizable air guide/duct you can see the opening to the ducting I just added. Interestingly enough, the Carrera GTS come from the factory with both front and rear ducting and liners from the 997.2 Turbo. That rear TT ducting is what you are looking at here. This is another thing that separates it from the standard C2/4S. Realize this pic was taken with the carrier extended. When the carrier is under load both ducts are in line with the longitudinal axis of the car.
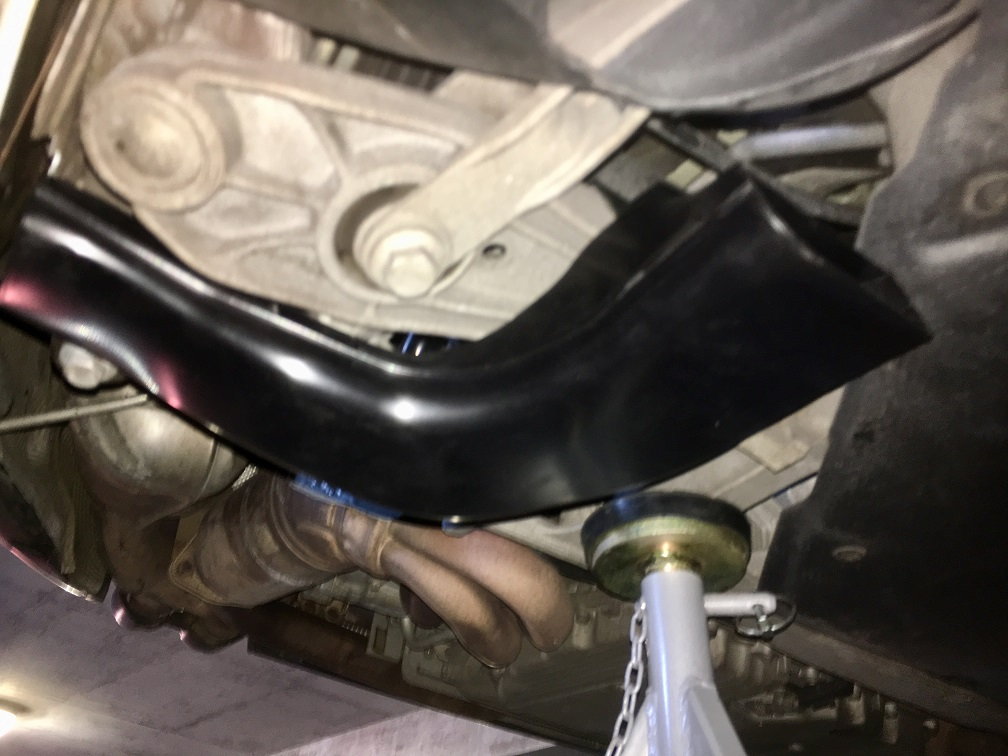
Passenger side: Here is a shot from underneath the car showing the clear intake path of the new ducting.
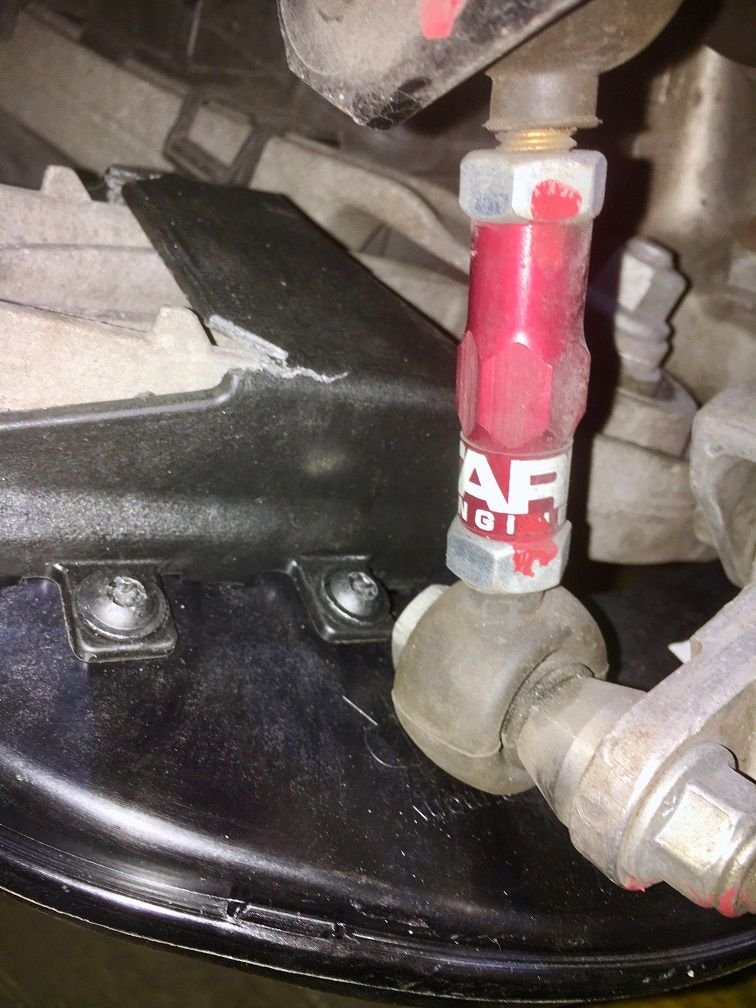
Passenger side: Here you can see the inboard (left screw is fully tightened and the outboard (right) screw is only half engaged to prevent the bracket from snapping. The cuts I made relieved some of the stress but not all of it as you can see. I may very well lose these on the next hard bump or track day. For anyone doing this mod, I'd suggest you buy a pair of washers for each side and longer bolts for the outboard bolt hole. I'll do that if I ever have to do this again.
Driver's side: Here you can see a good clear shot of the entire duct, bracket and exit mouth right on the rotor. This is the driver's side on the ground with the passenger side in the air. You can see where the knuckle contacts the top of the duct and can probably imagine what it would do to the ducting assembly if the carrier suddenly dropped.
I hit the track on Monday (three days from now) and hopefully the ducts make it home with me and keep the brakes a little cooler for more hot laps and a firmer pedal.
Passenger side: Just below this sizable air guide/duct you can see the opening to the ducting I just added. Interestingly enough, the Carrera GTS come from the factory with both front and rear ducting and liners from the 997.2 Turbo. That rear TT ducting is what you are looking at here. This is another thing that separates it from the standard C2/4S. Realize this pic was taken with the carrier extended. When the carrier is under load both ducts are in line with the longitudinal axis of the car.
I'm a bit confused. I see the new duct below the LCA, but which are the TT/GTS part(s) that the lesser cars don't get? I tried looking through the PET and didn't see a different part number for the GTS.
I'm a bit confused. I see the new duct below the LCA, but which are the TT/GTS part(s) that the lesser cars don't get? I tried looking through the PET and didn't see a different part number for the GTS.
Thanks for the help.
Firstly, do you have a 2011/2012 PET? I'd love to have it.
The turbo parts on the rear are those circled. On the front they are the fender liner and front brake ducts which I'll include when I have time to upload pics soon.
I finally had the chance to switch out my wheels and get some better (not excellent though) pics of the new GT3 fender liners.
First, here is the parts list:
The above does not include the GT2 ducts which are part numbers: 996-341-117-90-and-996-341-118-90
Though the liners come with support nuts, you'll need an additional nut for each deflector to attached to the body and I also needed one for each side to attach the fender liner spoiler to the front bumper cover spoiler. It's better to have too many extras of these than too few and they are relatively inexpensive.
Unfortunately I didn't have the time to put together a DIY but it's as straightforward as it gets. All the original holes on my OEM GTS liners line up with the GT3 fender liners. So, it's just a matter of R&Ring molding screws in the wheelwell and underneath where the liner attaches to the bumper cover. 8 each side if I recall correctly.
Step 1 is removing the original fender liners and brake ducts. Interesting fact, the GTS also has Turbo front brake ducts like in the rear.
Next, you'll need to attach the liner spoiler to the liner. Three screws take care of that job. I needed to trim some of the plastic so it fit the front bumper cover's spoiler. Nothing major, just a snip or two. After that, everything screws back together.
The new liners have a nice gaping hole where the GTS liners had vanes that directed air onto the wheel and inside the wheelwell. The deflectors are a new addition and route all of that previously abandoned air right onto the top and mid-front portions of the rotor
The new GT2 ducts add even more air routed from under the car and through the front body liner right onto the bottom portion of the rotor. With the deflectors above this pic shows just how much air is routed directly onto the rotor now.
The GTS rotor shield needed a quick snip to expose more surface area. Though I've heard of others needing zip ties and the like, these GT2 brake ducts snapped into place on the thrust arm without needing anything else to hold them in place.
The result? In my next and last track day this year I went all six sessions at 30 min each in 80 degree ambient temp with no fade and a solid, stiff pedal all day. It was a revelation.
Plus, I set a PB of 2:45 at ABCC on the last session of the last track day this year. So, that was a great way to end the season.
Next up, I have the car inspected, 40k/4yr maintenance done (on time, not mileage) and put to bed for a long sleep.
Sounds like the GT2 brake ducts don't require trimming when used with the GT3 fender liners, correct?
Correct. I didn�t need to trim the GT2 ducts with the GT3 fender liner. I would have if I fit them to the GTS fender liner.
Originally Posted by BillNye
Also, did you have a lack of cooling prior to the caliper upgrade?
My brake fluid was boiling in the last few laps of the last couple sessions of a track day. It was annoying when those are the scenarios where I�m running my fastest. This setup has completely solved for that.
Once again the season comes to an end and attention turns to final maintenance before I tuck it in for 5 long months.
With 35k on the odo, I went in for my major maintenance (I think they changed the names from 'minor maintenance'/'major maintenance' to 'intermediate maintenance' and simply 'maintenance' respectively).
Surrounded by piggies.
The 997.2's 'maintenance' schedule is 40k miles/4 years. I'm a year late on time and a year early on miles. Call it a wash.
I had all the standard maintenance items covered (see attached PDF) including a cleaning of the condenser and radiator. Additionally, because my car is tracked, I elected to have the coils replaced early too. All Porsche parts were used sans the air filter which is a reusable unit. I do the oil change myself just before storage so that was also not done at this time.
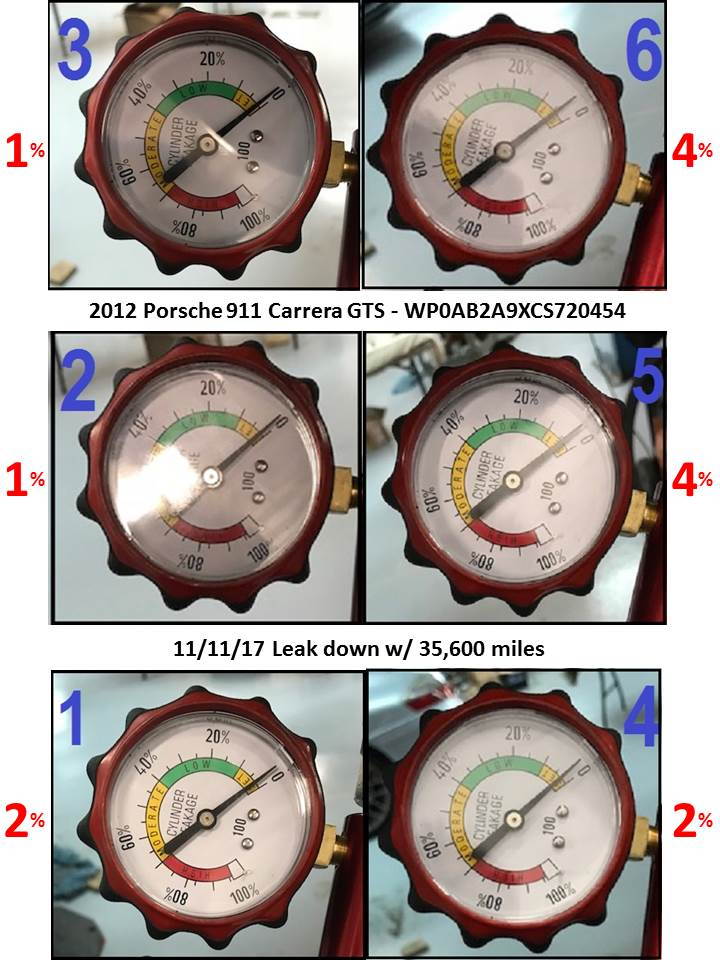
My CPO expires in December and while I've never had to add oil between changes or had any other inclination to have the engine looked at, I elected to have a leak down and scope done on all cylinders for peace of mind.
All cylinders were bright and shiny and I passed the leak down with flying colors:
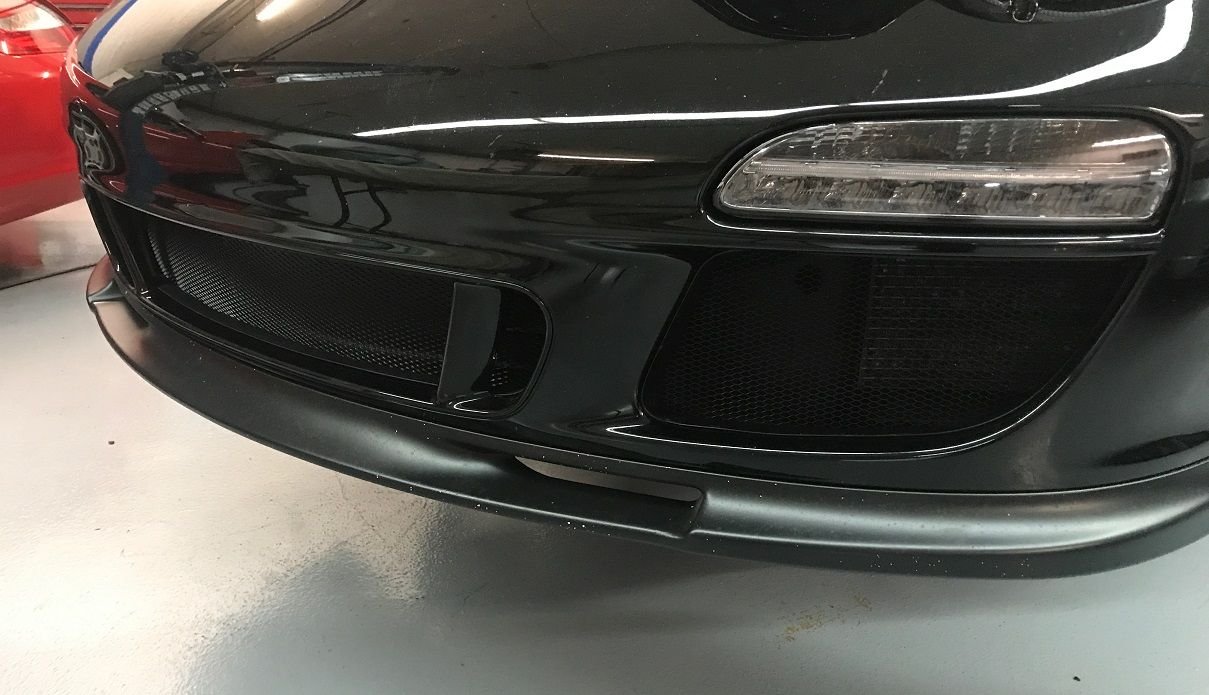
With a clean bill of health from the doc, I zipped over to my race shop and had them add Rennline grills I had put off doing myself for lack of space to remove a front bumper cover.
They trim the side grill slats, sand them and then paint the inner housings. It looks super clean... glorious.
I wish I would have done this sooner.
Next, I'll change the oil and throw the cover on it. Before the end of the year, I plan to install a Numeric shifter.
And while the car is in storage over winter I'm going to wire a new 'track only' steering wheel which will be a fun project.

 08-13-2017, 06:31 PM