

DIY Preventative Maintenance: 997.1S Water Pump Replacement - Part 1
 07-10-2012, 04:58 PM
#1
Drifting
Thread Starter
Background and Goals
My '08 C2S currently has 52K+ miles and 4 yrs on the clock. After much research and seeing a few WP's go out for other members I decided to pre-emptively replace my WP. 50K-60K miles seems like the right range for a WP replacement plus I'll go out of my way with maintenance to avoid being stuck in a remote part of Texas in the heat of summer. P-dealers are few and far apart even in the major cities. In addition, once the impeller goes parts of it will likely get caught somewhere inside the coolant system and/or worst the engine� this can potentially lead to hot spots in the engine block where it is not getting cooled properly resulting in a cracked engine block� similar in some ways to a person suffering from a stroke - blockage to the heart or brain is deadly. Better to address the potential issue up front. A new WP is available from Suncoast for ~$250� cheap insurance compared to a new engine.
I consider this DIY project a level 6 out of 10 due to all the components you have to remove before getting to the WP and the tight spaces you have to operate within. Here are some instructions which may help others.
Tools Required:
- 24mm socket and break bar - used to turn tensioner pulley and remove the s-belt
- 15mm, 10mm, E-10 Torx sockets
- Various socket wrench(1/4" and 3/8") plus numerous extensions of varying sizes especially the stubby ones with a flex head
- 10mm open box wrench
- 1/4" and 3/8" torque wrenches
- Pliers used to move coolant hoses clamps
Note: I found my Max Axess tool set to be of great help in those tight areas.
Parts:
- New Water Pump and Gasket...ref PET page 27
- 2 gallons of Porsche Coolant
- 2 gallons of distilled water
Optional/Recommended Parts
- New Thermostat Housing Gasket... ref PET page 27
- New bolts for exhaust manifold... ref PET page 55
- New exhaust manifold gasket... ref PET page 55
Torque Values:
7.5 ftlb. (10 Nm) for the water pump
34 ftlb. (46 Nm) for the engine carrier bracket
17 ftlb. (23 Nm) for cat bracket
~ 6 ftlb. for Thermostat housing... could not locate a reference value so this is based on the torque value required to remove the torx screws
Reference Materials:
PET Catalog - http://www.porsche.com/uk/accessorie...artscatalogue/ Then select your model and MY
Pedro's DIY for Boxster - http://www.pedrosgarage.com/Site_3/R...ater_Pump.html
Youtube Video -
Removal/Installation Instructions:
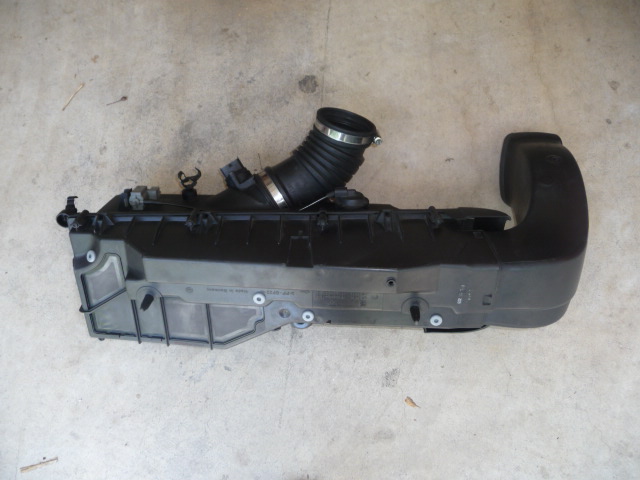
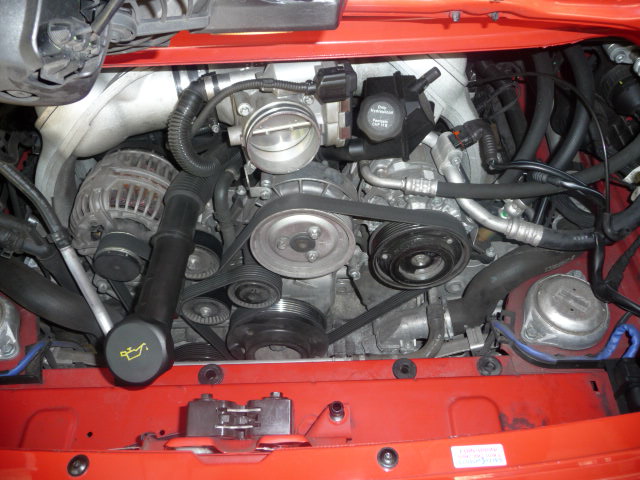
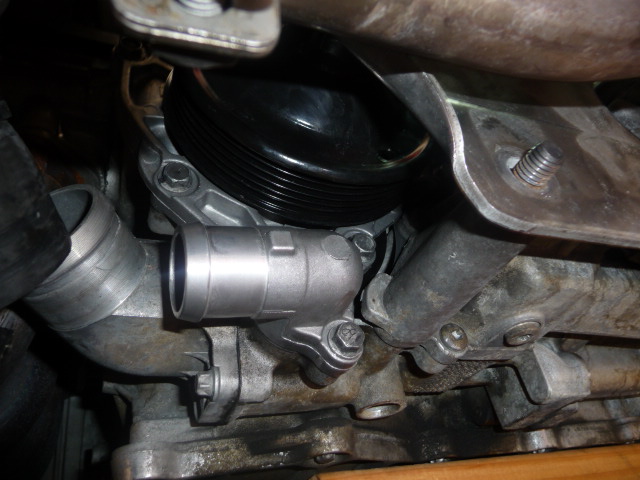
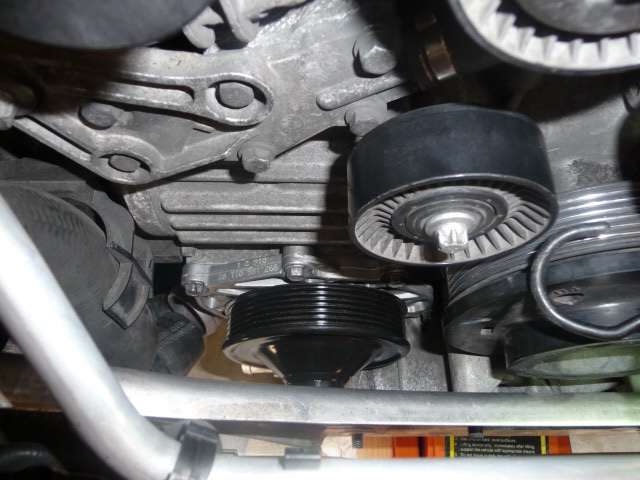
1. Remove the air box completely and the s-belt to gain access to the WP. The WP is located at the bottom of the engine rear end driver side. It's the last large black ribbed pulley. Some instructions from a prior DIY posting: https://rennlist.com/forums/997-foru...tine-belt.html
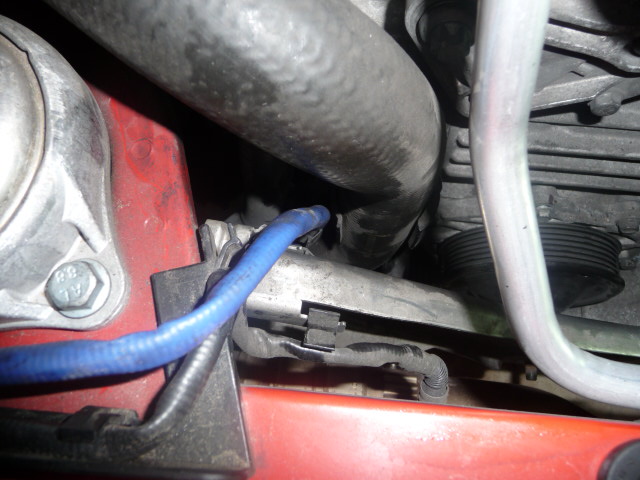
2. To avoid stressing some of the electrical wiring I loosen them from their attach points to the engine carrier bracket. The bracket will be moved to allow enough room for the WP to be removed.
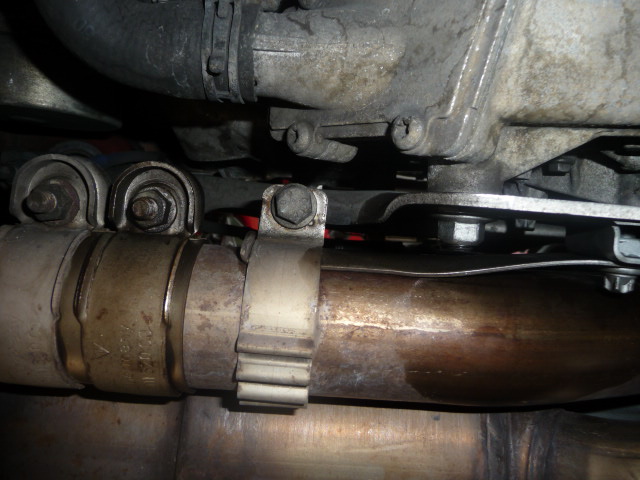
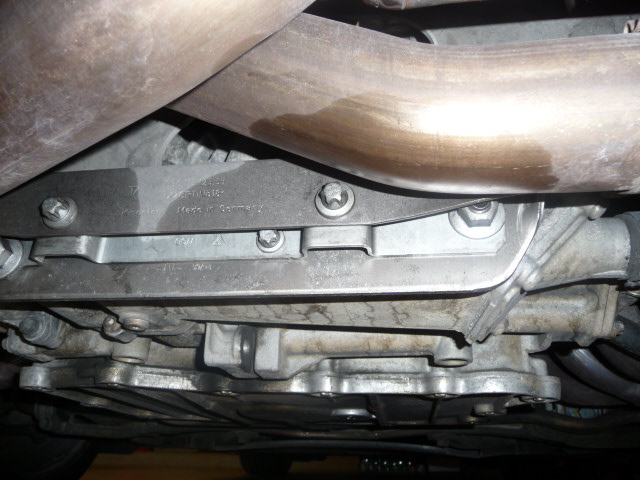
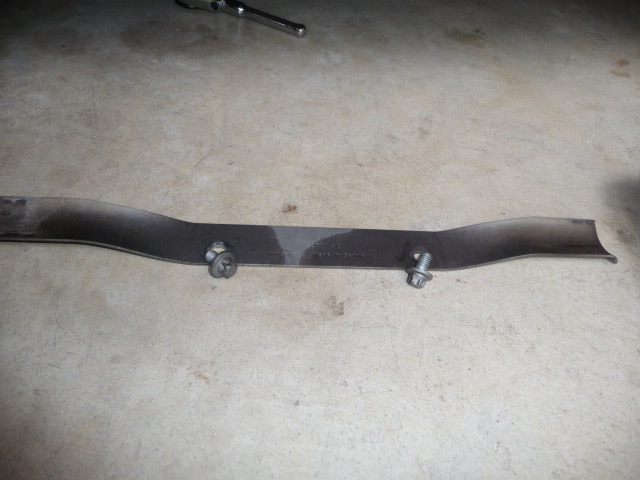
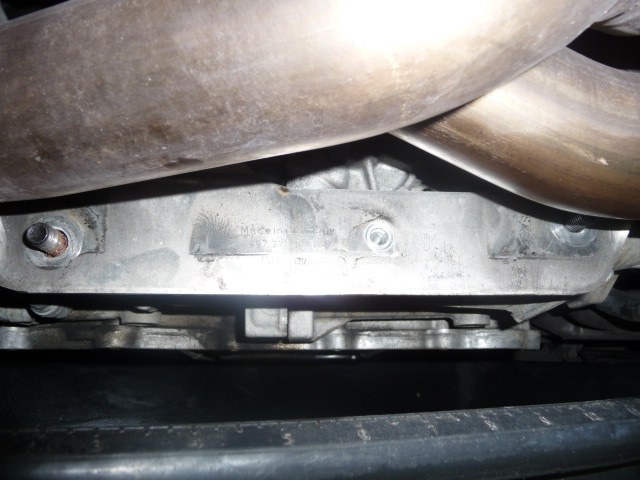
3. Unbolt the cat brackets from the cat and the engine carrier bracket. Hindsight - I highly recommend removing the driver side header as well to allow for enough space to get a torque wrench into the WP and thermostat housing area when you're ready to install all components back. Make sure you have a replacement head gasket on hand if you do so.
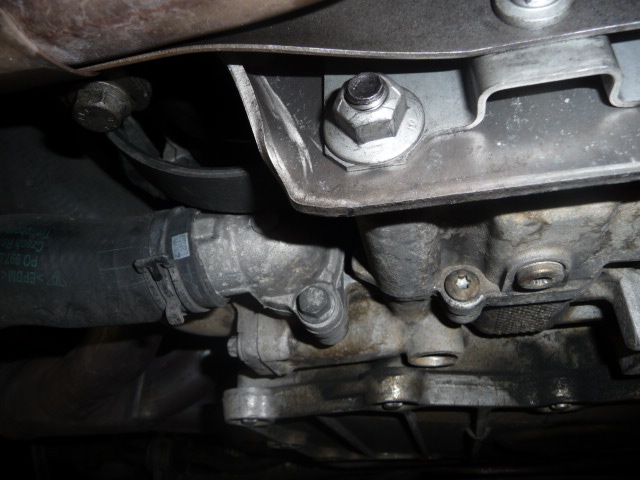
4. Remove the coolant hoses from the WP and the thermostat housing unit. ~2.5 gallons of coolant came out at this point. To move the metal coolant hose out of the way I had to remove the thermostat housing. Make sure you have a new gasket for the thermostat housing if you do this. I assumed that the gasket I purchased for the WP had both the WP and T-housing gasket... not so. Another trip to the local dealer... more time in the project but I got some tech time with my favorite service rep there. The SR started out as a P-car mech so he actually knows the product.
This is a long write up so saving at this point JIC I lose my internet connection. Continuing on the next thread.
My '08 C2S currently has 52K+ miles and 4 yrs on the clock. After much research and seeing a few WP's go out for other members I decided to pre-emptively replace my WP. 50K-60K miles seems like the right range for a WP replacement plus I'll go out of my way with maintenance to avoid being stuck in a remote part of Texas in the heat of summer. P-dealers are few and far apart even in the major cities. In addition, once the impeller goes parts of it will likely get caught somewhere inside the coolant system and/or worst the engine� this can potentially lead to hot spots in the engine block where it is not getting cooled properly resulting in a cracked engine block� similar in some ways to a person suffering from a stroke - blockage to the heart or brain is deadly. Better to address the potential issue up front. A new WP is available from Suncoast for ~$250� cheap insurance compared to a new engine.
I consider this DIY project a level 6 out of 10 due to all the components you have to remove before getting to the WP and the tight spaces you have to operate within. Here are some instructions which may help others.
Tools Required:
- 24mm socket and break bar - used to turn tensioner pulley and remove the s-belt
- 15mm, 10mm, E-10 Torx sockets
- Various socket wrench(1/4" and 3/8") plus numerous extensions of varying sizes especially the stubby ones with a flex head
- 10mm open box wrench
- 1/4" and 3/8" torque wrenches
- Pliers used to move coolant hoses clamps
Note: I found my Max Axess tool set to be of great help in those tight areas.
Parts:
- New Water Pump and Gasket...ref PET page 27
- 2 gallons of Porsche Coolant
- 2 gallons of distilled water
Optional/Recommended Parts
- New Thermostat Housing Gasket... ref PET page 27
- New bolts for exhaust manifold... ref PET page 55
- New exhaust manifold gasket... ref PET page 55
Torque Values:
7.5 ftlb. (10 Nm) for the water pump
34 ftlb. (46 Nm) for the engine carrier bracket
17 ftlb. (23 Nm) for cat bracket
~ 6 ftlb. for Thermostat housing... could not locate a reference value so this is based on the torque value required to remove the torx screws
Reference Materials:
PET Catalog - http://www.porsche.com/uk/accessorie...artscatalogue/ Then select your model and MY
Pedro's DIY for Boxster - http://www.pedrosgarage.com/Site_3/R...ater_Pump.html
Youtube Video -
Removal/Installation Instructions:
1. Remove the air box completely and the s-belt to gain access to the WP. The WP is located at the bottom of the engine rear end driver side. It's the last large black ribbed pulley. Some instructions from a prior DIY posting: https://rennlist.com/forums/997-foru...tine-belt.html
2. To avoid stressing some of the electrical wiring I loosen them from their attach points to the engine carrier bracket. The bracket will be moved to allow enough room for the WP to be removed.
3. Unbolt the cat brackets from the cat and the engine carrier bracket. Hindsight - I highly recommend removing the driver side header as well to allow for enough space to get a torque wrench into the WP and thermostat housing area when you're ready to install all components back. Make sure you have a replacement head gasket on hand if you do so.
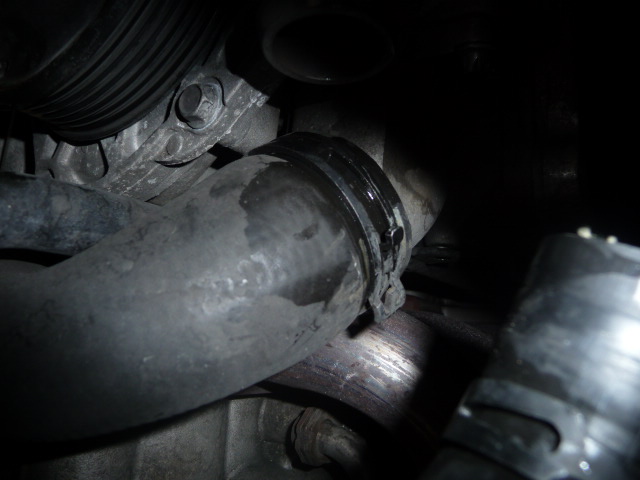
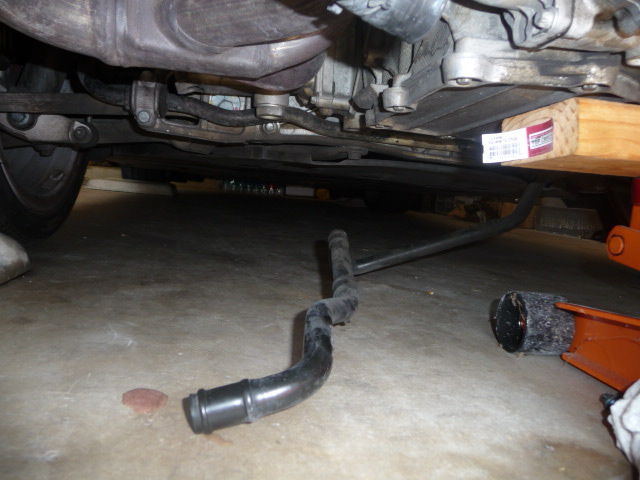
4. Remove the coolant hoses from the WP and the thermostat housing unit. ~2.5 gallons of coolant came out at this point. To move the metal coolant hose out of the way I had to remove the thermostat housing. Make sure you have a new gasket for the thermostat housing if you do this. I assumed that the gasket I purchased for the WP had both the WP and T-housing gasket... not so. Another trip to the local dealer... more time in the project but I got some tech time with my favorite service rep there. The SR started out as a P-car mech so he actually knows the product.
This is a long write up so saving at this point JIC I lose my internet connection. Continuing on the next thread.
Last edited by USMC_DS1; 07-11-2012 at 12:38 PM.

The following users liked this post:
TV911 (08-24-2019)
07-10-2012, 06:31 PM
#2
Drifting
Thread Starter
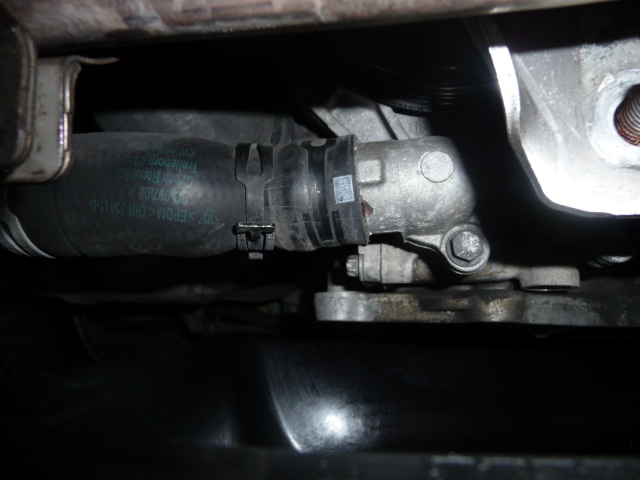
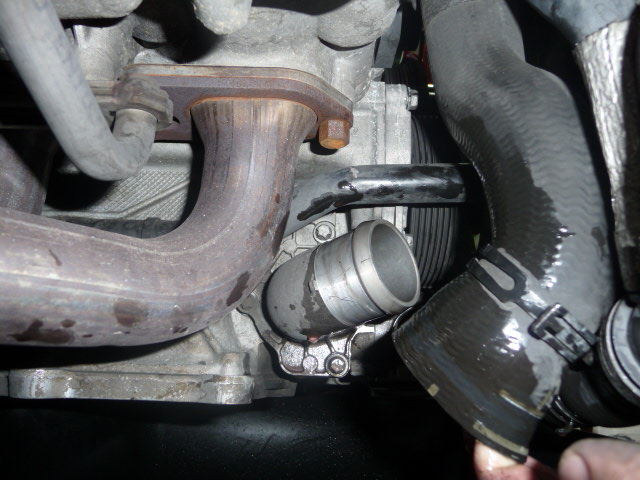
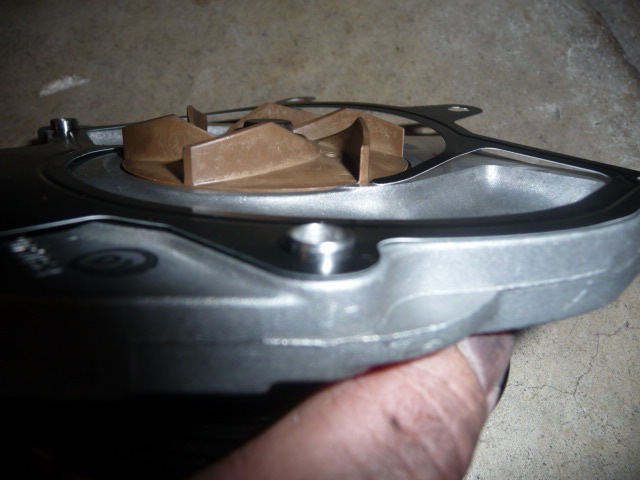
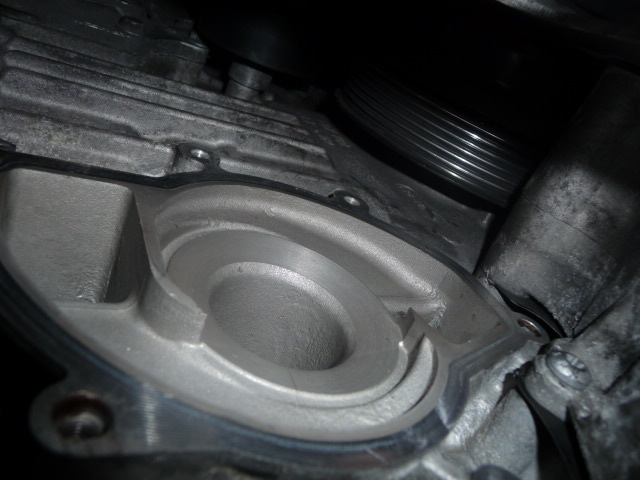
5. Pull the engine carrier bracket back enough to remove the WP. Note: you may need the T-housing out to access the WP bolts easily. In addition, you will likely have to jack the engine up a bit to loosen the bracket enough. I used my floor jack and a 2x4. The T-housing is held in place by 4 torx screws so use the E10 sockets. The WP has seven 10mm bolts. I marked all bolts by their location using the clock system. Note that the WP's 4 o'clock bolt will be the most difficult to remove and install due to space constraints.
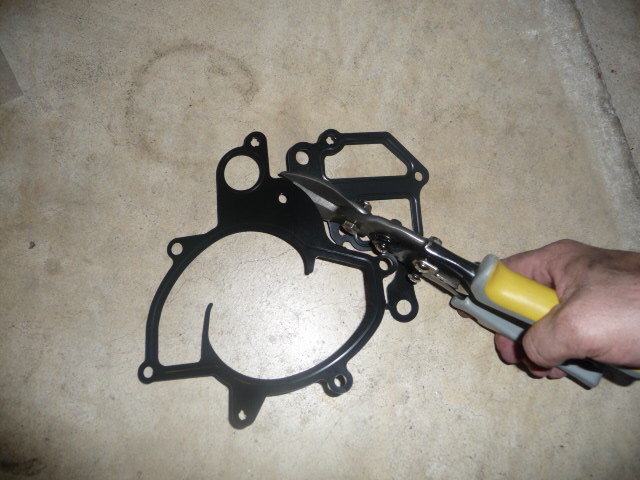
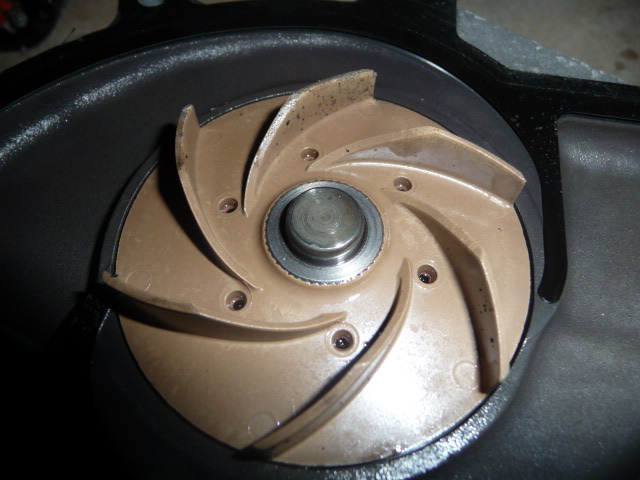
6. Cut the metal gasket at three points and mount to the new WP. It's keyed so will only fit one way. Make sure the mated surface areas are cleaned thoroughly. I used a brass brush to remove any old material from the T-housing, WP, and engine mount areas.

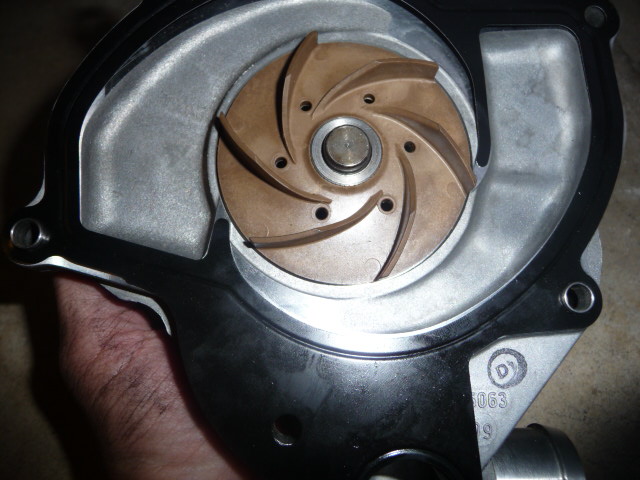

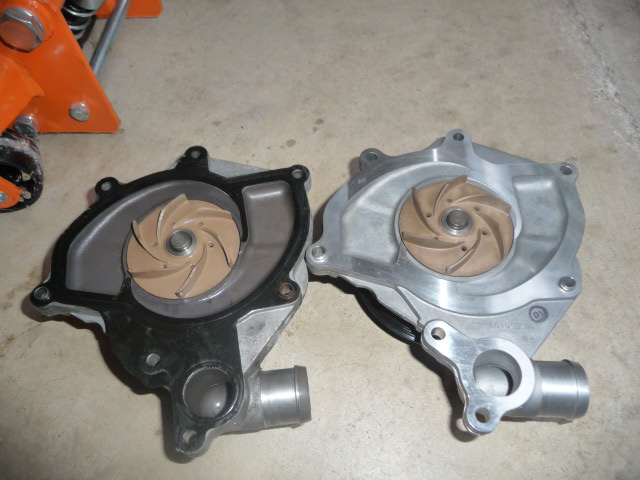
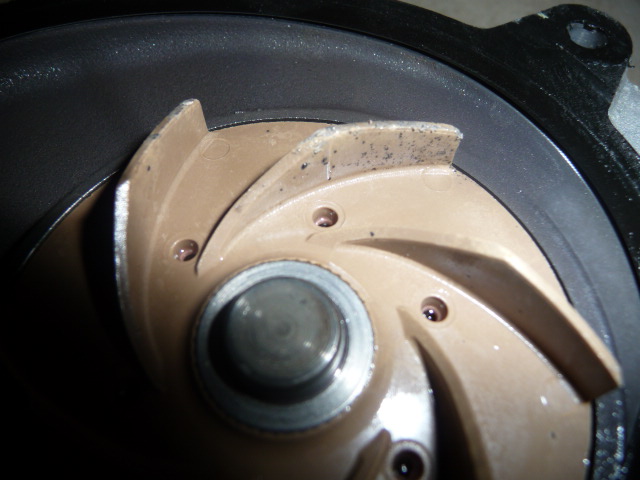
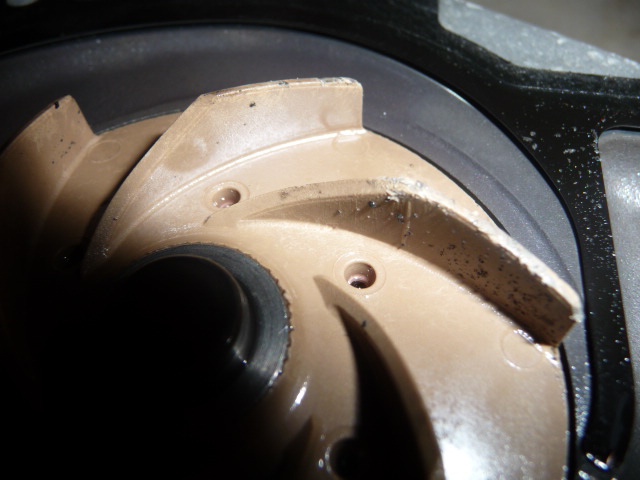
7. Inspect the old WP. I noted some minor wear on the impellers but no big chunks missing... a good sign.
8. Re-install all parts using the proper torque setting noted in Part 1.
9. Fill back up with coolant. I like to use an Airlift tool to do this part as noted in a prior DIY for the 3rd radiator add.
Conclusion and note to self:
The most effective way to perform this DIY requires the removal of several components including the air box, s-belt, thermostat housing, and exhaust manifold. As the WP preventative maintenance lines up closely with the 48K miles major inspection (mileage wise) and while I have those components out... I may as well execute several DIY's into one project at the 96K mark:
1. replace/service air filter
2. clean/service MAF
3. replace s-belt
4. replace WP and gasket
5. inspect t-housing and replace gasket
6. replace spark plugs and coils
7. replace header gaskets
7. partial coolant flush
Until then it's really just your basic oil changes, brake bleeds, etc.
6. Cut the metal gasket at three points and mount to the new WP. It's keyed so will only fit one way. Make sure the mated surface areas are cleaned thoroughly. I used a brass brush to remove any old material from the T-housing, WP, and engine mount areas.
7. Inspect the old WP. I noted some minor wear on the impellers but no big chunks missing... a good sign.
8. Re-install all parts using the proper torque setting noted in Part 1.
9. Fill back up with coolant. I like to use an Airlift tool to do this part as noted in a prior DIY for the 3rd radiator add.
Conclusion and note to self:
The most effective way to perform this DIY requires the removal of several components including the air box, s-belt, thermostat housing, and exhaust manifold. As the WP preventative maintenance lines up closely with the 48K miles major inspection (mileage wise) and while I have those components out... I may as well execute several DIY's into one project at the 96K mark:
1. replace/service air filter
2. clean/service MAF
3. replace s-belt
4. replace WP and gasket
5. inspect t-housing and replace gasket
6. replace spark plugs and coils
7. replace header gaskets
7. partial coolant flush
Until then it's really just your basic oil changes, brake bleeds, etc.
Last edited by USMC_DS1; 07-21-2012 at 02:48 AM.
The following users liked this post:
TV911 (08-24-2019)
 07-10-2012, 11:55 PM
#7

Very nice. I've been an owner of a 997 for 3 weeks now and in the process of doing the 60K service including the pump now and 3rd rad install now.
As a new owner, can you tell me more about some of the other items you mentioned? A search didn't turn up much on these things. Clean/service MAF - Is there something you can spray on to clean it? Replace head gaskets - This considered 'normal' maintenance? Haven't seen anything posted about replacing the head gaskets.
As a new owner, can you tell me more about some of the other items you mentioned? A search didn't turn up much on these things. Clean/service MAF - Is there something you can spray on to clean it? Replace head gaskets - This considered 'normal' maintenance? Haven't seen anything posted about replacing the head gaskets.
Trending Topics
07-11-2012, 12:23 AM
#8
Drifting
Thread Starter
Very nice. I've been an owner of a 997 for 3 weeks now and in the process of doing the 60K service including the pump now and 3rd rad install now.
As a new owner, can you tell me more about some of the other items you mentioned? A search didn't turn up much on these things. Clean/service MAF - Is there something you can spray on to clean it? Replace head gaskets - This considered 'normal' maintenance? Haven't seen anything posted about replacing the head gaskets.
As a new owner, can you tell me more about some of the other items you mentioned? A search didn't turn up much on these things. Clean/service MAF - Is there something you can spray on to clean it? Replace head gaskets - This considered 'normal' maintenance? Haven't seen anything posted about replacing the head gaskets.
Cleaning the MAF is easy. Just remove the air box and spray with an aerosol MAF cleaning agent available at most automotive stores. It's basically an electronic contact cleaner. BTW, make sure you don't actually touch the MAF sensors with anything... just spray and let it dry.
Last edited by USMC_DS1; 07-21-2012 at 02:49 AM.
07-11-2012, 01:36 AM
#9
Advanced
Join Date: Mar 2012
Location: NV
Posts: 83
Likes: 0
Received 0 Likes
on
0 Posts
1st welcome to 997 club. Head gaskets don't need to be replaced as a part of any scheduled maintenance . If you replace your spark plugs, however, some have found it beneficial to remove the headers to access the plugs. Especially to get the torque wrench in there - the #4 plug is the toughest to access. If you remove the headers it's recommended to replace the head gasket as well. Same thing with the WP and/or thermostat housing.
.
.
Thanks
07-11-2012, 09:38 AM
#11
1st welcome to 997 club. Head gaskets don't need to be replaced as a part of any scheduled maintenance . If you replace your spark plugs, however, some have found it beneficial to remove the headers to access the plugs. Especially to get the torque wrench in there - the #4 plug is the toughest to access. If you remove the headers it's recommended to replace the head gasket as well. Same thing with the WP and/or thermostat housing.
Cleaning the MAF is easy. Just remove the air box and spray with an aerosol MAF cleaning agent available at most automotive stores. It's basically an electronic contact cleaner. BTW, make sure you don't actually touch the MAF sensors with anything... just spray and let it dry.
Cleaning the MAF is easy. Just remove the air box and spray with an aerosol MAF cleaning agent available at most automotive stores. It's basically an electronic contact cleaner. BTW, make sure you don't actually touch the MAF sensors with anything... just spray and let it dry.
I'll check out the MAF cleaner and add that to the list.
Was planning to do a water pump write up from my project, but you covered it all. Thanks again
 07-11-2012, 11:47 AM
#14
Drifting
Thread Starter
Folks, thanks for the positive comments and contribution to refine the write-up.
Money Pit, would be great if you still did a write-up... or append to this one with your own insight. No one person has all the answers and we'll all benefit from any additional findings from your car. thx.
Money Pit, would be great if you still did a write-up... or append to this one with your own insight. No one person has all the answers and we'll all benefit from any additional findings from your car. thx.