

Maintenance: Replace Serpentine Belt

Thread Starter
Drifting
Joined: Feb 2011
Posts: 3,024
Likes: 65
From: Austin, TX
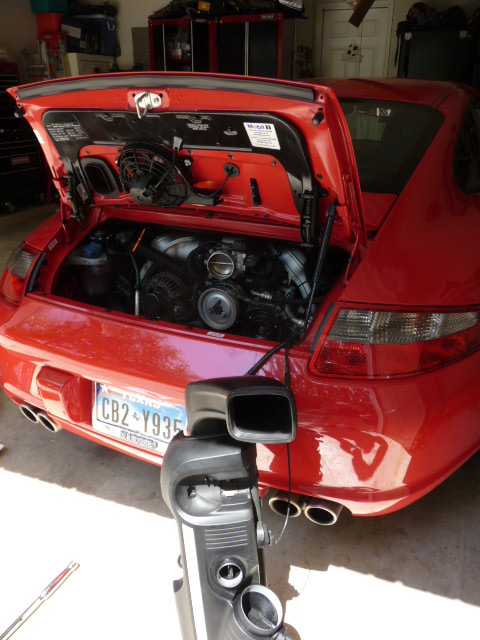
My '08 C2S has 47,500+ miles so it's time to inspect and possibly replace the serpentine belt... the job took about 45mins from start to finish. Total cost was $53.50 for genuine Porsche s-belt from Pelican Parts.
Vehicle History: 1st owner drove her for 2.25 yrs. I purchased her 3+ months ago with 46K miles on her. 1st owner did all scheduled maintenance at Power Porsche in Newport where she was purchased by him. All service records were provided by PP when I in turned purchased her from them. There was no record of the s-belt being replaced by PP.
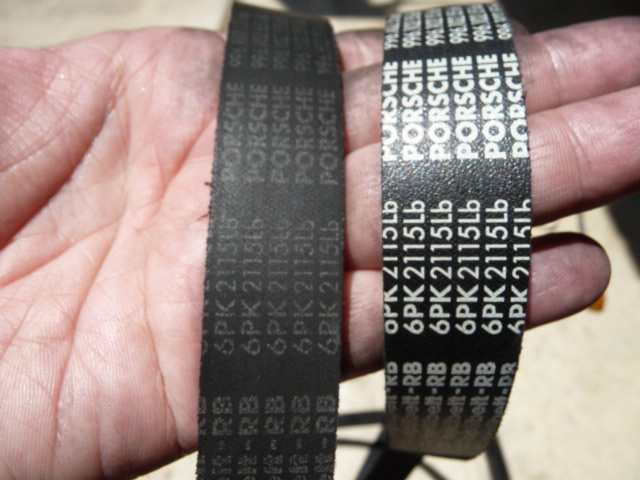
The original S-Belt looked decent enough for a car with 48k miles but I could see small fraying on the edge as compared to the new belt so I replaced it while I had it all apart.
P1010751.JPG
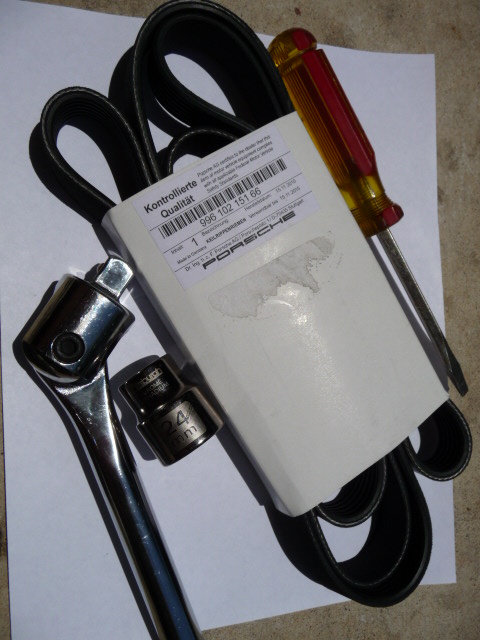
Tools and parts required: 24mm socket, break bar and/or drive ratchet, flat head screw driver, and a new serpentine belt.
P1010739.JPG
Procedure: I followed the instructions on RennTech:
http://www.renntech.org/forums/tutor...-polyrib-belt/.
Here are also some additional pics and notes which may help others with this job.
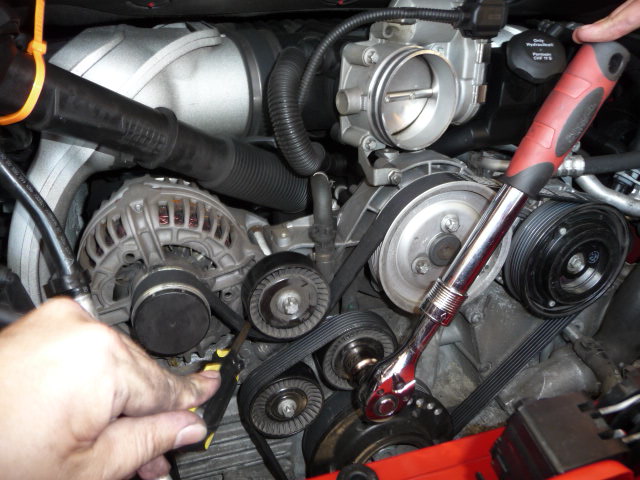
Disconnect and remove the air box per these RennTech instructions: http://www.renntech.org/forums/tutorials/article/52-air-filter-change-instructions/
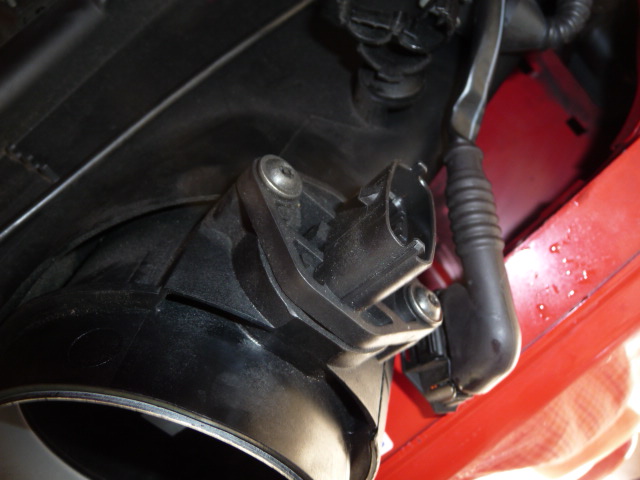
I pulled the connecting plug off the mass air flow sensor to make the job of getting in there with a drive wrench easier.
P1010760.JPG
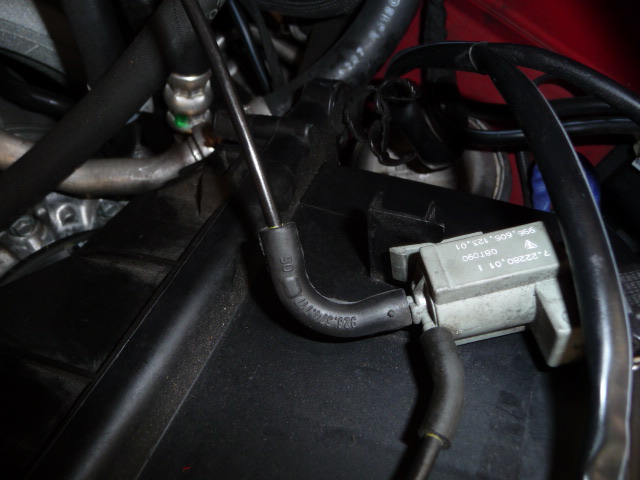
I also unclipped this part from the air box which allowed me to place the airbox outside the engine compartment.
P1010759.JPG
Here's the air box outside my engine compartment.
P1010762.JPG
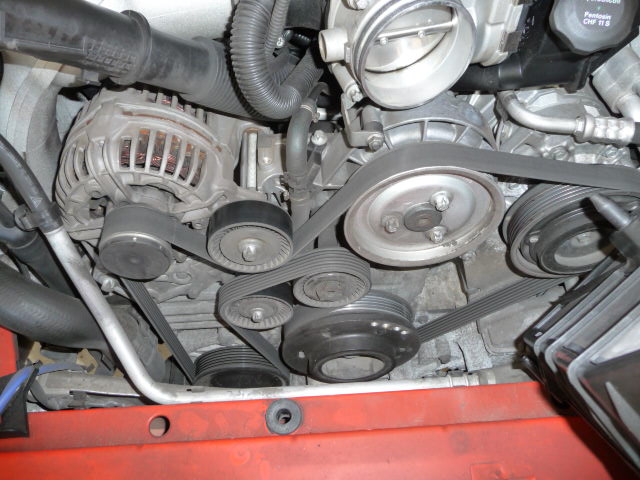
As a reference I took a pic of the s-belt routing before removing it.
P1010743.JPG
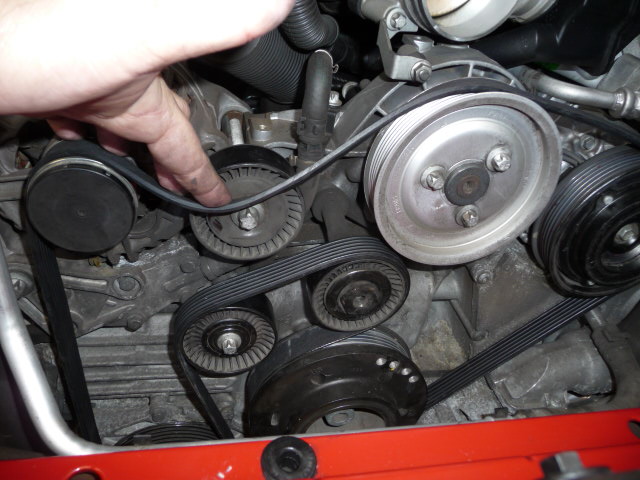
Turn tensioning pulley (#7) clockwise to loosen the s-belt and remove it.
P1010749.JPG
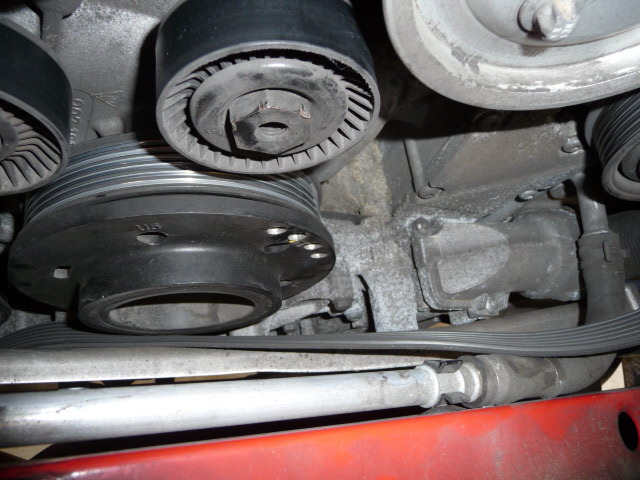
This is a good time to inspect all the pulleys and tensioners for damage, free play, and proper movement.
Slide/feed the new s-belt in thru and between the bottom pulley (#1) and the rear of the engine compartment at the bottom... it's a little tight here
P1010750.JPG
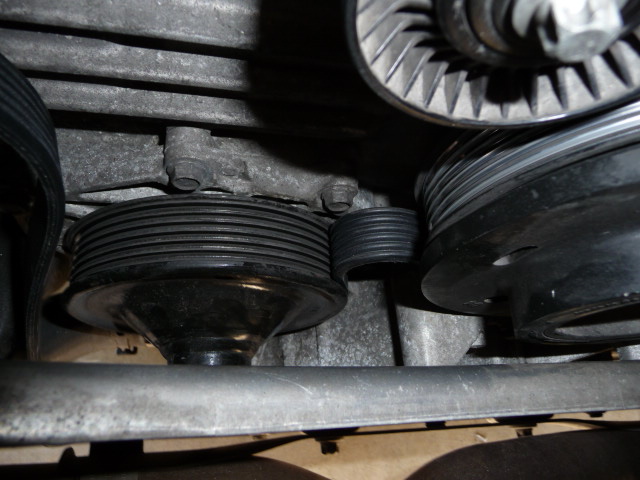
I found it easier to start the routing process by feeding a small part of the s-belt thru/between pulley #1 and #6 from the bottom.
P1010752.JPG
THIS IS IMPORTANT/HELPFUL: once the routing is done make sure that the slack is near pulley #3, turn the tensioner pulley clockwise, slide the s-belt under pulley # 3... I found a screw driver very useful to help slip the s-belt into place.
P1010755.JPGP1010757.JPG
Again, thank you Renntech.org for some excellent instructions... even though they were for the 996.
Previous Maintenance Jobs: I replaced the air(with a K&N) and cabin filters when I purchased her 3 months ago. The dealership replaced my RMS and oil/oil filter as condition of my purchase. My PPI found an RMS leak... Last week I replaced my spark plugs and coils.
Next job will be to bled the brakes... waiting for Fedx to deliver my jackpoints to make that job a bit easier and safer.
Note: I kept the old s-belt JIC.. it's in my p-car emergency bag. Even though it's an old belt... it might be the only one available should I get stuck in a remote part of the country where there are no p-car dealerships in sight.
Vehicle History: 1st owner drove her for 2.25 yrs. I purchased her 3+ months ago with 46K miles on her. 1st owner did all scheduled maintenance at Power Porsche in Newport where she was purchased by him. All service records were provided by PP when I in turned purchased her from them. There was no record of the s-belt being replaced by PP.
The original S-Belt looked decent enough for a car with 48k miles but I could see small fraying on the edge as compared to the new belt so I replaced it while I had it all apart.
P1010751.JPG
Tools and parts required: 24mm socket, break bar and/or drive ratchet, flat head screw driver, and a new serpentine belt.
P1010739.JPG
Procedure: I followed the instructions on RennTech:
http://www.renntech.org/forums/tutor...-polyrib-belt/.
Here are also some additional pics and notes which may help others with this job.
Disconnect and remove the air box per these RennTech instructions: http://www.renntech.org/forums/tutorials/article/52-air-filter-change-instructions/
I pulled the connecting plug off the mass air flow sensor to make the job of getting in there with a drive wrench easier.
P1010760.JPG
I also unclipped this part from the air box which allowed me to place the airbox outside the engine compartment.
P1010759.JPG
Here's the air box outside my engine compartment.
P1010762.JPG
As a reference I took a pic of the s-belt routing before removing it.
P1010743.JPG
Turn tensioning pulley (#7) clockwise to loosen the s-belt and remove it.
P1010749.JPG
This is a good time to inspect all the pulleys and tensioners for damage, free play, and proper movement.
Slide/feed the new s-belt in thru and between the bottom pulley (#1) and the rear of the engine compartment at the bottom... it's a little tight here
P1010750.JPG
I found it easier to start the routing process by feeding a small part of the s-belt thru/between pulley #1 and #6 from the bottom.
P1010752.JPG
THIS IS IMPORTANT/HELPFUL: once the routing is done make sure that the slack is near pulley #3, turn the tensioner pulley clockwise, slide the s-belt under pulley # 3... I found a screw driver very useful to help slip the s-belt into place.
P1010755.JPGP1010757.JPG
Again, thank you Renntech.org for some excellent instructions... even though they were for the 996.
Previous Maintenance Jobs: I replaced the air(with a K&N) and cabin filters when I purchased her 3 months ago. The dealership replaced my RMS and oil/oil filter as condition of my purchase. My PPI found an RMS leak... Last week I replaced my spark plugs and coils.
Next job will be to bled the brakes... waiting for Fedx to deliver my jackpoints to make that job a bit easier and safer.
Note: I kept the old s-belt JIC.. it's in my p-car emergency bag. Even though it's an old belt... it might be the only one available should I get stuck in a remote part of the country where there are no p-car dealerships in sight.

Rennlist Member

Joined: Jan 2004
Posts: 591
Likes: 6
From: Honolulu, HI
Awesome man! So good to see more DIY type members posting here. I was getting a little frustrated with all the see the dealer/ file a warranty claim type responses.
Getting your hands dirty is so much more fulfilling!
Tag for reference.
Getting your hands dirty is so much more fulfilling!
Tag for reference.
Last edited by IslandS52; Jun 20, 2011 at 02:34 AM.
Racer
Joined: Dec 2006
Posts: 259
Likes: 7
From: Treasure Island, Florida - Home of the Wide Beach
USMC_DS1,
Great write up.
Any time I save old "rubber" products, I give them a good coating with 303 Aerospace Protectant (http://www.303products.com/shop303/i...protectant.cfm) and store them in a zip lock bag. I learned the hard way w/ my '71 MGB when I replaced my fan belt only to learn 3 miles down the road it was dry rotted.
Thread Starter
Drifting
Joined: Feb 2011
Posts: 3,024
Likes: 65
From: Austin, TX
Thanks for the rec NA011. Just ordered a spray bottle of 303. The s-belt was already in a zip lock but it could use some protectant... plus I have tons of SCUBA gear which could use this as well.
Trending Topics
Poseur
Rennlist Member
Rennlist Member


Joined: Nov 2005
Posts: 17,731
Likes: 289
From: Santa Barbara, CA
I'd like to add an additional tip to make this project a little clearer or easier.
Make sure that you cinch down on the adjusting roller pulley (bright green here) as far as it will go--it will be nearly touching the left come-along idler pulley (lower yellow one in this image). Otherwise, you can't get the belt over everything. This means if you're using a combination wrench (24mm) that you need to make sure the air box is fully removed to give you complete access, and that you start your wrench at least at the 10 o'clock position or better. Otherwise, you will run into a conflict on the other side of the engine. Of course, as demonstrated here on this thread, if you use a ratchet, it's not a factor--but make sure the handle is long enough to provide sufficient torque! You will turn the ratchet or wrench clockwise, and the pulley will move to the left closing the gap between the bright green pulley and the lower yellow one.
Tools needed--24mm head combination or ratchet, a #2 or 3 flat head screwdriver or a 7mm nut driver (for the rubber boot).


Race Director

Joined: Sep 2006
Posts: 19,031
Likes: 266
From: Bentonville, AR
The frayed edge of the belt suggests the belt is not tracking properly and my (admittedly very limited) experience (with my Boxster) is the belt is not tracking properly because an accessory drive pulley/shaft has some play and this is very likely due to wear.
In my Boxster's case it was the water pump which upon checking for play I found some while none of the other accessory drives had any play. Now what prompted me to check was the engine was making some noise and I removed the relatively new belt and started the (cold) engine and ran it just long enough to determine the noise was not present.
This prompted a check for play. But I also noticed the new belt -- just weeks old -- had a sharp edge (inner edge) while the old belt with at least 60K miles on it still had rather dull edges.
Sincerely,
Macster.
Thread Starter
Drifting
Joined: Feb 2011
Posts: 3,024
Likes: 65
From: Austin, TX
The frayed edge of the belt suggests the belt is not tracking properly and my (admittedly very limited) experience (with my Boxster) is the belt is not tracking properly because an accessory drive pulley/shaft has some play and this is very likely due to wear.
In my Boxster's case it was the water pump
In my Boxster's case it was the water pump

Advanced
Joined: Feb 2011
Posts: 95
Likes: 0
From: Montreal, Canada
I'd like to add an additional tip to make this project a little clearer or easier.
Make sure that you cinch down on the adjusting roller pulley (bright green here) as far as it will go--it will be nearly touching the left come-along idler pulley (lower yellow one in this image). Otherwise, you can't get the belt over everything. This means if you're using a combination wrench (24mm) that you need to make sure the air box is fully removed to give you complete access, and that you start your wrench at least at the 10 o'clock position or better. Otherwise, you will run into a conflict on the other side of the engine. Of course, as demonstrated here on this thread, if you use a ratchet, it's not a factor--but make sure the handle is long enough to provide sufficient torque! You will turn the ratchet or wrench clockwise, and the pulley will move to the left closing the gap between the bright green pulley and the lower yellow one.
Tools needed--24mm head combination or ratchet, a #2 or 3 flat head screwdriver or a 7mm nut driver (for the rubber boot).
Poseur
Rennlist Member
Rennlist Member
Joined: Nov 2005
Posts: 17,731
Likes: 289
From: Santa Barbara, CA