


Solution for peeling fan/temp switches!

Instructor
Joined: Nov 2013
Posts: 135
Likes: 0
From: San Mateo, CA

Anyways, it�s unacceptable what Porsche did with the control *****
Cheers!
Last edited by renncayman; Nov 28, 2013 at 05:05 AM.
Instructor
Joined: Mar 2007
Posts: 161
Likes: 0
From: Atlanta Area
I may do that as well Perk10. The thought of paying my Indy for disassembly to send off whole unit or more breakdown for switches is no bueno. (I can't really DIY because a) I'm pitiful with such things & b) have a left hand injury that leads to a) )
I don't care for the stickers as they don't have the width to cover the full switch, seems like $$ for partial solution - no offense to those who like it.
Maybe I get my daughter with the artistic flair to paint it.. Any paint suggestions?
I don't care for the stickers as they don't have the width to cover the full switch, seems like $$ for partial solution - no offense to those who like it.
Maybe I get my daughter with the artistic flair to paint it.. Any paint suggestions?
Instructor
Joined: Nov 2013
Posts: 135
Likes: 0
From: San Mateo, CA
I may do that as well Perk10. The thought of paying my Indy for disassembly to send off whole unit or more breakdown for switches is no bueno. (I can't really DIY because a) I'm pitiful with such things & b) have a left hand injury that leads to a) )
I don't care for the stickers as they don't have the width to cover the full switch, seems like $$ for partial solution - no offense to those who like it.
Maybe I get my daughter with the artistic flair to paint it.. Any paint suggestions?
I don't care for the stickers as they don't have the width to cover the full switch, seems like $$ for partial solution - no offense to those who like it.
Maybe I get my daughter with the artistic flair to paint it.. Any paint suggestions?
 Human body is so damn clever it learns to do things in different ways
Instructor
Joined: Mar 2007
Posts: 161
Likes: 0
From: Atlanta Area
Oh I agree Renncayman... I have been able to do most anything I ever wanted to.
Thankfully piano was never an interest. Some gearhead tasks tho are clearly two handed affairs. I am just pragmatic about certain fine motor control tasks.. I declined that bomb disposal unit home study course as well :-)
Thankfully piano was never an interest. Some gearhead tasks tho are clearly two handed affairs. I am just pragmatic about certain fine motor control tasks.. I declined that bomb disposal unit home study course as well :-)
Instructor
Joined: Nov 2013
Posts: 135
Likes: 0
From: San Mateo, CA
Oh I agree Renncayman... I have been able to do most anything I ever wanted to.
Thankfully piano was never an interest. Some gearhead tasks tho are clearly two handed affairs. I am just pragmatic about certain fine motor control tasks.. I declined that bomb disposal unit home study course as well :-)
Thankfully piano was never an interest. Some gearhead tasks tho are clearly two handed affairs. I am just pragmatic about certain fine motor control tasks.. I declined that bomb disposal unit home study course as well :-)


Racer
Joined: Nov 2012
Posts: 498
Likes: 4
From: Houston, TX
Pulled the Temp/Fan switches this weekend to do the ClimaRepair fix. Removed all existing paint/material from the switches and shot them with a coat of primer and two coats of flat black paint. Left the switch white where the TEMP and fan icon would be. Let it dry overnight. Installed the switches back into the unit and put the stickers on.
Opinion and observations on ClimaRepair:
1. The paint blends with the other switch colors. The stickers, not as well.
2. The stickers cover 95% of the exposed switch face, so the not-so-well-color-blending is made more apparent because most of the switch has the sticker on it. The ClimaRepair kit comes with two sets of stickers. After seeing the results of using it as designed, I think I can get better results by using only the portion of the sticker that contains the TEMP letters and FAN icon.
3. I put the sticker on and pushed it down with the supplied guitar pick. I then tried to actuate the switches and the bottom/top edges of the sticker caught on the unit's frame and peeled up the stickers a little. This may well be due to two user errors. First, I put on 3 coats of paint which is pretty thick given the clearance between the switches and the unit's frame. Second, I didn't let the stickers adhere/dry overnight. I'm not sure if that would make a difference given the underlying paint thickness, but it might have helped.
Conclusion:
ClimaRepair is a reasonable choice ($30) if your buttons are gnarly and you don't want to mess with pulling the unit and painting but you really want the TEMP and FAN icon on the buttons. If you put the stickers on over the OEM buttons (i.e. don't add layers of paint like I did), I assume they will lay down fine. Also, I doubt anyone who isn't ****-retentive won't notice that they are stickers unless they look really closely. It's one of those things that catches the eye of the person who knows it's there, but goes largely unnoticed by the rest of the world.
I really do want the TEMP and FAN icon to show up, but I don't like the look of the entire button being covered with the sticker. What I'll likely do is take the switches back off, take the stickers off, and remove the paint. Then I'll cut only the TEMP and FAN icons off the ClimaRepair stickers, mask a slightly smaller portion of the white area on the button where those pieces go, and paint the rest. Then I'll put the TEMP/FAN stickers on the exposed white part and do a flat clear coat. That way the edges of the sticker won't be exposed (I hope). Also, that way, I'll have 95% of the button painted in flat black and stickers only for the TEMP/FAN icon. This is similar to the result that StickyNoMore seems to give (from the pictures on their site). I will follow up when I'm done.
Given that I am expecting the same result as StickyNoMore gives, but I have to buy the stickers, mess with paint/masking/cutting stickers/etc, and since it costs about 1/2 what StickyNoMore charges, I think it may be 50/50 as to whether it's worth it just to send the buttons to them vs. messing with it yourself. If I used StickyNoMore, I'd ask them to clear over the stickers if they didn't already or I'd do it myself when I got them back.
Bottom line - two relatively easy/cheap options for putting stickers on.
1. DIY with ClimaRepair (either using them as designed or modifying them as I described above). $30(ish) plus paint and you pull the switches.
2. StickyNoMore - $75(ish)? if you pull the switches. Otherwise $150(ish)? if you send them the whole unit. The switches really aren't that hard to get out if you take your time and see how they are engaged.
Instructor
Joined: Nov 2013
Posts: 135
Likes: 0
From: San Mateo, CA
Wow, good and extense review there! I didn't take apart the buttons and that was the main reason the climarepair kit was appealing to me, I wanted a quick and easy solution that would just make it look maybe not perfect but 100 times better.
Cheers
Cheers
Instructor
Joined: Nov 2013
Posts: 135
Likes: 0
From: San Mateo, CA
Updating status: 6 months on my car and still happy with the result. I noticed that it's important to press and action the ***** as shown in their video:
414EBFBB-1FAA-4DC7-9FDF-C1EE1CCFDB9A_zpsapci77vh.png
414EBFBB-1FAA-4DC7-9FDF-C1EE1CCFDB9A_zpsapci77vh.png
Rennlist Stories
The Best Porsche Posts for Porsche Enthusiasts

9 Features and Characteristics That Only Porsche People Understand
Verdad Gallardo
I've Written 500 Rennlist Articles: Here's How Porsche Has Changed Along the Way
Joe Kucinski
10 Most Unnecessary Porsches Ever Built (And Why We Love Them)
Verdad Gallardo
Porsche 911 GT3 S/C vs 718 Spyder RS: 10 Categories, One Winner
Joe Kucinski
This Builder Is Turning Heads With Its Slantnose 911 Creation
Verdad Gallardo
Porsche 911 GT3 Artisan Edition Pays Homage to Japanese Culture
Verdad Gallardo
Porsche Reveals Coupe Variant of the Electric Cayenne With a Fresh Look
Verdad Gallardo
10 Porsche Colors That Have More Personality Than Most People
Verdad Gallardo
Guntherwerks' Final Speedster Creation Is the Ultimate Porsche Restomod
Verdad Gallardo
Racer
Joined: Nov 2012
Posts: 498
Likes: 4
From: Houston, TX
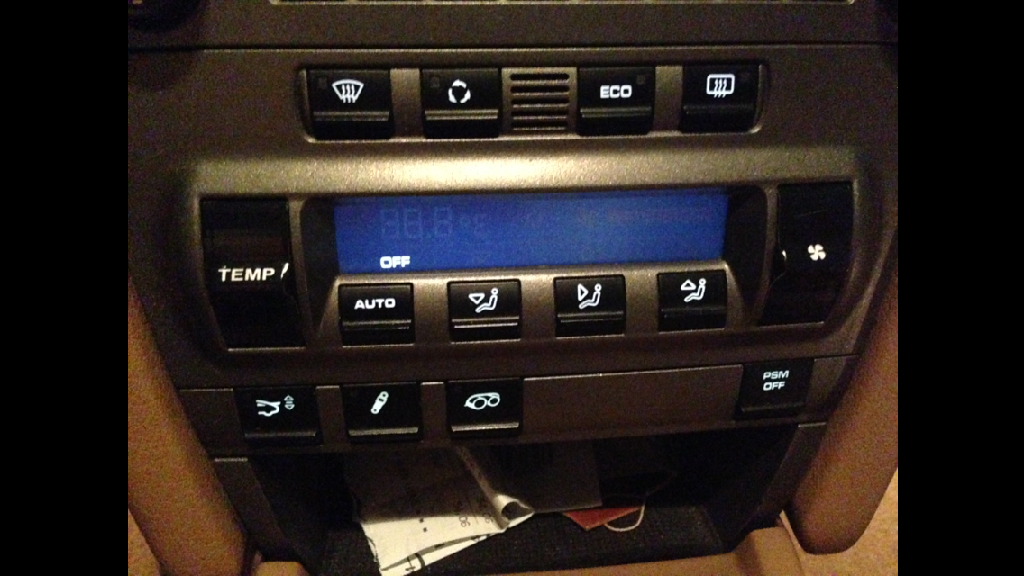
In any case, the TEMP sticker shows white on the left middle of the switch. This occurred after three days on the car and I have no idea how it happened. I don't wear rings or watches and I don't believe I hit it with anything hard, but the sticker is discolored.
Summary of the pics:
- Repainted switches re-installed in unit. I left portions white hoping light would show through the switch and the sticker and illuminate at night - it didn't.
- Stickers in very worn looking state after only a few days in the car. On the bench for removal. I went back to just black paint.
- Back in black.
I have another set of stickers if anyone wants them. RENNCAYMANN can tell you how to install them because I obviously don't know how to do it right.

Burning Brakes
Joined: Jan 2011
Posts: 779
Likes: 15
From: Ponte Vedra Beach,Florida
Yours looks very good. Mine did not turn out that well. I finally got time to attach some pics. You can see where the top of the stickers are catching on the faceplate and pulling up. That is due either to the amount of paint I put on the switch itself or I put the sticker on slightly too high. I think it's the former.
In any case, the TEMP sticker shows white on the left middle of the switch. This occurred after three days on the car and I have no idea how it happened. I don't wear rings or watches and I don't believe I hit it with anything hard, but the sticker is discolored.
Summary of the pics:
I have another set of stickers if anyone wants them. RENNCAYMANN can tell you how to install them because I obviously don't know how to do it right.
In any case, the TEMP sticker shows white on the left middle of the switch. This occurred after three days on the car and I have no idea how it happened. I don't wear rings or watches and I don't believe I hit it with anything hard, but the sticker is discolored.
Summary of the pics:
- Repainted switches re-installed in unit. I left portions white hoping light would show through the switch and the sticker and illuminate at night - it didn't.
- Stickers in very worn looking state after only a few days in the car. On the bench for removal. I went back to just black paint.
- Back in black.
I have another set of stickers if anyone wants them. RENNCAYMANN can tell you how to install them because I obviously don't know how to do it right.
Man, I wish you would have posted this on Thursday. I ordered a set on Friday.
Racer
Joined: Nov 2012
Posts: 498
Likes: 4
From: Houston, TX

Racer
Joined: Nov 2012
Posts: 498
Likes: 4
From: Houston, TX
I tried that too, but it wasn't so permanent. Also, it looked a little purple-y (purple-ish?). Painting was a good (cheap) solution for me. Took a little extra time/effort taking the switches out but I think it was worth it.
Burning Brakes
Joined: Jan 2011
Posts: 779
Likes: 15
From: Ponte Vedra Beach,Florida
They now moved up to $47 with shipping, so it is not that big of deal. I ended up selling my car last night, so I am just giving them to the new owner when they get here.
Instructor
Joined: Nov 2013
Posts: 135
Likes: 0
From: San Mateo, CA
Yours looks very good. Mine did not turn out that well. I finally got time to attach some pics. You can see where the top of the stickers are catching on the faceplate and pulling up. That is due either to the amount of paint I put on the switch itself or I put the sticker on slightly too high. I think it's the former.
In any case, the TEMP sticker shows white on the left middle of the switch. This occurred after three days on the car and I have no idea how it happened. I don't wear rings or watches and I don't believe I hit it with anything hard, but the sticker is discolored.
Summary of the pics:
I have another set of stickers if anyone wants them. RENNCAYMANN can tell you how to install them because I obviously don't know how to do it right.
In any case, the TEMP sticker shows white on the left middle of the switch. This occurred after three days on the car and I have no idea how it happened. I don't wear rings or watches and I don't believe I hit it with anything hard, but the sticker is discolored.
Summary of the pics:
- Repainted switches re-installed in unit. I left portions white hoping light would show through the switch and the sticker and illuminate at night - it didn't.
- Stickers in very worn looking state after only a few days in the car. On the bench for removal. I went back to just black paint.
- Back in black.
I have another set of stickers if anyone wants them. RENNCAYMANN can tell you how to install them because I obviously don't know how to do it right.
Sorry to hear that! I did nothing special other than follow the video tutorial and be careful not to press the buttons with my nails or on the center but on the upper or lower sides (as they show on their video section).
Did you contact climarepair for a solution?