When you click on links to various merchants on this site and make a purchase, this can result in this site earning a commission. Affiliate programs and affiliations include, but are not limited to, the eBay Partner Network.
2) Yup, the TopGear went in without a hitch, everything lined up. Now at the end of the day, even if you were just taking out and putting back in the stock central muffler, there'll be some degree of grunting/swearing as it's a tight space - but it's not the TopGear part's fault. In fact, because the TopGear bypass overall is less bulky than the stock muffler, it's probably a easier to put in than the stock muffler part.
3) Tip alignment is actually registered to the exit pipe from the side-can. In turn, the side-cans are partially registered to the cats, which are bolted to the headers/engine. That explains why you see sagging tips if your engine mount if failing.
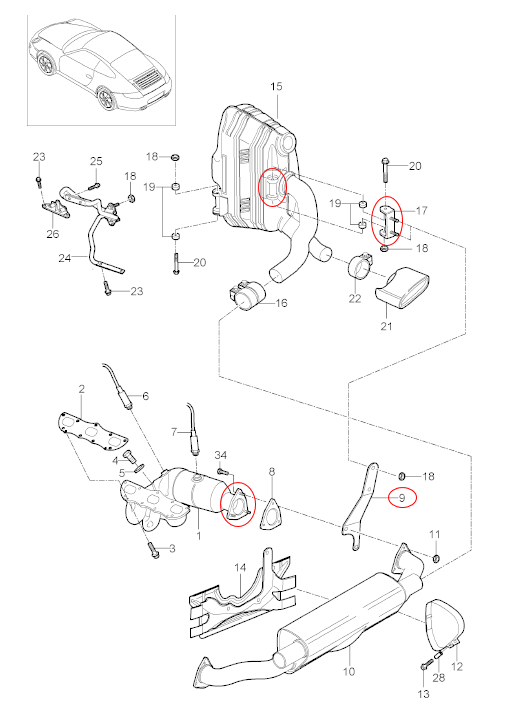
In the diagram below, bracket #9 is connect to the 3-bolt flange coming out of the cats. In turn, bracket #9 lifts the side-can up into position (via bracket #17 connecting to a mounting point on the can). When you're removing the center muffler, you disconnect the two 13-mm nuts holding bracket #9 to the flange on the cat, and then bend the bracket back so you can wiggle the muffler off of the studs on that flange (that's where I had most of my grunting/swearing, I used a pry-bar). Installation is the reverse.
So the picture in post #24 showing the sagging tips is due to bracket #9 being disconnected at that time, hence the side cans sagging down. When you put everything back and bolt bracket #9 to the 3-bolt flange coming out of the cats, that pushes the side-cans (and hence the tips) back up into place.
Karl.
PS: The PSE cans have two exit pipes, so that area is more crowded than the normal setup. That's where the Billy Boat got into trouble...
OK I see now. Thank you for the detailed explanation.
...with headphones on I could not notice difference in sound with pse on/off on either bypass pipes...
Originally Posted by wjk_glynn
...Personally I’ve found that when in the cabin, PSE-on results in only a modestly louder sound, especially with the windows closed. But if you’re outside and behind the car, the difference between PSE on/off is a lot more noticeable.
Just to show how PSE off/on is more pronounced from the outside (as compared to in-cabin in post #24), here's some tailpipe sounds from the same car...
Mine came today three days after ordering. Got the old muffler off but the remaining cat studs are rusted to the cats. No amount of pounding is loosening them. Gonna need a torch.
...the remaining cat studs are rusted to the cats. No amount of pounding is loosening them...
Just an FYI...
On my 2010, 5 of the 6 studs on the cats were welded studs. There was only one actual bolt & nut. I left the 5 welded studs as-is, and could maneuvered the bypass flanges over them (bending back bracket #9 in the earlier diagram to give clearance).
I also picked up a 13mm halfmoon wrench for the top stud/nut on the cat-flange, makes life a lot easier.
Karl.
**EDIT**: Iceter noted that the studs are in fact pressed in, not welded. See post #40
On my 2010, 5 of the 6 studs on the cats were welded studs. There was only one actual bolt & nut. I left the 5 welded studs as-is, and could maneuvered the bypass flanges over them (bending back bracket #9 in the earlier diagram to give clearance).
I also picked up a 13mm halfmoon wrench for the top stud/nut on the cat-flange, makes life a lot easier.
Karl.
I would have been glad to leave the studs but the nuts were so rusted they had no sides. I had to use a stripped nut remover and once I got them moving they snapped within half a turn.
I can see where that half moon wrench would have been handy. I was able to get a ratchet up there just barely.
On my 2010, 5 of the 6 studs on the cats were welded studs. There was only one actual bolt & nut. I left the 5 welded studs as-is, and could maneuvered the bypass flanges over them (bending back bracket #9 in the earlier diagram to give clearance).
I also picked up a 13mm halfmoon wrench for the top stud/nut on the cat-flange, makes life a lot easier.
Karl.
From the factory, I don’t believe they are welded. They are pressed in. The studs have shanks that are slightly larger than the hole in the cat flange. They will come out, but only with lots of pressure or the shock of hammering. I would be pretty pissed if a PO welded bolts to the flange.
A Chinese C-clamp isn’t up to the task. A good quality ball joint press will do the trick with a little modification.
...the nuts were so rusted they had no sides. I had to use a stripped nut remover and once I got them moving they snapped within half a turn.
Oh man that must have been so annoying. If it had happened to me, I’d have been royally eff’ed as I wouldn’t have the mechanical experience to handle that.
Originally Posted by 318touring
If anyone is looking for sound clip comparison between standard non-PSE exhaust, factory and Topgear bypass.
Cool, there’s definitely a difference in timber between them. Is it perceptually louder with the TG bypass installed?
Originally Posted by Iceter
...They are pressed in. The studs have shanks that are slightly larger than the hole in the cat flange. They will come out, but only with lots of pressure or the shock of hammering.
Ahhh... thanks for the correction. For some reason I’d remembered seeing something on one of them that had led me think they were welded, but I’m sure you’re correct as it makes far, far more sense.
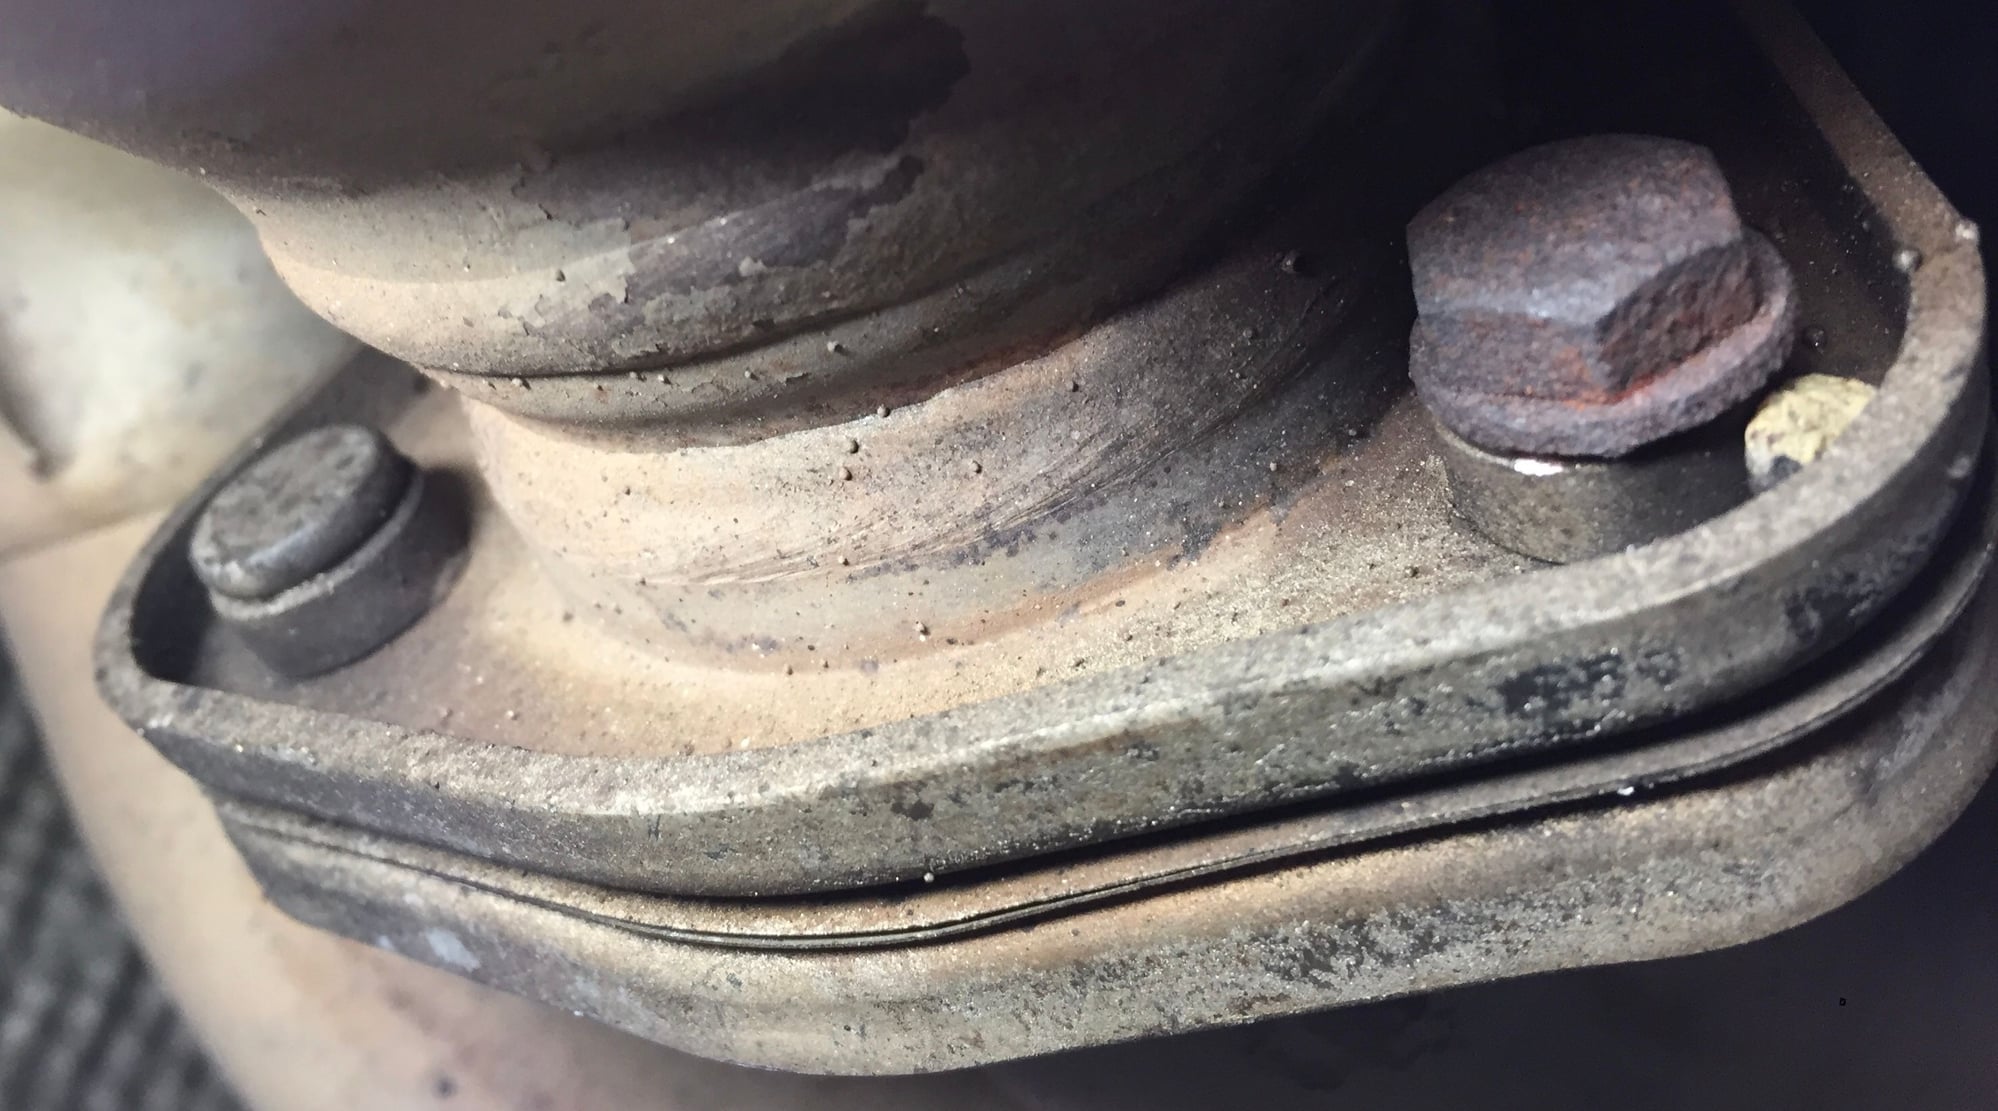
For everyone else’s reference, here’s a pick showing the head of a pressed in stud (left side) and the one and only bolt (right side) on my car. Ignore the little pebble on the right...
Ahhh... thanks for the correction. For some reason I’d remembered seeing something on one of them that had led me think they were welded, but I’m sure you’re correct as it makes far, far more sense.
For everyone else’s reference, here’s a pick showing the head of a pressed in stud (left side) and the one and only bolt (right side) on my car. Ignore the little pebble on the right...
Karl.
Yep mine are all like the left one in your pic and completely rusted over. A ball joint press might do the lower two but I doubt it would fit into the space available to address the upper one. Also a couple of mine are broken off flush with the cat flange so there is nothing for the press to push on. No amount of hammering is going to loosen them. If I hammer any harder the cat flanges are going to start bending.
...a couple of mine are broken off flush with the cat flange so there is nothing for the press to push on. No amount of hammering is going to loosen them. If I hammer any harder the cat flanges are going to start bending.
I just remembered that CarFanatic on YouTube ran into the same problem.
Jump to the 2m37s mark in this video to see how he dealt with it using a drilling technique:


 11-12-2018, 10:37 PM