"GT3 Touring"-Style Decklid
 12-12-2023, 12:12 PM
#31
RL Community Team
Rennlist Member
Rennlist Member
The reason why the OEM mesh works is because it has that panel underneath. Even with a high quality mesh, it's still going to look a bit "tuner special" with a direct view to the engine. I like the idea, but I suspect the execution in real life will not look as good as the models.
edit: ah, sorry. Not familiar w the Carrera setup. Carry on!
edit: ah, sorry. Not familiar w the Carrera setup. Carry on!
Last edited by brontosaurus; 01-18-2024 at 12:24 PM.
 12-12-2023, 02:30 PM
#32
The reason why the OEM mesh works is because it has that panel underneath. Even with a high quality mesh, it's still going to look a bit "tuner special" with a direct view to the engine. I like the idea, but I suspect the execution in real life will not look as good as the models.
The following users liked this post:
brontosaurus (01-18-2024)
12-12-2023, 03:20 PM
#33
Rennlist Member
The reason why the OEM mesh works is because it has that panel underneath. Even with a high quality mesh, it's still going to look a bit "tuner special" with a direct view to the engine. I like the idea, but I suspect the execution in real life will not look as good as the models.
12-12-2023, 04:57 PM
#34
Rennlist Member
Join Date: Apr 2010
Location: Ormond Beach, FL
Posts: 5,907
Likes: 0
Received 1,166 Likes
on
746 Posts
Unless there is a panel underneath the mesh, not going to work in Florida. Already get enough water in the engine bay with the original spoiler. Think torrential rain showers...
12-12-2023, 05:02 PM
#35
Rennlist Member

That�s what a CSR ducktail looks like before the addition of the mesh and mine is a Evo, which is vented.
12-13-2023, 09:59 AM
#36
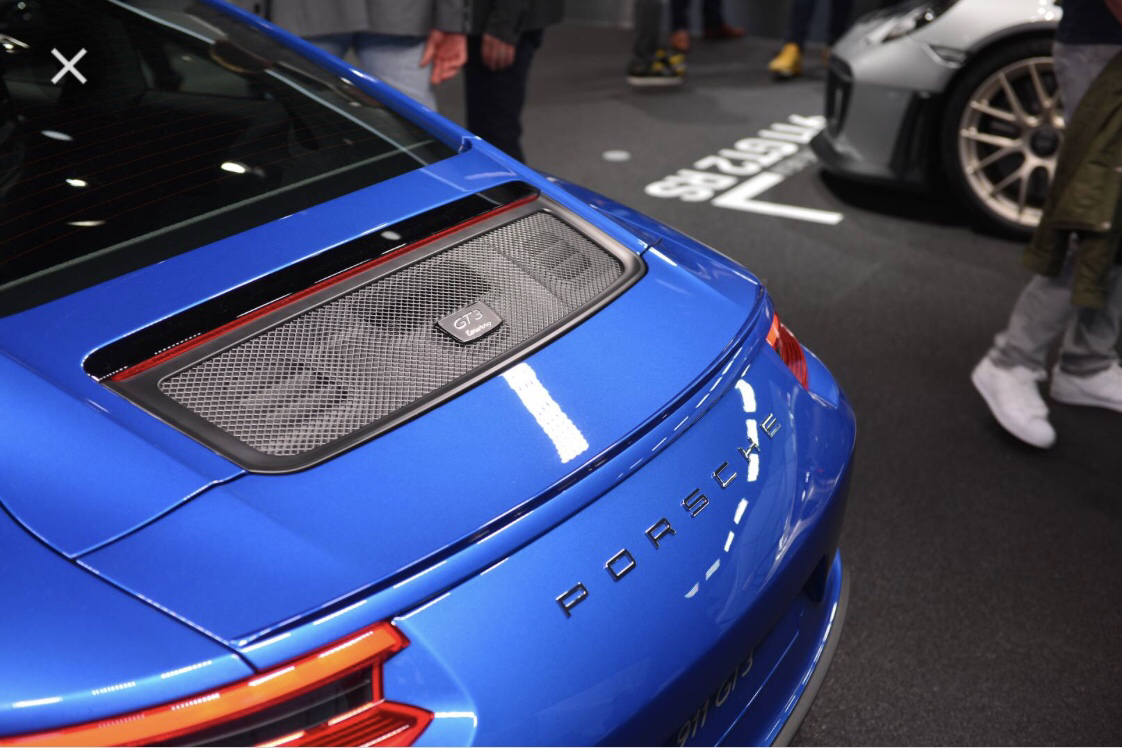
Alright, hands hurt after doing all the linework for this. As people have pointed out, there are many classically designed ducktails available for 996/997, but how about going the opposite way? The 991 R and GT3 Touring have awesome mesh decklid motifs. With some original design input, I think we can replace the 996 louvres with mesh and modernize the rear end.
Is this not a night and day difference?

Since the 996 spoiler insert is proportionally much larger (esp in height) than the 991's mesh insert, we have a little extra canvas to paint on. I don't want the mesh too large, and for functional reasons we have to frame off the mesh anyways in order to hide the mounting hardware/tabs that hold the top cover to the actual retractable spoiler. So there's still a ducktail finishing this piece off, in order to keep the mesh wide and flat and try for the illusion of width.

I sunk the mesh into a pocket to highlight it a little more strongly than on the 991; the draft angle of that pocket conveniently lines up with the ducktail profile. The ducktail shape is still kind of like the 996 GT3, but simplified to just one cross-section and slimmed down to fit on a spoiler insert. No need to limit the spoiler deploy height anymore, at full up this will only add a little downforce so we can balance it out with normal 996 Aerokit/Cup stuff. In that sense, this is the "real" 996 GT3 Touring spoiler haha.

Mocked back up on the game model. The frame around the mesh could be body-colored as well - I think the black frame is more of the 991 vibe, whereas the body-colored frame feels more air-cooled. Either way I love it though, so it's up to you guys now to tell me what sucks!


Is this not a night and day difference?
Since the 996 spoiler insert is proportionally much larger (esp in height) than the 991's mesh insert, we have a little extra canvas to paint on. I don't want the mesh too large, and for functional reasons we have to frame off the mesh anyways in order to hide the mounting hardware/tabs that hold the top cover to the actual retractable spoiler. So there's still a ducktail finishing this piece off, in order to keep the mesh wide and flat and try for the illusion of width.
I sunk the mesh into a pocket to highlight it a little more strongly than on the 991; the draft angle of that pocket conveniently lines up with the ducktail profile. The ducktail shape is still kind of like the 996 GT3, but simplified to just one cross-section and slimmed down to fit on a spoiler insert. No need to limit the spoiler deploy height anymore, at full up this will only add a little downforce so we can balance it out with normal 996 Aerokit/Cup stuff. In that sense, this is the "real" 996 GT3 Touring spoiler haha.
Mocked back up on the game model. The frame around the mesh could be body-colored as well - I think the black frame is more of the 991 vibe, whereas the body-colored frame feels more air-cooled. Either way I love it though, so it's up to you guys now to tell me what sucks!
12-13-2023, 10:30 AM
#37
RL Community Team
Rennlist Member
Rennlist Member
The following users liked this post:
TheChunkNorris (12-22-2023)
12-22-2023, 06:50 AM
#38
First test print. It's not perfect yet, but it's awesome!

The contours I designed into the mesh frame catch light and shadow exactly the way I envisioned it, so this is looking super promising! You can also see, this design works with the original tea tray mechanism (if someone wants to educate me on what it's supposed to be called, I'm all ears) and will not let in any more water than the original 996 Carrera louvres. The way that it frames off the real intake and fan ports actually ended up better than I expected - with a mesh on top partially obscuring the view, and of course, with the tea tray blacked out (eg. SEM Trim Black), it'll be a fairly OEM looking rendition of the 991 motif.
More angles with the spoiler retracted. I'm thinking of designing some simple inserts for the intake and fan port to make those horizontal lines continue uninterrupted across the tea tray. Happy to hear out any ideas!


And two views with the spoiler deployed. I'm fighting some print warp issues here, going to scan the tea tray to confirm that as well as do some fitment tweaks. While we're in here, let's tighten up the panel gaps vs OEM as well. It just doesn't seem necessary to maintain 6mm between the spoiler and the decklid.


Zoomed out. We'll need paint and fitment before throwing a final verdict, but the small ducktail lengthens the appearance of the tail just right IMO.

I've got my work cut out for me, but the next prototype will be smooth so it'll be time to paint it and really preview the final look!
The contours I designed into the mesh frame catch light and shadow exactly the way I envisioned it, so this is looking super promising! You can also see, this design works with the original tea tray mechanism (if someone wants to educate me on what it's supposed to be called, I'm all ears) and will not let in any more water than the original 996 Carrera louvres. The way that it frames off the real intake and fan ports actually ended up better than I expected - with a mesh on top partially obscuring the view, and of course, with the tea tray blacked out (eg. SEM Trim Black), it'll be a fairly OEM looking rendition of the 991 motif.
More angles with the spoiler retracted. I'm thinking of designing some simple inserts for the intake and fan port to make those horizontal lines continue uninterrupted across the tea tray. Happy to hear out any ideas!
And two views with the spoiler deployed. I'm fighting some print warp issues here, going to scan the tea tray to confirm that as well as do some fitment tweaks. While we're in here, let's tighten up the panel gaps vs OEM as well. It just doesn't seem necessary to maintain 6mm between the spoiler and the decklid.
Zoomed out. We'll need paint and fitment before throwing a final verdict, but the small ducktail lengthens the appearance of the tail just right IMO.
I've got my work cut out for me, but the next prototype will be smooth so it'll be time to paint it and really preview the final look!
Last edited by circuit.heart; 12-22-2023 at 06:51 AM.
The following 12 users liked this post by circuit.heart:
85eurocarrera (12-22-2023),
barbancourt (05-21-2024),
brontosaurus (01-18-2024),
GC996 (12-22-2023),
imhighlander (03-22-2024),
and 7 others liked this post.
12-22-2023, 07:43 AM
#39
Burning Brakes
Any wind tunnel plans?😎
seriously, nice job. I like it!
seriously, nice job. I like it!
The following users liked this post:
TheChunkNorris (12-22-2023)
12-22-2023, 08:20 AM
#40
Rennlist Member
Very cool and like the fact it�s taking form this quickly.
 01-17-2024, 11:28 PM
#42
I forgot to respond here, there's no value to doing CFD or wind tunnel on an aesthetic piece like this unless a client wants to pay out the nose for pretty pictures. I'm certainly going to road test it, if you want to lend me some suspension stroke sensors I can measure delta-lift for ya 
Have an update! I had to redo the linework almost entirely due to the teatray scan not agreeing with the original spoiler scan. Very well... build the part on the teatray since that's what it has to fit on anyways. I did some rudimentary simulation of what I expect the spoiler to look like after vacuum forming softens out the edges. Still loving it, there are just a couple points to discuss with everyone.

1) I want to wrap the edge of my spoiler over the teatray rather than mating with it exactly. Partially this is because my design does not (literally cannot) align perfectly with the teatray, so it's nice to be able to make my own edge. But the real benefit to this is to put some material in the huge (~6mm) panel gap that Porsche left between the spoiler and the decklid. I plan on using 2.5mm or 3mm ABS plastic sheet for forming, so reducing the panel gap by 2-2.5mm seems like it should be perfect. Matches the decklid-to-quarter-panel gap pretty well IMO, but I would like to get feedback on this.

2) Clearances are tight. The wire mesh looks like it'll literally be sitting on top of the horizontal ribs of the teatray, then my spoiler right on top of it. This should be feasible in reality but it's gonna need to be made in 3 parts: the top skin you see, the mesh you see, and a frame underneath to which the top skin and mesh get glued (paint your top skin first). How do we want to make the frame? Vacuum forming may be possible but the trimming involved to clear other parts would be painful. 3D printing is my preference (it's strong enough for W2W racing bumpers, it'll be strong enough here I promise) for simplicity but it'll take forever to print each one if you guys end up really loving this design and I get a bunch of sales

3) There's a rubber grommet with a wire pigtail sticking out above the mesh, that needs to be relocated or otherwise lowered somehow. Is this for the fan?

To be safe, I think I'll print another prototype first before hunkering down to make the vacuum forming mold. But as promised, smoothed, painted and installed so we have something real to look at!
Have an update! I had to redo the linework almost entirely due to the teatray scan not agreeing with the original spoiler scan. Very well... build the part on the teatray since that's what it has to fit on anyways. I did some rudimentary simulation of what I expect the spoiler to look like after vacuum forming softens out the edges. Still loving it, there are just a couple points to discuss with everyone.
1) I want to wrap the edge of my spoiler over the teatray rather than mating with it exactly. Partially this is because my design does not (literally cannot) align perfectly with the teatray, so it's nice to be able to make my own edge. But the real benefit to this is to put some material in the huge (~6mm) panel gap that Porsche left between the spoiler and the decklid. I plan on using 2.5mm or 3mm ABS plastic sheet for forming, so reducing the panel gap by 2-2.5mm seems like it should be perfect. Matches the decklid-to-quarter-panel gap pretty well IMO, but I would like to get feedback on this.
2) Clearances are tight. The wire mesh looks like it'll literally be sitting on top of the horizontal ribs of the teatray, then my spoiler right on top of it. This should be feasible in reality but it's gonna need to be made in 3 parts: the top skin you see, the mesh you see, and a frame underneath to which the top skin and mesh get glued (paint your top skin first). How do we want to make the frame? Vacuum forming may be possible but the trimming involved to clear other parts would be painful. 3D printing is my preference (it's strong enough for W2W racing bumpers, it'll be strong enough here I promise) for simplicity but it'll take forever to print each one if you guys end up really loving this design and I get a bunch of sales
3) There's a rubber grommet with a wire pigtail sticking out above the mesh, that needs to be relocated or otherwise lowered somehow. Is this for the fan?
To be safe, I think I'll print another prototype first before hunkering down to make the vacuum forming mold. But as promised, smoothed, painted and installed so we have something real to look at!
The following 6 users liked this post by circuit.heart:
blacksquid (03-19-2024),
brontosaurus (01-18-2024),
GC996 (01-18-2024),
imhighlander (03-22-2024),
plpete84 (01-18-2024),
and 1 others liked this post.
01-18-2024, 12:18 AM
#43
Rennlist Member
I’m loving this HARD
01-19-2024, 11:20 PM
#44
I'm actually getting carpal tunnel doing this, maybe it's time to take some Rhinoceros training and get more efficient at it. Here's the first revision of the frame to connect the top skin of the spoiler to the teatray!

I've elected not to use the OEM tab method of hooking the spoiler into the teatray - given that this is 3D print I don't trust leaving a tab in constant tension. Instead I have those triangles dotted across the front face, each one of them has a #10 thread so I can put in a thread-forming screw that will clamp the frame to the teatray from underneath. Meanwhile, the four slotted tabs in the back are as faithful as I can get it to OEM as there's nothing wrong with this method.
All the other ribs and cuts are just to clear the teatray, this was really tedious to get everything lined up. Here's a negative view lined up to the teatray to kind of illustrate. As long as my 3D scan is accurate, it should be good on the first try. Hoping so because I do NOT want to go back in here to fix it!

The frame also has a little extra internal lip to sit the mesh on, and ends in a slope matching the top skin to continue the line down to the first rib of the teatray.

Anyways, I'm having the frame printed over the weekend, fingers crossed!
I've elected not to use the OEM tab method of hooking the spoiler into the teatray - given that this is 3D print I don't trust leaving a tab in constant tension. Instead I have those triangles dotted across the front face, each one of them has a #10 thread so I can put in a thread-forming screw that will clamp the frame to the teatray from underneath. Meanwhile, the four slotted tabs in the back are as faithful as I can get it to OEM as there's nothing wrong with this method.
All the other ribs and cuts are just to clear the teatray, this was really tedious to get everything lined up. Here's a negative view lined up to the teatray to kind of illustrate. As long as my 3D scan is accurate, it should be good on the first try. Hoping so because I do NOT want to go back in here to fix it!
The frame also has a little extra internal lip to sit the mesh on, and ends in a slope matching the top skin to continue the line down to the first rib of the teatray.
Anyways, I'm having the frame printed over the weekend, fingers crossed!
Last edited by circuit.heart; 01-19-2024 at 11:25 PM.
The following 8 users liked this post by circuit.heart:
85eurocarrera (01-21-2024),
GC996 (01-19-2024),
gtxracer (01-24-2024),
Ian Cooke (01-22-2024),
imhighlander (03-22-2024),
and 3 others liked this post.

The following users liked this post:
blacksquid (03-19-2024)