SNS Engine Rebuild
#1
I bought GTX Racer's M96 engine last fall...making room for his pretty awesome LS swap which he has done a great job documenting. I have Jake's video series, a few books and this forum to guide me through the steps. I have watched Jake's series three times through at this point and I haven't begun to put anything together...but it was certainly helpful for the disassembly process. This is my first Porsche engine rebuild. Taking it slowly and for this engine, I have sent my cases to LN for sleeving with Nickies. My car is a 1999 C4 that I daily drive that has close to 189,000 miles. I am planning to rebuild this engine and then swap with the one in my car now and do another re-build, maybe to higher performance standards on the second round.
During the teardown I found a broken piston skirt, scored crank and some toasted bearings. Wondering if I need a whole new crank...I can feel the scoring barely with my finger, is this too much to be polished away?
During the teardown I found a broken piston skirt, scored crank and some toasted bearings. Wondering if I need a whole new crank...I can feel the scoring barely with my finger, is this too much to be polished away?
The following users liked this post:
C2-996 (10-09-2021)
#3
#4
Yes, that crank is wasted.. Likely you'd find a cracked journal under the wear marks on that rod journal.. Buy another crank.
When you have the engine ready to assemble, in front of you, that is when the video will help you collect the dots.
When you have the engine ready to assemble, in front of you, that is when the video will help you collect the dots.
The following users liked this post:
MajicB (02-24-2021)
The following 3 users liked this post by Charles Navarro:
#6
Yes, that crank is wasted.. Likely you'd find a cracked journal under the wear marks on that rod journal.. Buy another crank.
When you have the engine ready to assemble, in front of you, that is when the video will help you collect the dots.
Thank you Charles and Jake. I knew in my gut that it was a problem. I am appreciative there's no fussing around anymore with that broken part. Charles, I'll be reaching out.
I am not checked out on the multi-quote function?!?
#7
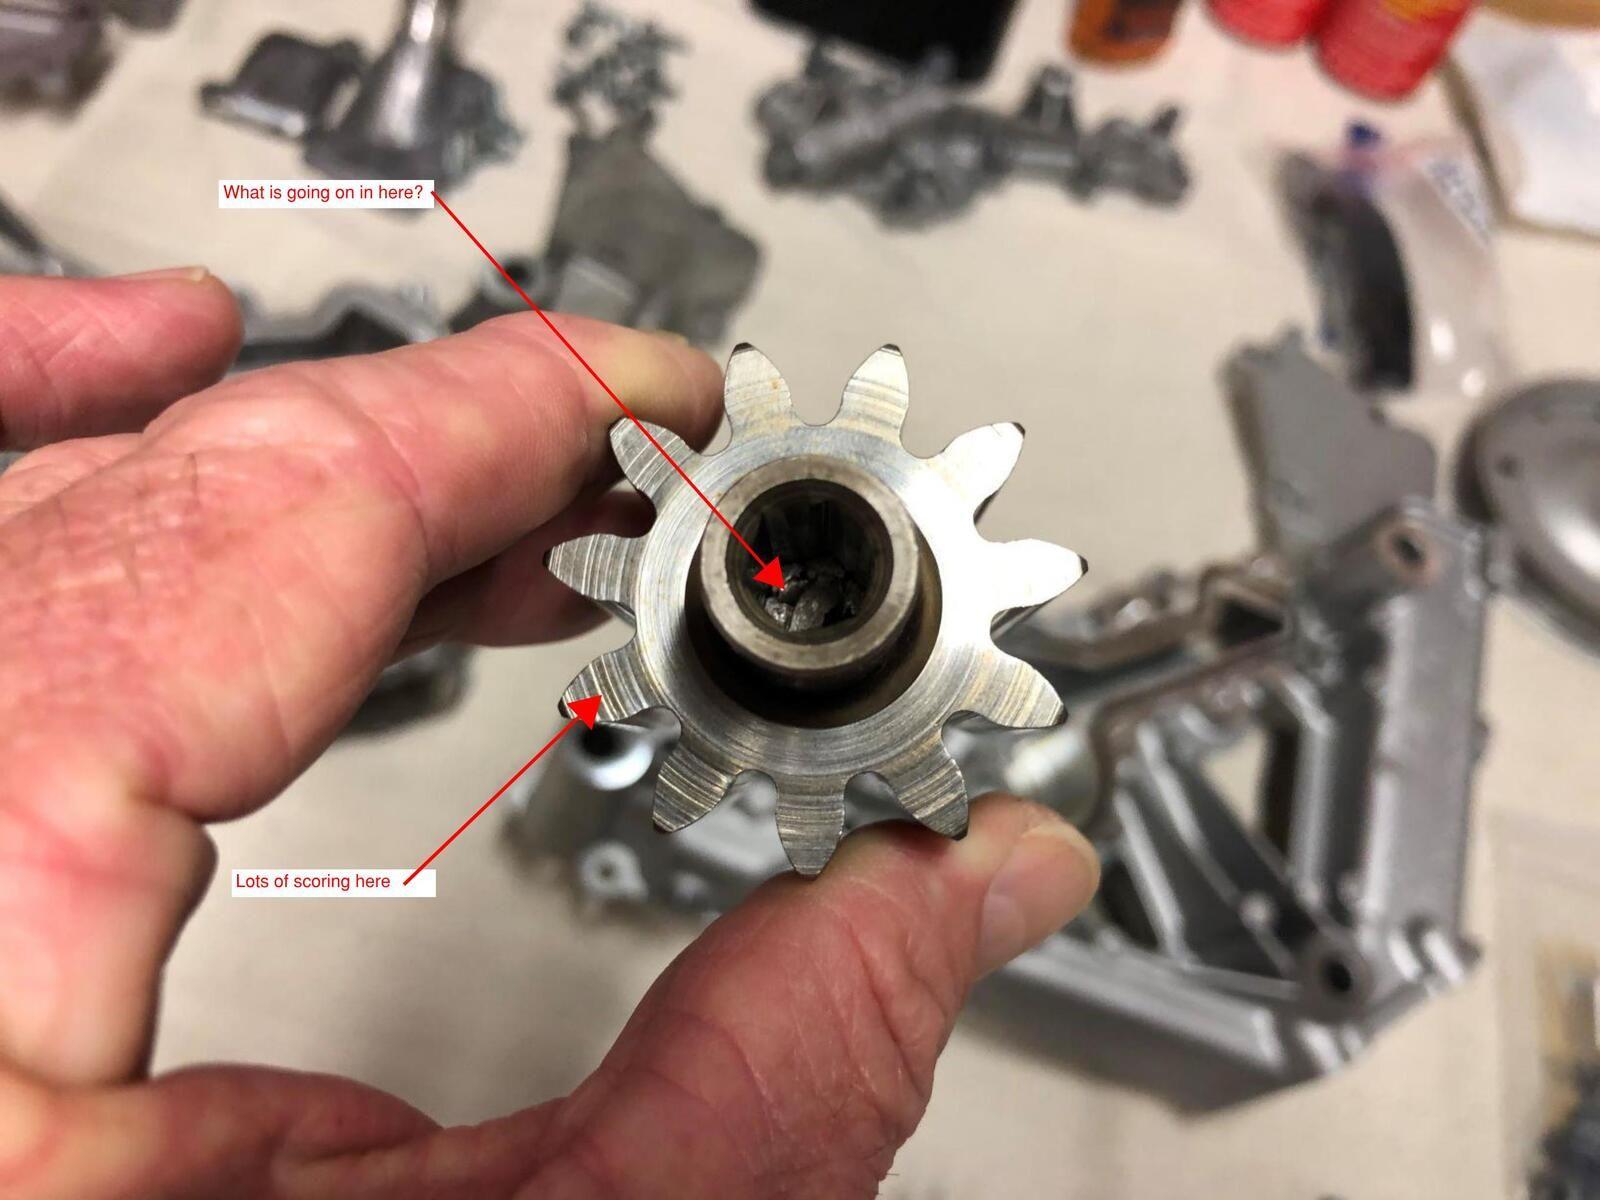
The deeper I go....check out these photos of my oil pump and the front console. I've become numb to the number of parts I need to replace in lieu of reuse. First pic is old and new pump side by side. I've got scoring in the housing (red arrow second pic) and on the gears themselves. And what is going on at the bottom of the hex shaft in the old pump? I hope to begin the assembly around the beginning of February.
Last edited by SoundnSpeed; 01-08-2021 at 10:26 PM.
Trending Topics
The following users liked this post:
paddlefoot64 (11-29-2022)
The following 8 users liked this post by SoundnSpeed:
Billup (05-10-2021),
dporto (01-09-2021),
Eurocarguy911 (01-09-2021),
Harry_sz (05-11-2021),
moosetaco (01-09-2021),
and 3 others liked this post.
#11
How far do I take the balancing of the rotating assembly? The image below is a listing of the weights of components. Initially, I just numbered the components, 1-6, as I removed them from the packaging and then recorded their individual weights. That is the top rows. I then identified the average total weight (at the far right) and the min and max weighted assemblies (in the shaded boxes). I then worked to recombine the parts into more closely weighted total assemblies (that is the second set of rows). I think I can improve a little on the .96g difference I am at in this take. My overarching question is how close is close enough for the total weights - should I be shooting for .5g or less? or what? I am not opposed to material removal from parts but would rather avoid it....lastly, should I also be including the wrist pin clips in this calculation (part of me is "why not, I already did all the other pieces" and part of me is "really?" haha)
#12
Captain Obvious
Super User
Super User
Joined: Aug 2003
Posts: 22,846
Likes: 340
From: Cambridge, Ontario, Canada
Is that sheared off hex shaft in the middle of the oil pump gear?
P.S. My bearings looked a lot like yours but they didn't spin.
P.S. My bearings looked a lot like yours but they didn't spin.
Last edited by Imo000; 01-21-2021 at 02:58 PM.
#14
My intermediate level balance spec puts all the pistons with matched pins within .5 gr of each other for the full set. My race epic is .2gr.
That said, yours are definitely close enough of you are only balancing the reciprocating mass, and not dynamically balancing the remainder of the rotating mass. The rotating mass is light years of imbalance compared to what the pistons will be.
That said, yours are definitely close enough of you are only balancing the reciprocating mass, and not dynamically balancing the remainder of the rotating mass. The rotating mass is light years of imbalance compared to what the pistons will be.
#15

Material removed to create it from a round hole is not turned into swarfe but pushed to the bottom where it stays and that's perhaps what you see.
Last edited by hardtailer; 01-21-2021 at 04:41 PM.
The following users liked this post:
Porschetech3 (01-21-2021)


