When you click on links to various merchants on this site and make a purchase, this can result in this site earning a commission. Affiliate programs and affiliations include, but are not limited to, the eBay Partner Network.
Wow I seem to have the strangest bad luck when working on my cars at times!
So the GREAT news is I got it installed. Once I figured it out, it all became pretty obvious how it goes in. But as I was fastening one of the nuts at the top it didn't quite catch the threads and went falling down into what I call the "abyss"
I call it that because I spent about 10 minutes fishing through that area with my magnetic pick up tool and not finding the stupid nut. I have the other one and it sticks right to the magnet so I know it's not the nut, but somehow it remained elusive. So during my search all of a sudden my magnetic pick up tool breaks in half!
Now I have half a magnetic pick up tool AND my lost nut hiding in the abyss. Would have run to the hardware store but of course they closed 45 minutes ago. So tomorrow it will be. How can I be so unlucky? But what I am glad about is that once I retrieve these items I know exactly how to get that thing in there. I look forward to driving my car again very soon. I missed a 75 degree day today because of this issue
Just think of all the money you saved. And if the next one fails, you�ll be able to do it in 1/3rd the time.
Wow I seem to have the strangest bad luck when working on my cars at times!
So the GREAT news is I got it installed. Once I figured it out, it all became pretty obvious how it goes in. But as I was fastening one of the nuts at the top it didn't quite catch the threads and went falling down into what I call the "abyss"
I call it that because I spent about 10 minutes fishing through that area with my magnetic pick up tool and not finding the stupid nut. I have the other one and it sticks right to the magnet so I know it's not the nut, but somehow it remained elusive. So during my search all of a sudden my magnetic pick up tool breaks in half!
Now I have half a magnetic pick up tool AND my lost nut hiding in the abyss. Would have run to the hardware store but of course they closed 45 minutes ago. So tomorrow it will be. How can I be so unlucky? But what I am glad about is that once I retrieve these items I know exactly how to get that thing in there. I look forward to driving my car again very soon. I missed a 75 degree day today because of this issue
Pick up a mechanics mirror when you get a new magnetic pick up tool. Maybe you will be able to see in there to locate the lost stuff. Another tool I have found useful is my phone. Put it in video mode and shove it in there. Amazing what you can see when you do that. And yes, it takes an enormous amount of patience when you DIY. I have found almost every job turns into 2 or 3 jobs. When I did my AOS, I spent 2 days searching for a lost bolt, hand twisted up and over from underneath searching along the top of Bank 1. Finally found it and what a relief. Damn things can be frustrating at times, as with any car project. And recently replaced my motor mounts and busted a coolant line. I'm still waiting on that part to get here so I can finish...and that means a total coolant drain and refill, so add that to what needs to be done. The best thing is when you are all done, a keen sense of "I did it myself" accomplishment. And saving money.
This saga is now complete. That car is back together again but eventually I'm going to want someone to go in there and help clean up the mess.
What mess exactly? Well I couldn't retrieve the broken 1/3rd end of my magnetic pick-up tool, 3 nuts, and my 4mm allen wrench. That's right, all that crap is still sitting in some unseen 996 body cavity because for the life of me I could not locate and pick up those items.
But the hardtop is now on and the car is ready for a wash but with rain in the forecast we'll wait until tomorrow. Wow what an adventure but at least now I know for the next time
That stuff in there would only bother me if it was rattling around while driving.
That stuff in there would only bother me if it was rattling around while driving.
Took it for a drive today and heard nothing. I imagine it's all hiding in a crease where the floorpan meets the body. Eventually I'll get around to retrieving it but for now I just wanted to get back on the road!
I am laughing at your Saga. I also left some stray pieces down in the dark abyss. After over a year, no rattles yet, so I am not sweating it. When I did a Front window regulator, I fished out a nut, and a socket from someone that worked on it in the past. So I suppose even the Pros do it....
Today my rear passenger window went down a little and wouldn’t come back up. I put it down a little bit more to see if it would come back up, now it’s stuck half was down.
I park outside so I need to figure this out soon.
I see that sending off the regulator is the most cost effective option. Can I manually keep the window up somehow while I wait for the regulator to be repaired?
What can I troubleshoot to determine if it is actually the regulator? Is there any way to manually get the window up?
I would try to pull it up as someone is holding down the button. Worth a try.
i was able to pull it up. It has a lot of slop in it. The regulator is not holding it in. I hear a lot of crunching. Pressing the up button pulls it down and pressing the down button pulls it down.
I am guessing that the regulator is dead?
At least I was able to pull it up, but it is by hand. I can easily push it down as well.
Option 2: The regulator rebuild is on sale for $180 on eBay with lifetime warranty.
Looking on rhe regulator, and hearing the crunch, I assume that it simply needs the cables replaced. The regulator repair kit looks pretty easy diy if it’s just touting the cable and installing the new gears. I would rather not have to wait for mail and return... sounds like about a week in between.
Has as anyone attempted a self-repair? What is your recommendation?
Option 2: The regulator rebuild is on sale for $180 on eBay with lifetime warranty.
Looking on rhe regulator, and hearing the crunch, I assume that it simply needs the cables replaced. The regulator repair kit looks pretty easy diy if it�s just touting the cable and installing the new gears. I would rather not have to wait for mail and return... sounds like about a week in between.
Has as anyone attempted a self-repair? What is your recommendation?
My opinion is that you don�t know what�s wrong, so what if the DIY repair doesn�t solve the problem? I would send in the regulator to the AZ shop - not EBay, unless it�s the same shop. Chris is the guy that rebuilds these in AZ. He will make sure it�s totally fixed. Also, getting the regulator out and then back in isn�t easy, so you want to have it repaired and have the repair last, rather than going back in and doing it again later.
We now offer a rebuild service directly through Rennlist as a vendor for $149 + shipping. We also use metal parts to replace the cheap plastic parts that break.
We now offer a rebuild service directly through Rennlist as a vendor for $149 + shipping. We also use metal parts to replace the cheap plastic parts that break.
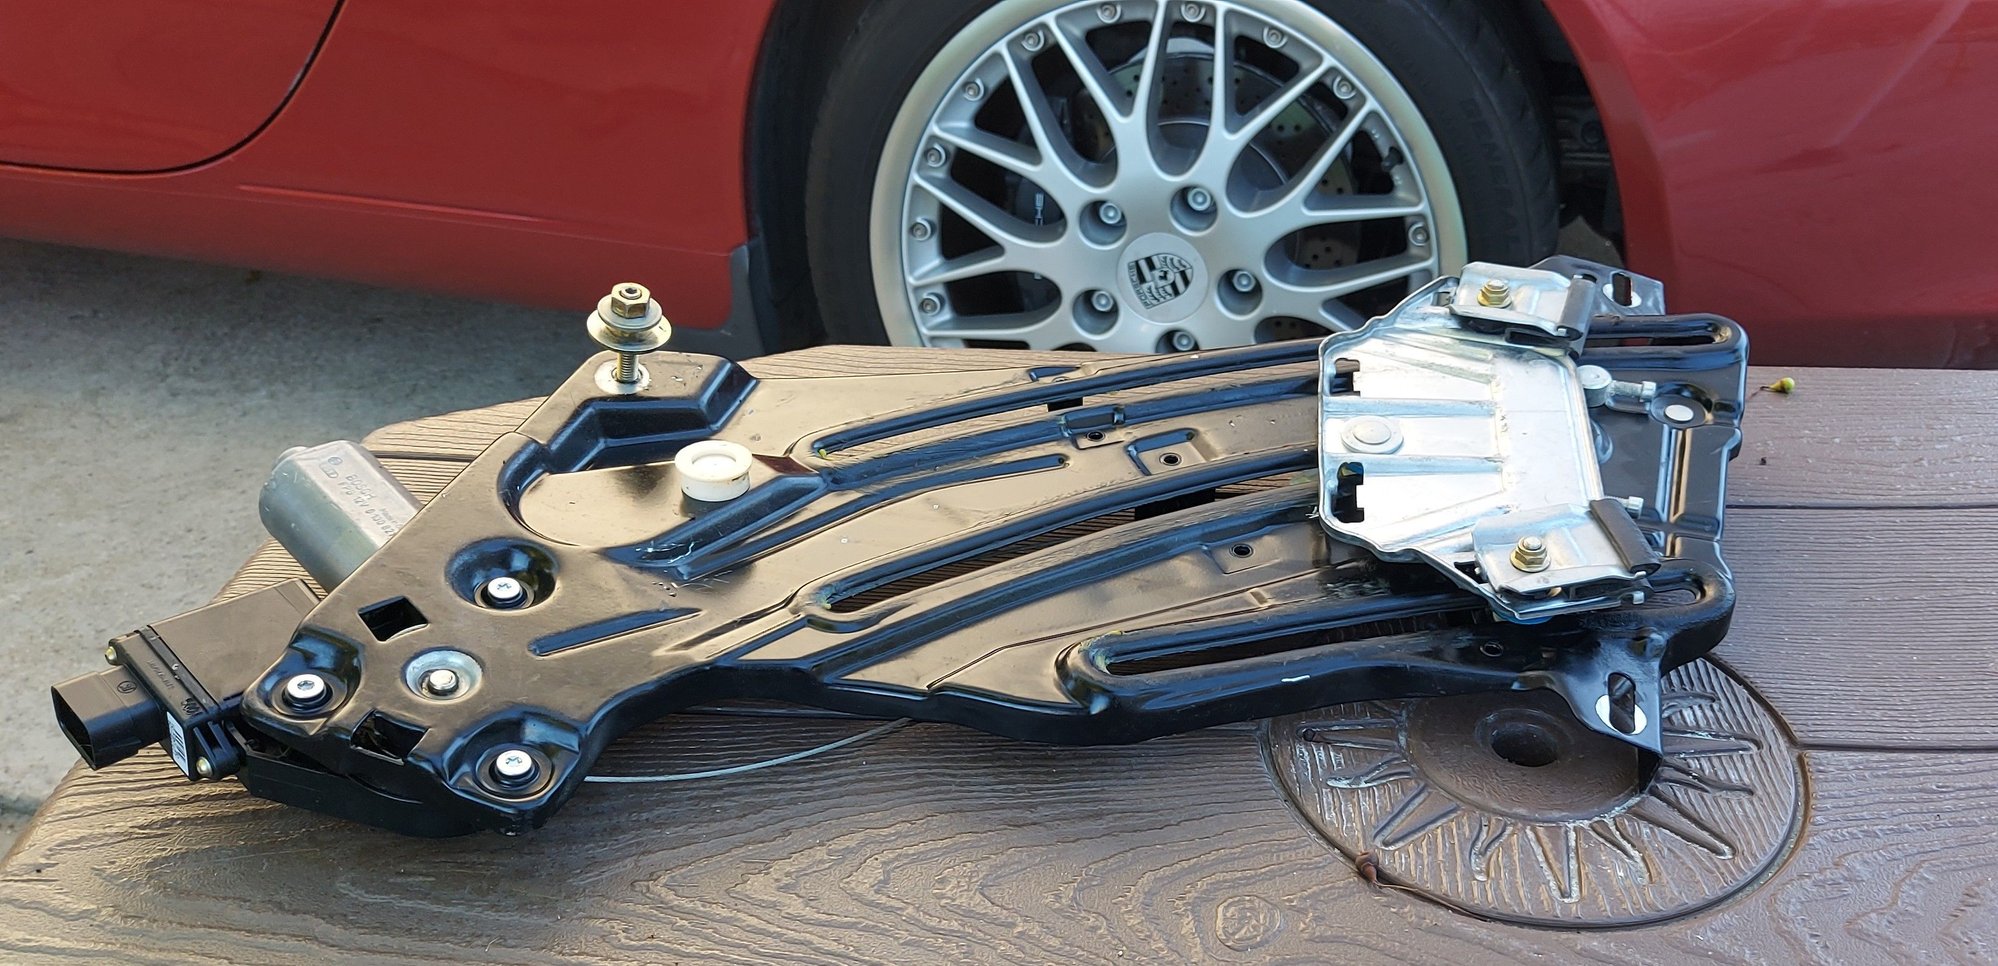
Little window froze half way open. Read all the posts and how to articles which have necessary info but are not very clear, couldn't find any videos. A document I believe from Porsche makes no sense to me at all. Bentley manual mentions front regulator but completely omits rear one.
Began with the top up but hard to work bent over, so opened top all the way but with the clamshell still open. Not sure if there is an advantage to having the top in a certain position.
Panel came off ok, removed one nut from one of the two clamps that hold the glass which allowed the glass to rotate giving access to the two top nuts that hold the regulator in place. Removed the plug that allows access to the third bolt that holds the regulator, used a hex socket with long extension to back that bolt all the way out of the regulator which was now fully loose. Not sure if that lower bolt should be completely removed as I did it, or just loosened and then slid out of it's slot.
Tried to slide the regulator up and out, but it's too wide . Had to loosen nuts that secure the convertible top mechanism, remove some clips and a link, and remove a ram (but left hydro lines installed), this allowed the assembly to be pried at strong metal where the seat belt mounts, and gave just enough room to wiggle the regulator out.
There is a connector at the bottom with barely enough slack to reach it, and I had to squeeze the tabs hard and wiggle it for a while before it released.
On the other side there is an exposed wheel that the cables run on, and the wheel is gone which apparently is my problem. But the wheels seems to have disappeared I don't see anything in the fender it is actually very clean. Monday I will see if the company in Arizona will rebuild the regulator, and it looks like they replace that wheel with a steel one. Didn't drop any nuts or tools yet, did an old aircraft mechanic trick tied a string to my ratchet in case it falls.
For reassembly should the lower bolt be installed on the regulator and slid into the slot, or put in the slot and screwed into regulator after it is lowered into position? If it can be installed on regulator before install that should be easier because it might be hard to line up. Are there any adjustments to the glass after install? There is a dirt film that shows where the clamps were holding it, and as long as I don't clean the window I should be able to mount the glass just about exactly where it came off.
Lots of these points and questions I mention I didn't see covered in previous posts.
yes there are three adjustment, the bottom attachment bolt if you look it is adjustable thru a hole once installed, also look right above where the window mounts and two adjustments screw there for forward rearward adjustment, do all before putting the card back on. best way is close the door with sheet of paper between fron window and rear glass and should take a slight pull to remove the paper, another Idea I use to install the unit in is biuld a wood wedge about 8 inchs long and is 1/4 in. thick at -one end to 2 in. thich at the other end. 2x4 works.... the-n you can put the wedge between the convertible frame up front by the seat belt attachment and spread to make it much easier to remove and install the regulator. the guys in Arizona does great work. 1-480-570-5116 -

 02-16-2018 | 02:00 AM