

DIY - 993 Transmission Drop & LWF
 11-28-2010, 02:27 PM
#61
Seared
Rennlist Member
Rennlist Member

 11-28-2010, 10:56 PM
#63
Noodle Jr.
Rennlist Member
Rennlist Member
04-19-2011, 12:04 PM
#64
Instructor
This is a great place.
I had never dropped a tranny before and was a little bit hesitant, especially with having to get the car up so high. I used this DIY last weekend and everything went smoothly.
I recruited a rennlist buddy, Roche993, to assist and while it was great to have two guys on the job it would definitely be doable with one. Andy managed to remove the plastic cap and the fork bearing through the wheel well while I did nothing more than hold the light in the right position so that he could see. Something tells me it won't be as easy to get back on.
I couple of small things that I'd add to the DIY:
-- Make sure to disconnect the reverse light switch, which is hidden under a rubber boot. I think it's on the driver's side in the middle of the tranny and is not at all hard to reach. Also, be careful when moving the tranny around because the plastic face on the switch input is easy to damage and it about $80 to replace. Ask me how I know.
-- Be careful about any cables/wires getting stuck on the various little clips that are attached to the tranny on the top side, we almost tore one when we were doing the final lowering on the tranny jack.
-- The oil line that crosses underneath is removed from the engine on the driver's side, and to reach it with a wrench I had to unbolt the sway bar mounts and swing the sway bar down out of the way. I used an adjustable wrench on the oil line nut, it was not torqued on very tightly at all. The oil line can then be moved out of the way without removing anything else. At least that's how I did it.
-- Definitely follow the directions about lowering the tranny a bit before going after the top starter bolt and clutch slave! Still not easy but much better access.
My transmission is out and with my mechanic for diagnosis. Hopefully we'll get to try out the replacement instructions soon and will do our best to document with photos.
cheers,
Don
04-19-2011, 12:23 PM
#65
Addict
Lifetime Rennlist
Member
Lifetime Rennlist
Member
Be cautious on putting it back in...the alignment of the shaft on the transmission has to be spot on with the clutch....that is one of the hardest parts. Be carefull not to hang the transmission on the input shaft, you can bend the shaft and that would be it....tranny rebuild. I found the hardest part is rethreading back the clutch fork shaft blind without throwing off the needle bearings or seals....one time I did this on jackstands, tried for about 6 $#*()#)(* hours to do that, gave up, dropped the godamn engine, and threaded that shaft in 3 minutes, and put the engine back in....that cost me some time (not much overall) but then had to pay for an alignment.
THAT is one of the reasons I now have a full 2 post lift. :-)
Cheers,
Mike
THAT is one of the reasons I now have a full 2 post lift. :-)
Cheers,
Mike
04-19-2011, 01:38 PM
#66
Instructor
Be cautious on putting it back in...the alignment of the shaft on the transmission has to be spot on with the clutch....that is one of the hardest parts. Be carefull not to hang the transmission on the input shaft, you can bend the shaft and that would be it....tranny rebuild. I found the hardest part is rethreading back the clutch fork shaft blind without throwing off the needle bearings or seals....one time I did this on jackstands, tried for about 6 $#*()#)(* hours to do that, gave up, dropped the godamn engine, and threaded that shaft in 3 minutes, and put the engine back in....that cost me some time (not much overall) but then had to pay for an alignment.
THAT is one of the reasons I now have a full 2 post lift. :-)
Cheers,
Mike
THAT is one of the reasons I now have a full 2 post lift. :-)
Cheers,
Mike
A lift is definitely on my wish list!
Don

 12-12-2013, 05:41 PM
#68
Racer
Join Date: Aug 2011
Posts: 267
Likes: 0
Received 0 Likes
on
0 Posts
I wish I had a home garage that spacious! Well done for the write up, some excellent info there for anyone having a go themselves.
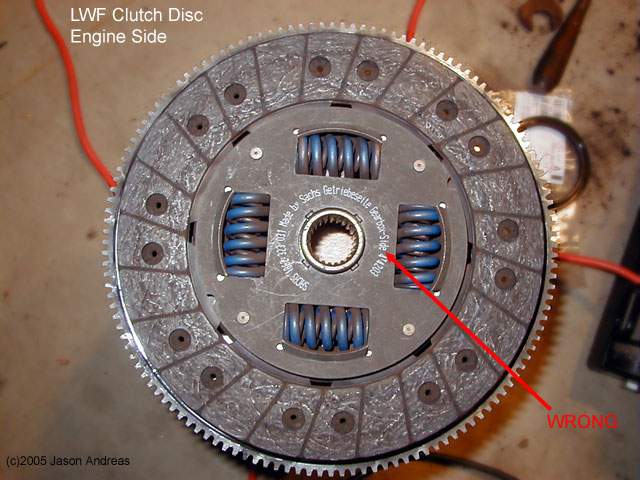
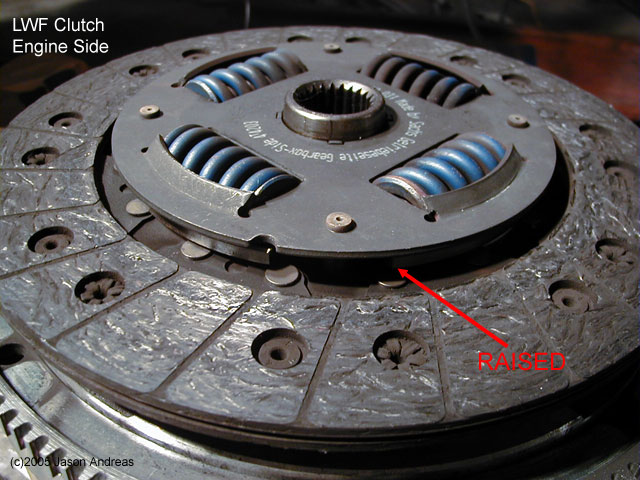
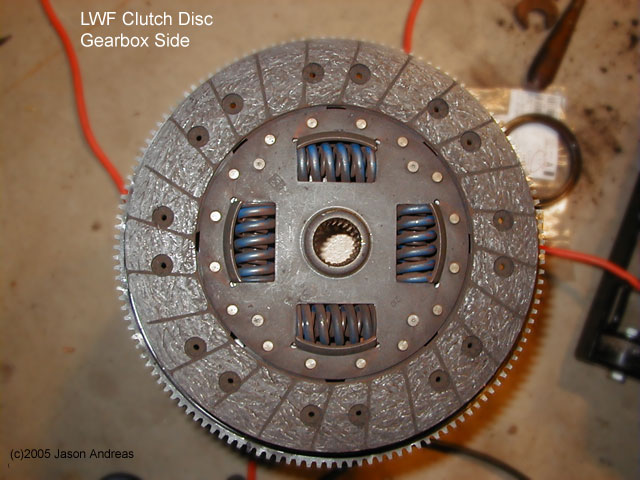
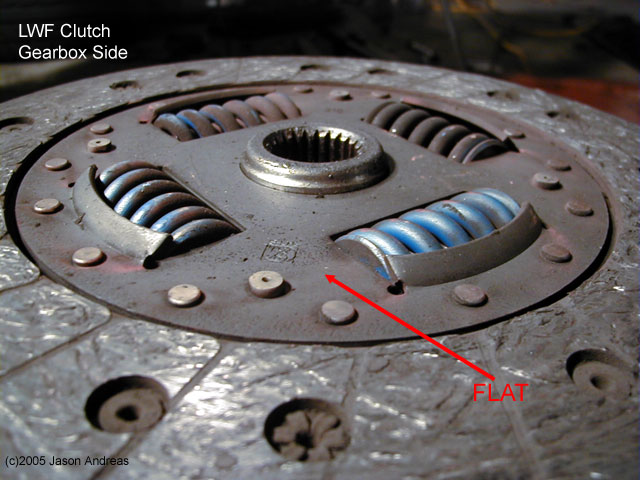
The only thing I would like to add as a reinforcement of your instructions is more detail on the correct orientation of the clutch centreplate. You did state that the spring face goes to the flywheel side, therefore by inference the flat face points towards the gearbox, contrary to normal practise. This is critical, since it is (just) possible to fit these parts the wrong way around.
I should add that if you do manage to get it wrong & start the engine, you will be faced with the boss of the centreplate friction welding itself to the end of the guide tube. You don't need to ask me how I know, but suffice to say the guy who did it no longer works at 9m....
Ehfar.
12-12-2013, 06:45 PM
#69
Technical Guru
Rennlist Member
Rennlist Member
I was referring to the tech manual when looking at the friction plate and it says the opposite for a DMF. Anyways couldn't let it lie and forced myself to seperate the tranny to check. Thank **** I did. Flywheel side clearly written on the friction plate. What a stroke of luck I was on here. It's a lwf and clutch.
 12-13-2013, 07:20 AM
#71
Rennlist Member
Thanks for the pictures guys! I'm doing this in a week and I could've certainly f-ed this one up.
So just to make it super clear... When installing the LWF the "raised" side of the friction plate, which in my case says "gearbox side" is the side that actually goes towards the flywheel. The flush side of the friction plate that has no writing on it goes towards the gearbox.
Is that correct?
So just to make it super clear... When installing the LWF the "raised" side of the friction plate, which in my case says "gearbox side" is the side that actually goes towards the flywheel. The flush side of the friction plate that has no writing on it goes towards the gearbox.
Is that correct?
12-13-2013, 11:11 AM
#72
Three Wheelin'
Thanks for the pictures guys! I'm doing this in a week and I could've certainly f-ed this one up.
So just to make it super clear... When installing the LWF the "raised" side of the friction plate, which in my case says "gearbox side" is the side that actually goes towards the flywheel. The flush side of the friction plate that has no writing on it goes towards the gearbox.
Is that correct?
So just to make it super clear... When installing the LWF the "raised" side of the friction plate, which in my case says "gearbox side" is the side that actually goes towards the flywheel. The flush side of the friction plate that has no writing on it goes towards the gearbox.
Is that correct?
Good luck with your project!
Hi Jason! how are you doing?
12-13-2013, 11:44 AM
#73
Addict
Lifetime Rennlist
Member
Lifetime Rennlist
Member
I just remember it this way - the RS flywheel is dished quite a bit, and it's to have that raised section of the clutch disk to clear. So the raised section goes towards the dished section, i.e. towards the flywheel....
12-18-2013, 01:34 PM
#74
Racer
Join Date: Aug 2011
Posts: 267
Likes: 0
Received 0 Likes
on
0 Posts
Thanks for the pictures guys! I'm doing this in a week and I could've certainly f-ed this one up.
So just to make it super clear... When installing the LWF the "raised" side of the friction plate, which in my case says "gearbox side" is the side that actually goes towards the flywheel. The flush side of the friction plate that has no writing on it goes towards the gearbox.
Is that correct?
So just to make it super clear... When installing the LWF the "raised" side of the friction plate, which in my case says "gearbox side" is the side that actually goes towards the flywheel. The flush side of the friction plate that has no writing on it goes towards the gearbox.
Is that correct?
12-18-2013, 01:38 PM
#75
Technical Guru
Rennlist Member
Rennlist Member