

Engine removal follow up - LWF
 01-04-2005 | 10:01 AM
#1
Thread Starter
Three Wheelin'
Joined: Mar 2002
Posts: 1,547
Likes: 5
From: Belgium
Ok guys here is an update on my progresses :
At this stage, all valve cover seals are replaced with the 2 rear distribution seals . My catalyser has a new holder, and my heat tube broken support is fixed with a stainless steel home made replacement.
Last week end, I considered the job on the engine done. Knowing that I still have to replaced the distributor cover, rotors,�and I�m very tempted to replace the spark plug cables too!
So I decided to leave the engine for a while, and proceed for the LWF. There are a lot of threads on this you should read, the best documented one is LWF What is it
But I�m not an experience technician, and I�d like to post some more details on the subject to may be help new DIYer like me to save time during their job.
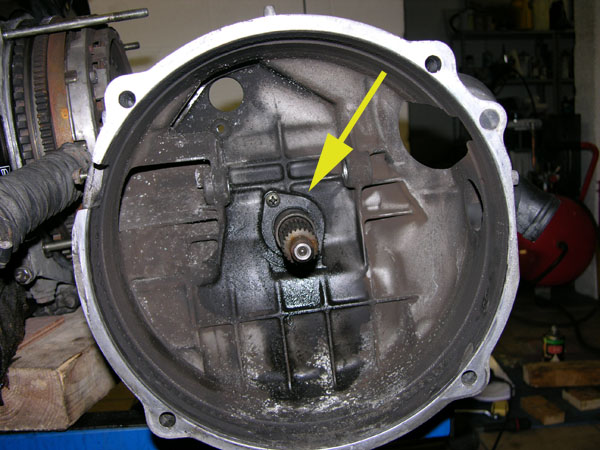
With gearbox still connected to the engine, we have to remove the clutch fork operating shaft. To do it I removed the cover shown on the next picture, and there, the small piece which holds in place the bearing cover (already removed on the pict)
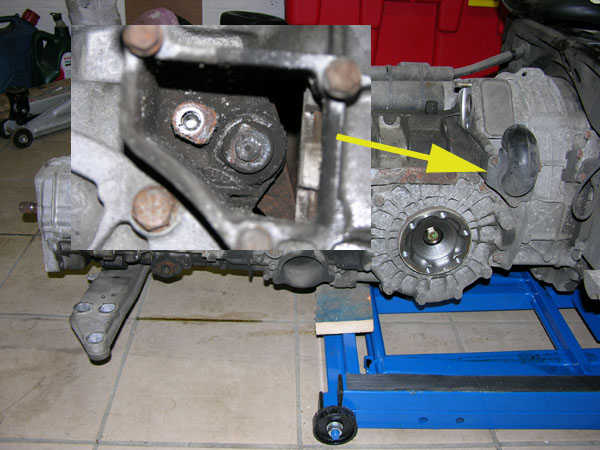
To remove the bearing cover, the Workshop manual procedure was not working for me. So I took a tool used to remove the plastic from an electrical wire (sorry I don�t know the English specific name for that one!) and pull the cover without any problem:
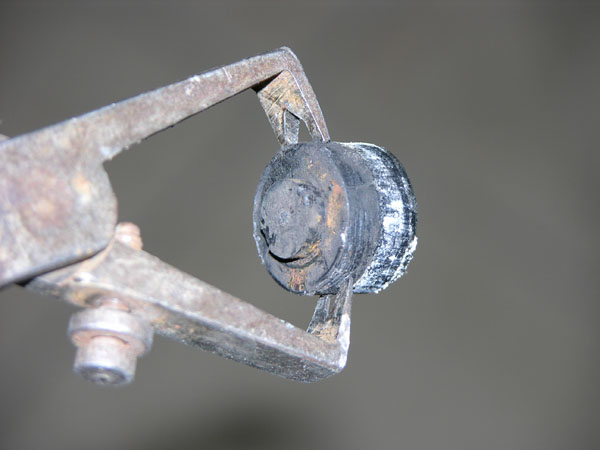
Now to remove he shaft, I used a long (too long but I didn�t want to cut it) M6 rod which I screwed in the shaft on one side, and on the other side a grip wise on which I knock gently with a hammer to extract the shaft.

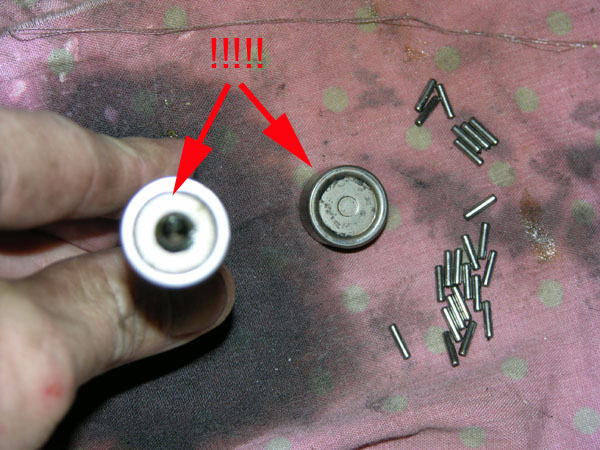
Doing this, if you don�t want to drop the needles from the bearing on the other side of the shaft, here is what to do: by the starter location, you can access the other side of the shaft through a small hole. As the shaft is coming out, through that hole, you can push with a nail against the bearing to make it follow the shaft. Doing so, you should be able to extract the shaft with the bearing, without dropping the bearing needles on the way out.

Here is a picture of the shaft with one bearing in place, and the other one dismantled . Notice that the bearing is made of 23 needles that are held in place only by the grease left in the bearing.

Now tatoo somewhere in your brains that the 2 bearing cages are different. One has a hole to allow you to set the M6 screw in place to extract the shaft. If by any chance you invert their position when replacing the shaft�good luck the next time you will want to remove it!!!
As the clutch fork is released, it�s time to unbolt the gear box from the engine by removing the 3 bolts left ( the fourth one is one of the starter).
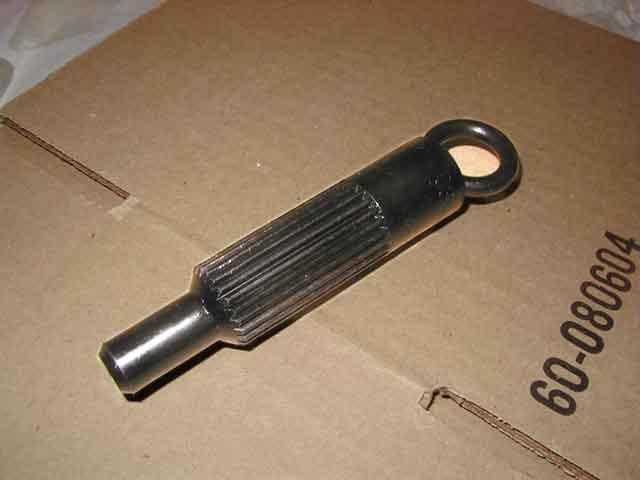
Here is the clutch guide tube you have to replace. It�s held in place by 2 parker screws. The oil you see was sprayed before trying to unscrew those B�.! I had to use an impact hammer to removed them!
then on the engine, you have the clutch assembly with the 9 famous M8 x 40 cheesehead screws where I was stuck not having the 12 pans driver to remove them.

I took the opportunity to change the clutch slave cylinder. How easy it is in those conditions!!! 15 minutes with the bleeding! Note the position of the slave cylinder to replace the new one in the same position not to twist it when setting it back to the gearbox


my bleeding equipment:

That�s all I have for today gentlemen. Sorry! But believe me, I�m also nervous to know how it will go the cheesehead screw removal

At this stage, all valve cover seals are replaced with the 2 rear distribution seals . My catalyser has a new holder, and my heat tube broken support is fixed with a stainless steel home made replacement.
Last week end, I considered the job on the engine done. Knowing that I still have to replaced the distributor cover, rotors,�and I�m very tempted to replace the spark plug cables too!
So I decided to leave the engine for a while, and proceed for the LWF. There are a lot of threads on this you should read, the best documented one is LWF What is it
But I�m not an experience technician, and I�d like to post some more details on the subject to may be help new DIYer like me to save time during their job.
With gearbox still connected to the engine, we have to remove the clutch fork operating shaft. To do it I removed the cover shown on the next picture, and there, the small piece which holds in place the bearing cover (already removed on the pict)
To remove the bearing cover, the Workshop manual procedure was not working for me. So I took a tool used to remove the plastic from an electrical wire (sorry I don�t know the English specific name for that one!) and pull the cover without any problem:
Now to remove he shaft, I used a long (too long but I didn�t want to cut it) M6 rod which I screwed in the shaft on one side, and on the other side a grip wise on which I knock gently with a hammer to extract the shaft.
Doing this, if you don�t want to drop the needles from the bearing on the other side of the shaft, here is what to do: by the starter location, you can access the other side of the shaft through a small hole. As the shaft is coming out, through that hole, you can push with a nail against the bearing to make it follow the shaft. Doing so, you should be able to extract the shaft with the bearing, without dropping the bearing needles on the way out.
Here is a picture of the shaft with one bearing in place, and the other one dismantled . Notice that the bearing is made of 23 needles that are held in place only by the grease left in the bearing.
Now tatoo somewhere in your brains that the 2 bearing cages are different. One has a hole to allow you to set the M6 screw in place to extract the shaft. If by any chance you invert their position when replacing the shaft�good luck the next time you will want to remove it!!!
As the clutch fork is released, it�s time to unbolt the gear box from the engine by removing the 3 bolts left ( the fourth one is one of the starter).
Here is the clutch guide tube you have to replace. It�s held in place by 2 parker screws. The oil you see was sprayed before trying to unscrew those B�.! I had to use an impact hammer to removed them!
then on the engine, you have the clutch assembly with the 9 famous M8 x 40 cheesehead screws where I was stuck not having the 12 pans driver to remove them.
I took the opportunity to change the clutch slave cylinder. How easy it is in those conditions!!! 15 minutes with the bleeding! Note the position of the slave cylinder to replace the new one in the same position not to twist it when setting it back to the gearbox
my bleeding equipment:
That�s all I have for today gentlemen. Sorry! But believe me, I�m also nervous to know how it will go the cheesehead screw removal
Last edited by Toga; 12-31-2006 at 11:05 AM.
01-04-2005 | 04:21 PM
#3
Instructor
Joined: Dec 2004
Posts: 177
Likes: 0
From: Seal Beach, CA
Toga, you're a far better technician than you give yourself
credit. If you only lived closer I'd come over and hang out
just to watch you perform your magic. Keep up the good
work and the pics are worth a million euros.
credit. If you only lived closer I'd come over and hang out
just to watch you perform your magic. Keep up the good
work and the pics are worth a million euros.
01-04-2005 | 04:58 PM
#4

Addict
Rennlist Member
Rennlist Member
Joined: Nov 2003
Posts: 3,530
Likes: 3
From: Kauai, Hawaii
Toga,
As usual, very good writeup!!!
You know, you are doing such a good job with these that you are giving me no excuse to do the same when the time comes for a LWF upgrade.
Much appreciation from someone who, like you, has never delved into the innards of a Porsche motor before. I applaud you for the guts it takes to take on the unknown.
01-05-2005 | 12:19 PM
#5
Thread Starter
Three Wheelin'
Joined: Mar 2002
Posts: 1,547
Likes: 5
From: Belgium
Originally Posted by SteveAbrahams
Toga, you're a far better technician than you give yourself
credit.
credit.
The guts came slowly by reading all the posts about the different subject. I have a very kind support from a lot of people here, and knowing that if I had a problem, there were a lot of fans behind ready to help, gave me no excuse not to try. You could do it! You just need patience, the workshop manual, the right tools and Rennlist
Originally Posted by Kkim
You know, you are doing such a good job with these that you are giving me no excuse to do the same when the time comes for a LWF upgrade.

Last edited by Toga; 01-06-2005 at 04:53 AM.
01-05-2005 | 02:33 PM
#7
Drifting
Joined: May 2004
Posts: 3,312
Likes: 1
Now what the hell are all those metal things you took pictures of? They are part of a Porsche, yes? Where would I find these parts? Are they located in the trunk... or maybe under the dash, dunno.  But if it's a Porsche, it looks like it needs some waxing.
Just kidding, I admire you for taking on such a job, I wouldn't even know where to begin.
But if it's a Porsche, it looks like it needs some waxing.Just kidding, I admire you for taking on such a job, I wouldn't even know where to begin.
Trending Topics
01-05-2005 | 04:31 PM
#8
Thread Starter
Three Wheelin'
Joined: Mar 2002
Posts: 1,547
Likes: 5
From: Belgium
Originally Posted by mnmblu
I admire you for taking on such a job, I wouldn't even know where to begin.
01-05-2005 | 06:26 PM
#9
Thread Starter
Three Wheelin'
Joined: Mar 2002
Posts: 1,547
Likes: 5
From: Belgium
Yes I got the right tool today at 1700 to remove the �cheesehead� M8 screws from the pressure plate! And guess what, I was facing�cheesehead� M10 screws!!!  Another hour lost to get the tool, and here I was trying to remove the double mass flywheel (Thanks Rick Lee for the tip to block the flywheel!).
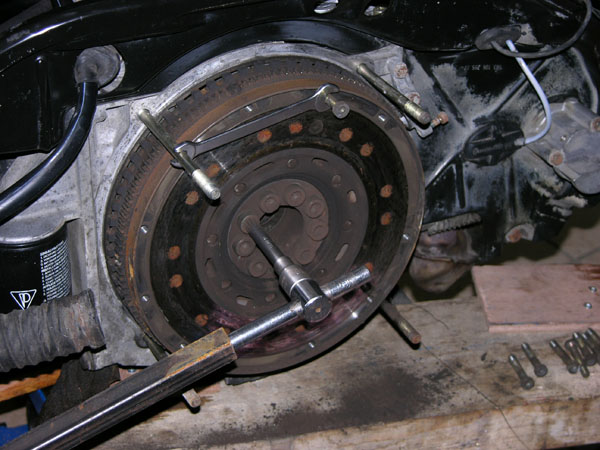
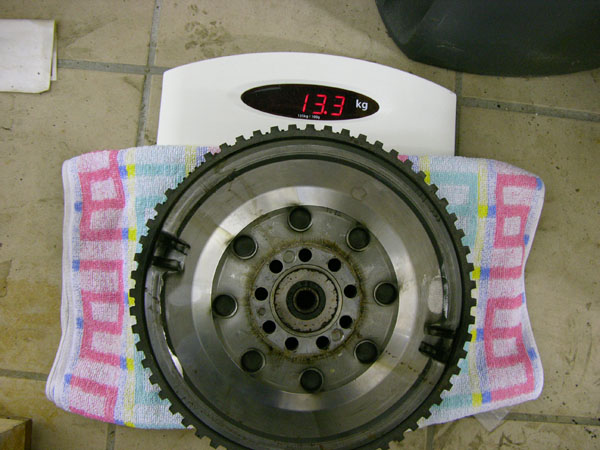
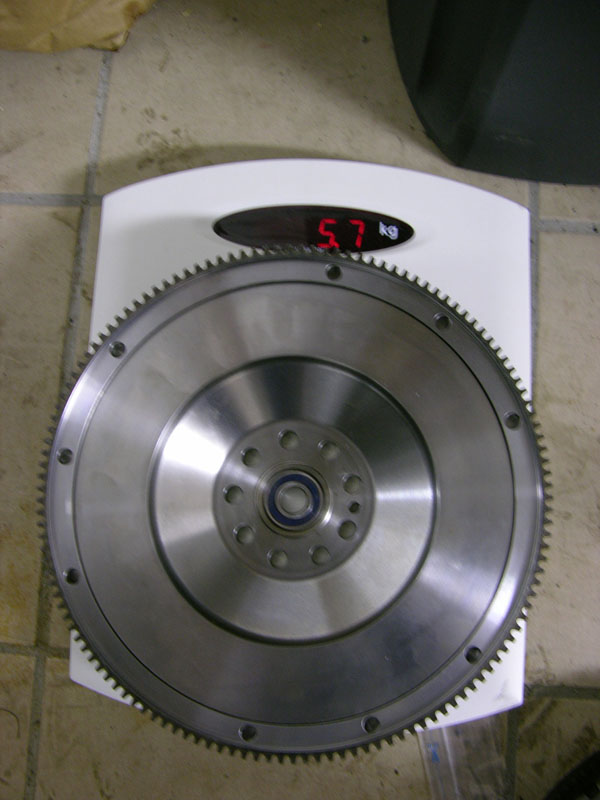
I mainly followed the explanation given by John D in the link above. But what�s good for the motivation�look the next pictures is the double mass flywheel in kg followed by the new LWF� no comment:
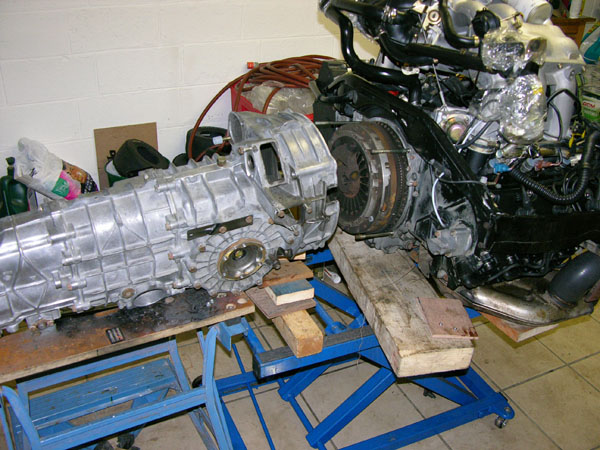
and here is the engine with the new LWF in place

Tomorrow, I'll continue with the new pressure plate and the clutch. I'm looking for a clutch centering device...
Another hour lost to get the tool, and here I was trying to remove the double mass flywheel (Thanks Rick Lee for the tip to block the flywheel!). I mainly followed the explanation given by John D in the link above. But what�s good for the motivation�look the next pictures is the double mass flywheel in kg followed by the new LWF� no comment:
and here is the engine with the new LWF in place
Tomorrow, I'll continue with the new pressure plate and the clutch. I'm looking for a clutch centering device...
Last edited by Toga; 12-31-2006 at 01:36 PM.
01-05-2005 | 06:48 PM
#10
Addict
Rennlist Member
Rennlist Member
Joined: Mar 2004
Posts: 4,266
Likes: 3
From: Europe
Hello Toga,
Back near you with lots of jetlag. And beleive it or not... I did not receive the secondary distributor drive belts from Pelican.
My brother will forward them as soon as they get in.
I talked to an automotive engineer friend and he says to forget the hugely expensive wiring from Porsche and get a good alternative at 1/10th the cost. He will help with the rework of the dual distributor... you'll meet him on the 14th...
Remember me when you reinstall the engine.. I'll help!
01-05-2005 | 07:01 PM
#11
Pro
Joined: Jan 2004
Posts: 510
Likes: 1
From: Connecticut
JP,
Awesome information and pics, keep it coming.
The word you were looking for to describe the tool you used to remove the bearing cover is a very important English word. You can use it in many contexts, with many different meanings. And it makes me giggle. The term is "STRIPPER!"
Awesome information and pics, keep it coming.
The word you were looking for to describe the tool you used to remove the bearing cover is a very important English word. You can use it in many contexts, with many different meanings. And it makes me giggle. The term is "STRIPPER!"
01-06-2005 | 03:42 AM
#12
Technical Guru
Rennlist Member
Rennlist Member
Joined: May 2002
Posts: 8,138
Likes: 112
From: USVI
Originally Posted by Toga
Tomorrow, I'll continue with the new pressure plate and the clutch. I'm looking for a clutch centering device...
 01-06-2005 | 04:39 AM
#13
Thread Starter
Three Wheelin'
Joined: Mar 2002
Posts: 1,547
Likes: 5
From: Belgium
Hi Monique! Welcome back. Sure I'll advise you when ready to replace the engine. Concerning the cables, I think that the Porsche solution gives you also the new plugs for the distribution cover and the spark plugs. I'm still undecided on that particular problem.
JohnJL: thanks. Stripper. I'll remember that! Tell me more about the other contexts where you use it
JasonAndreas: good infos! I wish I could just pick it up from the picture! And I doubt I can find that for 2� here. I'll let you know.
Now breakfast and I go for the pressure plate/ bearing assembly.
