Gearing up for the big dance- last few questions
 10-16-2005, 05:45 AM
#1
Burning Brakes
Thread Starter
Ok, so I'm almost ready to get the show on the road and get the motor out of the car.
Tonight I did sort of a "dryrun" to do a walk-through, look for problems, and fill in some of the gaps in the factory manual.
I am sort of overkill in this regard. I like things to run smooth. When I replaced the front bumper cap with the euro TT nose, I did a complete R&R of the old bumper while the new one was at the paint shop. This way, I had already done it and discovered a few "if I had to do this again" sort of things that really saved me time when it came time to install the new cover (and it didn't get scratched.)
Anyway, for the peanut gallery:
I looked all over for a spec. for the speed reference sender. I found one post in the archives where it was listed as .8mm +/- .2mm for the LWF. However, I can't find it in the manual anywhere and would like a double-check.
My maintenance kit came with new Bosch triple electrode plugs. I've heard these are "pre-gapped" at the factory to .7mm. I'd like to double check, but because there are three electrodes converging on the insulator, I'm not sure how best to check the gaps.
What type of grease should I use on the release shaft needle bearings? Axle grease?
I've bought a new slave cylinder for the clutch. Is it possible/safe to install and bleed the SC while the motor is out? This would be super easy with no motor/gearbox in the way.
Is it suggested to use some cheap 75w90 gear oil while I break-in the transmission, then swapping to Mobil1?
I also did a search on power steering fluids and the differences between Pentosin and Dextron. I checked my fluid and it looks to be a light peach color. I'm assuming it was filled with Dextron. For those wondering where you can get the Pentosin CHF 11S, I found some at Pelican Parts (and much cheaper to boot) at $19.00 a litre.
My big question is in regards to the black tubular transmission support bracket that attaches from the gearbox to the insides of the shift rod tunnel.
I tired to get the best pics I could but I was only inches away, while trying to hold the shop light and manipulate the camera. Hopefully you can see what I'm talking about.
Anyway, I can find no mention of this brace/bracket/support anywhere in the manual. I do seem to remember seeing a thread where someone said they used this as a guide to align the engine/tranny for installation? It's very vauge in my memory.
Anyway, I can't even figure out it's use, let alone how best to remove it.
Again, thought and ideas are welcome.
And some pics:
Tonight I did sort of a "dryrun" to do a walk-through, look for problems, and fill in some of the gaps in the factory manual.
I am sort of overkill in this regard. I like things to run smooth.
When I replaced the front bumper cap with the euro TT nose, I did a complete R&R of the old bumper while the new one was at the paint shop. This way, I had already done it and discovered a few "if I had to do this again" sort of things that really saved me time when it came time to install the new cover (and it didn't get scratched.)Anyway, for the peanut gallery:
I looked all over for a spec. for the speed reference sender. I found one post in the archives where it was listed as .8mm +/- .2mm for the LWF. However, I can't find it in the manual anywhere and would like a double-check.
My maintenance kit came with new Bosch triple electrode plugs. I've heard these are "pre-gapped" at the factory to .7mm. I'd like to double check, but because there are three electrodes converging on the insulator, I'm not sure how best to check the gaps.
What type of grease should I use on the release shaft needle bearings? Axle grease?
I've bought a new slave cylinder for the clutch. Is it possible/safe to install and bleed the SC while the motor is out? This would be super easy with no motor/gearbox in the way.
Is it suggested to use some cheap 75w90 gear oil while I break-in the transmission, then swapping to Mobil1?
I also did a search on power steering fluids and the differences between Pentosin and Dextron. I checked my fluid and it looks to be a light peach color. I'm assuming it was filled with Dextron. For those wondering where you can get the Pentosin CHF 11S, I found some at Pelican Parts (and much cheaper to boot) at $19.00 a litre.
My big question is in regards to the black tubular transmission support bracket that attaches from the gearbox to the insides of the shift rod tunnel.
I tired to get the best pics I could but I was only inches away, while trying to hold the shop light and manipulate the camera. Hopefully you can see what I'm talking about.
Anyway, I can find no mention of this brace/bracket/support anywhere in the manual. I do seem to remember seeing a thread where someone said they used this as a guide to align the engine/tranny for installation? It's very vauge in my memory.
Anyway, I can't even figure out it's use, let alone how best to remove it.
Again, thought and ideas are welcome.
And some pics:
 10-16-2005, 05:58 AM
#2
Burning Brakes
Thread Starter
Also, while looking at the shift rod coupler under the car, I found the linkage somewhat suspect. The shift rod is mated to the coupler via a thick rubber spacer with two bolts. When I applied pressure to the shift rod there was some significant play between the rod and rubber spacer. I took some photos of this. In my mind this would contribute to sloppy shifting. Thoughts? Ideas?
In the first pic, you can see the gap between the rubber spacer and the coupler. In the second pic, I am pushing the rod towards the front of the car. In the third, I'm applying pressure towards the transmission. You can see the slop where the bolt heads meet the coupler flange.
What to do? Is this normal?
 10-16-2005, 01:22 PM
#4
Former Vendor
Join Date: May 2002
Location: Tampa
Posts: 6,849
Likes: 0
Received 0 Likes
on
0 Posts
In your first pic, just remove the bolts the hold those arms and that braket to the tunnel. I think this requires a 19mm wrench. Once the bolts are out, remove the bracket in between the arms. The transmission comes out with the arms attached. Nothing else needs to be removed. Now that you have a nice pic, you will remember the orientation of the bracket. This is a crash safety item to keep the engine/tranny from coming forward into the cockpit in case of a collision. So it is best to have it facing the right direction.
In your second pic, that is normal for the coupler. There is generally a gap in there. This allows a little more isolation of the tranny to the shifter for less vibration. It is also responsiable for less feel, more flex and retardation of movement. A trade off to make the cars more friendly to the general public.
In your second pic, that is normal for the coupler. There is generally a gap in there. This allows a little more isolation of the tranny to the shifter for less vibration. It is also responsiable for less feel, more flex and retardation of movement. A trade off to make the cars more friendly to the general public.
10-16-2005, 01:46 PM
#7
Guru
Lifetime Rennlist
Member
Rennlist Small
Business Sponsor
Lifetime Rennlist
Member
Rennlist Small
Business Sponsor
Bob is right, 19mm wrench for those support tubes.
I recall the flywheel ref. sensor gap to be 1mm +/- .3mm(?)
I dont recall seeing that gap at the shifter linkage coupler. The bolts are shouldered, to prevent overtightening on the rubber isolator.
Dont forget to disconnnect the loom on top of the engine. This is four connections one being for MAF, another for ISV. The other two I dont recall.
Ground connection at the bottom of the starter to bellhousing, that is sometimes easy to forget.
Throttle cable, especially on Varioram cars can be difficult. Manual asks for the cable to be disconnected at the throttle pedal, but I generally disconnect it at the throttle body. I usually lower the engine about 10" to gain access to this cable from the top. I am probably doing this the hard way. I have a knack for doing things the hard way
Trending Topics
10-16-2005, 01:48 PM
#8
Guru
Lifetime Rennlist
Member
Rennlist Small
Business Sponsor
Lifetime Rennlist
Member
Rennlist Small
Business Sponsor
Forgot to add, clutch slave can be disconnected at the rubber line / hard line connection in the tunnel, just foreward of the slave itself. I do this because, for me, its easier than trying to mount the slave once the engine/gearbox in back in place. Plus you are replacing the slave, no brainer.
10-17-2005, 08:49 AM
#9
Three Wheelin'
Originally Posted by Leland Pate
My god this is slow going... it's taken me forever to upload these pictures...
10-17-2005, 09:16 AM
#10
Three Wheelin'
Good luck Leland! I know how you should feel, I did it last year! You'll love it. This is a great experience, and not really difficult if you take your time! Better look twice than make a mistake!
I have plenty of pictures about the job. Feel free to ask if you need a particulary one, I'll see if I have it in stock!
Concerning the grease, it's a Porsche product. I'll look for the ref when back home (wednesday).
For the clutch, disconnect it where Chris does it: at the connection in the tunnel. You can then reconnect easily before lifting the engine back in place (and flush it too).
I posted a lot about engine removal. Just do a search with "engine removal" with thread starter "Toga". You'll have links to the different stages of the job.
Keep us informed!
10-17-2005, 09:15 PM
#11
Technical Guru
Rennlist Member
Rennlist Member
Originally Posted by Leland Pate
I looked all over for a spec. for the speed reference sender. I found one post in the archives where it was listed as .8mm +/- .2mm for the LWF. However, I can't find it in the manual anywhere and would like a double-check.
Originally Posted by Leland Pate
What type of grease should I use on the release shaft needle bearings? Axle grease?
10-17-2005, 09:32 PM
#12
Burning Brakes
Thread Starter
Thanks very much for the information guys.
J, I have some Olista Longtime graciously sent to me by Mr. Weiner.
I made a nice spreadsheet as a checklist for the removal.
It's an excel and I can't upload it. If anyone wants a copy, just send me an email.
________________________________________________________________________ _____
Procedure Completed Torque ft/lbs Notes
1 Disconnect battery
2 Remove airbox
3 Remove heater blower
4 Disconnect wiring harness, left side
5 Remove AC compressor
6 Disconnect MAF, ISV, connectors on top, etc.
7 On left side disconnect:
8 Hose to carbon canister
9 Hose to brake booster
10 Connector to temp. sensor
11 Connector to knock sensor
12 Connector to cruise control
13 Connector to reference mark sensor
14 Disconnect oxygen sensor connector, right side
15 Disconnect fuel lines, both sides 26
16 Disconnect throttle cable
17 Bleed and disconnect power steering pump
MOVE UNDER CAR
18 Remove heater tubes and flapper boxes
19 Remove mufflers 15/20
20 Disconnect axles 60
21 Disconnect shift rod coupler 13 Loctite 270
22 Remove front transverse strut 48
23 Remove complete sway bar 17/34
24 mark position of toe eccentrics and cross member placement
25 Loosen strut/control arm bolts, detach from cross member 74
26 Remove rear cross member 88
27 Disconnect oil return line from gearbox
28 Drain oil 37/37
29 Disconnect 36mm oil return tube, left side 52
30 Disconnect flanged oil line, right side 66
31 Disconnect ground cable to starter CE
32 Disconnect starter terminal #30 CE
33 Pull out throttle cable
SUPPORT ENGINE/Apply slight preload
34 Disconnect forward transmission brace from tunnel CE
35 Remove 6 transmission mounting bolts 34
36 Remove two engine carrier bolts 63
37 Lower engine slightly/ Disconnect clutch slave cylinder
38 As motor comes down, ensure CV shafts are free
39 Replace lower control arms before lowering vehicle
SEPARATE Engine/transmission 34
40 Remove cover and remove release cross shaft
CLUTCH/FLYWHEEL
41 Flywheel mounted to crankshaft 63 red loctite
42 Pressure Plate 17
MISC.
43 Spark Plugs 22
44 Valve covers 7
45 Rocker arm shafts 9
46 Alternator/fan belt pulley half bolt 37
NOTES:
All torques are in ft/lbs
CE= Calibrated Elbow (i.e. I couldn't find it)
10-23-2005, 05:40 PM
#13
Technical Guru
Rennlist Member
Rennlist Member
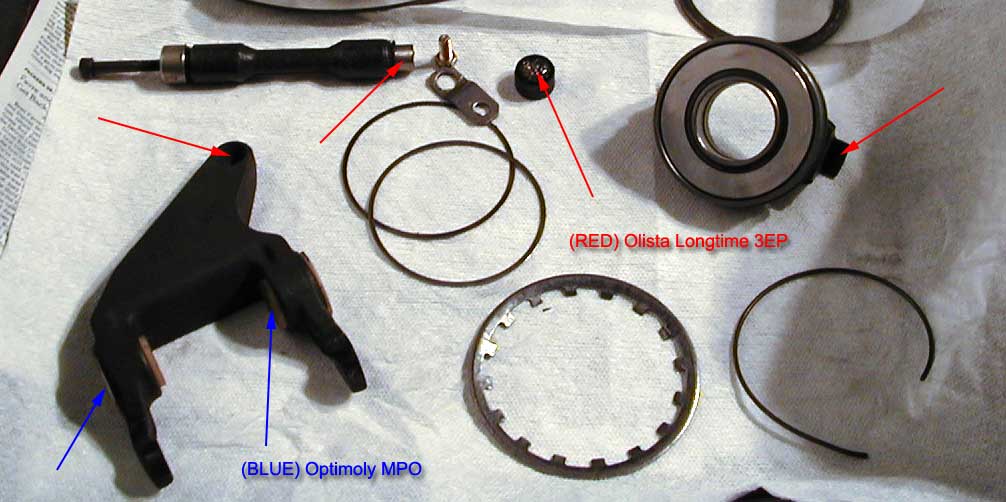
I just remembered (came across) I had this photo of all the pieces (in addition to the guide tube) that you need to lube with Olista Longtime. Hope everything is going smoothly!
10-23-2005, 06:46 PM
#14
Former Vendor
Join Date: May 2002
Location: Tampa
Posts: 6,849
Likes: 0
Received 0 Likes
on
0 Posts
Jason,
I added another spot (blue arrow). This is where the clutch slave contacts the fork. This can squeek if not lubed. Also, make sure that the ears are fully lubed where the fork contacts the throwout bearing.
I added another spot (blue arrow). This is where the clutch slave contacts the fork. This can squeek if not lubed. Also, make sure that the ears are fully lubed where the fork contacts the throwout bearing.
Last edited by viperbob; 05-21-2009 at 09:19 PM.
10-23-2005, 06:51 PM
#15
Burning Brakes
Thread Starter
You guys are the heat.
Thanks for the photo, Jason.
I just got an email from Chris saying the gearbox will ship tomorrow.
Tell me this guy doesn't kick ***: He's including a billet diff. cover and RS tranny mounts.
I thought I read somewhere that the guide tude does not get lubed???
Thanks for the photo, Jason.
I just got an email from Chris saying the gearbox will ship tomorrow.
Tell me this guy doesn't kick ***: He's including a billet diff. cover and RS tranny mounts.
I thought I read somewhere that the guide tude does not get lubed???