

Engine removal phase 4
 12-15-2004, 05:06 PM
#1
Three Wheelin'
Thread Starter
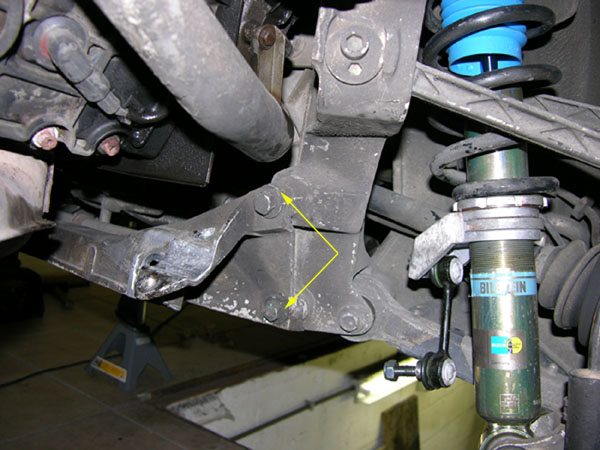
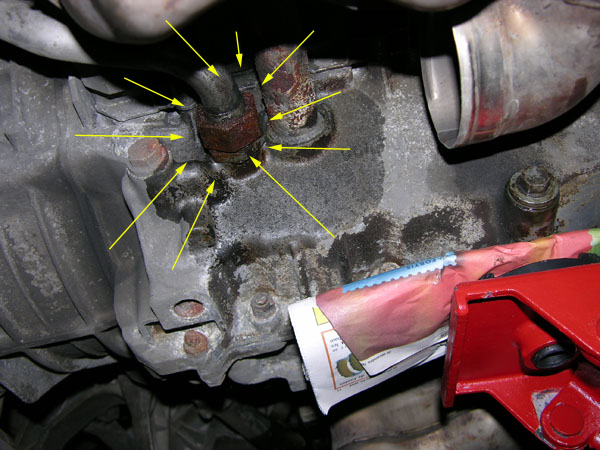
Here I remove the stabilizer bar: on the link rod, you need a 17mm open wrench between the bar and the rubber from the link rod to block the bolt, and a 16mm to unscrew
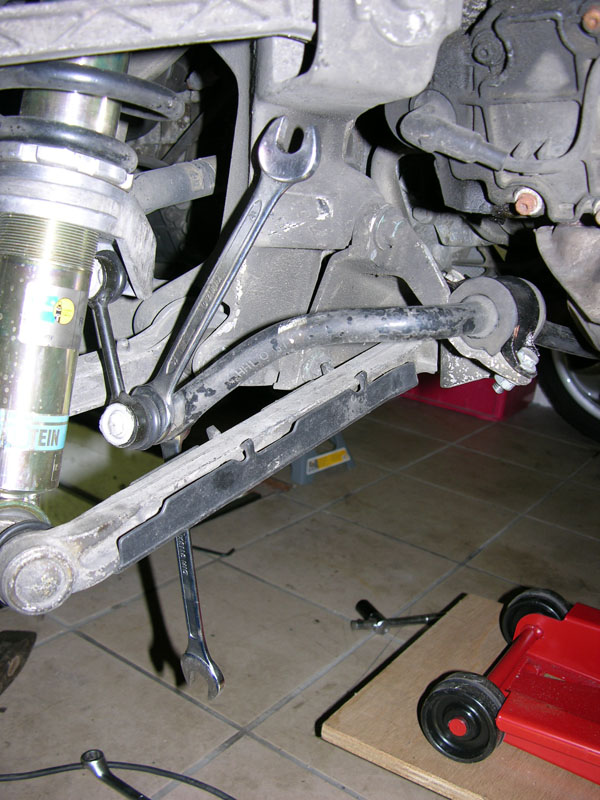
then we remove the silent block (?) with 2x 13mm wrench.
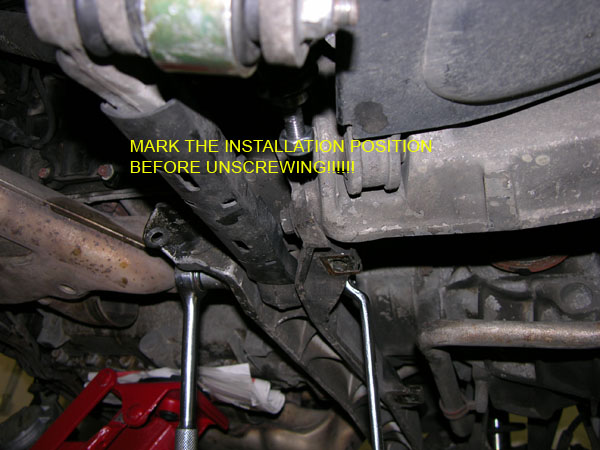
we release the toe arm from the inner mount. MARK THE POSITION OF THE INSTALLATION before touching to the eccentric. (That�s one of the points they use to aligne the wheels).
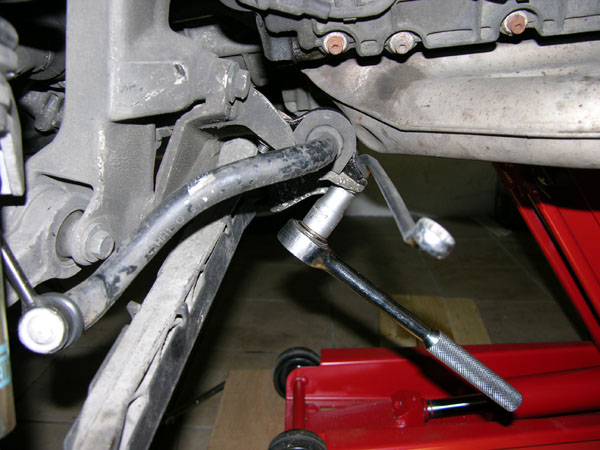
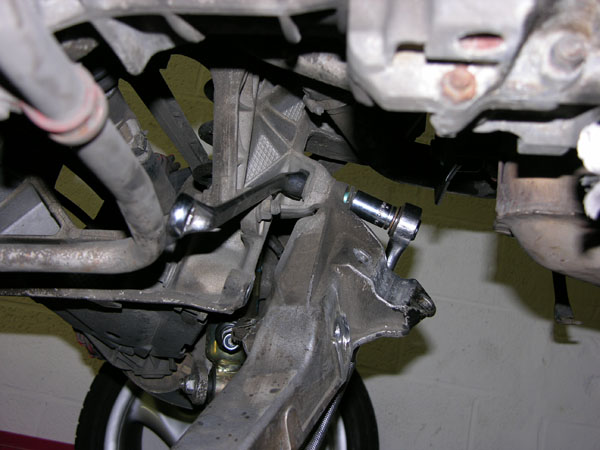
When the toe arm is released from the inner mount, do not force it down. At the bottom of the shock absorber, you will have to release the bolt using a Torx 140 and a 18mm wrench as shown:
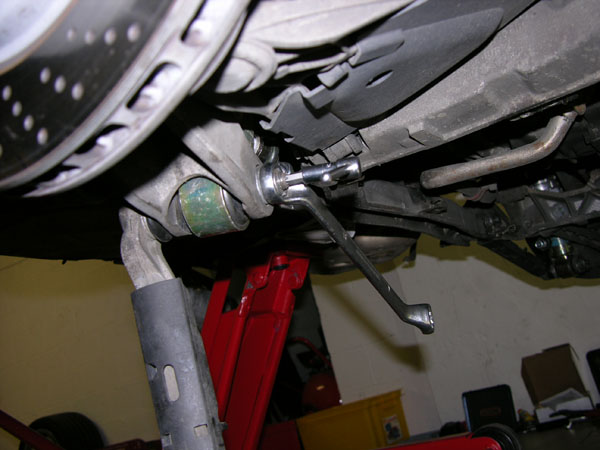
Then 4 bolts to remove the crossmember (bolt 16mm nut 18mm)
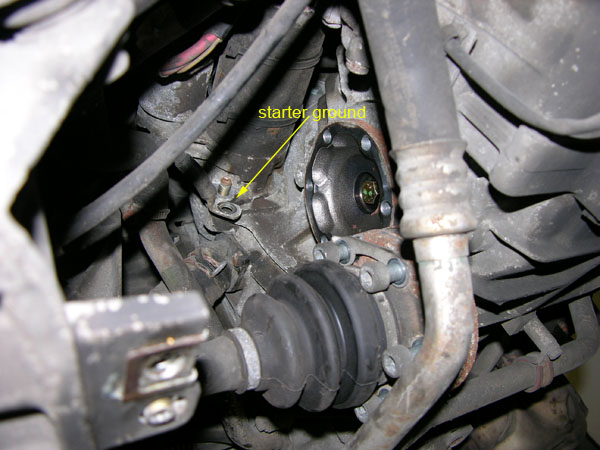
Under the car unbolt the drive shaft from transmission. They are very tight. I used the best tool available on our European market, just to be sure not to round the screws and be in deep s...! No problem here. Use the hand brake to prevent the shaft to turn.
Then we have access to the starter.
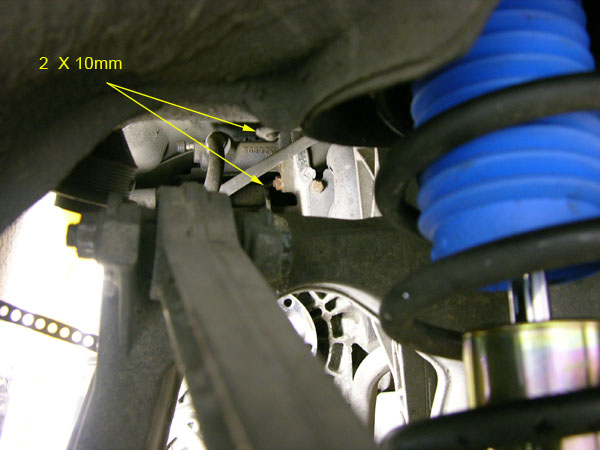
Remove the ground wire with a Alen N� 10 then the manual says wire n� 30� I love it! Well I don�t know which one it is, so I disconnected all the wires. One is hold by a 12mm nut, another one has a small plastic cover over a 10mm nut. (those 2 are not visible on the picture)
Now I should remove the slaver cylinder from the clutch. I delay this until the engine will be a few cm down. Look at the picture and will understand why!
So now the lower side of the engine compartment looks quite empty! One more tube to remove, and it will be time to finally remove the engine! Pressure is coming up!
To remove the oil return tube, we need two open wrench: 1 x 32mm and 1 x 36mm. Big ones!
Ok I fly to the shop to buy those wrench. I really need to show you that engine tonight!
Unfortunately, I got the 32 but the 36 is not in stock! And the worse to come: they need a week to have it. There I�m close to the heart attack!
I'm stuck gentlemen! ( time for a well deserved BEER!)Tomorrow morning, I 'll give a few phone calls and I hope I'll find that wrench!
On that last picture, I have a question: do you know which one to unscrew? the outer one or the one closer to the engine case?
When that line is out, the way is free for the engine to come down.
All you comments, and advises are welcome
Cheers
then we remove the silent block (?) with 2x 13mm wrench.
we release the toe arm from the inner mount. MARK THE POSITION OF THE INSTALLATION before touching to the eccentric. (That�s one of the points they use to aligne the wheels).
When the toe arm is released from the inner mount, do not force it down. At the bottom of the shock absorber, you will have to release the bolt using a Torx 140 and a 18mm wrench as shown:
Then 4 bolts to remove the crossmember (bolt 16mm nut 18mm)
Under the car unbolt the drive shaft from transmission. They are very tight. I used the best tool available on our European market, just to be sure not to round the screws and be in deep s...! No problem here. Use the hand brake to prevent the shaft to turn.
Then we have access to the starter.
Remove the ground wire with a Alen N� 10 then the manual says wire n� 30� I love it! Well I don�t know which one it is, so I disconnected all the wires. One is hold by a 12mm nut, another one has a small plastic cover over a 10mm nut. (those 2 are not visible on the picture)
Now I should remove the slaver cylinder from the clutch. I delay this until the engine will be a few cm down. Look at the picture and will understand why!
So now the lower side of the engine compartment looks quite empty! One more tube to remove, and it will be time to finally remove the engine! Pressure is coming up!
To remove the oil return tube, we need two open wrench: 1 x 32mm and 1 x 36mm. Big ones!
Ok I fly to the shop to buy those wrench. I really need to show you that engine tonight!
Unfortunately, I got the 32 but the 36 is not in stock! And the worse to come: they need a week to have it. There I�m close to the heart attack!
I'm stuck gentlemen! ( time for a well deserved BEER!)Tomorrow morning, I 'll give a few phone calls and I hope I'll find that wrench!
On that last picture, I have a question: do you know which one to unscrew? the outer one or the one closer to the engine case?
When that line is out, the way is free for the engine to come down.
All you comments, and advises are welcome
Cheers
Last edited by Toga; 12-30-2006 at 01:34 PM.


 12-15-2004, 05:42 PM
#4
Technical Guru
Rennlist Member
Rennlist Member
Originally Posted by Toga
Unfortunately, I got the 32 but the 36 is not in stock! And the worse to come: they need a week to have it. There I’m close to the heart attack!
Originally Posted by Toga
On that last picture, I have a question: do you know which one to unscrew? the outer one or the one closer to the engine case?

awesome writeup...
12-15-2004, 06:16 PM
#7
Toga,
I missed the prologue or first episode of this.... why are you removing the engine?
Unlike my colleagues, I would offer some mechanical advice but I have problems just putting my airbox back on.
I missed the prologue or first episode of this.... why are you removing the engine?
Unlike my colleagues, I would offer some mechanical advice but I have problems just putting my airbox back on.
Trending Topics
 12-15-2004, 06:26 PM
#9
Addict
Rennlist Member
Rennlist Member

Originally Posted by pegasis0066
Toga,
I missed the prologue or first episode of this.... why are you removing the engine?
I missed the prologue or first episode of this.... why are you removing the engine?
https://rennlist.com/forums/993-forum/174810-before-i-start.html
grab a chair and follow the progress of his work... live on must see, Toga Vision!!
Thanks, Max!
 12-15-2004, 06:52 PM
#10
Technical Guru
Rennlist Member
Rennlist Member
Originally Posted by Toga
Do you remember at what torque you put it back in?
Code:
Location					Thread		Tightening torque Nm (ft lb.)
Engine Carrier to engine mount			M12		85 (63)
Transmission carrier to body			M12		46 (34)
Drive shaft to transmission flange		M10		81 (60)
Oil drain plug to thermostat housing				50 +- 5 (37 +- 4)
Oil drain plug to crankcase					50 +- 5 (37 +- 4)
Selector rod (fit bolt)						18 (13) (lock additionally with Loctite 270)
Stabilizer bar to crossmember			M8		23 (17)
Stabilizer mount to shock absorber		M10		46 (34)
Link no. 2 to crossmember (ecc.)		M12 x 1.5	85 (63)
Link no. 2 (track rod) to wheel carrier	M12 x 1.5	85 (63)
Rear crossmember to side panels			M12 x 1.5	120 (88)
Front crossmember to side panel			M10		65 (48)
Screw-in neck in left-hand crankcase		M22 x 1.5	70 (52)
section (oil return to oil tank)
Screw-in flange in right-hand			M24 x 1.5	90 (66)
section (oil feed to oil pump)
12-15-2004, 07:27 PM
#12
Addict
Rennlist Member
Rennlist Member
Join Date: May 2004
Location: Los Angeles
Posts: 2,124
Likes: 0
Received 0 Likes
on
0 Posts
Originally Posted by pegasis0066
Unlike my colleagues, I would offer some mechanical advice but I have problems just putting my airbox back on.
12-16-2004, 05:06 AM
#14
Three Wheelin'
Thread Starter
Thanks guys,
Jason thank you for that list. I think the one we are looking for is on the last line. But I'm impressed they use loctite only on the selector rod bolt. I was tempted to use it everywhere...
Let's go for a wrench hunt!
See you tonight!
Jason thank you for that list. I think the one we are looking for is on the last line. But I'm impressed they use loctite only on the selector rod bolt. I was tempted to use it everywhere...
Let's go for a wrench hunt!
See you tonight!
