When you click on links to various merchants on this site and make a purchase, this can result in this site earning a commission. Affiliate programs and affiliations include, but are not limited to, the eBay Partner Network.
While I'm not exactly new to Rennlist, I am predominantly a lurker. I purchased a new to me 2016 C4 GTS in the spring of 2019 in Chicago at Barrington Porsche and drove it home to Louisiana. By far one of the most memorable road trips of my life. However, it was quickly obvious that the stock GTS "Sound Package Plus" wasn't very plus, and while the NW Musicar option looks quite impressive, it is (in my opinion) not a very good bang for buck. After a lot of dragging around the internet (including this forum), I realized the source material for DIY audio upgrades was lacking. And I learned I was quite lucky to have found a CPO w/o a Bose as it seems much harder to upgrade.
Inspired by the likes of flgfish & Cysco, I decided some improvements were needed. A few key threads jumped out as info rich, so I'll cross link them here for those who may come behind me.
flgfsh: My "value" 991 tweeter upgrade / 3-Way system for 2015 911 / Build Log
Cysco: DIY Car Audio Speaker Upgrade
I was able to complete my upgrade during some vacation time I took around Christmas 2019. I'd debated posting a thread, but in flgfish's value tweeter thread, I was able to provide some info that proved of value to others which convinced me to make a full build post. Initially, I started w/ a quick tweeter upgrade, along the line of flgfish's, which I documented somewhat in his thread hereand here.
Budget ~$3,000 (when adjusted for inflation, I compared my past installs (primarily my S2000) and it aligned w/ historic. So budget was easily approved by spouse), and I was able to come in just at ~5% over.
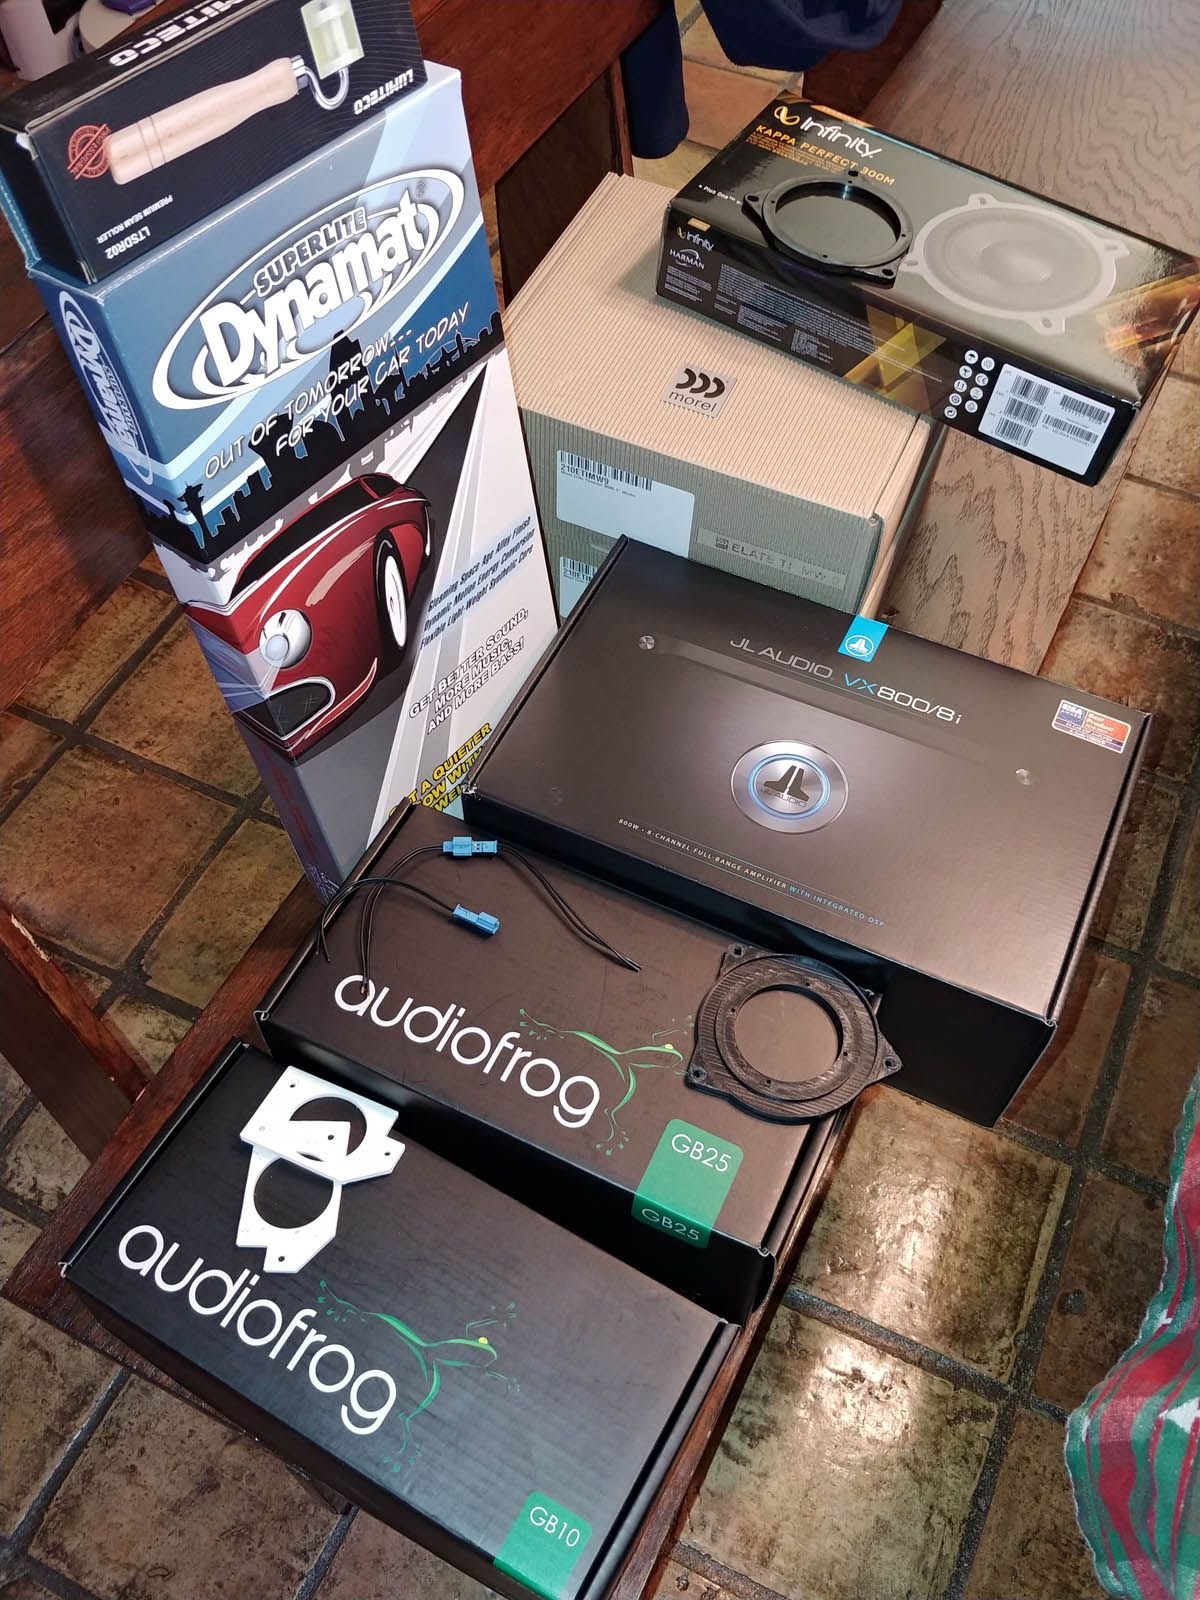
Components: For most hardware, I used my 20+ year local dealer and was able to get great deals on the hardware (but it's so darn easy to link to Crutchfield). An established relationship here allowed me to get discounts significantly below what you'll see these items on sale for...
Amp: JL Audio VX800/8i
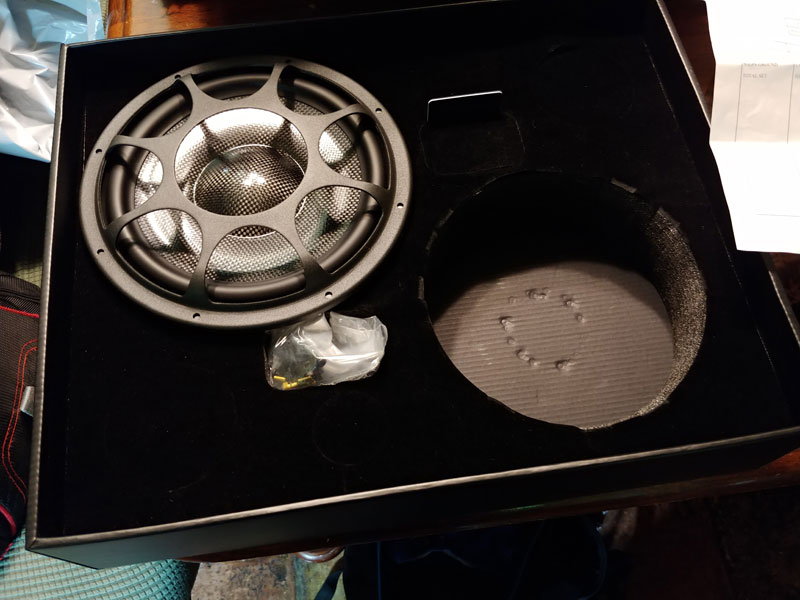
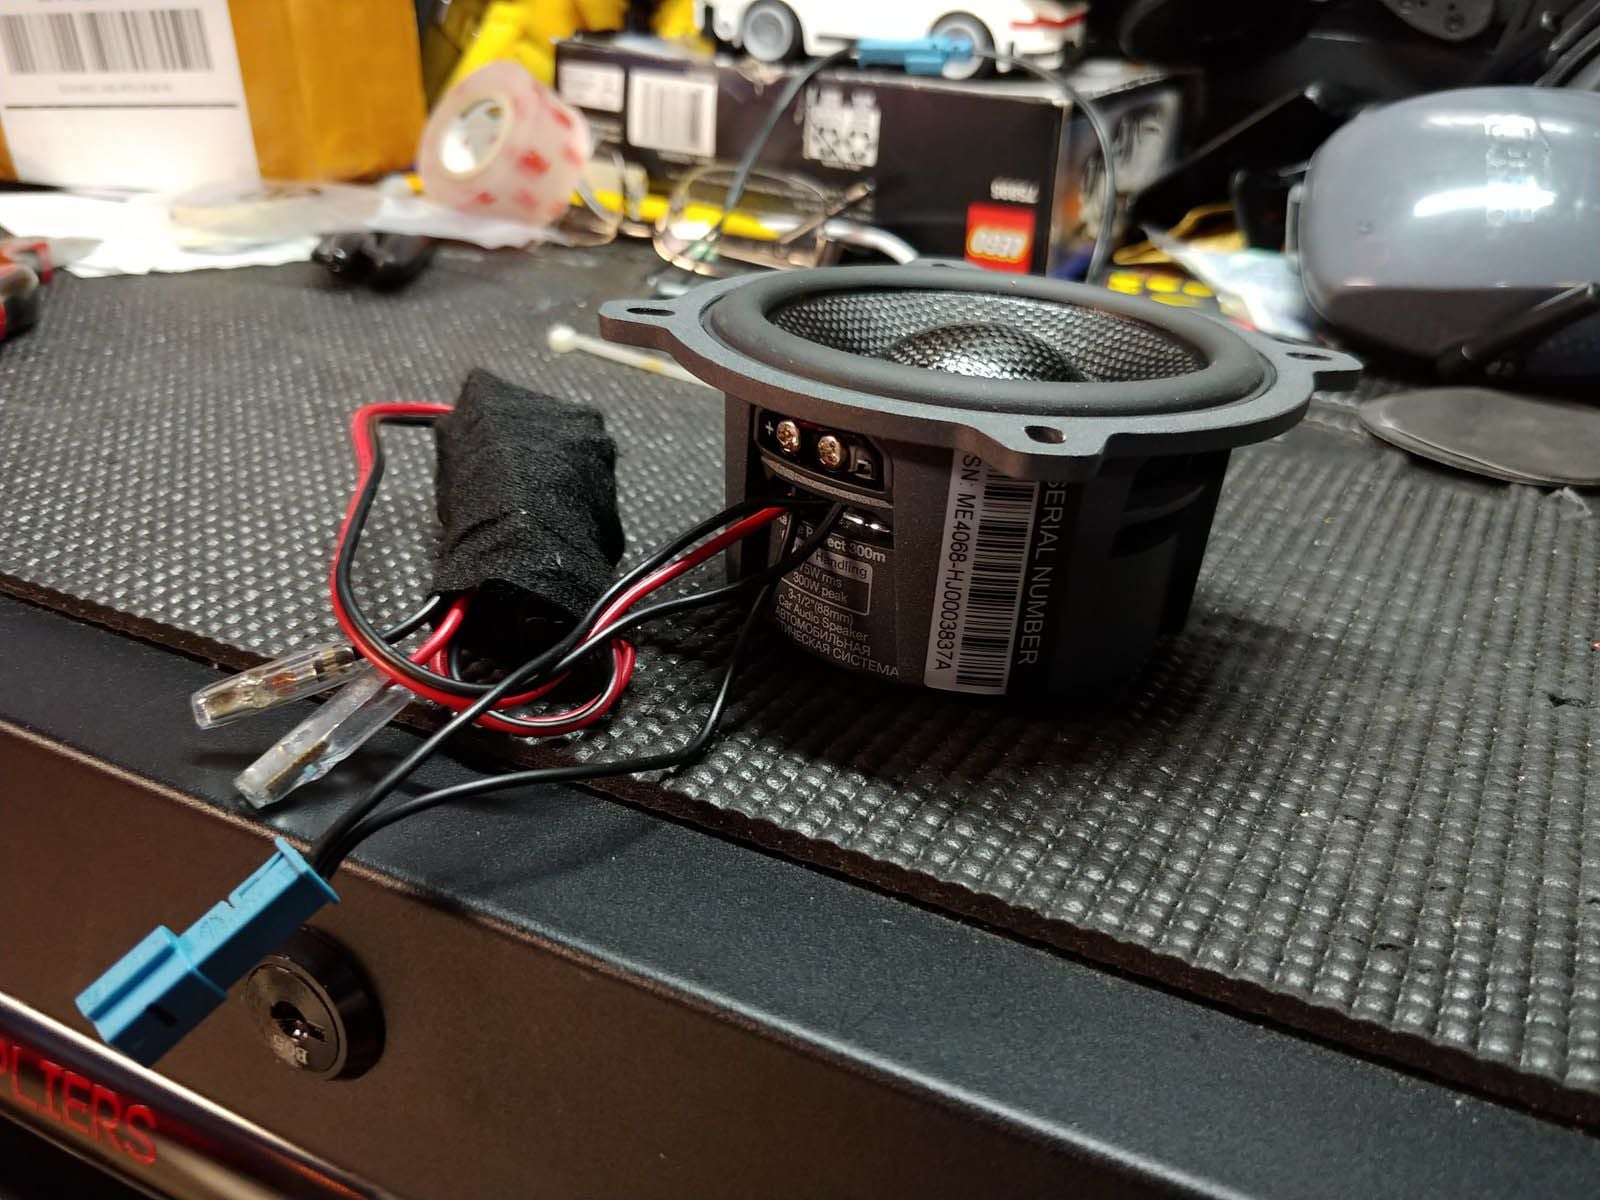
Amp remote: JL Audio DRC-205 with InstaMorph hand shaped housing with neodymium magnets embedded (attaches below passenger seat) Front highs: Tweeters: Audiofrog GB10 Mids: Audiofrog GB25 for the doors. Woofers: I chose the Morel Elate MW Ti9's (caught them on Crutchfield for $425/ea on Black Friday) due to guaranteed knowledge of their fit. (curiously enough, I had 3 of these arrive defective (loud raspy noises from the voice coils) before I ended up with a good set of 2. I'd probably research other options before going this path again. They sound fantastic though.) These have since been replaced (under warranty) with Morel Carbon Elate MW9s after the Ti woofers failed.
Rear highs: Infinity Kappa Perfect 300ms mids and REF-275tx tweeters (dialed them down -7db for a light fill while holding the soundstage up front) I chose to retain my rears to help overcome road noise on long trips and my mild tinnitus.
Installation components / adapters / harnesses: (Initially, I reached out to NW Musicar, but they politely declined. I instead chose to source them myself.)
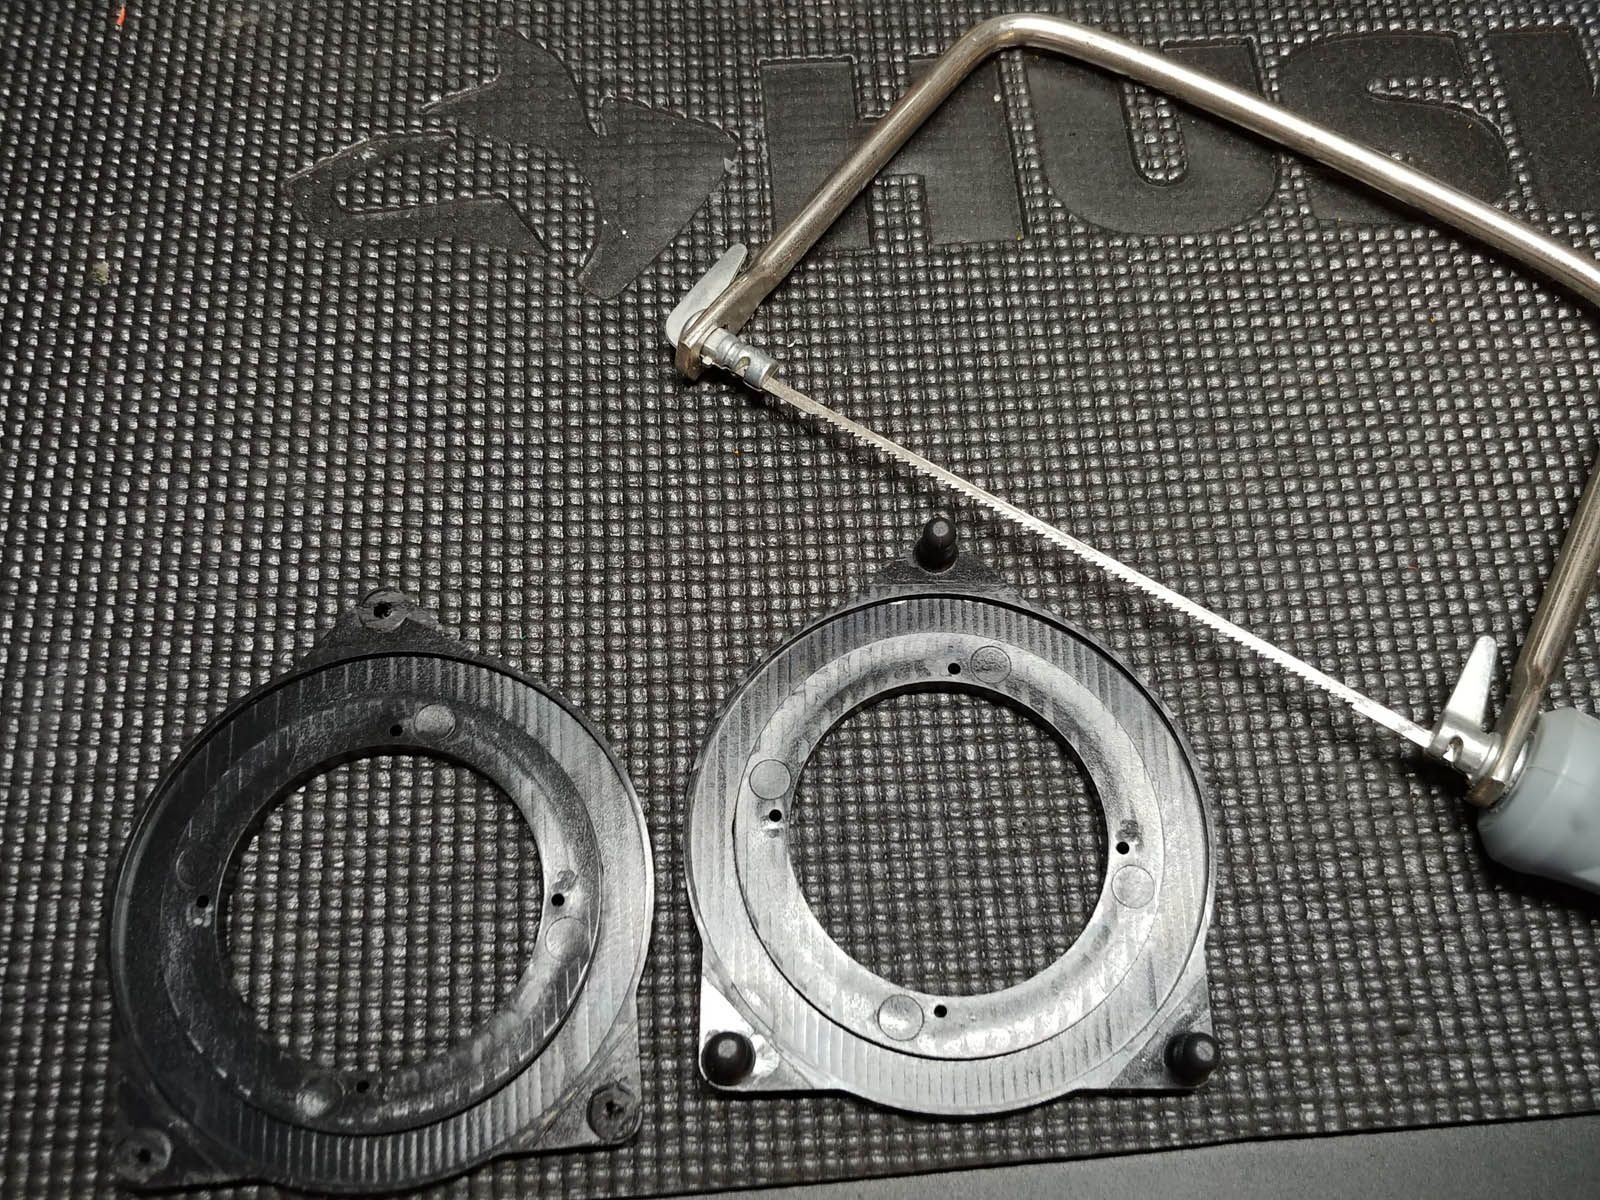
Homemade Woofer adapter / spacers which are a thing of shame (jigsaw cut), but they work and are thankfully hidden.
3D printed tweeter adapters, based on dimensional data found from this thread and sized for the Audiofrog GB10 (.dwg file attached)
Speaker adapters for the mids - both to match 3.5" speakers and 2.5" speakers. (On the 2.5" cut off the MB mount ***** and slightly enlarge the remaining holes)
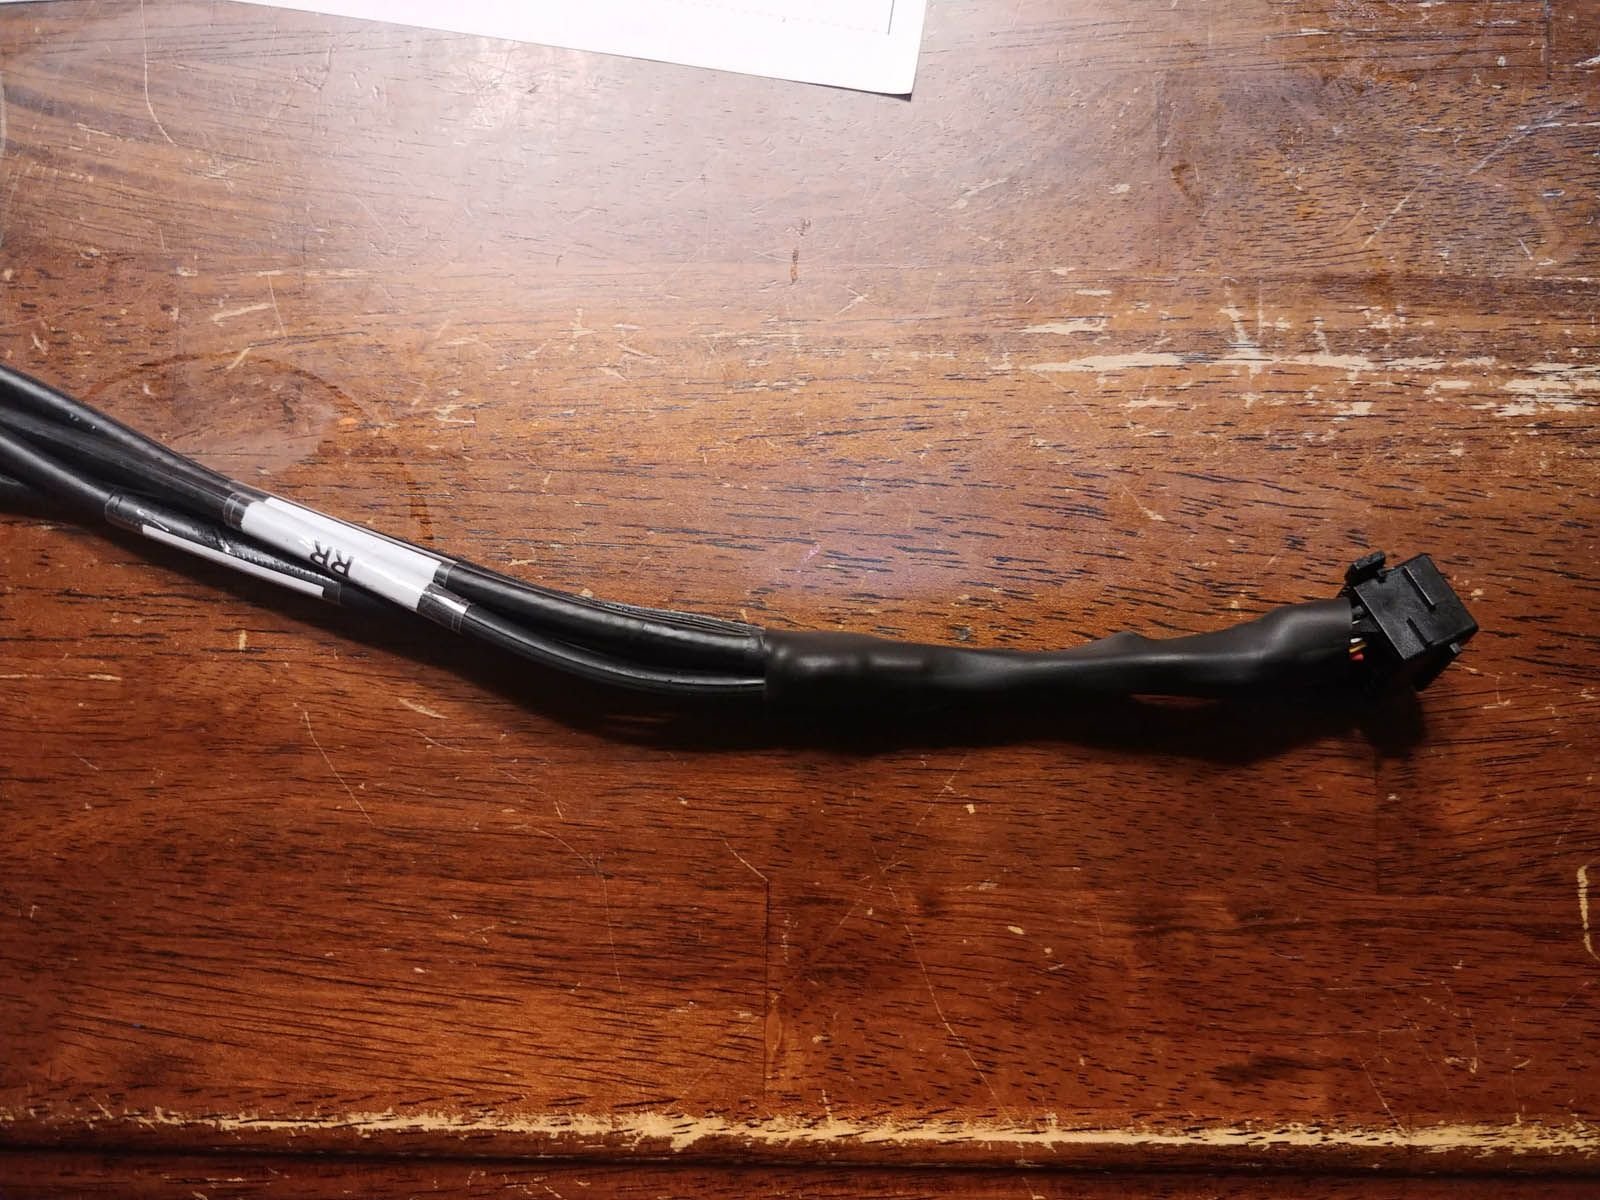
OEM style wire connectors for the mids and tweeters are apparently BMW lamp and speaker connectors.
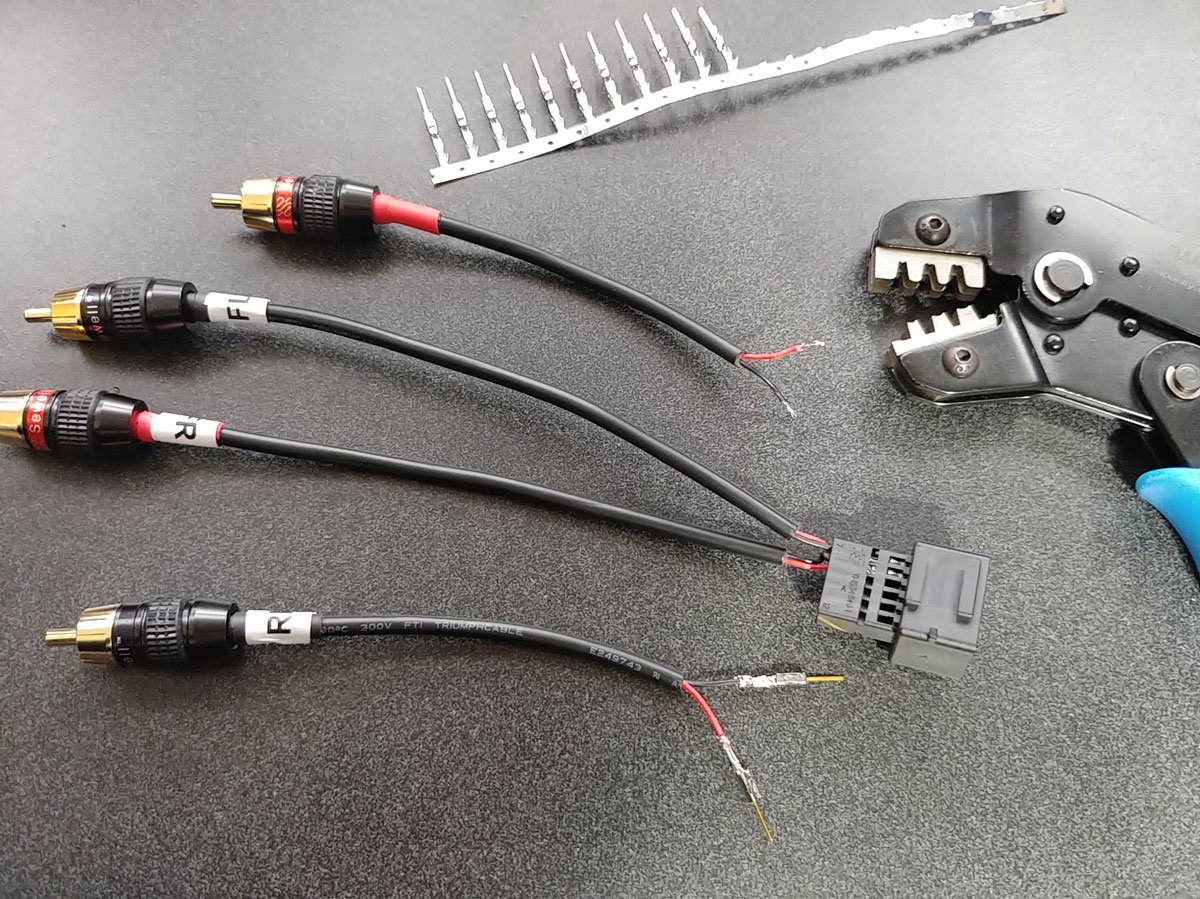
OEM style connectors for the woofers appear to be Stock ABS sensor plugs for a VW Golf. For the factory amp harnesses, I purchased a 987 amp from Ebay and removed the OEM male connectors from the amp PCB. (987 645 441 00 ASK Porsche Cayman S 987 Factory Stereo) The connector alignment tabs had to be slightly modified to fit the 991.1 factory plugs. Edit: The input connector has been replaced with a VW factory harness and amp well cleaned up accordingly. See post 14 below
New OEM Burmester tweeter grills -- got my local dealer to price match these.
Amp connectors (amp output to improvised factory harness) were XT30's which are smaller and easier to deal with in cramped spaces. HDPE sheets to cut into woofer adapter and spacer. Glued and screwed [edit] together with JB Weld plastic bonder miniDSP UMIK-1 Calibrated Microphone (already owned this)
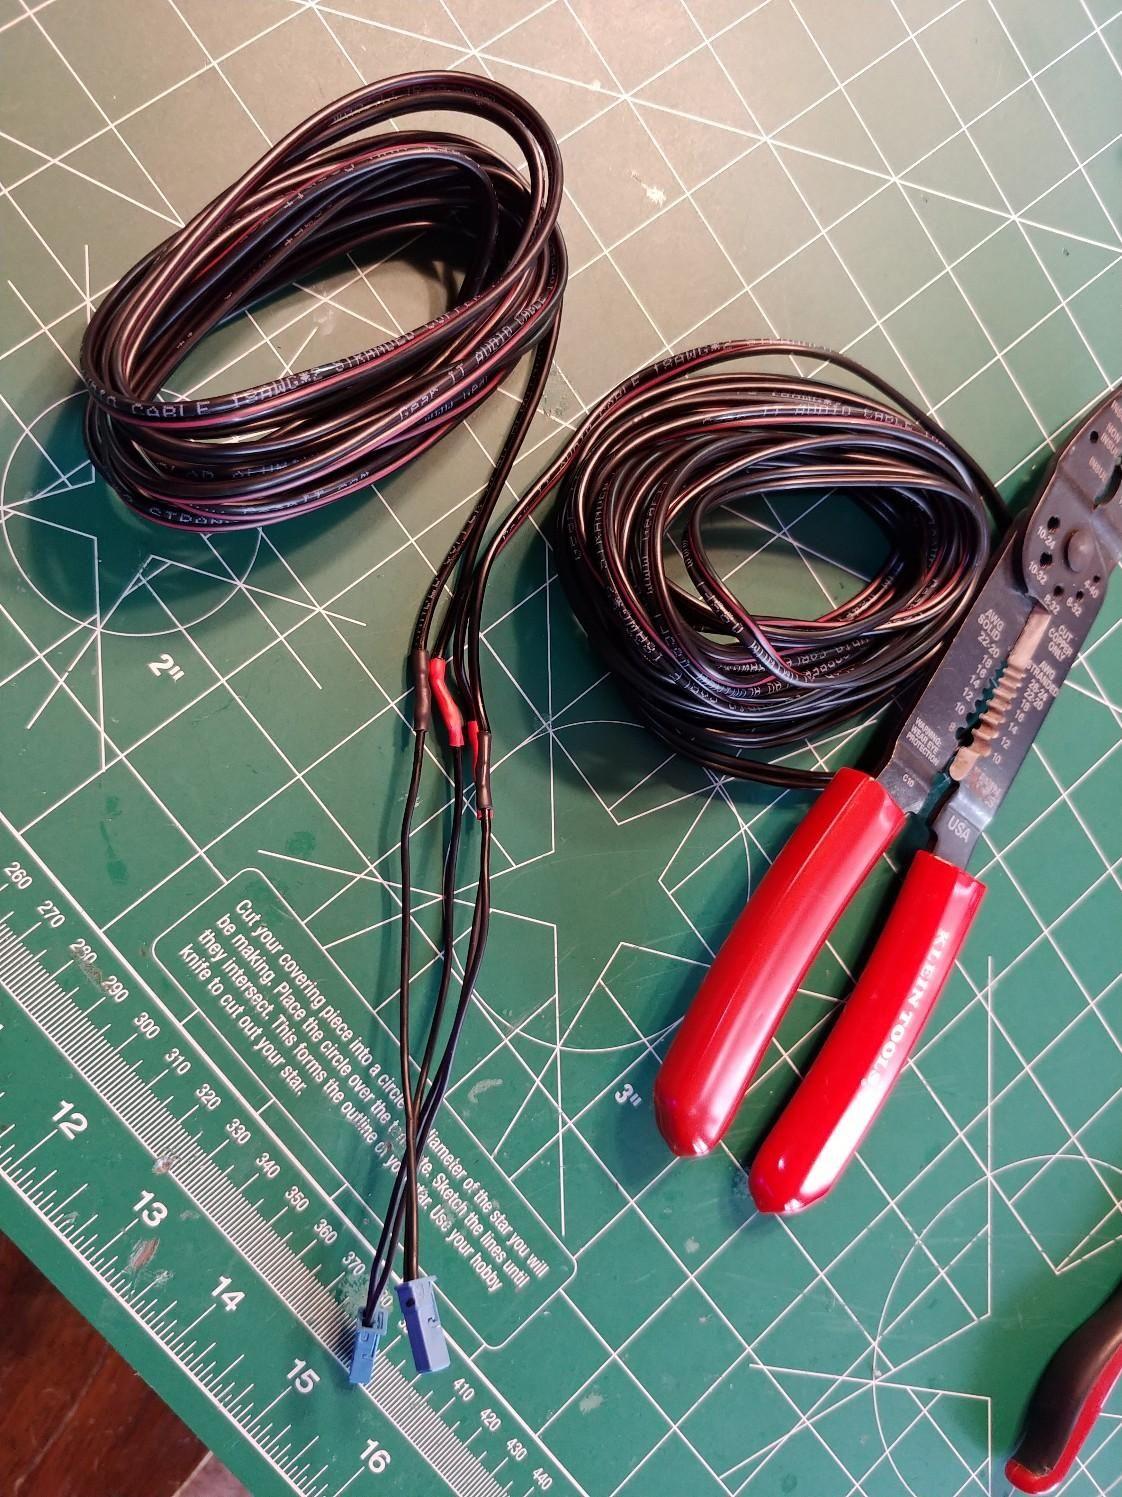
Various wires, shrink fit, etc. I had around the house.
As Cysco outlined in his post -- 10 predominant steps. I've linked his post above, so for the sake of brevity, I will try to avoid repeating a lot of what he and flgfish provided.
With (1) Researching and (2) Purchasing complete, step (3) Disassembly was surprisingly easy relative to previous cars where I've done large installs.
Obligatory picture of gear pre-install
Steps 4-9
(4) wiring stuff up - most of this is building the custom adapters, soldering the BMW and VW adapters to the speaker wires, etc.
(5) run new speaker wires for tweeters - attach BWM adapter to speaker wire then run as established.
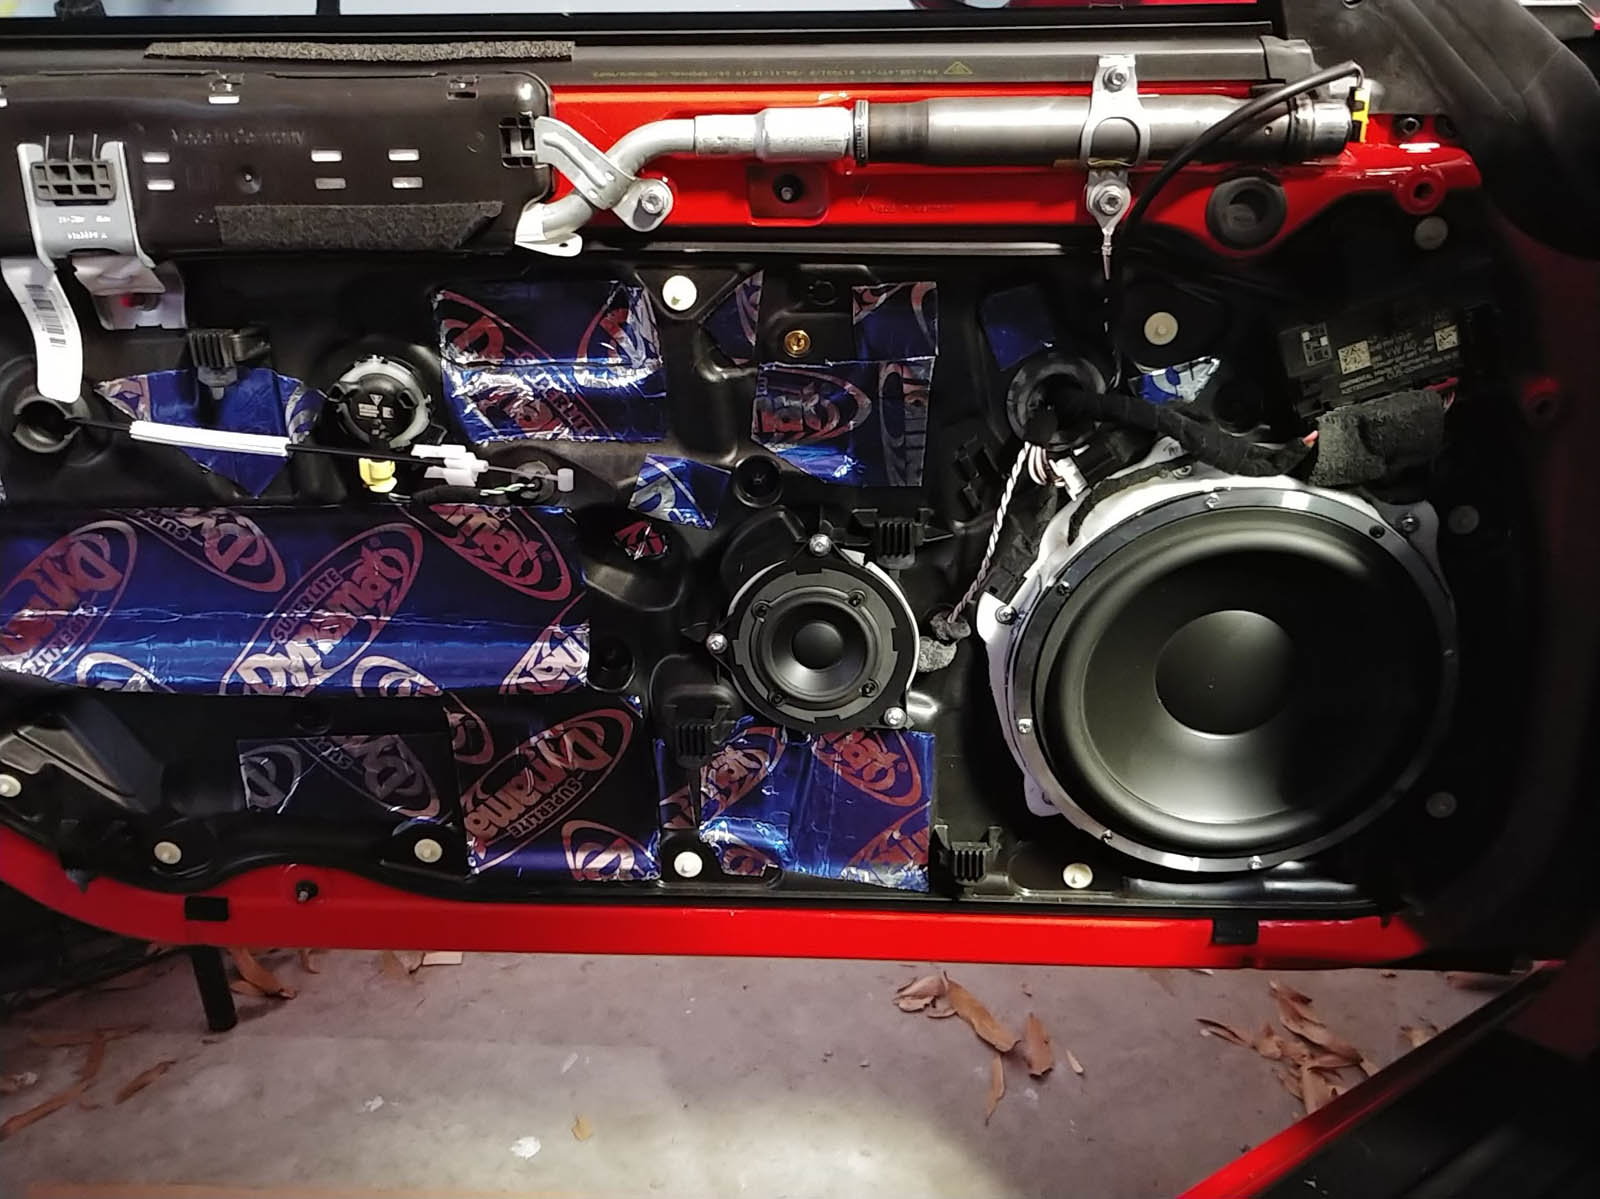
(6) sound deaden the doors
(7) mounting the speakers - using BMW and MB adapters, plus custom making woofer adapter / spacer. Spacer was 1.25" thick (0.25" adapter ring + 1" plastic spacer) cut into ring.
(8) mount/wire speakers - plug and play!
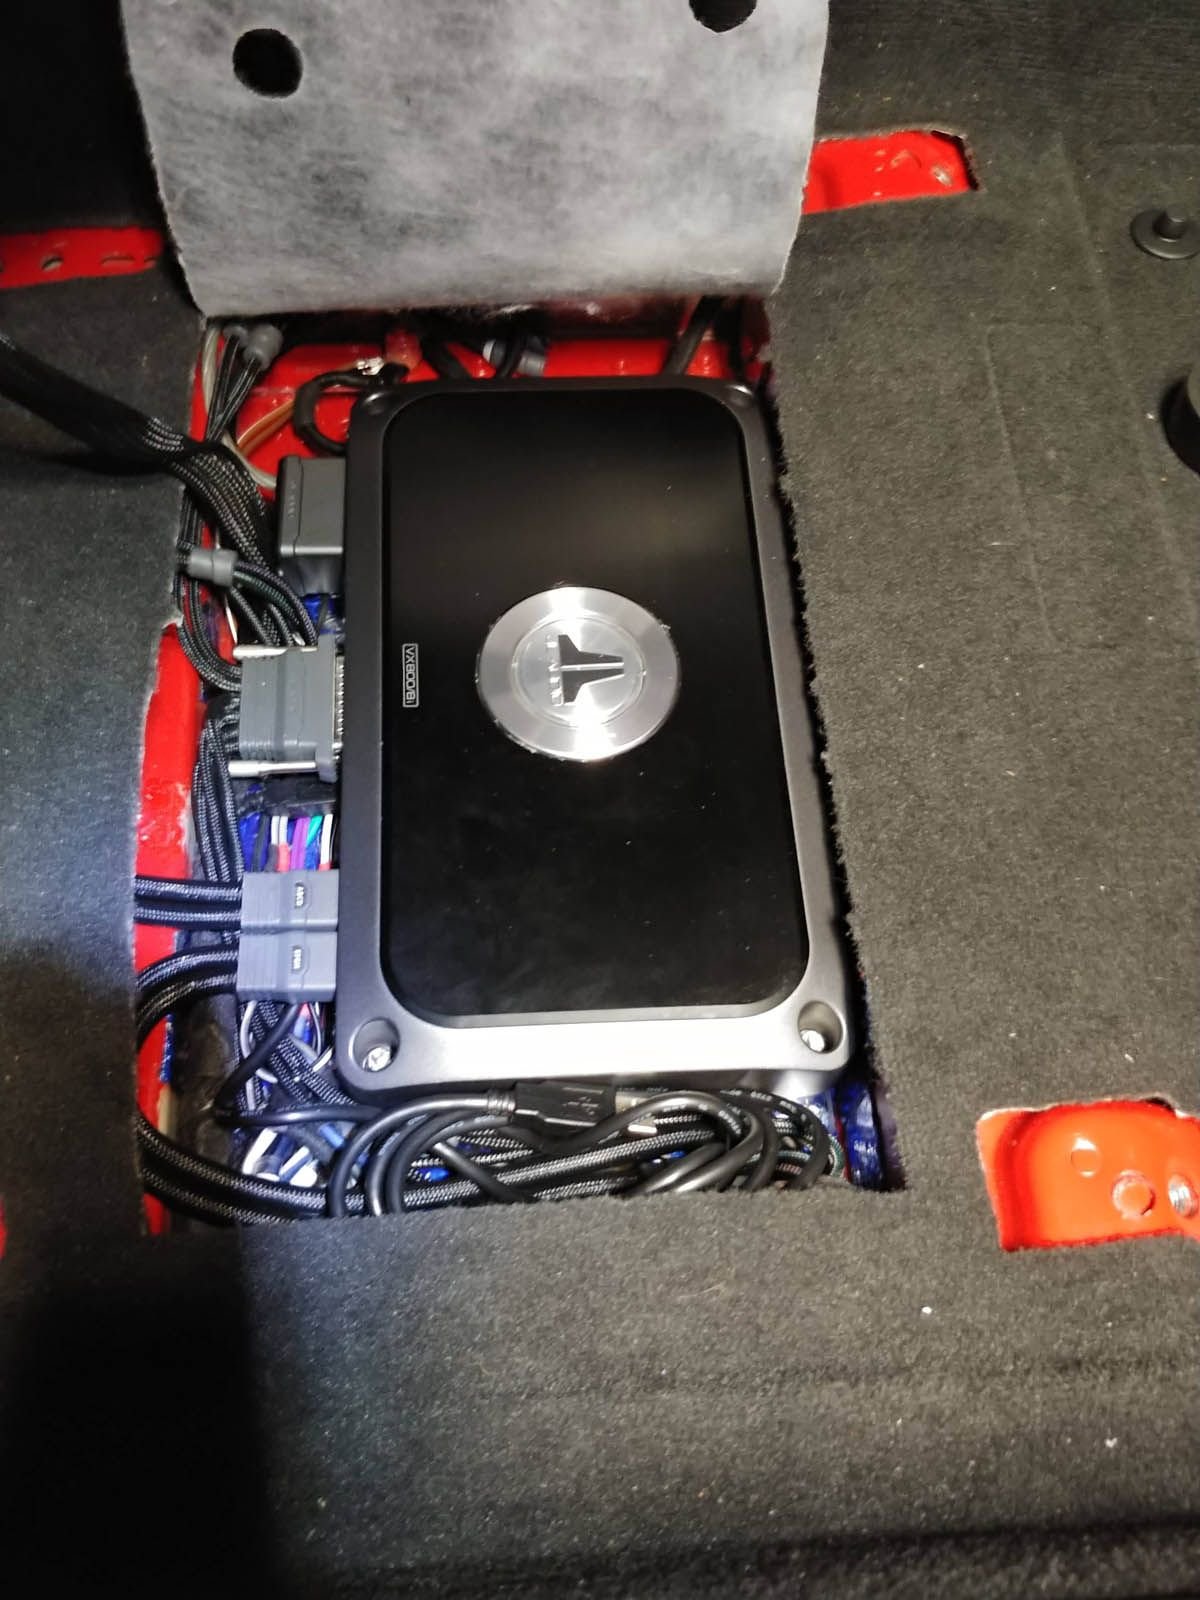
(9) wiring / mounting the amp - (plug and play!) Amp
Amp input from 991 harness to RCAs (not seen) and amp turn on lead
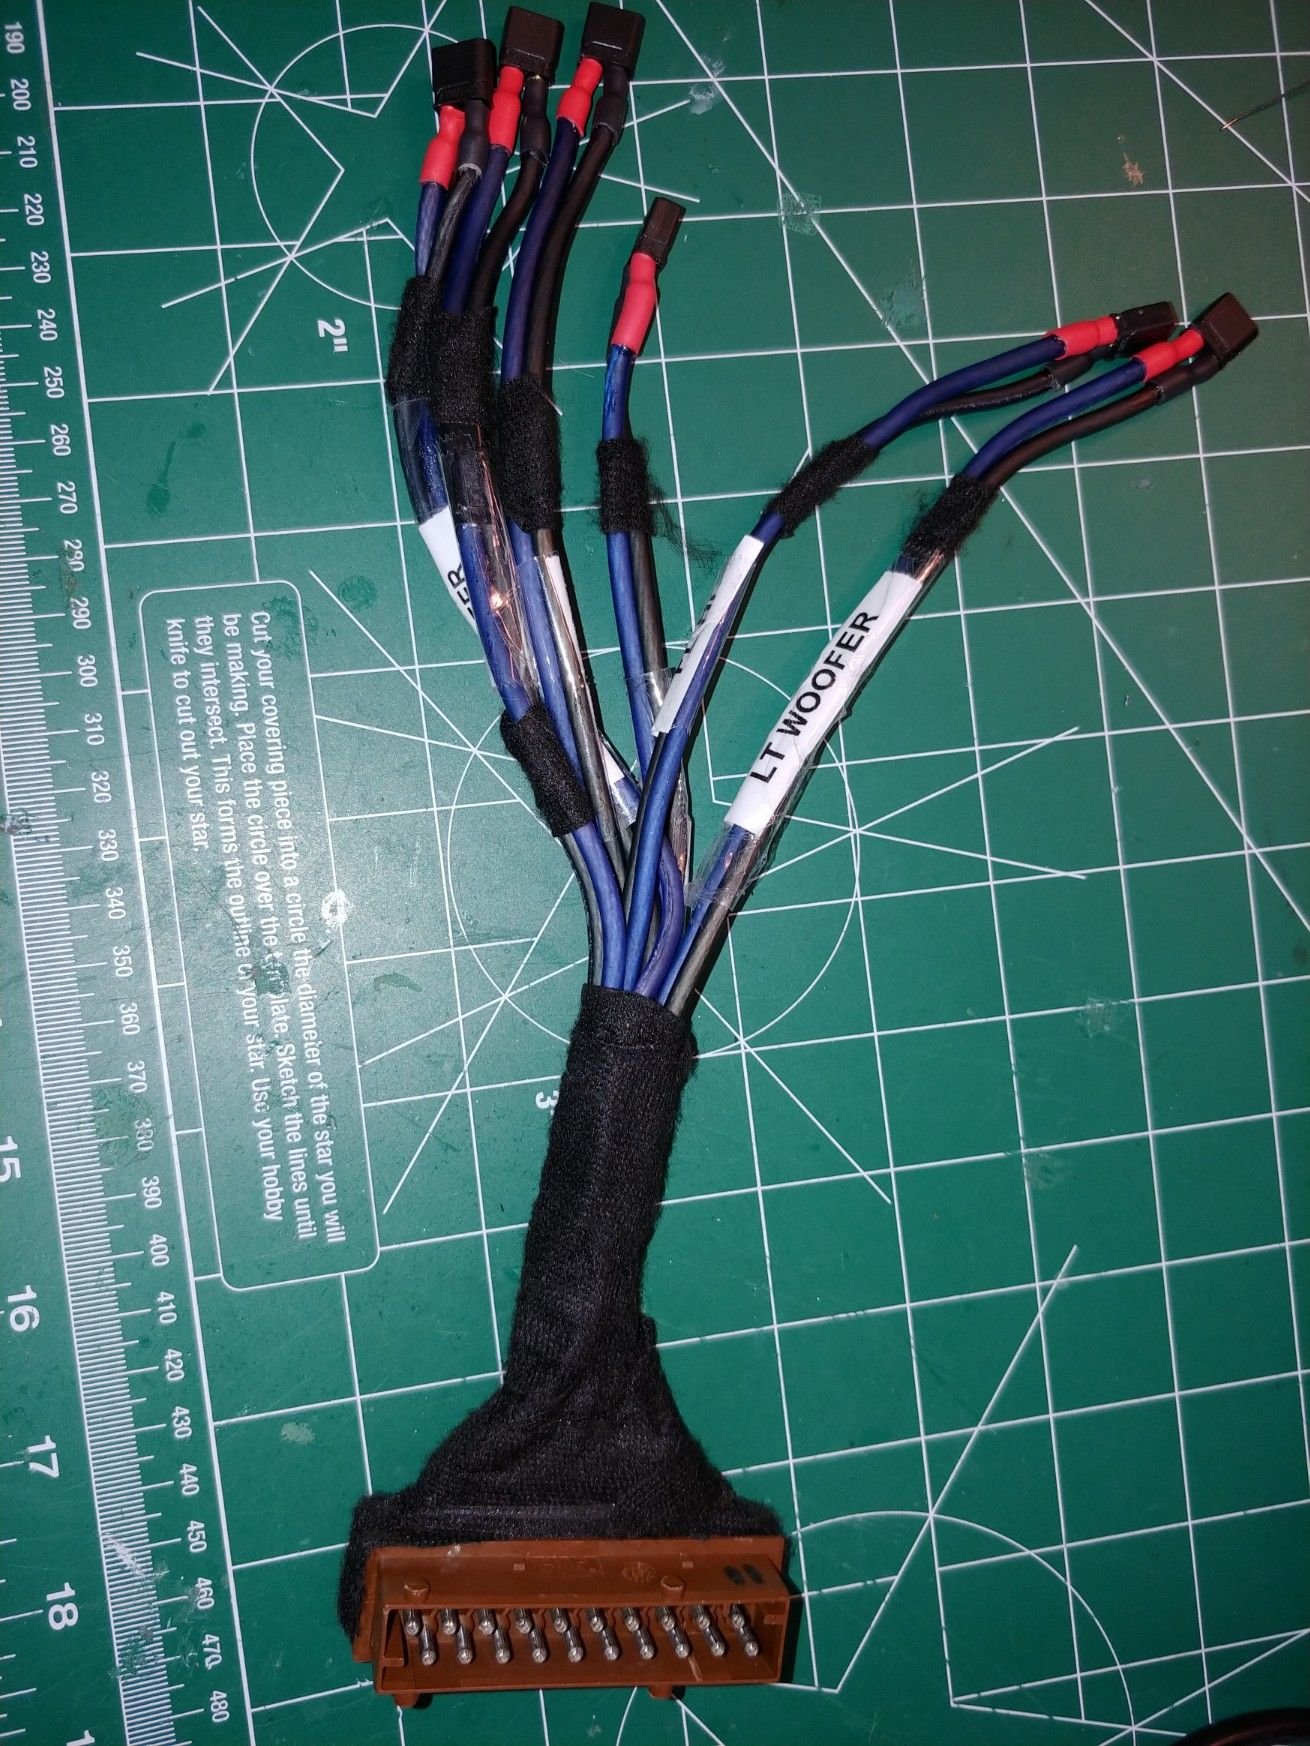
Custom amp output to 991 speaker harness with XT-30 connectors
JL Audio VX800/8i output harnesses with XT-30 connectors
Tweeter wiring ready to be run from amp well to under dash. Note BMW speaker adapters which are equivalent to OEM. (Color even matches the NW Musicar adapters from photos.) XT-30 adapters were soldered on in place (in car) so as to allow for exact wiring length to be determined. I don't have an actual picture of this connector sticking out of the dash, but it's there.
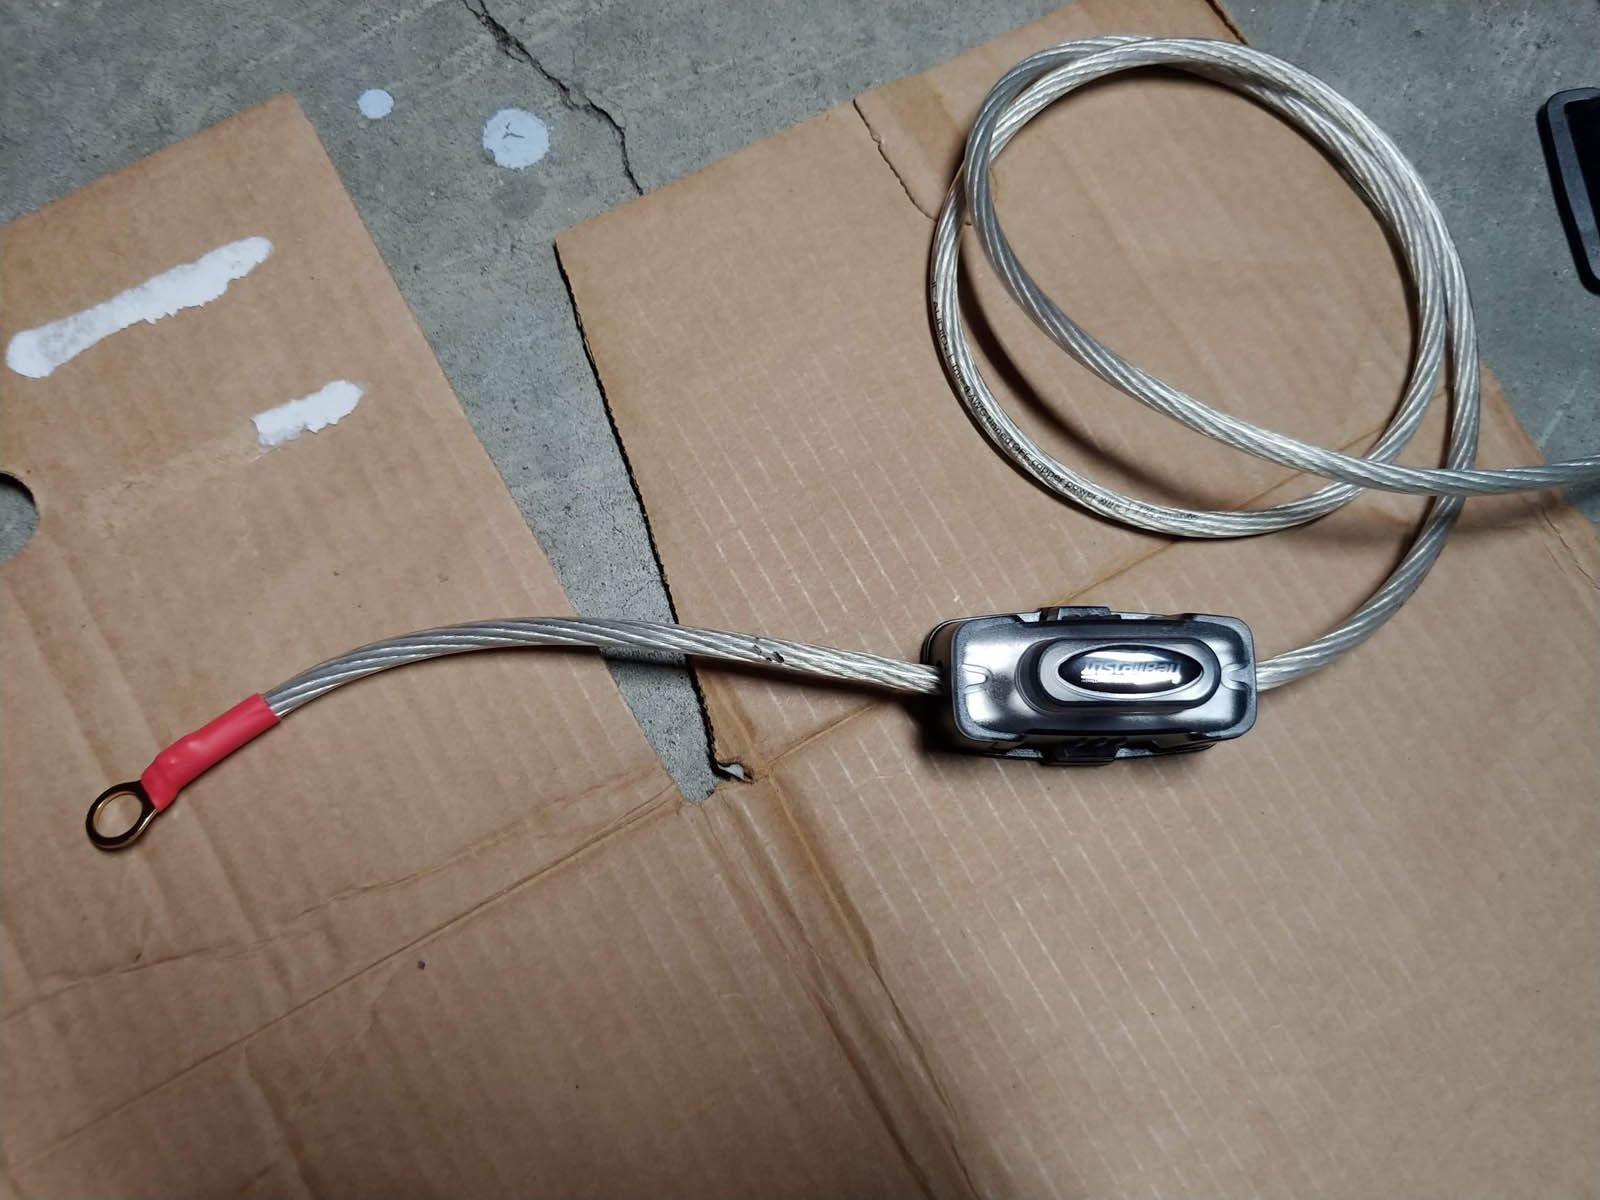
Fused power lead - run to foot well connection as well documented elsewhere.
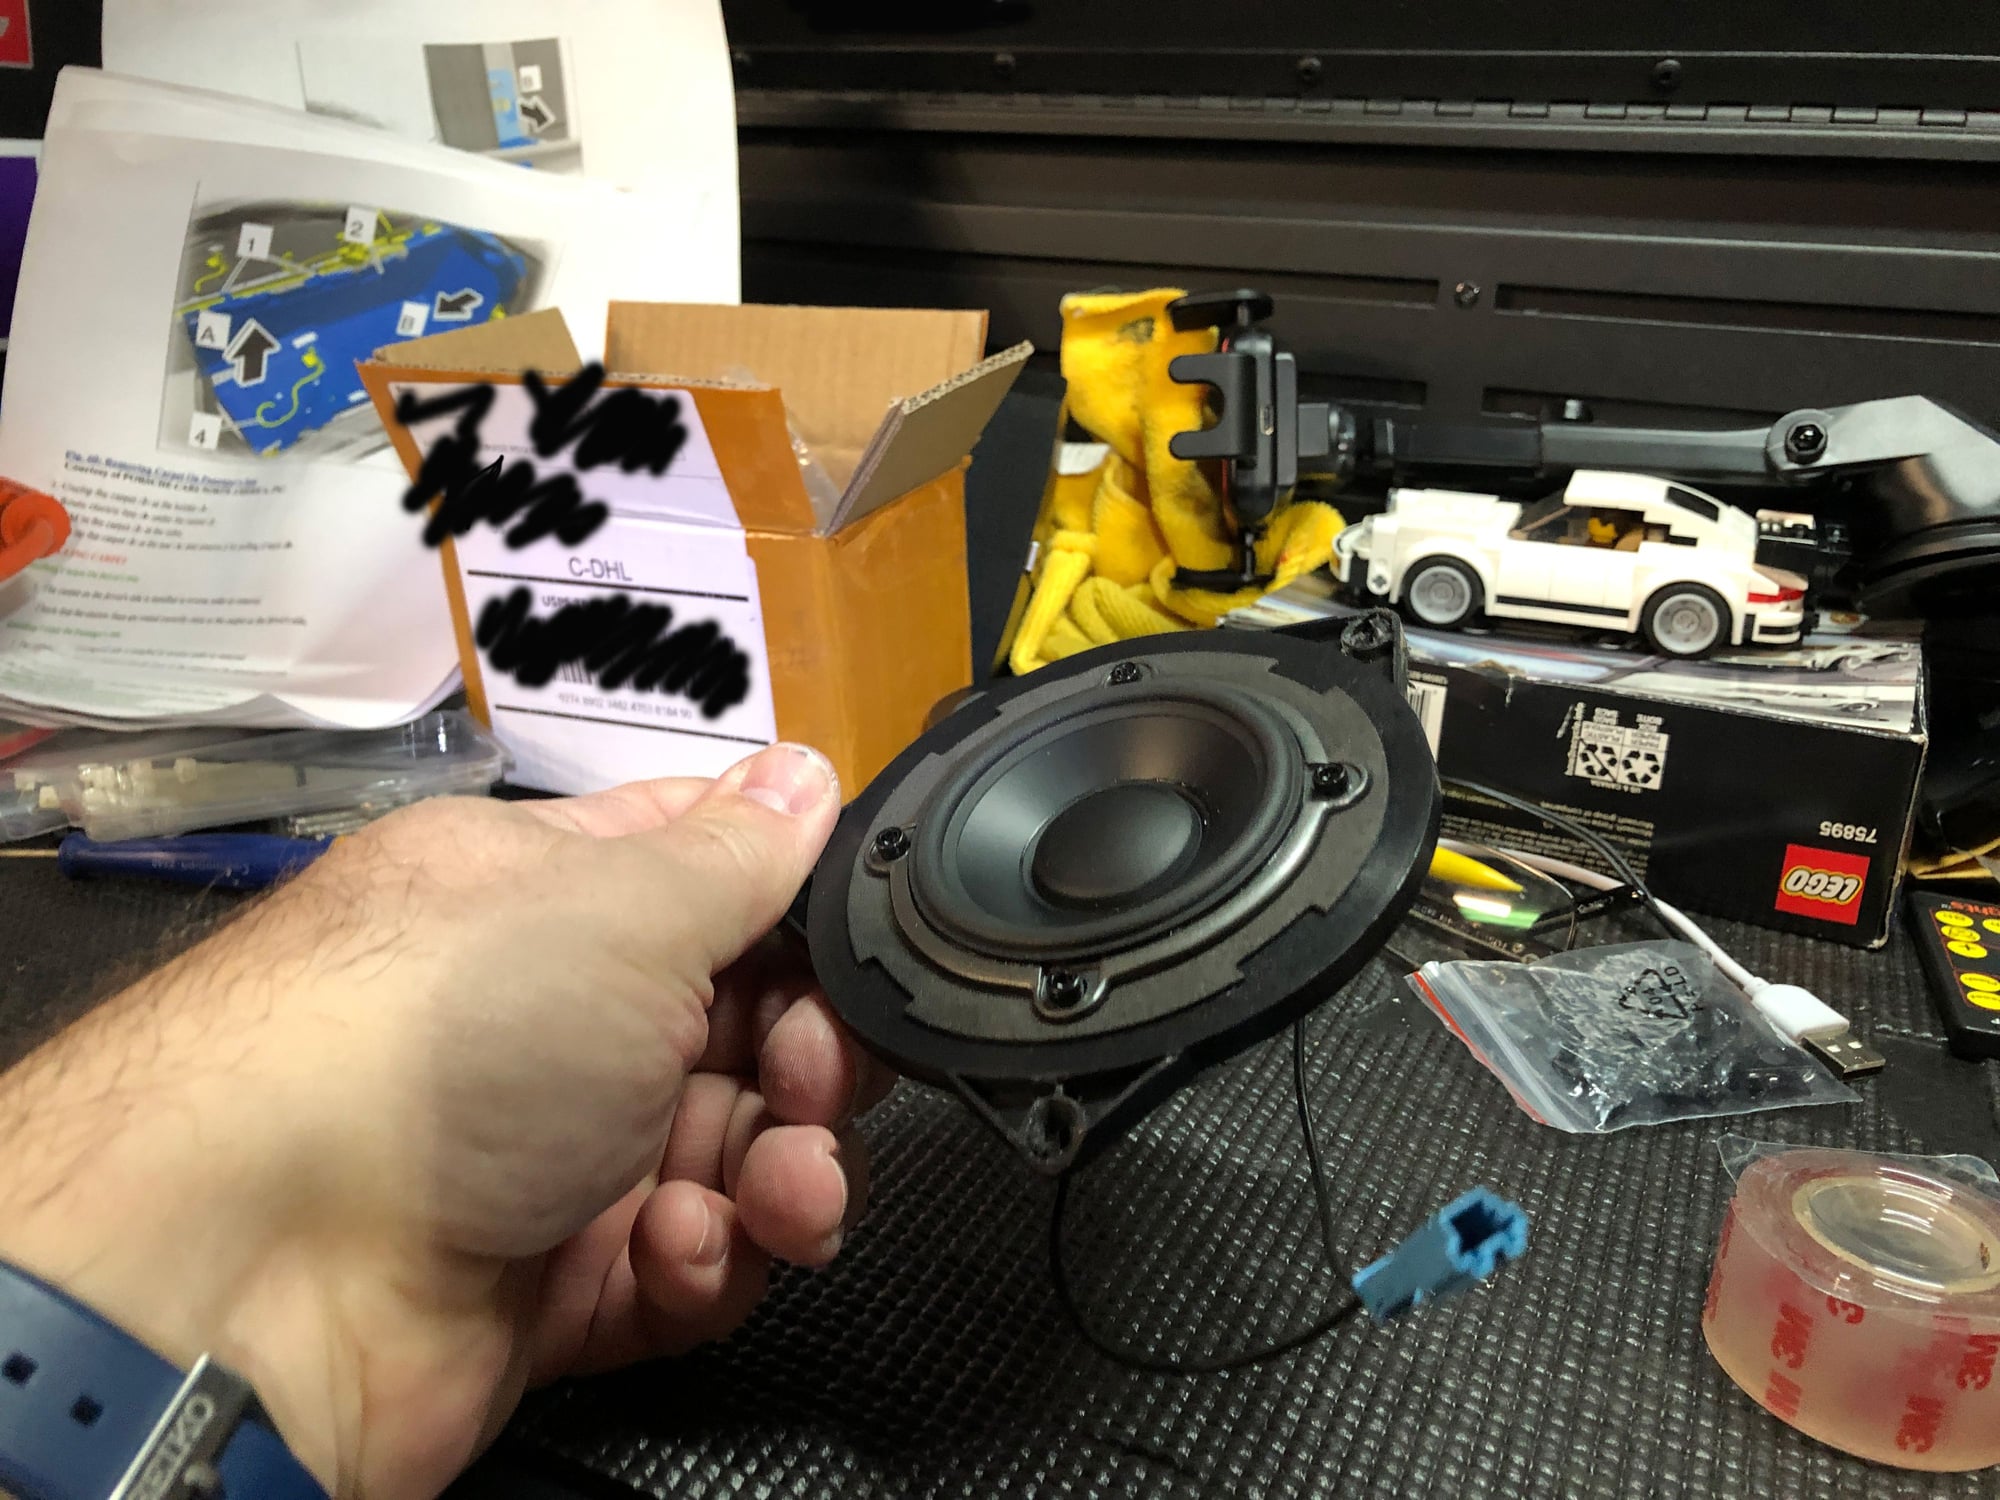
Front mid (GB-25) wired up for install and mounted on 2.5 to 4" Mercedes Benz speaker adapter.
Cutting off the Mercedes Benz mounting ***** for 2.5" adapter plate. Holes had to be enlarged for factory screws.
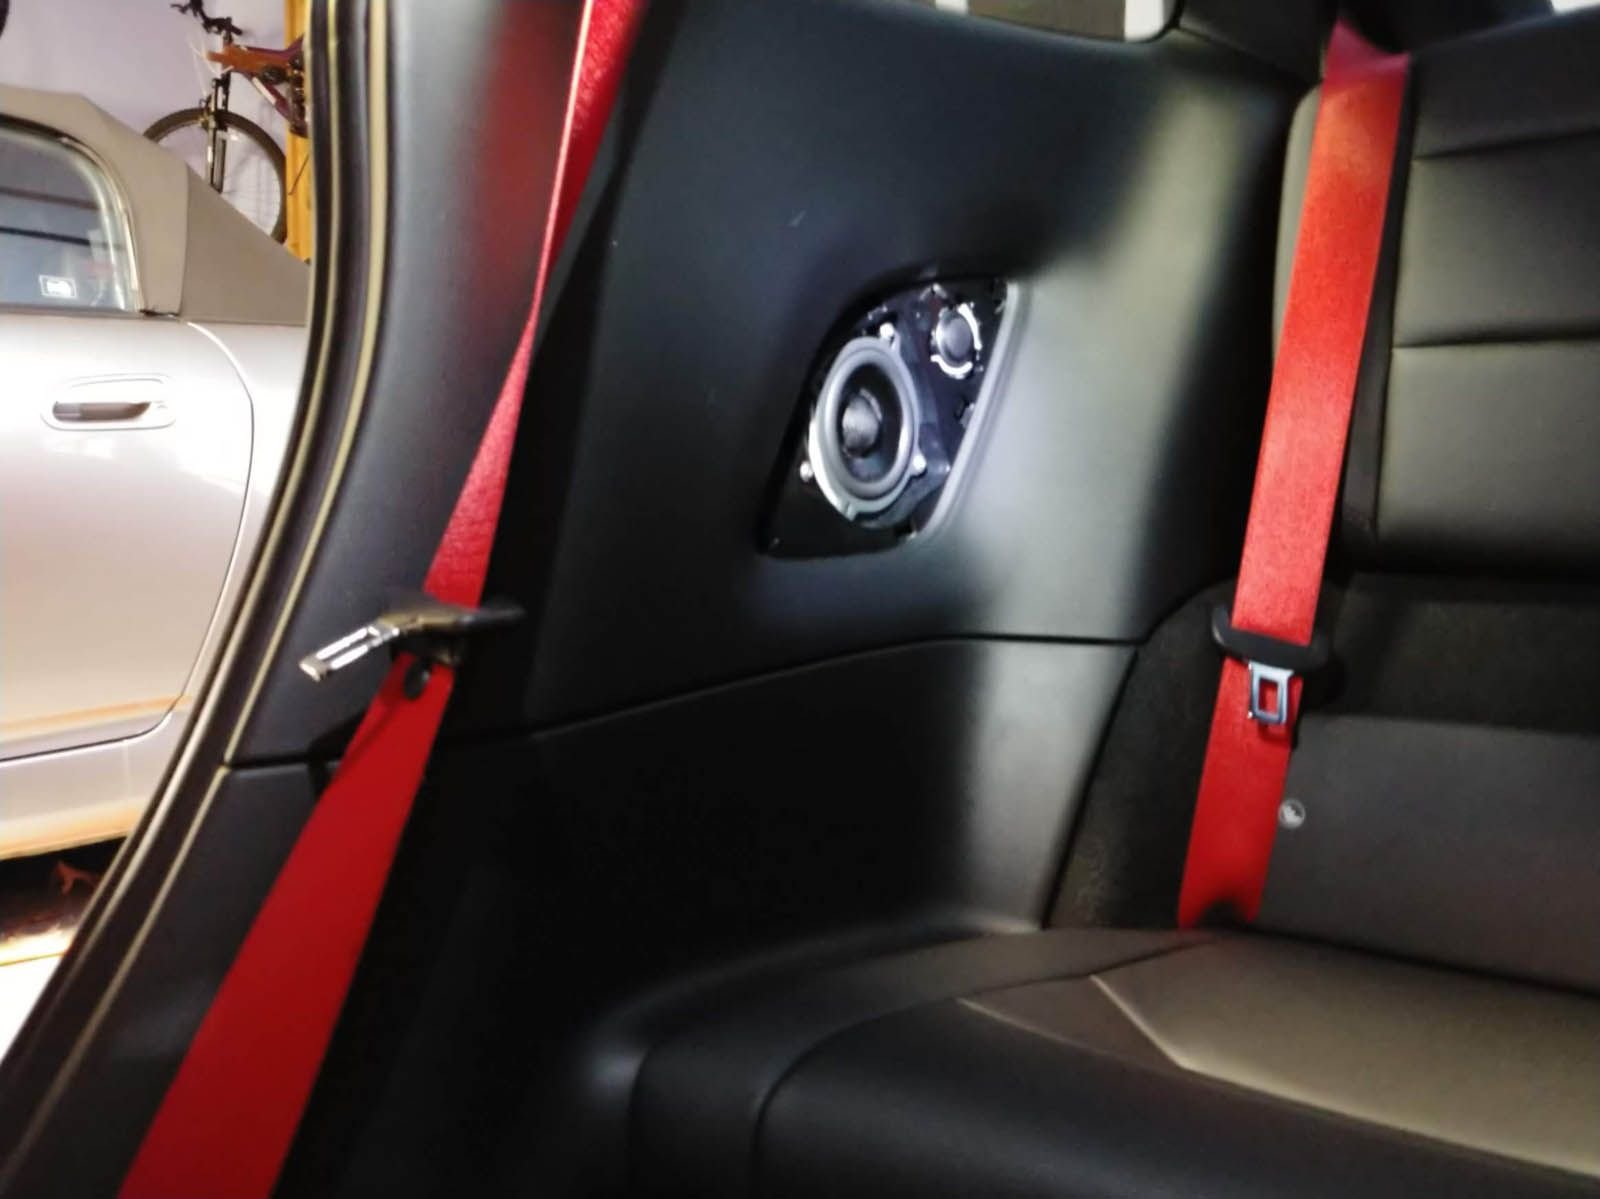
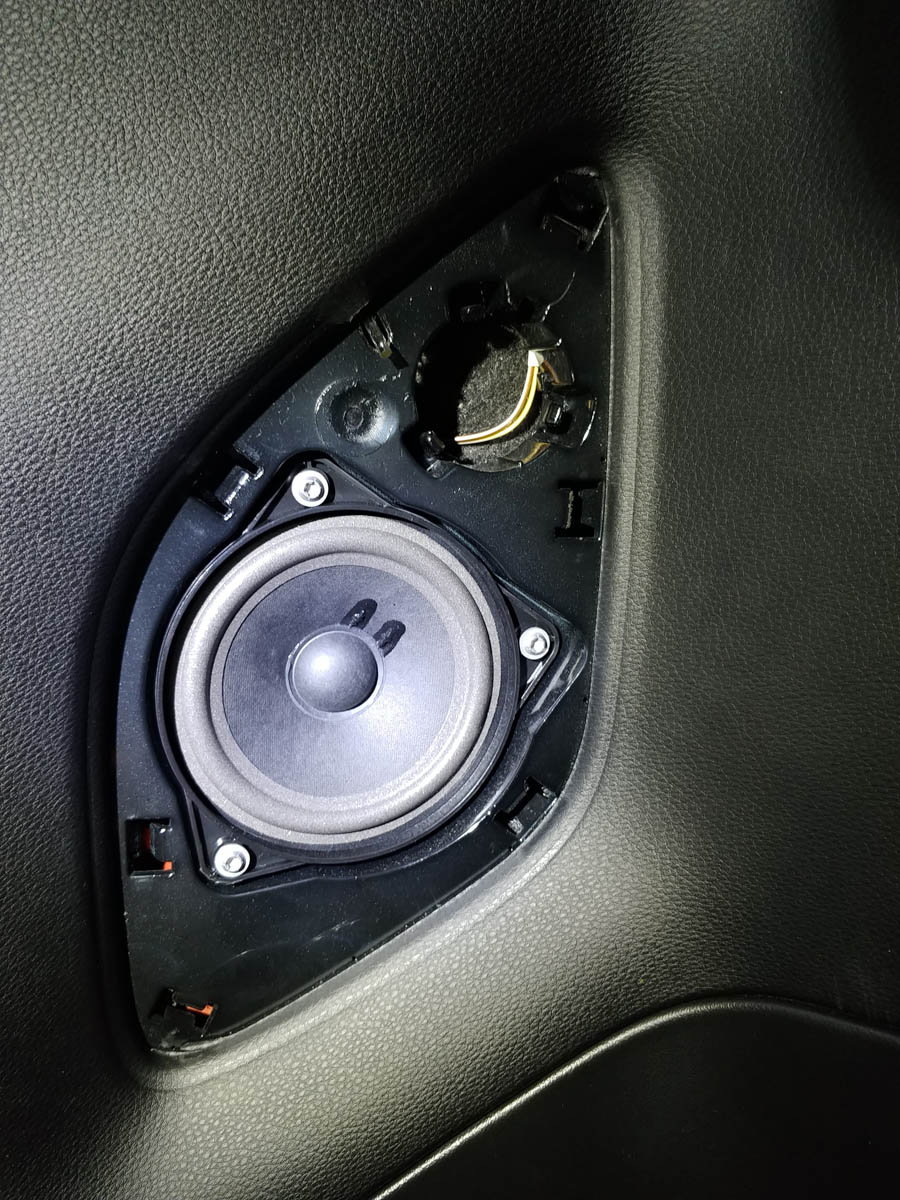
Rear mid Infinity Kappa Perfect 300ms wired up, with tweeter crossover and wiring ready to attach to tweeter.
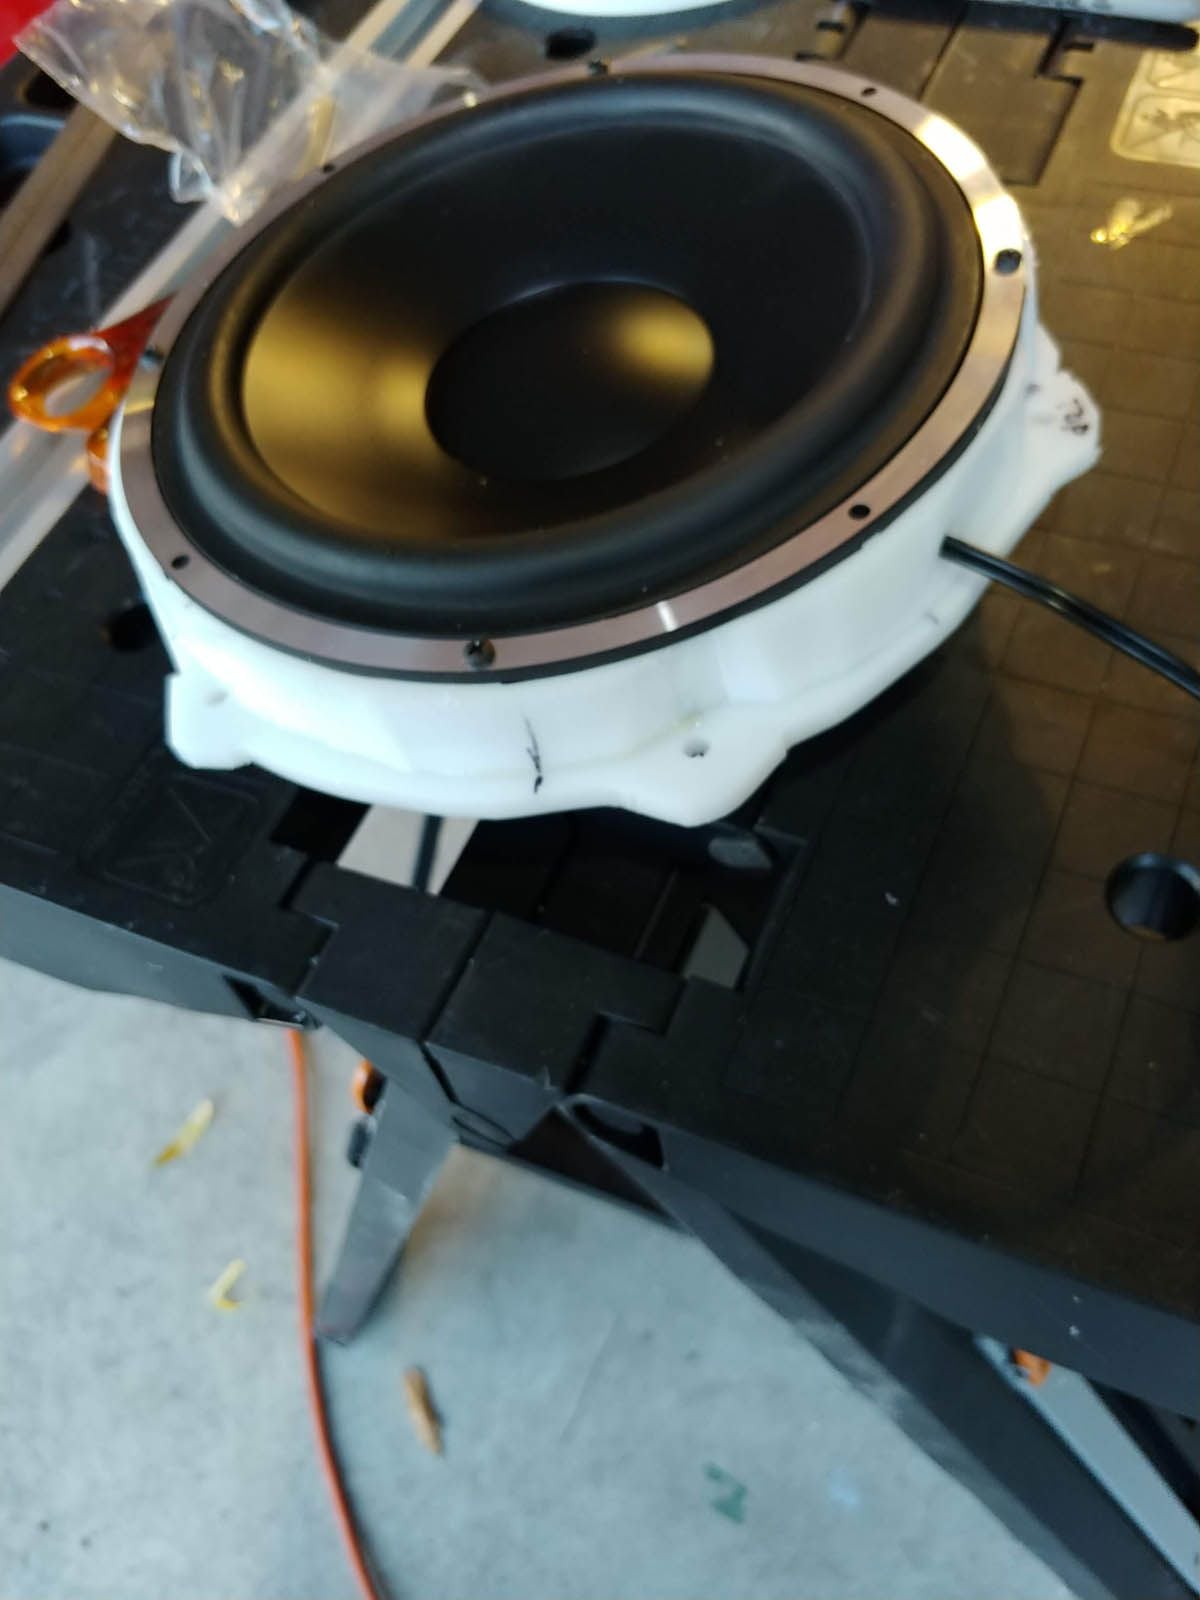
Woofer mounted into my (terrible - jigsaw cut) spacers / adapters. Probably should have gotten my hands on a router table for this part. 20/20 hindsight.
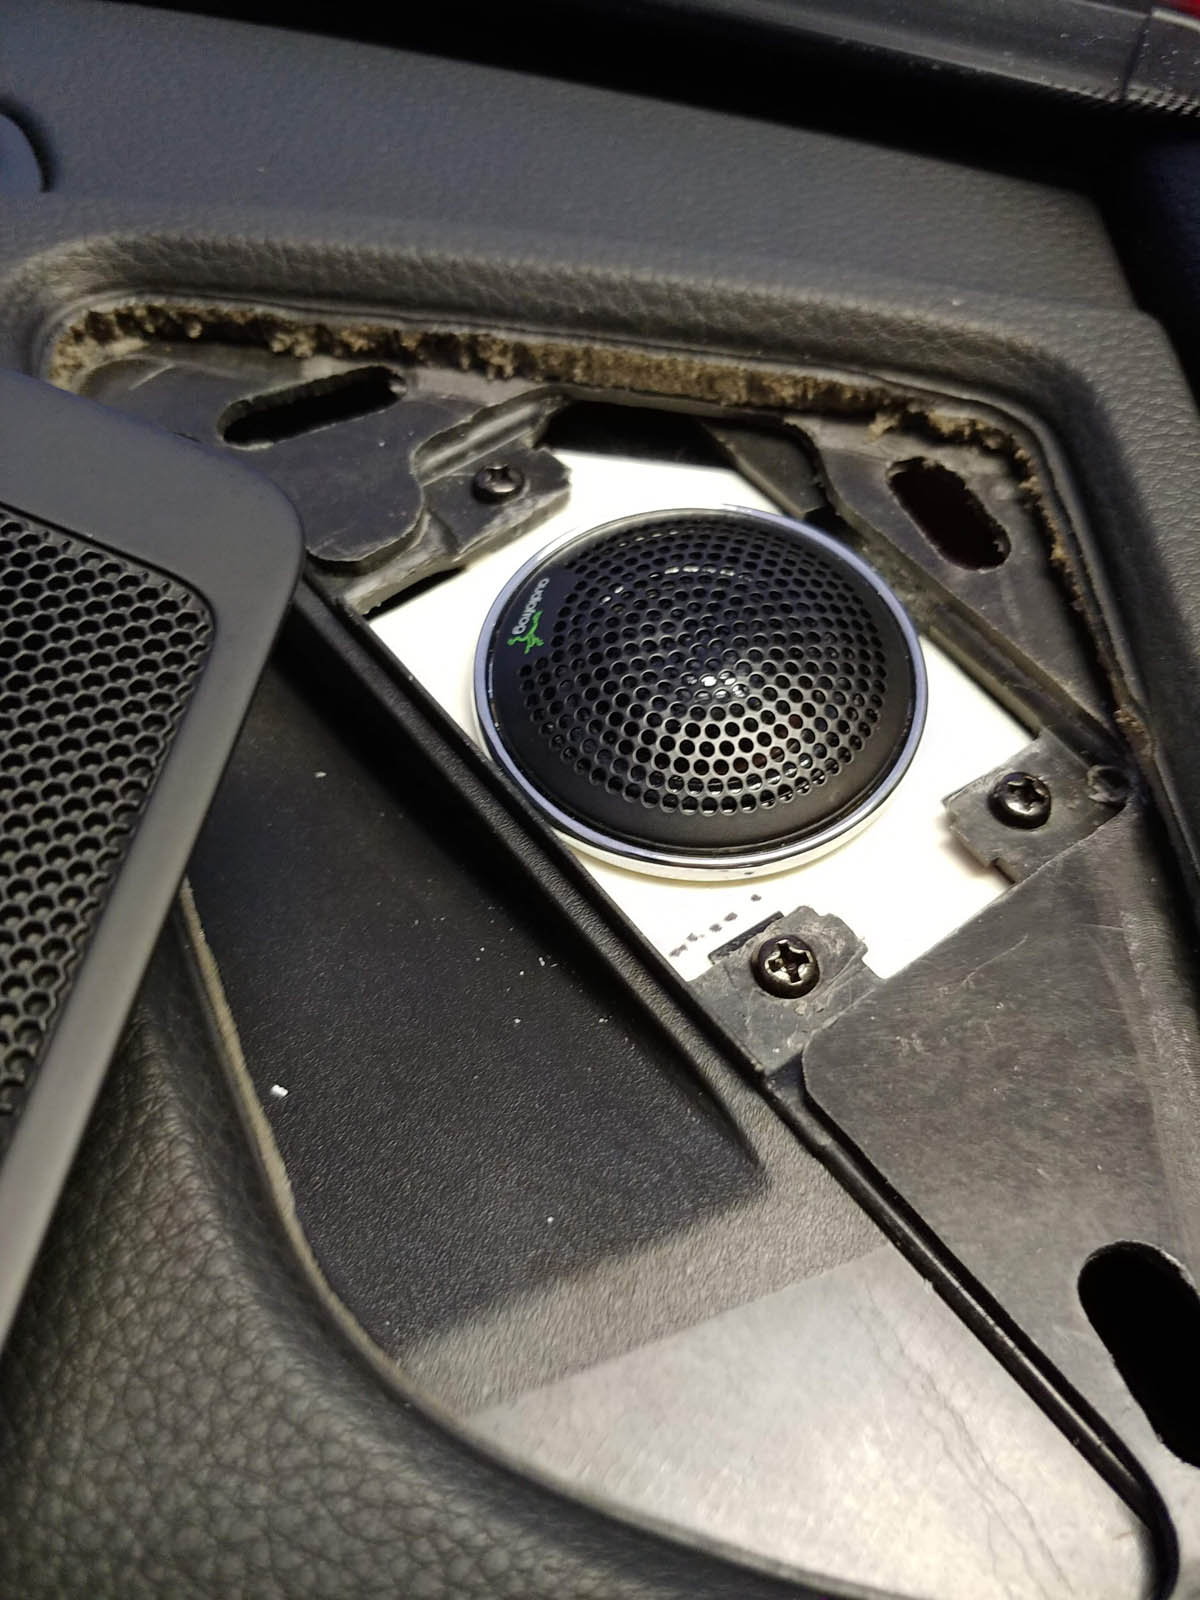
Tweeter mounted in 3D-printed adapter. Mounted from below in order to add clearance above the tweeter. (Was a bit tight when mounted from above like the Burmester tweeter.) Used Burmester grills in place of "Plus" standard tweeter grills
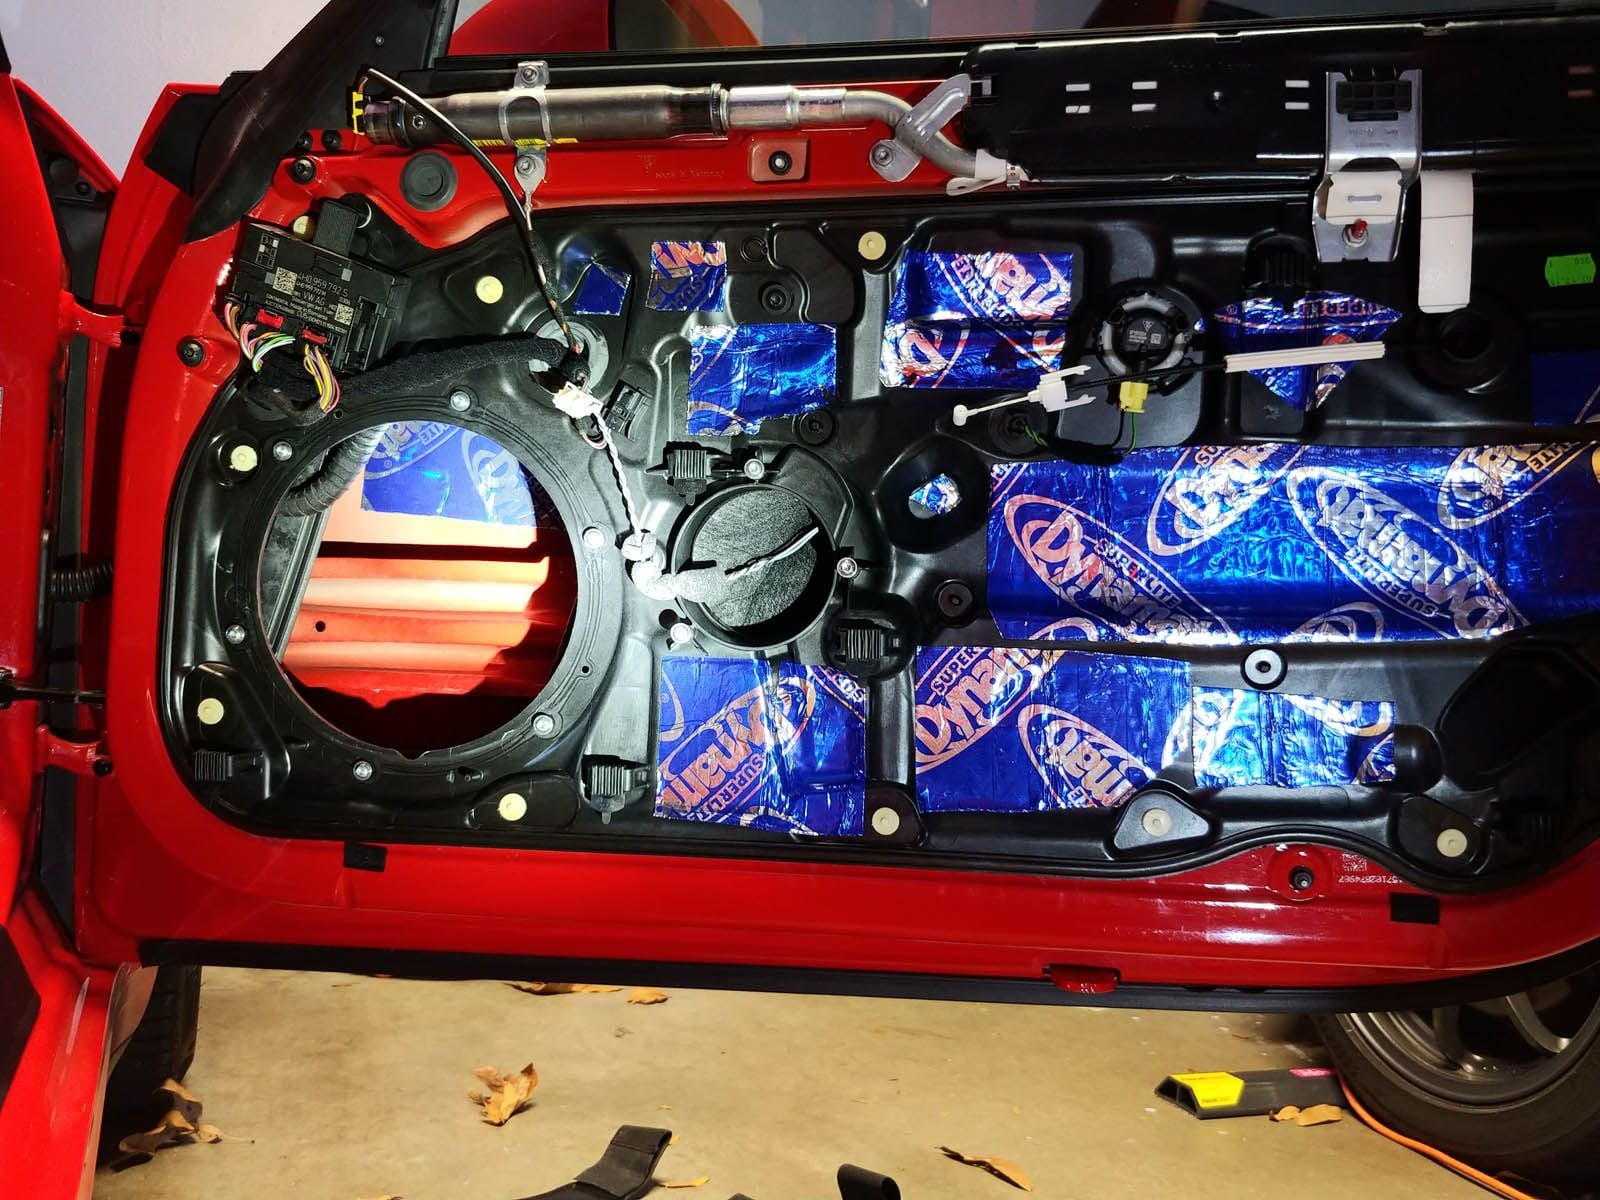
Sound deadening via Dynamat Lite the inner door panel and exterior panel
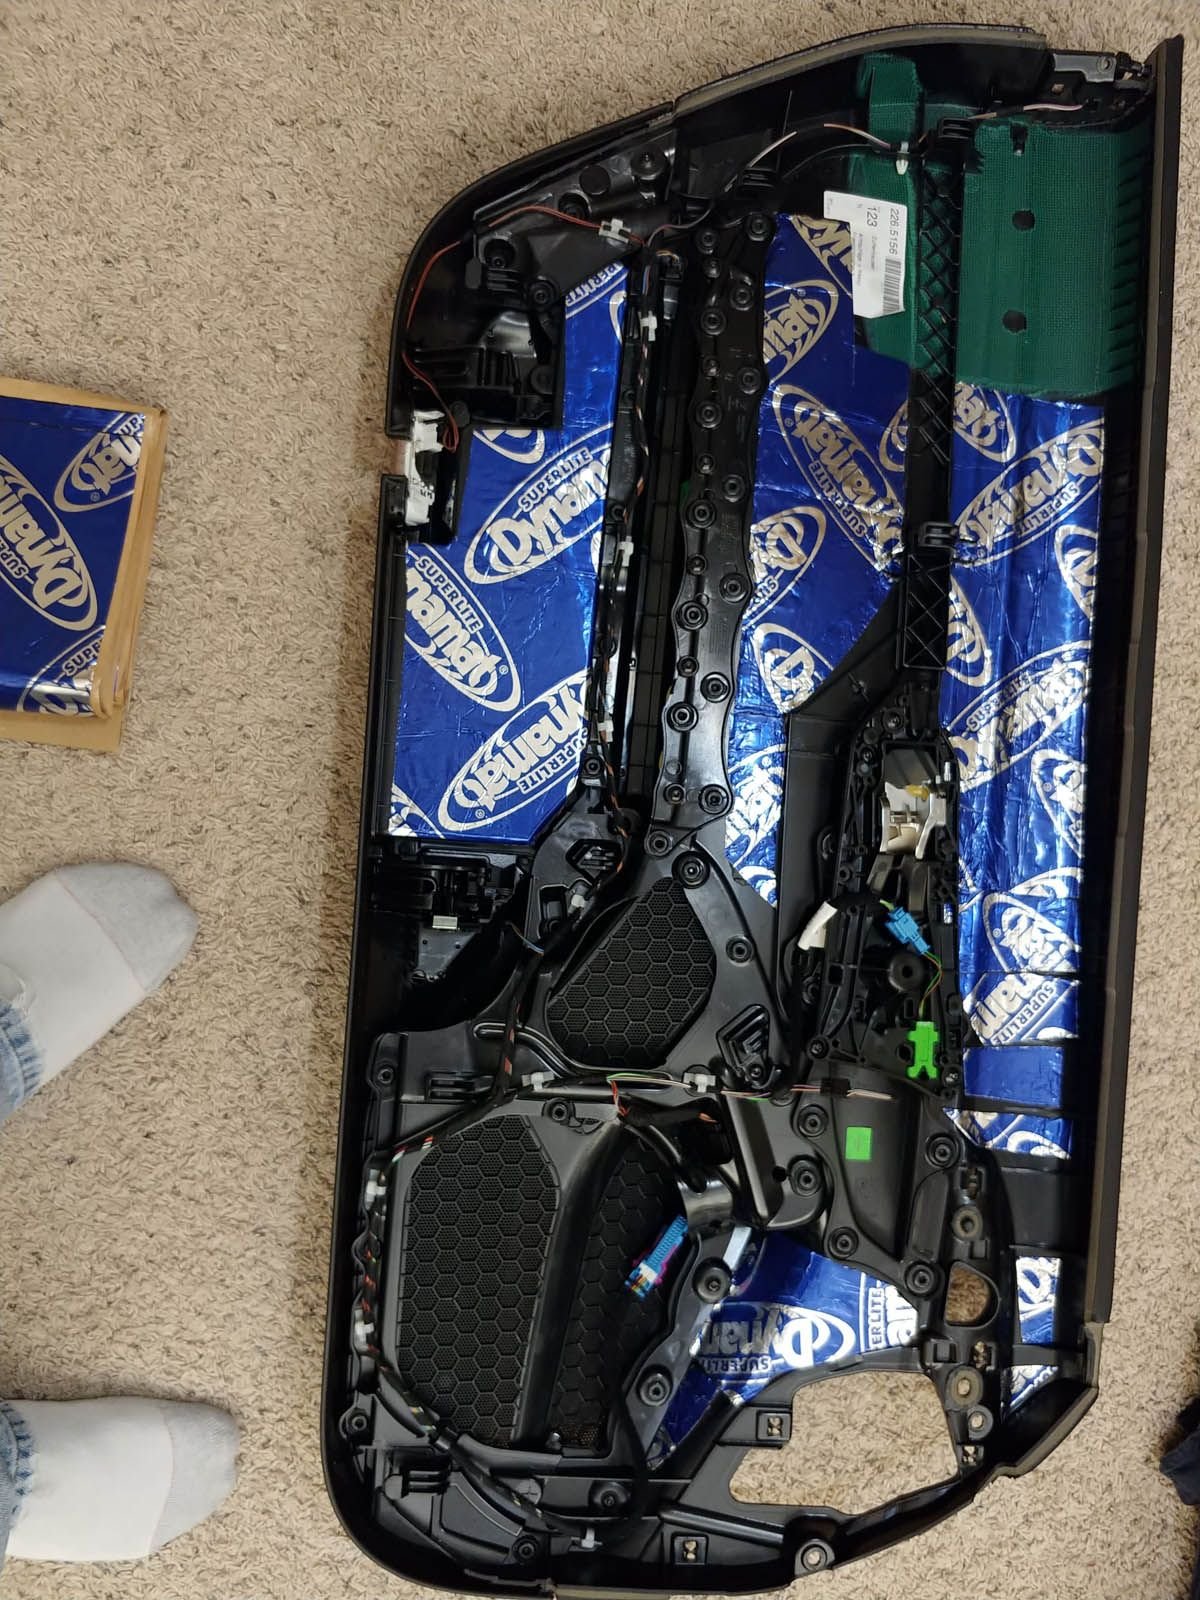
Sound deadening via Dynamat Lite the door panel
Speakers mounted in door -- again, that shameful woofer adapter.
Rear speakers mounted. Tweeter mounted via friction fit. Added some foam double sided tape around the friction fit to help ensure no rattles. Highly successful.
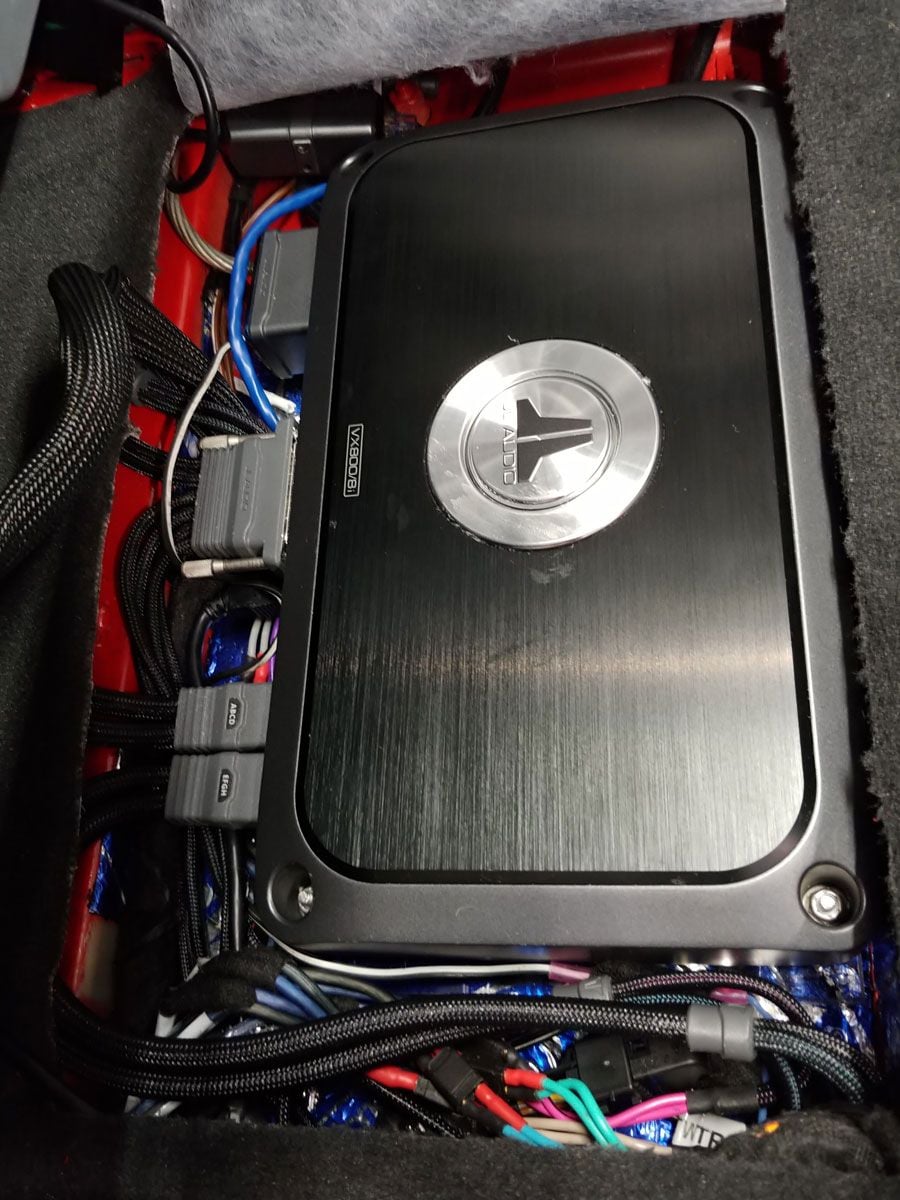
Amp installed below seat. (Note: black USB wire for programming on bottom of well.) The JL Audio VX800/8i fits, but only barely. This is a super tight fit, and requires the amp output wires to slightly loop under the carpet out of the well.
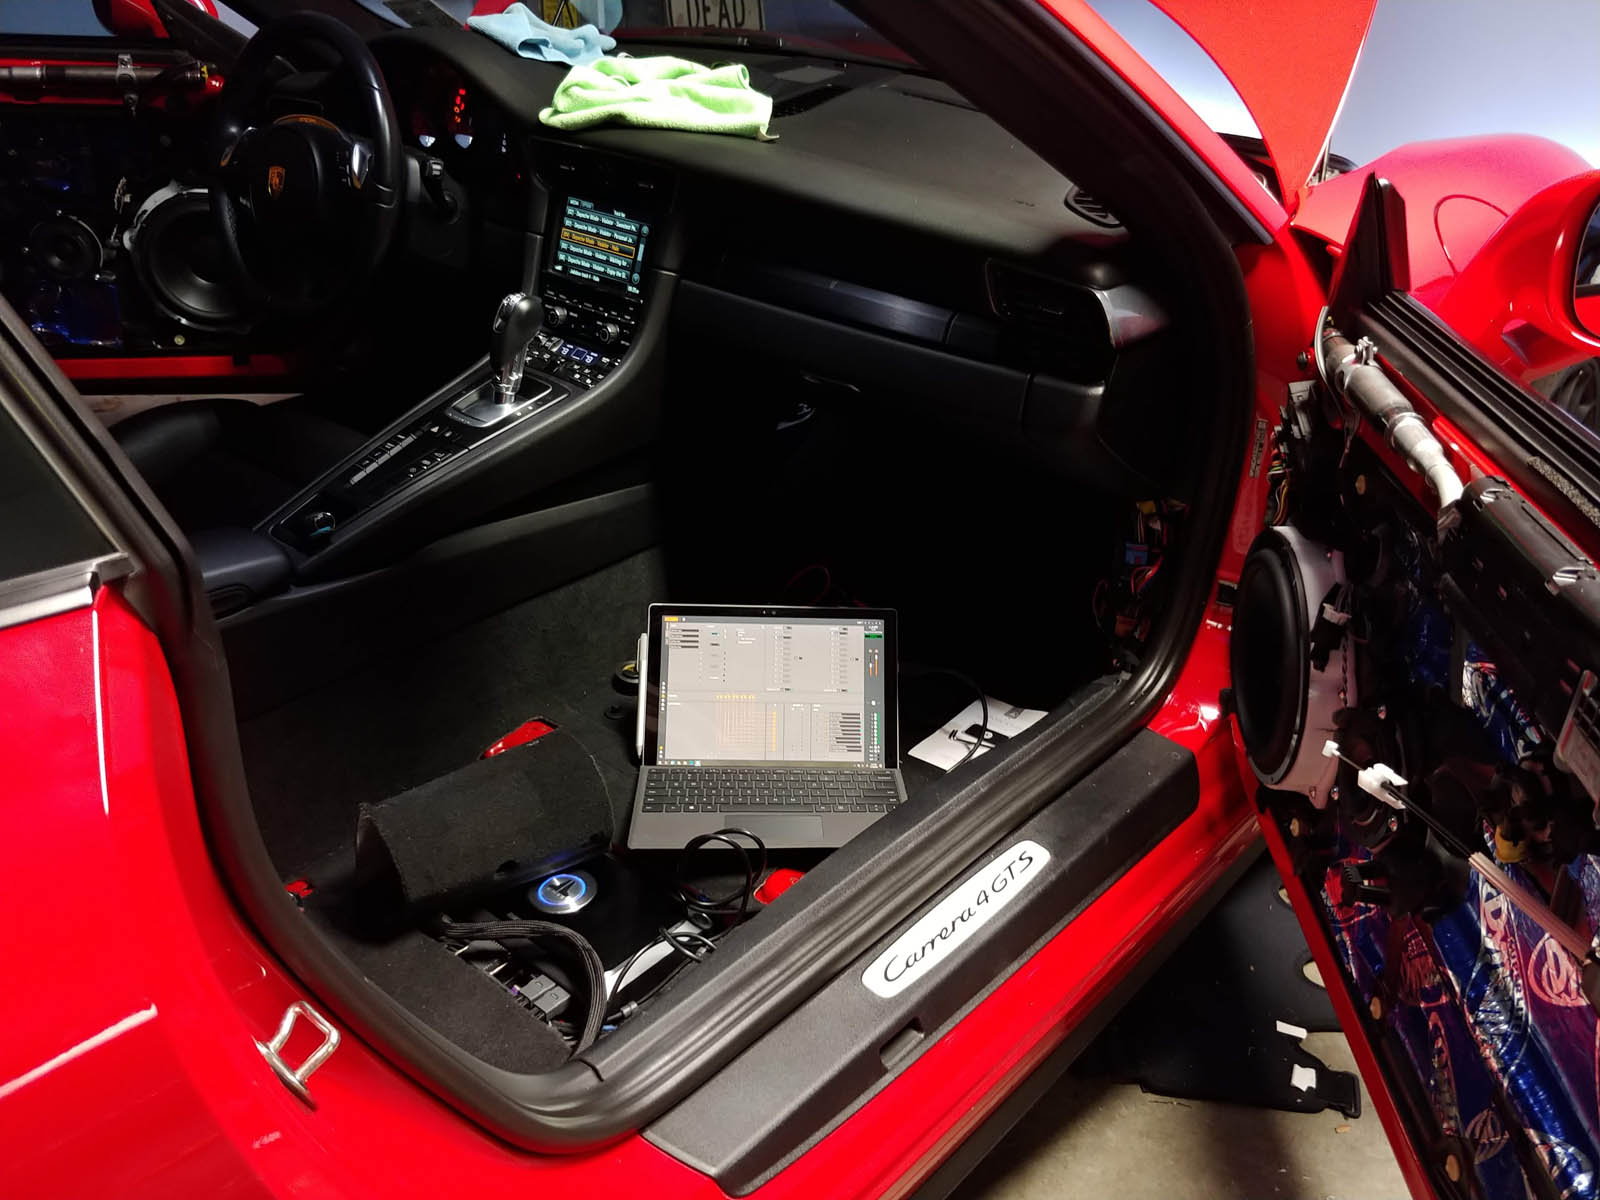
Step 10 -- Testing, tuning, and configuration
The JL Audio utility TuN made configuration and setup incredibly easy. I'm willing to share my TuN files for those who might be interested, but use at your own risk. Especially a potentially bad idea if you're using different speakers vs mine. First start up -- None of the magic smoke escaped (yay!!), configured the basic setup in TuN, and toggled the system on.
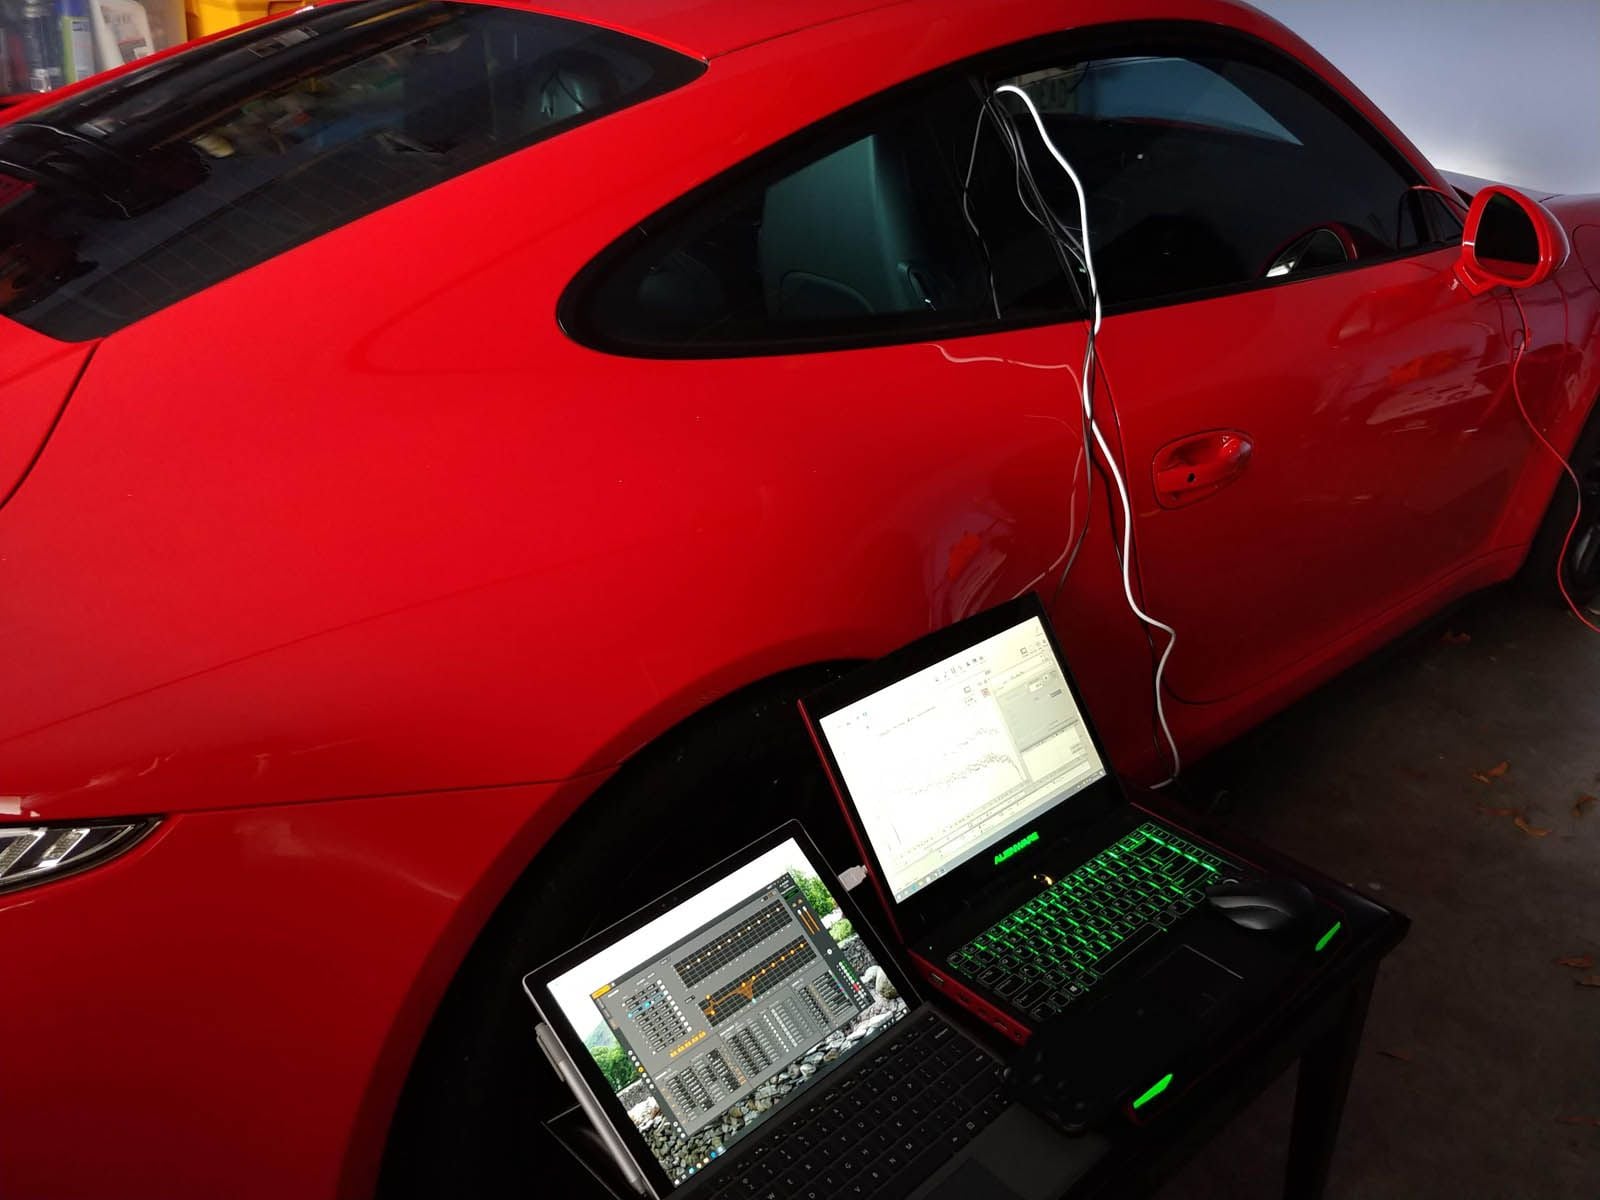
Spending some time (early photo) using TuN, REW (Room EQ Wizard), and a miniDSP UMIK-1 to tune the crossovers, parametric equalizers, balance sound. Double laptops allow for quick sweeps and pink noise generation with easy adjustments and re-tests.
Final thoughts -- I really enjoyed doing this project. I definitely have something far closer to a sound quality performing car than I expected from the start. The sound quality and imaging is incredible, but some of that fades at speed when I turn on the real woofer (PSE!). I'm totally okay with that compromise. The bulk of the time, I want the stereo so I can sing along on road trips and long drives. My GTS gets some to and from work duty, so having incredible sounding audio while in traffic is a God send.
More than happy to answer questions, provide dimensional data (depths, etc.) for those who might want it. I took a lot of that data and recorded it.
Also, while my post is no where near as amusing as Cysco's (great read!!), I was striving for brevity and information over entertainment.
--Philip
Last edited by PJK3; 03-27-2021 at 03:35 PM.
Reason: Clarification on assembly of woofer adapters. Screws were used, not just glue. Updating for changes.
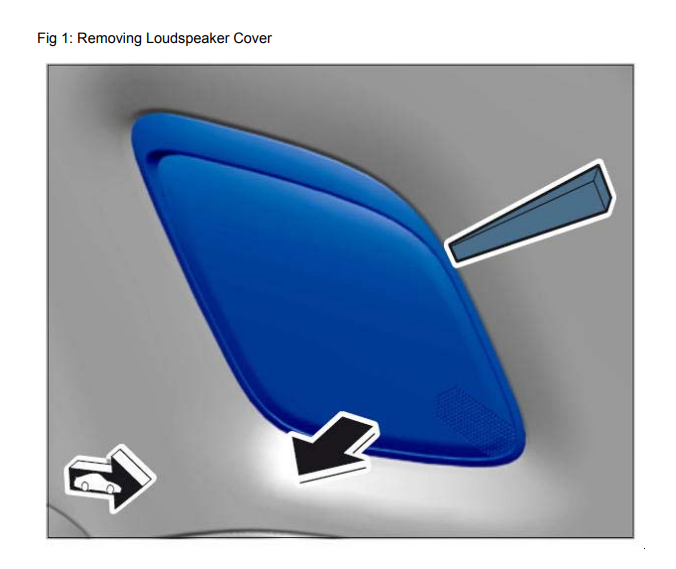
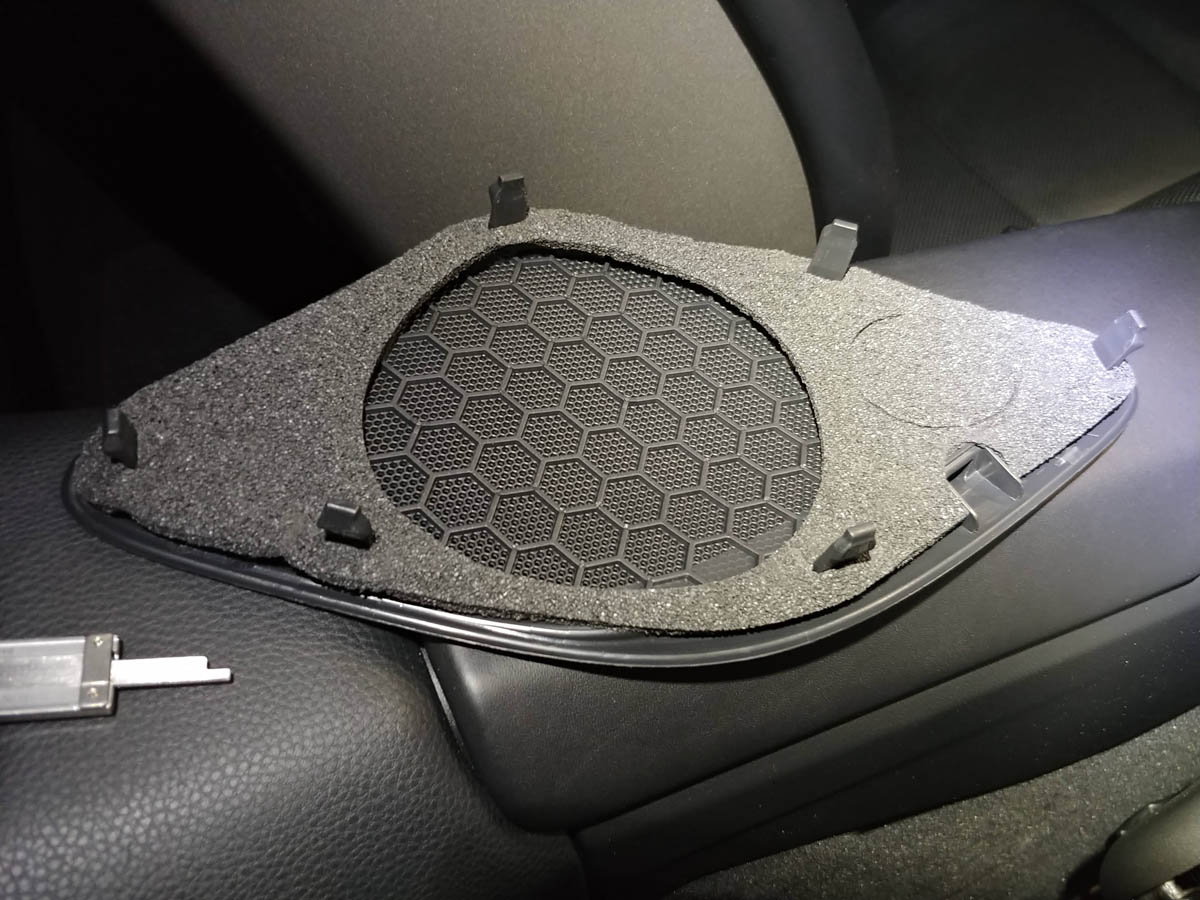
This is awesome! I did the budget tweeter upgrade and that�s good enough for me at the moment. I have a 10 inch woofer for the deck in a sealed box that I will install in a bit once I can make a beauty panel for it to fit the rear deck. On the pic of the rear speaker where you have the grill off but the Rear panel in place-were you able to remove the grill without taking off the rear panel? If so, does it just pop off? The reason I ask is because I need to tap a speaker lead for the input of my amp-I would rather tap the rear but don�t want to pull the panel to get to it.
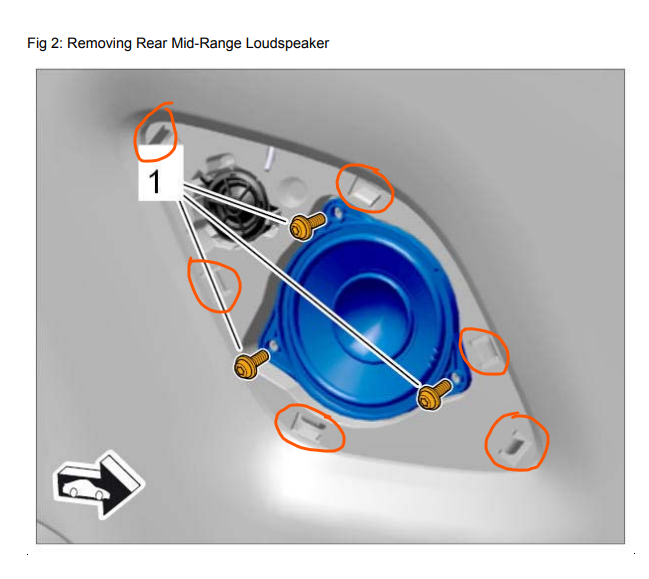
No need to remove the rear panel. The rear speaker cover pops off in a fairly easy fashion as indicated below, BUT I found it to be a bugger to pull. The clips (locations circled in orange) are quite tricky to dislodge. You want to pull firmly but slowly. Go for a single clip at a time. I found the lower front most clip to be the trickiest for both of mine. I definitely got the impression that the grill was fragile enough that it could be distorted or broken if you tried to ape it versus finesse it.
Probably unnecessary to say, but I'm not responsible for any damage or issues you might have with using these instructions.
Orange circles indicate clip points. Take note of the orientation of the clips / grill, as giving it a tad of lateral helped on the final clips. Note orientation of clip catches Note orientation of clips
-------------------
A few other things I thought about later, but neglected in my original post:
The amp I found on ebay cost me about $50-ish dollars shipped. It was used and potentially in questionable condition. The seller supplied me with clear photos of the connectors (which were in good condition). Since the connectors were all I wanted, the condition of the rest of the amp wasn't of much concern as long as I didn't see any blackening, melting, or other damage that would indicate a short circuit.
I'll need to post photos of the DRC-205 controller and it's magnetically "mounted" location. Primarily, I just wanted to be able to have a simple way to adjust amp modes for various EQ and time correction modes. The ***** I have configured for volume (which stays at full) and woofer volume. That's subject to change, but it's what I'm using it for now.
The amp is mounted to a 0.25" piece of acrylic, which was cut and sized to be a tight fight in the well, both fore and aft, as well as left and right. As a backup, I have numerous strips of 3M double sided tape holding it in place for any potential vertical movement.
The fit of the 3D printed adapter (tweeter) wasn't perfect based on the dimensions I had. I had to knock a 0.5mm here and there off with some sandpaper. We (myself and the co-worker who's 3D printer I used) mis-estimated the shrink on the part after printing. YMMV. It was definitely close enough for government work.
Inline capacitors were used on the tweeters to prevent accidental damage. Calculated at 4 ohms for a 1200 hz high pass (~35 μF)
Forgot to include Dynamat SuperLite as components, which worked well for me. I used ~2/3 of the box, with at least 1 sheet left over. Probably on the order of 7-8 sq ft of coverage in the 12 sq ft box. And it definitely met the description of "super lite" as it was about ~5.5 lbs.
After pulling the front seat, the SRS / Airbag system was tripped. I used my Launch CRP-123X to reset the error.
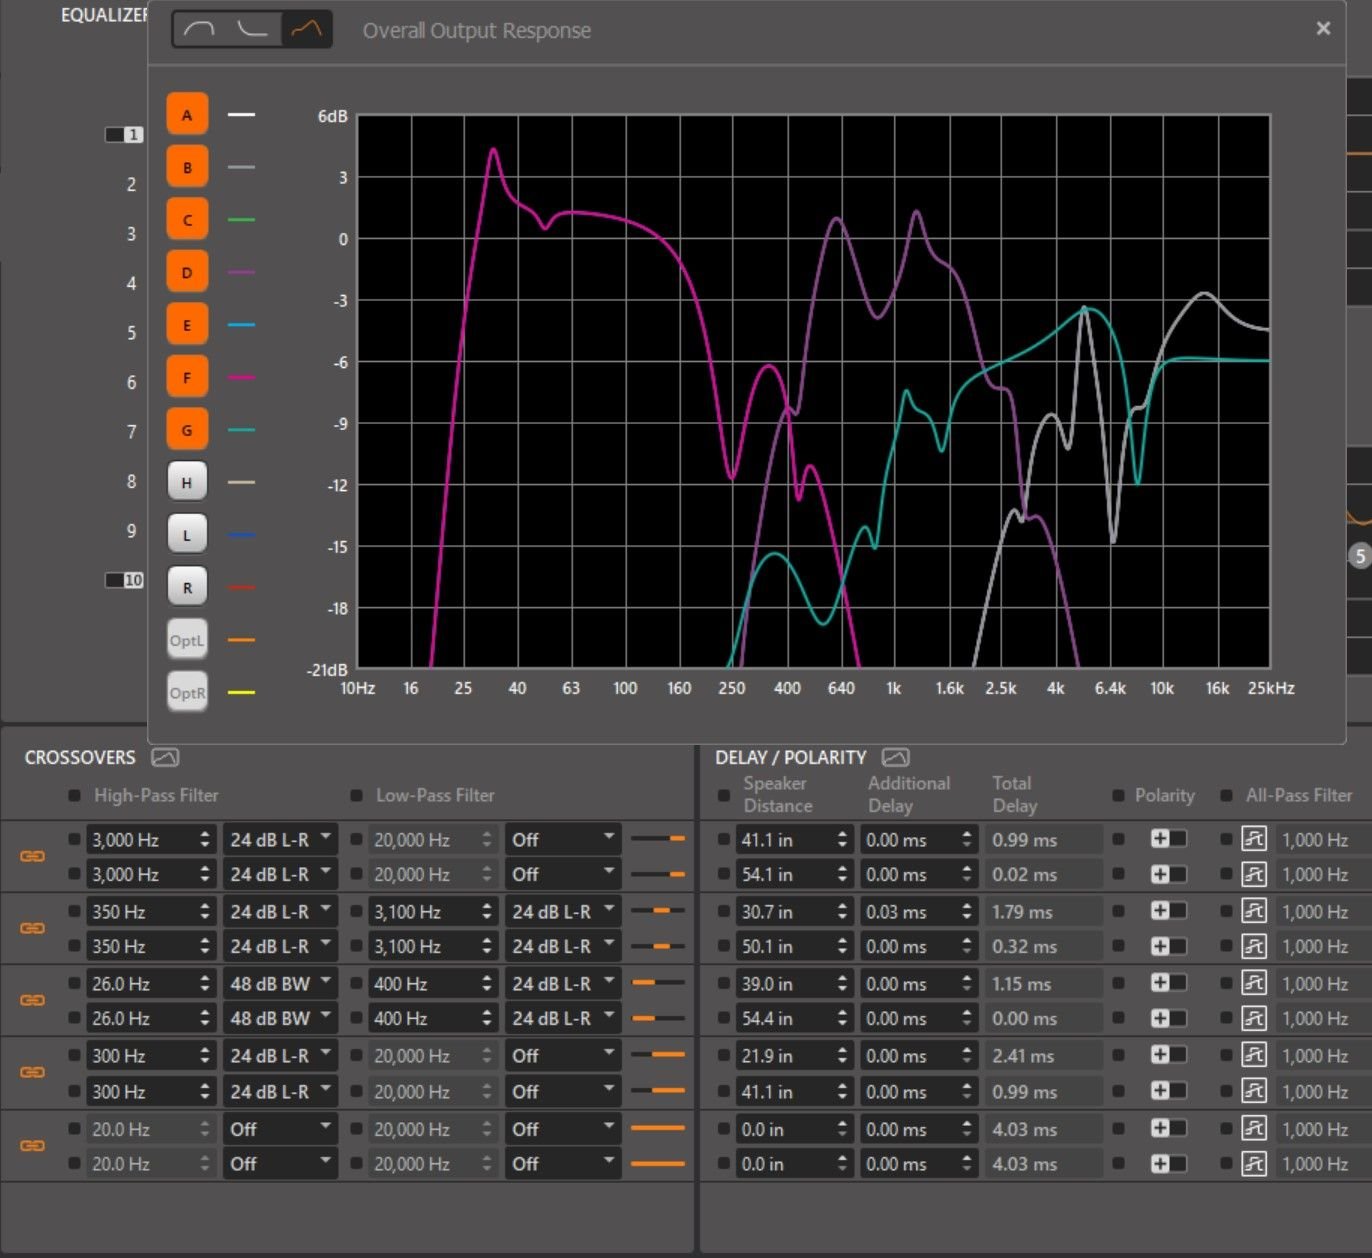
Final output response curves, crossover points, and time delay settings (for driver positioning):
A&B: Front Tweeters (white)
C&D: Front Mids (purple)
E&F: Front Woofers (bright pink)
G&H: Rear highs (light blue)
(Edit: forgot to add final tuning / TuN output response curves.)
Last edited by PJK3; 07-24-2020 at 03:28 AM.
Reason: (Forgot to add final tuning / TuN output response curves & grammar))
Amazing! As an audio guy myself, I find it disgraceful the crap that Porsche installs in their cars. The only system I have liked to date has been the Burmester in my Panamera Turbo. The rest of the systems are pathetic given the caliber of car. I want to do a new audio system, so this helps a lot. Saved the page! Thanks man.
Amazing! As an audio guy myself, I find it disgraceful the crap that Porsche installs in their cars. The only system I have liked to date has been the Burmester in my Panamera Turbo. The rest of the systems are pathetic given the caliber of car. I want to do a new audio system, so this helps a lot. Saved the page! Thanks man.
Glad it's of value for you. If you have questions, I'll do my best to answer them.
Nice work, the JL amp I think is a league ahead software wise and good that it's got balanced inputs on both high and low level.
Only thing with the JL is really they expect you to have a amp beauty panel so you can route their lovely braided pigtail looms under it, and hide the patching. Vs say a more basic connector where you can splice and wrap your own loom. It's be nice if they did an unterminated connector kit with crimp tool.
Only thing with the JL is really they expect you to have a amp beauty panel so you can route their lovely braided pigtail looms under it, and hide the patching. Vs say a more basic connector where you can splice and wrap your own loom. It's be nice if they did an unterminated connector kit with crimp tool.
I don't know why they used those ancient dot matrix printer looking connectors, but they take up a ton of room. That's a HUGE reason I went with a Helix V Eight instead of the JL. I did my build before there were a couple examples of people fitting them under the passenger seat... I just wasn't sure it would. So I went V Eight instead.
Yeah it's a DB25, very common actually in the pro audio space to handle 8x balanced lines. What'd be nice is to buy a D25 and multicore cable then crimp it into the VAG amp input connector.
Nice work, the JL amp I think is a league ahead software wise and good that it's got balanced inputs on both high and low level.
Only thing with the JL is really they expect you to have a amp beauty panel so you can route their lovely braided pigtail looms under it, and hide the patching. Vs say a more basic connector where you can splice and wrap your own loom. It's be nice if they did an unterminated connector kit with crimp tool.
Thank you. I have been highly impressed with the JL and the ease and flexibility of configuration. But yeah -- that amp well is a mess. I have a beauty panel that covers it (aka the carpet and passenger seat), so I don't have to look at it. But one of the reasons it is such a mess is the heavy RCA's I cut up for the connector. I made that harness in advance, and it's overly bulky, wires overly long, and consumes way more room in that well than I'd like. A new connector and some way shorter wiring will go a long way. I'd also just have preferred normal RCA type connections, etc. versus these proprietary plugs.
Originally Posted by flgfish
I don't know why they used those ancient dot matrix printer looking connectors, but they take up a ton of room. That's a HUGE reason I went with a Helix V Eight instead of the JL. I did my build before there were a couple examples of people fitting them under the passenger seat... I just wasn't sure it would. So I went V Eight instead.
And yes! The extra fore to aft space the JL input and speaker connectors take up is just a pain. If Cysco hadn't a photo in his thread successfully showing the amp installed, I would have continued to look elsewhere. His wiring came out cleaner as I simply left too much extra length in my cables and left the DRM and programming USB cables in place.
Looking back at this thread, there are a few things I need to update eventually. (response curves, new Carbon MW9s, and eventually that amp well.)
A few updates --
First the 2 of 5 Morel Elate Ti MW9's that ended up working, both went defective and started rattling. Not sure what was going on there, but that now makes 5 of 5 defective. Morel stepped up reasonably well and offered replacement under warranty or an upgrade to the Carbons for a small incremental cost. I elected to upgrade to the Elate Carbon MW9s given my total lack of success w/ the Elate Ti WM9s. So far, they've performed very well even when I've thrown way more bass and load at them than I ever dared w/ the Elate Ti MW9s.
Humorous aside:
As a curious coincidence that is probably not coincidental, Crutchfield was listing the Elate Ti MW9s and the Elate Carbon MW9s in parallel for a while.
When I contacted Morel and explained my issue, I ended up being sent to Casey Thorson who is the COO. After telling him my experience, he worked out the solution for me.
The very next day, the Elate Ti MW9s were GONE from Crutchfield. (This is a copy of the link from the first post.) Usually, Crutchfield keeps old products on their site long after being out of production. (Example, my office radio purchased 16 years ago.) I found their disappearance to be quite interesting, and I believe this would support a bad / defective batch theory.
I forgot to get pictures while installing, so the next time I have the door panels off, I'll update the photos. In the meantime, here's one in a box. That's 1 sexy Morel Elate Carbon MW9
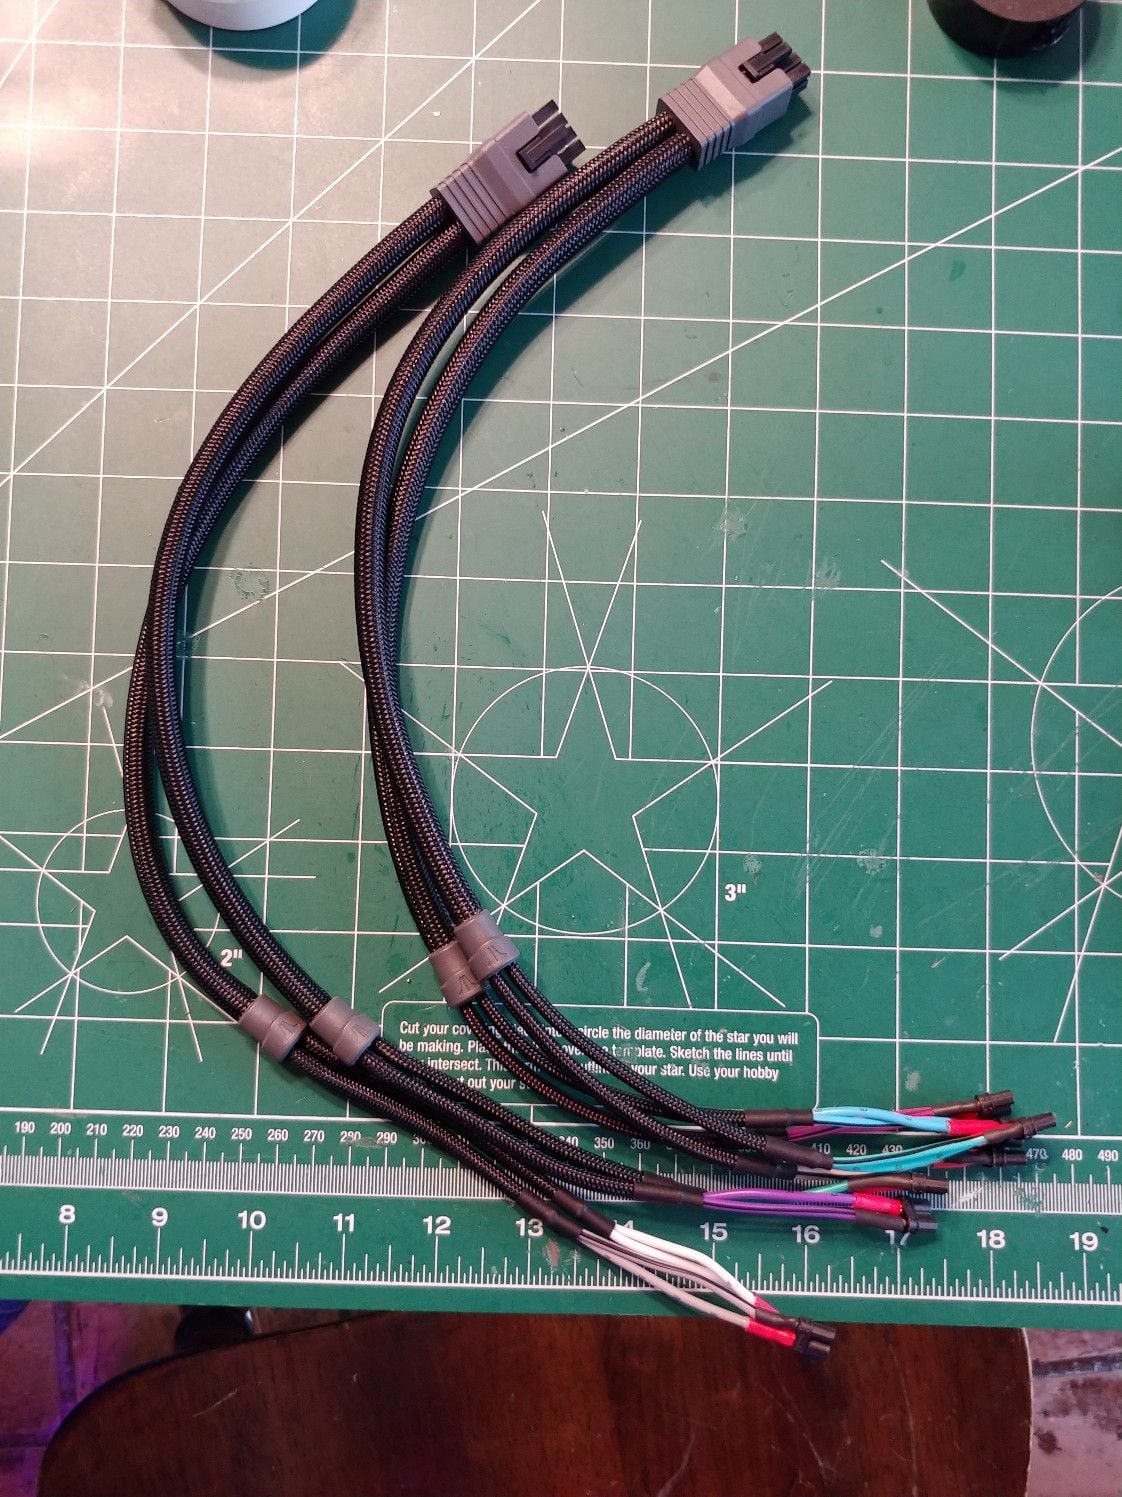
Next, based on the info from over at Muu83's thread, I was able to make a new harness that allowed me to clean up the amp well, eliminate a potentially bad solder joint in the old harness, and generally make it better.
I made all these over a month ago, but only got around to posting now.
The input VW connector 4F0972112 does not come with the pins when ordered as a part through VW. I'm glad I didn't order a second connector for backup pins.
The correct pins can be acquired via TE Connectivity and are either TE 5-963716-2 or TE 5-965908-1. I was considering trying to make (and sell) these harnesses for others, but at my hobbyist skill level, it was a bit of a PITA and the potential payback not really worth using my limited free time. I can confirm that the IWISS SN-28B crimpers I mentioned above work well with those pins.
Prep - using TE Connectivity Pins 5-963716-2 After shielding and cloth tape.
In the end, I didn't go the DB25 route, as if I do go subwoofer, I'll need those superfluous RCA outputs from the VX800/8i to send a DSP sub output to the sub amp. Also, having already bought the RCA parts, it didn't make sense to scrap those.
A slightly cleaner and WAY less packed amp well.
Next time I get a window of opportunity, I'm going to setup the tuning mics, laptops, etc. and re-tune to match the new woofers. I'll post updates for that as well.
Last edited by PJK3; 05-05-2021 at 10:53 AM.
Reason: typo on part number

 07-23-2020, 08:53 PM


 I have a beauty panel that covers it (aka the carpet and passenger seat
 ), so I don't have to look at it. But one of the reasons it is such a mess is the heavy RCA's I cut up for the connector. I made that harness in advance, and it's overly bulky, wires overly long, and consumes way more room in that well than I'd like. A new connector and some way shorter wiring will go a long way. I'd also just have preferred normal RCA type connections, etc. versus these proprietary plugs.