When you click on links to various merchants on this site and make a purchase, this can result in this site earning a commission. Affiliate programs and affiliations include, but are not limited to, the eBay Partner Network.
Recently got a new to me 50th Anniversary 911 in Geyser Grey. Very well optioned car except for the fact that it had the Base-Level stereo in it (not even Bose) They Call it Sound Package Plus. There is nothing "Plus" about it. After doing some research, it turns out that there is actually one really good thing about the Sound Package Plus, and that is that it's "easy" to replace the amp and speakers. (as opposed to the Bose system that is pretty difficult) After reading a few threads on here (Especially the one about the Musicar upgrade package) I came to the realization that I might be crazy enough to try to DIY an audio upgrade. I consider myself pretty handy and have done light work on my previous Porsche cars but had zero experience with car audio.
So, armed with a complete lack of knowledge, but a lot of determination, I set out to tackle this project myself. I thought I'd share my experience. I don't intend for this to be a complete DIY guide, but maybe it'll show some people how much work is involved in taking on a project like this and that it is doable if you are ambitious like me. For the record, I did reach out to a local car audio specialist to see what they would charge me to do the install if I brought them my own equipment. They quoted me a little over $3,000 USD in labor.
Step 1: Do a Ton of Research
Like I said, I had zero car audio experience so I watched a good number of youtube videos. The best youtube channel I found was called Car Audio Fabrication. I learned a lot about the terminology, what equipment/tools I would need to buy, and what type of challenges I might face. Beyond that, I used the thread here about the Musicar Stage III Package to get some ideas about the speakers I should get and some tips about installing stuff into a 991. I eventually determined that the most straight forward approach would be to get a 3-way component system and a small enough amp to sit in the factory location under the passenger seat. the amp had to have a built in DSP (digital signal processor) that was easy enough for even a total noob like myself to program.
Step 2: Buy a Ton of Stuff
Armed with a newly acquired dangerous amount of knowledge, I went on a shopping spree. I decided to go with a JL Audio vx800/8i 8-channel. It's got a built in DSP that is very user friendly and I could run discreet channels (75watts each) to the tweeters and mids in the doors and bridge the remaining channels for the door woofers (150watts each) For speakers, I went with a set of Morel 903 components. Morel has a great reputation and I believe Musicar said that the 8.75in woofer found in that set would fit in the door. (crazy to think that essentially a 9" woofer can fit in a 991's door.) I bought both the amp and speakers from reputable ebay sellers. The amp was a display model that set me back $900 and the Speakers were $1500. Beyond that, I ended up dropping around $300 on various items on Amazon like sound deadening material, amp install kit, various connectors, a new soldering iron, heat gun and shrink wrap material. etc. All in at this point, I was in the ballpark of $2700.
Step 3: Dismantling the Car
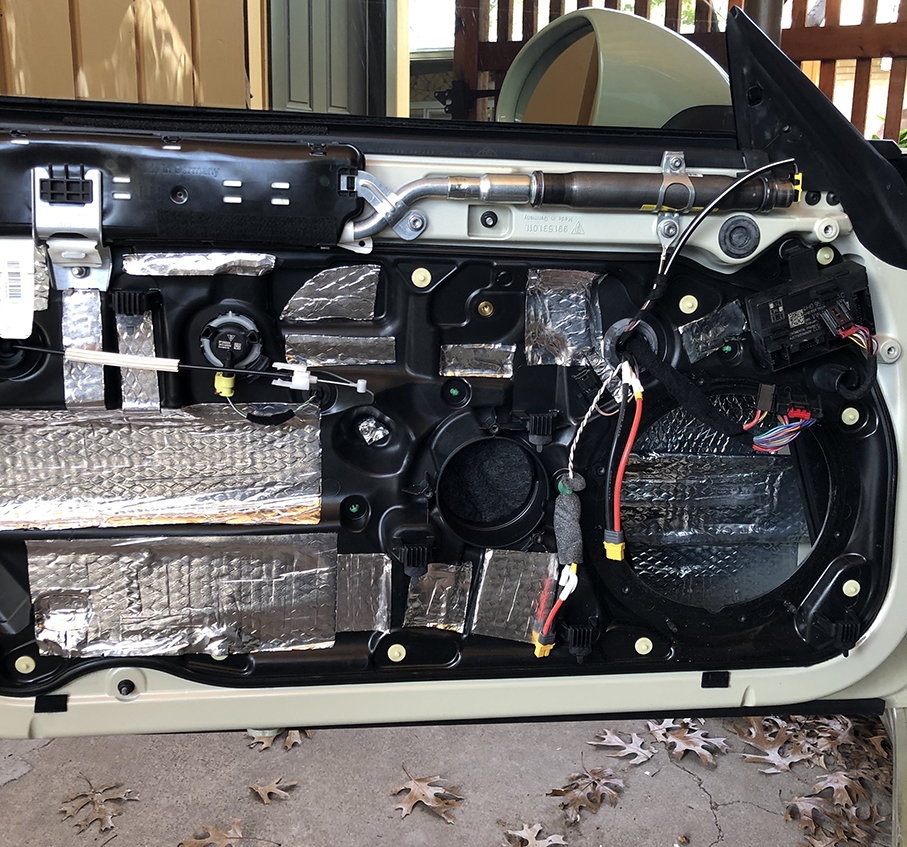
This step was surprisingly easy. There are plenty of guides out there about how to remove various pieces of your 911. For this project you need to remove three major things. 1) factory tweeters - this involves popping off a couple dash trim pieces with some basic trim pry tools and removing the side air vents so you can access the clips that hold the tweeter grills in place. This probably took 30-mins total. 2) Door panels. This one seemed scary at first, but it's amazing how easy it is. It's a few plastic cover pieces and a few screws and they just pull right off. Follow the various guides that are online so you know what plugs to unplug and where the screws are hidden. Total time probably 30mins. 3) passenger seat. This is just four bolts and the airbag wiring harness. Hardest part is contorting the seat out of the car without throwing out your back.
Step 4: Wire up the Speakers
I wanted to use quick connects for the speakers to make the install easier/cleaner. Busted out my new soldering iron and connected the quick connects to the new speakers and wrapped with my new fancy heat gun. In theory, doing this could save me some time if I ever decided I wanted to remove the new setup and put back in the old.
Step 5: Run Speaker Wire for New Tweeters
The only speaker wire you'll need to run is for the new tweeters. The factory small mid-ranges in the door and the tweeters are powered by a single output channel from small amp under the seat. For the new setup we want a discreet channel running to each speaker. I ran the speaker wire under/to the right side of the passenger foot well carpet. The passenger wire got fished behind the fuse box carpet in the footwell and up behind the glove box. I use a stiff piece of speaker wire to fish it up into the tweeter housing in the dash. The Drivers wire goes from the same area in the passenger's foot well, then behind the center console(there's basically an empty void behind there), then under the driver's carpet over to where the driver's side fuse box is and then straight up into the tweeter housing. This part took a bit of time to figure out. PRO TIP: take your time doing this to make sure the wire is secured and out of the way.
Step 6: Sound Deaden the Doors
Since I had the door panels off, I decided to put some sound deadening material in there. I didn't want to go crazy with the stuff as it does have some weight to it. I also didn't want to cause myself any fits trying to put the panel back on so I only put the material in places I knew wouldn't cause any fitment issues. I put a couple good size pieces on the inside of the outer door skin. I had to giggle when I saw the tiny little piece of sound deadening material that the factory put back in there. Hard to imagine it makes any difference at all. I know the material I put on there isn't the prettiest, but It sure is effective. The door doesn't resonate at all when you close it. It definitely closes with a more pronounced "thud". I also took the opportunity to put a little material on the inside of the door panel and also put felt tape around any wires or things that looked like they could rattle.
Step 7: Figure out how to Mount the Speakers
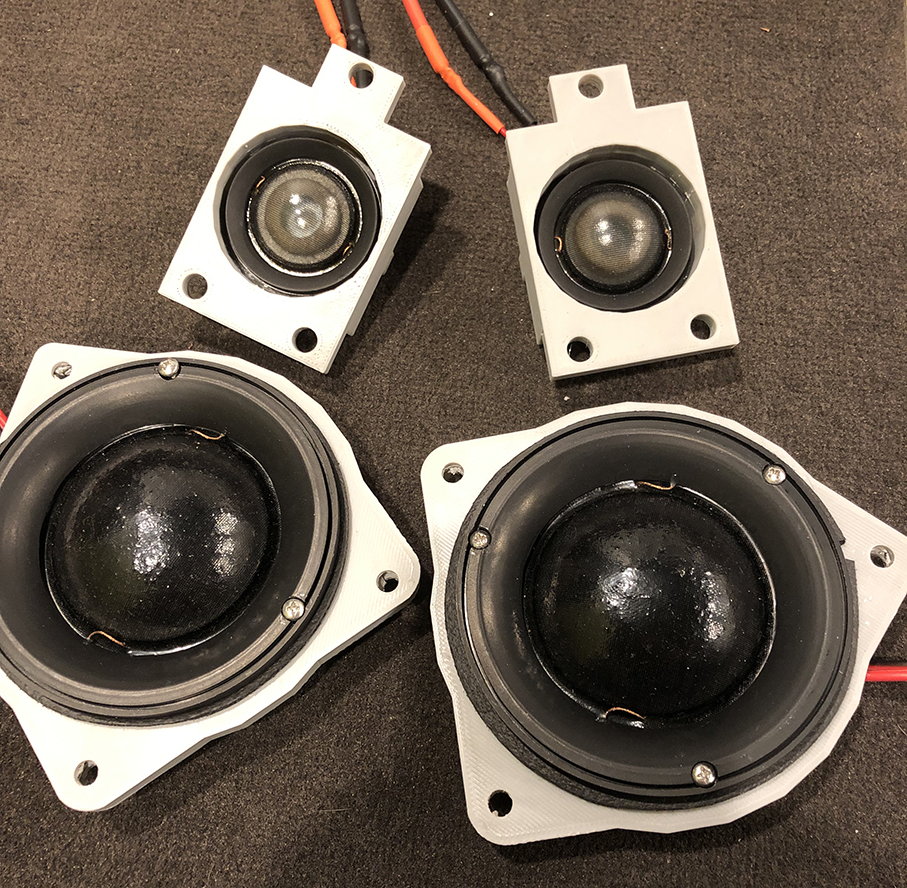
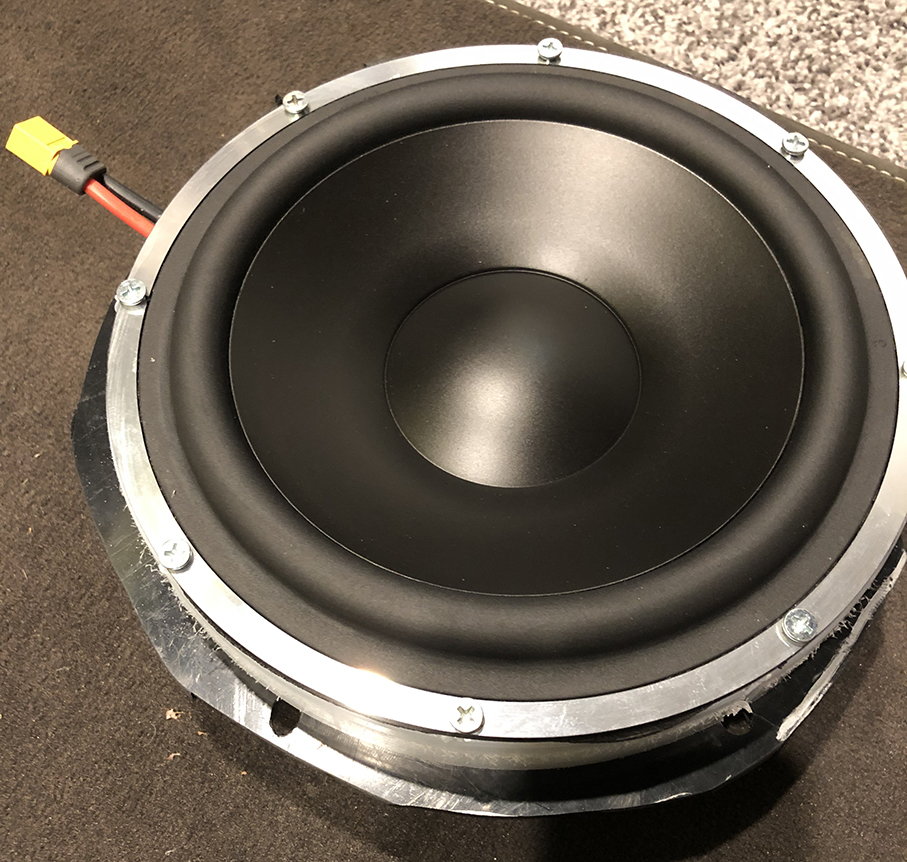
It's probably obvious that none of the speakers I got matched up with the mounting holes of the original speakers. The tweeters in the base audio package are actually mounted inside the speaker grills. There are mounting holes inside the dash for the Burmeister tweeters. You'll want to figure out a way of utilizing those. The mids in the door are pretty easy to deal with as you just need to make an adapter that fits your new speaker and has the same hole pattern as the old set. the trickiest one to deal with are the woofers in the door. That hole is huge, but it's not very deep. You can't make a simple adapter and just mount the woofers in there since the woofer would sit back to far and would block your window from sliding down. You need to make a spacer to push the woofer forward. (my target was to make a 1.25in spacer)
Being the nerd that I am, I ended up 3D modeling adapters for the mids and tweeters and 3D printing them out of ABS. I'm pretty proud of how the turned out and they worked great. The biggest pain in the butt I experienced in this whole project was making those spacers for the woofers. My 3D printer print bed wasn't big enough for me to print them. So, I tried cutting plastic spacers out of thick plastic. That failed miserably because my jigsaw blade kept bending during the cut making for a seriously out of whack circle. In a dream world I'd have a router table or something fancy to do this cut with. Unfortunately, I do not posses such manly things. I ended up having to go to a local plastic supply shop and had them cut the spacers out for me to the tune of $300!??! It's really frustrating when you have all the knowledge and ability to do something, but just lack the proper tool for the job. I'm sure I could have figured something out given time, but I was in a hurry. I took the original woofer out and traced it onto some ABS plastic and used my jigsaw to cut out the shape. Then I mounted my $300 plastic rings to them and finally mounted the woofers to the ring. I'm still disappointed with how terrible the spacers turned out. They work, but I've got higher standards.
Step 8: Mount and Wire Speakers
Once I was certain everything was going to fit, I went ahead and made note of what color wires were running to each location and used the below wiring diagram to verify which were positive and negative. All the speaker wires in the car a color coded and they all terminate at the wiring harness under the passenger's seat. I originally searched for OEM connectors for the new speakers so I could utilize the factory connectors on the speaker wires but I had no luck finding them (Musicar offers them with their package which is awesome) I ended up snipping the factory connectors and soldering on my own new ones. If I ever want to return to factory, I'll add the connectors to the OEM speakers so they'll just plug into me connectors. Mounting and connecting the speakers was easy and the end result I think turned out good. (except for those damn woofer spacers. Ugh.)
Step 9: Wiring the Amp
This part was surprisingly easy. Porsche was nice enough to include a power junction in the passenger's foot well. If you pull that carpet back you'll see a box with a large red wire coming out of it. This is the power location I used. I purchased a 4-gauge Oxygen Free Copper amp install kit that included an inline fuse. I connected my new power cable to the same terminal that the red wire was attached to and then ran the cable under the carpet along the left side (opposite side to the speaker wires to avoid potential interference. For the ground wire, there's a Porsche provided ground location under the passenger's seat I used that ground location.
For speaker wires and amp inputs I initially wanted to build a wiring harness that I could just plug into the factory one, but I had a tough time sourcing a proper harness. I ended up snipping the speaker wires and input wires and hard wiring them. Not the best solution, but good enough. It wouldn't be much effort to reconnect the factory wires.
My new setup is a left and right channel system only so the center and rear channels aren't used. There are Positive and Negative wires for each channel from the factory head unit along with a remote power on wire to tell the amp when to turn on and off. My new amp uses RCA connectors for inputs so I wired RCA connectors to the Left and Right channels of the factory wires along with a remote on wire from the amp to the PCM's remote on.
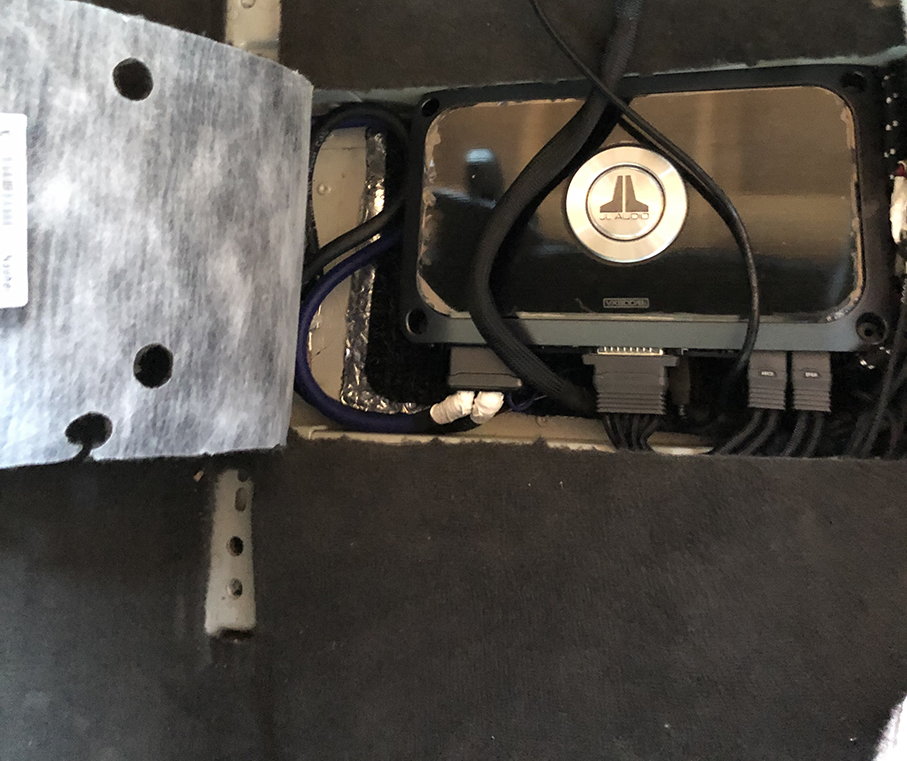
Step 10: Final setup and Moment of Truth
My new amp just barely fits. To be honest, I got luck here I didn't think ahead to see if the amp I bought would even fit. I would definitely advise that make sure your amp will actually fit in the the factory location before buying. :-) It took some experimentation to get the proper orientation of the amp. The passenger seat has a cross member that is very close to the floor of the car so you don't get much vertical space to house your amp. I connected up all the connections and went inside to tell my wife that I was going to turn it on for the first time. She yelled "I hope you don't blow anything up!". I went back out. Connected my battery and turned on the car. No sound, (which was good) but more importantly, no smell of anything burning. :-)
The amp uses a USB connection to connect to a laptop. There's a software program you run that basically steps you through the process of setting up the amp. You start off by telling it what type of speaker configuration you have. In my case, a 2-channel 3-way system with tweeters, mids and woofers. You then use a tape measure and enter in inches how far away from the driver's seating position each speaker is. Finally, you enter to the crossover points for each speaker. This is provided by the speaker manufacturer. It's basically telling the amp to send frequencies below a certain point to the woofer, above a certain point to the tweeters and between those two points to the mids. Once you create your program, you upload it to the amp. The amp defaults to being muted so you don't blow anything.
The moment of truth. I nervously clicked the un-mute button. And.... Music! After getting out of the car and doing a little victory dance, I used the PCM to make sure I was getting sound from both left and right channels. I then did a quick ear test to make sure each speaker was playing. closed the doors to the car, synced my phone and loaded up some Depeche Mode.
Oh. My. Gawd.
It's hard to put into words how good the new system sounds. The sound is warm and full. So much better than the factory setup. The most amazing part though is the bass. The bass is deep, clean and punchy. Seriously impressive. A buddy of mine asked where the sub was. There's no sub woofer. That's just the 9-in woofers in the doors. It's really crazy how good the bass is in this setup. I haven't done any fine tuning of the amp's EQ yet. I'm waiting to get used to it before messing with settings, If this is how it sounds with the EQ set "flat" I can't wait to see how it sounds after I tweak it.
Step 11: Clean up and enjoy.
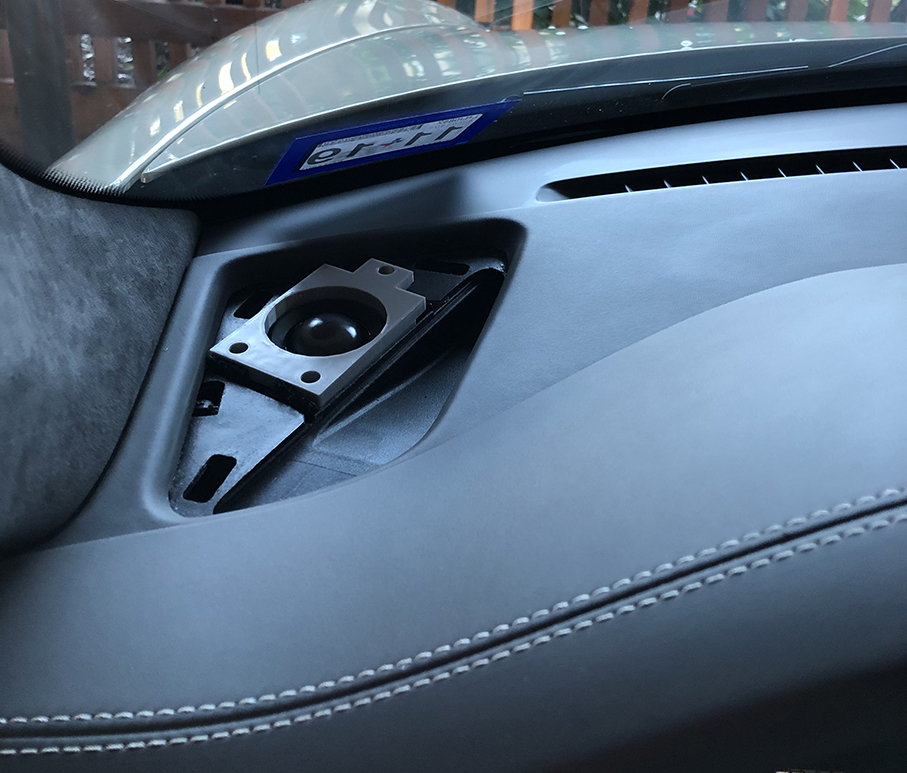
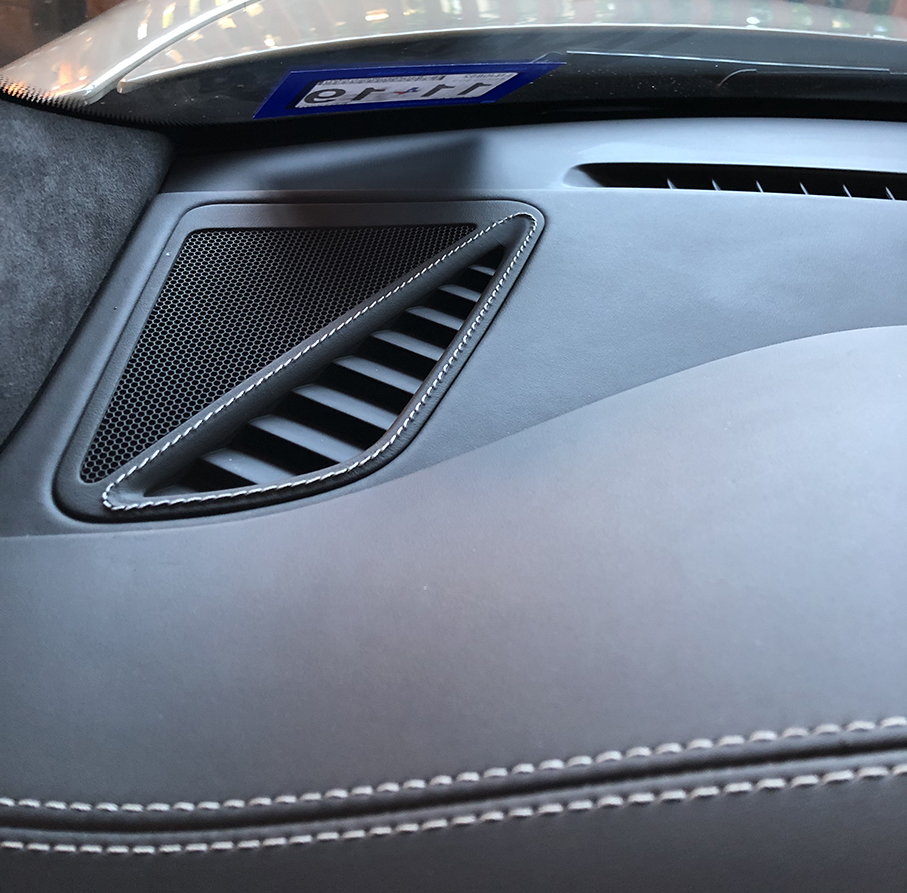
The original tweeter grills won't fit back in place. There were actually different grills used for the Burmester setup. You'll need a set of those. I had the fine folks at Exclusive Options make me a set in Leather to match the rest of the interior of my car. I put the seat back in, vacuumed things out and went out for a long drive.
Closing Thoughts
All in after the fiasco with the stupid woofer spacers and the custom tweeter grills, I'm sitting at about $3400 for the project. I completed it from start to finish over four days with five-seven hours a day. Was it worth it? Absolutely. It's a massive upgrade over what was in there originally. What would I do different? I'd probably spend more time trying to find a suitable harness to avoid cutting any wires. I plan on keeping my 50A for a long time, so it's not really a big deal for me though. Overall, it was a fun project to do and the results are pretty amazing.
Anyway, if anyone has any questions about my experience installing this stuff, feel free to ask.
Did you retain the center speaker? The Sub underneath the dash? Also, did you keep the rear speakers connected, disconnect or replace? THX Amazing work.
Amazing job! I wish mine had the base stereo, I'd do something similar. Too much trouble to change the Bose, but might have to do the Musicar tweeters some day
Amazing job! Wow. I can only imaging how good it sounds. On a side note, I can’t believe how good my Bose system sounds in these cars. Crisp and nice clean, deep bass
" I can�t believe how good my Bose system sounds in these cars. Crisp and nice clean, deep bass"
Say what??
Yes, I�m serious. The upgraded Bang Olufsen in my S5, is terrible and it has a subwoofer somewhere. It�s very clear, but no deep, smooth bass at all. The Q7 I have has a crappy system too. My Hellcat has a Harmon Kardon that is just cheap sounding. It actually has two 10� subs in the trunk, from factory, mounted where a spare tire would be. The bass is sloppy and too loud. The 911, when you turn it up just a bit, has a nice blend of everything. I do like it a lot.
Did you retain the center speaker? The Sub underneath the dash? Also, did you keep the rear speakers connected, disconnect or replace? THX Amazing work.
I disconnected the centers and rears. Both those speakers are just filler sound and don't bring a lot to the party. Like the Musicar system, I just went with 3-way components. Left and Right channel only. The amp does a really great job with the delay between each speaker and the sound really does sound like it's coming from the middle of the car.
Originally Posted by Joec500
Do you have a bose system in the car? What did you use to input the signal from the PCM to the amp?
No Bose system. Just the "base" audio package. I've read that it's harder to upgrade the bose system. Kinda funny that the worst system Porsche offers is the easiest to upgrade.
Originally Posted by flgfish
I think most installers would fabricate brackets and spacers out of MDF. I like the 3D printed ones, very slick. Good job!
I think you're right. A lot of lower-level installers would use MDF, but it's just not a good material in any area that could get wet. The high-end shops would use plastic (like the Musicar system)
Originally Posted by koala
Amazing job! I wish mine had the base stereo, I'd do something similar. Too much trouble to change the Bose, but might have to do the Musicar tweeters some day
I have no doubt that the Musicar tweeters would make a noticable improvement over stock. The Dynaudio tweeters they use are supposed to be really solid and those guys really know their stuff. Or, if you ever wanted, you could buy a set of morel mt250 tweeters (~$350) and I could just print you a set of the brackets I made. :-)
Musicar upgrade was night and day along with the center channel disconnect. Before doing that I was really exasperated with the Bose which gave me a headache no matter what I listened to.
Very cool write up—$3,400 well spent, I bet! I’ve had BOSE in other cars and I’m not at all impressed. BOSE does make it hard to modify the system, I know. I currently have B&O and BOSE in my other cars, and B&O system sounds better than the BOSE but not by a huge margin. I used to upgrade speakers, amp, and subs in the past but not feeling very motivated these days so I opted for the Burmester, which I’m thoroughly enjoying. Otherwise, I would have done exactly what you did. Good job!


 01-14-2019 | 05:30 PM