When you click on links to various merchants on this site and make a purchase, this can result in this site earning a commission. Affiliate programs and affiliations include, but are not limited to, the eBay Partner Network.
Following up on my prior post: Here is what the tucked-cord approach looked like along my driver's side pillar when I hardwired to the driver's side. This was the previous approach before going to the trouble to pop off the pillar cover. I'd assume you'd do the same on the passenger side unless someone has devised a more clever approach to get the cord down the A-pillar without popping it off. The way shown here is pretty subtle.
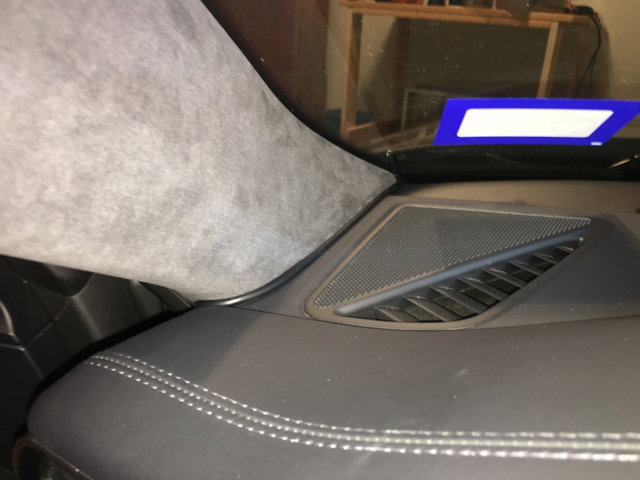
Instead of routing the wire down the windshield side of the A pillar and then across the dash edge, route the wire inside the top edge of the A pillar and then tuck the wire behind the door weather stripping all the way down to the fuse box or passenger side socket. This way don't have to take off the A pillar -- you only have to pry the top edge of the A pillar out far enough to tuck in the wire.
Instead of routing the wire down the windshield side of the A pillar and then across the dash edge, route the wire inside the top edge of the A pillar and then tuck the wire behind the door weather stripping all the way down to the fuse box or passenger side socket. This way don't have to take off the A pillar -- you only have to pry the top edge of the A pillar out far enough to tuck in the wire.
+1. This is what I did and works great. No need to remove anything.
In any case @StormRune you can still press down the wire that you show in the picture and it will go down enough to just disappear.
Instead of routing the wire down the windshield side of the A pillar and then across the dash edge, route the wire inside the top edge of the A pillar and then tuck the wire behind the door weather stripping all the way down to the fuse box or passenger side socket. This way don't have to take off the A pillar -- you only have to pry the top edge of the A pillar out far enough to tuck in the wire.
That's how I did the one in my F150 so that certainly makes sense. Popping the A-pillar was pretty easy too but it is certainly safer that way... and easier to remove on sale or camera change later. Thanks!
Originally Posted by alex_c
+1. This is what I did and works great. No need to remove anything.
In any case @StormRune you can still press down the wire that you show in the picture and it will go down enough to just disappear.
Yeah, I tried, but in that car the fit between the pillar and the leather dash was so tight I stopped trying in fear of damaging the leather either getting it in or when pulling it back out later.
Okay, mine arrived today and I installed it! First ever dash cam for me. Install took about 30 minutes but I probably spent some of that going back and forth trying to figure out where to put the front camera. Below the mirror felt a little low to me (and partially blocked my vision) so I wound up putting it to the right of the mirror, right below my EZPass. All the wires are completely hidden!
Thank you all so much for the install advice!
I also ordered the Blackvue Power Magic Battery Pack - arrives tomorrow and I will probably put that in on Sunday.
I also ordered the Blackvue Power Magic Battery Pack - arrives tomorrow and I will probably put that in on Sunday.
Got mine today and installed it this afternoon. Put it in the cavity under the carpet below the passenger seat. It fit, barely. The drivers side cavity was already occupied with the guts of the Escort Max Ci 360 and ALPriority systems. Battery works great, just wish there was an app solution to turn it off when not needed. Didn�t want to put it in the glove box, so the passenger side cavity was the only free space left in the car. You can do the installation without removing the seat from the car, although you have to unbolt it from the floor.
Edit: I installed the newer B-124 battery pack, not the Power Magic B-112. The 112 is taller than the 124 and likely would be too tall for the under-the-seat cavity.
Okay, mine arrived today and I installed it! First ever dash cam for me. Install took about 30 minutes but I probably spent some of that going back and forth trying to figure out where to put the front camera. Below the mirror felt a little low to me (and partially blocked my vision) so I wound up putting it to the right of the mirror, right below my EZPass. All the wires are completely hidden!
Thank you all so much for the install advice!
I also ordered the Blackvue Power Magic Battery Pack - arrives tomorrow and I will probably put that in on Sunday.
Congrats on the new camera! I am extremely pleased so far with its performance. I'm sure you will too.
Originally Posted by flickroll
Got mine today and installed it this afternoon. Put it in the cavity under the carpet below the passenger seat. It fit, barely. The drivers side cavity was already occupied with the guts of the Escort Max Ci 360 and ALPriority systems. Battery works great, just wish there was an app solution to turn it off when not needed. Didn’t want to put it in the glove box, so the passenger side cavity was the only free space left in the car. You can do the installation without removing the seat from the car, although you have to unbolt it from the floor.
Edit: I installed the newer B-124 battery pack, not the Power Magic B-112. The 112 is taller than the 124 and likely would be too tall for the under-the-seat cavity.
Cool! I will install the hard-wire kit this weekend, as I haven't had the time to do it so far, only using the 12V outlet.
BTW, today I had an unexpected incident on the road, when I saw a wooden bench right in the middle of my lane! I am glad I had the camera as it captured the whole incident, and I was able to replay the event, and realize how incredibly the "T" performed in that situation.
Okay, mine arrived today and I installed it! First ever dash cam for me. Install took about 30 minutes but I probably spent some of that going back and forth trying to figure out where to put the front camera. Below the mirror felt a little low to me (and partially blocked my vision) so I wound up putting it to the right of the mirror, right below my EZPass. All the wires are completely hidden!
I bought the Blendmount for my 900, but like you didn�t like the look of the camera down so low. I live in a non EZPass area so the GTS does not have a transponder, so I mounted the camera just below the headliner, and to the right of the rear view mirror plastic housing, just enough to the right to allow me to remove the camera from the mount. Works well there and I like the look a lot better than with the Blendmount.
BTW, today I had an unexpected incident on the road, when I saw a wooden bench right in the middle of my lane! I am glad I had the camera as it captured the whole incident, and I was able to replay the event, and realize how incredibly the "T" performed in that situation.
I have bought 3 of the Blackvue 900’s, one for each of our cars. This was after my wife was involved in an accident that could have been fatal, and my daily driver which she was driving was totaled. She was very lucky and walked away with ‘only’ a cracked sternum and lots of bruises and scrapes. The guy who caused the accident changed his tune when the SP showed up and neither driver was ticketed. If my vehicle had a dash cam we would have had proof of fault. As it is now each insurance company is handling their share of the accident claims, although my insurance company is going after the other one based on my wife’s statement and photographic evidence of the accident sequence. The SP Trooper that worked the accident was a total and complete bonehead.
Thanks Alex for all that useful information. It was most helpful. I'm just getting into DashCams, so please forgive my uninformed questions.
I intend to use the DashCam on both the Road and the Track. I am an HPDE Track Instructor and would like to conveniently download the
Video which I just recorded to my iPhone 6 to share it with Students to point out possible errors they or others may have made on the
previous Track Session.
Any advice you can give me on which features DashCam Cameras would require to make that simple and easy would be most appreciated.
I also notice the new 4K H.265 Compression availability. How is the Video Compression Selected and installed by the user?
Or is this pre-installed in the Camera chosen by the owner?
Thank you for your comments!
Downloading the video(s) to your phone is quite easy, as the cam has a built in WiFi that your phone can connect to, and download the videos. From there you can send them like any other video. Or you can remove de SD card and do it from your computer.
The compression is set automatically, and most devices will recognize the new format with no problems, unless you are using an old OS.
I have the BlackVue 750 and the one thing that drives me nuts is that downloading over WiFi of videos from it is extremely slow. I can patch in on live view easily, but trying and grab a video and it takes half an hour for a 1 minute video. I don't understand why that is. It is the one thing that drives me nuts. Otherwise, I love the unit.
I also find it interesting that I can swap out the 750 with the new one and don't have to rewire everything. Thanks for that info. Will probably upgrade at some point and this makes it that much easier to do.
-TJ
That's curious, I use it with the 650 and it's fast, 30 mins for a 1 min video doesn't sound right, did you talk to Blackvue?

 05-30-2018, 10:05 AM