When you click on links to various merchants on this site and make a purchase, this can result in this site earning a commission. Affiliate programs and affiliations include, but are not limited to, the eBay Partner Network.
Another amazing 964 thread, I am truly impressed with the level of detail and passion that is going into your restoration. I am embarking on my own 964 rebuild / modification journey, however not to your extent right now but one day it will get stripped to the tub. I was about to order some Paul Mason fuel lines but now you have me thinking about rebuilding my lines. It’s an excuse to buy a Koul new tool and I like the fact that the original fittings can be reused and replated. From what I have gleaned the engine lines can be done with the Koul tool but the lines up front will need new crimp rings and a shop to crimp. Do you happen to remember how many meters you purchased to cover all rubber hose replacement? I have the engine lines exposed but wondering how much to also do the front. One last question did you buy the crimp rings (are they called cut rings?) from Cohpro, do you happen to remember the part number and quantity? 🙏
Subscribed and looking forward to the next installment
Thanks for the kind words, I only know one way to do things, tear everything apart and go through it all piece by piece. Just more fun that way.
Yes you are correct, the polyamide engine lines I re used all of the factory hardware once re plated.
The lines front to rear require new hose and ferrules all available from Cohpro. From memory I got 2M of 6255-Cohline-3124 polyamide for the engine lines and 2M of Cohline 2240 for the soft lines on the front to rear pipes.
The ferrules I cannot remember but know I bought 8 of them, Cohline were very helpful in recommending which ones to buy to suit that 2240 hose.
My neighbor has a crimping machine so I was able to do them one at a time using the old ones as guides / samples but any hydraulic hose shop can crimp them for you.
I would reccommend an external spring on the hose from the pump to hard line to help maintain shape as its a very tight bend.
Much appreciated, I will reach out to them and get an order placed. 🙏
Originally Posted by racoguy
Thanks for the kind words, I only know one way to do things, tear everything apart and go through it all piece by piece. Just more fun that way.
Yes you are correct, the polyamide engine lines I re used all of the factory hardware once re plated.
The lines front to rear require new hose and ferrules all available from Cohpro. From memory I got 2M of 6255-Cohline-3124 polyamide for the engine lines and 2M of Cohline 2240 for the soft lines on the front to rear pipes.
The ferrules I cannot remember but know I bought 8 of them, Cohline were very helpful in recommending which ones to buy to suit that 2240 hose.
My neighbor has a crimping machine so I was able to do them one at a time using the old ones as guides / samples but any hydraulic hose shop can crimp them for you.
I would reccommend an external spring on the hose from the pump to hard line to help maintain shape as its a very tight bend.
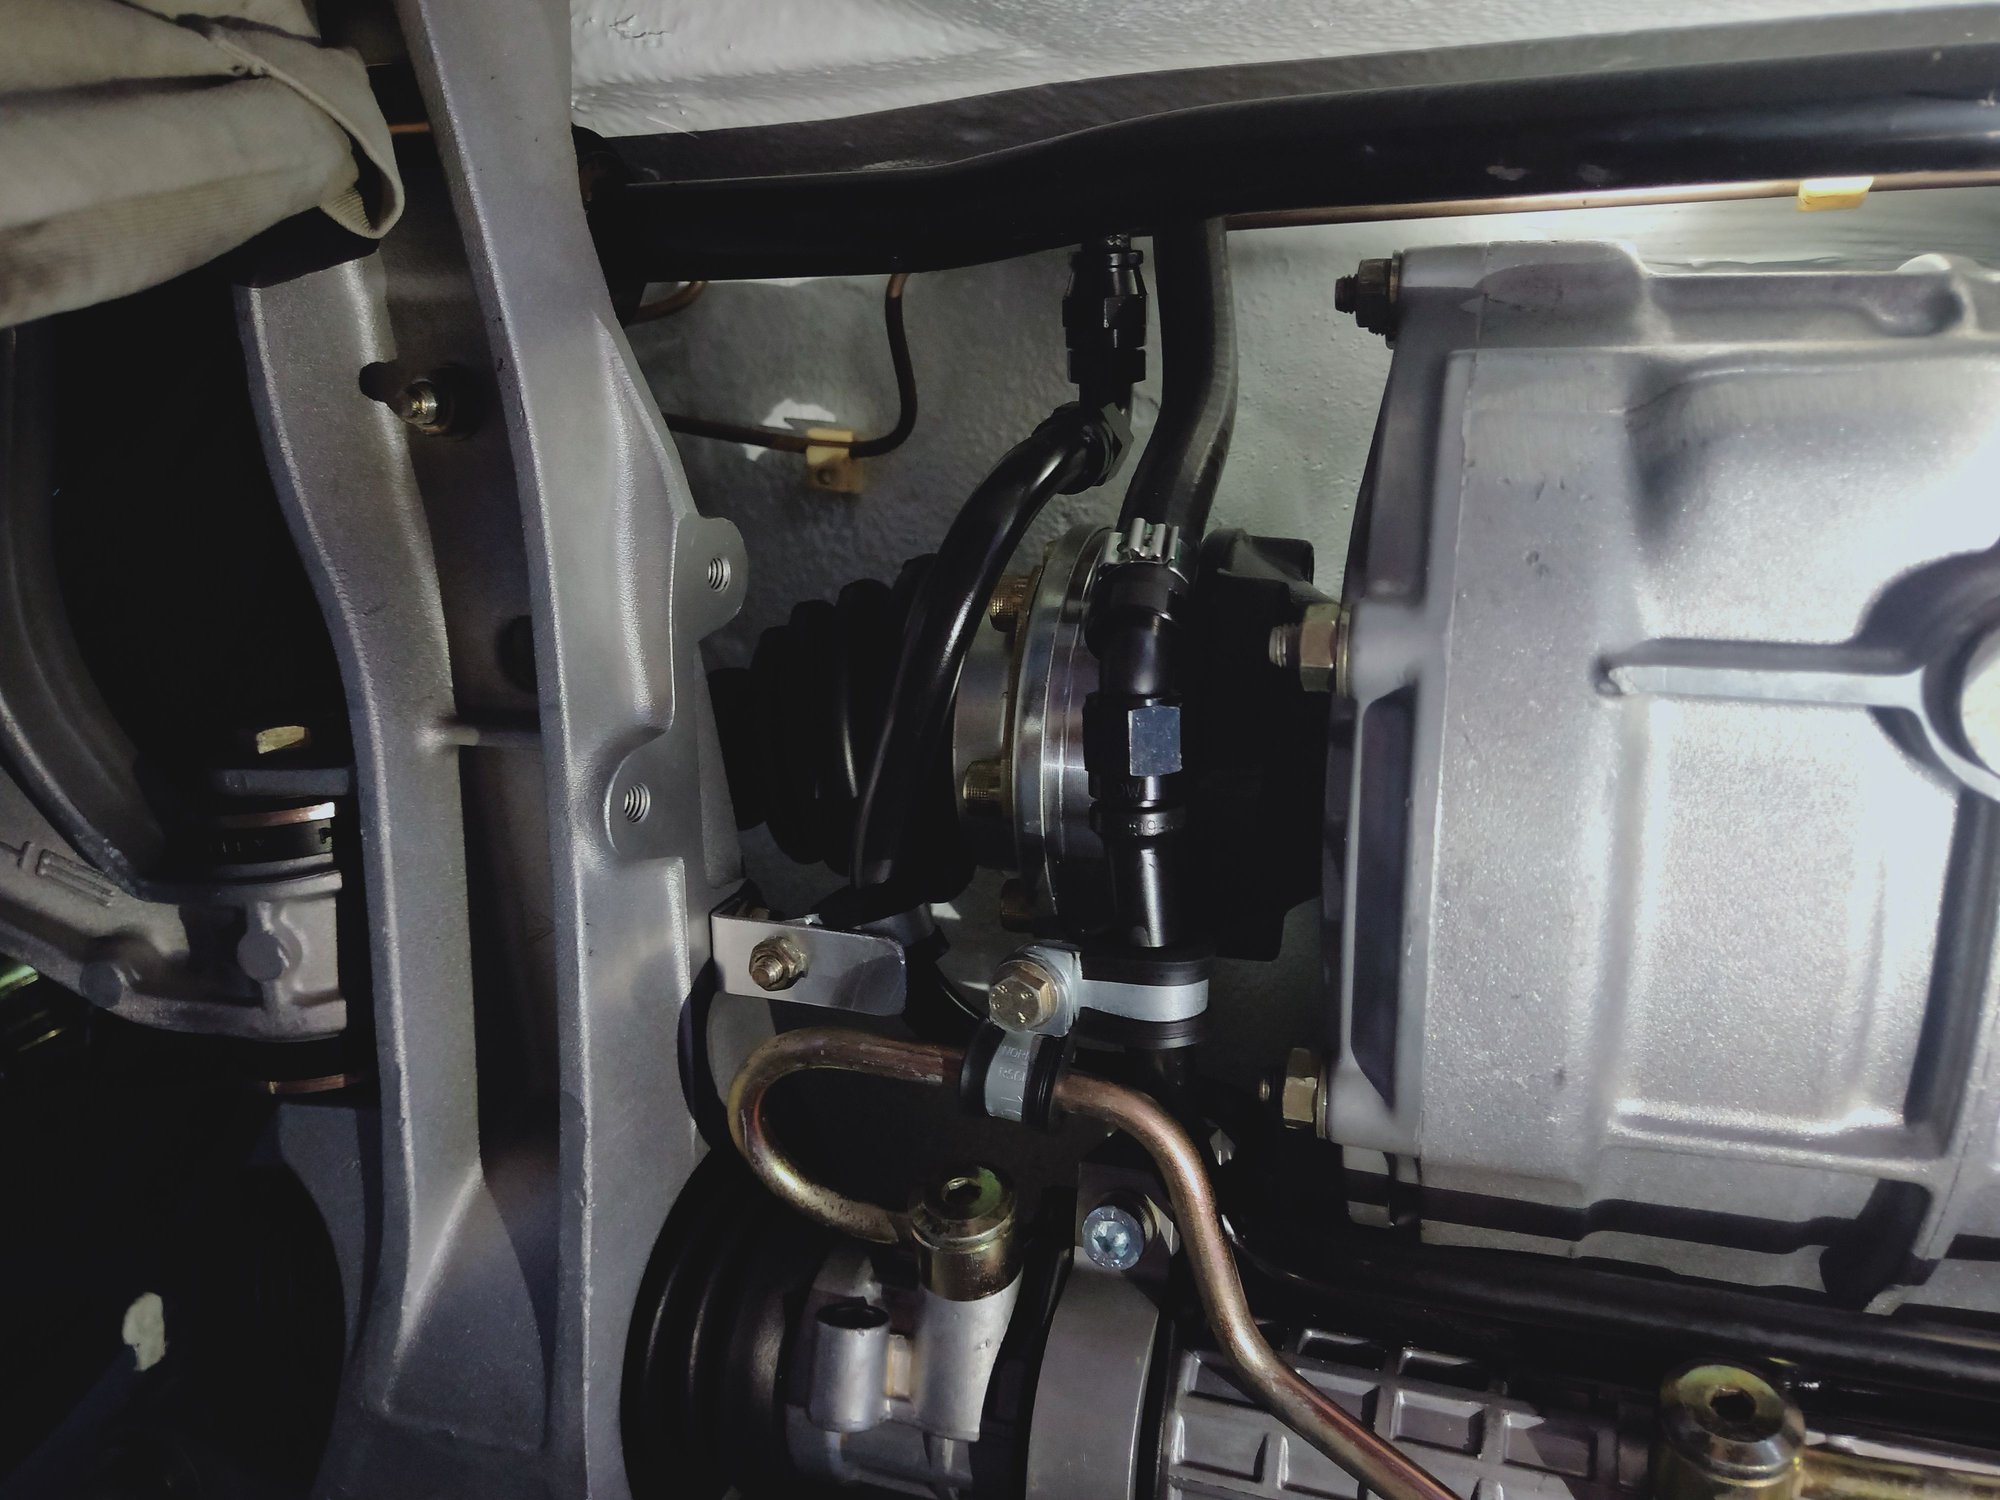
Power steering solution time, the leaky power robbing power steering pump on the engine is gone along with all of its hoses, pipes and brackets. Should clean up the engine bay nicely with all of that gone. Originally I'd sourced a Mercedes A class electric pump for this car but then when I built the MK2 Golf I installed an Opel Zafira TRW pump in that which is load sensing and gives a really nicely weighted feel. Rather than reinvent the wheel with something new that I may not end up liking I decided to get another TRW pump for the 964. Porsche themselves used this very pump in the 997 Cup cars so its often referred to as a 997 Cup pump. Mounting it in the front keeps the lines very short and the battery is right there for power, only thing I didn't want to do was drill and holes on the car to mount it. Using the TRW bracket I set about modifying that to suit my needs. Once I had my first mounting point sorted I was away. Using an existing hole in a support bracket it gave the pump a home, now to make a support arm for the other side and then I'll use a rubber block to support the base to the floor but it is actually sturdy enough without it. There's a large rubber plug in the front bulkhead behind the pump for RHD cars that is unused on this car for which I'll make a connection block to run the lines through to the power rack. Some other bits being worked on as well, a friend of a friend does carbon skinning so I've given him a bunch of interior parts to get on with. The door tops, rear 1/4 tops and top dash vent. These will all be covered with a single layer of carbon fiber, epoxied and sanded to a smooth finish then clear coated and polished. Here they are after their initial carbon layer application. There will be more parts I get done but don't want carbon everywhere so I'll need to complete more of the interior before those decisions are made.
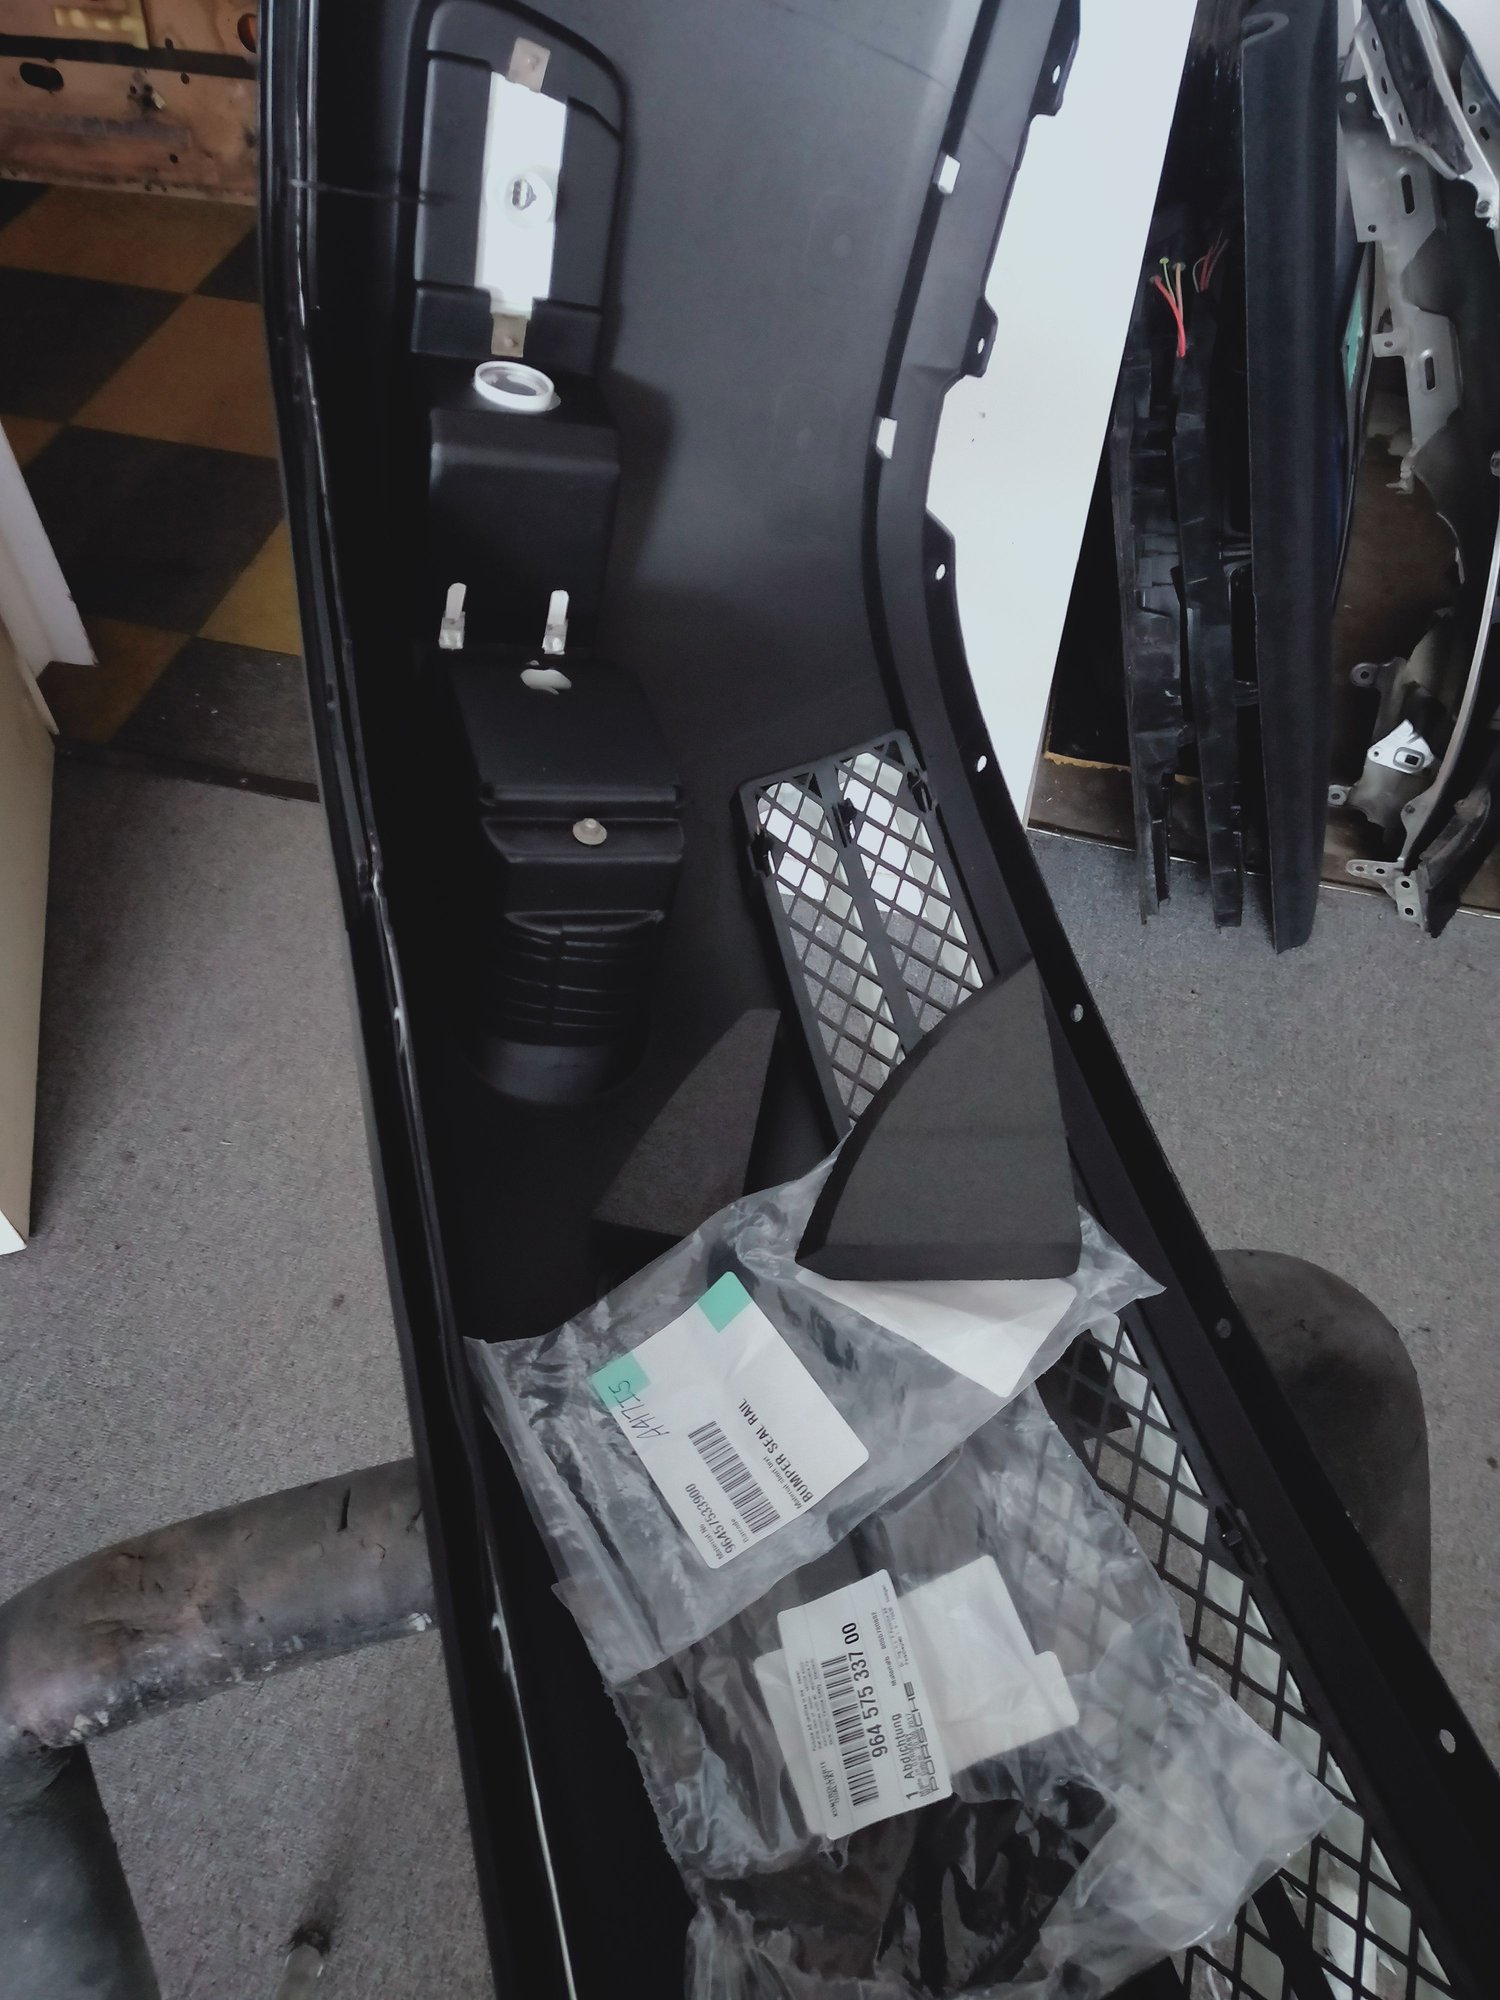
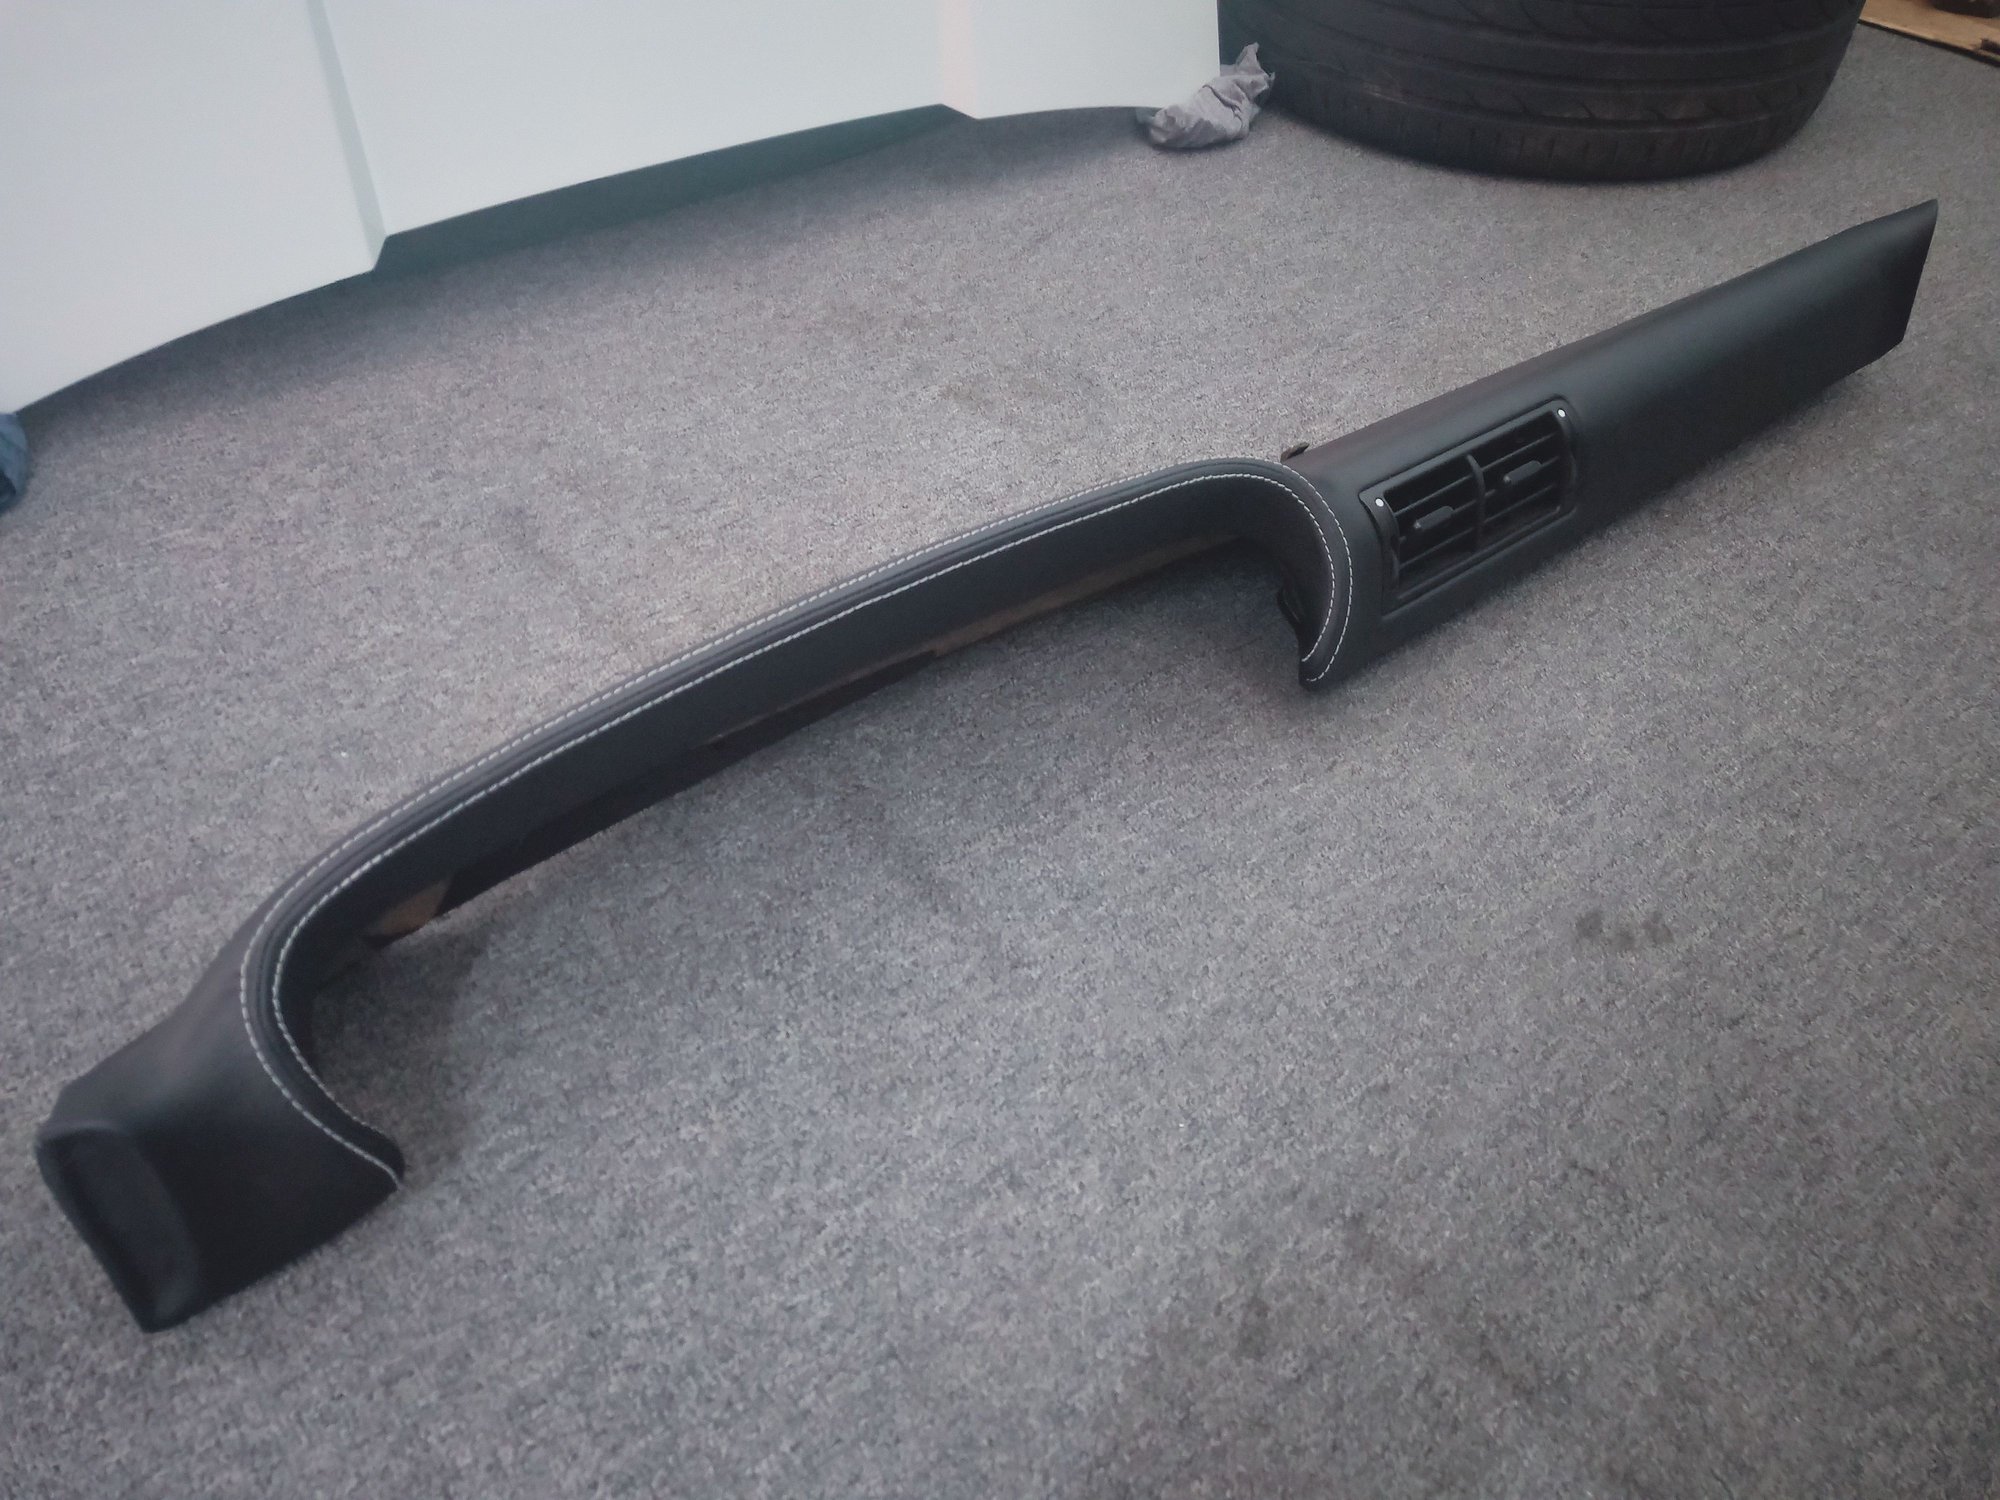
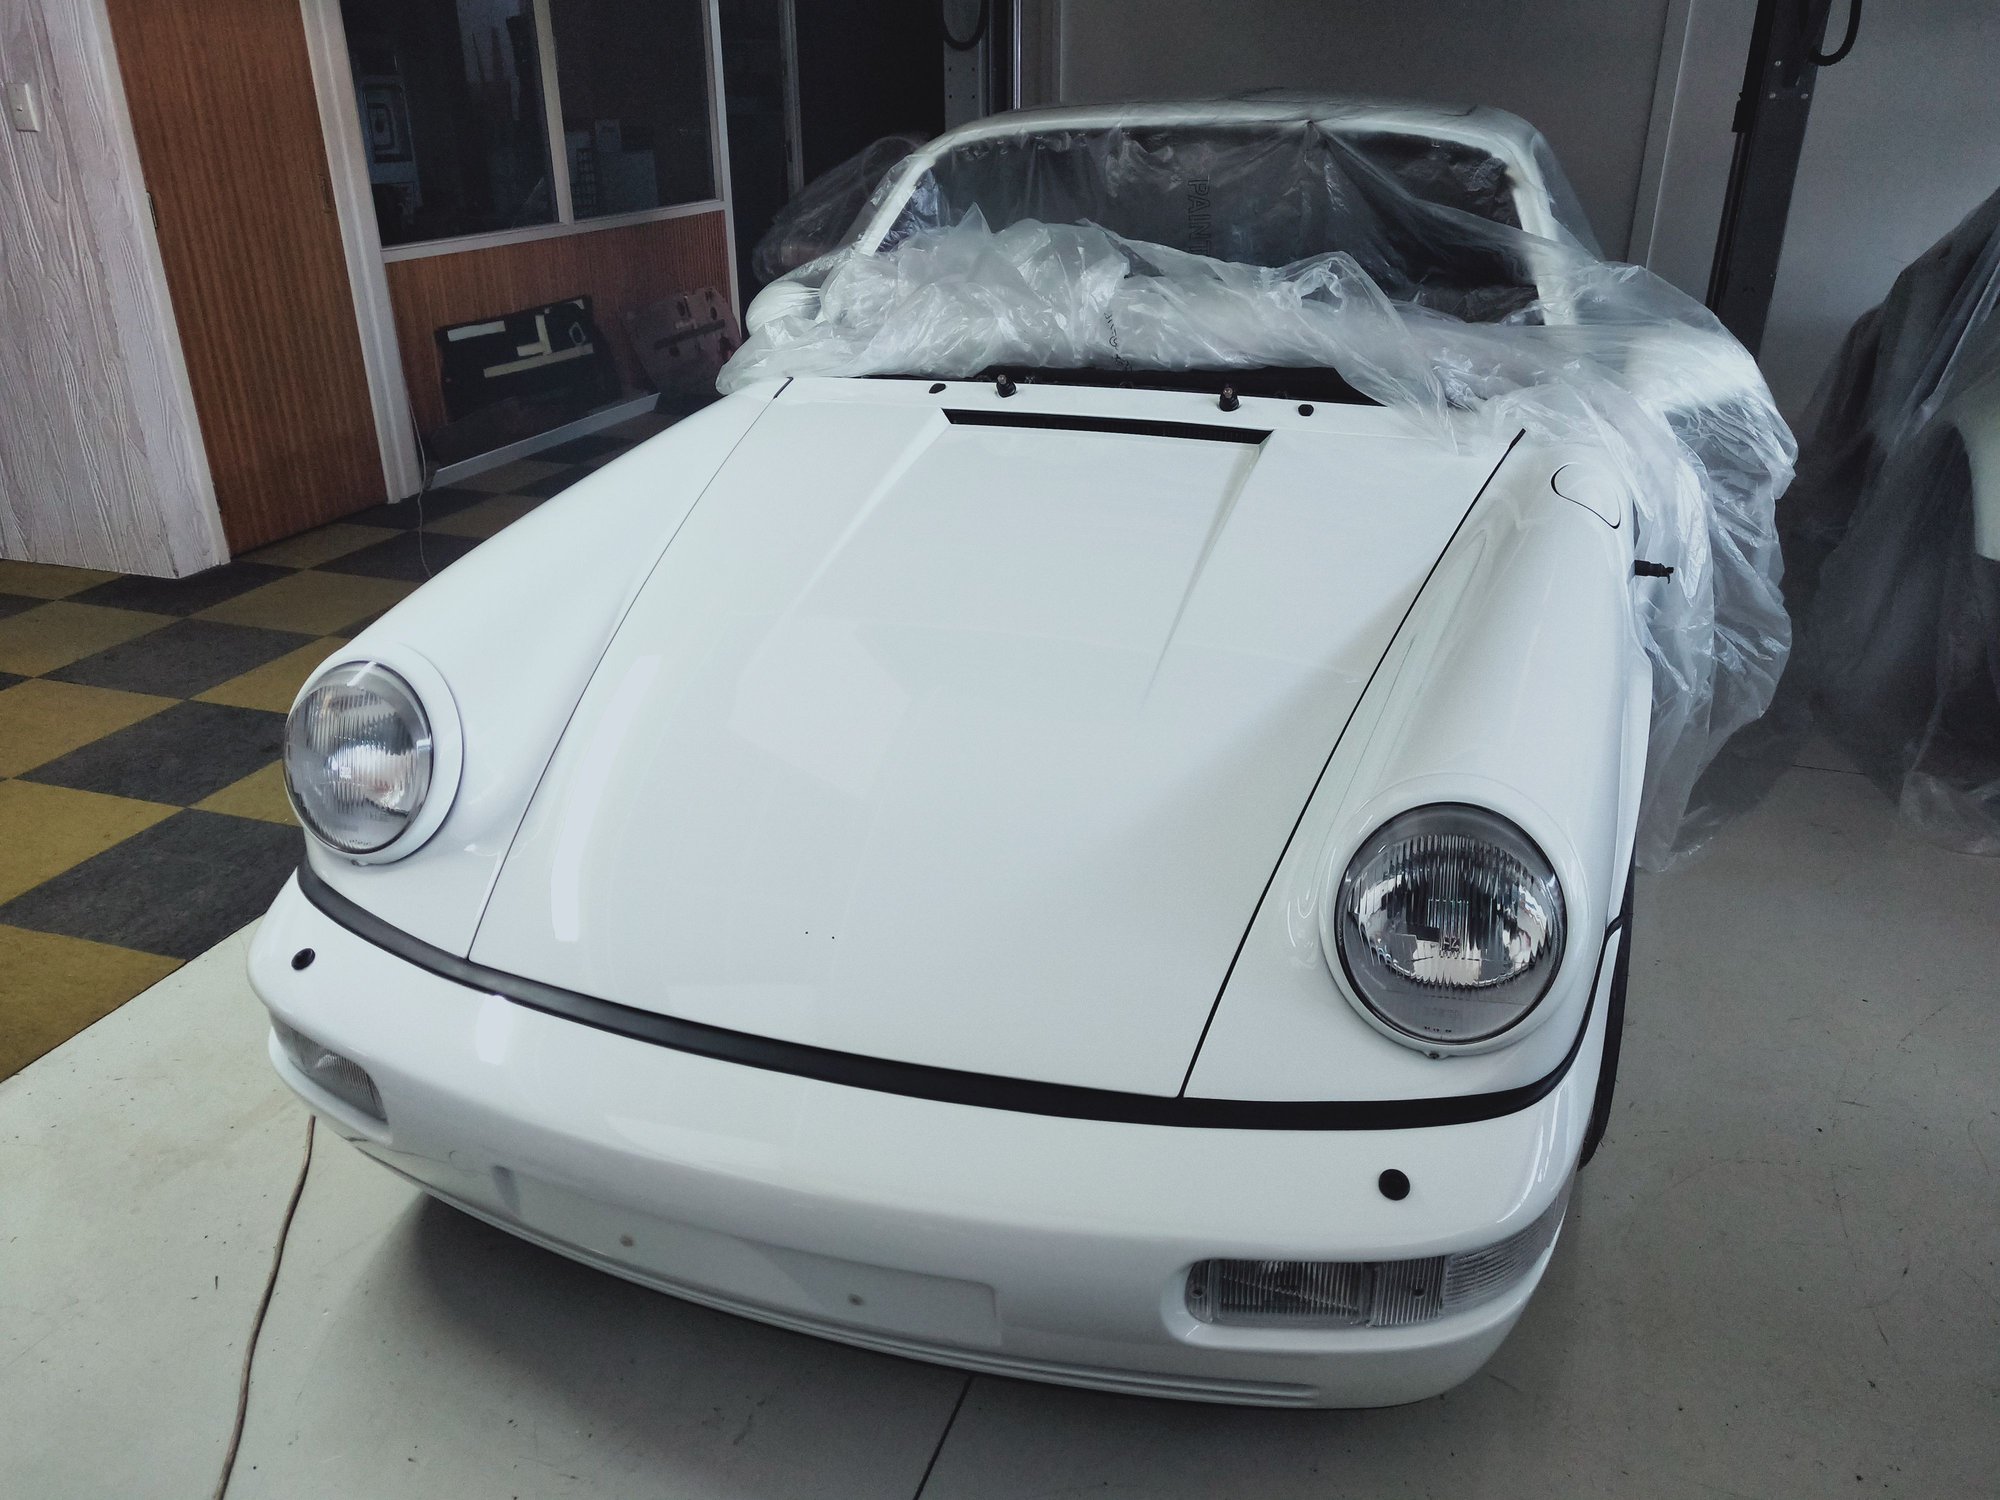
When the car was painted the guys went an extra step and painted the insides of the bumper and side skirts satin black, nicely finishes the inside and especially the front bumper is no longer red. New foam from Porsche to help guide air in to the oil cooler, not sure how much this really achieves but according to PET they are supposed to be there. Washer nozzles on and hoses attached I'm ready to slap this bumper on, only as it turns out it wasn't that easy. Messed with it for most of the morning having it off and on a bunch of times. The washer valve for the headlights was jamming between the bumper and bumper support panel causing it to pinch there not allowing the bumper to slip on all the way. Readjusted the valve orientation and hoses it all went together flawlessly. Great to finally see the bumper and front lights completed after all this time. In my ownership I've never seen this car with a stock front bumper on it. The vision in my head for this car is finally starting to come to life, got a call from Ian Goodwin Car Upholstery to say my dash was ready, that's been a project in itself but as usual he's done a phenomenal job. Black leather with a white French seam around the binnacle and we did a separate metal top plate covered in alcantara that is fastened to the dash with studs through. This way there's no chance of the leather pulling away on top of the dash due to how much stretch is required. I always wanted a contrasting material on top anyway and now matches the headliner as well. Add to that the carbon vent when completed it will look pretty ace, can't wait. Naturally I dropped everything else to get this puppy in the car, been looking at a bare metal dash for far too long. A simple process of one nut and 4 screws it fits like a glove. Job extremely well executed, thanks Ian! He did say he's never doing another one...... Last job was to take the center vent apart, clean it and replace all of the crumbled foam on the flaps. A simple enough process on these older cars where you can still actually take stuff apart. New foam cut from 3mm EVA and reassembled, new foam strip where it meets the vent in the dash completing yet another small job.
With the electric pump mounted the next job is to make the hoses, I knew this would be awkward where the car was parked on jack stands. I really did make my life difficult here. Started out using as much of the factory lines as possible and cutting off the rest, there's a large rubber plug on the RH side going in to the front tub that I wanted to use as I didn't want to drill any holes to run the lines. Off to the parts store for an initial lot of fittings and hose to then try and come up with something tidy, getting up off the floor for every single thing got pretty annoying not to mention wriggling your way back under the car between the jack stands only to realize you've forgotten something to have to repeat that process again. The difficulty was mainly with welding the fittings and pipes, I'd have to mark where they go, take them off the car, go to the bench, tack them, back to the car and re fit to check they are ok. Then take them off again, fully weld and install again to be able to do the next step. Repeat this process 10-15 times it adds up to taking an awful long time. Another couple trips to the parts store for more bits and pieces, you always need more than you think! Lines are super short, run through the rubber plug and just wiring the pump left to do. While the front end was up in the air I decided I'd fit the front H&R springs as well, pretty quick and easy on the LH one but also still needed to test fit the wheels I made on the front. Rears have had tires on them and mounted on the car, they fit fine but the front wheels I only made recently and worked out to 17x9 and added complication by having big red 993TT calipers up front. So, to test I removed the strut, off with the stock spring and re fitted the strut with no spring, mounted rotor, caliper, spacer, wheel and then use a jack to lift the wheel up in to the arch. Brakes do not clear the wheels unless I run a wider spacer but that then means the wheels become too wide. I can't really be bothered messing about with it further so I'm just going to buy another pair of stock calipers. My original calipers I used on another car.......... Removed the strut and fitted the new spring, with that reinstalled took the big caliper and rotor off swapping it out for a stock rotor and re mounted the wheel with a 15mm spacer I had laying around. Good clearance to the spring and I can probably bring the wheel in a little more, 5mm or so as the stock calipers are nowhere near as wide as the 993 ones. Plan now is to sell my 993TT set and find another pair of stock 964 front ones. At least now I can carry on detailing and finishing the wheels.
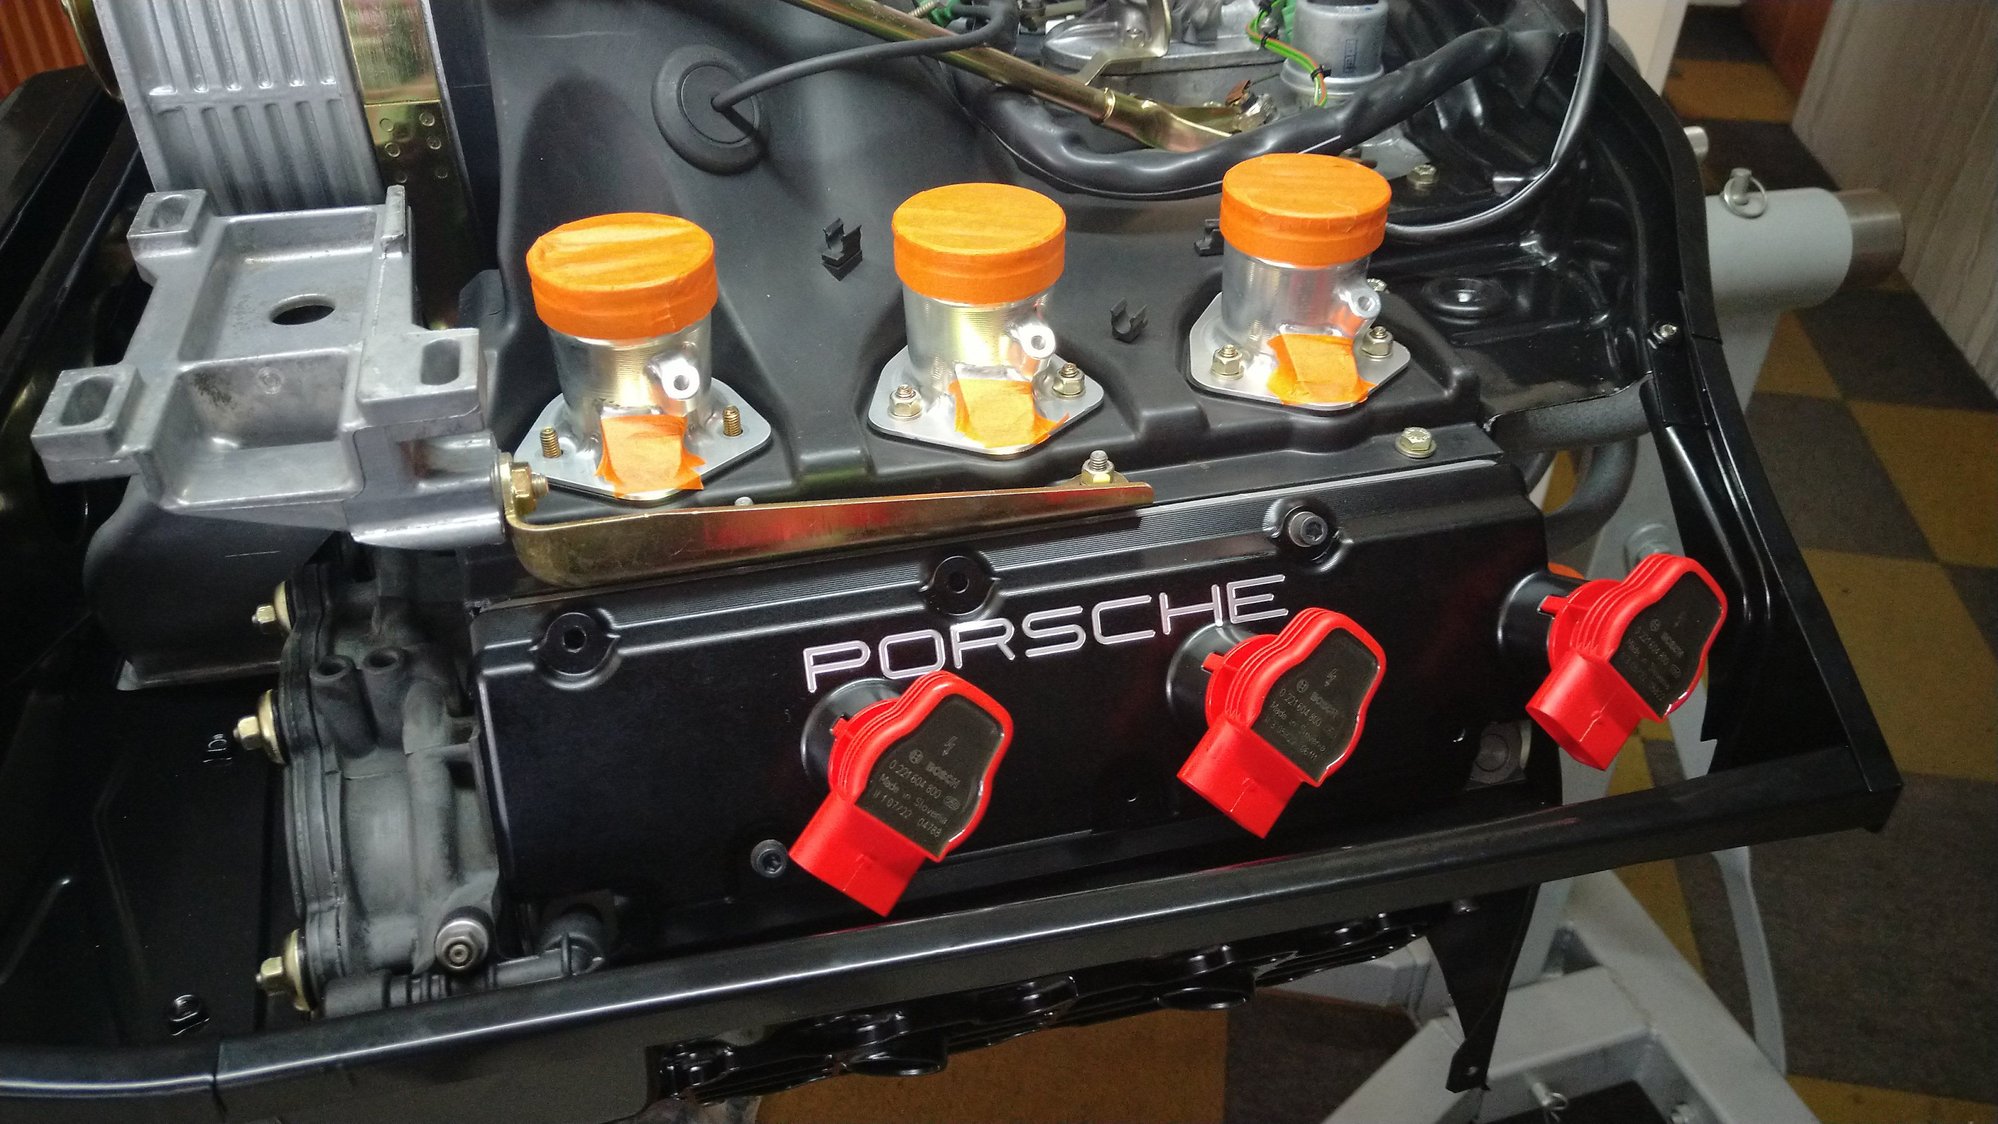
Bonnet time, another piece sitting around is better off being back where it belongs. Pretty much done with the front end for the time being so there won't be a need for much opening and closing of the bonnet to work in this area thus risking damage to it. Had my neighbour, a fellow car enthusiast give me a hand to lift it on. Funny thing is when you have someone that is in to restoring cars help you, there's no real need to say anything as they already know what to do and think alike. I'd drilled 2mm guide holes from hinges to body to set the height when everything was pre paint so it was just a matter now of adjusting the bonnet itself to ensure even gaps down the sides etc. Set the latch and also decided to install an emergency cable in case the hood release ever breaks, no easy way to get it open if that happens so its best to have a back up plan. Decided some time ago I'd do yellow seat belts and probably a couple of other yellow accents on the interior to tie them all together. I've kept the original black belts in case it doesn't work and want to change back but so far I like it. New belt webbing measured out the same as the original and had a seat belt specialist sew them up the correct way. New webbing instantly transforms how well the belts retract, huge difference. Lastly a bit more work on the engine, wanted to install the valve covers but ran in to a small issue. The supplied replacement studs are not quite long enough so I will be getting 5mm longer ones to complete this task. The covers themselves are a work of art, 100% made in house in NZ by David Gouk Race engines, engraved with the logo and anodized black. Of course he designed these to work with the Audi R8 coil on plug coil packs we will be running on this engine. No distributor and leads to mess up the look of the engine bay, clean and simple. Added to that I also test fitted the intake runners from Island Works Sweden to be able to adapt the 996 GT3 intake plenum going on as well. This allowed me to make the needed spacers for the fuel rails and finish off the fuel hoses to and from the fuel rails. Once the correct length studs come in I'll take all this apart again to finish it off permanently but so far everything seems to work out great.
Restoring a car to this level everything you pick up to put back on seems to look old and worn out as is the case with the key but thankfully there's not much that isn't still available new from Porsche. New key head with light ordered and installed, add it to the ever growing total but needs must. Looking forward to the day I can turn this key and hear this thing start again, the EV world we are headed for will be dull and boring. Last major dash piece to be done is the knee pad, 3 piece somehow needs to become one. I don't smoke and don't carry around junk in my ash tray so this needs to go away for a cleaner more seamless look. Started out by putting a metal rod through the foam ash tray cover and inserting this in to each end of the knee pads, then tying it all together with a metal strip to give it some structure. Two part foam mixed up and poured in, one of a couple pours to get the shape I needed and to fill all the gaps. I cut the vinyl off the ends of the knee pads to help the foam adhere to the existing substrate. Once happy with the shape it was still a little wavy and the vinyl on the knee pads doesn't lend itself well to sanding flat so I glued on a 3mm foam layer that is able to be sanded with a block. This worked extremely well and came out ace, nice and straight ready for the alcantara to go on. Will have white French seams on the ends where the pad meets the doors.
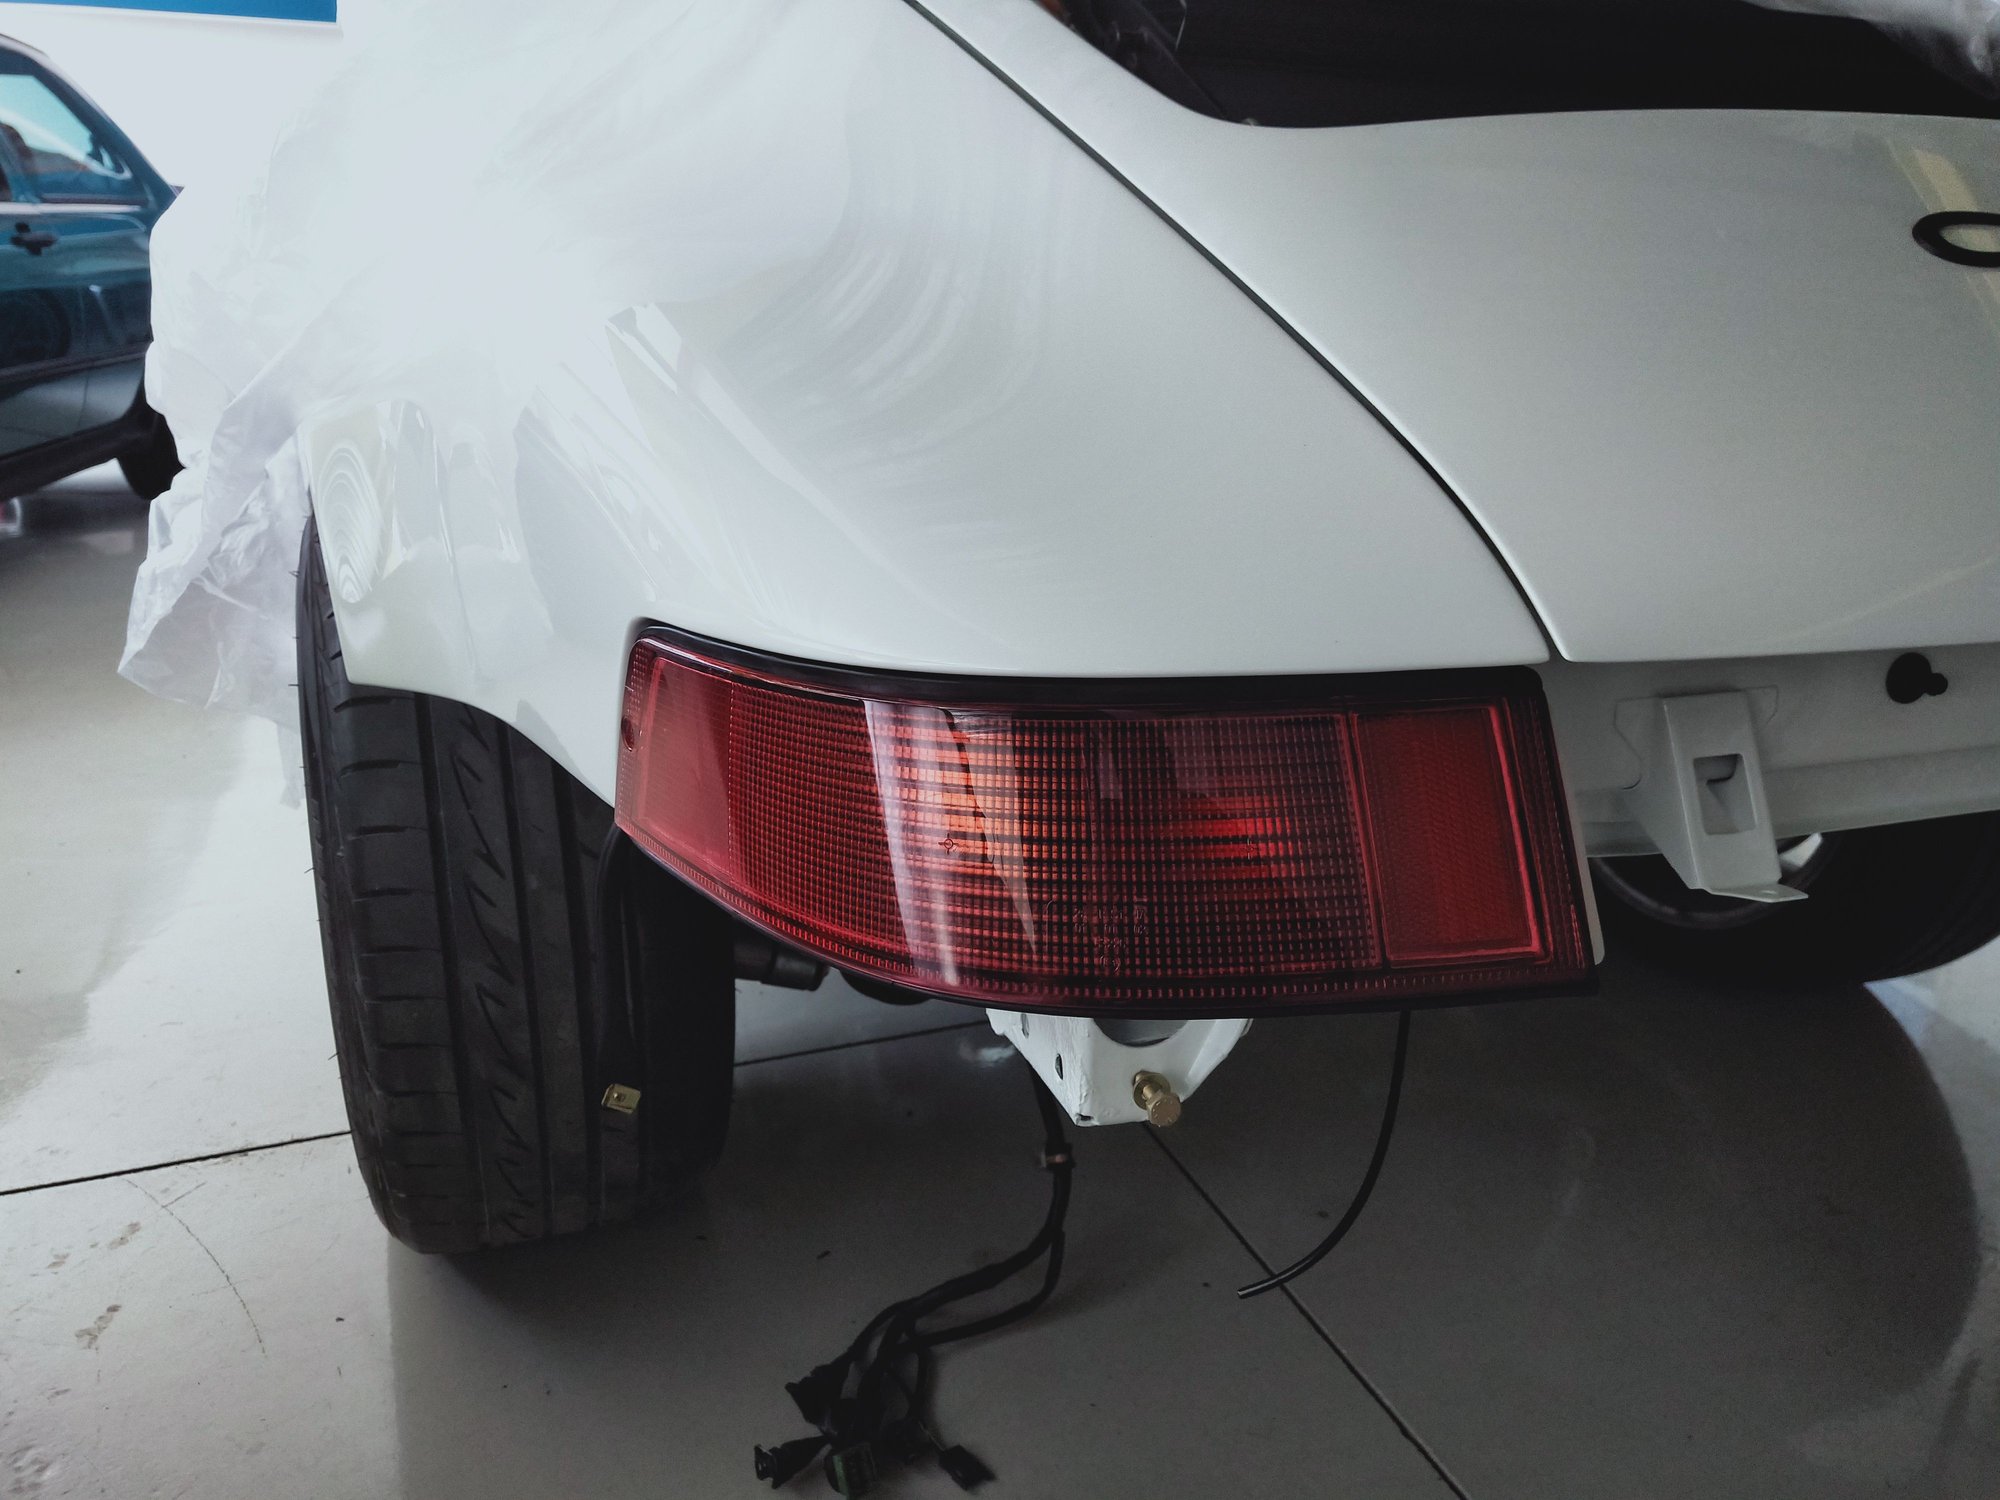
Decided to sell the new backdate windscreen I bought back in 2015 and used that money to buy the correct 964 one I needed, imbedded antenna and the correct size for a gasket with no metal trim. I've installed plenty of windows in my time and have only broken one or two, both being old windows but something about expensive windscreens makes me more nervous. As I'd decided to have a go at this on my own I'd need to be very careful, started by applying mastic to the gasket groove for the glass and putting the gasket on the window. These cars have no drain holes in the window frame so the gaskets are installed and sealed with mastic. With the rope installed I started pulling the rope at the base while trying to put a bit of pressure on the outside with my other hand, got the rope to the top corners on both sides but the window had popped out some at the top and the overwhelming instinct to start pushing it in from the outside is what would potentially crack it, especially in the corners. Thankfully I stopped at that point and removed the screen for a reset. Repositioned it in the center of the frame and tried again, still difficult but bit by bit managed to settle it in to place. Took quite a few hits with an open palm to get it to go in all the way. Phew. Seems nice and tight. Thankfully I didn't apply mastic to the outside of the gasket, that stuff is horrible and lands up everywhere. Glass in, its time to seal the outside. Blue painters tape around the outside of the gasket to protect the paint and catch the excess mastic. This worked very well. Flattened the tip of the mastic applicator which allowed it to be inserted between the body and gasket to squeeze the non hardening sealant in. This stuff skins over just a little bit so if you're tidy with the masking there's very little to clean up once the tape is removed. Job done. For the tail lights I'd purchased new lenses but upon removing one I found the housing to be in pretty average shape as well, one tail light had been replaced as it was date marked 1996 but I was going to do both lenses so that they would match. After a bunch of thinking and looking at ways to salvage them the decision was made to just pony up and buy brand new units from Porsche..... Expensive yes definitely but in reality the car deserves them.
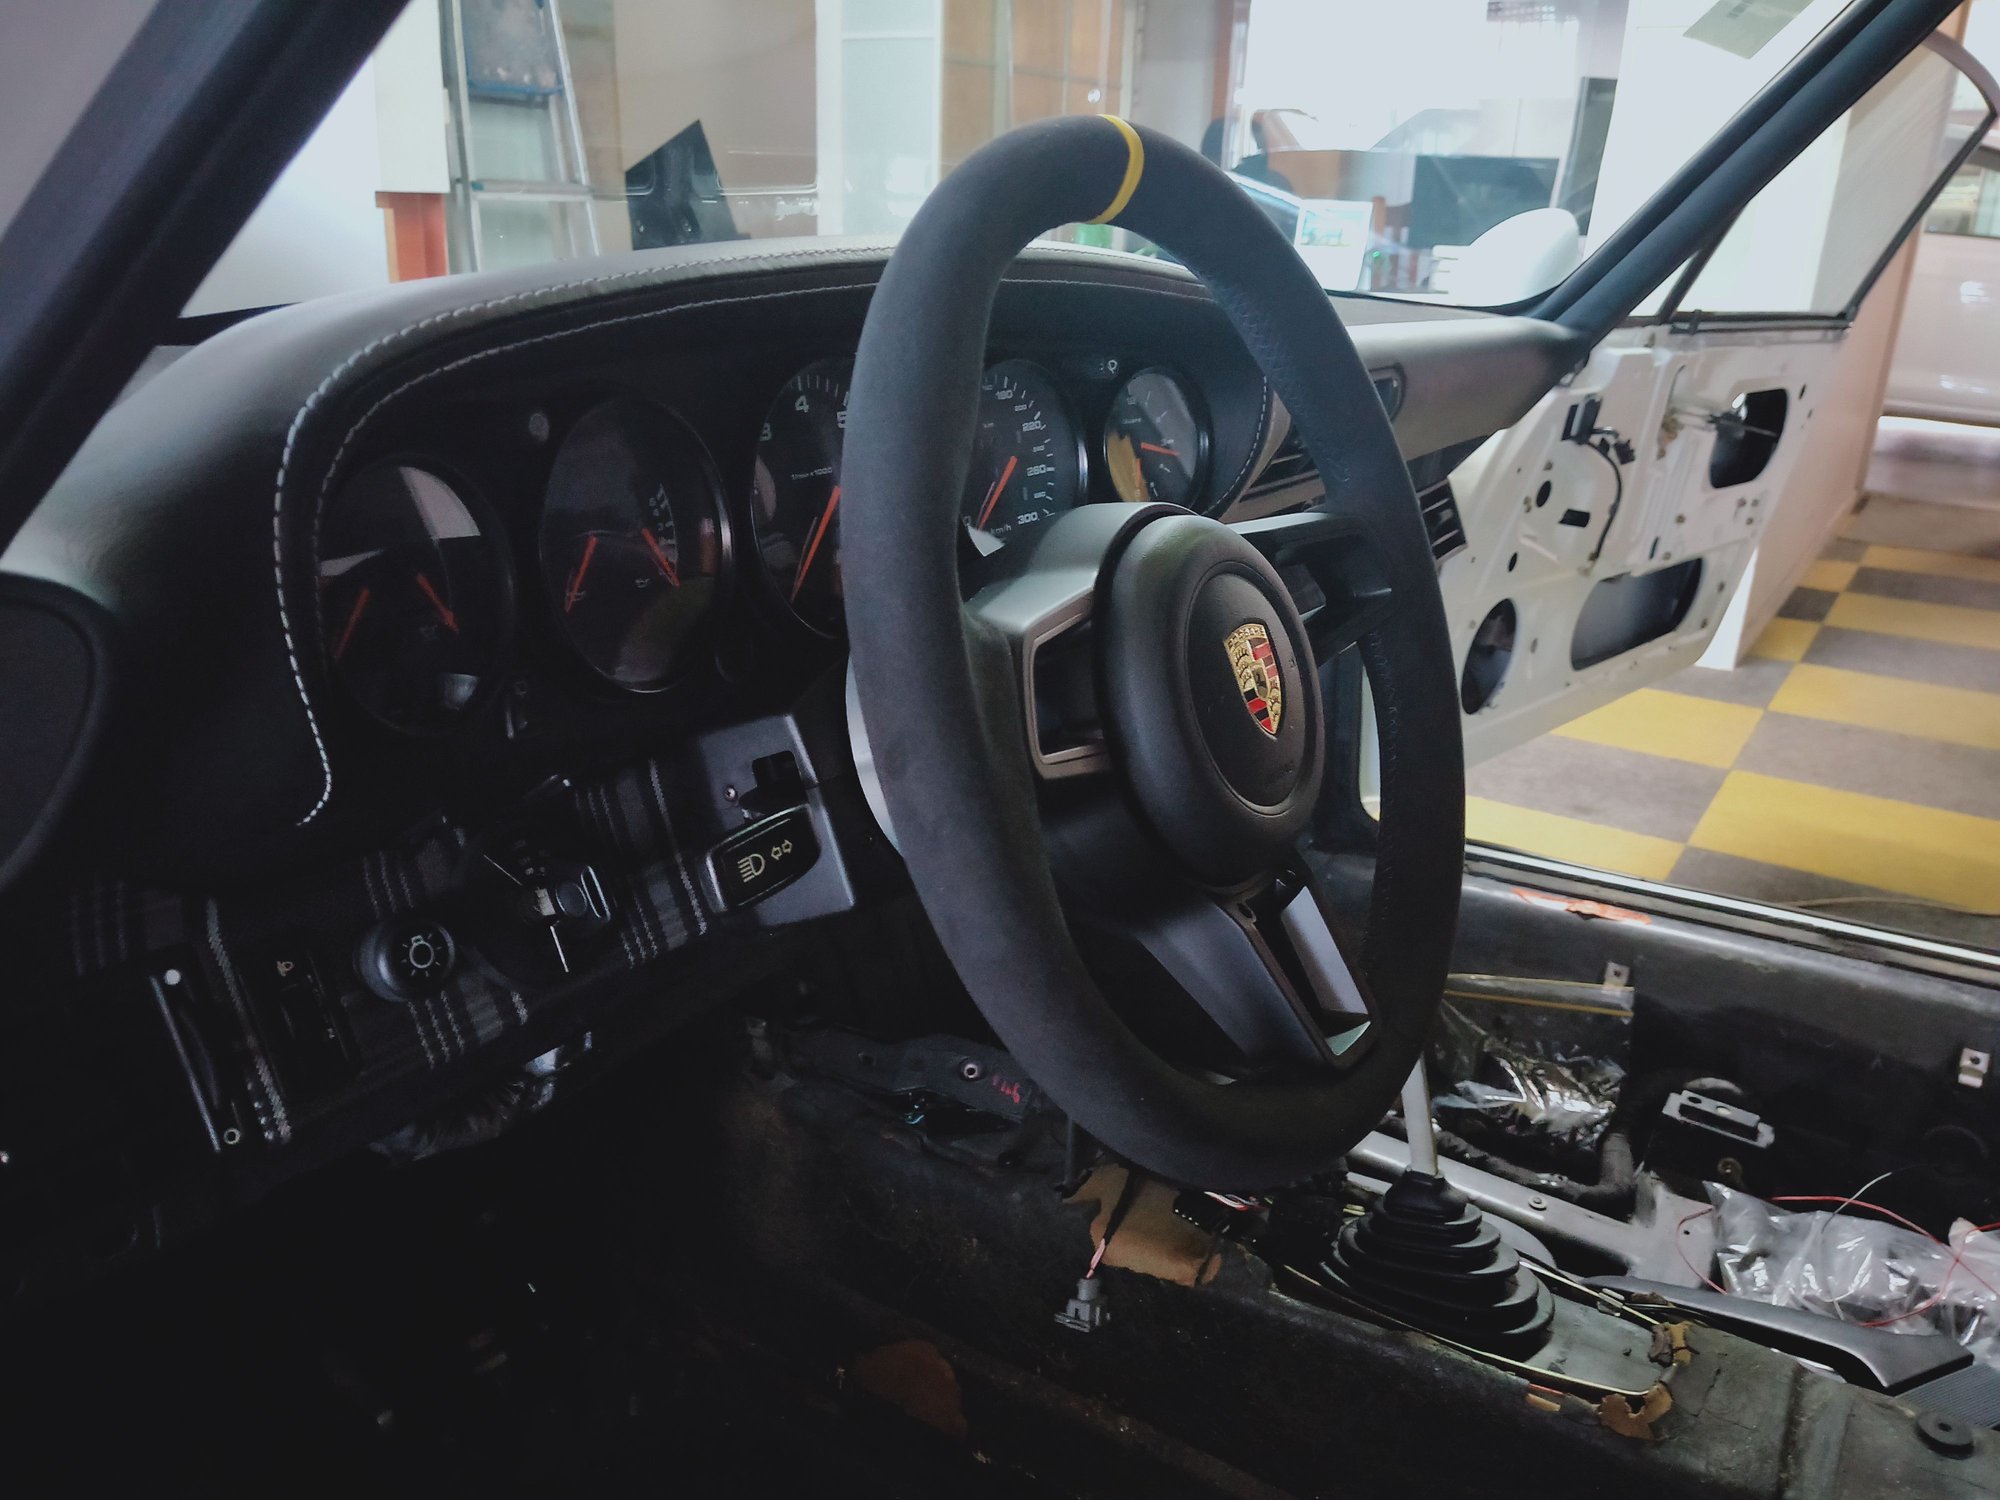
Steering wheels, been looking at options for ages and the Momo that was in the car won't cut it. After looking at loads of options I'd kind of settled on a BBS 4 spoke, pretty hard to find these days and almost certainly would need re doing as most are pretty worn and battered but then I stumbled upon something else. Problem with all modern steering wheels is they have functions that don't work on older cars thus look out of place. The Cayman GT4 however has a really nice basic wheel, no buttons, no paddles etc but of course it doesn't fit..........or does it? Had a hunch it would be the same fine spline as a Mk3/4/5/6/7 Golf and this is where cross knowledge of brands is handy, the Mk2/3 Golf use a spline adapter to go from coarse to fine splines and I already knew the spline on the 964 was the same as the early Mk2 Golf with the spline adapter because the Momo in the car had a VW boss kit on it. Couldn't find a manual GT4 wheel so I settled on a PDK one and I'll remove the paddles. Wheel arrived and adapter arrived a quick test fit proved I was right. It fits, but... Left with a 30mm gap between the steering column housing and back of steering wheel I'd need to make an adapter to fill that gap that would also serve as a horn contact ring adapter. Bit of time on the lathe later, This presented me with another problem, being that the column housing and back of steering wheel are shaped the round adapter in between looked out of place, probably wouldn't be too bad once black but I figured I could improve it. Thought about different ways of attacking it, extending the column housing, changing the back of the steering wheel etc but then thought why not shape the adapter the same as the back of the wheel, all rather simple in the end making a ring from flat aluminium. Much better, still have to fill the holes left by the paddle shifters I removed but that's easy. Removed the wire harness for the airbag and horn contact and now the original horn wire just plugs on to the GT4 contact plate. I did cover the adapter in leather but looking at it I think I'll remove it again and powder coat or paint it satin black. Fitted I feel it really does look at home, nice chunky wheel feels nice.
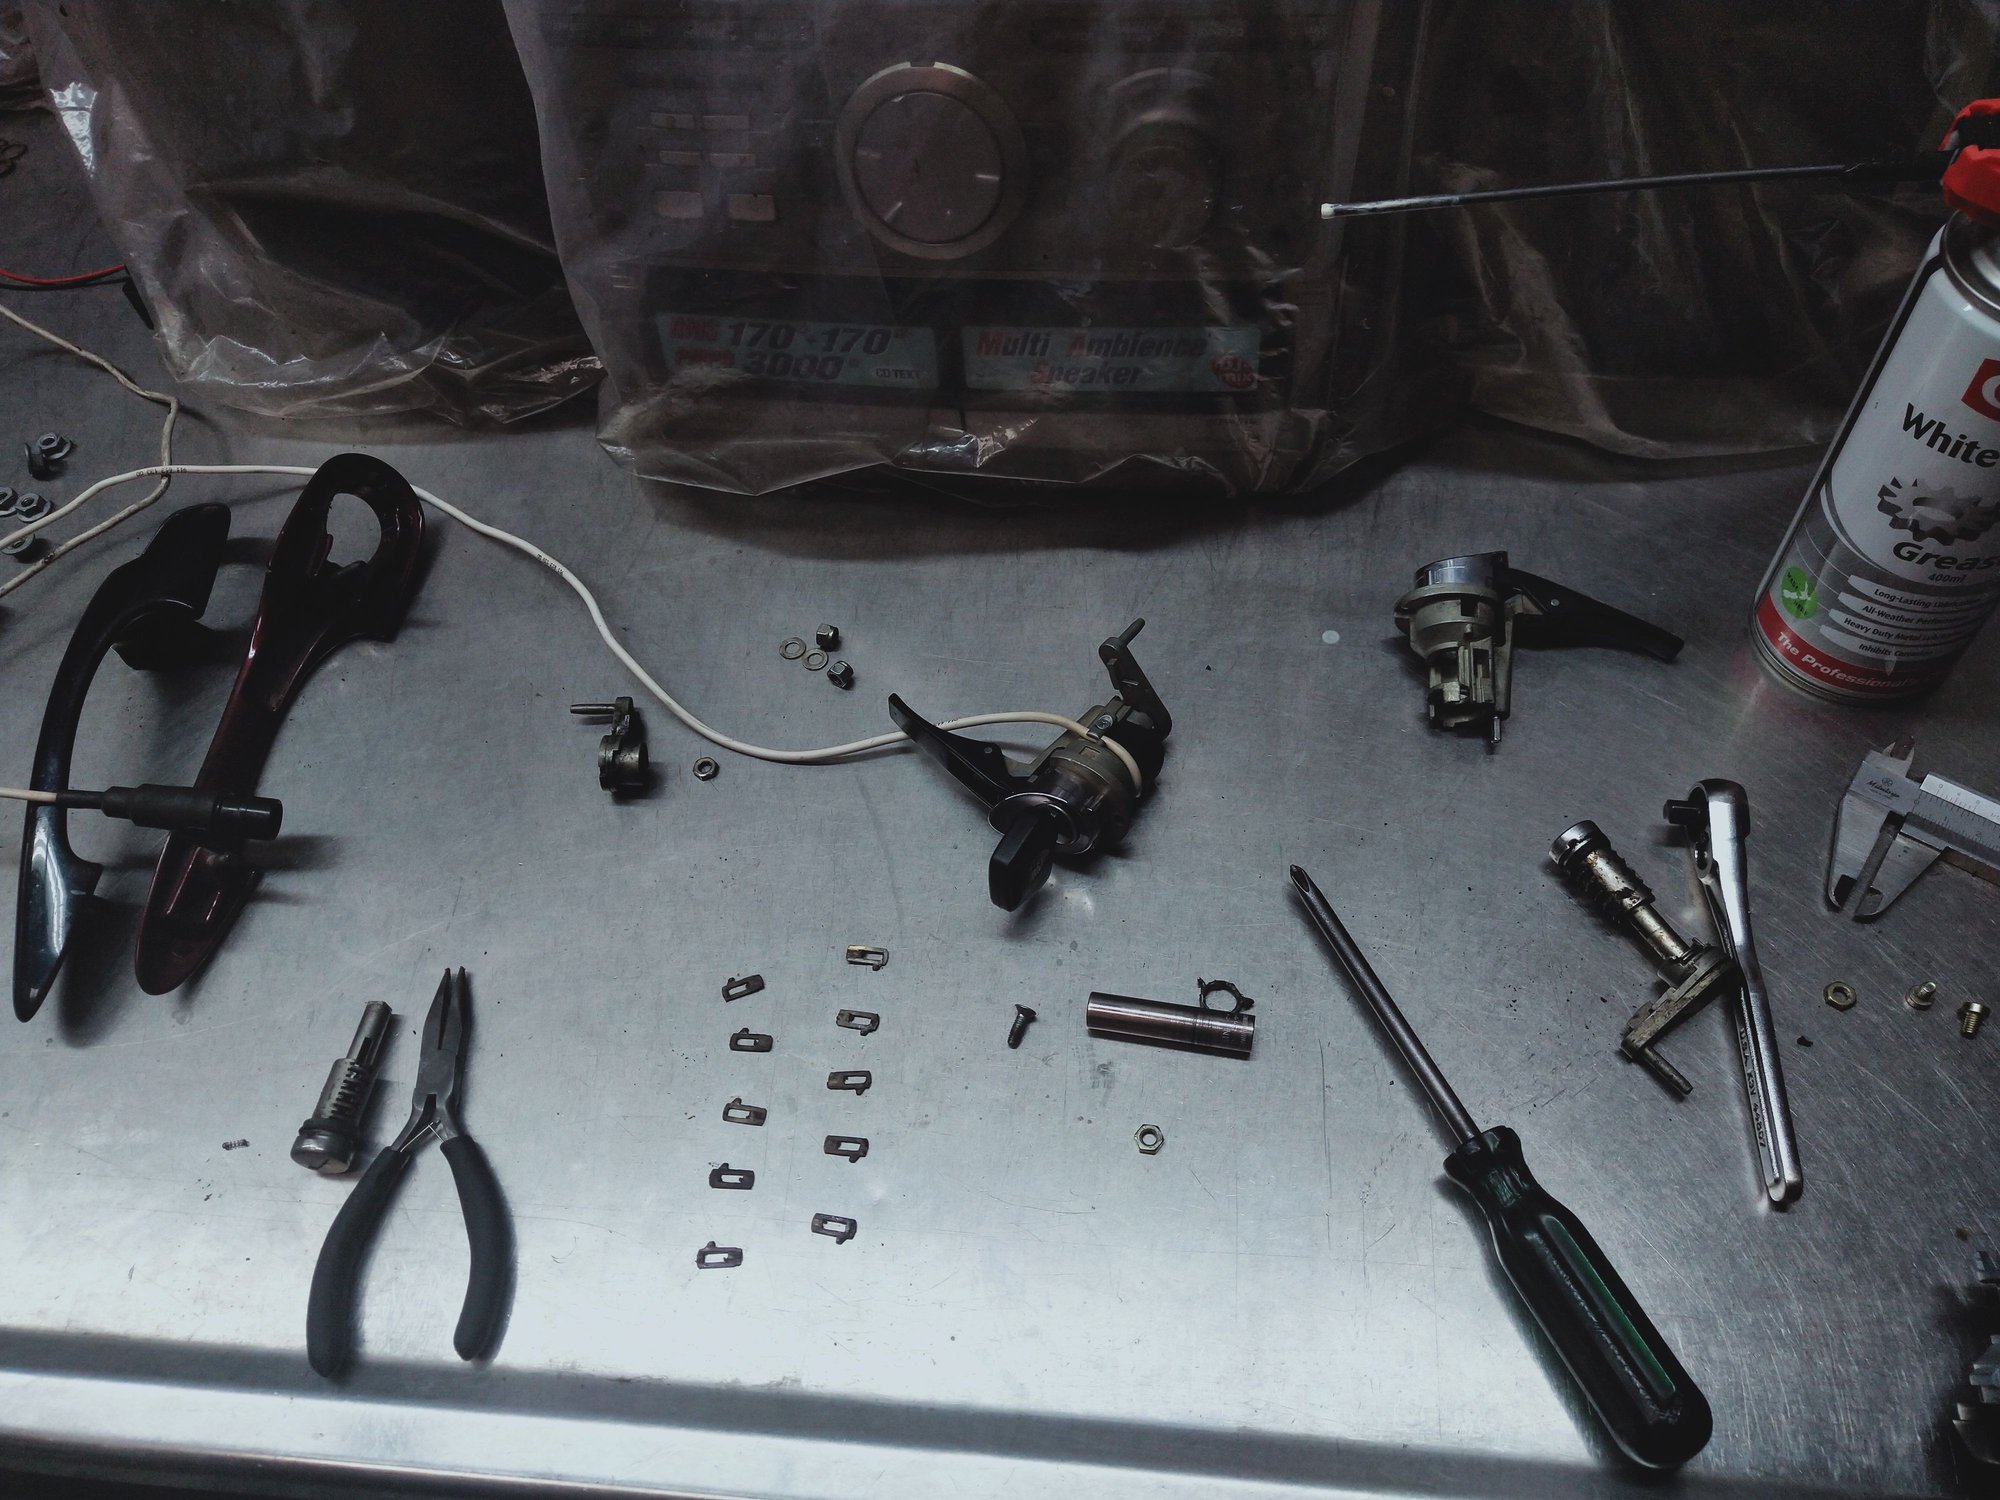
Rear window time. In cleaning the window I found the heater grid to be very dirty and corroded but this seemed to all come off pretty easily with ordinary household Jif. Left the rag pretty black so there was plenty of crud build up on there. Spent some time checking the grid with a circuit tester and found the most bottom line has breaks in it, I looked at a few different options to fix it but in the end gave up on it as I'll probably never ever use it anyway. The difference is easy to see, cleaned on the left and corroded on the right. New factory seal which I was hoping would be pre cut for the heater grid wires but I was wrong, they really couldn't have made that whole setup any more difficult than this. Used the old seal to lay on top of the new one to mark where to cut the holes and slots for all the wires to come through, still managed to get them a little bit off from where they needed to be but will be ok. Installed the seal on the glass and connected the demister, tucking the wires neatly in to the rubber. Was on my own again that day but it went in pretty easy as I had access through the rear 1/4 windows as they are not installed yet. Settled it in to place with a few taps but the rubber sat a little proud in the bottom right corner which took me a while to figure out that during the install the wiring had got caught between the body and the seal. Didn't want to take the window back out again so with a fair bit of effort managed to pry the wires out one by one. Same story as the front seal, masked the aperture and carefully applied the non hardening sealant between the glass and seal as well as seal to body. Since fitting the aero mirrors I've been wanting to do 993 color coded door handles as well, I just feel they go well together. Was going to buy brand new ones as they are not very expensive and fit my 964 internals but after more research found out you cannot buy the 993 chrome bezels around the key slot by themselves. Found a pair of complete used ones on eBay in the US and had them sent over, both need painting of course but first wanted to create a pair of nice handles using the best parts of the 964/993 stuff I had. Everything apart and loads of cleaning, 30yo grease gone hard as a rock took a lot of effort to clean off. Freed up all of the springs and brass key plates transferring my 964 ones to the 993 tumblers as they were in nicer shape. The passenger 993 handle had a blanking plug in it and several sources online said this just pops out but that isn't the case. There's a tiny roll pin in the chrome bezel that needs to be drilled out to remove the bezel from the cylinder and the plug can then be removed. On reassembly I used a 2mm screw instead of a roll pin, does the same job. New base gaskets on and test fitted on the door. Love it, great decision. Maybe ill just leave them this way, one blue, one red! Colours of the Dutch flag.
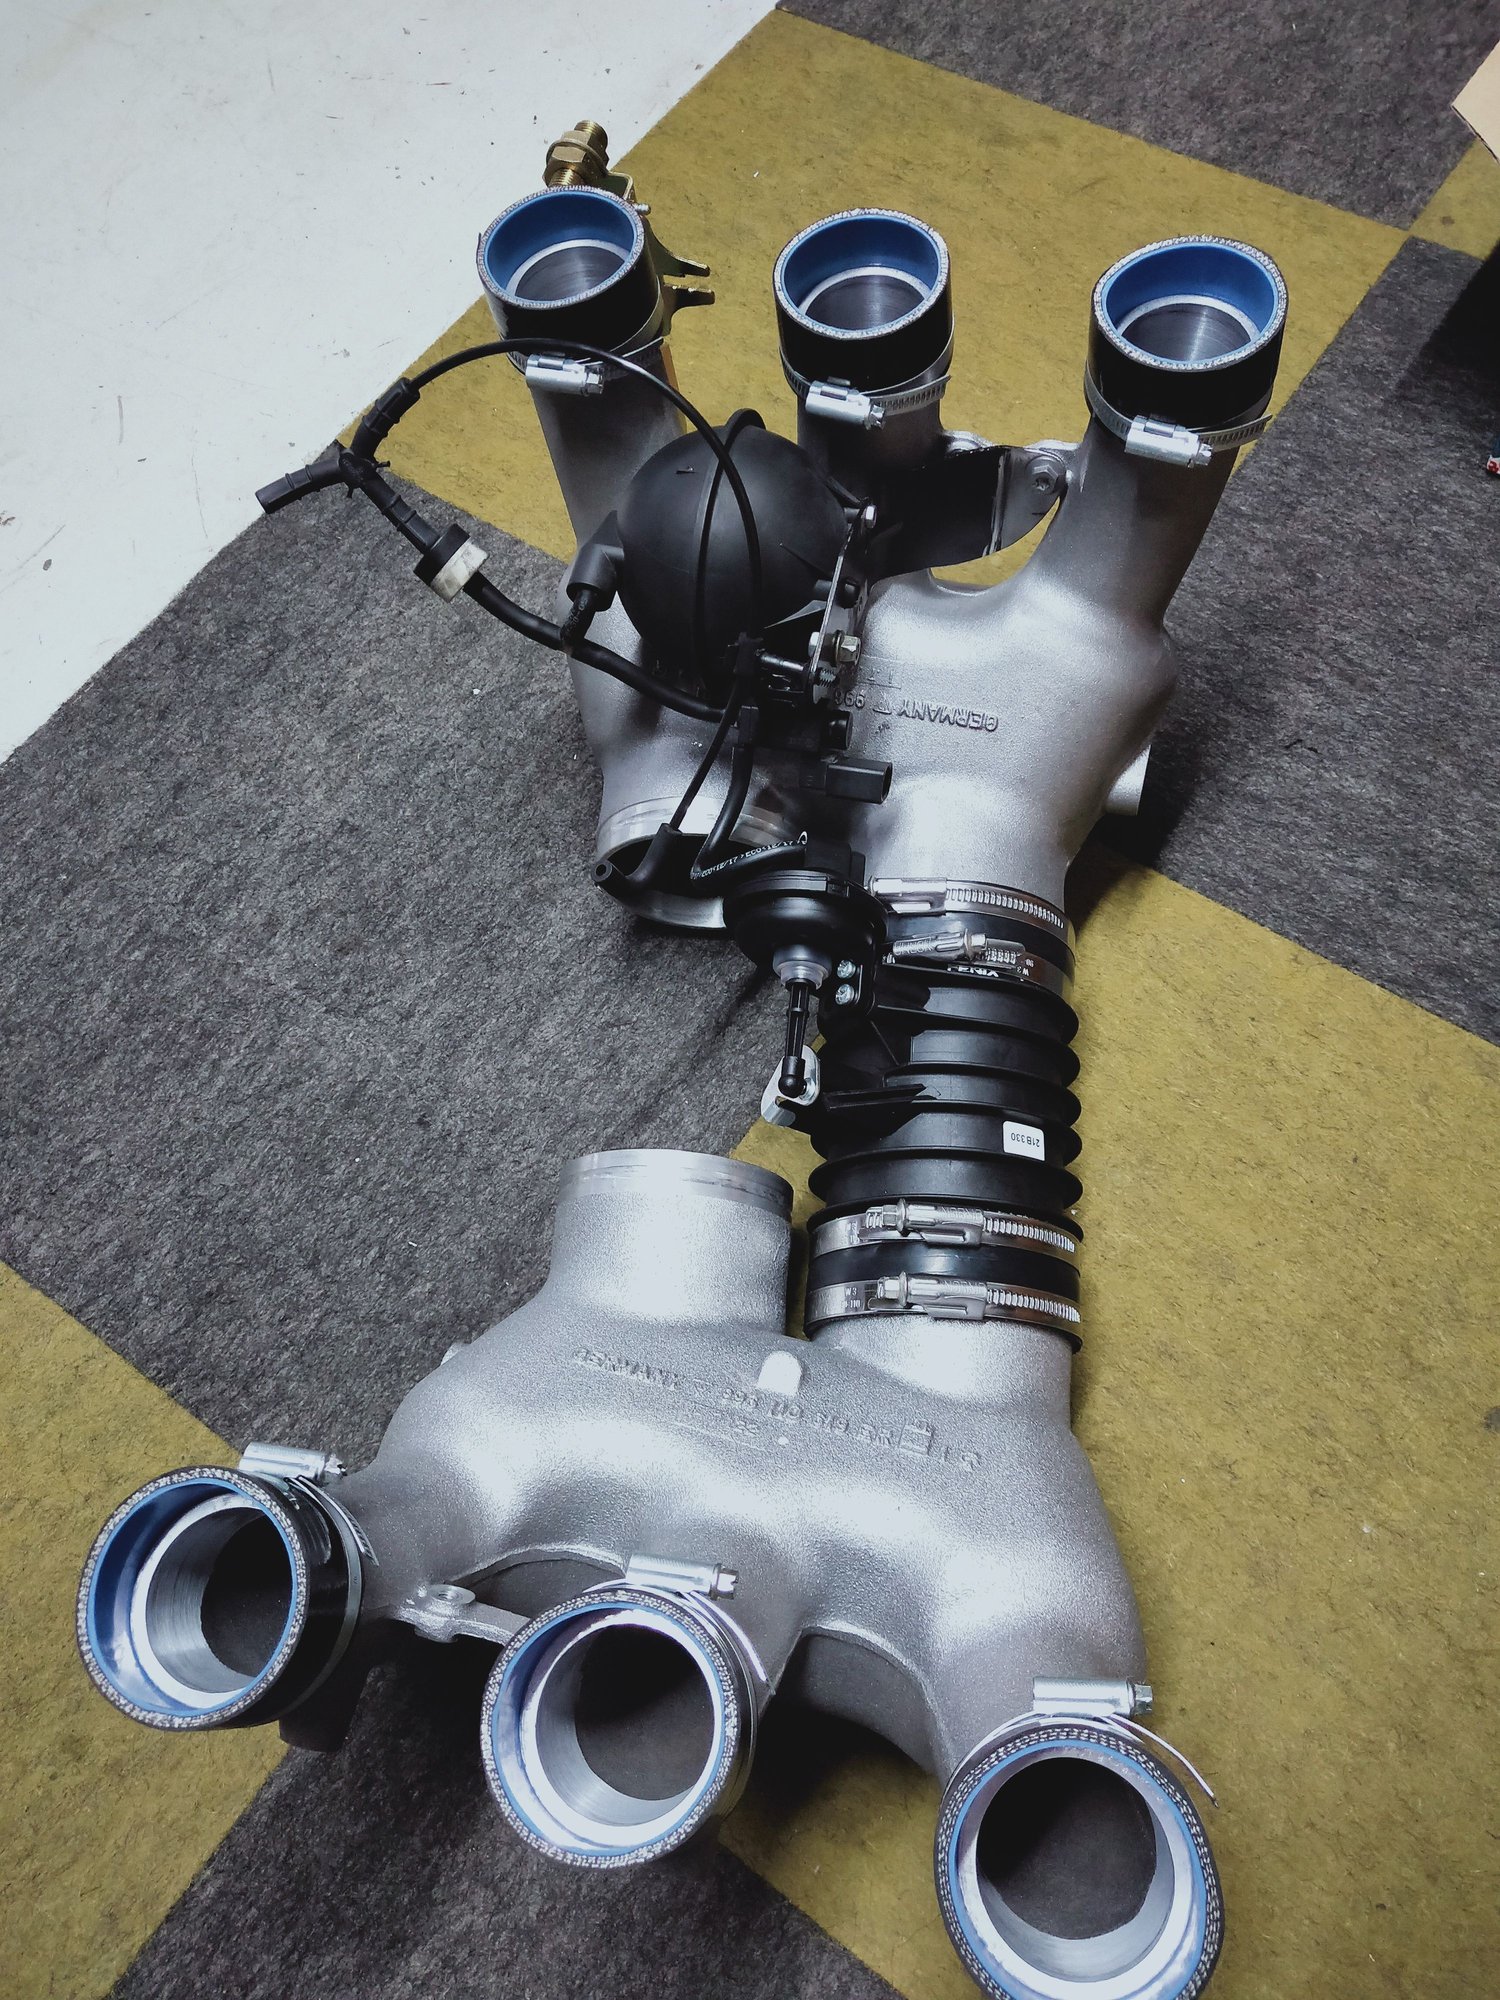
Back on to the engine, dug out the old manifolds and center section with its overly complicated array of hoses and things. None of this will be used other than maybe a couple of hoses and a one way valve. All to be replaced by the 996 GT3 plenums and a 997 GT3 electronic throttle body that will hugely simplify everything and also clean up the engine bay a lot. Of course as covered before this manifold doesn't just bolt on so I got a set of intake runner stub pipes from Island Works in Sweden, a very nicely machined set of billet parts. These then give you the correct cylinder spacing and also match the plenum pipe diameter to the head diameter. New 354cc Bosch injectors and 997 throttle body from EFI Hardware in Australia, the injectors also are a drop in with a small spacer tube needed to use the original 964 fuel rails and hoses. I had also sourced a new 996 GT3 resonance tube for this project but as the 996 engine is wider this does not fit.....yet. With the plenums on I could measure the width and it looks like about 10mm needs to be cut off each end of the resonance tube. In the lathe it goes, chop off 10 mm and used a parting tool to machine down one rib on each end to make room for a rubber sleeve and clamps. Test fit on the engine with masking tape to hold it in place as I'd forgotten to order the sleeves. With loads of room under the manifold I decided that's the perfect spot for a vacuum tank to reside to operate the resonance flap. A dig in my VAG parts bin yielded a vacuum tank and solenoid from a MK5 Golf R32 used for the exhaust valve flap. Even used the bracket with a minor modification to bolt up under the manifold. One way valve from the 964 set up re used and a Y connector going to the fuel pressure regulator. Hopefully I can even use the factory 964 wiring as the original set up also had a resonance flap and solenoid. The rubber boots and clamps duly arrived it was a case of taking everything apart again to fit these and screw it all together properly. For the throttle body intake side I need to make a Y pipe and had ordered a 4" alloy donut for this but the slack company I bought it from didn't bother shipping it till a week later of course meant I didn't have it for the weekend. I can get injectors from Australia that literally arrived the day after ordering but I cannot get an alloy donut from NZ 600km away in a week. Go figure. So this is where it sits for now, next job is the throttle body and Y pipe. Once this is complete I'll take the plenums off again and cut off all of the unneeded lugs and bosses to smooth out the plenums and casting lines then prime and paint them probably in the same grey as the fan.
Looking good! I also like the idea of modernizing the induction without the complexity (and expense) of ITBs. What are you running for engine management? Great that you were able to keep all the OE-style fuel system components.
Looking good! I also like the idea of modernizing the induction without the complexity (and expense) of ITBs. What are you running for engine management? Great that you were able to keep all the OE-style fuel system components.
I was considering something like a Haltech or Link ECU but the person dyno tuning the engine works with MoTec every day so I decided to pony up the extra and run with an M130 MoTec on his advise.
I feel the extra expense will be worth it from a familiarity point of view most likely producing a better end result.