
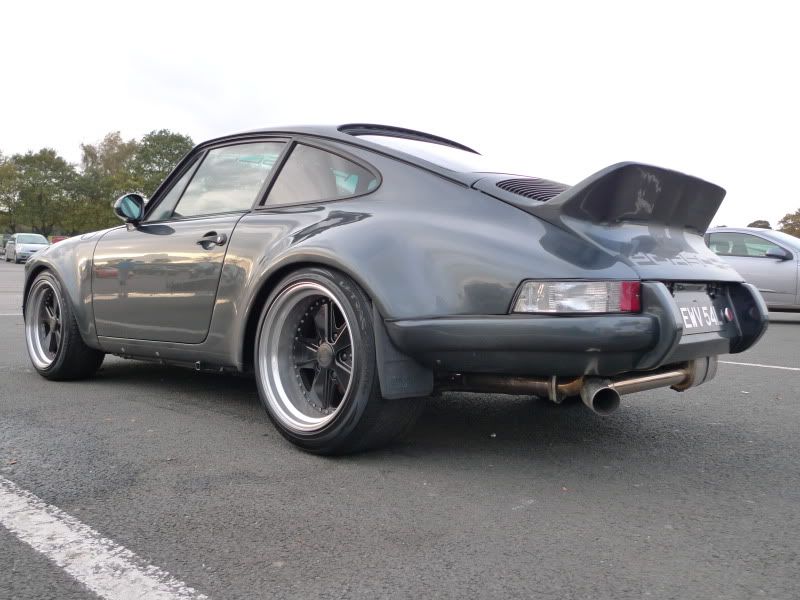
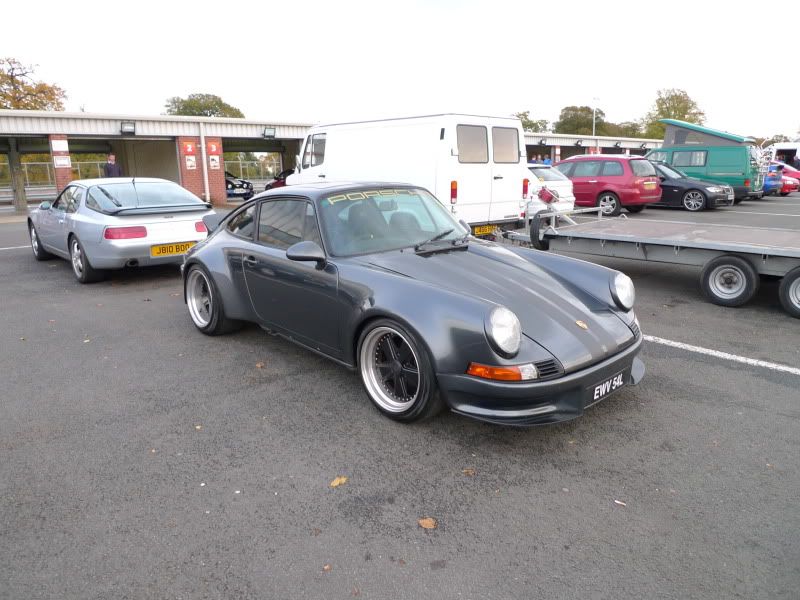
Project "Amazon" Restoration-Lightweight C4- 2Pack paint soon;-)
 03-22-2011, 12:47 AM
#331
Intermediate

Join Date: Aug 2004
Location: Leesburg, GA
Posts: 47
Likes: 0
Received 0 Likes
on
0 Posts
Sorry to get off topic on your thread but, I had to commit on this car. I have a 92 slate gray C2 that is going to undergo a conversion to become a 73 RSR and I hope for mine to look very much like this one. Is there a build thread on this car anywhere or more pictures?
Thanks
Mike
Thanks
Mike
 03-22-2011, 01:04 AM
#332
Three Wheelin'
Thread Starter
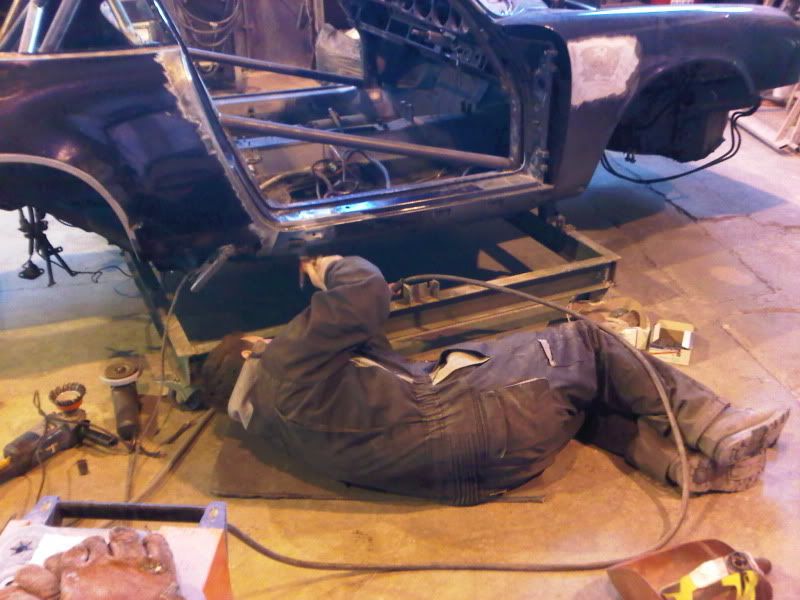
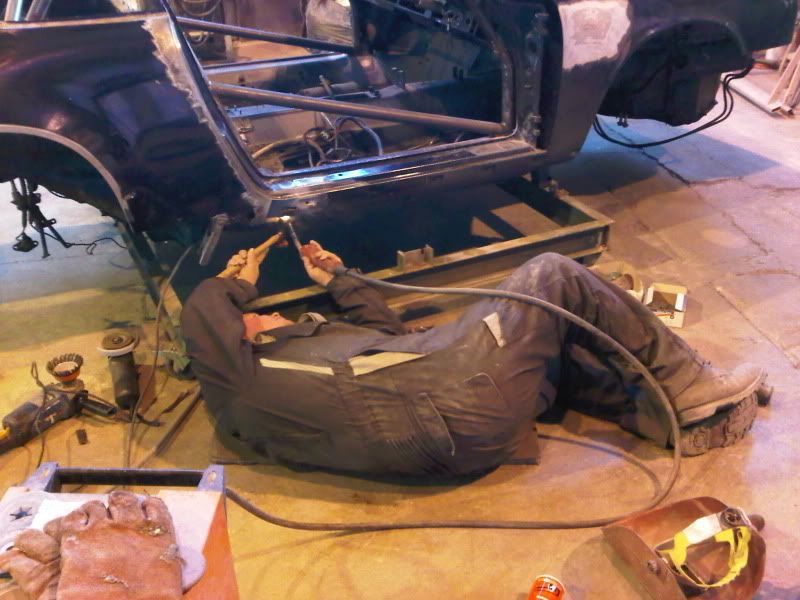
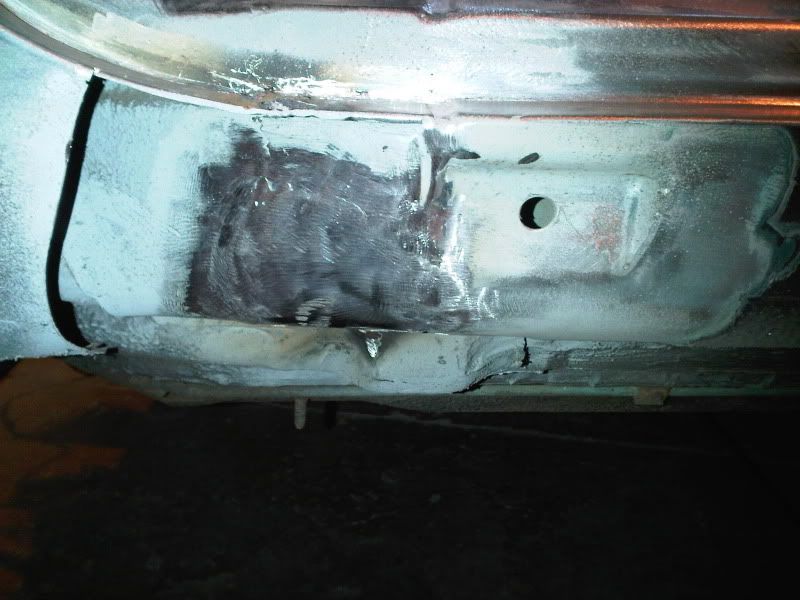
After seeing Steve-Boxsey and Russ on here with their spot of rust on the sill, i guess I will show you mine.
At the beginning, it didnt look much as the owner said it was a mere drip from the drain hole on the bottom door, yeah right!
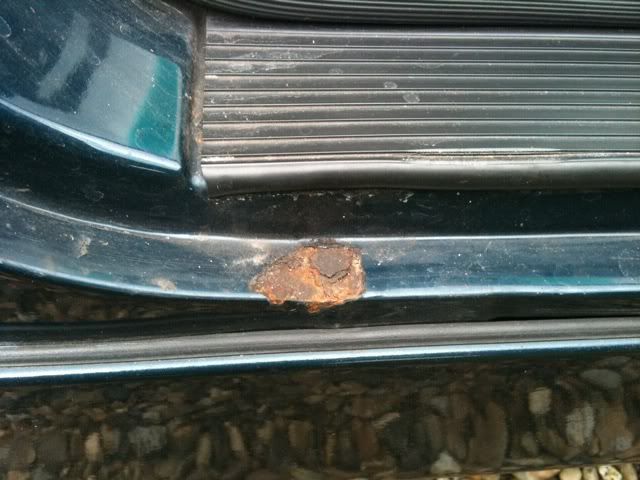
But having removed some of the paint and a little prodding....
At the beginning, it didnt look much as the owner said it was a mere drip from the drain hole on the bottom door, yeah right!
But having removed some of the paint and a little prodding....
03-22-2011, 04:42 AM
#333
Advanced
Join Date: Apr 2010
Location: Nr Evesham, UK
Posts: 96
Likes: 0
Received 0 Likes
on
0 Posts
Norm - lesson learnt ... don't prod! 
... but seriously - I've found a few little rought bits on the seam between the sills and floor - particularly bad behind the rear jacking point where it gets the road-rash from the rear wheels. I've had fun putting it right with the dremel and the POR-15, but it would have been a lot easier if the body shopy had done it for me. Then there's the rear wing seam which meets the rear bumper - especially around the plate nut fixing points. These seemed all OK, but a bit of agitation revealed brown gold!
... but seriously - I've found a few little rought bits on the seam between the sills and floor - particularly bad behind the rear jacking point where it gets the road-rash from the rear wheels. I've had fun putting it right with the dremel and the POR-15, but it would have been a lot easier if the body shopy had done it for me. Then there's the rear wing seam which meets the rear bumper - especially around the plate nut fixing points. These seemed all OK, but a bit of agitation revealed brown gold!
Last edited by c2dweller; 03-22-2011 at 09:42 AM.
03-22-2011, 01:50 PM
#334
Three Wheelin'
Thread Starter
Sorry to get off topic on your thread but, I had to commit on this car. I have a 92 slate gray C2 that is going to undergo a conversion to become a 73 RSR and I hope for mine to look very much like this one. Is there a build thread on this car anywhere or more pictures?
Thanks
Mike
Thanks
Mike
Norm - lesson learnt ... don't prod!
... but seriously - I've found a few little rought bits on the seam between the sills and floor - particularly bad behind the rear jacking point where it gets the road-rash from the rear wheels. I've had fun putting it right with the dremel and the POR-15, but it would have been a lot easier if the body shopy had done it for me. Then there's the rear wing seam which meets the rear bumper - especially around the plate nut fixing points. These seemed all OK, but a bit of agitation revealed brown gold!
... but seriously - I've found a few little rought bits on the seam between the sills and floor - particularly bad behind the rear jacking point where it gets the road-rash from the rear wheels. I've had fun putting it right with the dremel and the POR-15, but it would have been a lot easier if the body shopy had done it for me. Then there's the rear wing seam which meets the rear bumper - especially around the plate nut fixing points. These seemed all OK, but a bit of agitation revealed brown gold!
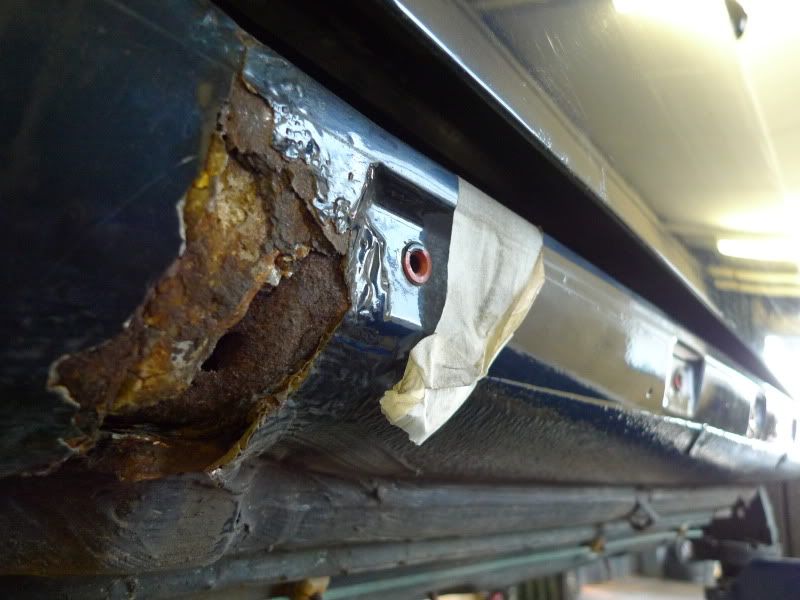
In no time, the rust was cut away revealing a little bit on the kidney bowl but not much, this was cut away too giving you this...
 03-22-2011, 02:04 PM
#335
Three Wheelin'
Thread Starter
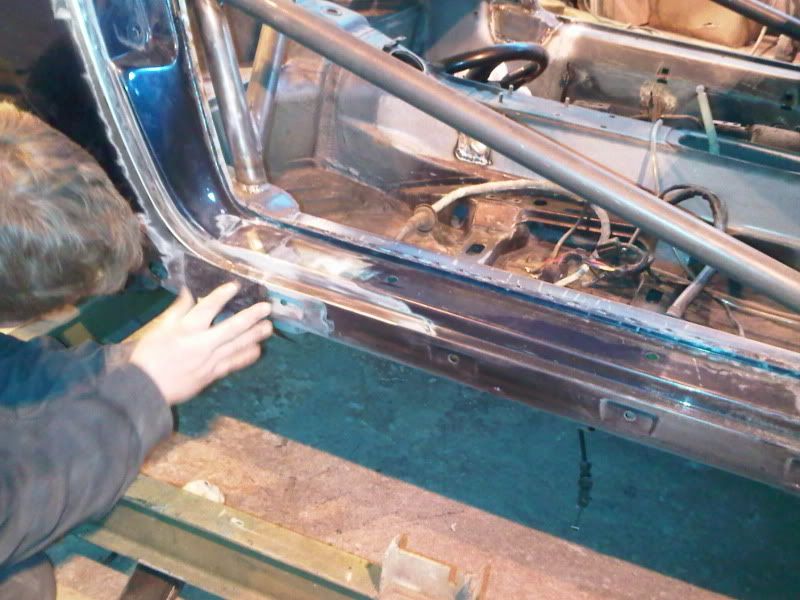
Neil does best (Fetal postition ), cutting new metal into shape and weld...then tag 2 metal together
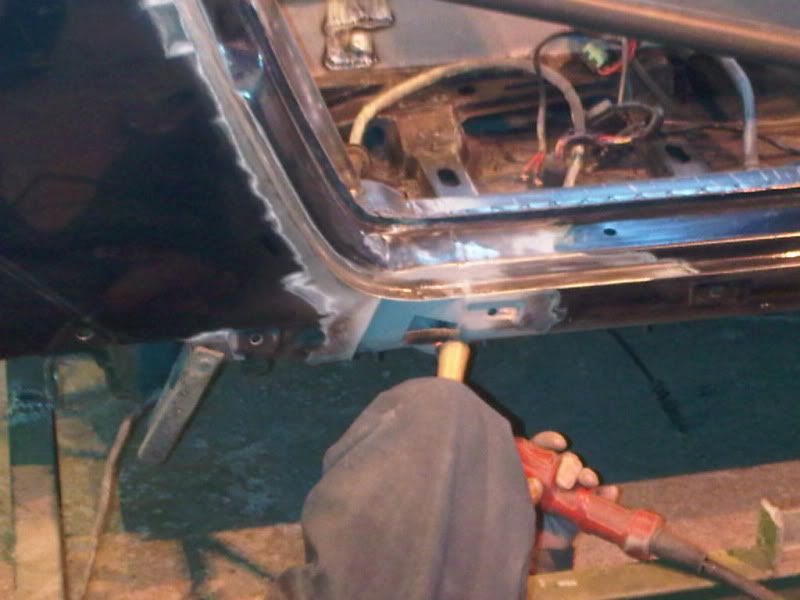
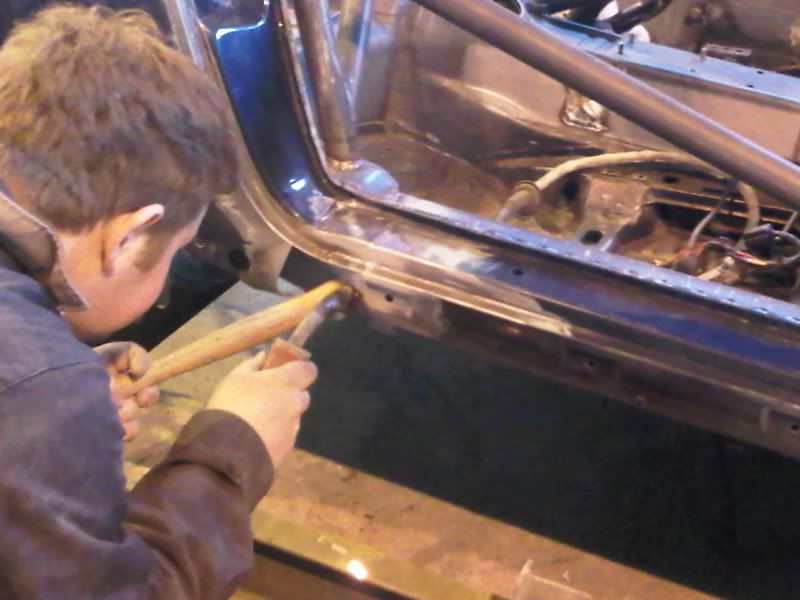
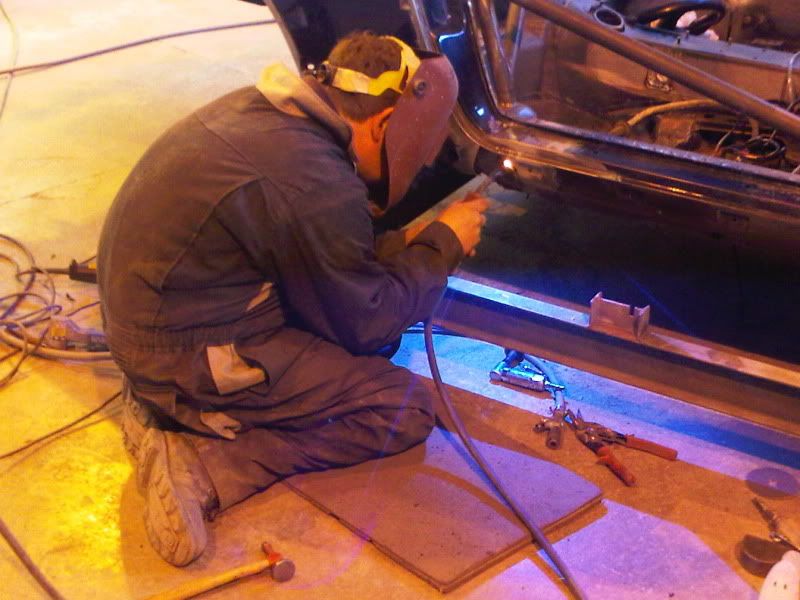
Then weld
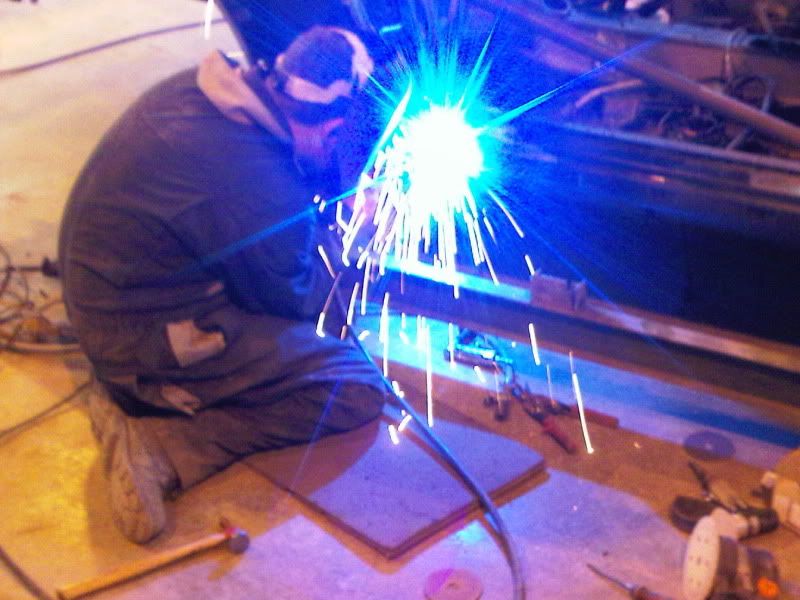
Then grind the excess weld
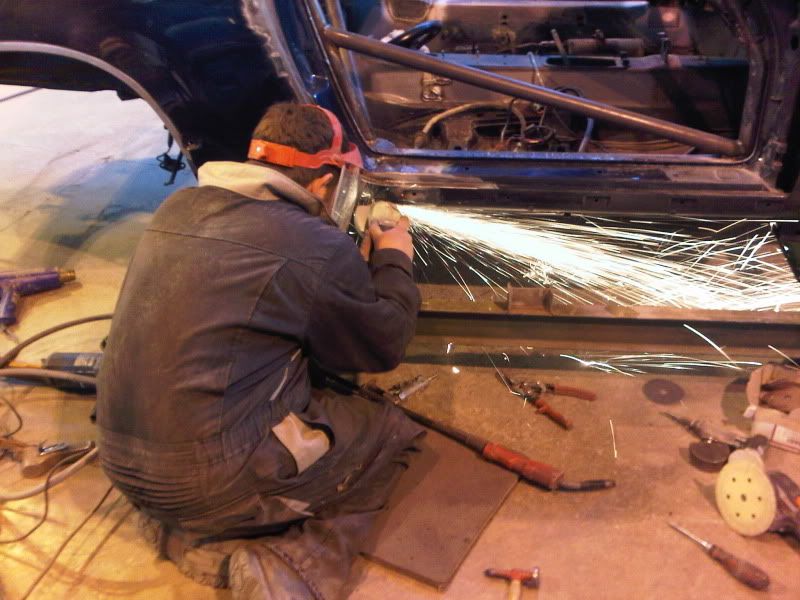
Then smooth with finer grinder/sander
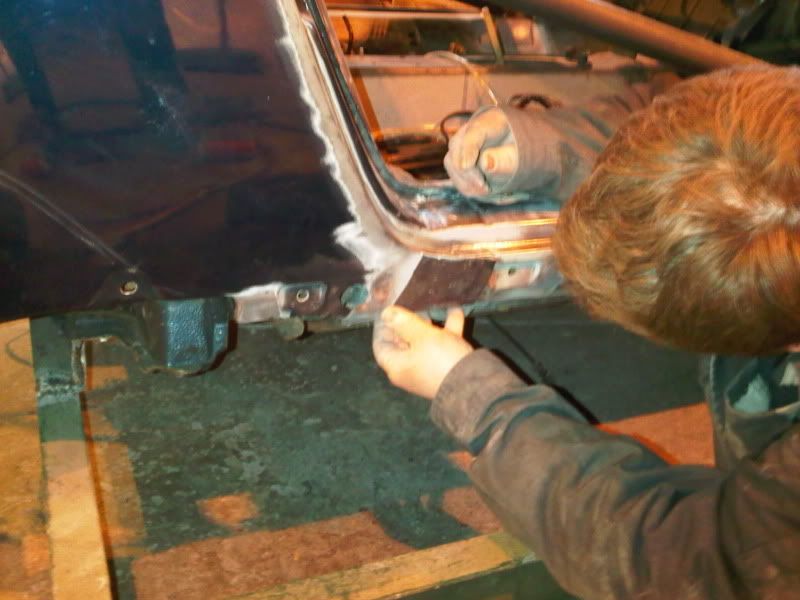
Now thats the inner kidney bowl sorted, now the outer sill-wing. Oh and all metal not any bodge up job.
Difficult to take a photo with shiney metal reflecting back.
The kidney and sill thats patched will be treated, stoneguarded-paint then waxoiled.
), cutting new metal into shape and weld...then tag 2 metal togetherThen weld
Then grind the excess weld
Then smooth with finer grinder/sander
Now thats the inner kidney bowl sorted, now the outer sill-wing. Oh and all metal not any bodge up job.
Difficult to take a photo with shiney metal reflecting back.
The kidney and sill thats patched will be treated, stoneguarded-paint then waxoiled.

 03-22-2011, 09:44 PM
#338
Three Wheelin'
Thread Starter
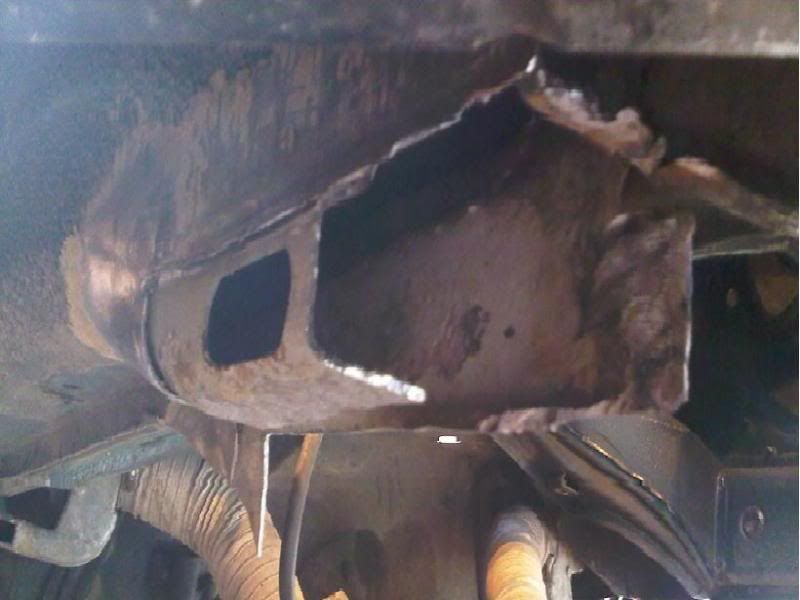
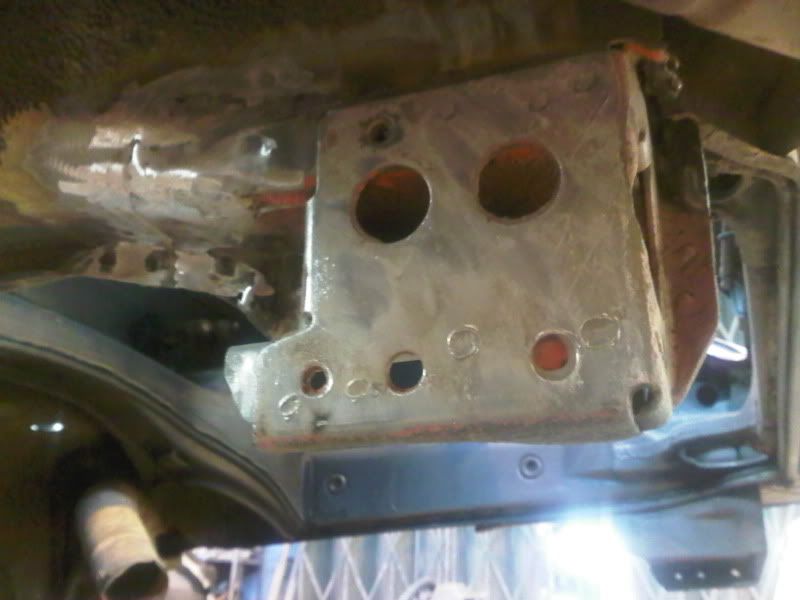
Am sure these repairs am showing you are a common 964 body symtom. The question is when have you checked behing those arches and rear bumper?
What I must make clear is when I was cleaning the car thoroughly, I noticed because the rear arches dont have any plastic liner to keep all the mud and rain out. The insides of the arches must take a bit of hammering for these once a daily used car. Traps such as inside top part of the side rear light casing for example! Thank G that mine was fine, but the LEFT rear chassis bumper beam bracket took a bit of weather battering!
Not for the faint hearted, but luckly enough a donor rear section was sourced. Anyway, Neils work commences making things look easy!
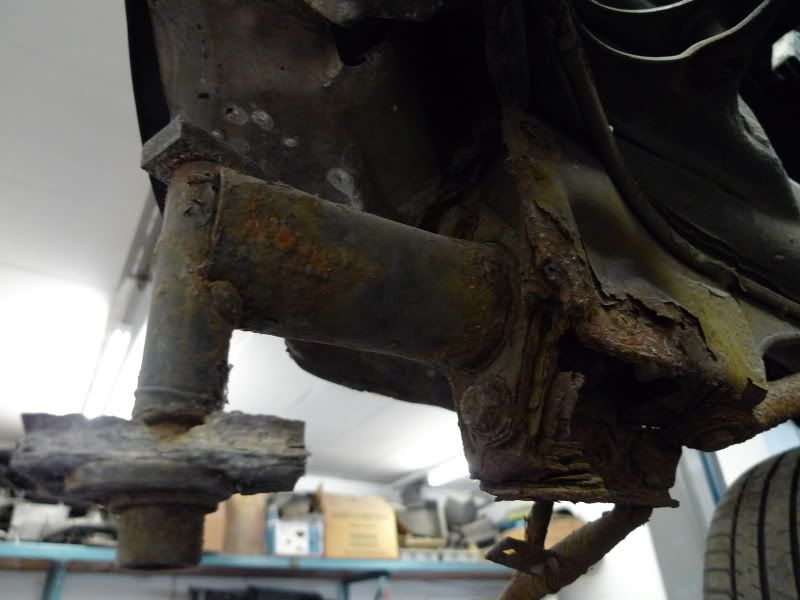
Look at the rear bumper bracket!
The rear bumper bracket just crumbled off chassis leg!
What I must make clear is when I was cleaning the car thoroughly, I noticed because the rear arches dont have any plastic liner to keep all the mud and rain out. The insides of the arches must take a bit of hammering for these once a daily used car. Traps such as inside top part of the side rear light casing for example! Thank G that mine was fine, but the LEFT rear chassis bumper beam bracket took a bit of weather battering!
Not for the faint hearted, but luckly enough a donor rear section was sourced. Anyway, Neils work commences making things look easy!
Look at the rear bumper bracket!
The rear bumper bracket just crumbled off chassis leg!
03-22-2011, 09:49 PM
#339
Three Wheelin'
Thread Starter
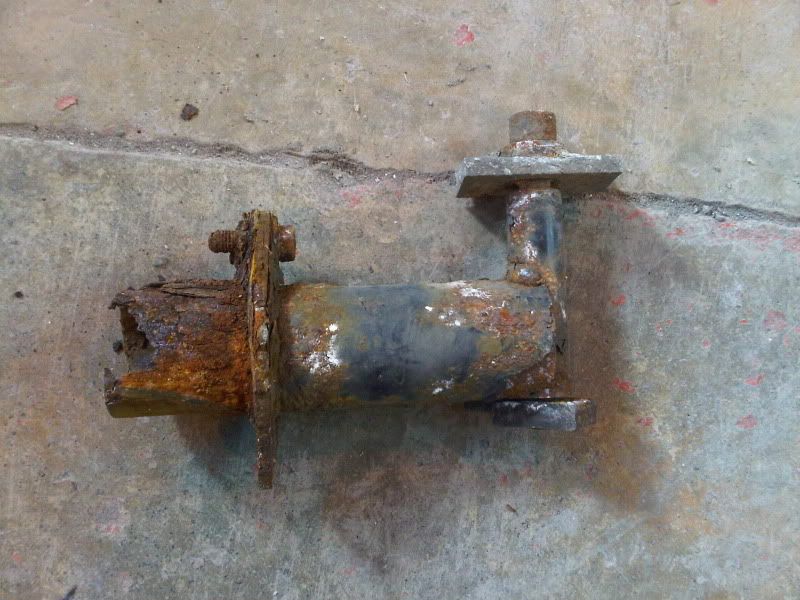
The right side seemed fine, caked and protected by grease & oil YAK! Seems like there has been either a leak through the years, or just a builtup of crap and drips.
Bracket not as bad.
YAK! Seems like there has been either a leak through the years, or just a builtup of crap and drips.Bracket not as bad.
03-22-2011, 09:59 PM
#340
Three Wheelin'
Thread Starter
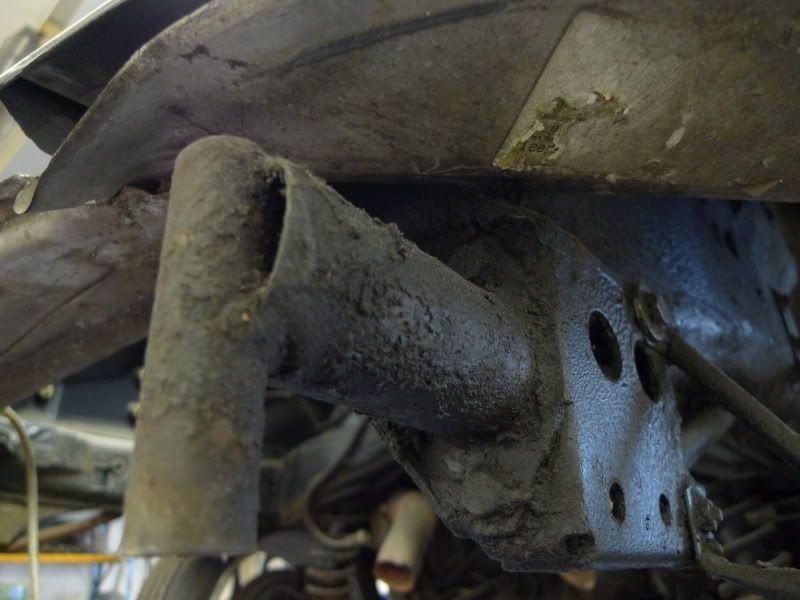
The new brackets are to hand, but ALL tinwear whether its engine tinwear, all the bumper and sill brackets are poorly coated in thin paint, easily scratchable and made very cheap. SO, the best thing before using them, send them to be powercoated which all mine will be done.
Tinny but expensive brackets need recoating because am sure these get a fair bit of battering under those arches.
Tinny but expensive brackets need recoating because am sure these get a fair bit of battering under those arches.
03-22-2011, 10:36 PM
#341
Addict
Rennlist
Site Sponsor
Rennlist
Site Sponsor
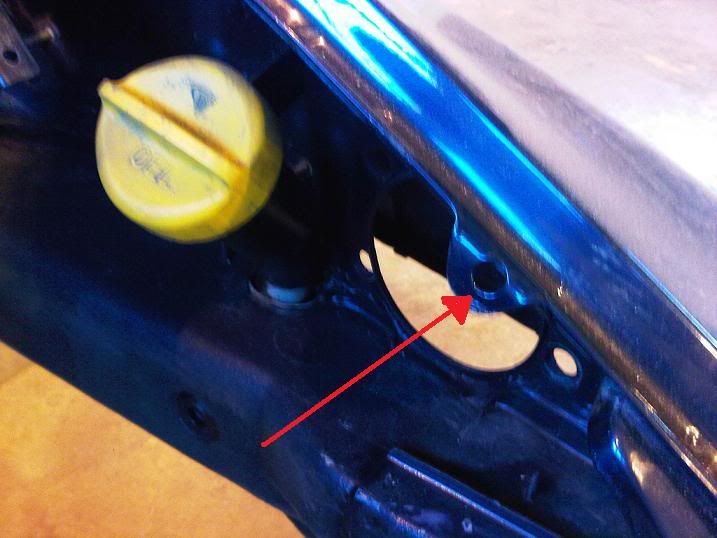
Easy one. The bracket is on all replacement panels from Porsche, so the fact that it is there signifies that the car has had accident damage in the past and has had the quarter panel replaced with a new one. The bottom line is that the bodyshop who fitted the panel should have removed the bracket before it was painted, but at least it is a simple correction to make at this stage of the build.
Of course, the probability is that the rust you just repaired on the sill to quarter joint was caused by the same bodyshop inadequately painting and protecting their freshly fitted panels......
03-22-2011, 10:40 PM
#342
Three Wheelin'
Thread Starter
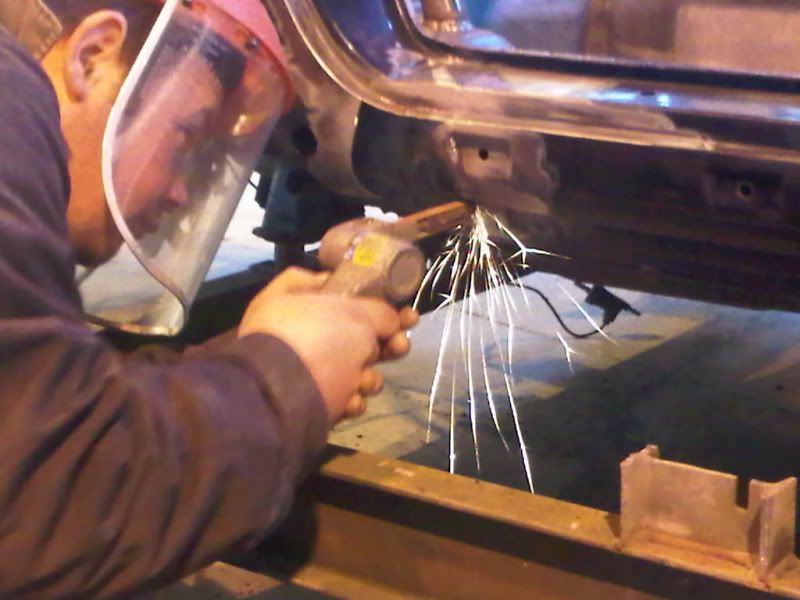
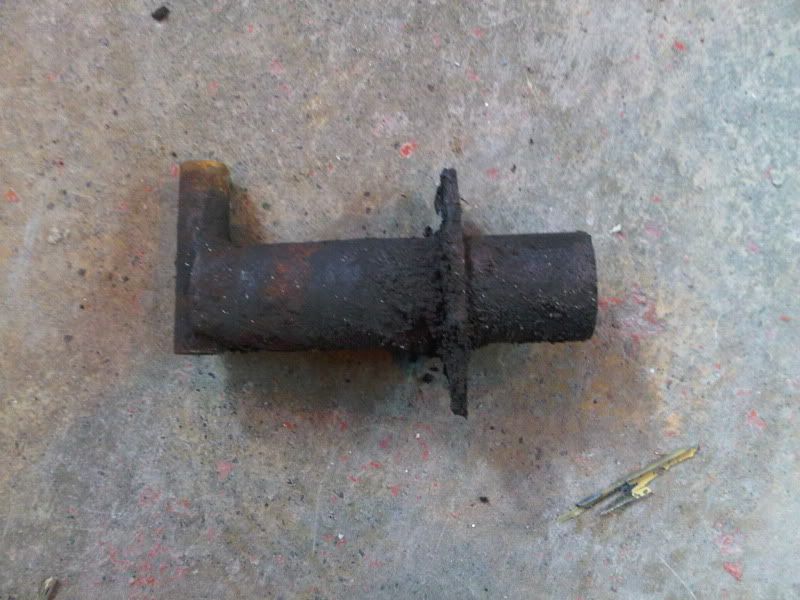
Anyway, going back to the repair of the rear chassis leg. Well not entirely the chassis leg, as its a bracket casing thats rotted thats spot welded from factory.
The square block was cut out as shown below, and the donor welded in place. The tip is if you are to buy a donor piece, make sure they cut the down to the chassis leg enough for you to cut off. Mine was generiously cut as shown!
Sorry no pic of the whole donor piece, but parts been cut!
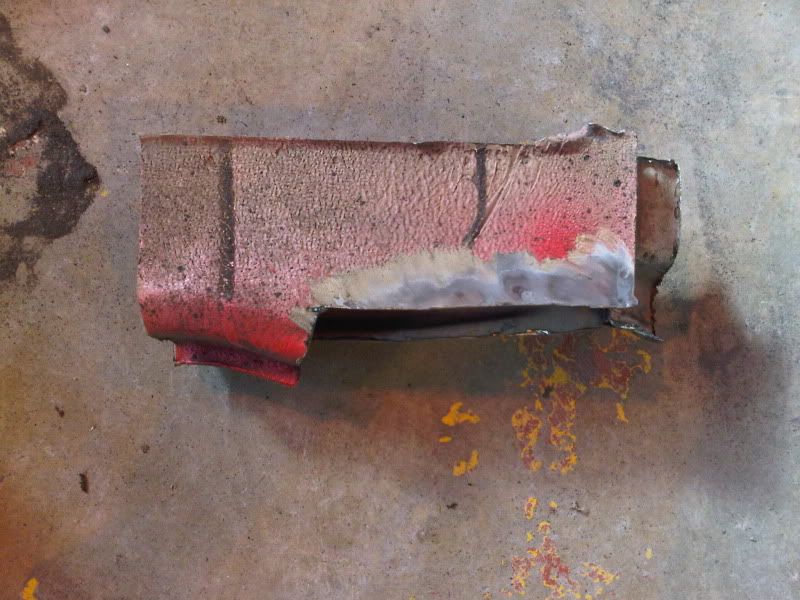
Whole part welded not just spot welded like factory, so should be even stronger. All will be treated and stoneguarded
The square block was cut out as shown below, and the donor welded in place. The tip is if you are to buy a donor piece, make sure they cut the down to the chassis leg enough for you to cut off. Mine was generiously cut as shown!
Sorry no pic of the whole donor piece, but parts been cut!
Whole part welded not just spot welded like factory, so should be even stronger. All will be treated and stoneguarded
Last edited by Nski; 03-22-2011 at 11:12 PM.
03-22-2011, 10:47 PM
#343
Three Wheelin'
Thread Starter
Easy one. The bracket is on all replacement panels from Porsche, so the fact that it is there signifies that the car has had accident damage in the past and has had the quarter panel replaced with a new one. The bottom line is that the bodyshop who fitted the panel should have removed the bracket before it was painted, but at least it is a simple correction to make at this stage of the build.
Of course, the probability is that the rust you just repaired on the sill to quarter joint was caused by the same bodyshop inadequately painting and protecting their freshly fitted panels......
Of course, the probability is that the rust you just repaired on the sill to quarter joint was caused by the same bodyshop inadequately painting and protecting their freshly fitted panels......
We gathered the rear wing was replaced as we noticed the spot weld on that wing was not factory when opening the rear bootlid when buying the car. The welding work wasn't very good with odd little holes hence the rust, but now all rectified  Not surprising stuff on these near 20 year old cars!
Hope your well Colin, thanks!
Last edited by Nski; 03-23-2011 at 10:15 PM.
03-23-2011, 04:00 AM
#344
Nordschleife Master
Fantastic updates Norm
I guess this car is turning out to be a lot rustier and a bigger job than you thought it was when you started. Should be as good as new when finished though
I guess this car is turning out to be a lot rustier and a bigger job than you thought it was when you started. Should be as good as new when finished though
03-23-2011, 05:32 PM
#345
Racer
hi norm wow was not expecting that and colins answer must have been a shock now i no why you let neil loose on your car he is the man and nothing seems to faze him other people would be running round with there hands on there head its nearly at the good bit now so look forward to seeing it in paint love the photos of the escort being a ford fan and a mk 2 nut heres an other project ive been watching and a good colour to
Last edited by ray stobbs; 05-20-2012 at 02:43 PM.