
My Engine Rebuild

 03-14-2009, 06:45 AM
#32
Rennlist Member
Thread Starter
Join Date: Sep 2006
Location: Welwyn Garden City, Herts England
Posts: 121
Likes: 0
Received 0 Likes
on
0 Posts
Dutch. That makes perfect sense. I applied a light smear of RTV silicone to the bolt and the "O" rings. After realising what I had done, I pulled four through bolts, checked the "O" rings and replaced again with new. The four I pulled had no tear marks and appeared to have seated OK. The worse bit of this was cleaning off the then set RTV silicone from the bolt and the recess in the case. I found paint stripper worked best for this, it has similar ingredients as the locitie silicone removal spay you can buy.
Low 964. Brave or stupid, you can make the judgement when I have it running.
The plan is to have it up and running for the 964 meet at the Centre of Gravity in April. Going to have to pull out the stops now I have set a deadline
.
Low 964. Brave or stupid, you can make the judgement when I have it running.
The plan is to have it up and running for the 964 meet at the Centre of Gravity in April. Going to have to pull out the stops now I have set a deadline
.
03-14-2009, 07:24 AM
#33

Great job !! I love these stories with pics of the work and parts itself 
One question : Did you order new cylinders/pistons or did you machine the original cylinders with a groove for the gasket ?
Thanks and keep up the good work !
Dick964
One question : Did you order new cylinders/pistons or did you machine the original cylinders with a groove for the gasket ?
Thanks and keep up the good work !
Dick964
03-14-2009, 11:24 AM
#34
Racer
Join Date: Dec 2008
Posts: 453
Likes: 0
Received 0 Likes
on
0 Posts
"There appears to be two schools of thought to mount the pistons. Either mount the pistons onto the rods, then fit the cylinders over the top, which I felt was a little tricky. Or the option I chose, mount the pistons into the cylinder, then month the whole assembly onto the rods. Either way you need to get the spring clip into the pistons to hole the wrist pin into position.
"
A couple of questions,
1. If one would go with installing the pistons onto the rods, then mount the fit the cylinder onto the piston....how would you remove the ring compression tool? I am assuming you have to disassemble the tool? In that case, any ring compression tool do the trick, or do you need a special one? Also, if you install pistons onto rods first, does it make installation of the spring clip a bit easier to where you might not need a tool like the one you "home made"?
2. You don't mention it, but is it not customary to lightly coat the rings or the cylinder wall with oil when installing a piston?
I am not trying to be critical, just trying to learn something. Thanks
03-14-2009, 06:26 PM
#36
Pro

Join Date: Dec 2007
Posts: 586
Likes: 0
Received 0 Likes
on
0 Posts
Quote....
"The plan is to have it up and running for the 964 meet at the Centre of Gravity in April. Going to have to pull out the stops now I have set a deadline"
So do I................everything today took twice as long as I thought, especially as I had mounted front top mounts the wrong way round last week.....no wonder I couldnt get any neg camber. duh........
03-15-2009, 06:28 AM
#38
Rennlist Member
Thread Starter
Join Date: Sep 2006
Location: Welwyn Garden City, Herts England
Posts: 121
Likes: 0
Received 0 Likes
on
0 Posts
Tango635. 1. You can purchase piston ring compressors which are a "C" shaped steel band, which have small tangs at each end of the C. It comes with plier type tools that locate on the tangs and you compress the piston rings in this way. This tool would be easier to use in the this application if you were trying to fit the cylinders after the pistons.
As for the "homemade" tool. I found it very hard to get the "C" clips in without it, even on the bench. I read somewhere that the cross section went up from 1.0mm to 1.7mm when Porsche made the 964. The pre 964 style could be installed with pliers.
2. That is right. I cleaned everything thoroughly with Isopropyl alcohol, including the rings, pistons, ring groves, oil holes and cylinders. Then wiped the rings, outside of the piston, inside of piston ring tool and inside of cylinder with oil before assembly. When installed and the temporary head studs in place I cycled the engine several times and wiped away as much of the oil residue as possible, i understand this prevents the rings seating on initial start up. I found it important to clean the ring tool every time and apply fresh oil as it soon picked up little bits of dust/dirt from my bench that then got transferred to the next piston, despite placing it on a clean plastic bag.
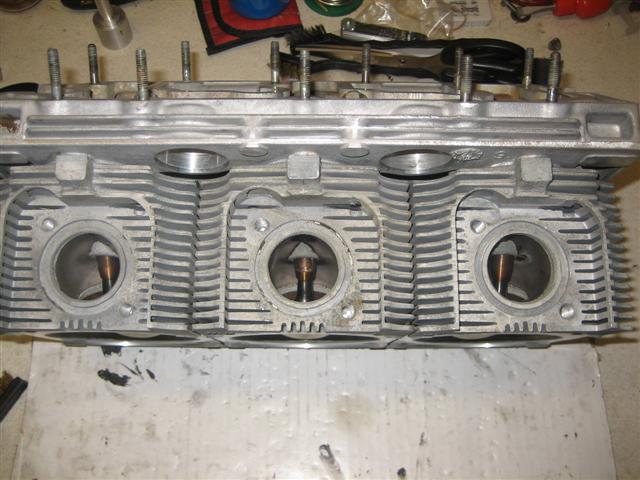
John Boggiano I don't really know, but my best guess would be to aid cooling of the exhuast valve. The lower heat shields (red in my photos) cloak around this area.
This is from another angle when I was checking Colin�s heads.
Even if I dont manage to get it done I am going to come up to the meet at CG. So I hope to meet some of you then.
Regards
Ross
As for the "homemade" tool. I found it very hard to get the "C" clips in without it, even on the bench. I read somewhere that the cross section went up from 1.0mm to 1.7mm when Porsche made the 964. The pre 964 style could be installed with pliers.
2. That is right. I cleaned everything thoroughly with Isopropyl alcohol, including the rings, pistons, ring groves, oil holes and cylinders. Then wiped the rings, outside of the piston, inside of piston ring tool and inside of cylinder with oil before assembly. When installed and the temporary head studs in place I cycled the engine several times and wiped away as much of the oil residue as possible, i understand this prevents the rings seating on initial start up. I found it important to clean the ring tool every time and apply fresh oil as it soon picked up little bits of dust/dirt from my bench that then got transferred to the next piston, despite placing it on a clean plastic bag.
John Boggiano I don't really know, but my best guess would be to aid cooling of the exhuast valve. The lower heat shields (red in my photos) cloak around this area.
This is from another angle when I was checking Colin�s heads.
Even if I dont manage to get it done I am going to come up to the meet at CG. So I hope to meet some of you then.
Regards
Ross
03-15-2009, 06:34 AM
#39
Rennlist Member
Thread Starter
Join Date: Sep 2006
Location: Welwyn Garden City, Herts England
Posts: 121
Likes: 0
Received 0 Likes
on
0 Posts
Sorry Dick and Madmog, I missed you posts.
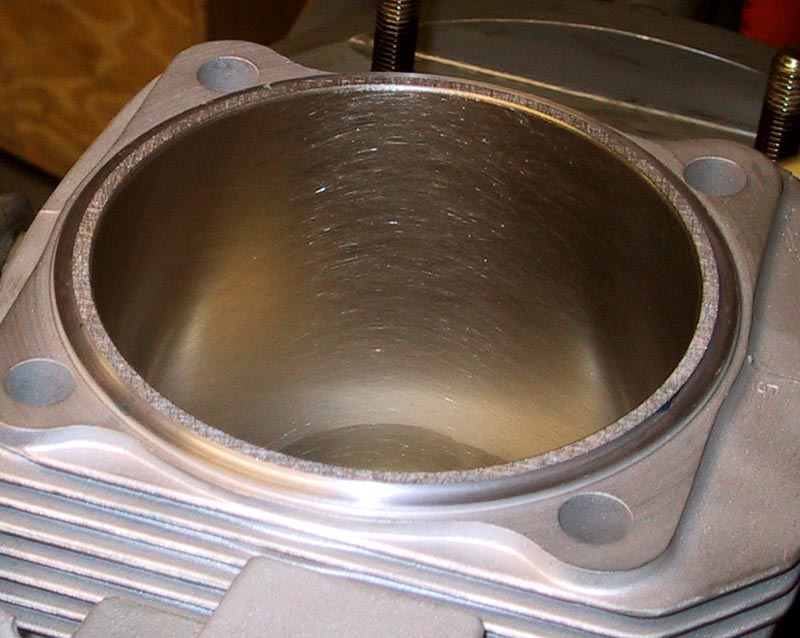
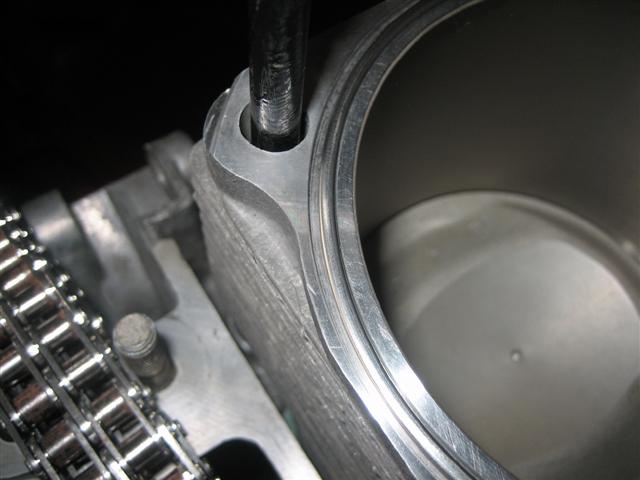
Dick. I did look into getting some second hand "old" style cylinders and getting these machined, but there is not much material to play with and I was warned about the inner thin lip of the cylinder breaking away over time. I found this picture on my search, not sure where from, so cannot reference it, sorry if its someone reading. I brought new Mahle cylinders and pistons which are the later style with the grove.
Madmog. If I get stuck or need a lift, I will give you a shout. Thank you for the kind offer.
Ross
 03-15-2009, 10:26 AM
#41
Rennlist Member
I've never rebuilt a flat-six, but have done other V8 and V6 motors. If you put the pistons on the rods first, and the cylinders on the block, why couldn't you install the piston/rod assembly through the top of the cylinder barrels like a conventional motor? I'm going to guess it's not done because the cylinders are not bolted in yet?
 03-17-2009, 06:32 PM
#45
Rennlist Member
Thread Starter
Join Date: Sep 2006
Location: Welwyn Garden City, Herts England
Posts: 121
Likes: 0
Received 0 Likes
on
0 Posts
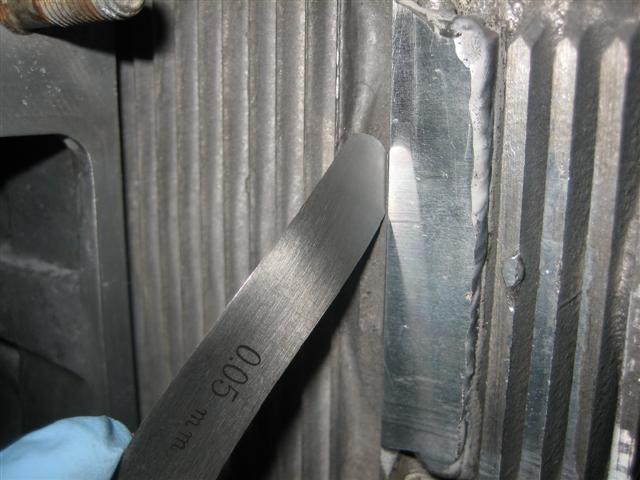
I was doing my final cleaning of the timing chain mounting area on the crank case and noticed a very fine hairline gap between the head of number one and the cylinder. I checked the other three and the opposite bank and noticed this to be the same on all. The heads were fully torqued down at this point so it appeared as if the graphite sealing ring was not compressing fully. I was able to get a 0.05mm feeler gauge blade at the central point of each head, but not by the head studs, showing the heads were deforming slightly.
I was a bit unsure of what to do. The graphite rings had come with the Wrightwood racing gasket set, which is meant to be the business. I put a post on this forum, along with asking a few others their thoughts about this. In the end I decided to pull both banks of head off and change the rings for the latest version of the steel rings direct from Porsche (�15.00 each!!!!!). These are a hollow steel ring similar to the exhaust to head rings that compress when sandwiched.
See below the side by side comparison.
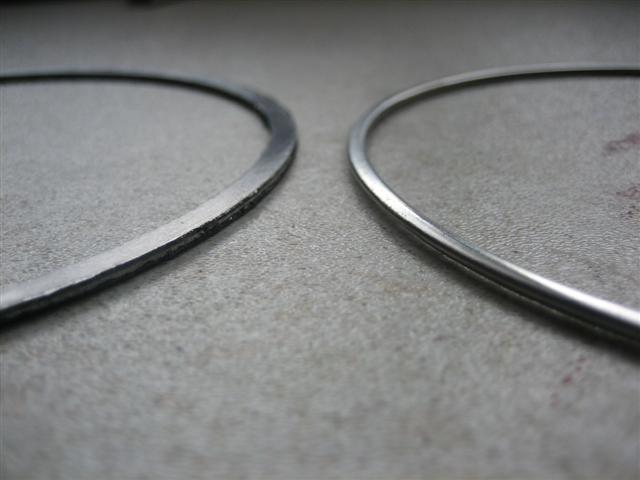
Before I ordered these I did refit the heads without any form of ring to check they seated correctly, which they did. The graphite rings before installation were 1.60mm thick and identical when I removed them. The grove in the cylinders is 1.50mm, so they appear to have compressed by 0.05mm only. By contrast the Porsche steel rings were 1.80mm thick and as the heads were touching the cylinders when fitted and torqed down at compressed 0.3mm. I assume that they are sprung steel and will exert a slight bit of upwards force and maintain a seal at this point.
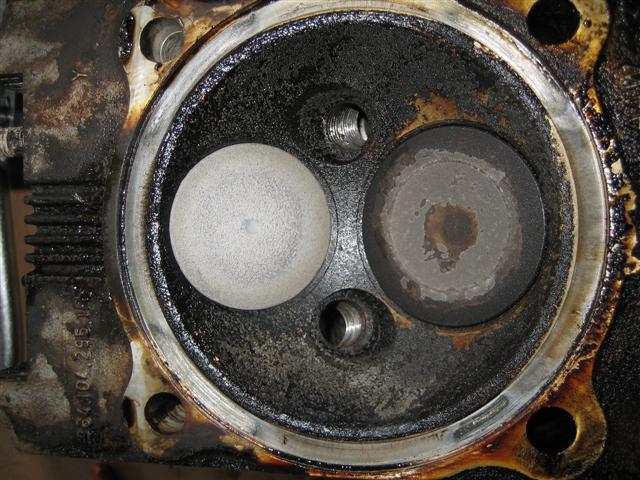
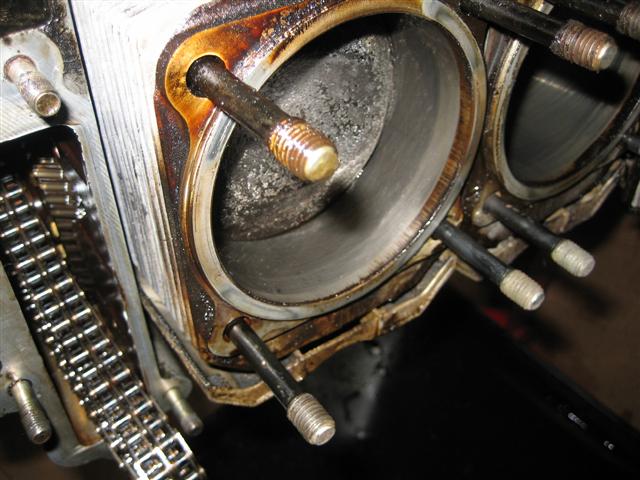
I assume the heads were bending as they had a reduced contact area when using the Wrightwood graphite rings. Thus not allowing the head to be fully supported by the cylinder. If you look at these two photos when I stripped the engine, you can see the same thing occurring with the early Porsche design. The contact surface with the cylinder is very narrow, not much wider than the graphite ring and as the head studs are outboard of this line, the heads are allowed to bend and create contact patches by the studs only.
I was a bit unsure of what to do. The graphite rings had come with the Wrightwood racing gasket set, which is meant to be the business. I put a post on this forum, along with asking a few others their thoughts about this. In the end I decided to pull both banks of head off and change the rings for the latest version of the steel rings direct from Porsche (�15.00 each!!!!!). These are a hollow steel ring similar to the exhaust to head rings that compress when sandwiched.
See below the side by side comparison.
Before I ordered these I did refit the heads without any form of ring to check they seated correctly, which they did. The graphite rings before installation were 1.60mm thick and identical when I removed them. The grove in the cylinders is 1.50mm, so they appear to have compressed by 0.05mm only. By contrast the Porsche steel rings were 1.80mm thick and as the heads were touching the cylinders when fitted and torqed down at compressed 0.3mm. I assume that they are sprung steel and will exert a slight bit of upwards force and maintain a seal at this point.
I assume the heads were bending as they had a reduced contact area when using the Wrightwood graphite rings. Thus not allowing the head to be fully supported by the cylinder. If you look at these two photos when I stripped the engine, you can see the same thing occurring with the early Porsche design. The contact surface with the cylinder is very narrow, not much wider than the graphite ring and as the head studs are outboard of this line, the heads are allowed to bend and create contact patches by the studs only.