

964RS replacement trailing arm bushes

 12-27-2012, 08:02 PM
#122
Rennlist Member
I'm currently rebuilding a 964 starting from a white body, that's why I have all these parts laying around.
 12-30-2012, 05:18 PM
#123
Racer
Join Date: Feb 2011
Location: Chester County, PA
Posts: 434
Likes: 0
Received 0 Likes
on
0 Posts
I was able to removed the trailiong arm today, but the spring plate need that special tool. I'll try tomorrow with a cut off 12mm allen and a closed wrench. Hopefully it doesnt need to much force to break loose.
I was planning on replacing the trailing arm bushings only but after seeing my spring plate's bush,... I think I'll have to splurge for ERP's new spring plate.
****,,... it never ends.
I was planning on replacing the trailing arm bushings only but after seeing my spring plate's bush,... I think I'll have to splurge for ERP's new spring plate.
****,,... it never ends.
12-30-2012, 05:47 PM
#124
Nordschleife Master

I haven't started wrenching on the rear suspension yet, but I've been thinking up a solution regarding the need for Porsche's $65 special tool and the use of their NLA Torque Adapter.
The solution I came up with in my head and I went out and bought tools yesterday, but I haven't actually applied it to the car, is to do the cut-off 12mm bit, a shorty 12mm wrench to function as the torque adapter, then another 12mm bit hooked up to the 1/2" drive breaker bar.
The solution I came up with in my head and I went out and bought tools yesterday, but I haven't actually applied it to the car, is to do the cut-off 12mm bit, a shorty 12mm wrench to function as the torque adapter, then another 12mm bit hooked up to the 1/2" drive breaker bar.
01-01-2013, 02:08 PM
#125
Racer
Join Date: Feb 2011
Location: Chester County, PA
Posts: 434
Likes: 0
Received 0 Likes
on
0 Posts
I think I found a tool that might do the trick for the spring plate removal, instead of the pricey Porsche tool, which is available in very limited supply. It's a motorcycle axle removal/installation tool with multiple allen sizes, and the 12mm happen to be at the right end of the tool.
Only $19 shipped, made in the U.S.
Only $19 shipped, made in the U.S.
01-05-2013, 09:12 PM
#126
Nordschleife Master
Any update on this?
I've started tearing into the rear suspension and loosened the driver's side bolt. It was pretty tight. I had to use a bit of a cheater bar on the end of my 18" breaker bar to get it going.
I haven't gotten around to cutting the 12mm L-shaped key to start attacking the pass. side.
I've started tearing into the rear suspension and loosened the driver's side bolt. It was pretty tight. I had to use a bit of a cheater bar on the end of my 18" breaker bar to get it going.
I haven't gotten around to cutting the 12mm L-shaped key to start attacking the pass. side.
01-06-2013, 07:28 AM
#127
Burning Brakes
Join Date: Apr 2011
Location: Perthshire, Scotland
Posts: 838
Likes: 0
Received 0 Likes
on
0 Posts
I used the hex from my hex socket set which was an ideal length when removed from the socket and put a ring spanner on it.
similar to link
http://www.ebay.co.uk/itm/10pc-1-2-I...item41631e2bb8
similar to link
http://www.ebay.co.uk/itm/10pc-1-2-I...item41631e2bb8
01-06-2013, 10:23 PM
#128
Nordschleife Master
Alright, I went for it tonight, and success!!! Sorta.
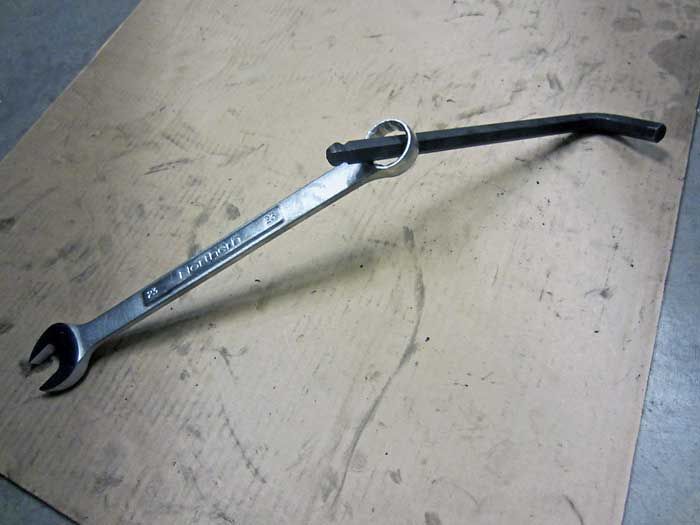
Here was my original approach I discussed a few posts up, of using a normal 12mm wrench as a torque adapter. This method FAILED almost as soon as I put force on it. The open end of the wrench yielded and that was the end of that.

I then resorted to my 24" floor jack handle aka cheater bar. I was fortunate enough that I had the car jacked up high enough and the fastener head was at the right angle that I was able to get a good 1/4 turn or more on the fastener before the bar started to hit the shock mount on the trailing arm and that was the end of that method.
Luckily I was able to get enough rotation with the above method that the bolt was loose enough that I was able to put more rotation on it using this method.
The bolt now spins freely.
I haven't actually removed anything from the rear suspension besides the rear calipers, i've just been breaking loose all the bolts.
I still need to remove the rear lower shock bolts. After hitting one side for several minutes w/ my Dewalt electric impact rated at over 300ft/lbs, I gave up on that and will continue to try on those tomorrow or later this week.
Now that I have those spring plate bolts loosened, I now realize i'm going to struggle to accurately get that bolt torqued back to the required 147ft/lbs using any of the methods I used to remove it. I'm now working with my dad on welding together some sort of DIY torque extension / torque adapter in order to be able to properly torque that bolt upon reassembly.
Here was my original approach I discussed a few posts up, of using a normal 12mm wrench as a torque adapter. This method FAILED almost as soon as I put force on it. The open end of the wrench yielded and that was the end of that.
I then resorted to my 24" floor jack handle aka cheater bar. I was fortunate enough that I had the car jacked up high enough and the fastener head was at the right angle that I was able to get a good 1/4 turn or more on the fastener before the bar started to hit the shock mount on the trailing arm and that was the end of that method.
Luckily I was able to get enough rotation with the above method that the bolt was loose enough that I was able to put more rotation on it using this method.
The bolt now spins freely.
I haven't actually removed anything from the rear suspension besides the rear calipers, i've just been breaking loose all the bolts.
I still need to remove the rear lower shock bolts. After hitting one side for several minutes w/ my Dewalt electric impact rated at over 300ft/lbs, I gave up on that and will continue to try on those tomorrow or later this week.
Now that I have those spring plate bolts loosened, I now realize i'm going to struggle to accurately get that bolt torqued back to the required 147ft/lbs using any of the methods I used to remove it. I'm now working with my dad on welding together some sort of DIY torque extension / torque adapter in order to be able to properly torque that bolt upon reassembly.
01-07-2013, 10:21 AM
#130
Burning Brakes
Join Date: Apr 2011
Location: Perthshire, Scotland
Posts: 838
Likes: 0
Received 0 Likes
on
0 Posts
Vandit,
these are a bit of a pain if your lucky you can disconnect at the hub/shoe end and pull them through the back of the trailing arm however mine were stuck in the trailing arm with corrosion they just push in to the trailing arm tried a small chisel round the flange of the collar to remove them but ended up damaging the cable in which case you have to disconnect them from handbrake adjuster at the back of the center console and pull them through. Be aware these cables cost �70 each to replace!
these are a bit of a pain if your lucky you can disconnect at the hub/shoe end and pull them through the back of the trailing arm however mine were stuck in the trailing arm with corrosion they just push in to the trailing arm tried a small chisel round the flange of the collar to remove them but ended up damaging the cable in which case you have to disconnect them from handbrake adjuster at the back of the center console and pull them through. Be aware these cables cost �70 each to replace!
01-08-2013, 09:00 AM
#131
Racer
Join Date: Feb 2011
Location: Chester County, PA
Posts: 434
Likes: 0
Received 0 Likes
on
0 Posts
Vandit, the e-brake cable is not that hard. just watch out for your fingers. You have to pull the spring up on the shoe, and unclamp the small retainer, then pull the cable from behind the wheel hub assembly. It will be tight but just pull and twist, it should come right out.
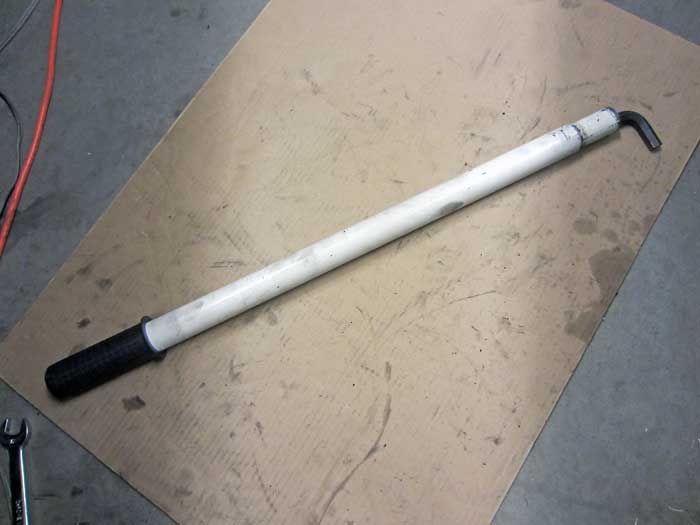
Update: do not buy the tool I posted,... it is a very clever tool but not appropriate for the amount of torque you need to apply. Mine was probably made of butter because it twisted and deformed when i used my wrench and a breaker bar. Still didn't budge, so I bought a Sears 12mm (L shape) hex key and sliped my floor jack handle over it and it worked.
My spring plate buschings are very bad, so new spring plate will have to go in. Funny how those look like there were about to fall off, but the trailing arm bushing still loook very good.
01-08-2013, 09:28 AM
#132
Nordschleife Master
Same here on the L-shape hex w/ the jack handle cheater bar slipped over in order to break em loose. See my pic for reference.
As for the bushings, the spring plate bushing is suppose to be weaker/softer than the trailing arm bushing, hence it fails sooner. This is by design (not the failure part) in order for the Weissach effect to work (basically the spring plate bushing gives causing the rear to toe-in under braking for added stability).
As for the bushings, the spring plate bushing is suppose to be weaker/softer than the trailing arm bushing, hence it fails sooner. This is by design (not the failure part) in order for the Weissach effect to work (basically the spring plate bushing gives causing the rear to toe-in under braking for added stability).
01-26-2013, 10:14 AM
#133
Drifting
So guys, what' the final update on this one? Did you manage to replace everything and tourqe the bolts correctly? What tools did you end up with finally?
I'm about to start this job in two weeks!
Thomas
I'm about to start this job in two weeks!
Thomas
01-27-2013, 06:48 PM
#134
Nordschleife Master
I haven't worked on the car in 2wks due to other commitments and work travel out of the country. I've currently dropped the whole rear suspension (front too), but haven't even gotten around to removing the old bushings, much less reinstalling new parts.
My spring plate bushes look just as bad as PChar's, so i'm glad i'm replacing them w/ the ERP monoball spring plates.
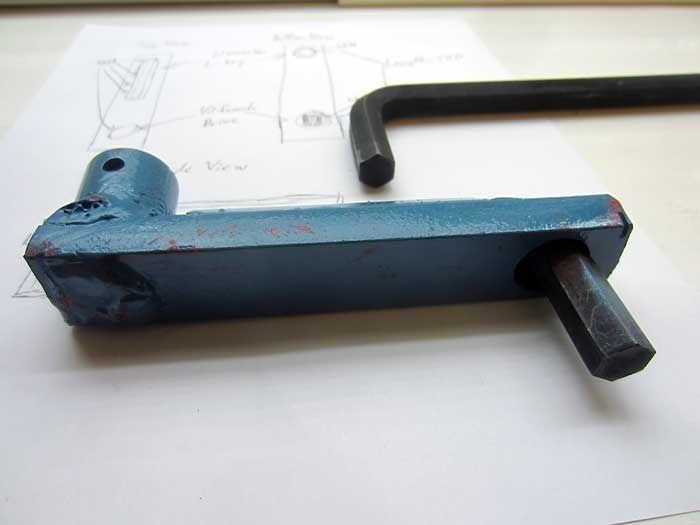
As for the tool to torque the spring plate bolt properly on the right side, I worked with my dad and drew up a diagram and he was able to weld together a tool and ship it to me. I haven't used it yet, but I feel fairly confident that it will be the right tool for the job.
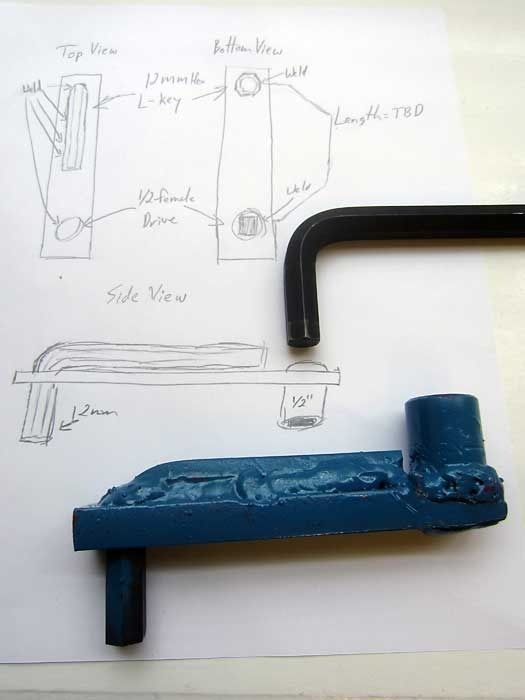
It's basically a 12mm L-shaped hex, welded to a piece of .5" thick metal strap, then a female 1/2" drive welded to the opposite side.
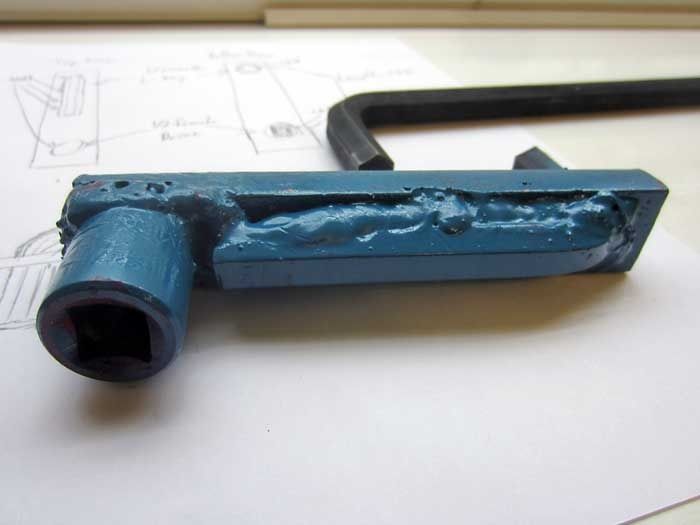
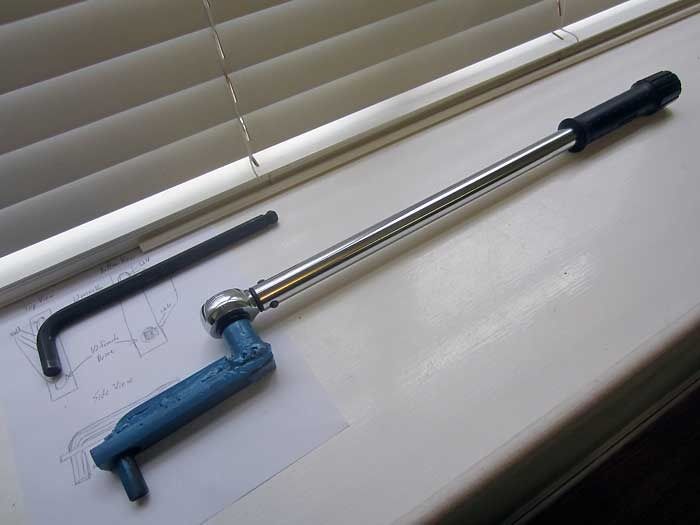
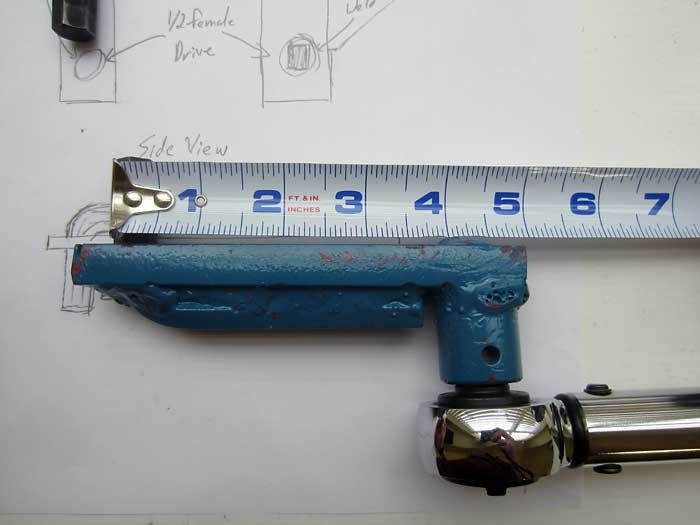
Since it extended the length of the tool by about 4.5", I need to recalculate the torque wrench settings.
Per this site
http://www.freeinfostuff.com/TorqueE...eExtension.htm
If I keep the tool perfectly in-line w/ the wrench, I should set the torque wrench to 117ftlbs in order to achieve 147ft/lbs at the fastener using my 18" torque wrench. I could also set the tool to a 90 degree angle to the wrench, then i'd set the wrench to 147ft/lbs. Any angle in between there would require recalculation to achieve the correct torque at the fastener.
My spring plate bushes look just as bad as PChar's, so i'm glad i'm replacing them w/ the ERP monoball spring plates.
As for the tool to torque the spring plate bolt properly on the right side, I worked with my dad and drew up a diagram and he was able to weld together a tool and ship it to me. I haven't used it yet, but I feel fairly confident that it will be the right tool for the job.
It's basically a 12mm L-shaped hex, welded to a piece of .5" thick metal strap, then a female 1/2" drive welded to the opposite side.
Since it extended the length of the tool by about 4.5", I need to recalculate the torque wrench settings.
Per this site
http://www.freeinfostuff.com/TorqueE...eExtension.htm
If I keep the tool perfectly in-line w/ the wrench, I should set the torque wrench to 117ftlbs in order to achieve 147ft/lbs at the fastener using my 18" torque wrench. I could also set the tool to a 90 degree angle to the wrench, then i'd set the wrench to 147ft/lbs. Any angle in between there would require recalculation to achieve the correct torque at the fastener.

