When you click on links to various merchants on this site and make a purchase, this can result in this site earning a commission. Affiliate programs and affiliations include, but are not limited to, the eBay Partner Network.
But seriously.. I understand that the only proper way of flushing / filling the AC --never mind converting to 134a-- means servicing the expansion valve.. which I also understand is attached to the evaporator?
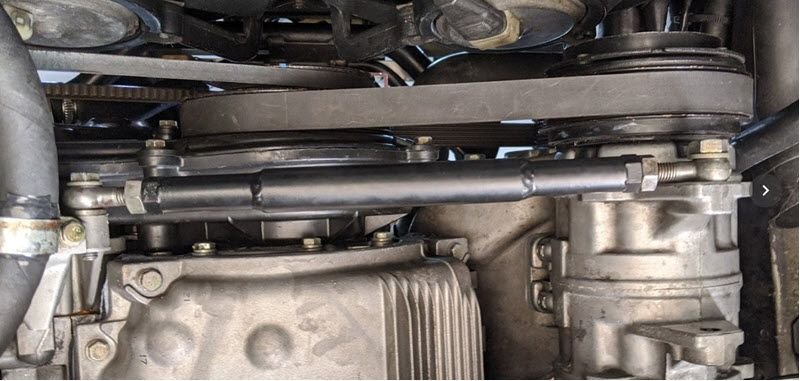
After doing the Nissan Quest alternator mod my tension rod looked stretched to the max just like Tom's. It would probably hold forever but it seems sketchy to me. Used my crappy welding skillz to make an extension for the tension rod. I found some steel tubing from McMaster Carr that has the exact ID to fit the factory tension rod OD.
I'd make it just a little bit shorter next time but this seems a lot more rigid now. I can post details if anyone want to replicate this.
But seriously.. I understand that the only proper way of flushing / filling the AC --never mind converting to 134a-- means servicing the expansion valve.. which I also understand is attached to the evaporator?
I actually bought a new one to cover my bases, but since the A/C was working fine on R12, but for the compressor oil leak, I opted not to put it in for now. I'm not sure how'd you service it other than just replacing it, and I worried I'd be opening up a new rabbit hole if I dug in to replace it... Tomorrow I'll use an electronic leak detector to see what I might be up against this summer.
So far during the lock down:
KW coilovers installed
Fixed creaky rear hatch (with felt!)
Fixed window rattle and missing rail guide
Replaced the battery
Made new glove box bumper stops
Found 2 maddening rattles in the cabin
Converted to Griffith's A/C 134a
Replaced in-dash duct work so passenger side gets hvac
Installed Perry's LED lights for cluster
Wired console switch to garage door
Next up, belts and rollers and a few related oil leaks.
Tell me more about this! On warm days, mine is starting to creak again. Fixed it years ago with those Delrin pin receptacle inserts.. probably the O-rings on those are done... but I'm curious about this felt fix
Tom, did you add Ester oil to your new compressor as part of the R134 conversion? How much? I'm going to try re-sealing mine using Griffiths rebuild kit. I'm not sure how much oil to put back in.
After doing the Nissan Quest alternator mod my tension rod looked stretched to the max just like Tom's. It would probably hold forever but it seems sketchy to me. Used my crappy welding skillz to make an extension for the tension rod. I found some steel tubing from McMaster Carr that has the exact ID to fit the factory tension rod OD.
I'd make it just a little bit shorter next time but this seems a lot more rigid now. I can post details if anyone want to replicate this.
My turn-buckle is not stretched to the max. The pic I posted was just after I hung the compressor on the bracket, but it's in the middle of its range (max) with the belt tensioned. I have the Nissan alternator too, so not sure why you needed to extent yours, but nice work either way.
Originally Posted by Dan Martinic
Tell me more about this! On warm days, mine is starting to creak again. Fixed it years ago with those Delrin pin receptacle inserts.. probably the O-rings on those are done... but I'm curious about this felt fix
I have new factory pins and receivers, and have adjusted endlessly (and had a windshield place try to fix the delamination) but after really studying my creaking, it was creaking where the metal part of the hatch touches the (new) rubber seal around the hatch opening. Didn't matter how tight I made the hatch, it would still creak. So.... I put self-adhesive felt on the hatch where it contact the rubber and no longer hear a peep out of the hatch.... Not sure how it would hold up over years and whether, but I'm happy to drive in peace in the meantime.
Originally Posted by markl951
Tom, did you add Ester oil to your new compressor as part of the R134 conversion? How much? I'm going to try re-sealing mine using Griffiths rebuild kit. I'm not sure how much oil to put back in.
Yes, I followed Griffith's recommendations. They recommend a specific amount of oil for each component changed. I ended up with about 4.5 to 5 ounces.
You guys might try taking the hatch completely off and tightening the hinge bolts?
I actually took the hatch off to have it resealed (the windshield place looked like a ding factory and they were going to remove it anyway). As best I can tell, I aligned it exactly like it was, and it seems water-tight and secure, but maybe someday I'll go back and see what adjustments can be made at the hinges... Something is making mine creak more than normal, so won't rule anything out unless/until I find it. Based on the felt anyway, it does seem the sound is coming from the hatch moving against the rubber seal -- even though I've tried adjusting the pins to the point where it closes so tightly it will hardly open... On the other hand, the creaking comes and goes, so it's possible the lack of noise and the recent felt are just a coincidence. Time will tell on that...
My creaking seems very much weather dependant: some days there's nothing, others days lots. The creak sounds like movement to me.. like it's "loose". I'll try replacing the o-rings in the Delrin inserts I put in years ago first.. then the felt.
FYI back when I did the Delrin inserts, I had installed a new seal around the opening and when I went to adjust the hatch pins, they were--still are--so frozen, I gave up before breaking something. I also noticed the rubber inside the latches looked ratty.. but didn't want to buy new replacements. Found the Delrin option and other than having to use thicker O-rings (instead of the thin ones that came with the inserts), they worked fine until recently!
I bought the Delrin ones but ultimately ditched them and got new receivers and rubber inserts from the dealer. The Delrin ones just didn't like to latch as well, and I found myself constantly fiddling with the pins. Soak your pins in PB blaster or something. If you mess with anything, you pretty much need to reset those pins.
Thanks for the felt pic
Originally Posted by Dan Martinic
Hmmm.. interesting. Wonder if there's a way to check these without removing the hatch..
Just remove the rear headliner panel and look up, while on your back in the hatch -- super comfy. You'd want a helper or two to move the hatch to where you want it when you tighten...
Luckily I’m retired with plenty of time on my hands. Got the 951 front end up in the air, R&R 34 year old starter. Luckily car is original 33K mile is unmolested, and clean underneath. Removed starter and heat shields, no rusty nuts, bolts. Everything came apart easily. Cleaned and repainted heat shields (ocd thing) waiting for new starter to arrive. Next; remove transaxle to figure out what/where rattle is. Repair and sell the car!
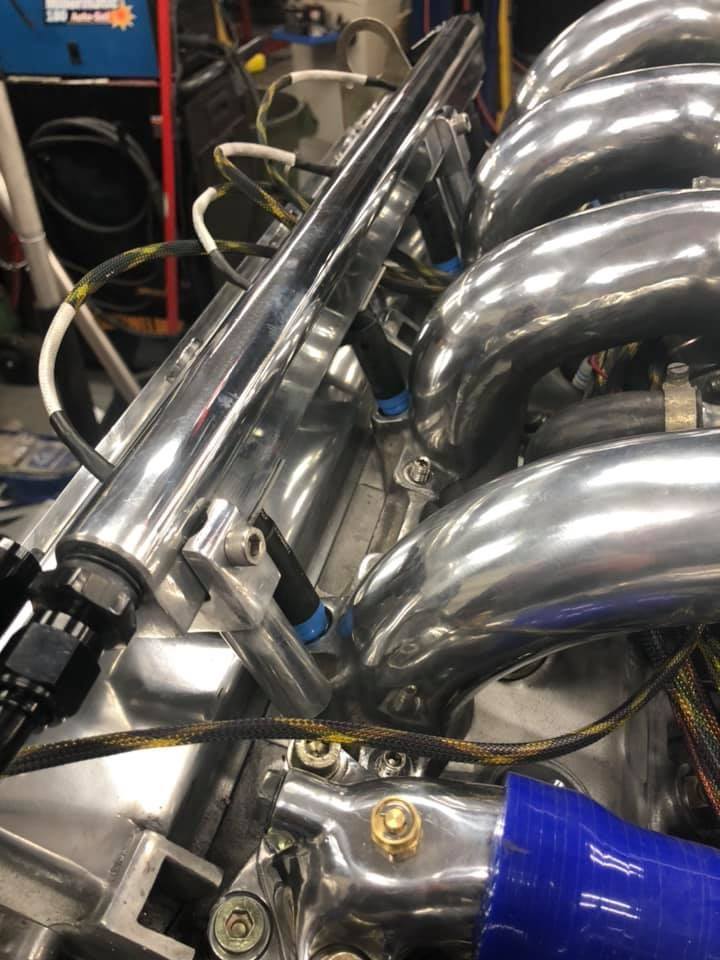
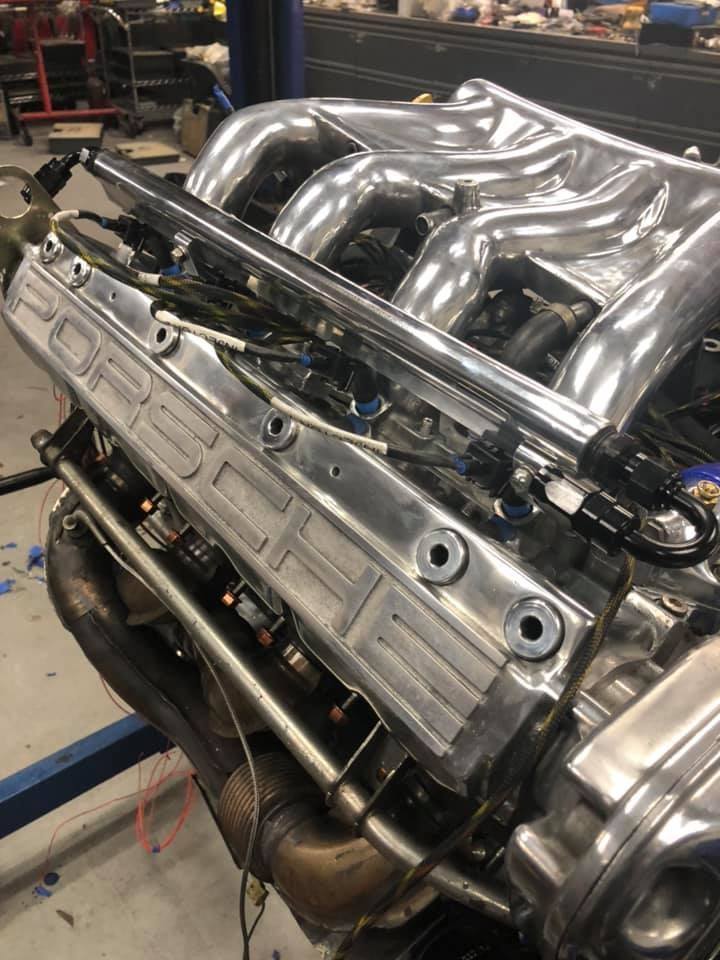
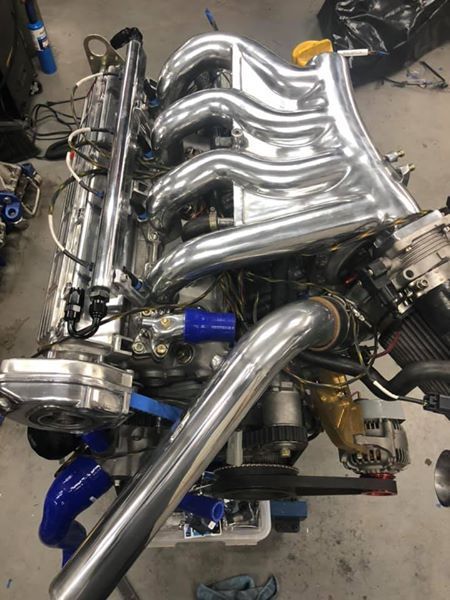
Decided to build a track car engine from the 'spare' parts around the shop. Amazing what I found in the store room! I first polished that intake manifold in the late 90's. 3.0 MID sleeved block, lightened crank, Arrow rods, Wossner pistons, 2.5 head with a modified coolant passage to fit the 3.0 block (totally forgot I had that!). I machined up a fuel rail system because I had a little extra Covid inspired time on my hands. Link Thunder ECU (also good to have some extra time to make up the harness!). All to go in a nice track car that hasn't been running in 10 years.


 04-24-2020 | 08:55 PM


 You'd want a helper or two to move the hatch to where you want it when you tighten...