

taking apart s4 engine
 03-29-2014 | 09:59 PM
#31
Pro
Joined: May 2003
Posts: 700
Likes: 0
From: Hamilton, Ontario, Canada
Jim has the right number there. Not alot of investment up to this point. Try it out. Read as much as you can. Enlist the help of experienced RLers or people who have rebuilt an engine before.
This is the approach that I took. I have rebuilt various parts more then two or three times, because I missed something or got the order incorrect, but in the end it does make sense to me much more than before.
The big thing is follow all of the torque settings and if I may make a suggestion from my experience, buy a good quality torque wrench c/w with angle torquing capability. I ended up buying three different wrenches of ok quality and in the end i could have purchased a good Snap-on or similar torque wrench that can do it all for the same or LESS money I spent on my wrenches. I can't stress how important it is.
Good luck. Take a boat load of pictures, baggie everything with notations on them and even photo stamp them if you are OCD. You will be VERY happy you did when you start putting it together.
I am hours from re-installing my rebuilt motor and I can't wait. I am sure that I probably have to re-examine something or re-route somethings just because it is my first time re-building an engine. Good luck and go for it.
03-29-2014 | 10:45 PM
#32
Burning Brakes
Joined: Oct 2004
Posts: 977
Likes: 0
From: Santa Rosa Beach, FL
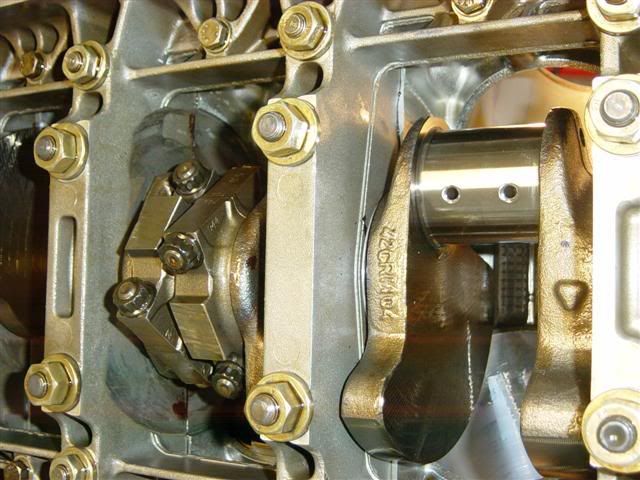
Here is a pic of my S4 engine showing the machining. My crank end play was well within spec and so I stopped at this point and did not split the block. No need to split the block if you don't need to!
 03-29-2014 | 11:08 PM
#34

Rennlist Member
Joined: Dec 2001
Posts: 25,152
Likes: 87
Indeed. I hope this forum isn't going to change into what you see on the MB or Ferrari forums "OMGZZZZ take it to YOUR MECHANICSSZZZZ"
OP - Take all the damn bolts off you see. See what moves.
OP - Take all the damn bolts off you see. See what moves.
Jeez guys, what's wrong with taking a motor apart? Sure, it's a lot harder to put it back together, but that job is made much easier by having taken it apart. We all started somewhere, and I can't think of a better way to start than by disassembling a spare $250 block.
OP, Keep asking questions, take lots of pictures for future reference (i.e. reassembly), get a felt pen and a bunch of plastic bags for small parts, and if you are not sure of something then ask questions.
A couple of hints:
1) As mentioned, don't touch the cylinder bores with anything other than a clean rag. The block is silicon/aluminum alloy with specially prepared bores to expose a hard silicon surface. It is hard but thin, and easily scratched by errant tools. Don't let your tools become errant.
2) Aluminum is soft. When cleaning, be careful not to gouge or scratch the gasket surfaces. You will need to get old sealer off of some surfaces, resist the urge to get out the old paint-scraper. Permatex gasket remover is great (also for cleaning carbon off pistons) and plastic scrapers are safe. There are other techniques but you will need to find a Zen Master to teach you.
3) Pistons, rods, pins, all that stuff has to go back into the same place it came out of. You will need to number everything (felt pen, not pencil) and take notes and pictures. And after you clean each part, put the number back on.
OK, that's three. Knowing how to count is important.
Cheers, Jim
03-29-2014 | 11:43 PM
#35
Rennlist Member
Joined: Jul 2008
Posts: 2,200
Likes: 2
From: Aurora, Ontario, Canada
 03-30-2014 | 02:54 AM
#37
Rennlist Member
Joined: Jun 2009
Posts: 3,065
Likes: 16
From: Somewhere, NC............................... Posts: Not nearly enough!
What makes you think it is NOT an S4 block?
What model is your 1989 928 -S4 or GT?
It is important to know these answers before you go further...
03-30-2014 | 05:38 AM
#38
Nordschleife Master
Joined: Jun 2006
Posts: 6,285
Likes: 56
From: ɹəpun uʍop 'ʎəupʎs
What makes you think it is NOT an S4 block?
What model is your 1989 928 -S4 or GT?
It is important to know these answers before you go further...
OP - great idea to buy a cheap engine to practice and learn on. I'd never really worked on a car before I got my first 928 (I did one oil change in my life prior to 928 ownership), and part of the adventure for me has been learning how to do it all myself.
I agree with Brendan - take the bits apart and see how it all goes and where it fits. Then read up on measuring end gaps, bearing clearances, sealants etc.. When you're ready, measure it all to make sure its all within spec per the factory "models tolerance dimensions" booklet, and put it all back together.
 03-30-2014 | 05:52 AM
#39
Rennlist Member
Joined: Jun 2009
Posts: 3,065
Likes: 16
From: Somewhere, NC............................... Posts: Not nearly enough!
That would be ideal... but to want to replace the shortblock due to a small oil leak? There's got to be an easier way to fix that.
03-30-2014 | 04:38 PM
#40
Rennlist Member
Joined: Feb 2003
Posts: 29,956
Likes: 180
From: saratoga, ca
thanks for replaying. I circled what I believe are the first set of bolts that need to be taken off in yellow. The purple circles are the bolts to split the engine in half, can someone please confirm this. Also the gear circle is a engine wear and a seem. Can someone please let me know if this is normal or if the block is bad? thanks

I don't know what those purple bolts do... they are not part of the block separation.
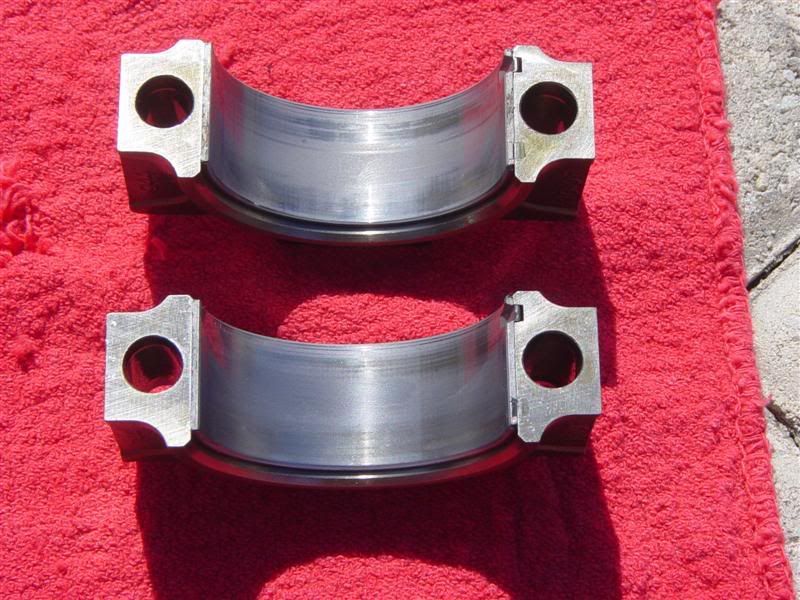
as jim says, leave the main block alone and just pull everything else out and rebuid. that wear you see is normal on the block sides bearings look good though.
I rebuilt Petty's race engione with not splitting the 5.0 block. just modified the pistons and re-rung, re-bearinged the engine. its putting out 320rwhp right now! whoo hooo!
03-30-2014 | 04:55 PM
#41
Team Owner
Joined: May 2004
Posts: 28,613
Likes: 2,651
From: Philly PA
here are Factory rebuild videos might be a good idea to watch them //
NOTE as previously stated splitting the block isnt really necessary unless there was and indication of severe bearing wear,
or the engine was run and overheated otherwise.
It should be left alone unless you know your going to install new main bearings.
Or your just taking things aprt to learn.
These videos may assist you thus saving you the work of taking the block apart.
 03-30-2014 | 11:10 PM
#43
Rennlist Member
Joined: Nov 2009
Posts: 8,608
Likes: 404
From: Dubuque, IA
Merlin I was just searching for those videos when I saw you posted them. Great way to see how it goes apart and together. I used them when I took my engine apart. It was fun.
To OP: GET A TORQUE WRENCH THAT MEASURES ANGLES. SNAP ON TECH ANGLE IS IDEAL. YOU WILL NEED IT TO PUT THE HEADS BACK ON.
You'll also head the correct Loctite sealant to put the girdle back on if you split the block. Read up on this and get it. Just any sealant won't do for the girdle to block (and end cam holders use the same sealant). Loctite 574
03-30-2014 | 11:36 PM
#44

Pro
Joined: Feb 2006
Posts: 693
Likes: 12
From: Australia
I think you will find a steel plate in behind the flywheel that is attcahed to both the block and the lower girdle and you will need to remove that before removing the girdle? In which case you will need to remove the flywheel first. But my memory is hazy....

