

'87 Intake Removal, Repairs, Installation Procedure (w/pics)
 03-05-2010 | 03:45 AM
#181
Under the Lift
Lifetime Rennlist
Member
Lifetime Rennlist
Member
Joined: Mar 2002
Posts: 18,647
Likes: 49
From: Buckeye, AZ
Oh, Dwayne - I just bought an internal bearing puller kit from Harbor Frieght. The smallest puller works perfectly for extracting the flappy bearings.
http://www.harborfreight.com/cpi/cta...emnumber=95987

http://www.harborfreight.com/cpi/cta...emnumber=95987
03-05-2010 | 09:46 AM
#183
Thread Starter
Three Wheelin'
Joined: Sep 2007
Posts: 1,363
Likes: 149
From: Ridgecrest, California
Oh, Dwayne - I just bought an internal bearing puller kit from Harbor Frieght. The smallest puller works perfectly for extracting the flappy bearings.
http://www.harborfreight.com/cpi/cta...emnumber=95987
http://www.harborfreight.com/cpi/cta...emnumber=95987
This is a GREAT idea! Thanks for trying it out and reporting - I would MUCH RATHER use a puller method such as this on these bearings. I'll be picking up the kit next time I'm out of town at a Harbor Freight store. When I try it out, I'll update the procedure with some pics.
I also agree with Bill on the orientation of the sleeve for the intake mounting studs. I've pulled the intake off Idaho twice now since this write up on Virginia and have found that when you intall the sleeve on the intake mounting stud with the "lip" oriented down and then place the gasket over the stud/sleeve, it acutally helps center the intake gasket. Having a properly centered gasket is important so that the injector cutouts align well with the injector pintle caps. I'll be making an update and at a future time, add some pics when I have an intake off again. THANKS, Bill!
03-05-2010 | 10:43 AM
#184

Rennlist Member
Joined: Jul 2002
Posts: 3,269
Likes: 5
From: Deep in the Heart of Texas!
On the GTS, the lip on the sleeves was pointed down and it seemed very logical to align the manifold to the intake ports and gaskets.
BTW, a couple thoughts for the updated procedure:
1. I think the best way to deal with aligning the fuel rail-to-dampener/regulator connections is to loosen the bolt at the base of the mounting brackets so the dampener or regulator can be turned away from the end of the pipe/rail. With the dampener or regulator moved slightly it's easier to pull up and then reinstall the fuel rail just where you want it. I also loosened the mounting that holds the dampener to the bracket (driver's side) to allow some additional fine adjustment.
My theory is that once the alignment is just right, you first tighten the fuel connection all the way, then snug back down the bracket connections. Any slight movement at the brackets shouldn't disrupt the critical fuel connection.
This approach worked well for me and only downside was that loosening the bracket mounting bolt caused some coolant to come out of the covers beneath, but those were old gaskets and probably good to replace anyway.
2. As we discussed in PM, when cutting the throttle shaft bearing shells, one does have to cut the entire shell from top to bottom, including the 'lip' at the bottom. I found it difficult to see when I had cut all the way through, but seems the easiest way to tell is when you try to drive a small screwdriver tip under the cut edge, if it's all the way through or most of the way through, then the shell will snap and pop loose pretty easily. If the shell won't budge, you need to keep cutting.
Finally, you might note for the handful of "late GTS" owners, there is a newer TPS (that provides the 'dynamic kickdown' feature) that differs by having a connector exactly identical to the MAF. The wire for the MAF is the longer of the two and has a tight turn right at the connector.
I think that's it, a long but very rewarding job!
03-05-2010 | 05:51 PM
#185
Archive Gatekeeper
Rennlist Member
Rennlist Member
Joined: Sep 2002
Posts: 17,686
Likes: 2,858
From: Irvine, CA
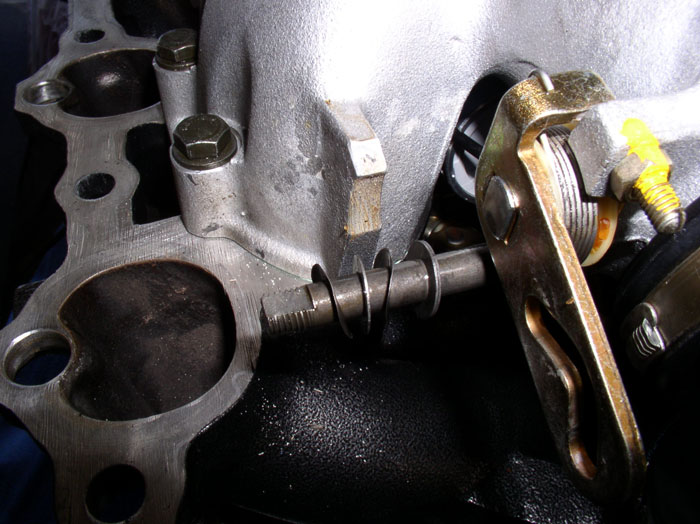
Just so it's clear to everyone with as few grams of brains in their head as me: Before you use the HF blind puller, remove the needle bearing cage first. This didn't occur to me and as I hammered up on the puller, the bearing cage caused the upper lip of the bearing shell to snap off around half its circumference. So I then had to remove the bearing cage, and then dremel the shell out the old fashioned way. ")

1 other thing, that's probably a non-issue since people wouldn't do this with the intake on the car- when you remove the needle bearing cage, the needles fall out all over the place into the intake. Be reasonably sure that you blow out the intake and make sure none are left over to get snacked on by the engine.
1 other thing, that's probably a non-issue since people wouldn't do this with the intake on the car- when you remove the needle bearing cage, the needles fall out all over the place into the intake. Be reasonably sure that you blow out the intake and make sure none are left over to get snacked on by the engine.
03-05-2010 | 05:59 PM
#186
Under the Lift
Lifetime Rennlist
Member
Lifetime Rennlist
Member
Joined: Mar 2002
Posts: 18,647
Likes: 49
From: Buckeye, AZ
Rob: I didn't have to pull the cages out first. I wedged the tip of the puller just inside of the bearing shell lip above the top of the cage. I pulled the whole bearing out intact. Perhaps this is because I expanded the puller with a wrench until it was pretty tight inside the shell.
03-05-2010 | 06:03 PM
#187
Archive Gatekeeper
Rennlist Member
Rennlist Member
Joined: Sep 2002
Posts: 17,686
Likes: 2,858
From: Irvine, CA
Ah. I guess I wedged it in the middle of the bearing cage, so it slid up and cracked the lip of the shell.
What's that demotivational poster say? ' Sometimes the purpose of your life is to serve as a warning to others?'
What's that demotivational poster say? ' Sometimes the purpose of your life is to serve as a warning to others?'
03-06-2010 | 01:09 PM
#189
Under the Lift
Lifetime Rennlist
Member
Lifetime Rennlist
Member
Joined: Mar 2002
Posts: 18,647
Likes: 49
From: Buckeye, AZ
03-07-2010 | 04:26 PM
#191
Three Wheelin'
Joined: Mar 2006
Posts: 1,489
Likes: 1
From: Happy To Be Home in Sumter, SC
Now, manuever the cam cover into place as you did in the dry run. Make sure the gaskets all mate up to their mating surfaces on the cylinder head. On this passenger installation, I didn't catch the fact that I had somehow dislodged the gasked from the left side (rear of the engine end) of the cam cover. I had put everything put back together and when I started the engine, it ran like crap. Traced the vacuum leak to the cam cover gasket - huge leak. Had to take the cam over off and reseat the gasket and re-install. All better after that.
04-26-2010 | 12:42 PM
#192
Drifting
Joined: Jun 2006
Posts: 2,707
Likes: 73
From: Indianapolis Area
Wow, This is an awesome thread.
Wish I would have read this earlier, but it will still help out immensely on my project!
https://rennlist.com/forums/928-foru...e-install.html
Wish I would have read this earlier, but it will still help out immensely on my project!
https://rennlist.com/forums/928-foru...e-install.html
05-31-2010 | 11:49 AM
#193
Rennlist Member
Joined: Dec 2004
Posts: 332
Likes: 1
From: Melbourne , Australia
Great post, brilliant job, I am in the middle of doing mine, plus other jobs!
I might have missed it, but when you do the pressure test is the motor at TDC?
I am guessing this as otherwise the valves would be open.
My flappy is missing the 'bolt head' and was sticking. I would have never realized without your awesome work!
Also you info on the bolt lenght for the rear coolant covers under the fuel damper was perfect.
I had a coolant leak develop when the bolt threaded itself. The bolts were only 15mm long where you measured them at 22mm & 20mm. The previous 'porsche garage' fitted the wrong size......one of many of their screw ups!
thanks so much
03-17-2012 | 08:11 PM
#194
Addict
Lifetime Rennlist
Member
Lifetime Rennlist
Member
Joined: Jul 2007
Posts: 4,539
Likes: 3
From: Germany
 07-04-2013 | 03:17 PM
#195
Pro
Joined: May 2003
Posts: 700
Likes: 0
From: Hamilton, Ontario, Canada
Even though I read and re-read the Dwaynes step by step manual a dozen times, i still put the flappy bearings upside down. Will this create any problems? If they have to be removed, is there a way to remove them without damaging them? I was so tickled how easy it was to install them with the threaded rod, i became confused with which direction they should have been oriented. I ended up installing both bearings in one step as opposed to Dwaynes since bearing installation. Is there a reason for this?