
'87 Intake Removal, Repairs, Installation Procedure (w/pics)
 06-06-2009, 11:20 PM
#166
Three Wheelin'
Thread Starter
Join Date: Sep 2007
Location: Ridgecrest, California
Posts: 1,363
Likes: 0
Received 147 Likes
on
31 Posts
Hello again,
Well, I took the intake off of Idaho ('88) recently and found a couple of interesting things worth noting for this thread. First, the spring tension on the flappy. In my original writeup on post #85, I wrapped the spring around the post a couple of times. This seems to be too tight and results in more vacuum in order to move the flappy plate - although I believed it was that tight when I took it off. I know Virginia ('87), the car that I documented this thread with, did have the intake taken off previously, so perhaps it was not installed with the correct tension by the PO.
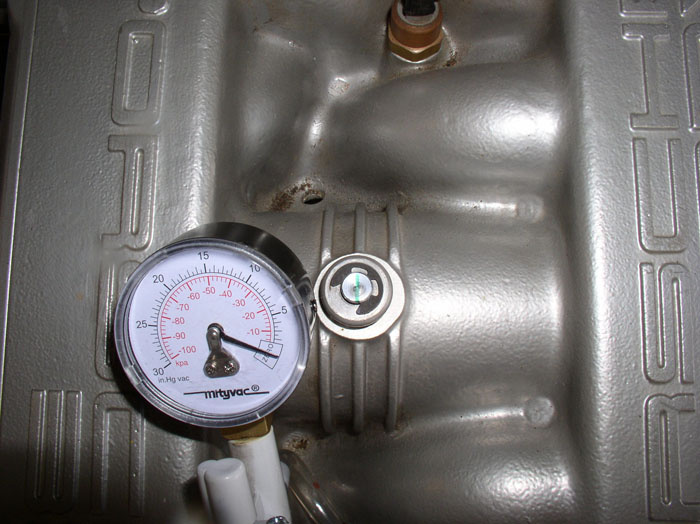
Anyway, I tested Idaho (a virgin intake) before disassembly to see what vacuum was required to move the flappy plate. This can easily be done by pulling the rubber cap off the top of the intake and marking the flappy spindle with a sharpie marker. In this case, I marked a vertical line so I could tell when the flappy was moving under vacuum. Next, disconnect the vacuum elbow to the flappy at the vacuum solenoid at the front of the engine and attach a vacuum pump to the elbow. Here's the flappy at rest with no vacuum.
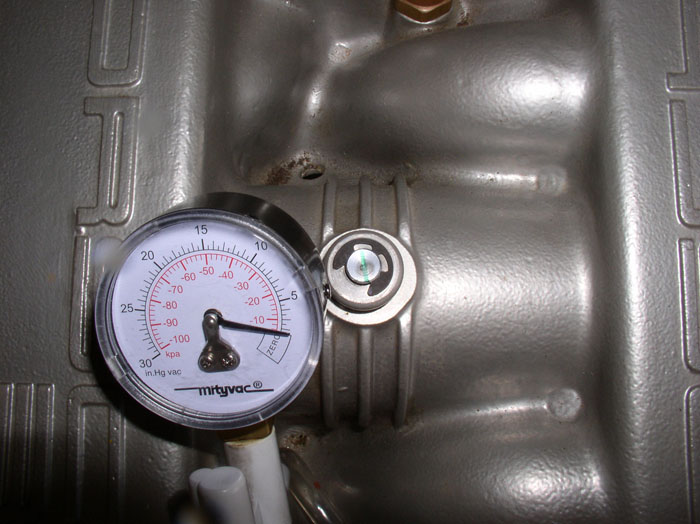
I slowly applied vacuum and noticed the flappy began movement at about 2 Inches Hg.
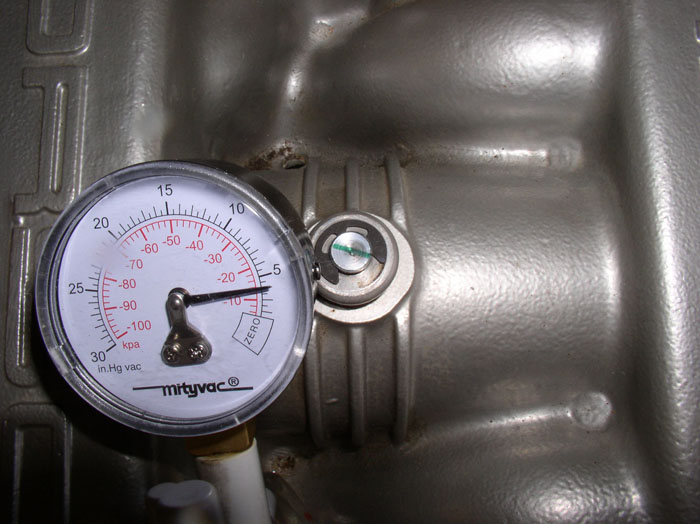
And the flappy was fully open when vacuum was at about 4 Inches Hg. This was significantly less vacuum than what was applied to my original post with Virginia.
When I disassembled Idaho's intake, I discovered the spring tension was less than one wrap! Therefore, I reassembled the intake under the same conditions and verified Idaho's flappy still operated as before the refresh. Next time I have Virginia's intake off, I'll be taking the tension out of the flappy spring to set it so that it begins moving at 2 Inches Hg and fully open at 4 Inches Hg. I've updated post number 85 with this information as well.
Sorry if this has caused any confusion but I believe the lighter tension is more appropriate. THANKS!
Well, I took the intake off of Idaho ('88) recently and found a couple of interesting things worth noting for this thread. First, the spring tension on the flappy. In my original writeup on post #85, I wrapped the spring around the post a couple of times. This seems to be too tight and results in more vacuum in order to move the flappy plate - although I believed it was that tight when I took it off. I know Virginia ('87), the car that I documented this thread with, did have the intake taken off previously, so perhaps it was not installed with the correct tension by the PO.
Anyway, I tested Idaho (a virgin intake) before disassembly to see what vacuum was required to move the flappy plate. This can easily be done by pulling the rubber cap off the top of the intake and marking the flappy spindle with a sharpie marker. In this case, I marked a vertical line so I could tell when the flappy was moving under vacuum. Next, disconnect the vacuum elbow to the flappy at the vacuum solenoid at the front of the engine and attach a vacuum pump to the elbow. Here's the flappy at rest with no vacuum.
I slowly applied vacuum and noticed the flappy began movement at about 2 Inches Hg.
And the flappy was fully open when vacuum was at about 4 Inches Hg. This was significantly less vacuum than what was applied to my original post with Virginia.
When I disassembled Idaho's intake, I discovered the spring tension was less than one wrap! Therefore, I reassembled the intake under the same conditions and verified Idaho's flappy still operated as before the refresh. Next time I have Virginia's intake off, I'll be taking the tension out of the flappy spring to set it so that it begins moving at 2 Inches Hg and fully open at 4 Inches Hg. I've updated post number 85 with this information as well.
Sorry if this has caused any confusion but I believe the lighter tension is more appropriate. THANKS!
 06-06-2009, 11:59 PM
#167
Three Wheelin'
Thread Starter
Join Date: Sep 2007
Location: Ridgecrest, California
Posts: 1,363
Likes: 0
Received 147 Likes
on
31 Posts
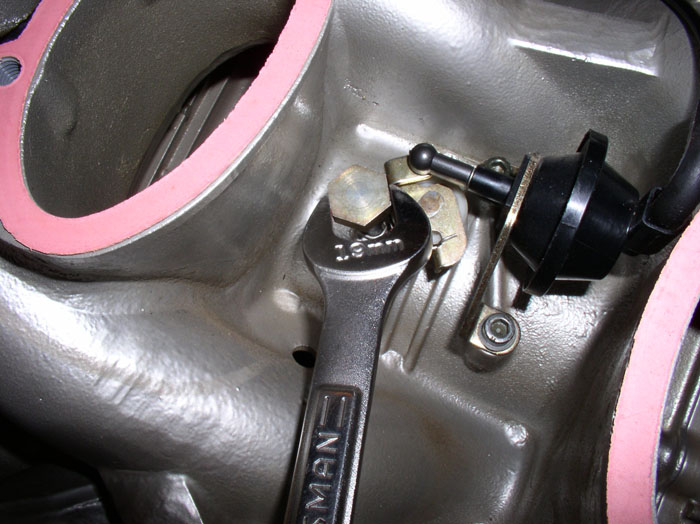
While I was working on Virginia's intake in the original post, I did not notice I was missing the flappy stopper nut located underneath the intake (see post #85). Apparently, mine had fallen off or come off when the PO had removed the intake. After a couple of comments on this thread that the nut was missing, I confirmed what the nut looks like, how it is installed and its proper setting when I disassembled Idaho's intake recently. Here's a pic of the nut properly installed from Idaho's intake job:
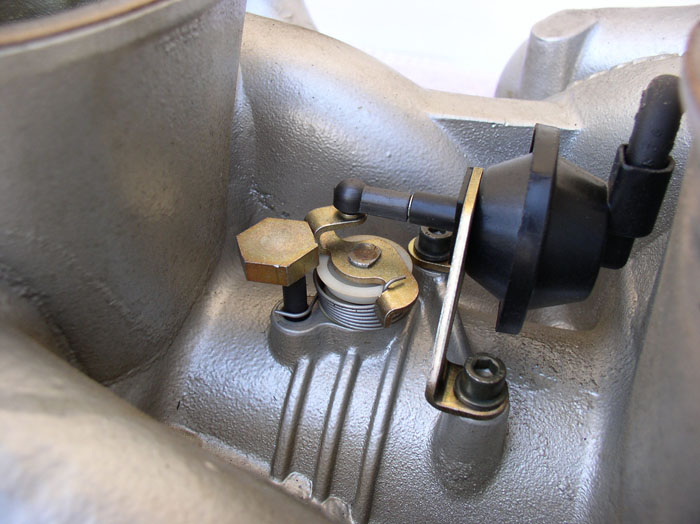
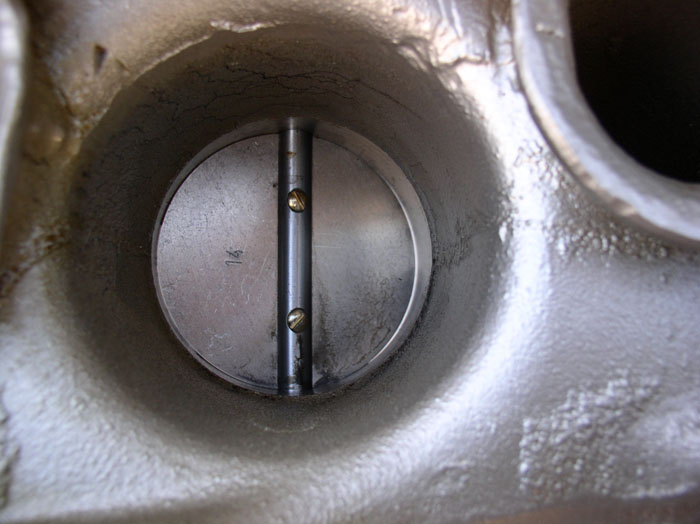
The nut is positioned so that it just prevents the flappy plate from completely closing against the walls of the intake. Here's a shot at the flappy at rest and you can see a small gap between the edge of the plate and the walls of the intake (perhaps a 16th of an inch).
The nut seemed firmly attached when I examined it on Idaho. However, if your nut is missing , you can replace it with a 19mm bolt head (cut away from the threads of the bolt) with a drilled hole (off center) that allows you to fit the replacement nut on the spindle - then twist the nut to adjust the flappy plate stop position.
When I take Virginia's intake off again in the future, I'll be installing the flappy stopper nut according to spec but wanted to get this udpate to those that may have been using this post and found this discrepancy. I've also updated the text on post #85 where this missing nut is obvious. Sorry again for the confusion. THANKS!
The nut is positioned so that it just prevents the flappy plate from completely closing against the walls of the intake. Here's a shot at the flappy at rest and you can see a small gap between the edge of the plate and the walls of the intake (perhaps a 16th of an inch).
The nut seemed firmly attached when I examined it on Idaho. However, if your nut is missing
, you can replace it with a 19mm bolt head (cut away from the threads of the bolt) with a drilled hole (off center) that allows you to fit the replacement nut on the spindle - then twist the nut to adjust the flappy plate stop position.When I take Virginia's intake off again in the future, I'll be installing the flappy stopper nut according to spec but wanted to get this udpate to those that may have been using this post and found this discrepancy. I've also updated the text on post #85 where this missing nut is obvious. Sorry again for the confusion. THANKS!
06-07-2009, 10:16 AM
#168
Team Owner
Thats the stopper nut I was telling you about, i would suggest that you refit the nut with some loctite so it wont fall off later.
It would be better to fit the nut in the correct position instead of trying to spin it on the roll pin, twisting this could cause the roll pin to shatter.
Fit the nut then tap into place
It would be better to fit the nut in the correct position instead of trying to spin it on the roll pin, twisting this could cause the roll pin to shatter.
Fit the nut then tap into place
 07-31-2009, 09:24 AM
#169
Rennlist Member
Dwayne,
This is a great thread, I started using this to remove the intake off of the 87 5-speed. I'm picking up a motor this weekend and giving the intake to the seller so he will leave the original one on with the engine.
Glenn
This is a great thread, I started using this to remove the intake off of the 87 5-speed. I'm picking up a motor this weekend and giving the intake to the seller so he will leave the original one on with the engine.
Glenn
08-24-2009, 07:30 AM
#170
Nordschleife Master
The nut seemed firmly attached when I examined it on Idaho. However, if your nut is missing , you can replace it with a 19mm bolt head (cut away from the threads of the bolt) with a drilled hole (off center) that allows you to fit the replacement nut on the spindle - then twist the nut to adjust the flappy plate stop position.
When I take Virginia's intake off again in the future, I'll be installing the flappy stopper nut according to spec but wanted to get this udpate to those that may have been using this post and found this discrepancy. I've also updated the text on post #85 where this missing nut is obvious. Sorry again for the confusion. THANKS!
, you can replace it with a 19mm bolt head (cut away from the threads of the bolt) with a drilled hole (off center) that allows you to fit the replacement nut on the spindle - then twist the nut to adjust the flappy plate stop position.When I take Virginia's intake off again in the future, I'll be installing the flappy stopper nut according to spec but wanted to get this udpate to those that may have been using this post and found this discrepancy. I've also updated the text on post #85 where this missing nut is obvious. Sorry again for the confusion. THANKS!
The correct size of hole to fit the spindle for my intake was 6.5mm - pressed on with a few gentle taps using a haft and a mallet. I then had a bit of trouble getting it off again to apply blue loctite, but that was reassuring.
Adjusting the nut's position was straightforward - twist it until there's clearance between it and the flappy on fully-closed, then twist it until you barely see the edge of the flappy butterfly move, to ensure that it can't bind against the walls of the intake.
09-06-2009, 05:34 PM
#171
Race Car
Join Date: Sep 2007
Location: No where Oklahoma AKA "The Dust Bowl" In The Arm pit Of Hell
Posts: 3,663
Likes: 0
Received 0 Likes
on
0 Posts
What a great write up. Came across it while searching for fuel injector electrical connectors. I have a couple that need replacing.
09-06-2009, 07:20 PM
#172

Im not knocking anything whatsoever,928's etc. but you have to agree, this thing is like a mouse trap, just look at that contraption,under that intake,its like a rube goldberg contraption lol
The following users liked this post:
Mrmerlin (05-04-2020)
09-13-2009, 09:32 AM
#175
Three Wheelin'
Thread Starter
Join Date: Sep 2007
Location: Ridgecrest, California
Posts: 1,363
Likes: 0
Received 147 Likes
on
31 Posts
I don't believe this particular writeup is up on Dwayne's Garage. Bill has done a tremendous job converting and posting these writeups on the site on his own time because I don't know how. I don't know the process for posting to the site but will see if I can help. THANKS for the question.
09-13-2009, 09:06 PM
#176
Nordschleife Master
Here's the pics of the replacement 19mm stop-nut for the flappy arm:
As you can see, only very slightly off-center hole in the bolt head.


As you can see, only very slightly off-center hole in the bolt head.
I just replaced the missing nut on my '87. Without it, in testing I found the butterfly was binding sometimes when manually released from fully open.
The correct size of hole to fit the spindle for my intake was 6.5mm - pressed on with a few gentle taps using a haft and a mallet. I then had a bit of trouble getting it off again to apply blue loctite, but that was reassuring.
Adjusting the nut's position was straightforward - twist it until there's clearance between it and the flappy on fully-closed, then twist it until you barely see the edge of the flappy butterfly move, to ensure that it can't bind against the walls of the intake.
Last edited by Hilton; 05-25-2010 at 07:46 PM.
09-13-2009, 09:13 PM
#177
Rennlist Member
Join Date: Apr 2002
Location: Albuquerque, New Mexico
Posts: 511
Likes: 0
Received 2 Likes
on
2 Posts
Hello Stephen,
I don't believe this particular writeup is up on Dwayne's Garage. Bill has done a tremendous job converting and posting these writeups on the site on his own time because I don't know how. I don't know the process for posting to the site but will see if I can help. THANKS for the question.
I don't believe this particular writeup is up on Dwayne's Garage. Bill has done a tremendous job converting and posting these writeups on the site on his own time because I don't know how. I don't know the process for posting to the site but will see if I can help. THANKS for the question.
03-04-2010, 09:52 PM
#178
Under the Lift
Lifetime Rennlist
Member
Lifetime Rennlist
Member
Jim Morton informed me that Eagleday sells the wire bales for the injector plugs that have "hands" on the ends of the arms, as discussed in this thread.
http://www.eagleday.com/amp2fejutiho.html
The last car I worked on had 4 wire bales that were falling off the injector plugs. These can't.
Also, I've worked on several more "virgin" cars in the interim. All had the spacers on the intake studs, wide end down. I still haven't seen any the other way. It may help in positioning the gasket.
03-05-2010, 03:41 AM
#180
Under the Lift
Lifetime Rennlist
Member
Lifetime Rennlist
Member
A "basic" intake and cam cover job is probably 8-10 hours. By basic, I mean removing, disassembling, reassembling and installing of the intake and covers for powder coating with knock sensor, CPS R&R, vacuum line and breather hose work, but none of the other myriad of things Dwayne did, such as rebuilding the throttle. If I tried to do all that Dwayne did, it would take me weeks.
OH, DON'T FORGET TO WASH THE DAYLIGHTS OUT OF THE INSIDE OF THE INTAKE AND CAM COVERS WHEN THEY COME BACK FROM POWDER COATING. I WASHED THEM 3 TIMES WITH SIMPLE GREEN AND POWER-WASH RINSE AND STILL COULD FIND BLASTING GRIT AND DUST ON THEM. THIS CAN DO BAD THINGS TO THE MOTOR.
OH, DON'T FORGET TO WASH THE DAYLIGHTS OUT OF THE INSIDE OF THE INTAKE AND CAM COVERS WHEN THEY COME BACK FROM POWDER COATING. I WASHED THEM 3 TIMES WITH SIMPLE GREEN AND POWER-WASH RINSE AND STILL COULD FIND BLASTING GRIT AND DUST ON THEM. THIS CAN DO BAD THINGS TO THE MOTOR.