

88 Fuel Sender Seal Replacement w/pics
 06-22-2008, 11:23 PM
#1
Three Wheelin'
Thread Starter
Join Date: Sep 2007
Location: Ridgecrest, California
Posts: 1,363
Likes: 0
Received 148 Likes
on
32 Posts
A while back we noticed the smell of fuel coming from the rear of the '88 after we filled it up. I couldn't find any fuel leaking on the ground but there was definitely a strong fuel smell coming from the rear. I opened the hatch, looked under the carpet and opened the cover over the fuel sending unit. There was fuel standing in the depression all around the top of the fuel sending unit! Apparently the seal was ruptured or had failed.
We drove the car enough to get the fuel level down and it stopped leaking. I ordered a new seal (about $3 at 928 Intl) and just this weekend decided to replace the seal. For other noobies like myself, I've include a few pics of the procedure. I'm still trying to figure out the photo software I'm using on my computer and the pictures are smaller than I'm used to with my old software. Hopefully, they are large enough to make sense.
Before beginning this procedure, ensure you do NOT have a full tank of fuel. Ours was about 1/2 full which worked out well for this procedure. Under the rear hatch carpet you'll find a square fabric pad that is attached to the floor with adhesive. Just peel it away.
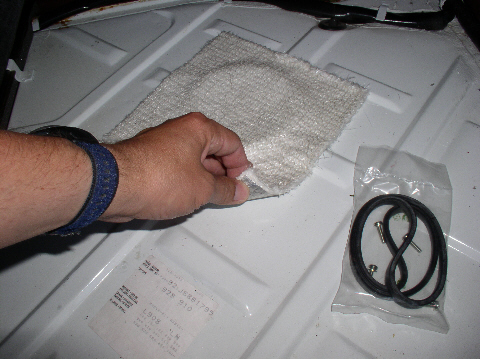
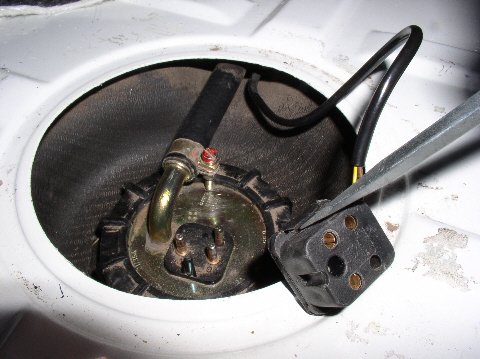
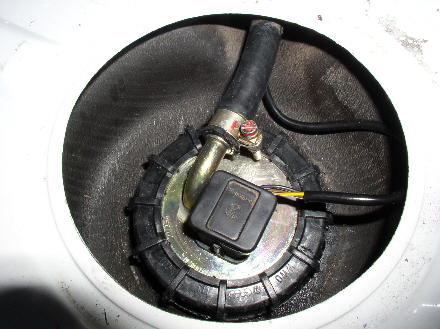
Underneath the fabric, you'll find a round black plastic cover. This fits snugly on a lip. Get your finder under the lip (or use a flat blade screwdriver) and pull the plastic cover off.
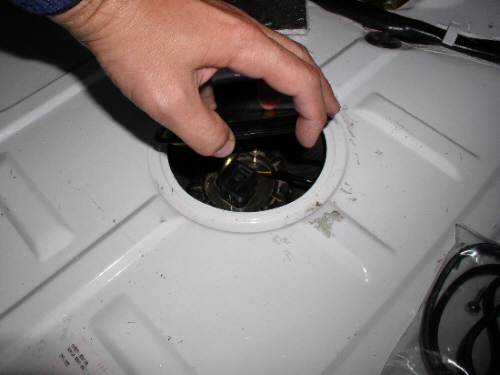
Underneath, you will see the fuel return hose and the electrical connector to the fuel sender unit.
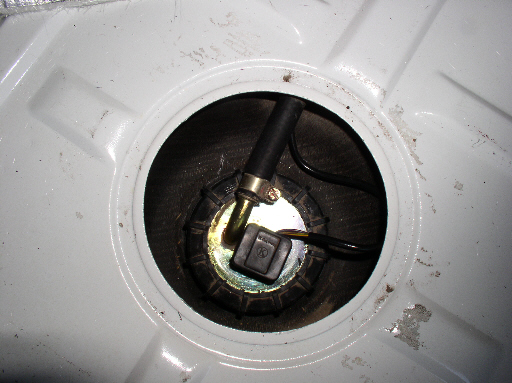
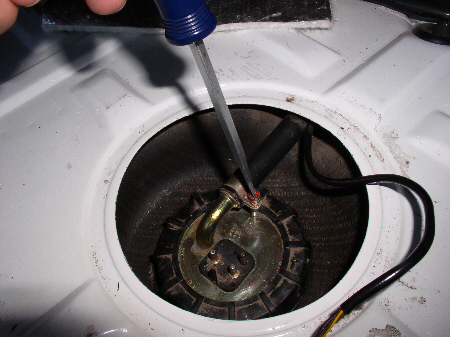
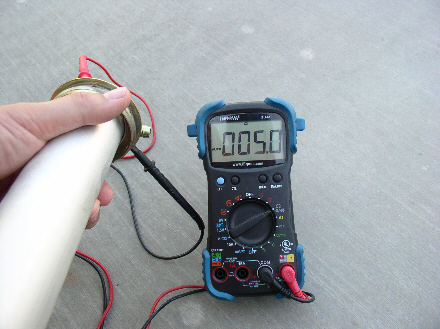
At this point, if you are not going to be testing the electrical connections, it is wise to disconnect the battery. In my case, I wanted to check voltages coming into the sender and return voltages coming out so I left the battery connected. Just be very carefull not to create any sparks while testing the electrics! The electrical connector simply pulls off. Pull straight up while rocking side to side.
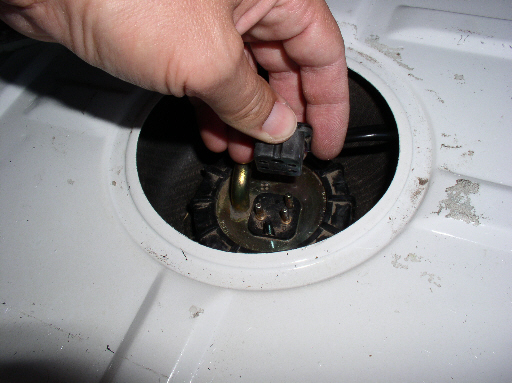
Next, you can open the connector housing by using a flat blade screwdriver to pry one of the side tabs open and pull the top off the connector.
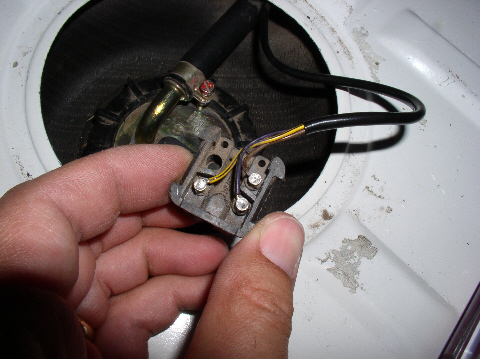
With the top off the connector, you can see the wires coming into the sender unit. The brown wire is ground. The purple wire is the voltage that indicates fuel level while the yellow wire is battery voltage and is used to indicate when fuel is so low (reserve) that the low fuel light will come on.
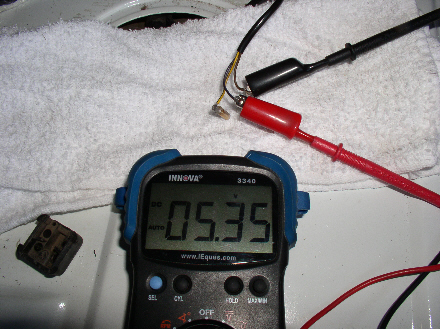
I checked the voltage coming to the sending unit by connecting the voltmeter to the gound and the purple wire while the wires were disconnected from the sender unit. You have to turn the ignition switch on to get the voltage - you do not need to start the car. I receive 5.35V at the sender. When I tested the '84, I received 5.25V at the sender.
Next, I checked the yellow wire and ground and received battery voltage while the ignition switch is still on.
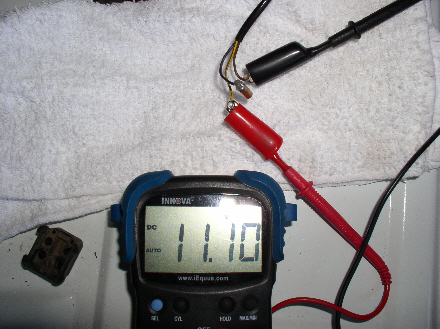
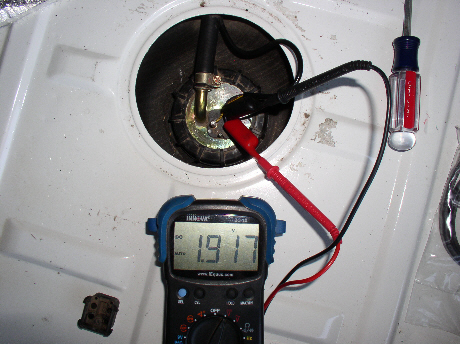
Next, I reconnected the wires to the sender unit without the connector housing so I could check the voltage coming back from the sender. It should be a smaller voltage than coming in depending on the fuel level. I got 1.917V while the tank was just below 1/2 full.

At this point, turn the ignition switch off and disconnect the battery if not done so already. Reassemble the electrical connector in the same order as they came out and snap the top on the connector into place. Then using a flat blade screwdriver, loosen the clamp on the fuel return hose and disconnect. You may want to place a towel around the area to soak up any dripping fuel - the hose is not under pressure but may have some fuel still in it.
Now you can remove the ring nut. I used a large pair of oil filter pliers. Mine was on pretty tight so get a good grip with the tool so you don't damage the ring nut too much - it's just plastic.
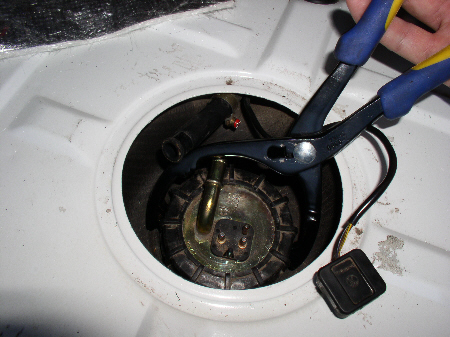
Once the ring nut is loose, remove it from the sender unit.
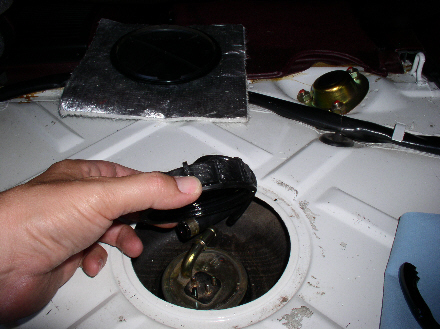
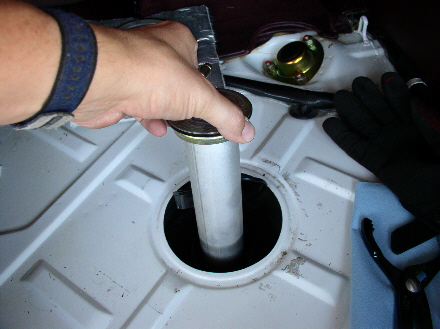
Now you can lift the sender unit out. Lift straight up but don't remove it from the tank. It will be filled with fuel so lift it high enough to let it drain out first then with it almost out of the tank, tilt it slightly side ways to drain what's left in the bottom cup out. Then remove the sender unit.
Continued.....
We drove the car enough to get the fuel level down and it stopped leaking. I ordered a new seal (about $3 at 928 Intl) and just this weekend decided to replace the seal. For other noobies like myself, I've include a few pics of the procedure. I'm still trying to figure out the photo software I'm using on my computer and the pictures are smaller than I'm used to with my old software. Hopefully, they are large enough to make sense.
Before beginning this procedure, ensure you do NOT have a full tank of fuel. Ours was about 1/2 full which worked out well for this procedure. Under the rear hatch carpet you'll find a square fabric pad that is attached to the floor with adhesive. Just peel it away.
Underneath the fabric, you'll find a round black plastic cover. This fits snugly on a lip. Get your finder under the lip (or use a flat blade screwdriver) and pull the plastic cover off.
Underneath, you will see the fuel return hose and the electrical connector to the fuel sender unit.
At this point, if you are not going to be testing the electrical connections, it is wise to disconnect the battery. In my case, I wanted to check voltages coming into the sender and return voltages coming out so I left the battery connected. Just be very carefull not to create any sparks while testing the electrics! The electrical connector simply pulls off. Pull straight up while rocking side to side.
Next, you can open the connector housing by using a flat blade screwdriver to pry one of the side tabs open and pull the top off the connector.
With the top off the connector, you can see the wires coming into the sender unit. The brown wire is ground. The purple wire is the voltage that indicates fuel level while the yellow wire is battery voltage and is used to indicate when fuel is so low (reserve) that the low fuel light will come on.
I checked the voltage coming to the sending unit by connecting the voltmeter to the gound and the purple wire while the wires were disconnected from the sender unit. You have to turn the ignition switch on to get the voltage - you do not need to start the car. I receive 5.35V at the sender. When I tested the '84, I received 5.25V at the sender.
Next, I checked the yellow wire and ground and received battery voltage while the ignition switch is still on.
Next, I reconnected the wires to the sender unit without the connector housing so I could check the voltage coming back from the sender. It should be a smaller voltage than coming in depending on the fuel level. I got 1.917V while the tank was just below 1/2 full.
At this point, turn the ignition switch off and disconnect the battery if not done so already. Reassemble the electrical connector in the same order as they came out and snap the top on the connector into place. Then using a flat blade screwdriver, loosen the clamp on the fuel return hose and disconnect. You may want to place a towel around the area to soak up any dripping fuel - the hose is not under pressure but may have some fuel still in it.
Now you can remove the ring nut. I used a large pair of oil filter pliers. Mine was on pretty tight so get a good grip with the tool so you don't damage the ring nut too much - it's just plastic.
Once the ring nut is loose, remove it from the sender unit.
Now you can lift the sender unit out. Lift straight up but don't remove it from the tank. It will be filled with fuel so lift it high enough to let it drain out first then with it almost out of the tank, tilt it slightly side ways to drain what's left in the bottom cup out. Then remove the sender unit.
Continued.....
Last edited by Dwayne; 06-23-2008 at 12:07 AM.
 06-23-2008, 12:01 AM
#2
Three Wheelin'
Thread Starter
Join Date: Sep 2007
Location: Ridgecrest, California
Posts: 1,363
Likes: 0
Received 148 Likes
on
32 Posts
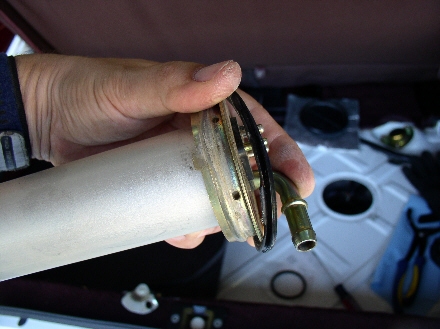
With the sending unit out, you can remove the old seal.
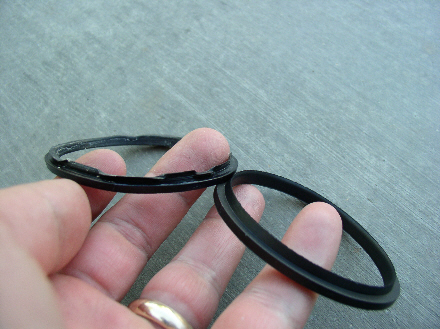
I compared the old seal to the new and it was obvious why the tank was leaking when filled. Parts of the old seal were deformed around the perimeter of the sending unit.
With the sending unit out, just for fun, I checked the resistance of the unit by connecting the multi-meter (set for ohms) to the ground and fuel level pins (where the purple wire goes and the brown ground wire goes). Holding the sending unit upright, the float will sink to the bottom (you should hear it fall). This simulates a completely empty tank. I got 70.5 ohms resistance.
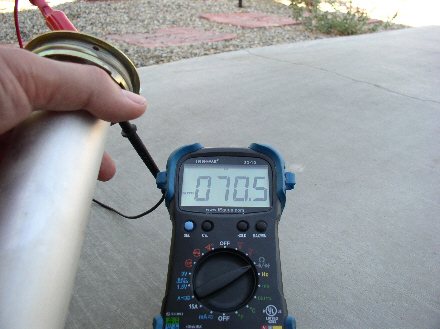
Then I turned the sending unit upside down and the float falls to the top (simulating a full tank) and I got 5 ohms. So in theory, when the tank is full, the voltage being returned from the sending unit should be close to the same voltage coming in (i.e., 5.35V minus about 5 ohms resistance). A low voltage should be returned (less than 1V) when the tank is empty or near empty.
Next, you can start putting it back together. First, place the new seal over the top of the sending unit.....

....and ensure it is seated properly all around.

Carefully lower the sending unit back into the tank. You will need to feel or search around for the unit to go into the holder at the bottom of the tank. In other words, there's a plastic hood at the bottom of the tank with a round hole in the top of it that the sender unit fits down into. Once you get it, you can seat the unit to the top of the tank. Then place the plastic ring nut back on the sending unit and tighten back down. Make sure the return hose pipe fitting is oriented to (facing) the rubber hose before tightening the ring. Next, you can fit the hose back onto the return fitting. It's a cramped fit but you can bend the hose to get it on - then tighten the clamp with the clamp oriented the same as it came off. Finally, place the electrical connector back on securely then reconnect the battery.
At this point, you can fill it up with fuel and check for leaks. I filled it up and let the car sit over night with a completely filled tank and checked for leaks the next day. Dry as a bone! After ensuring there are no leakes, you can put the black platic cover back on, place the adhesive fabric in place and place the carpet back in place. You're done!
Feel free to comment or recommend improvements to this procedure. THANKS for reading!
I compared the old seal to the new and it was obvious why the tank was leaking when filled. Parts of the old seal were deformed around the perimeter of the sending unit.
With the sending unit out, just for fun, I checked the resistance of the unit by connecting the multi-meter (set for ohms) to the ground and fuel level pins (where the purple wire goes and the brown ground wire goes). Holding the sending unit upright, the float will sink to the bottom (you should hear it fall). This simulates a completely empty tank. I got 70.5 ohms resistance.
Then I turned the sending unit upside down and the float falls to the top (simulating a full tank) and I got 5 ohms. So in theory, when the tank is full, the voltage being returned from the sending unit should be close to the same voltage coming in (i.e., 5.35V minus about 5 ohms resistance). A low voltage should be returned (less than 1V) when the tank is empty or near empty.
Next, you can start putting it back together. First, place the new seal over the top of the sending unit.....
....and ensure it is seated properly all around.
Carefully lower the sending unit back into the tank. You will need to feel or search around for the unit to go into the holder at the bottom of the tank. In other words, there's a plastic hood at the bottom of the tank with a round hole in the top of it that the sender unit fits down into. Once you get it, you can seat the unit to the top of the tank. Then place the plastic ring nut back on the sending unit and tighten back down. Make sure the return hose pipe fitting is oriented to (facing) the rubber hose before tightening the ring. Next, you can fit the hose back onto the return fitting. It's a cramped fit but you can bend the hose to get it on - then tighten the clamp with the clamp oriented the same as it came off. Finally, place the electrical connector back on securely then reconnect the battery.
At this point, you can fill it up with fuel and check for leaks. I filled it up and let the car sit over night with a completely filled tank and checked for leaks the next day. Dry as a bone! After ensuring there are no leakes, you can put the black platic cover back on, place the adhesive fabric in place and place the carpet back in place. You're done!
Feel free to comment or recommend improvements to this procedure. THANKS for reading!
The following users liked this post:
ezrajones (02-14-2022)
06-23-2008, 12:12 AM
#3
Addict
Rennlist Member
Rennlist Member
As always, nice write up!
Doesn't look very difficult either, especially after seeing your step by step.
Doesn't look very difficult either, especially after seeing your step by step.
 06-23-2008, 12:40 AM
#6
Racer
Join Date: Dec 2007
Location: Jasper, Texas
Posts: 292
Likes: 0
Received 0 Likes
on
0 Posts
you're an ace Dwayne.
thank you AGAIN for being such a solid and contributing member here...
(maybe i should not have used the words "solid" and "member" in the same sentence..)
thank you AGAIN for being such a solid and contributing member here...
(maybe i should not have used the words "solid" and "member" in the same sentence..)
06-23-2008, 10:26 AM
#7
Instructor
Join Date: Jun 2005
Location: Tampa Bay Florida
Posts: 132
Likes: 0
Received 0 Likes
on
0 Posts
Also, NEVER replace the sending unit without replacing the seal. Personal experience here. Put in a new sender, used the old seal, then raced to the gas station for a fillup to see if my gauge was now accurate. Upon returning home, the wife commented on a bad gas smell coming from the car. Sure, I said, I've been working on an open tank and thought nothing of it. Later on she persisted about the fuel odor, so I opened the hatch, pulled the carpet and the fuzzy patch away, only to find to my horror a pool of gas 2 inches deep in the recess on top of the tank and overflowing! Luckily I found a siphon hose and siphoned off the pool of gas, then milked about 5 gallons from the tank to get the level down so it would stop spewing over. Immediately got on the horn to 928 International and ordered a new seal.
Should be here today I hope. In the meantime I have kept the tank at no more than 1/2 full.
Moral - Always use a new seal. Heck, they are cheap enough.
Joe Celeste
Seminole, FL
87 928 S4
64 356 Coupe
Should be here today I hope. In the meantime I have kept the tank at no more than 1/2 full.
Moral - Always use a new seal. Heck, they are cheap enough.
Joe Celeste
Seminole, FL
87 928 S4
64 356 Coupe
Trending Topics
06-23-2008, 12:32 PM
#9
Craic Head
Lifetime Rennlist
Member
Lifetime Rennlist
Member
Dwayne, I'm convinced you're a borg with a camera in place of one eye.
One more for the archives. And another vote to have all of your posts immediately go into the 'How-to' section immediately upon posting.
One more for the archives. And another vote to have all of your posts immediately go into the 'How-to' section immediately upon posting.

 06-23-2008, 06:55 PM
#15
Rennlist Member
Very useful set of pics for all.
Just so you know....I looked into replacing the rubber end of the return line in my 83 while the tank was out being cleaned etc. The rubber part ONLY comes as a unit with the whole steel return pipe! Very large job to lace the steel pipe also - drop rear suspension! Guess what - a light tug on the rubber end at the tank - slid right off! So, if you have the tank out for any reason, and the end of the rubber is frayed from multiple R&R operations, pull it off, fit a new piece of fuel hose with a good quality hose clip while you have the access necessary. If the tank is NOT out, take care pulling on that hose.
jp 83 Euro S AT 51k