

Trying out the Hub Dust Cover Removal Tool (w/pics, of course!)
 03-02-2008, 01:04 AM
#1
Three Wheelin'
Thread Starter
Join Date: Sep 2007
Location: Ridgecrest, California
Posts: 1,363
Likes: 0
Received 149 Likes
on
33 Posts
There are several methods and improvised tools for removing the pesky front hub dust cover. I've tried a couple different methods I read about here on Rennlist (with success) and thought I would one day fabricate my own tool that mimicked the one called out in the WSM. However, time has not been on my side so I decided to just buy the Porsche recommended tool and try it out! So for those of you that like to collect tools as much as I do, read on....
I ordered it from 928 Specialists. THANKS guys!
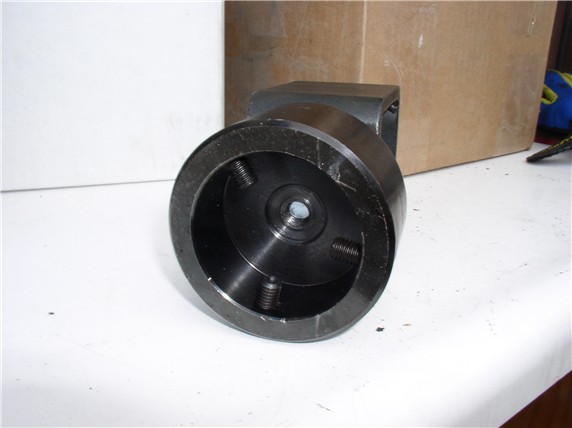
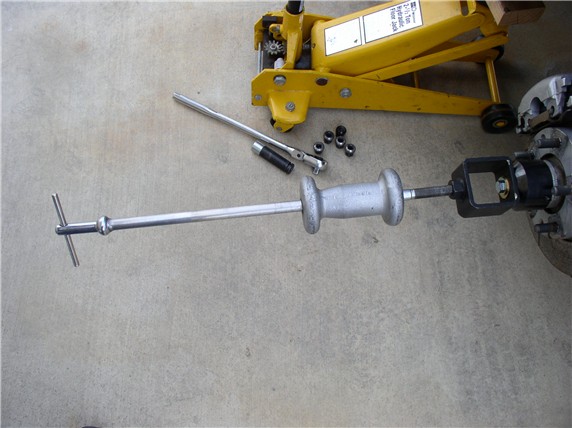
It's a very substantial piece of solid metal - very sturdy and well made. It's designed to work with a slide hammer. Here's a pic of the underside (while attached to the slide hammer kit adapter).
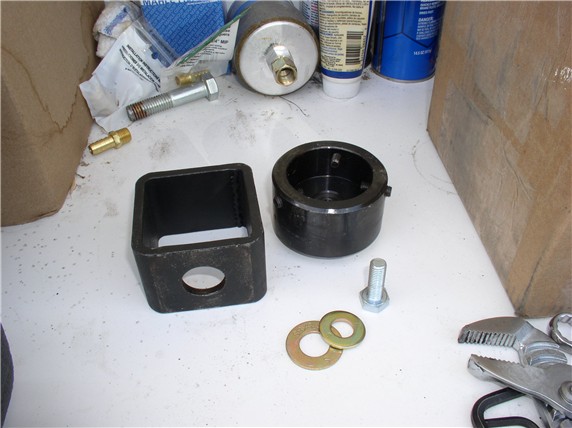
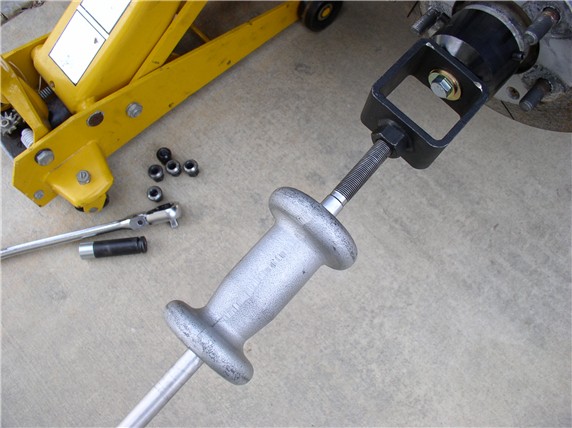
The slide hammer kit I borrowed from Kragen had SAE threads on all their adapters and the hub cover tool is metric. In fact, the threads are 10mm course thread (1.5 pitch) and I needed the bolt to be about 30mm in length. Most slide hammer kits come with an adapter like the square one shown below. So in order to use the hub cover tool with this adapter, I also needed a couple of washers to make the connection. So here's what I used to make it work with the slide hammer kit - I got the 10mm bolt and washers from an auto parts store:
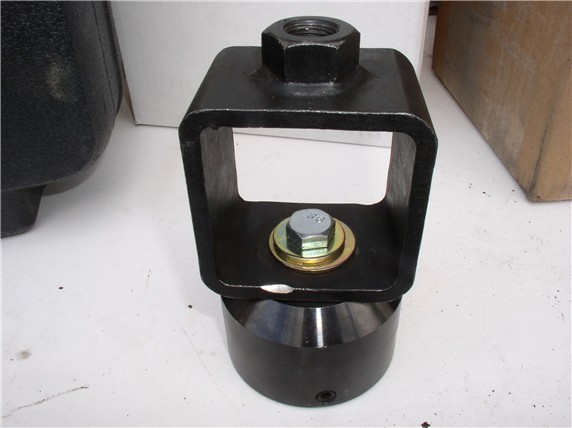
When the tool is attached with the slide hamer adapter it looks like this:
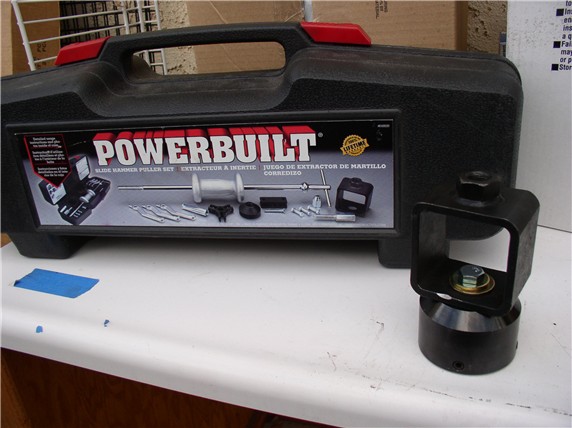
Here's the slide hamer kit that Kragen loans (for free!). I'll go shopping at HF next time I'm out of town and see if I can pick up my own.
So I tried it out today to check on the loose wheel bearing feel I was getting (I just replaced the front bearings 2-3 months ago!). Here's the tool going onto the dust cover:
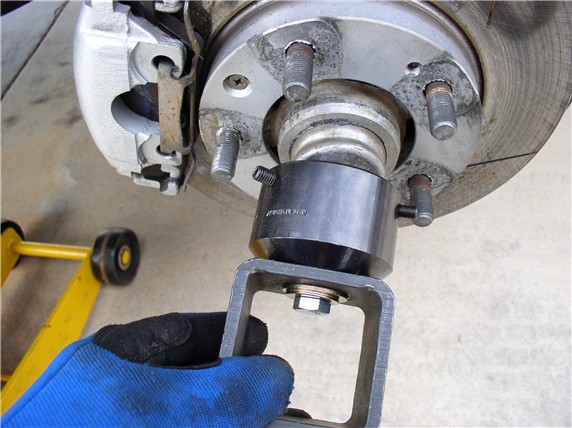
Fits like a glove. Once on, tighten the 3 allen set screws. It takes a 4mm allen wrench.
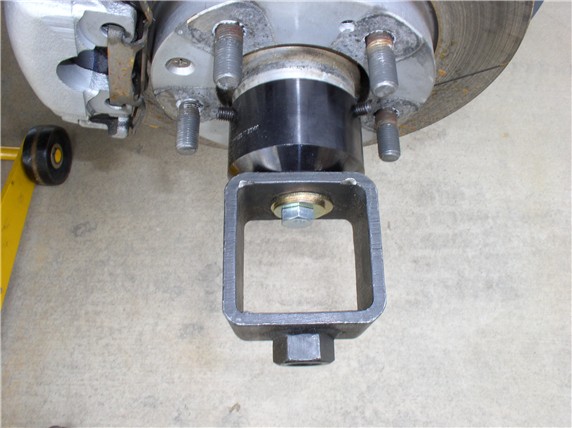
Here's what it looks like snuged up on the dust cover:
Then attach the slide hammer to the adapter:
And get ready to pop the cover off. It only took 3 moderate 'pops' with the slide hammer and the cover came right off - still attached to the tool.
I just left the dust cover still in the grips of the tool while I worked. When I was done and ready to put the dust cover back on, I simply positioned the slide hammer holding the dust cover over the hub and gave it a few light taps in the reverse direction (just to get the dust cover started) and loosened the set screws, removed the tool. Then, removed the center cap from the wheel, mounted the wheel back on, tightened the lugs and lowered the car.
At this point, used a large socket and small sledge hammer to tap the dust cover the rest of the way back in until it was seated. You can tell it's seated when the pitch (sound) of the taps changes. I prefer to tap the dust cover back in place with weight on wheels so the weight of the car absorbs most of the force of the blows rather than the bearings if the dust cover were tapped back in with weight off wheels. Here's a pic of the cheap socket I used for tapping the dust cover back in:
All in all, I really like the tool! It was very easy to set up! Not only did it make short, effortless work of pulling off the dust cover but it also aided in putting the cover back on. I'm very happy with it - I still think it would have been fun to make one, though! THANKS for reading!
I ordered it from 928 Specialists. THANKS guys!
It's a very substantial piece of solid metal - very sturdy and well made. It's designed to work with a slide hammer. Here's a pic of the underside (while attached to the slide hammer kit adapter).
The slide hammer kit I borrowed from Kragen had SAE threads on all their adapters and the hub cover tool is metric. In fact, the threads are 10mm course thread (1.5 pitch) and I needed the bolt to be about 30mm in length. Most slide hammer kits come with an adapter like the square one shown below. So in order to use the hub cover tool with this adapter, I also needed a couple of washers to make the connection. So here's what I used to make it work with the slide hammer kit - I got the 10mm bolt and washers from an auto parts store:
When the tool is attached with the slide hamer adapter it looks like this:
Here's the slide hamer kit that Kragen loans (for free!). I'll go shopping at HF next time I'm out of town and see if I can pick up my own.
So I tried it out today to check on the loose wheel bearing feel I was getting (I just replaced the front bearings 2-3 months ago!). Here's the tool going onto the dust cover:
Fits like a glove. Once on, tighten the 3 allen set screws. It takes a 4mm allen wrench.
Here's what it looks like snuged up on the dust cover:
Then attach the slide hammer to the adapter:
And get ready to pop the cover off. It only took 3 moderate 'pops' with the slide hammer and the cover came right off - still attached to the tool.
I just left the dust cover still in the grips of the tool while I worked. When I was done and ready to put the dust cover back on, I simply positioned the slide hammer holding the dust cover over the hub and gave it a few light taps in the reverse direction (just to get the dust cover started) and loosened the set screws, removed the tool. Then, removed the center cap from the wheel, mounted the wheel back on, tightened the lugs and lowered the car.
At this point, used a large socket and small sledge hammer to tap the dust cover the rest of the way back in until it was seated. You can tell it's seated when the pitch (sound) of the taps changes. I prefer to tap the dust cover back in place with weight on wheels so the weight of the car absorbs most of the force of the blows rather than the bearings if the dust cover were tapped back in with weight off wheels. Here's a pic of the cheap socket I used for tapping the dust cover back in:
All in all, I really like the tool!
It was very easy to set up! Not only did it make short, effortless work of pulling off the dust cover but it also aided in putting the cover back on. I'm very happy with it - I still think it would have been fun to make one, though! THANKS for reading!
 03-02-2008, 01:14 AM
#2
Nordschleife Master
NICE!
That could have come in handy, that dust cover is a bitch! Removing the cover is a must when adding most newer Porsche wheels, like my 19"s, you have to modify the dust cover to get the factory center caps to fit.
Hey now that you have the factory piece you can fabricate your own and sell them. That square steel peice is what just a 2x2 steel bar cut down (3x3 maybe), not sure what you would used for the part that attaches to the cap as of yet. But whatever you come up with, drill and tap some holes and add bolts and your set.
Nice
03-02-2008, 02:04 AM
#5
Three Wheelin'
Thread Starter
Join Date: Sep 2007
Location: Ridgecrest, California
Posts: 1,363
Likes: 0
Received 149 Likes
on
33 Posts
For those that may be interested, here's the measurements of the hub dust cover tool.
For the inside diameter - 55mm
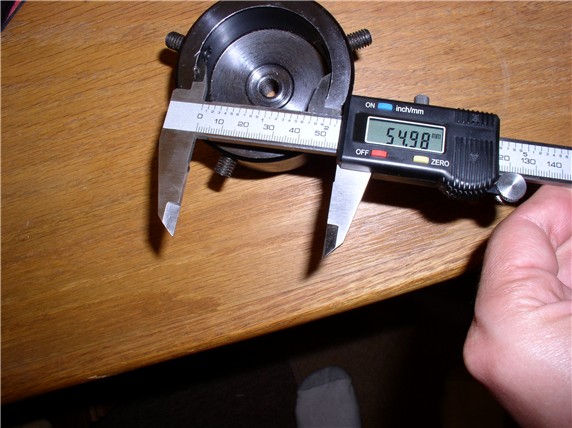
For the outside diameter - 75mm
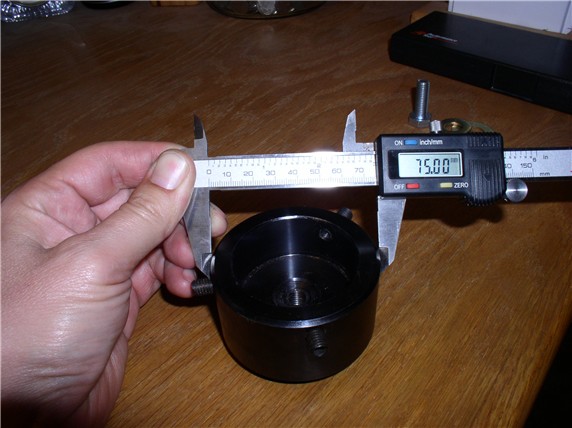
Height - 50mm
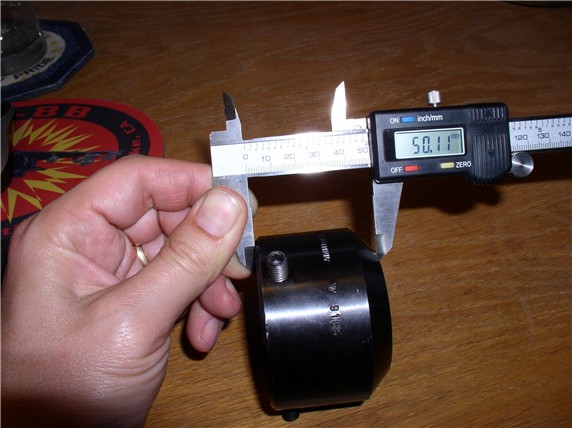
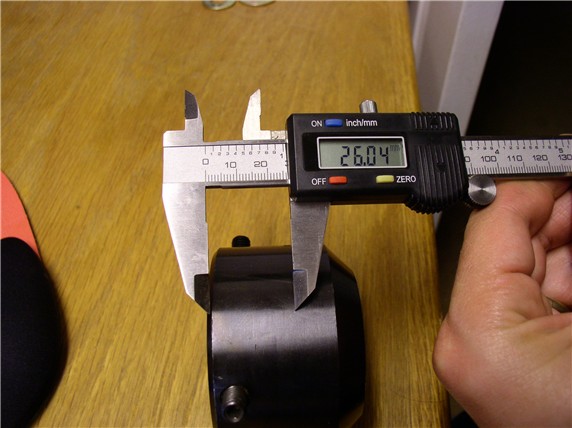
Inside Depth - although I couldn't get my micrometer inside, I did measure it with an object that sat flush with the rim when sitting inside - 26mm for inside depth.
For the inside diameter - 55mm
For the outside diameter - 75mm
Height - 50mm
Inside Depth - although I couldn't get my micrometer inside, I did measure it with an object that sat flush with the rim when sitting inside - 26mm for inside depth.
03-02-2008, 02:20 AM
#6
Dwayne takes requests, is proficient with the camera, and posts lots of pics, hmmm.... ....is your wife still awake?
Just kidding, thanks Dwayne . Perfect lunch time project this week.
....is your wife still awake? Just kidding, thanks Dwayne
. Perfect lunch time project this week.
03-02-2008, 02:38 AM
#7
Drifting
Join Date: Feb 2005
Location: Seattle, where everyone is above average, and the women are all beautiful
Posts: 2,932
Likes: 0
Received 1 Like
on
1 Post
I feel so dirty, I just tapped on mine with a hammer and walked it out. It never occured to me that I needed a tool for this.
Damn, I usually jump at an opportunity to add to my tool set.
Damn, I usually jump at an opportunity to add to my tool set.
Trending Topics
03-02-2008, 06:35 PM
#8
Chronic Tool Dropper
Lifetime Rennlist
Member
Lifetime Rennlist
Member

Dwayne--
Can you post the dim from the face of the puller sleeve to the center of the setscrew? Looks like three setscrews, right?
I'm guessing that plastic pipe won't cut it in this application...
Can you post the dim from the face of the puller sleeve to the center of the setscrew? Looks like three setscrews, right?
I'm guessing that plastic pipe won't cut it in this application...
03-02-2008, 07:12 PM
#9
Three Wheelin'
Thread Starter
Join Date: Sep 2007
Location: Ridgecrest, California
Posts: 1,363
Likes: 0
Received 149 Likes
on
33 Posts
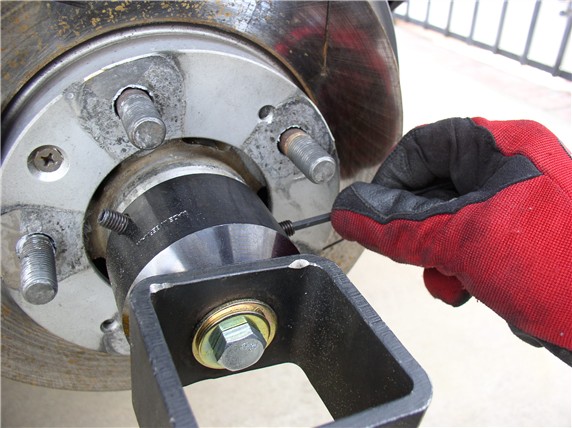
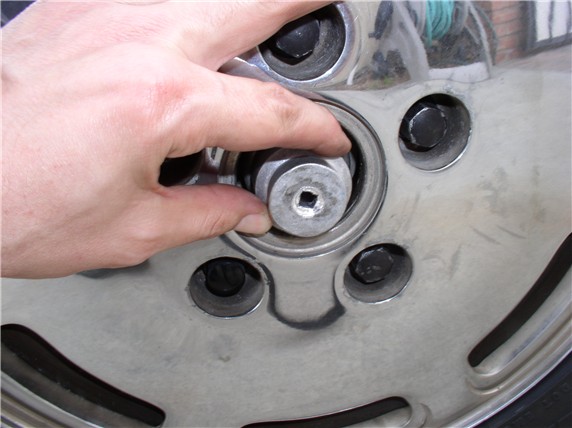
Here's the dim I believe you asked for. It's 8.5mm from the hub face to the center of the set screw and 41.5-41.6mm from the outboard face to the center of the set screw. Yes there are 3 set screws equally spaced around the circ. Here's a pic....
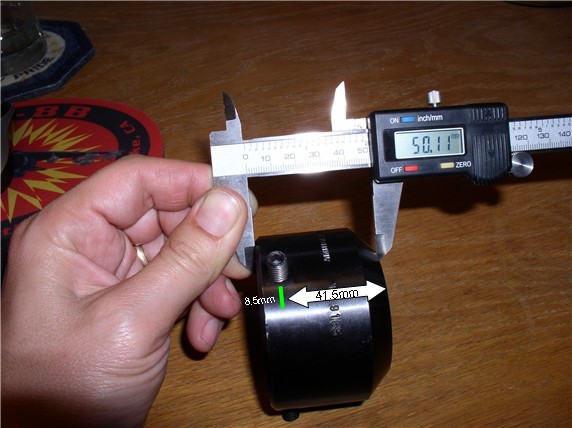
Let me know if this is not what you were looking for.....Unfortunately, I'm heading out the door for travel to the east coast for the week and won't be back until Friday - I'll be able to respond then.
03-02-2008, 07:27 PM
#10
Addict
Rennlist Member
Rennlist Member
Join Date: Nov 2007
Location: Somerset, NJ
Posts: 553
Likes: 0
Received 0 Likes
on
0 Posts
03-02-2008, 09:06 PM
#11
Chronic Tool Dropper
Lifetime Rennlist
Member
Lifetime Rennlist
Member
Thanks Dwayne, and thanks for the linky to the pipe bomb pictures. 