
How do you remove/disassemble the hatch upper latch? Now - Hatch rattle fix.
 03-12-2007, 05:38 PM
#1
Under the Lift
Lifetime Rennlist
Member
Lifetime Rennlist
Member
Thread Starter
I am in the process of replacing the plastic upper latch tongue that engages the lower recevier. I'm doing this in an attempt to resolve a hatch rattle I traced to the latch area.
The tongue is retained by a horizontal pin through the upper latch body. I drilled the pin flared end, which actually wasn't real straightforward, as it was free to spin. Drilled somewhat at an angle and got some bite from the bit as it spun and got enough of the end off to knock the pin out. It's going to be a bit of a trick to flare the end of the new pin.
My problem is the plastic latch tongue has an arm that prevents it from just falling out. Do I have to take the entire upper latch out of the car? I see another black plastic block above the piece I am trying to remove, but I'm not sure how it is held in.
This is an alarm lock/latch. Anybody BTDT?
Last edited by Bill Ball; 03-12-2007 at 11:52 PM.
 03-12-2007, 05:51 PM
#2
Rennlist Member
I have had the top piece out when I rekeyed it, and dont recall any major difficulty. The alarm wiring has a lead maybe 12" long, IIRC you need to remove the trim to reach the connector . Then its just the two cap screws to release the unit, and a bit of wriggling is needed to get the lock part out the grommet in the hatch. Unless of course, your model does it all differently?
hth
jp 83 Euro S AT 50k
hth
jp 83 Euro S AT 50k
03-12-2007, 06:03 PM
#3
Under the Lift
Lifetime Rennlist
Member
Lifetime Rennlist
Member
Thread Starter
OK, got the whole upper latch out. It just wiggles out with no need to remove the trim panels. I thought the alarm wiring might be an issue, requiring opening up the area, but there just a fat bundle going into the latch with enough slack that I can leave it attached while I work to replace the plastic piece.
03-12-2007, 07:43 PM
#4
Under the Lift
Lifetime Rennlist
Member
Lifetime Rennlist
Member
Thread Starter
Well, it all came apart easily. Now I need a suggestion for a rivet tool that can spread the open end of the pin. It is what I think is called a semi tubular rivet with a shallow depth hole at one end that needs to be spread. It is soft steel.
I have it all reassembled, and the latch appears to snug down better without cranking up the rubber bumpers.
Nicole, we need to do yours.
I have it all reassembled, and the latch appears to snug down better without cranking up the rubber bumpers.
Nicole, we need to do yours.
03-12-2007, 08:43 PM
#5
Rennlist Member
I punched mine through with a small pin drift, which un-swaged the end as you can see in the pic below. I was able to swage it back easily with a center punch. I think the pin is available separately if you want to just replace it. There are a few more pics here.
03-12-2007, 09:10 PM
#6
Addict
Rennlist Member
Rennlist Member
Originally Posted by Bill Ball
Well, it all came apart easily. Now I need a suggestion for a rivet tool that can spread the open end of the pin. It is what I think is called a semi tubular rivet with a shallow depth hole at one end that needs to be spread. It is soft steel..
03-12-2007, 11:24 PM
#7
Under the Lift
Lifetime Rennlist
Member
Lifetime Rennlist
Member
Thread Starter
Ah, I have one of those steering rack centering bolts and C-clamp.
The unit is all back together or I would use a vice like Dave did.
For now I just put a piece of duct tape over the head end. The pin is not going anywhere, but I will spread the end later.
I need to report that this is THE fix for all my rattles. I now have the rubber bumpers backed off such that the hatch aligns perfectly again with the quarter panels. There is so little tension on the latch it no longer "pops" when it releases, yet it releases perfectly! And yet there are no rattles back there anymore.
This is THE fix for anybody that has a rattle in the hatch area that can be traced to the latch area or thereabouts (I had my son drive the car while I laid in the hatch and located the source), and that gets better when the rubber hatch bumpers are screwed out OR anybody whose hatch seems OK but the bumpers are screwed so high the hatch no longer aligns with the body. Mine was up high enough that the rear wiper mechanism in the hatch was losing contact with the motor cam on the body.
Here are pics of what I did.
I drilled the end of the pin modestly and drove it out with a thin punch. I did this with the latch mounted on the car. BE CAREFUL. The latch body is subject to cracking. Best to remove the latch completely and do this on a workbench where you can back up the latch. Dave mentioned he was able to drive out the pin without drilling off the end, the re-use the pin. I had a new pin, so I just drilled it and it pushed out rather easily.

To remove and replace the plastic tongue, the latch needs to be removed and partially disassembled. After the Allens are removed, the latch can be pulled out. It may hang up a bit and feel like something is retaining it, but it should come completely out from the bottomof the hatch.

If you have an alarm lock, it may help to remove a few of the trim pins so that the cable to the lock is free and the latch will drop out more easily. I did not take the latch to the workbench, but to do so, you would pull out about 12 inches of cable until you get to a connector.

Remove 2 tiny Philips head screw shown in the 2nd image above and pull apart the housing.

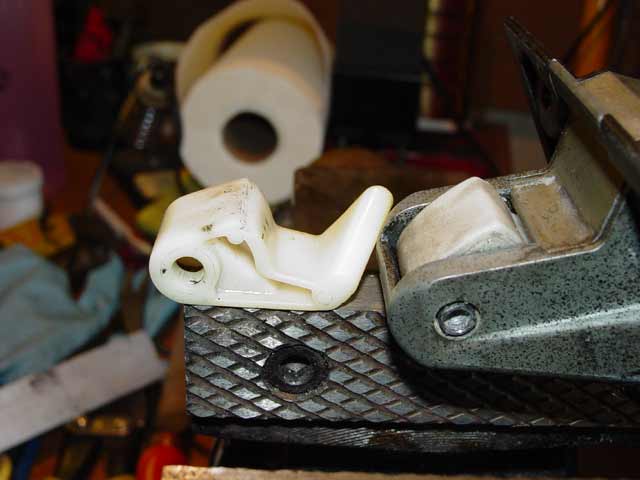
The old tongue is on the right. The primary difference is that the pin hole is larger from wear. It's rather subtle and I had doubts the new tongue was going to change anything.

The latch has a spring that goes in behind the tongue. The pin goes through the spring coil. The spring arm sticking out must be pressed in parallel to the backside of the tongue, about 110 degrees from where it sits untensioned. I used this small screwdriver to hold the spring in-place while I pressed the tongue into the latch, pulling it out once I got it started, then I pushed the spring arm in with a larger screwdriver as I squeezed down on the tongue until I got things lined up so I could reinsert the pin.

Voila! All that remains is to reinstall the front section with the tiny Philips screws and put the latch back into the body. NOTE: the black plastic piece in the center is a cover for the alarm electical block. This little cover must be removed for the tongue to be removed and installed. It pops out and back in rather easily.

The unit is all back together or I would use a vice like Dave did.
For now I just put a piece of duct tape over the head end. The pin is not going anywhere, but I will spread the end later.
I need to report that this is THE fix for all my rattles. I now have the rubber bumpers backed off such that the hatch aligns perfectly again with the quarter panels. There is so little tension on the latch it no longer "pops" when it releases, yet it releases perfectly! And yet there are no rattles back there anymore.
This is THE fix for anybody that has a rattle in the hatch area that can be traced to the latch area or thereabouts (I had my son drive the car while I laid in the hatch and located the source), and that gets better when the rubber hatch bumpers are screwed out OR anybody whose hatch seems OK but the bumpers are screwed so high the hatch no longer aligns with the body. Mine was up high enough that the rear wiper mechanism in the hatch was losing contact with the motor cam on the body.
Here are pics of what I did.
I drilled the end of the pin modestly and drove it out with a thin punch. I did this with the latch mounted on the car. BE CAREFUL. The latch body is subject to cracking. Best to remove the latch completely and do this on a workbench where you can back up the latch. Dave mentioned he was able to drive out the pin without drilling off the end, the re-use the pin. I had a new pin, so I just drilled it and it pushed out rather easily.
To remove and replace the plastic tongue, the latch needs to be removed and partially disassembled. After the Allens are removed, the latch can be pulled out. It may hang up a bit and feel like something is retaining it, but it should come completely out from the bottomof the hatch.
If you have an alarm lock, it may help to remove a few of the trim pins so that the cable to the lock is free and the latch will drop out more easily. I did not take the latch to the workbench, but to do so, you would pull out about 12 inches of cable until you get to a connector.
Remove 2 tiny Philips head screw shown in the 2nd image above and pull apart the housing.
The old tongue is on the right. The primary difference is that the pin hole is larger from wear. It's rather subtle and I had doubts the new tongue was going to change anything.
The latch has a spring that goes in behind the tongue. The pin goes through the spring coil. The spring arm sticking out must be pressed in parallel to the backside of the tongue, about 110 degrees from where it sits untensioned. I used this small screwdriver to hold the spring in-place while I pressed the tongue into the latch, pulling it out once I got it started, then I pushed the spring arm in with a larger screwdriver as I squeezed down on the tongue until I got things lined up so I could reinsert the pin.
Voila! All that remains is to reinstall the front section with the tiny Philips screws and put the latch back into the body. NOTE: the black plastic piece in the center is a cover for the alarm electical block. This little cover must be removed for the tongue to be removed and installed. It pops out and back in rather easily.
Last edited by Bill Ball; 03-13-2007 at 03:09 AM.
Trending Topics
03-12-2007, 11:52 PM
#8
Basic Sponsor
Rennlist
Site Sponsor
Rennlist
Site Sponsor
Bill,
Thanks for taking the time to document the work.
Best,
Roger
Thanks for taking the time to document the work.
Best,
Roger
__________________

Does it have the "Do It Yourself" manual transmission, or the superior "Fully Equipped by Porsche" Automatic Transmission? George Layton March 2014
928 Owners are ".....a secret sect of quietly assured Porsche pragmatists who in near anonymity appreciate the prodigious, easy going prowess of the 928."
Does it have the "Do It Yourself" manual transmission, or the superior "Fully Equipped by Porsche" Automatic Transmission?
George Layton March 2014928 Owners are ".....a secret sect of quietly assured Porsche pragmatists who in near anonymity appreciate the prodigious, easy going prowess of the 928."
03-12-2007, 11:56 PM
#9
Under the Lift
Lifetime Rennlist
Member
Lifetime Rennlist
Member
Thread Starter
Roger: Thanks for the parts! This is the most satisfying cheap fix I have done on this car. Nicole has jacked her hatch up so high to try to resolve the rattle that it no longer seals. She has the parts I believe and we are going to fix hers this week.
Last edited by Bill Ball; 08-17-2007 at 09:18 PM.
03-13-2007, 12:26 AM
#10
Rennlist Member
Nice work! I see the later alarm-latches are a bit easier to work with; the early ones are held together with roll pins. You would have probably cracked the housing if you tried to drive the pin out as I did -- you really need it backed up with something solid to do that, and that would be a challenge with the latch still on the car.
03-13-2007, 03:11 AM
#11
Under the Lift
Lifetime Rennlist
Member
Lifetime Rennlist
Member
Thread Starter
I agree, Dave. it would be preferable to remove the latch entirely and work on the bench. Nicole's already has a crack in the latch body, so we will take hers out, and we will try to repair the latch body too.
03-13-2007, 06:56 AM
#12
928 Addict
Rennlist Member
Rennlist Member
Join Date: Nov 2001
Location: IN BETWEEN A FROZEN CONCOCTION AND INDECISION
Posts: 1,741
Likes: 0
Received 1 Like
on
1 Post
Bill...this may be too simple and...too late but my previous Sharky hatch also rattled and I isolated it to the tow hex screws on the hatch itself that kept working themselves loose.
I'm sure you are beyond this but maybe will help someone else.
I'm sure you are beyond this but maybe will help someone else.
03-17-2007, 05:08 AM
#13
Cottage Industry Sponsor
Lifetime Rennlist
Member
Lifetime Rennlist
Member

Many moons ago I bought a replacement hatch latch piece that I never installed. It looks different from the ones Bill and Dave show in their pictures.
The bag says 928.512.161.02 which appears to be the correct PET number for 87-91.
I just opened up a used (and also cracked) hatch lock unit from another 91 model - and it has the same white plastic piece that Bill's car has. Note the much longer "arm" of the part in the assembled piece.
What part/piece do I have there?
Last edited by Nicole; 03-17-2007 at 07:59 PM.
 03-17-2007, 01:14 PM
#15
928 Barrister
Rennlist Member
Rennlist Member
Bill, thanks for posting pics of your alarm connection to the rear of the latch. I have mine out to overhaul the lock cylinder and now I don't have to remember how it screws back together.
I shall repeat my earlier warning: NEVER use graphite in these locks. NEVER.
I had graphite caked inside the latch and the cylinder. I also had trouble drilling out the two pins that hold the outer casing of the cylinder so I found a locksmith that simply shook her head when I confessed to buggering it all up with graphite and silicone (which seems to cement the graphite). As we were speaking, my car was running with my spare key in the ignition because I couldn't risk turning it off. Just a few minutes earlier it took me over an hour to get the ignition key to move far enough in the lock to actuate the starter. I don't even want to think about getting that cylinder out, but it probably will need to come out. I used WD 40 to flush it at the service station where it was "disabled" and tons of graphite crud came pouring out. I may need to buy new locks if all of this doesn't work. I don't know why they are so screwed; they only have 190,000 miles on them.")
I shall repeat my earlier warning: NEVER use graphite in these locks. NEVER.
I had graphite caked inside the latch and the cylinder. I also had trouble drilling out the two pins that hold the outer casing of the cylinder so I found a locksmith that simply shook her head when I confessed to buggering it all up with graphite and silicone (which seems to cement the graphite). As we were speaking, my car was running with my spare key in the ignition because I couldn't risk turning it off. Just a few minutes earlier it took me over an hour to get the ignition key to move far enough in the lock to actuate the starter. I don't even want to think about getting that cylinder out, but it probably will need to come out. I used WD 40 to flush it at the service station where it was "disabled" and tons of graphite crud came pouring out. I may need to buy new locks if all of this doesn't work. I don't know why they are so screwed; they only have 190,000 miles on them.