When you click on links to various merchants on this site and make a purchase, this can result in this site earning a commission. Affiliate programs and affiliations include, but are not limited to, the eBay Partner Network.
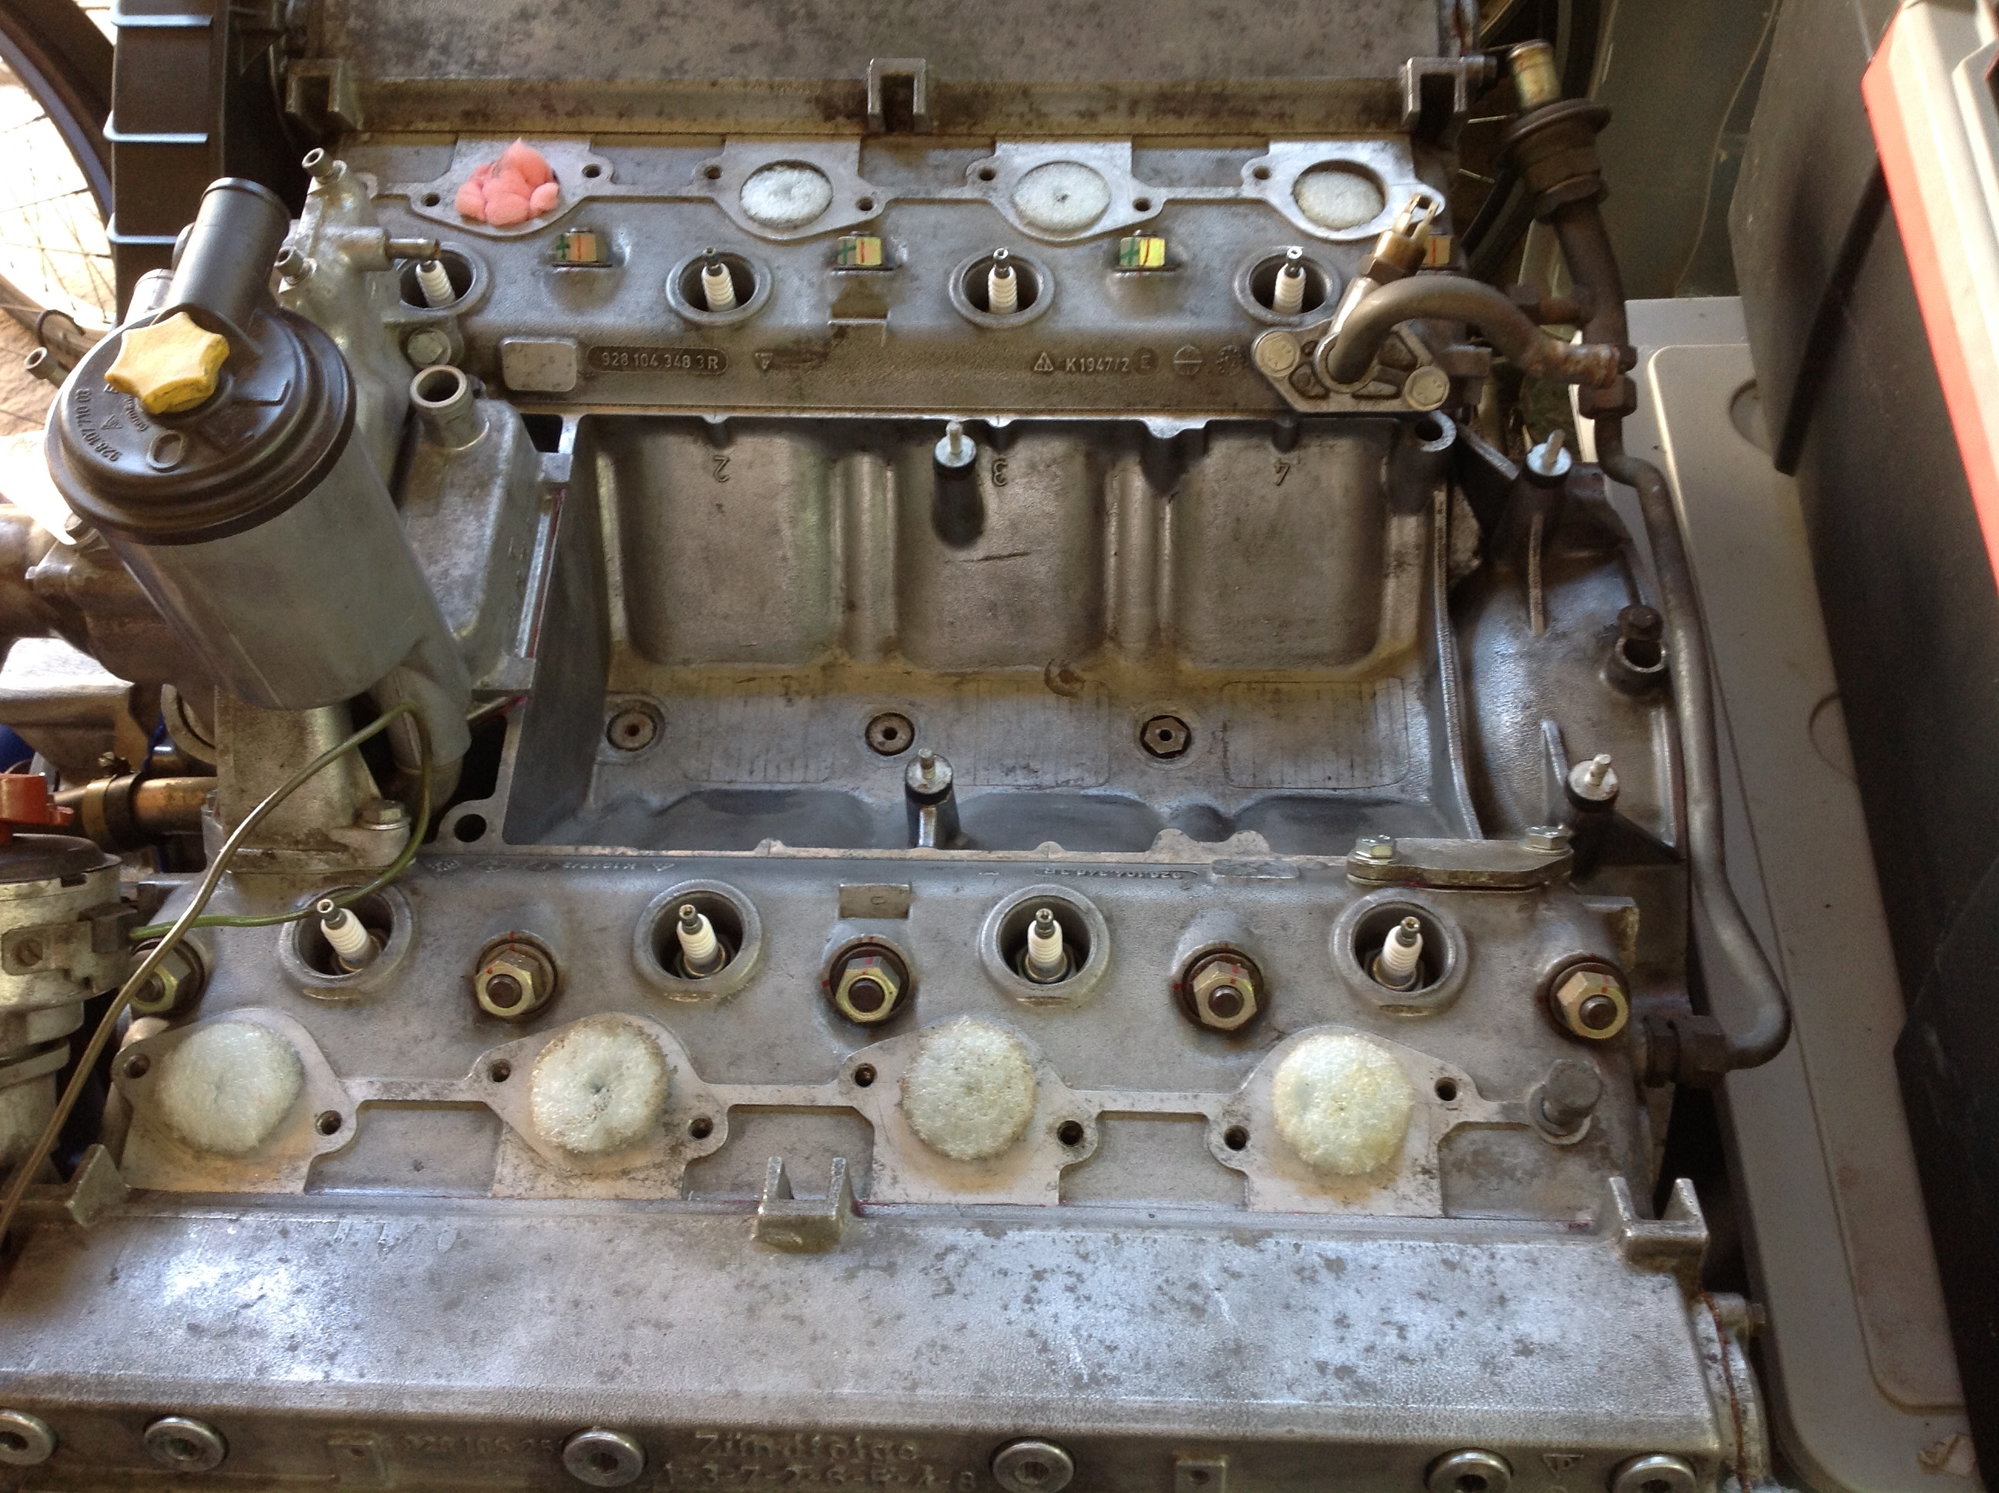
Hi fellow 928 enthusiasts, since about 2 year, I encountered a crack at the top (valley) of my Euro CIS 4.7L engine .
Coolant is constantly leaking on top of my engine. No problems with bad cooling or overheating.
Any idea what could have caused this ?
Can it be welded with the engine in the car?
This was before the crack when I overhauled the engine in 2016
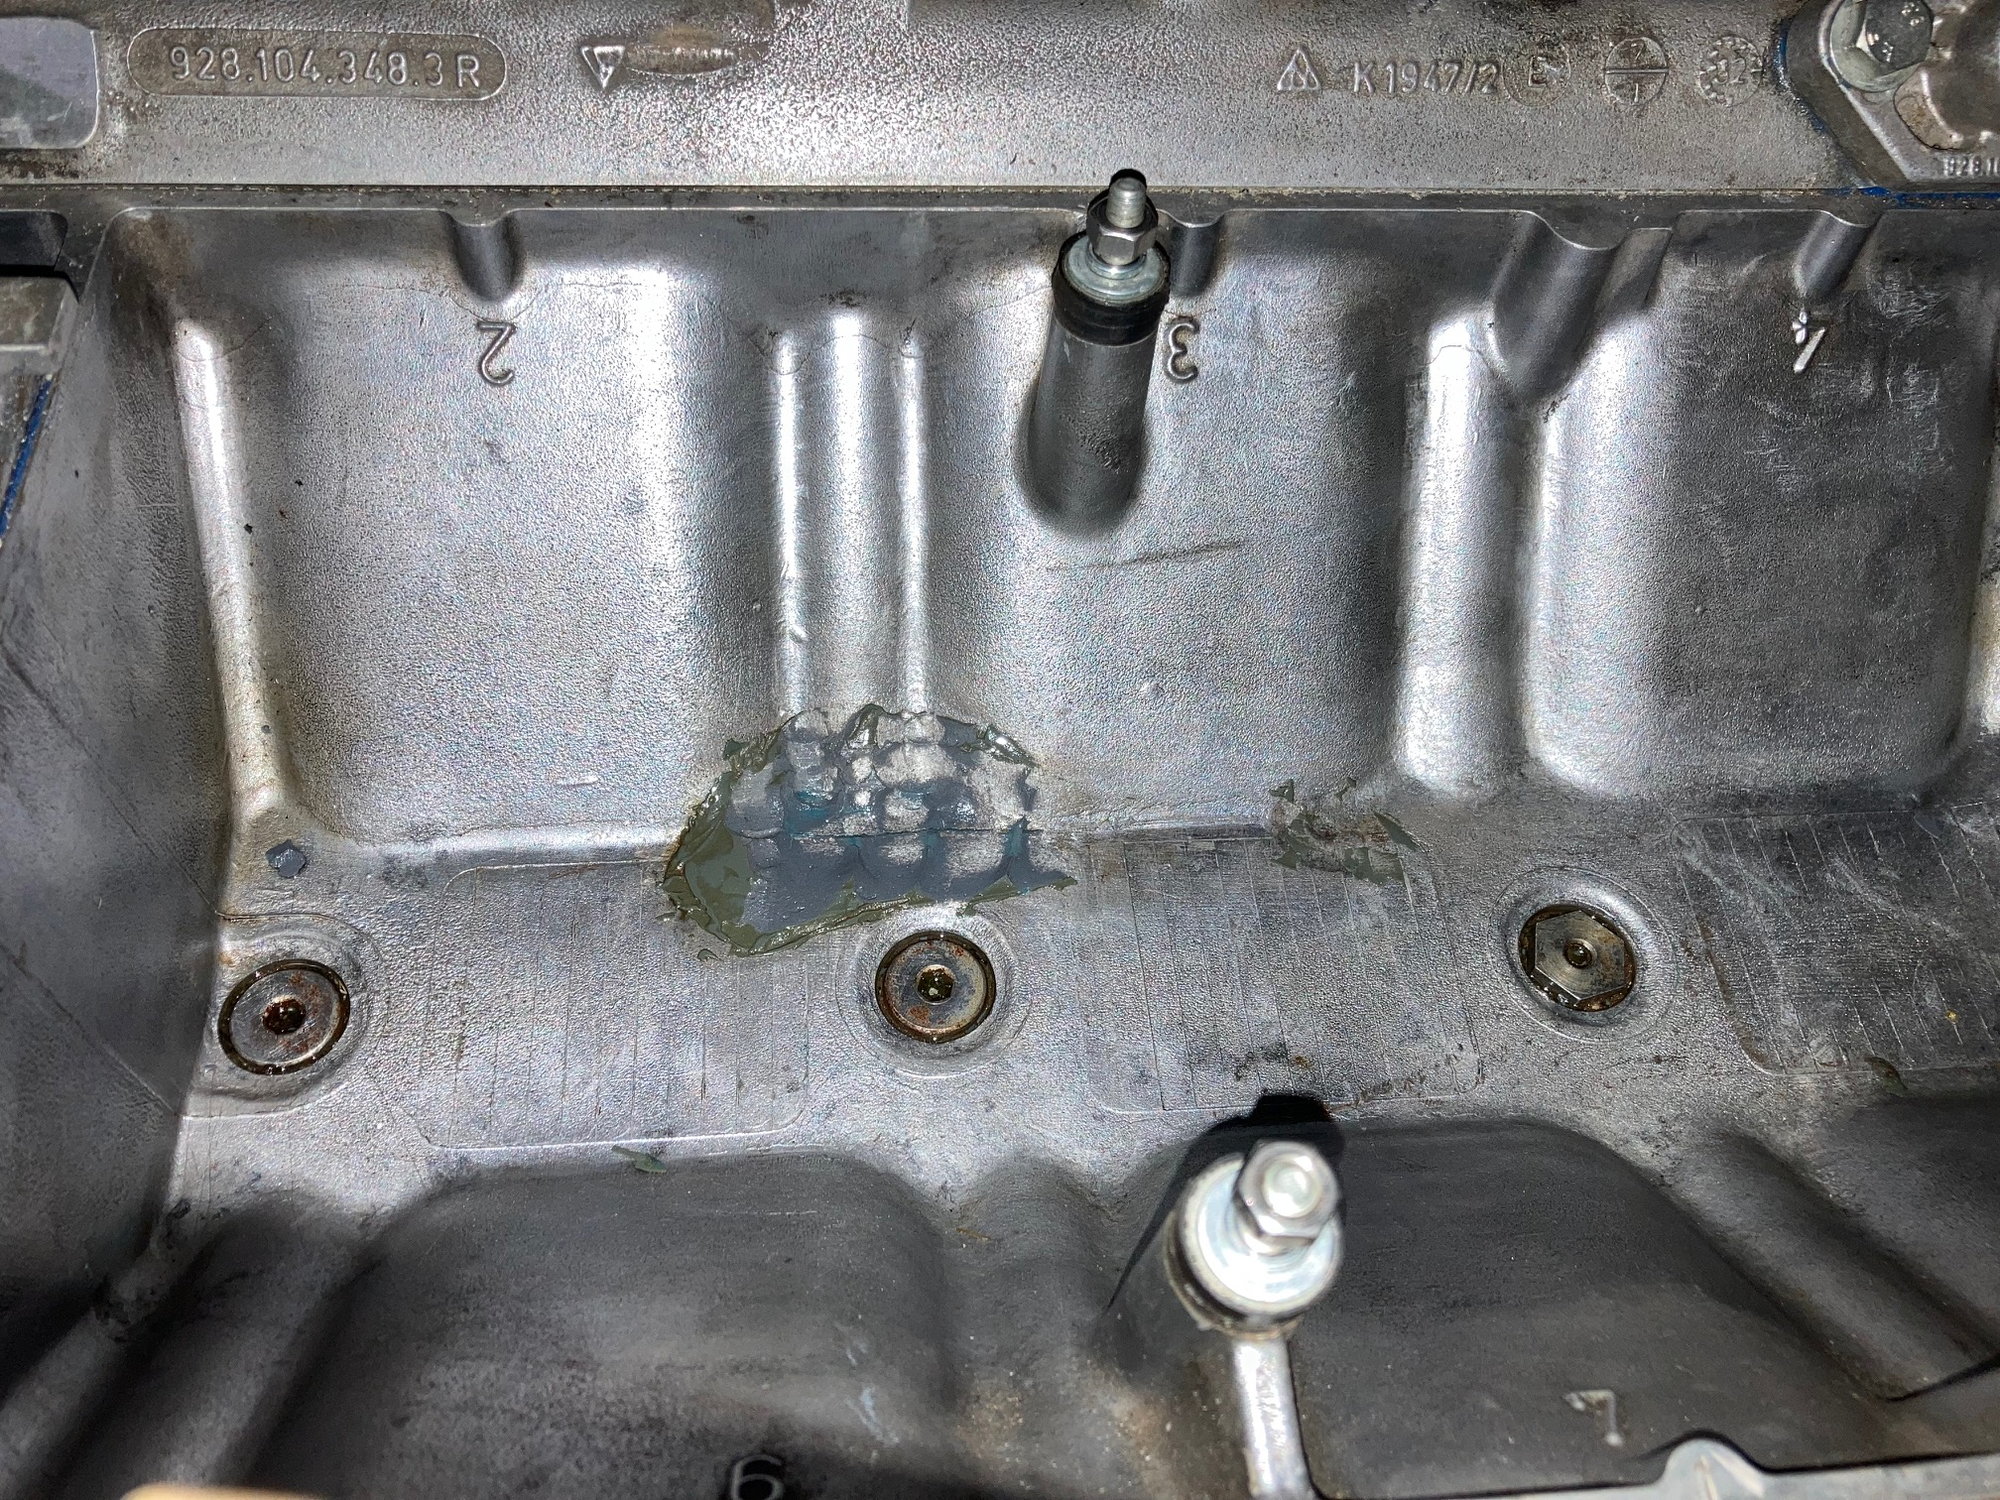
This is now. The grey stuff you see is my attempt to seal it with JB Weld. It only held for about 6 weeks.
I teach welding for a living and my specialty is aluminum. That is a really easy fix for me. Just an example of my work
wow , welding aluminium is really an art on itself.
Such a pity you do not live close by.
Problems that I have for welding my engine :
- I cannot heat it up
- engine must stay in the car when welding
- I do not know the exact material of the aluminium. I have heard it is called Silumin.
i think you need to revisit your interesting thread from two years ago as all that needed to be said was well covered therein.
Back to today- It looks as though you have tried to remove the blob of gunge you used to try and seal off the crack. Your photo suggests to me the JB Weld simply did not take as it should have given the clean patches in the midst of the remaining epoxy.
The cardinal error you made was expecting a dollop of the stuff to work. Chances are the alloy is saturated with oily residue plus whatever attrition exposure to coolant may have added. As i see things all is not lost and much as I expected such approach would likely fail what you seemingly overlooked was a good suggestion from one of the contributors who advised you to use a "patch" type approach if you did go down the epoxy repair route.
In your situation you might want to consider another attempt but this time try the following:
1. Heat the surrounding area with an electric heat gun to [hopefully] help drive any residual oily contamination out of the alloy. To achieve this the metal needs to be heated to a temperature in excess of 200C or so. I would think 10 or 15 minutes exposure might achieve this locally.
2. Degrease the locality of the repair using carb cleaner and tissue paper - repeat this three times or whatever takes your fancy.
3. You now need to make a patch. Go to your friendly Chinese takeaway, order a nice meal and ask if they can give you one of those aluminium food trays they put their offerings in. They are made from very thin aluminium that you can cut to shape with a pair of scissors and make a patch about six inches long by three inches wide and use the engine to act as a mould to shape the patch. The bigger you make the patch the more chance of long term success you will have. Degrease the contact side of the patch before applying the epoxy.
4. Apply the epoxy to the mating surface of the block- then firmly press the patch into the block working from the centre outwards, leave it 24 hours to fully set and keep your fingers crossed. If you can apply epoxy to the patch as well so much the better but that will be difficult given the flimsy nature of the thing.
The aluminium patch will have no problem resisting the pressure of the water jacket- just a question of whether you can get the epoxy to take. Remember you still have no idea of how the crack has propagated [most likely frost heave] and how it will continue to do so but assuming it will propagate with time it is likely to propagate axially [i.e. front to rear rather than side to side]. So, the longer you make the patch the more chance you have of long term success. If this were my engine and I decided to take this repair approach I would run the patch from the corner and cover the length of two cylinders. This approach will not repair the underlying problem but it may just give you more time coping with the problem all being well.
Drilling a couple of small holes to help stop propagation of the crack should do no harm but the problem with this is knowing how long the crack is, where it is and how deep to drill the holes. I suspect the block will be about 15mm thick- someone may have a better idea in this regard- if so drill to 10mm depth. If you do drill a small hole use a 2mm bit maximum and try to avoid drilling through competely then back fill the holes with epoxy.
We have covered other repair approaches previously in your thread but given your situation I suspect the above approach might just give you something to work with. A real world engineering solution would involve stripping the engine, grinding out the crack and welding the alusil material [17% silica content] with appropriate rods to eliminate the entire cracked surface- difficult and very involved. I suspect such is not really on your agenda and if you want a complete solution then a replacement block would be the way to go.
I have nothing to add that @FredR (and others) have not already said, apart from suggesting that you make sure which "flavor" of epoxy you want to use. In my own work to investigate certain repairs (nothing as serious as what is described in these threads, but with similar heat and chemical exposures) there are different grades of JB Weld that may be more or less appropriate to what you're trying to do. To wit, there is a marine grade JB Weld, as well as a high temperature version. From the nature of what you're trying to keep contained perhaps one of those might be more helpful for a long term solution. I don't know what availability is like for you but, much as I would love to deliver it in person, I would be happy to help send you some in the post.
Finally, to expand a little on the necessity to clean the aluminum very, very carefully prior to repair. If you already know this, apologies for the explanation but perhaps it helps others. Aluminum, without its protective oxide, is an amazingly reactive material. What is particularly useful with aluminum is that the reactivity with oxygen (and water, either as vapor in the atmosphere or with water itself) forms a passivating, protective layer. Unlike other metals such as iron (and plutonium, but that's out of scope here) the oxide on aluminum has a good match to the physical properties of the underlying metal so that, unlike iron oxide (rust), it continues to exhibit good adhesion to the underlying aluminum under a variety of conditions. Rust, as you know, tends to flake off quite easily, obviating any potential benefits of physical protection of the iron itself. The other interesting thing with aluminum oxide is that you can force it to be a reasonably thick layer. This layer is reasonably porous and can trap small molecules; this is what happens in anodizing and how you can get such interesting colors on aluminum, those are trapped dyes in the oxide layer. In your case, what Fred is referring to is the same absorption of oil or grease in the oxide layer. When they are heated they will tend to be driven out. This is how you can clean things up, but is also the root cause for failure of adhesion, as they will move to the surface and interfere with bonding.
Best of luck, I also remain very interested in how you fix this. As I said above, please PM me if I can be of help.
We tried welding a block in the valley....with the engine completely apart and the block super clean.
No matter what we tried....preheating, slow cool down, different filler rods, the weld cracked (and migrated further) when it cooled down.
I have welded several of these blocks , we cut up and old block to make filler rods from this , the process is now cost effective sue to the rarity of these engines and their cost ,
Preheating is must , My welder repairs Aircraft alloys for a living . You have to remove the engine and clean it thoroughly , large job , it cannot be done in the car .
I have repaired one in this area that had a conrod exit , and several ones with thrust bearing damage .
One of the repaired ones I race hard now for several seasons without issues .
i think you need to revisit your interesting thread from two years ago as all that needed to be said was well covered therein.
Back to today- It looks as though you have tried to remove the blob of gunge you used to try and seal off the crack. Your photo suggests to me the JB Weld simply did not take as it should have given the clean patches in the midst of the remaining epoxy.
The cardinal error you made was expecting a dollop of the stuff to work. Chances are the alloy is saturated with oily residue plus whatever attrition exposure to coolant may have added. As i see things all is not lost and much as I expected such approach would likely fail what you seemingly overlooked was a good suggestion from one of the contributors who advised you to use a "patch" type approach if you did go down the epoxy repair route.
In your situation you might want to consider another attempt but this time try the following:
1. Heat the surrounding area with an electric heat gun to [hopefully] help drive any residual oily contamination out of the alloy. To achieve this the metal needs to be heated to a temperature in excess of 200C or so. I would think 10 or 15 minutes exposure might achieve this locally.
2. Degrease the locality of the repair using carb cleaner and tissue paper - repeat this three times or whatever takes your fancy.
3. You now need to make a patch. Go to your friendly Chinese takeaway, order a nice meal and ask if they can give you one of those aluminium food trays they put their offerings in. They are made from very thin aluminium that you can cut to shape with a pair of scissors and make a patch about six inches long by three inches wide and use the engine to act as a mould to shape the patch. The bigger you make the patch the more chance of long term success you will have. Degrease the contact side of the patch before applying the epoxy.
4. Apply the epoxy to the mating surface of the block- then firmly press the patch into the block working from the centre outwards, leave it 24 hours to fully set and keep your fingers crossed. If you can apply epoxy to the patch as well so much the better but that will be difficult given the flimsy nature of the thing.
The aluminium patch will have no problem resisting the pressure of the water jacket- just a question of whether you can get the epoxy to take. Remember you still have no idea of how the crack has propagated [most likely frost heave] and how it will continue to do so but assuming it will propagate with time it is likely to propagate axially [i.e. front to rear rather than side to side]. So, the longer you make the patch the more chance you have of long term success. If this were my engine and I decided to take this repair approach I would run the patch from the corner and cover the length of two cylinders. This approach will not repair the underlying problem but it may just give you more time coping with the problem all being well.
Drilling a couple of small holes to help stop propagation of the crack should do no harm but the problem with this is knowing how long the crack is, where it is and how deep to drill the holes. I suspect the block will be about 15mm thick- someone may have a better idea in this regard- if so drill to 10mm depth. If you do drill a small hole use a 2mm bit maximum and try to avoid drilling through competely then back fill the holes with epoxy.
We have covered other repair approaches previously in your thread but given your situation I suspect the above approach might just give you something to work with. A real world engineering solution would involve stripping the engine, grinding out the crack and welding the alusil material [17% silica content] with appropriate rods to eliminate the entire cracked surface- difficult and very involved. I suspect such is not really on your agenda and if you want a complete solution then a replacement block would be the way to go.
Hi Fred, thanks for your elaborated explanation. This is really usefull information because I have little experience with applying epoxy on aluminium to seal. It often works for fixing sump pan damages on motorcycles but a big V8 Porsche engine is quite something else.
Especially because of the high temperatures and cooling fluid pressure.
Considering this, I eventually will go for a more solid solution : welding.
I also need to make sure the crack doesn't go any further .

 03-29-2022, 09:54 PM