When you click on links to various merchants on this site and make a purchase, this can result in this site earning a commission. Affiliate programs and affiliations include, but are not limited to, the eBay Partner Network.
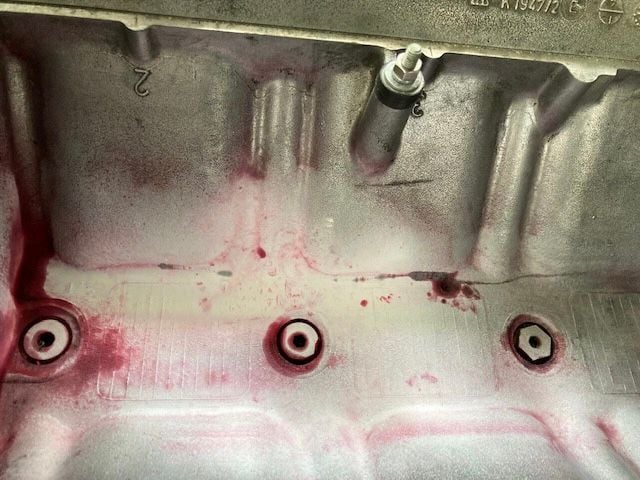
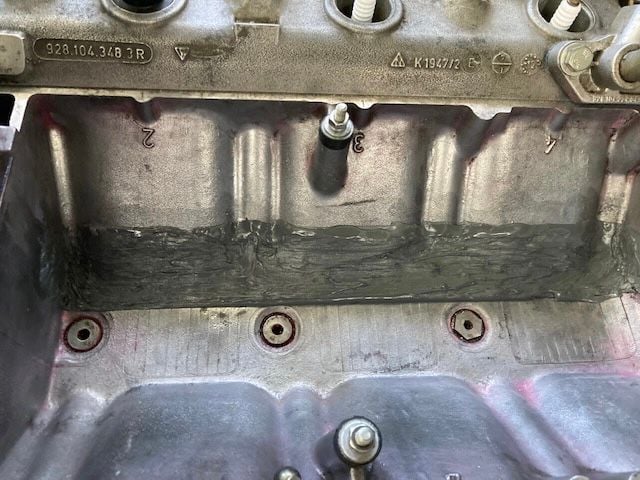
This is not a corrosion issue it is a mechanical failure issue. It could be a localised failure due to a casting defect that has propagated until the point where there is a through communication from the main cooling chamber to the base of the Vee. The head bolts are anchored next to the axis of the crank and stop the cylinder heads from going into orbit- action and reaction are equal and opposite assuming Sir Isaac knew what he was talking about and therefore a casting defect could explain this and with time, vibration and cyclic heat stresses crack propagation should such a defect be present is a very distinct possibility. Your original thread and the pictures therein show what appeared to be a very distinct axial crack at the base of the Vee, around the middle cylinders and some two inches or so long. if the problem is contained to that location it is still going to propagate with time. That is the "upside" or "best case scenario" as it were. If this is the case then you do not know where the crack originated or whether the problem travelled inside to outside or vice versa.
The downside is if frost heave was involved in the failure one might expect the problem to be worse around the middle cylinder area around the base of the head bolts or perhaps more so in your case if your motor deploys stud bolts - thus my suspicions. Even worse, you would not know if any damage was sustained on the other bank that has just not come to the surface [yet] given the same fluid was in the engine with similar environmental exposure.
Whatever the cause the trouble is you do not know the extent of the problem and the best scenario you can hope for using material currently available to you is to make a repair such that it might just slow down the rate of propagation or seal off the attrition to buy you an increement of service life that at the moment is zero hours without in-flight refuelling of coolant!.
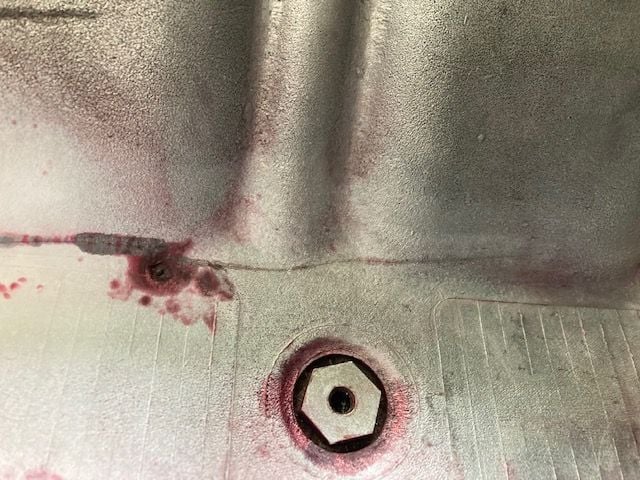
As to trying to determine the extent of the problem I have previously suggested to try some dye pen testing to indicate whether the surface cracking goes beyond what you could visibly see originally. Same would apply to the base of the cooling chamber were the cylinder heads off. The only other viable NDT tests are ultrasonic testing and radiography and then the bills start mounting. I am not sure you could get a meaningful external UT examination done given the local geometry - in that regard you would need an opinion from a skilled pratcitioner- I suspect that to achieve such you would need to have the engine stripped down and shoot the area from the inside of the crankcase. Probably much the same for radiographic examination.
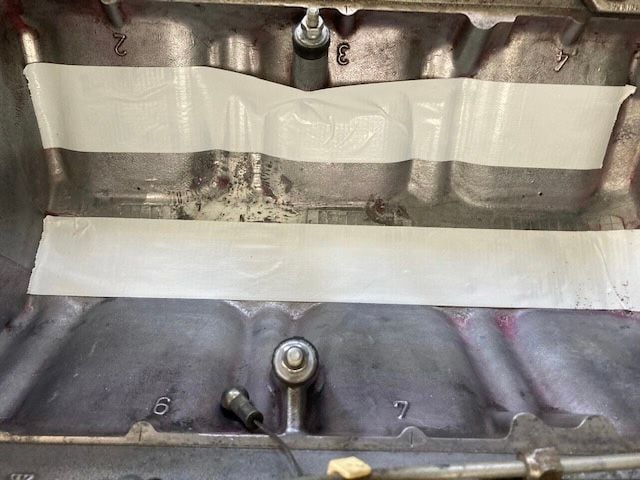
Thus the simplest and lowest cost option you have at the moment is to go for the approach I suggested with full contact coverage along the base of the Vee. It might just bale you out and will cost you next to nothing to try it. That or try an overlapping strip 6 inches long and keep your fingers crossed a bit tighter. I have demonstrated why the aluminium brace approach improves your chances of success quite dramatically. Alternatively just gob some 1212 over the general area and flip a coin.
"Chance favours the prepared mind"
Hi Fred, I bought the engine 5 years ago from a donor car. I overhauled the engine. it took about 1 year to overhaul. Then, I drove the car 2 years with no issues
So engine did not suffer from frost during my ownership.
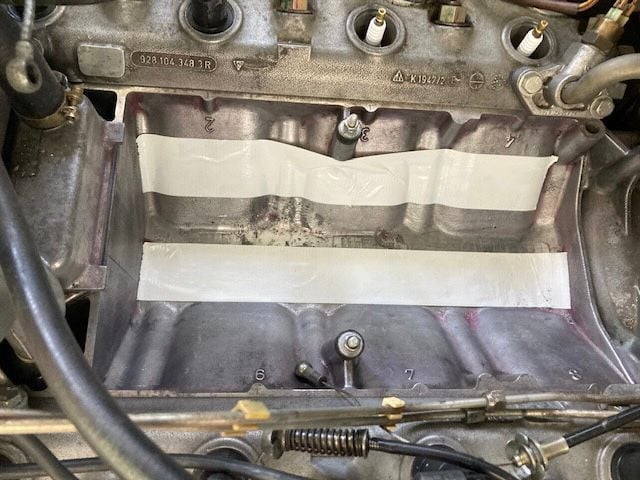
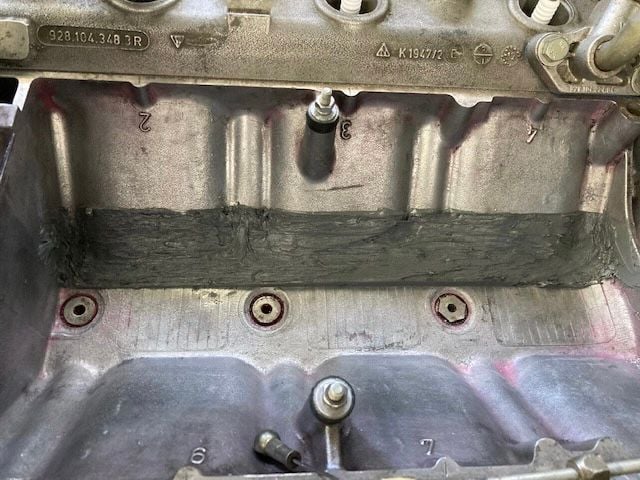
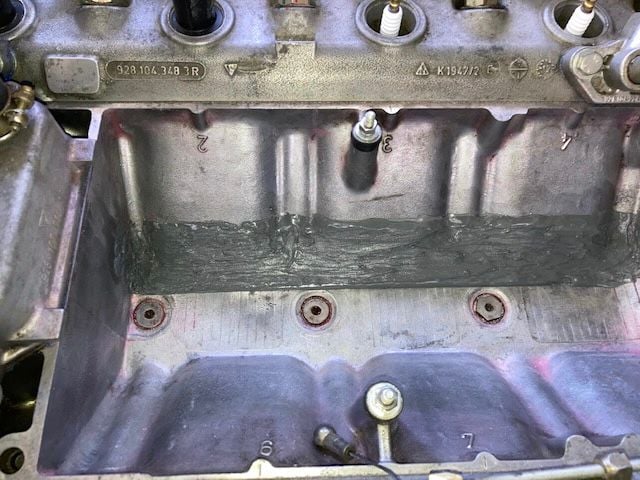
Since removing and dismantling the engine is not an option for the moment, I will first try to patch it up via Belzona 1212 together with a long piece of aluminium over the whole length of the Vee. I will drill 2 holes at both ends of the crack, but just 3-4 mm deep because I don�t think the base is 10 or 15 mm thick�
I also asked a professional welding company to make me an offer. Not yet received an answer but I expect to receive it by end of the week
So 2 important things need to be done :
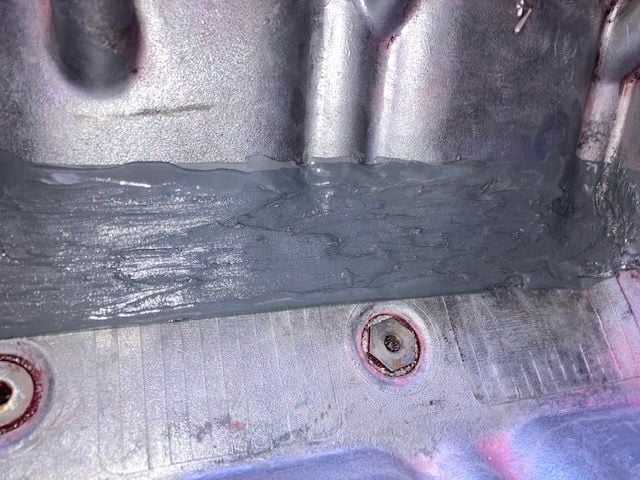
- prevent crack from further spreading : drill holes, fill them with belzona 1212
- seal it off so that no coolant can leak, even when not running�because when I left the car sitting last year for couple of months, the whole Vee was full of coolant
Can Loctite 5926 (blue silicon) to seal waterpump also be a solution ? And I mean sticking aluminium plate to the Vee by glueing it with this blue silicon.
Pitty that I cannot screw an aluminium plate to the bottom of the Vee with the silicone in between to seal crack off.
Hi Fred, I bought the engine 5 years ago from a donor car. I overhauled the engine. it took about 1 year to overhaul. Then, I drove the car 2 years with no issues
So engine did not suffer from frost during my ownership.
Since removing and dismantling the engine is not an option for the moment, I will first try to patch it up via Belzona 1212 together with a long piece of aluminium over the whole length of the Vee. I will drill 2 holes at both ends of the crack, but just 3-4 mm deep because I don�t think the base is 10 or 15 mm thick�
I also asked a professional welding company to make me an offer. Not yet received an answer but I expect to receive it by end of the week
So 2 important things need to be done :
- prevent crack from further spreading : drill holes, fill them with belzona 1212
- seal it off so that no coolant can leak, even when not running�because when I left the car sitting last year for couple of months, the whole Vee was full of coolant
Can Loctite 5926 (blue silicon) to seal waterpump also be a solution ? And I mean sticking aluminium plate to the Vee by glueing it with this blue silicon.
Pitty that I cannot screw an aluminium plate to the bottom of the Vee with the silicone in between to seal crack off.
Gerrit,
If the issue has been initiated by frost heave there is no telling when such was initiated rather it is something that has propagated with age and eventually manifested itself with the breach of containment you then eventually noticed- very unfortunate. Similarly there is no certainty this is what has happened- I see it as a possible explanation for what we see just as a casting defect might explain such but it is not a serial 928 problem- i.e. something that is commonly seen- in fact I have never come across anything vaguely similar- would need the likes of GB or our other professionals to comment as to whether they have seen anything vaguely like this given the numbers they see.
If you have asked for a quote for a welded solution I would hold off from doing anything else until you have received and evaluated such. Once you do down the Belzona route getting that thing off again will be somewhat difficult assuming you prepared the job correctly. I doubt the wall of the water jacket is that thick - my assumption is that there will be some local reinforcement of the joint in the base of the casting rather than a square edge finish so as to reduce any localised stress concentration. I visualise those kind of numbers in the base of the Vee that forms the main structural member tying the two halves of the motor together.
The Loctite variant you mentioned is a typical silicon RTV variant used to seal a joint- it is not a bonding agent so has little value as an adhesive.
If you can see a visual end to the cracking then drilling small holes at either end of the crack should do no harm - the problem is knowing where the crack ends and thus where to drill given the extent of the crack may be much greater than that immediately visible.
Today I received a price offer for welding my engine : between $750 - $1000
But I need to dismantle the engine completely and give them the faulty part for welding.
So this means that I will need to go down the road of Belzona since I need to bring my 928 to the MOT ( for a classic car this is every 2 years in Belgium) in May.
And I cannot keep my license plate while postponing the MOT since license plate is on owners name, not on the car.
Here in Belgium we keep the license plate even when changing our vehicle.
My current license plate for the Porsche is already 23 years old. I use to have an MGB of 1974 (bought in California) and in 2010 I sold it and bought the Porsche 928
So with a mate of mine , we will repair the crack in the coming weeks.
I will post some pictures.
Let�s keep our fingers crossed it will temporary hold till the welding solution end of year when I have some more time
I have zero expertise in this area and I have welded only steel with simple flux welders before. Just a curiosity question here to all the experts: would one of these "no weld" aluminum welding sticks work in this case?
I have zero expertise in this area and I have welded only steel with simple flux welders before. Just a curiosity question here to all the experts: would one of these "no weld" aluminum welding sticks work in this case?
I believe that the problem will be heating the surface of the engine that needs to be welded.
200 degree Celsius might still be doable, but 400 to 600 degree Celsius is something else.
Especially because there is tension near the studs of cilinder 2 and 3
I have zero expertise in this area and I have welded only steel with simple flux welders before. Just a curiosity question here to all the experts: would one of these "no weld" aluminum welding sticks work in this case?
Pure aluminum melts at 1200 degrees. Alloyed aluminum will melt at different Temps. The oxides that naturally occur on aluminum melts at about 3600 degrees.
Pure aluminum melts at 1200 degrees. Alloyed aluminum will melt at different Temps. The oxides that naturally occur on aluminum melts at about 3600 degrees.
Yeah, I have no expertise in alu welding. I don't think this is pure aluminum, which likely decreases the melting point, which is probably for the best, as you wouldn't want to melt the block. The best solution really is to get an expert alu welder.
Today I received a price offer for welding my engine : between $750 - $1000
But I need to dismantle the engine completely and give them the faulty part for welding.
So this means that I will need to go down the road of Belzona since I need to bring my 928 to the MOT ( for a classic car this is every 2 years in Belgium) in May.
And I cannot keep my license plate while postponing the MOT since license plate is on owners name, not on the car.
Here in Belgium we keep the license plate even when changing our vehicle.
My current license plate for the Porsche is already 23 years old. I use to have an MGB of 1974 (bought in California) and in 2010 I sold it and bought the Porsche 928
So with a mate of mine , we will repair the crack in the coming weeks.
I will post some pictures.
Let�s keep our fingers crossed it will temporary hold till the welding solution end of year when I have some more time
you can keep your license plate as long as you pay the yearly taxes.... no matter of MOT done or not.
you can keep your license plate as long as you pay the yearly taxes.... no matter of MOT done or not.
That is indeed true, but when you don�t go to the mandatory MOT every 2 years, you will probably get a huge fine, depending on how many months your are overdue with your MOT. I thought that in the past you could get a special extension p.e. when your car is being restored�but I could not find this in the legislation.
Oh, man. That's not good. I'd be looking for blocks or complete engines.
Me too! What that is telling me is that that whole bank of cylinders is about to simply break off of the block.
__________________
ReDesign by FEATHER
by Jerry Feather
Producer for 928 of:
-Hatch Latch Receiver Liner--All Versions
-Replacement Heavy Duty Spare Tire Cover
-Flush Center Console Conversion
-Cowl Cover, Cowl Seal, & Shell Stickers--All versions
(RHD included)
-Aluminum Gas Cap Ratcheting Pawl
I see that I should have probably posted that last post in my personal membership rather than my 928 business membership. However that was the one I happened to be in when I noticed this recent progress.
Nevertheless, my previous thoughts about the early much shorter seeming crack was that if the engine was still in the car and if the solution was important to be done there, I would have recommended using an aluminum kind of brazing alloy that I have been using in one of my 928 projects and that is from someone called "Muggy-weld" (or some similar goofy name, that I can't quite remember now), but it works quite amazing is such a situation as this. What it does, at about 750 degrees I think, is melt and flow into the space needed if you can get a special flux into the crack. It melts and flows much like the solder into a copper plumbing pipe joining situation. I use my oxy/ace torch and raise the joint to a fairly high, but not melting, temp and then introduce the aluminum rod and it instantly flows to the entire joint where there is flux.,
What I would have recommended for this earlier identified situation with only about one cylinder worth of crack, was to grind the crack into a slight V with a tiny pointed dremel tool and stop-drill the ends of the crack to the extent that the ends could be found. and then solder and flow/sweat my alloy into the joint with the torch. However. now that the crack is apparently the length of the block I am not sure I would do that. However, if the engine-in-car is still a big consideration I might still try my method.
On the other hand I WOULD NEVER TRY TO GLUE-THE-CRACK AS APPLIED BY THE OP. What a waste of effort. The "glue" is likely to seal the crack but it has nothing to do with fixing whatever is causing the crack in the first place, and, again, if that is not stopped I think this bank of the cylinders is going to simply break off of the engine.
The effort now to remove all the crap you have put onto or into it is probably not worth the effort to try my method. You need a new block. I wouldn't even start the engine after what you have done to or for it.
Last edited by Jerry Feather; 04-24-2022 at 12:50 PM.
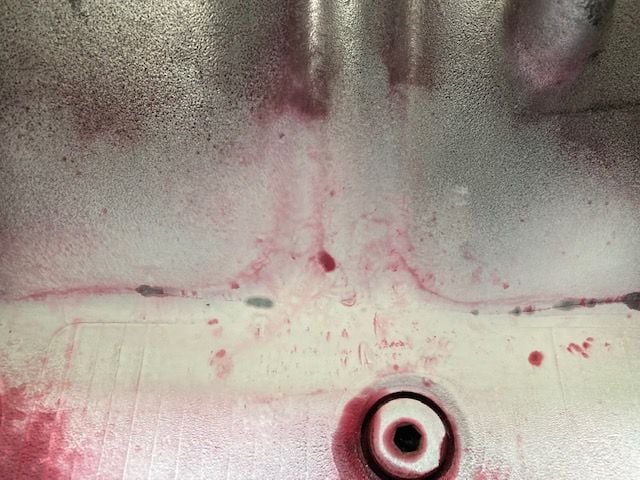
Good to see that you eventually took my advice of two years ago and did the dye pen scan- sad to say my concerns were spot on about the scope of the problem. I trust you did the same on the other side of the Vee?
In your current situation and as advised earlier I would now drain down the coolant and do a pneumatic test at 15 psig to see if it holds pressure. Block the drain in the base of the vee and fill with water to see if you can spot any bubbles. Your next problem is knowing whether the cracking is limited to that face inside the vee or whether it has propagated elsewhere- remember the cylinder heads sit on the top of the cylinders and the block periphery.
I am a bit surprised that you did not go with the splint type of approach as what you have done will reduce the chances of success some but I reckon there is still a good chance you will get some life out of the motor and success depends on your definition of such. If you want a few days to get your car tested that might might qualify, if you want to run around for the next few summer months whilst you find a new block that may also qualify as a success and of course ulitimately how long it does hold up.
Quite understandable that you are going to get some negative opinions when something that folks have not had to deal with suddenly appears so do not be put off by that at this stage. As I recall you managed to buy some time previously using a $10 tube of goo gobbed on the damaged surface and it sort of worked for a while. Now you have tried something completely different and time will tell how efffective it is or is not.
From a technical perspective what folks need to understand here is that there is no "structural failure" strange as it may seem to most - there is a containment failure and that is the problem you are trying to resolve. If there was a structural problem the head gasket would have blown ages ago so what do we know? The notion that the head is going to part company with the block could not be further from reality as I am concerned. Think about it some- the strongest part of the motor is "the arch"- this holds the heads to the block and ties the motor together as one "structural monocoque"- it is immensely strong and has been known to hold motors producing 1000 BHP with no modifications. Has anything changed here?- of course not. The head bolting is embedded into the arch and is firmly holding the heads and the water jacket together with the cracked face in direct compression. If a chunck of the water jacket wall were to let go it would be another matter but nothing in the dye pen examination suggests such is imminent- the crack is obviously limited to the interface between the arch and the wall of the jacket..
If there was any structural damage to the block you would have coolant in the sump or oil in the vee not to mention a blown head gasket. The simple fact is the integrity of the head bolting system is still perfect and that is holding the heads to the block and also trying to seal the part of the block that is cracked- i.e. the heads bolts are working for you rather than against you in this instance. Despite a crack along the base of the vee all you got leaking was a few drops of coolant- that is because the bolting is trying to "seal the crack" for you but of course a leak tight seal is just not possible as things stand.
When you first noticed the failure it was not imitating a horse taking a leak- just a few accumulated drops- nothing more that caught your attention. Do you [or anyone else for that matter] see a clear and obvious reason why it should suddenly get "worse" ? So what are we trying to seal here? You have a water jacket that operates at a maximum pressure of 15 psig. The force trying to lift the Belzona off the job face is defined by F= P x A where A is the area of the "crack face" the pressure is being applied across. The crack width is "sod all" so the force trying to lift off the belzona is 15 x "sod all" which amounts to "sod all"- i.e. visually nothing [strange as it may seem] which explains why your previous dab of "gumbo" sealed it for a while. Now you are in a different ball game with Belzona 1212- I have used that stuff applied on a surface immersed under seawater to effect a pipe repair such is just how amazing that stuff really is and why it costs! .
Bottom line- just try it now - if it works all well and good- if it fails you are no worse off than you currently are. The risk is the cracks may have propagated further than you can currently see - should that prove to be the case just scrap the thing and get a new block. As I can tell you have done all that could have been done and even had you gone down the weld and repair route I suspect the total cost would be the same as or maybe greater than getting hold of a decent used block but of course even those are getting harder to find these days.

 04-05-2022, 06:57 PM