When you click on links to various merchants on this site and make a purchase, this can result in this site earning a commission. Affiliate programs and affiliations include, but are not limited to, the eBay Partner Network.
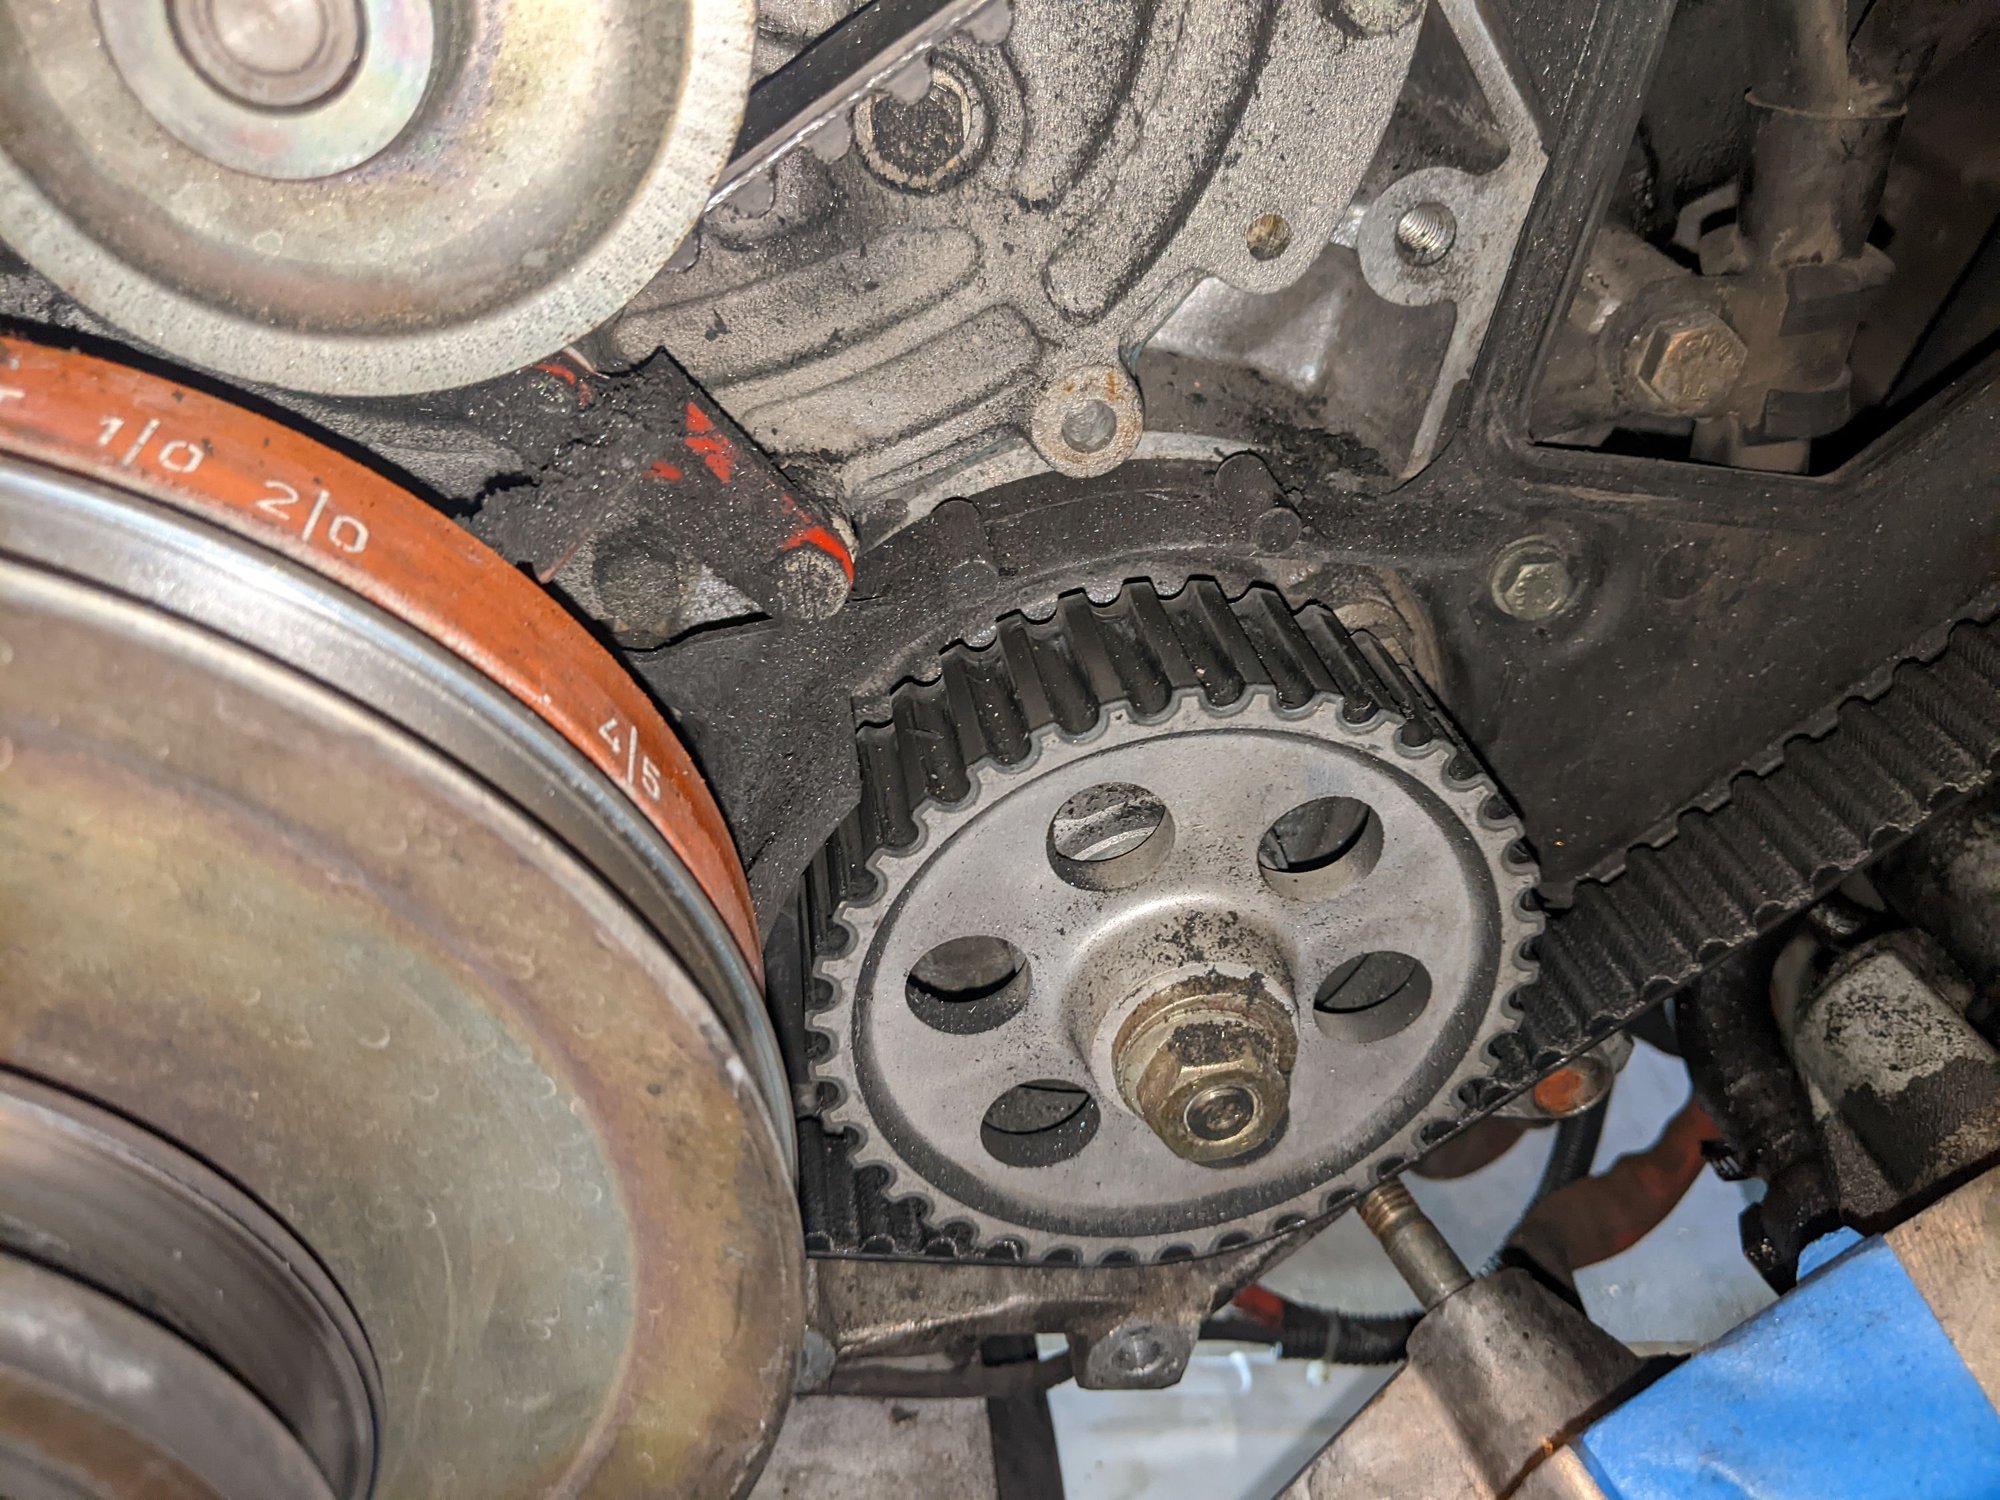
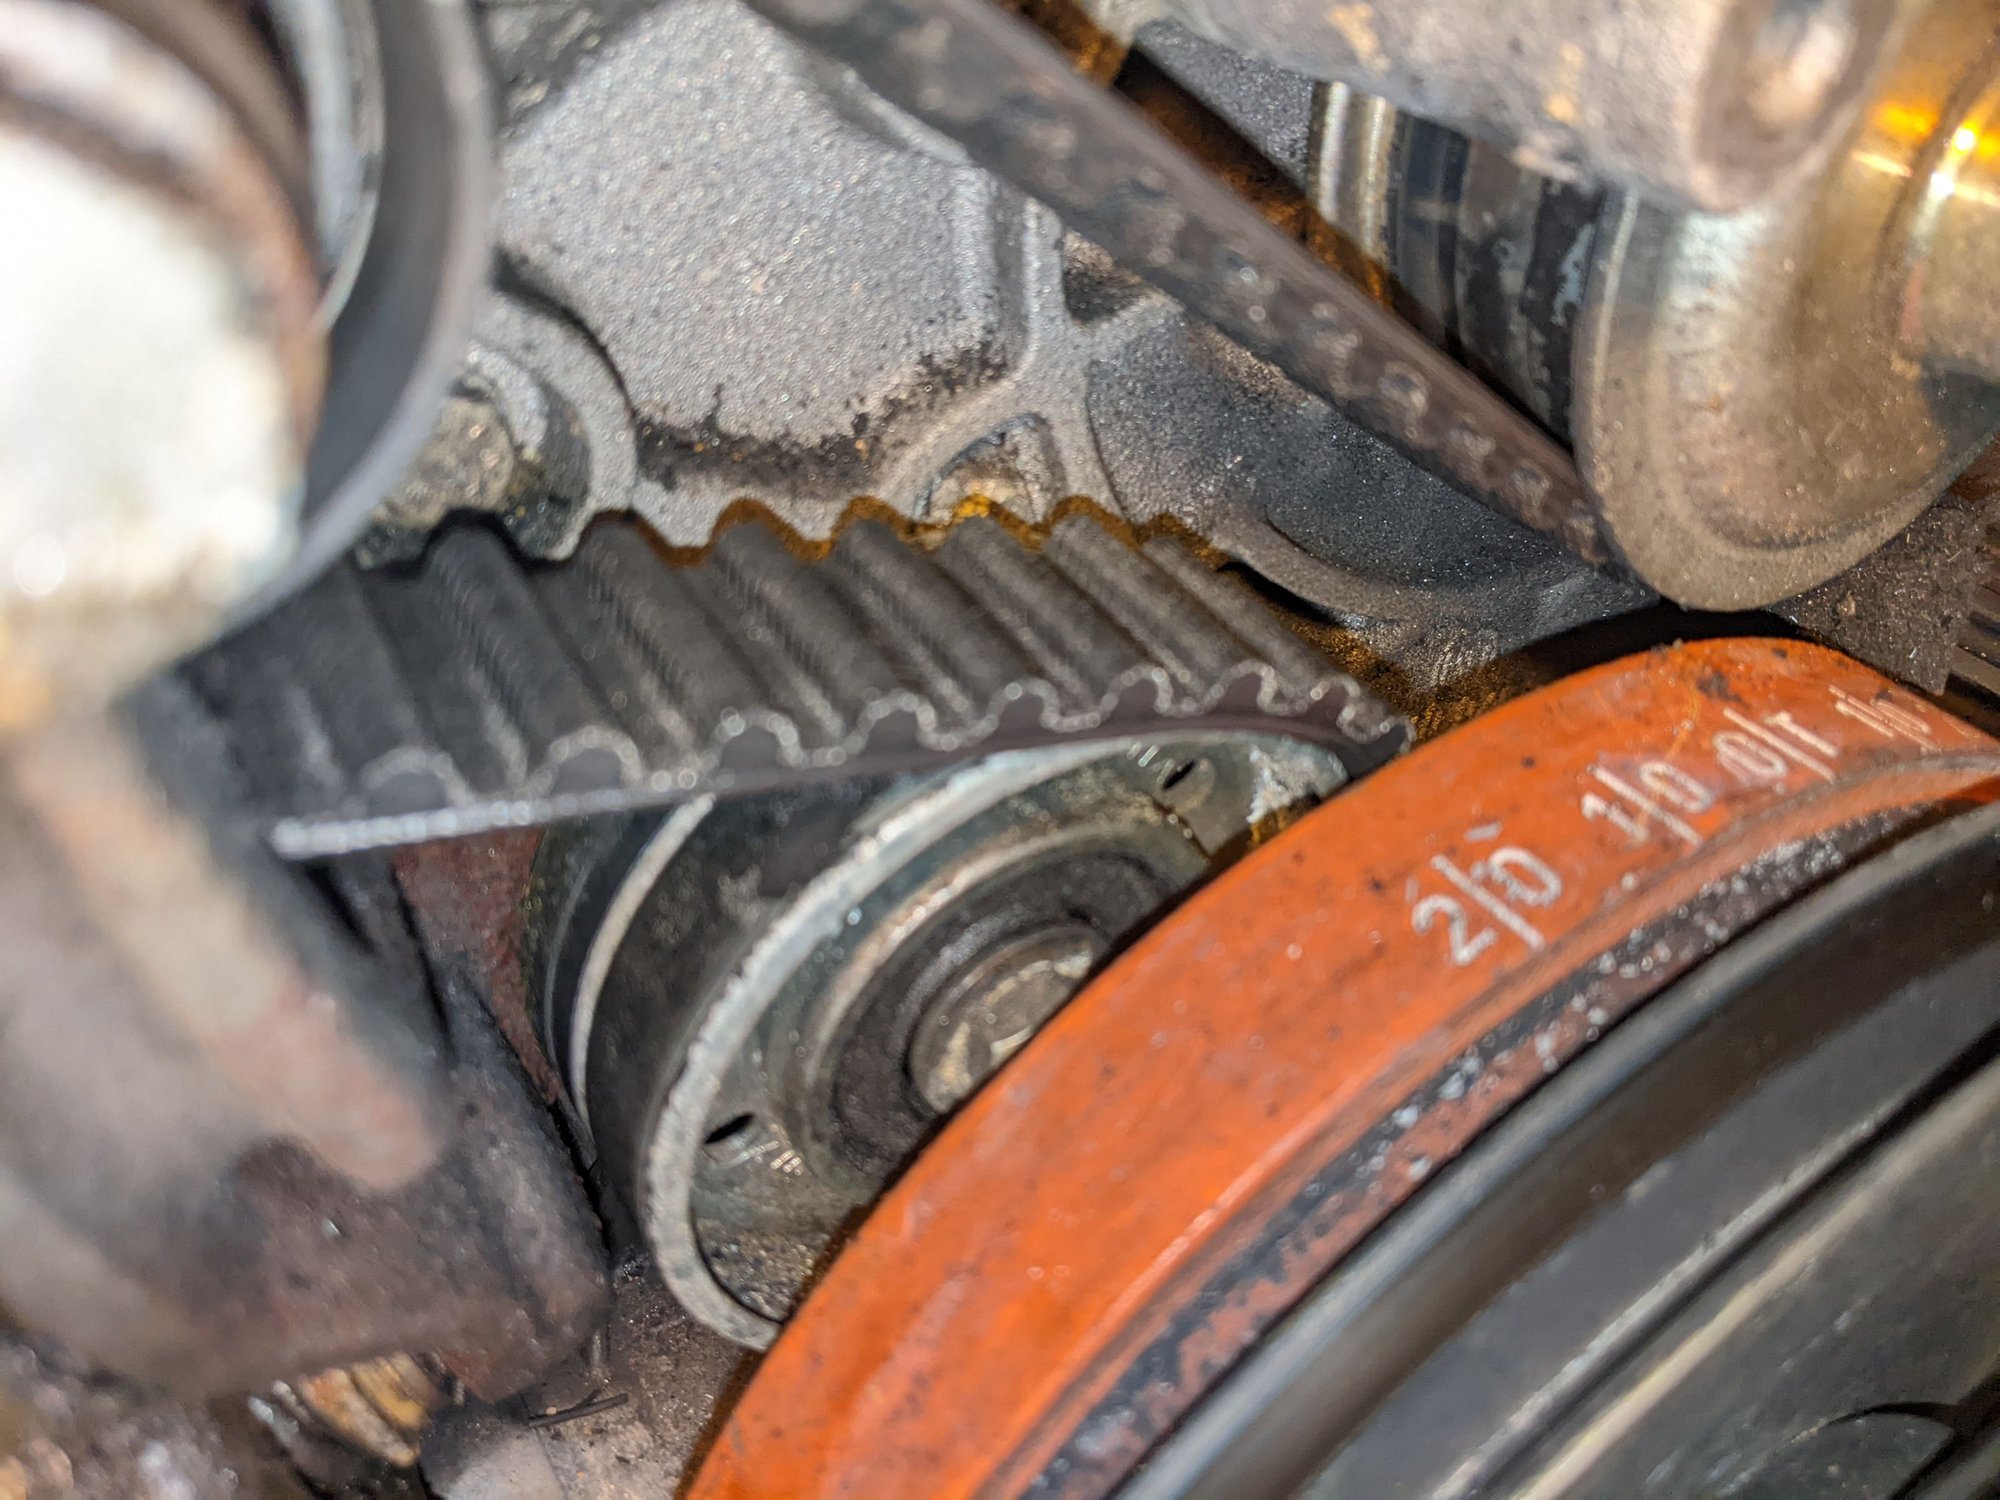
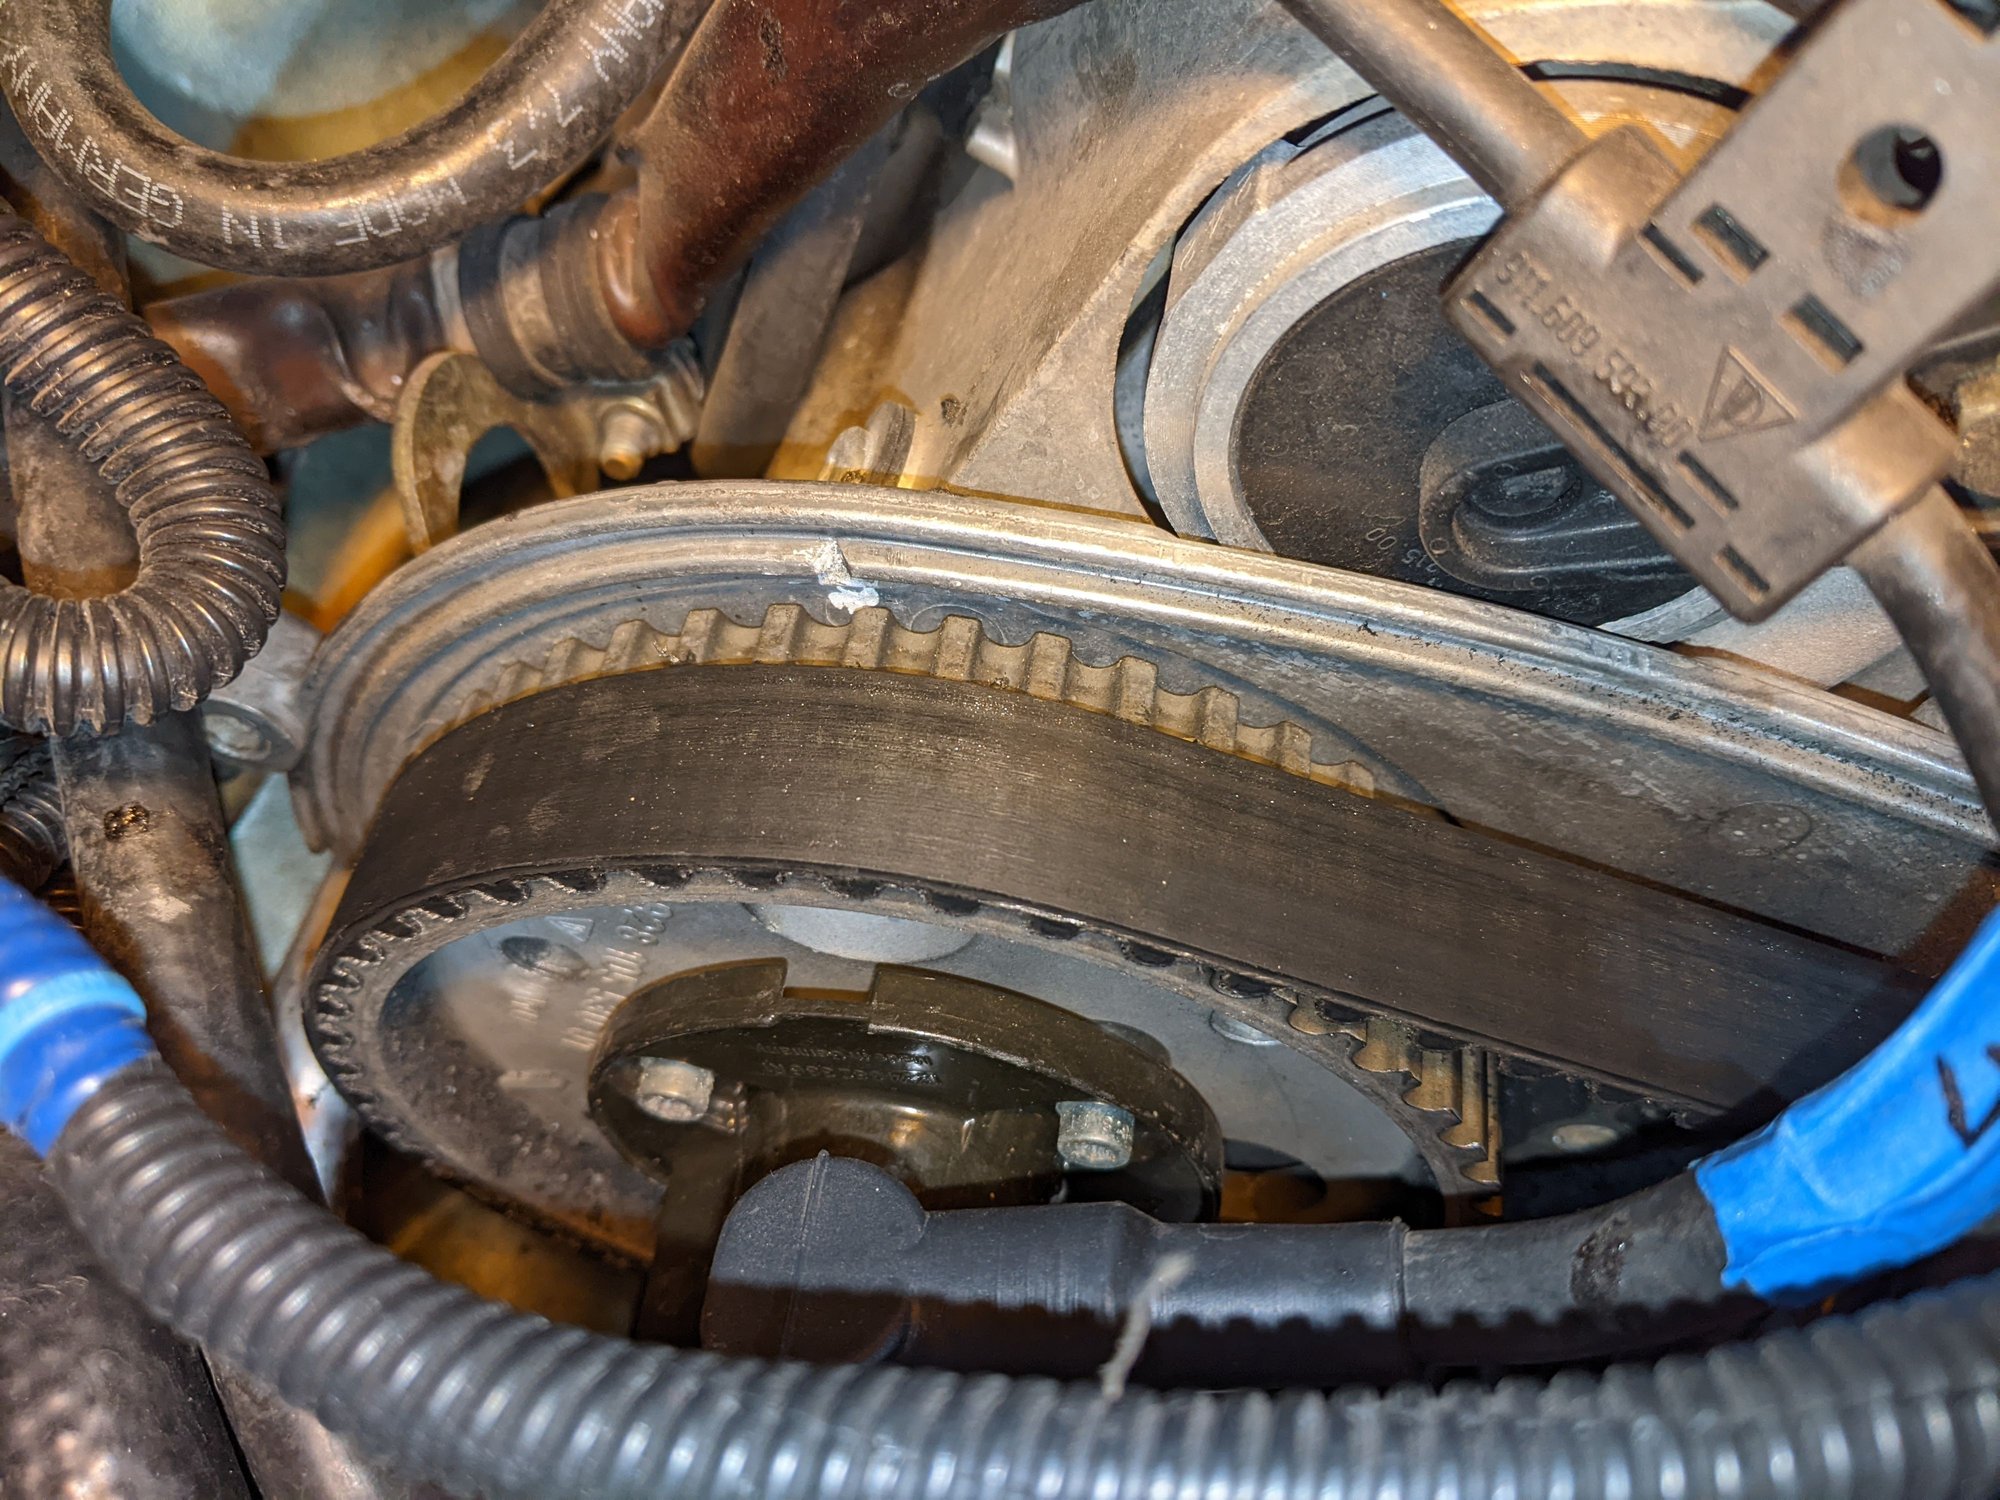
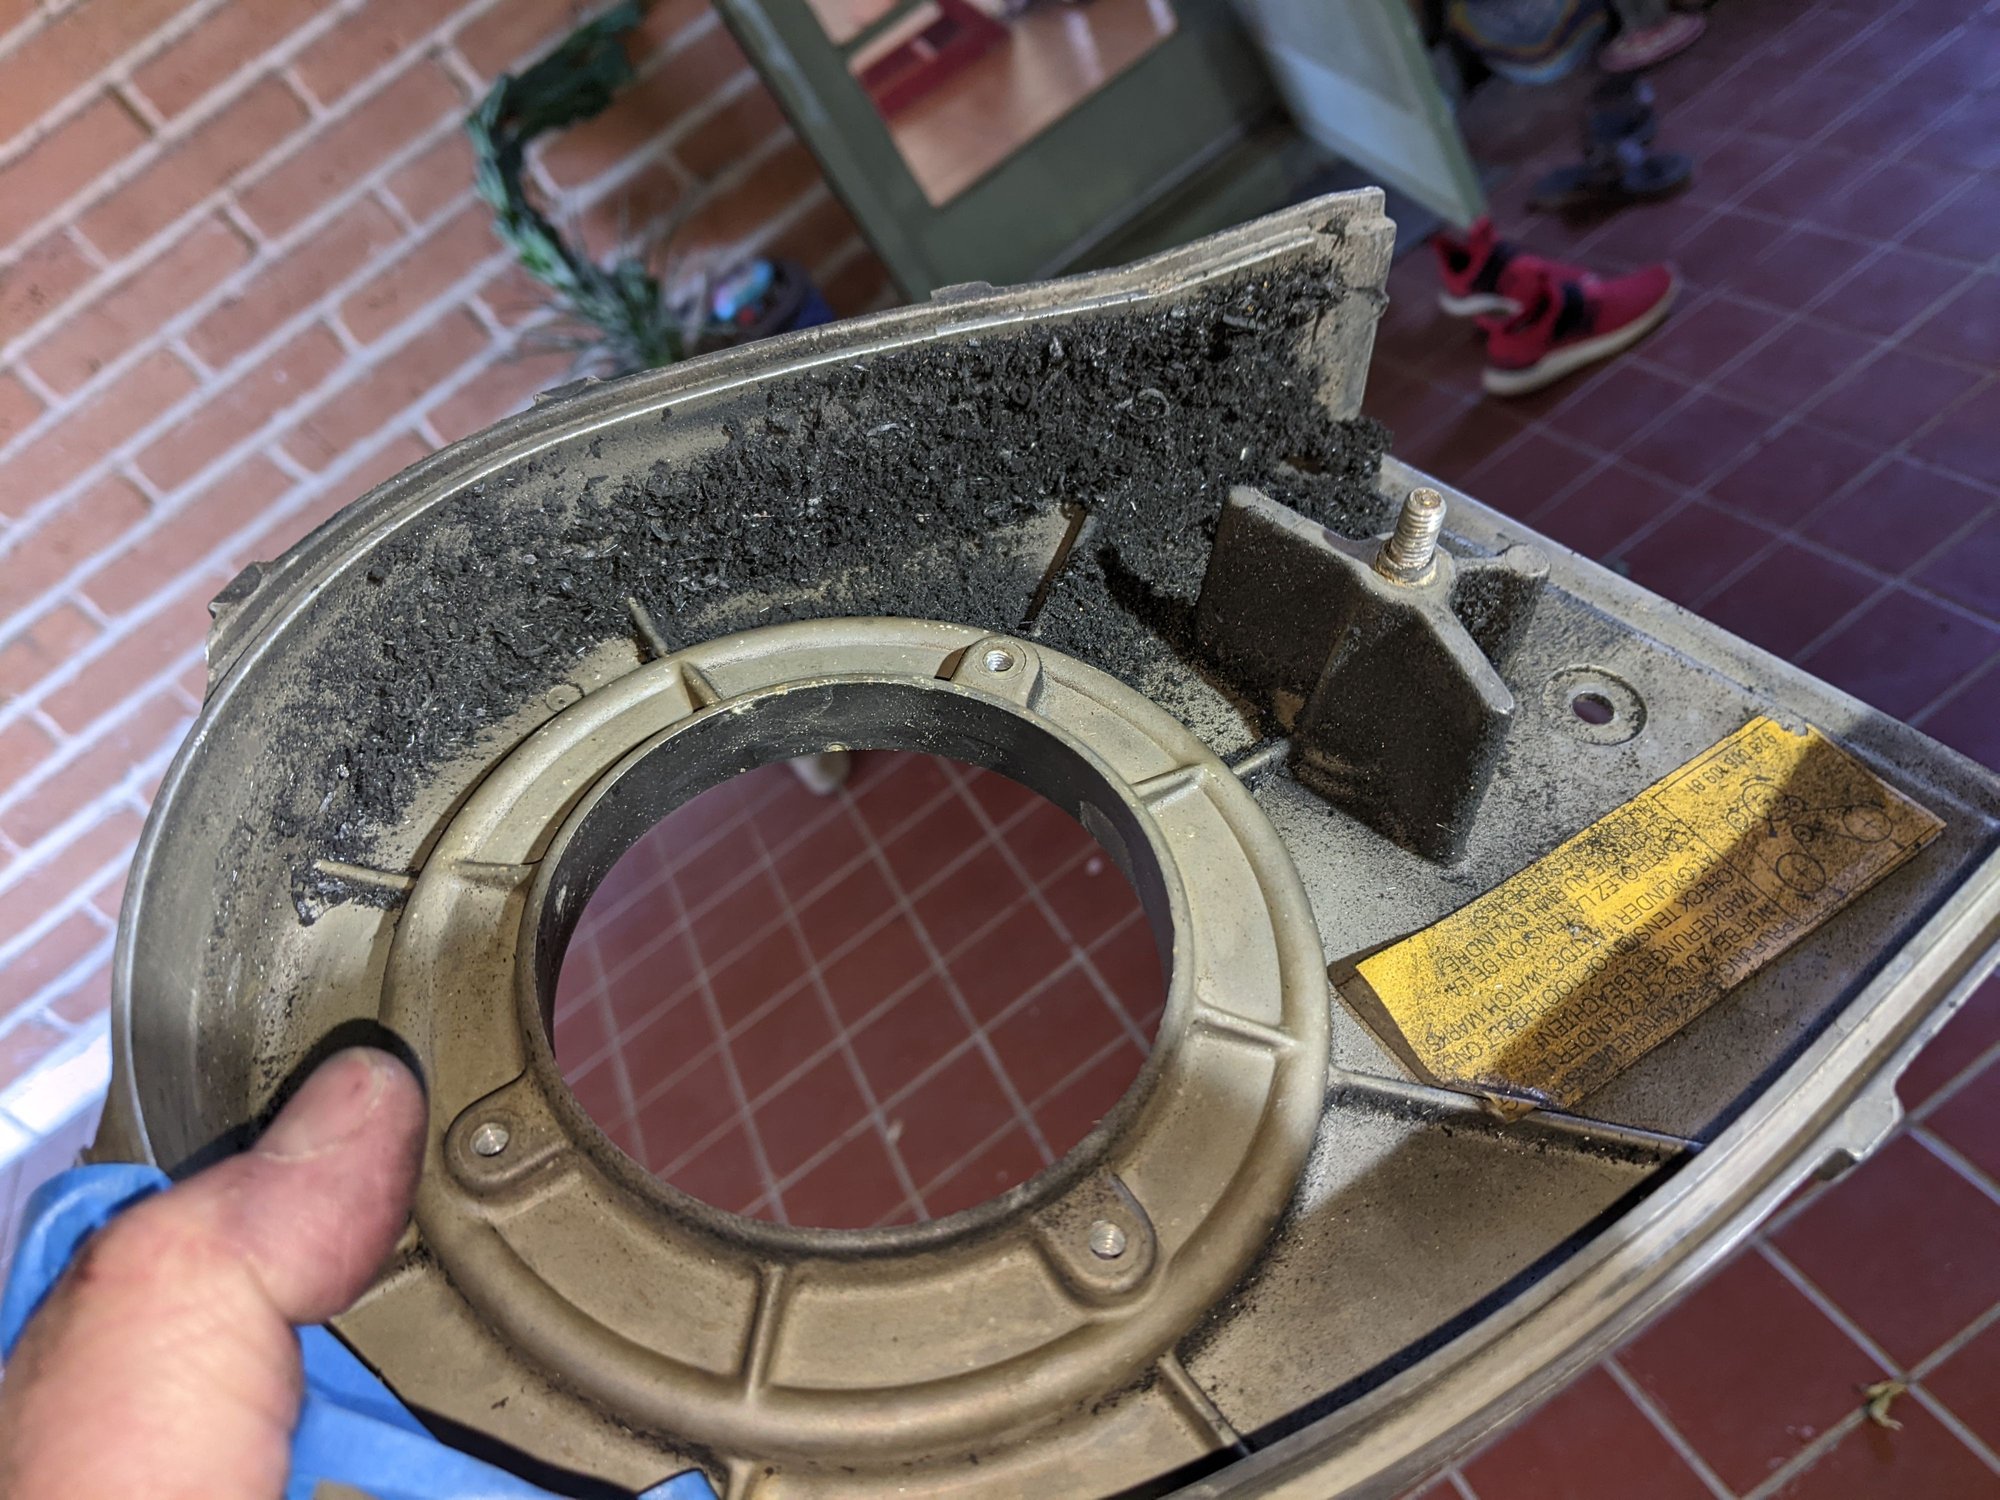
Well, I went even a little further in the afternoon and removed the top timing belt covers, as I was really curious about the condition of the timing belt. Well, what can I say, I am really really glad I am doing the TB job. While it only had 3k mi on it (it is 13 years old), apparently it wasn't necessarily put together well. While the inner side of the TB looks quite decent, the top looks to be scrapped seriously. I don't think I would even be able to identify the brand markings anymore. The top cover (especially the passenger side) was covered in rubber dust/shavings and the belt seems to ride at the very edge of the cam gears. I don't know how long this would have lasted, being continuously weakened by the top part being shaved away. My best guess is that: the tensioner was not rebuilt, 2) it was overtightened, 3) the idler bearing has some issues. Anyway, this is not great to see.
Input is still welcome on the bolt thread issue posted above and any comments on the TB, what could have caused this.
Some rubber dust visible on the driver side also. Inner side looks ok. Belt riding on the very edge of the cam gear. LOTS and LOTS of rubber dust (passenger side cover! And more rubber dust near the passenger side.
This is strange the amount of rubber,
Your belt looks good and new, (unless it has an uneven surface on its smooth side its hard for me to see this.)
the front edge shows a bit of wear possibly rubbing on the back of the crank damper,
look carefully for this prior to damper removal.
NOTE based on the amount of rubber you should see drastic damage to the belt .
Otherwise if there is belt damage then one of the pulleys has frozen.
and generally the cause of the belt damage will be just before you find lots of rubber
does it look like any of the idler pulleys are not turning while the belts moving?
whats the belt tension
check it cold at TDC before you take it off.
NOTE drain the block before removing idler /tensioner arm bolt,
the block holds about 2.5 gallons total letting the coolant drain out will ruin the small idler bearing as the coolant will fill it
On the air pump my guess is that the wrong belt (too short) was used and the pump has reached its travel limit for no tension.
NOTE removal of the fan support bracket is the way to remove the belt.
For the damaged AC anchor bolt . First determine if the threads are damaged to the bottom of the hole if only a few at the entrance,
then it may be OK to find a slightly longer bolt to secure the AC and Airpump.
NOTE use washers as spacers to get the bolt tight and in full use of the threads.
If any doubt then use this suggestion.
I would get a long bolt cut the head off and JB weld into the hole.
measure carefully before you install the new stud. so it will capture both brackets and have space for a washer and the nut .
NOTE adding any type of thread insert repair to this area will weaken the surrounding metal as material removal will be required.
So dont do it here.
JB welding in a fresh stud will work perfectly and make the anchor stronger.
I agree, it is A LOT of rubber. The top looks shiny, so I don't really know whether it has worn down. No self-respecting
mechanic would put the cover back on dirty like this after a belt change, right? It had to have come from this belt and
not the previous one? I know the PO and he said he did 98% of the previous work and he tends to be clean.
The pile-up is at the bottom joint between the passenger side top cover and the central cover.
I haven't gotten to the central cover yet, so will see what we have. I have already drained the
engine's block (see first post). BTW, to remove the water pump bolts, to ensure they don't sheer
off, would you rather use an air impact gun or a socket/wrench?
Yeah, I just should have removed the fan bracket. Lesson learned.
Only the first 1-2 threads are slightly mangled. I am going to try to smooth out the first two threads and then
run a thread cutter through. I think it should work. The JB-welding in a stud is not a bad idea and will
be my last resort! Agreed on not putting in an insert. I am just thinking of slowly and nicely
back/forth with the appropriate thread cutter.
Thanks!
Originally Posted by Mrmerlin
This is strange the amount of rubber,
Your belt looks good and new, (unless it has an uneven surface on its smooth side its hard for me to see this.)
the front edge shows a bit of wear possibly rubbing on the back of the crank damper,
look carefully for this prior to damper removal.
NOTE based on the amount of rubber you should see drastic damage to the belt .
Otherwise if there is belt damage then one of the pulleys has frozen.
and generally the cause of the belt damage will be just before you find lots of rubber
does it look like any of the idler pulleys are not turning while the belts moving?
whats the belt tension
check it cold at TDC before you take it off.
NOTE drain the block before removing idler /tensioner arm bolt,
the block holds about 2.5 gallons total letting the coolant drain out will ruin the small idler bearing as the coolant will fill it
On the air pump my guess is that the wrong belt (too short) was used and the pump has reached its travel limit for no tension.
NOTE removal of the fan support bracket is the way to remove the belt.
For the damaged AC anchor bolt . First determine if the threads are damaged to the bottom of the hole if only a few at the entrance,
then it may be OK to find a slightly longer bolt to secure the AC and Airpump.
NOTE use washers as spacers to get the bolt tight and in full use of the threads.
If any doubt then use this suggestion.
I would get a long bolt cut the head off and JB weld into the hole.
measure carefully before you install the new stud. so it will capture both brackets and have space for a washer and the nut .
NOTE adding any type of thread insert repair to this area will weaken the surrounding metal as material removal will be required.
So dont do it here.
JB welding in a fresh stud will work perfectly and make the anchor stronger.
I can't help but wonder whether the inner edge of the belt was starting to be shredded off and not the top? It is at the edge of the cam gear! If so, I could have ended up like this case very soon!
For restoring the thread, I ordered one of these tools. It is an internal thread restorer. Looks quite good, better than a traditional thread cutter, in that it starts at the good part. Will see. https://www.angloamericantools.com/t...ad_repair.html
the best tool for making threads work is to take a bolt and cut 3 flutes in the first few threads,
this way you wont be removing additional metal from this threaded hole. Use the side edge of a shop grinding wheel.
NOTE Any tap you use has potential to enlarge the hole and remove the threads enough,
so when you reach the final tightening the bolt pulls out the remaining threads.
Thats why you should not use anything except a bolt thats made for that hole.
This specific hole is a weak mounting point ,
and removing any metal from the existing threads will almost guarantee the fastener pulls the threads.
What you are describing is basically a thread tap, right? My only theoretical problem with that solution is that if it starts going into the cross thread, it ruins everything after it also. This tool is extended to the size of the thread and starts from the inner good threads. You extend it out to the actual size. Unlikely it pulls excess material, as long as the cutting blade is not wider than thread. They are sized in such small increments (this is between M8 and M11), I doubt it would be much off.
Originally Posted by Mrmerlin
the best tool for making threads work is to take a bolt and cut 3 flutes in the first few threads,
this way you wont be removing additional metal from this threaded hole. Use the side edge of a shop grinding wheel.
NOTE Any tap you use has potential to enlarge the hole and remove the threads enough,
so when you reach the final tightening the bolt pulls out the remaining threads.
Thats why you should not use anything except a bolt thats made for that hole.
This specific hole is a weak mounting point ,
and removing any metal from the existing threads will almost guarantee the fastener pulls the threads.
Well of course you would have to put the bolt in perpendicular to the hole, with the flutes cut properly so the bolt tip looks like a tap .
You should not have any problem, and dont force it beyond 1 turn.
I would try my method first before getting a tool
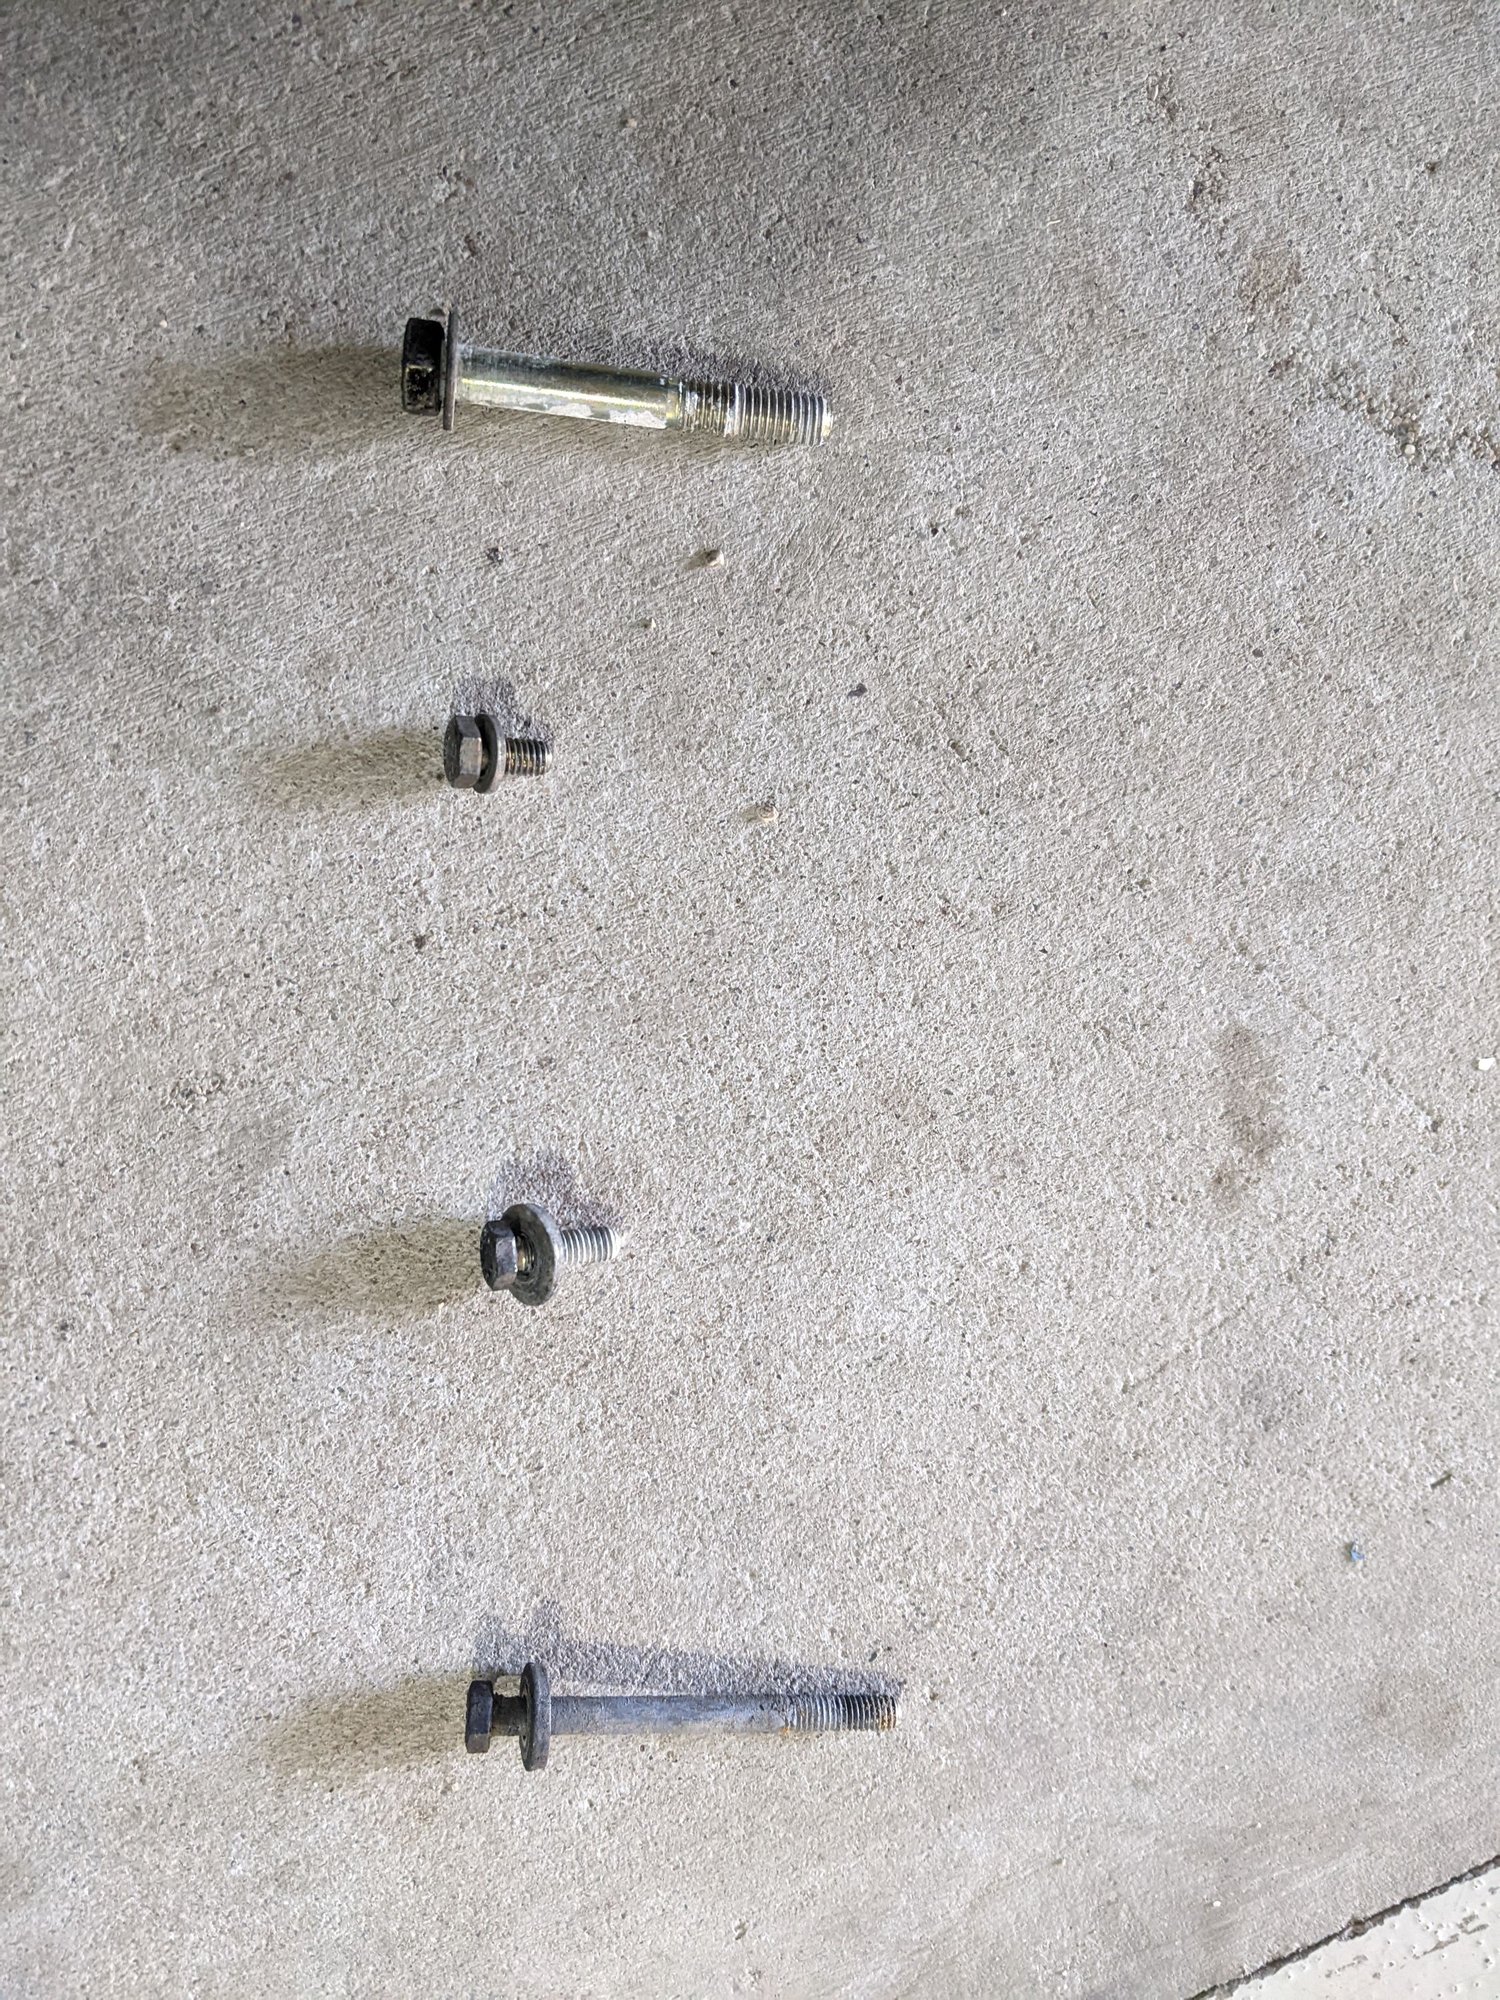
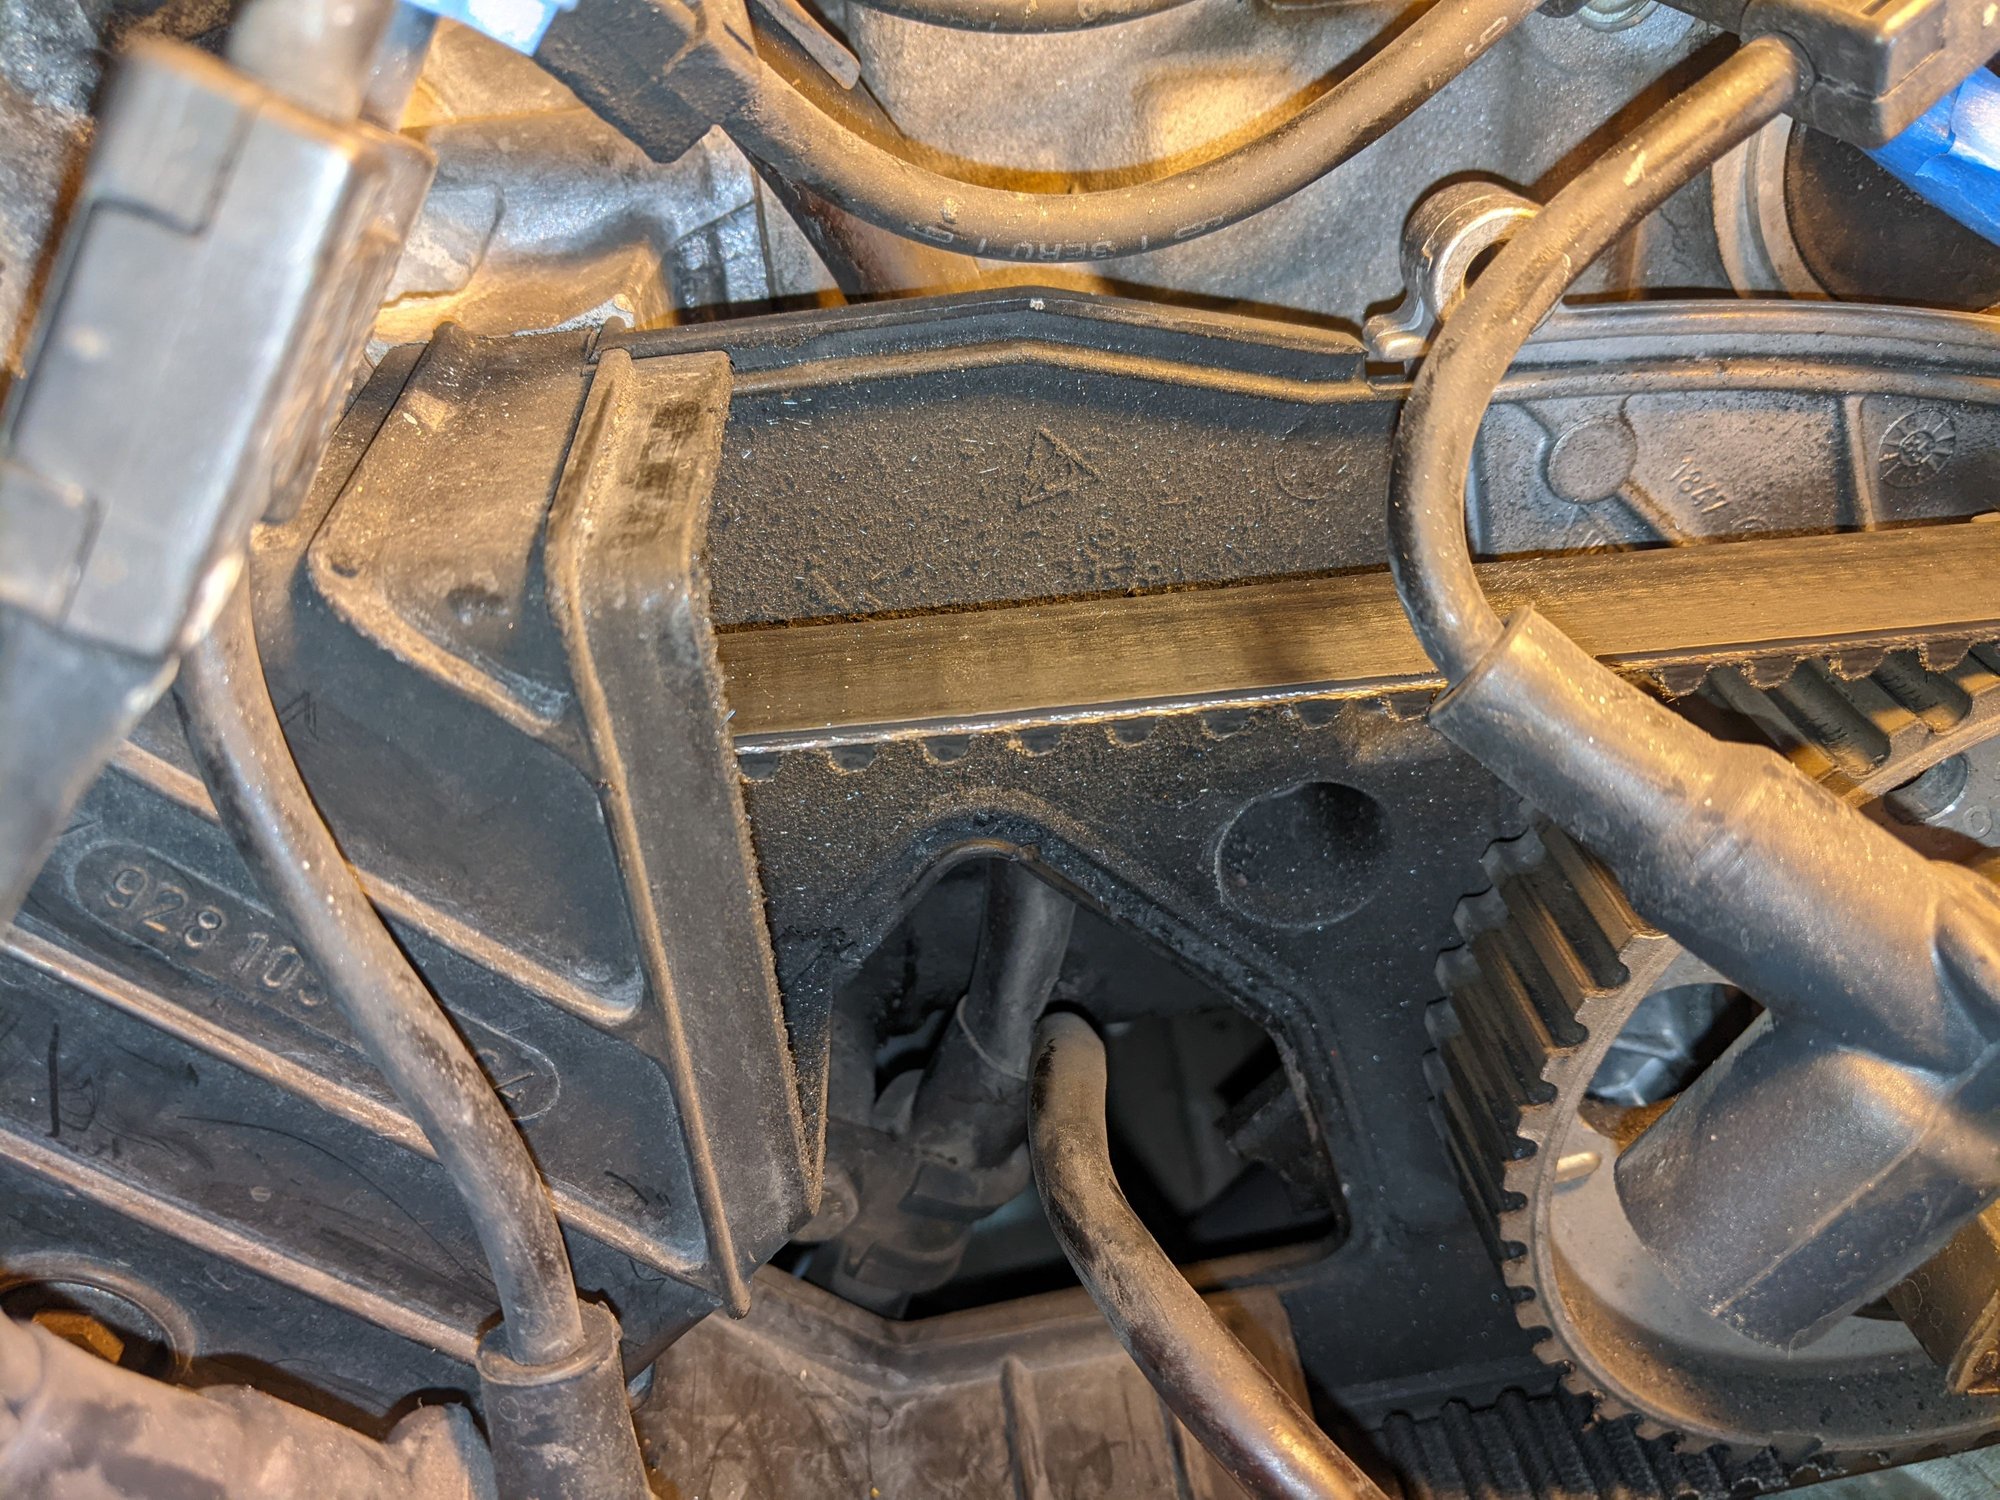
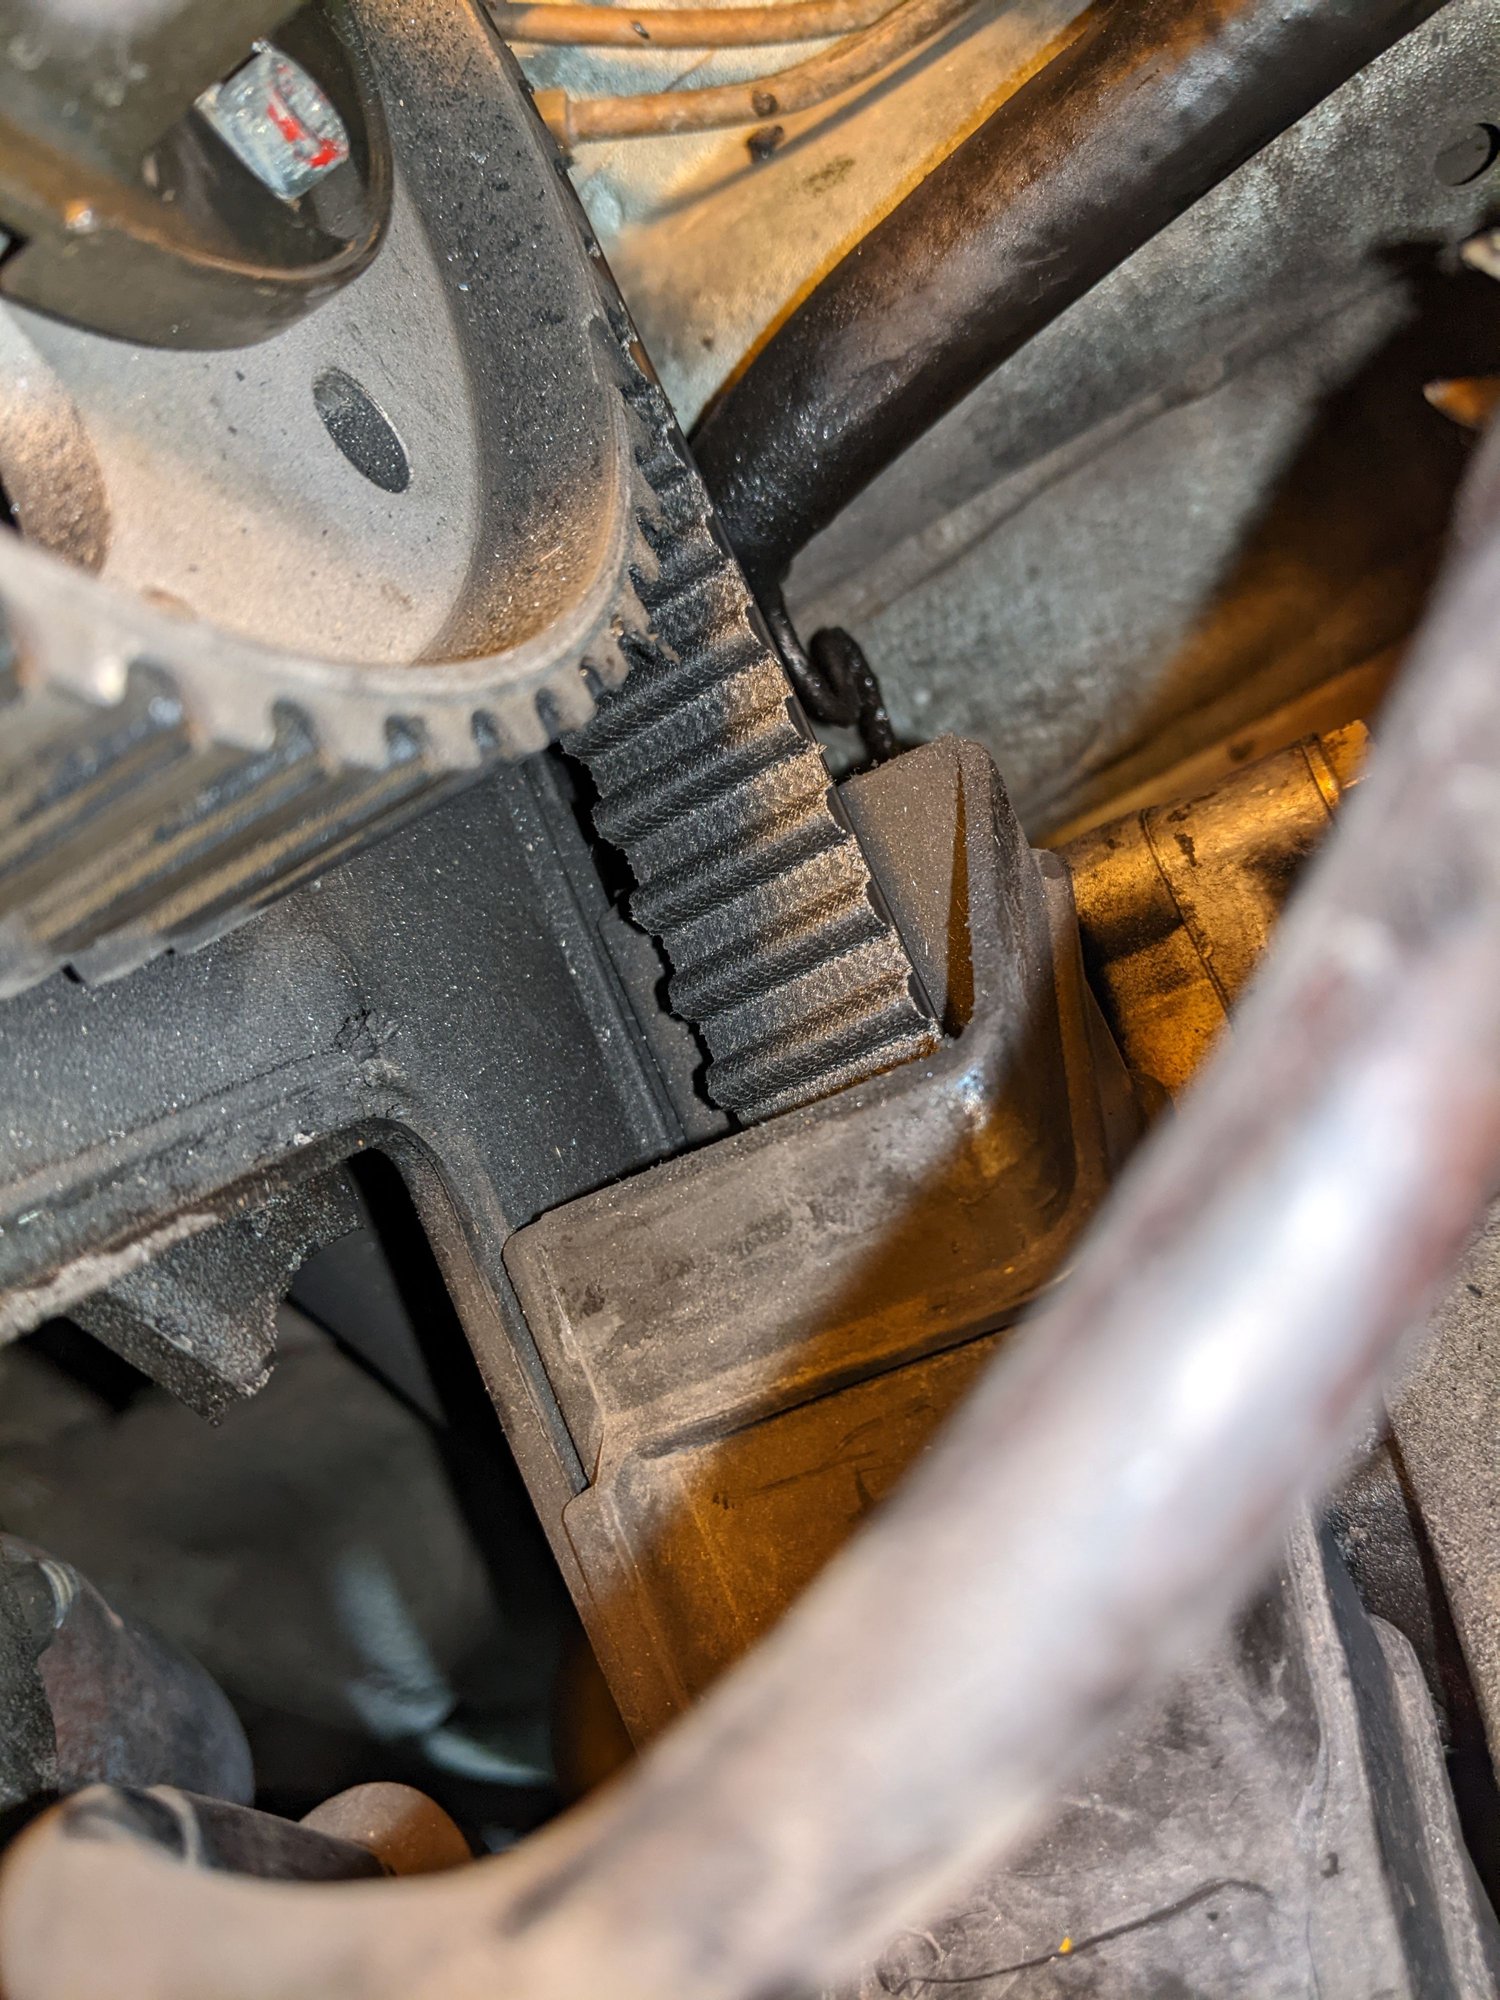
Alright, saga continues. Today I got to removing the center TB cover to see what the heck is going on. First I removed the alternator by undoing the two bolts that hold it on and laying it gingerly in a tub placed on it, then I loosened the bracket for the PS pump by its 4 bolts. Then, I got to undoing the 4 bolts for the center cover. They are not the same length, so keeping them marked. Taking the cover off requires some wiggling, as it slightly overloops the tensioner, but can be done.
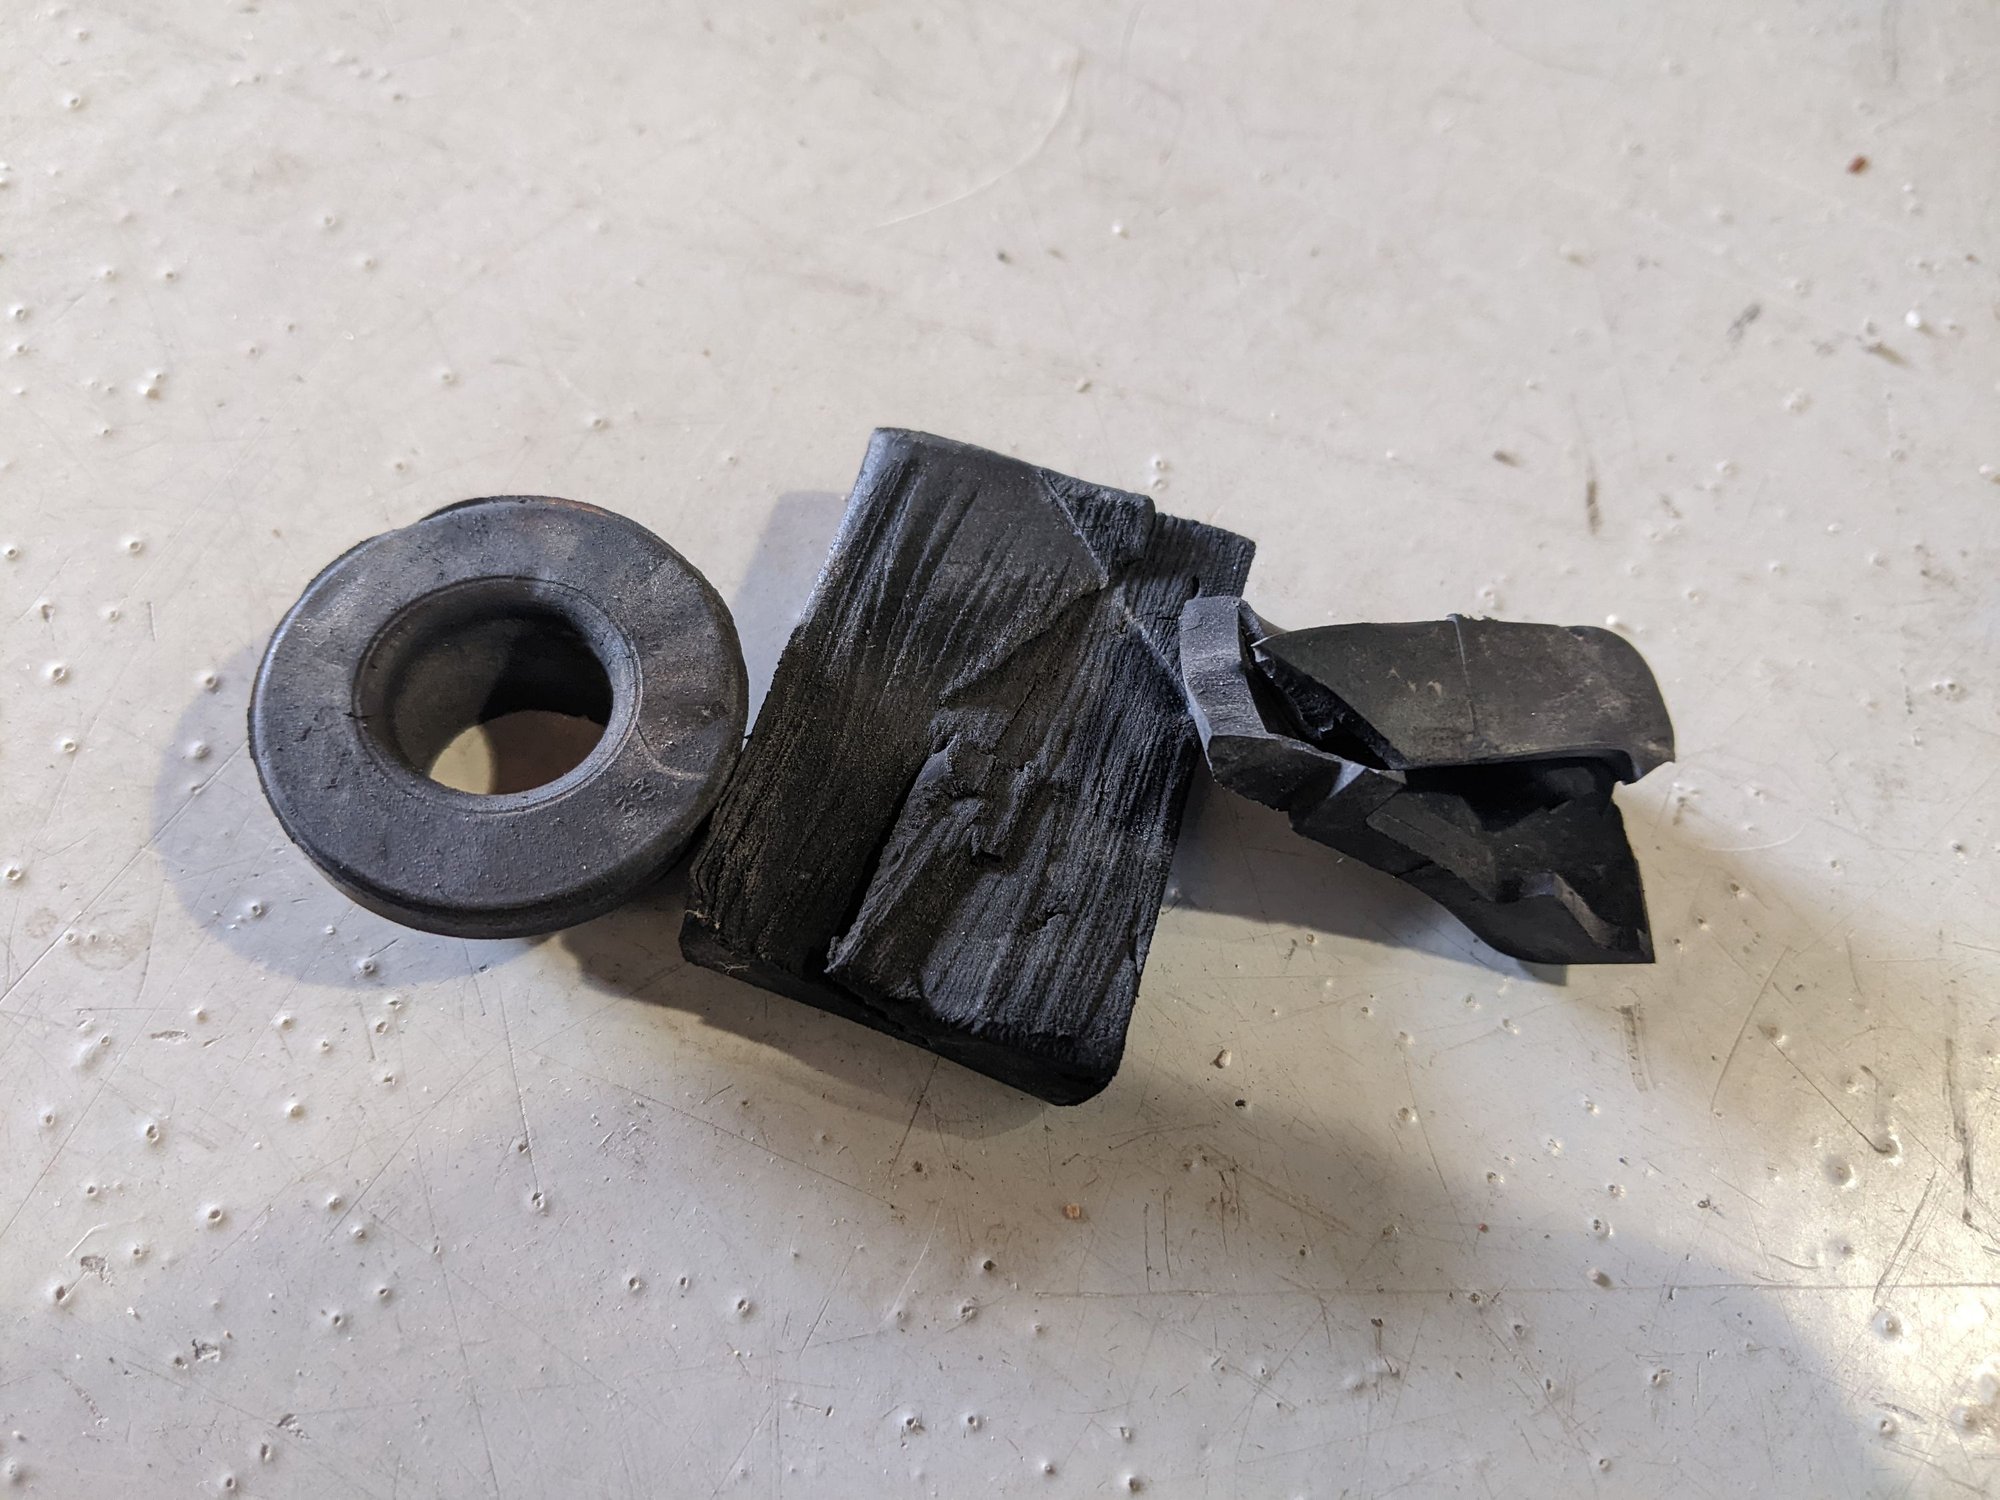
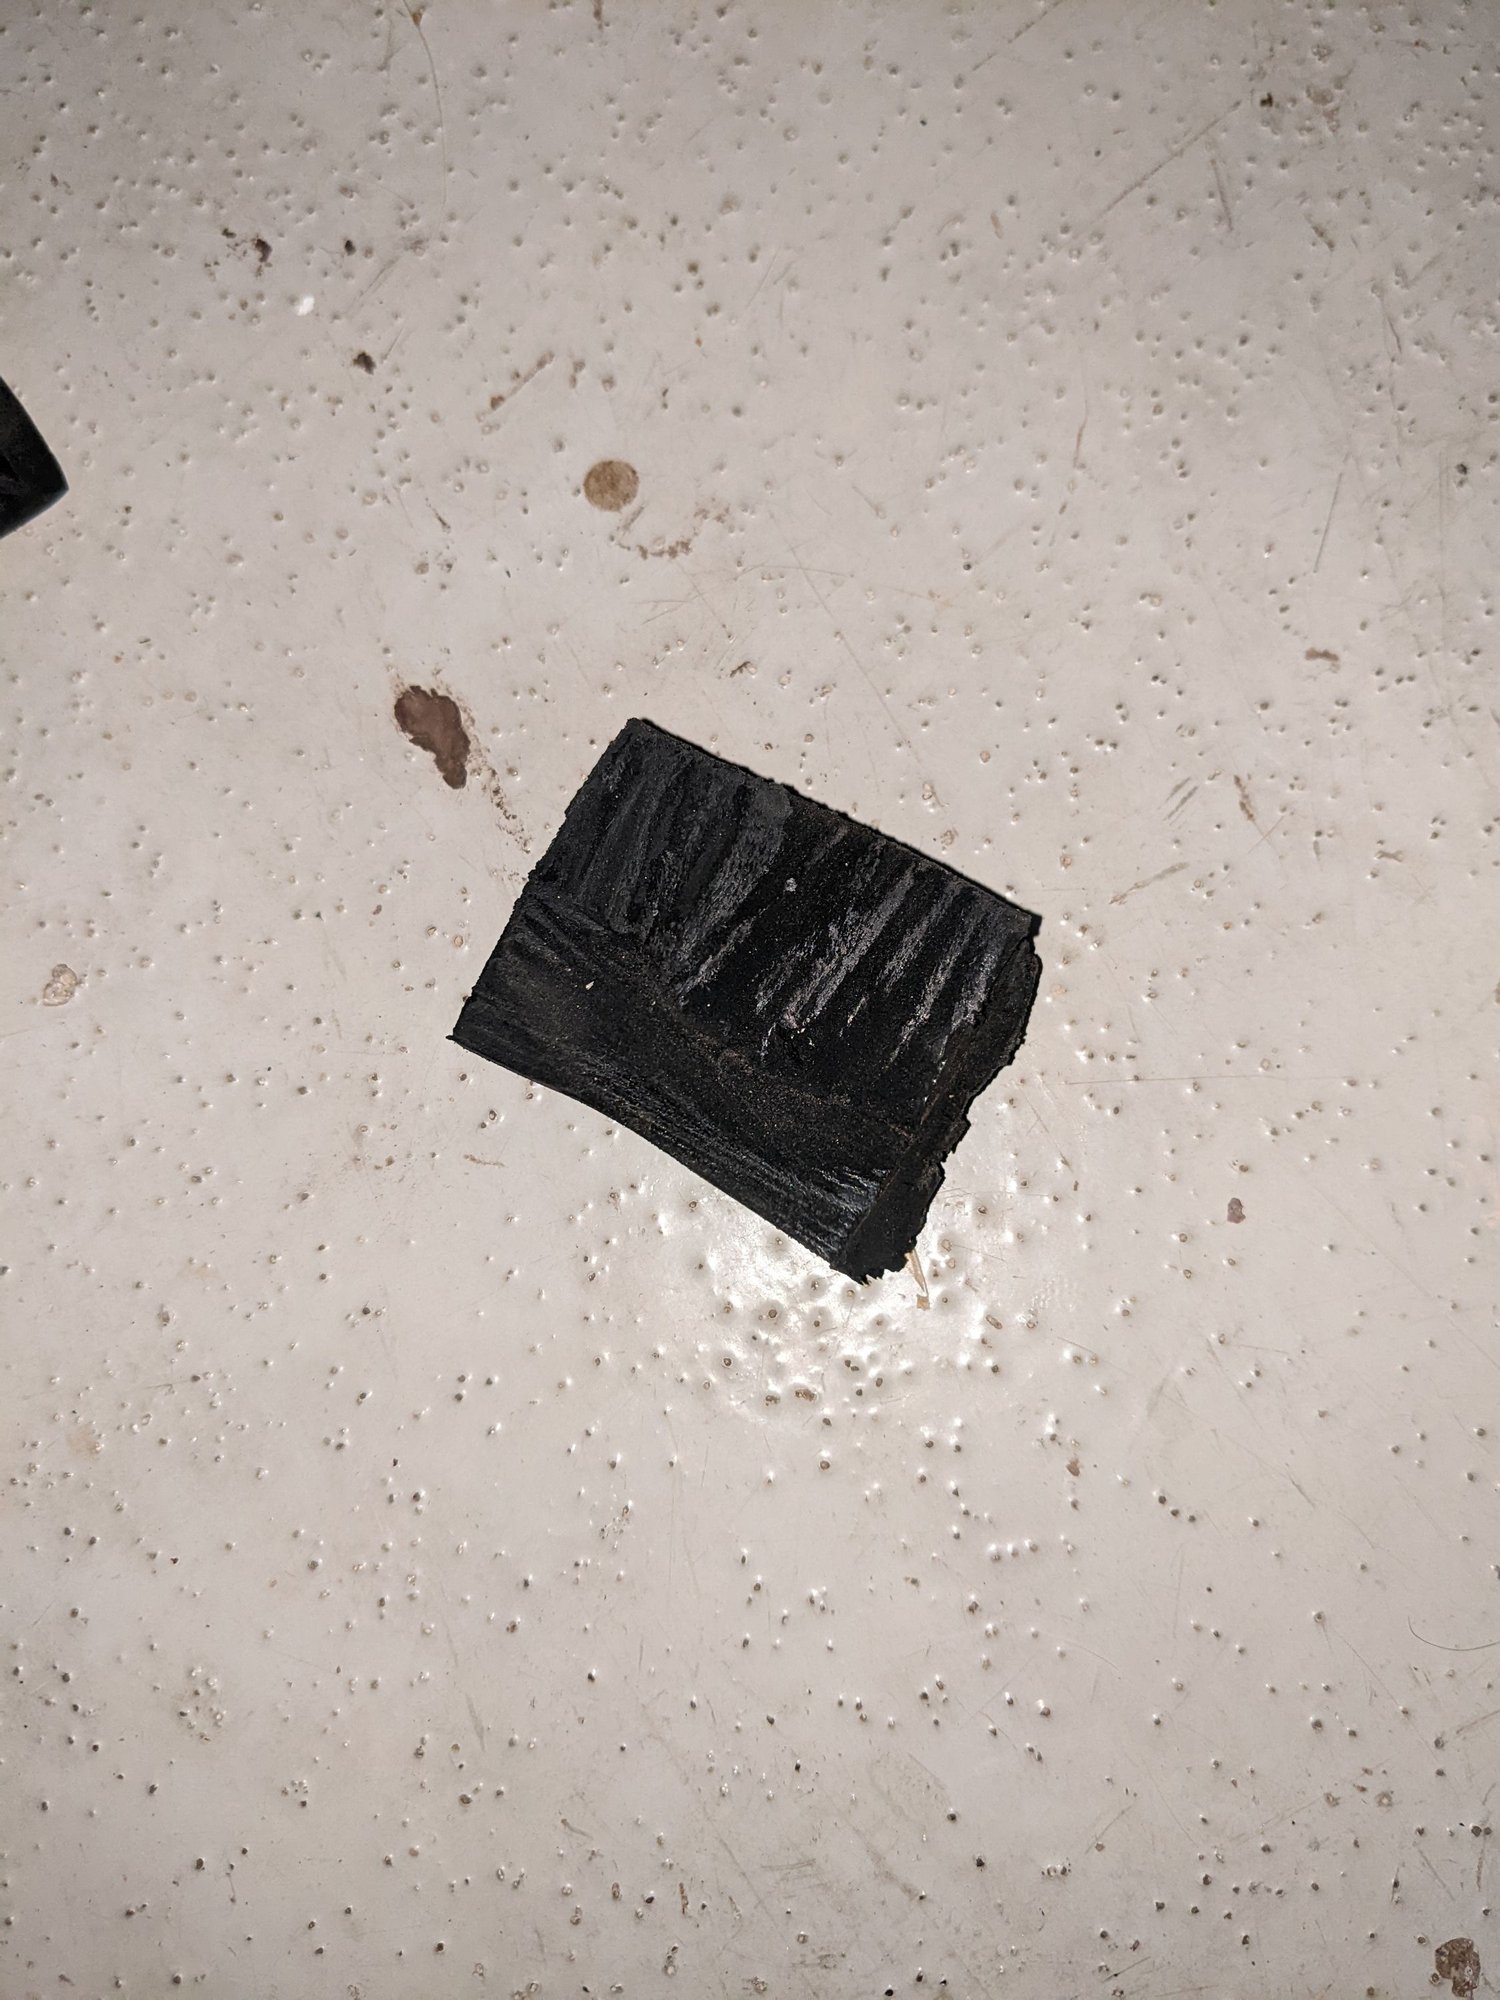
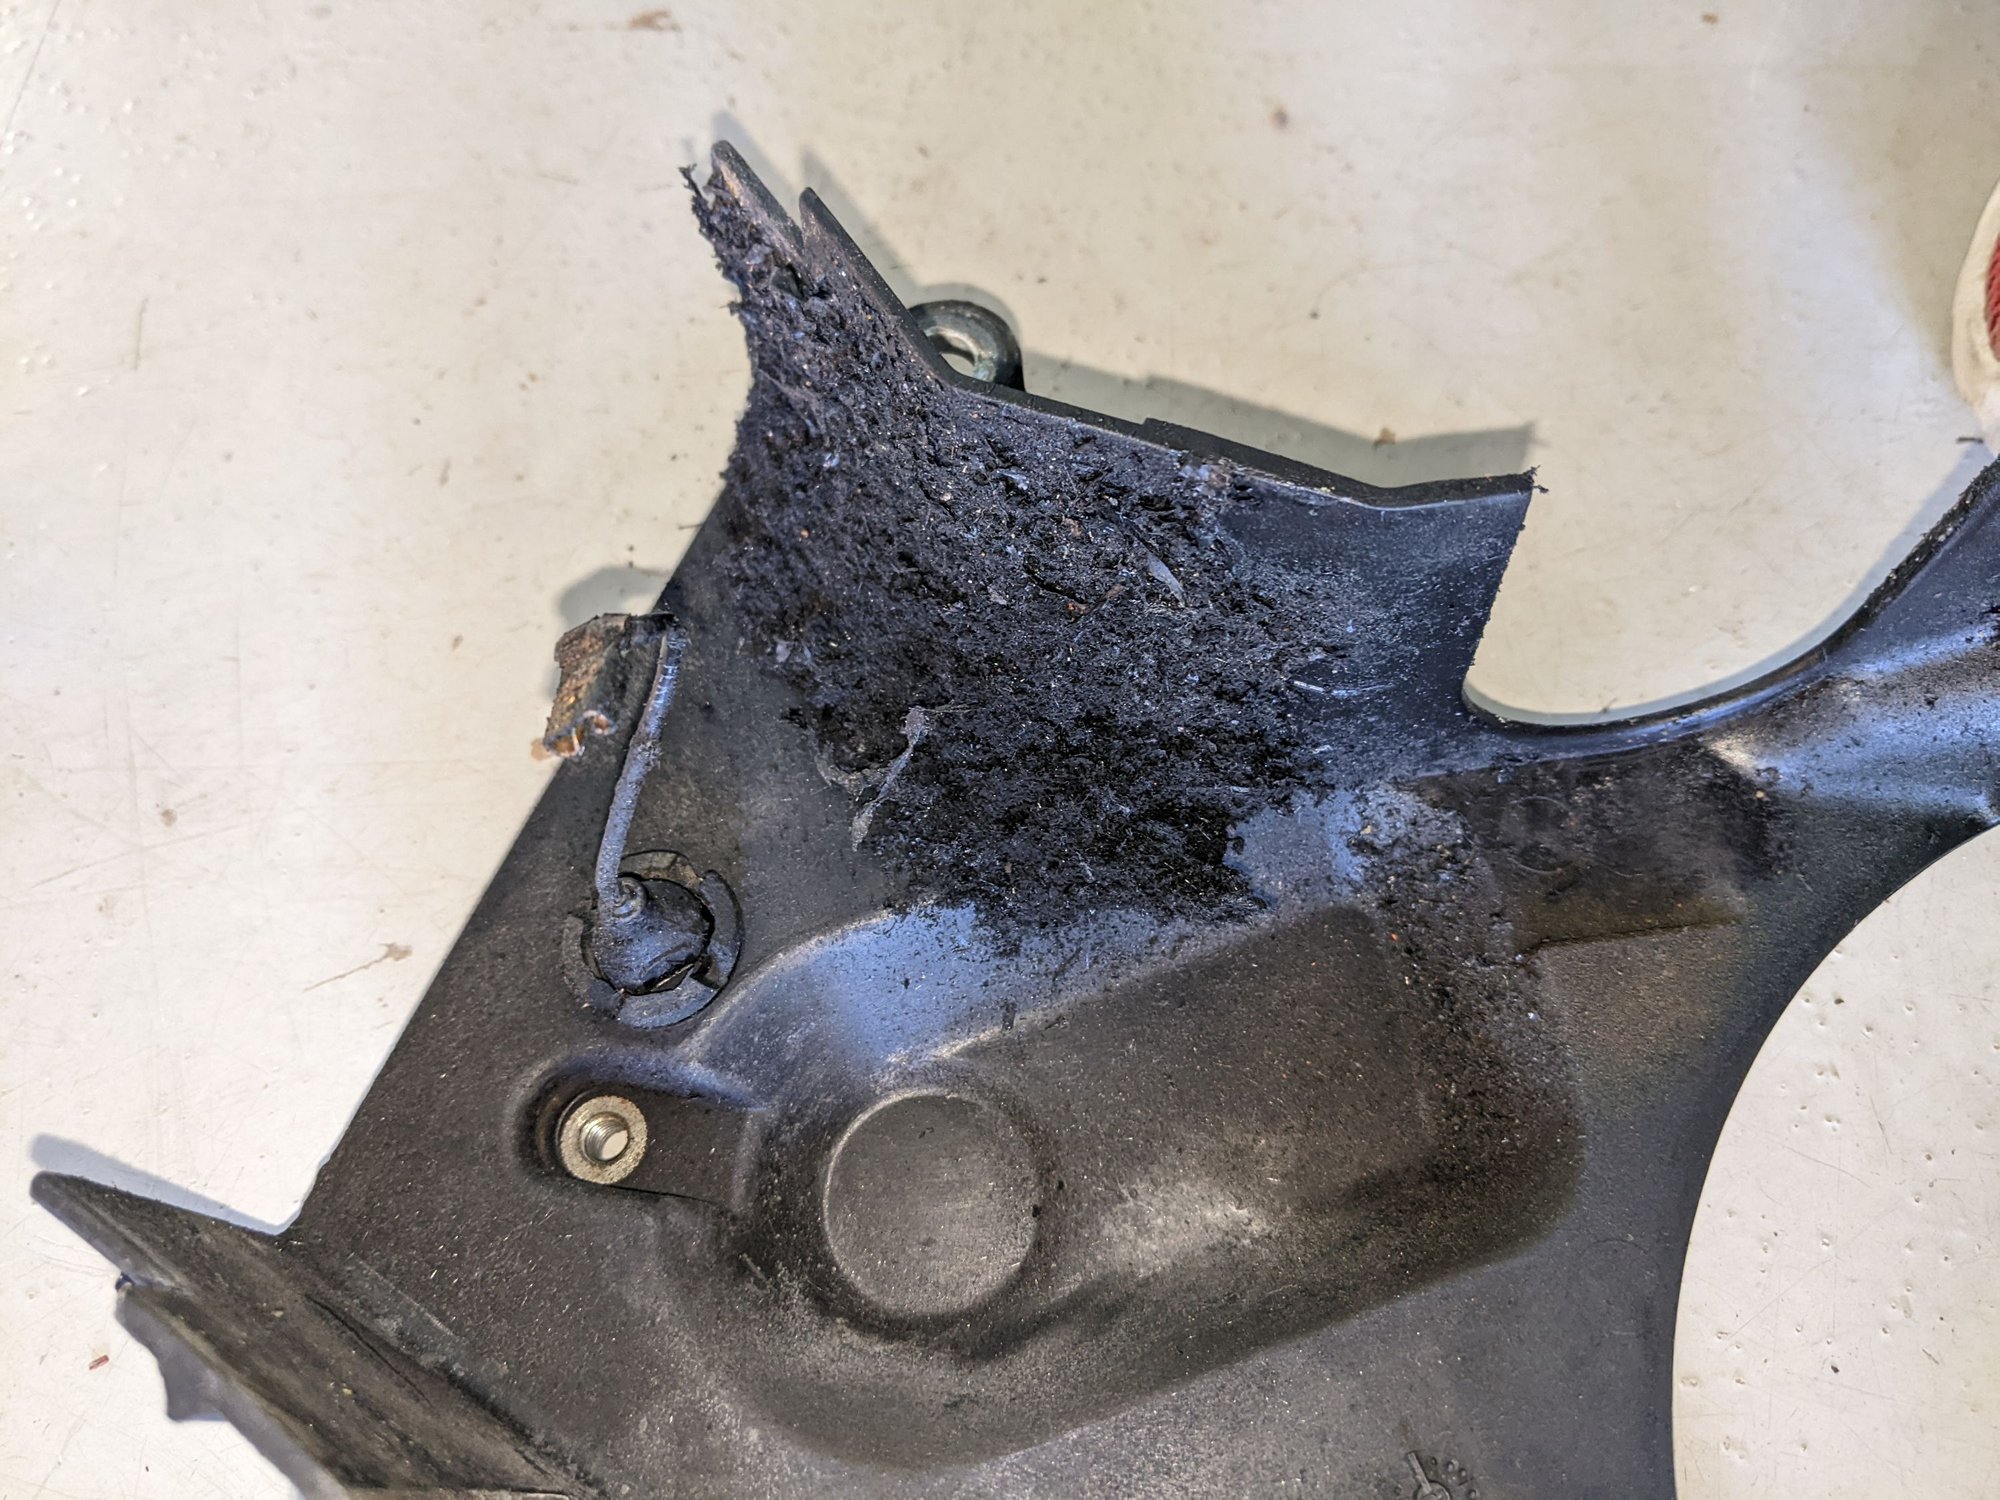
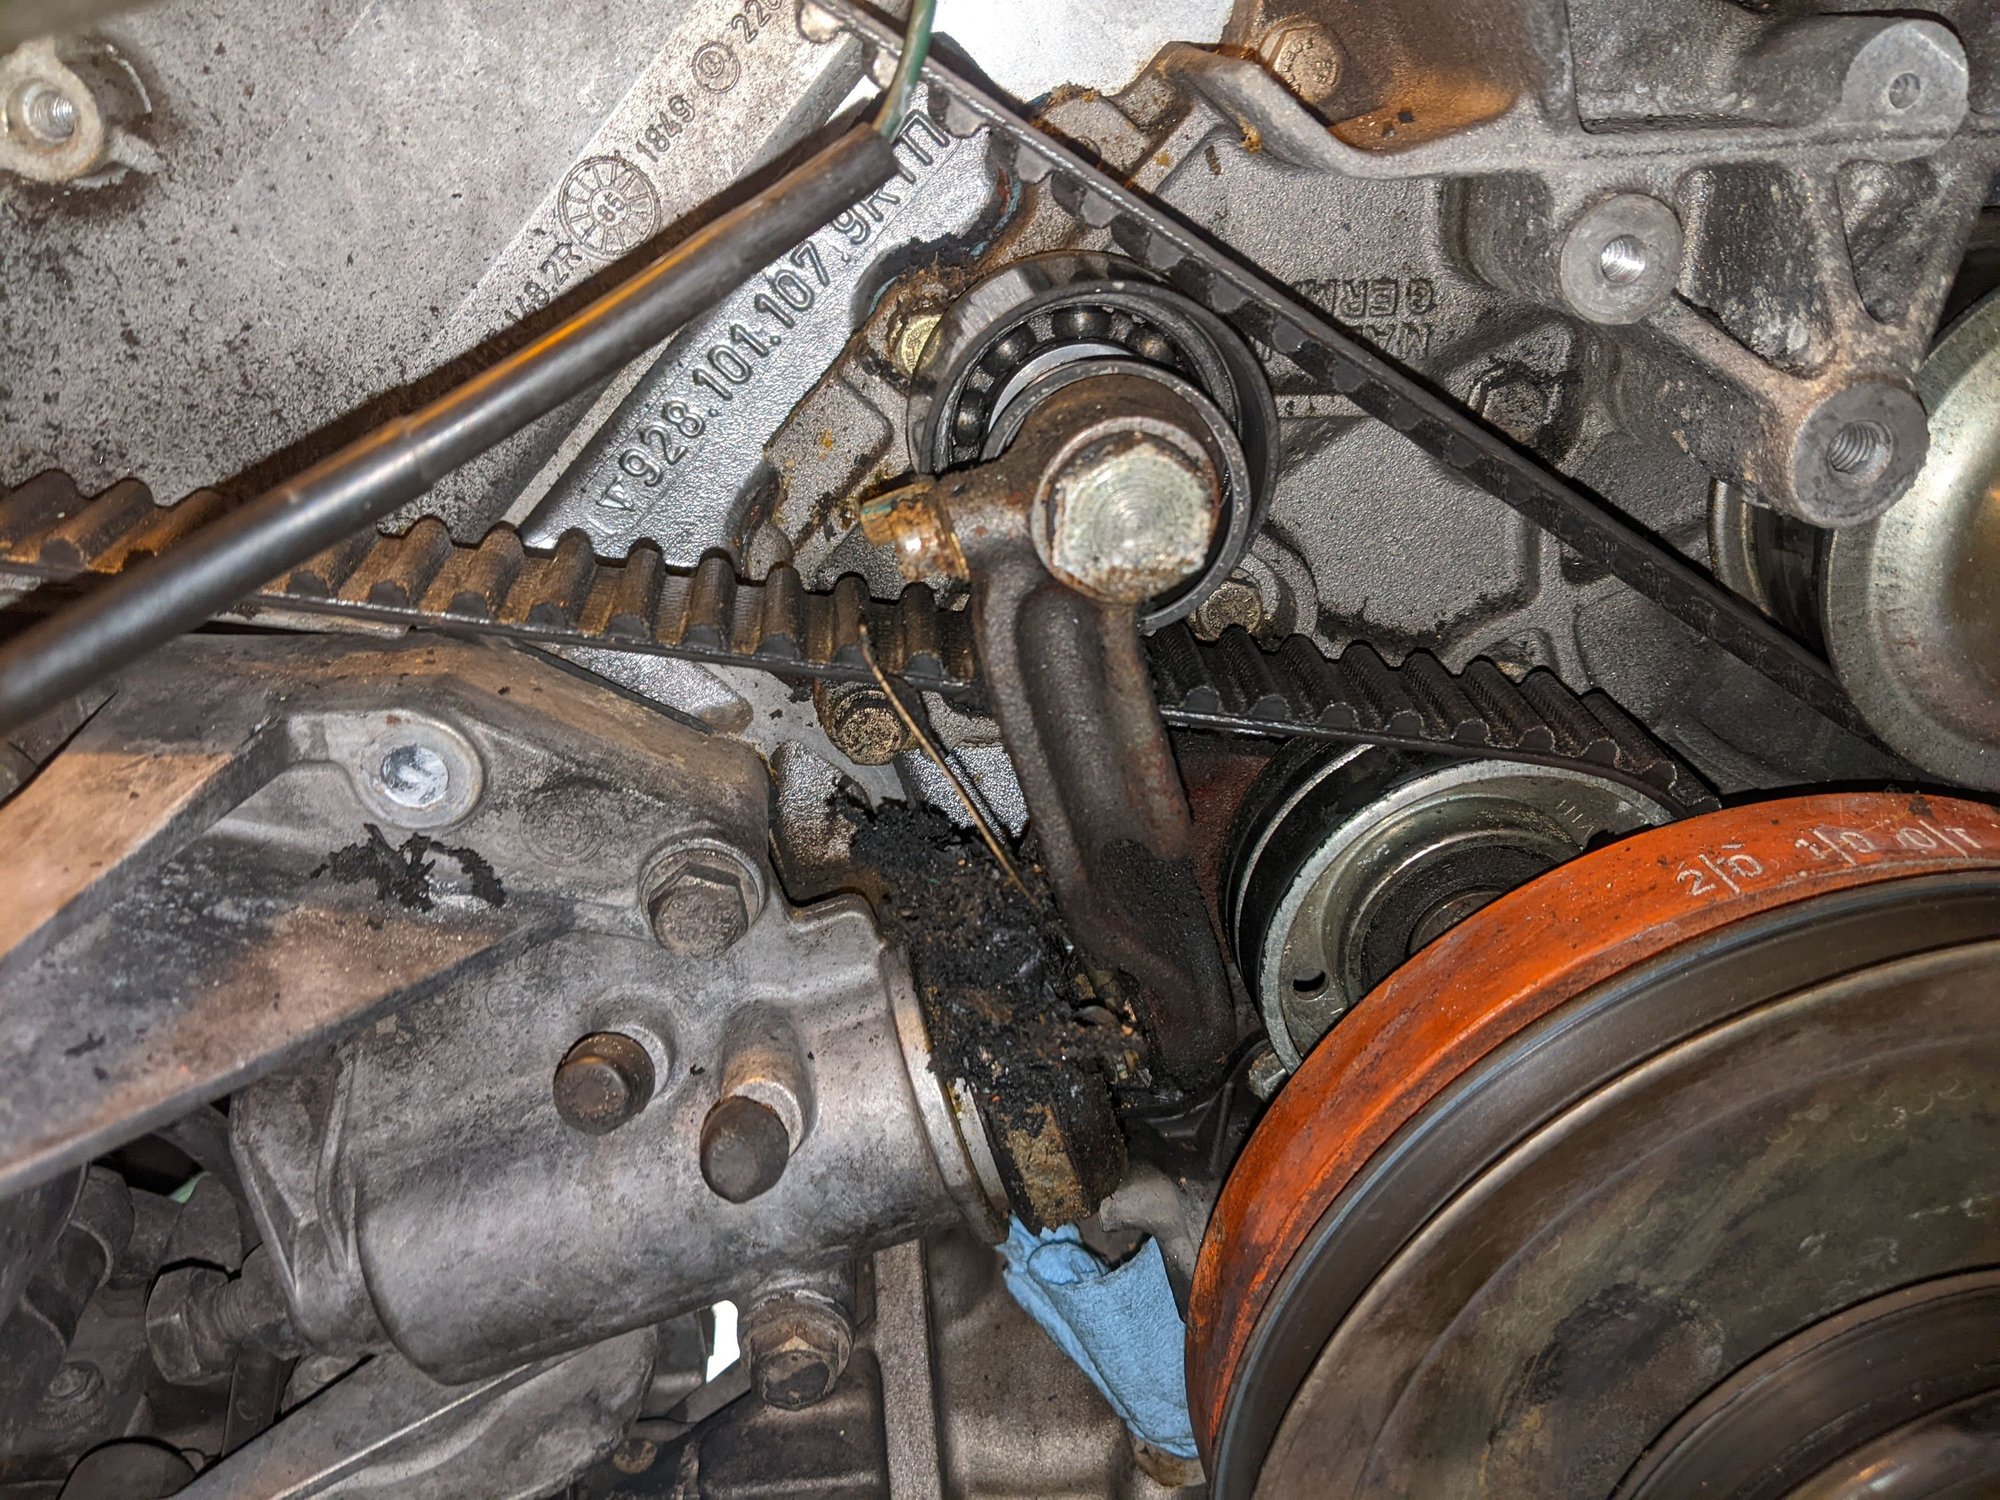
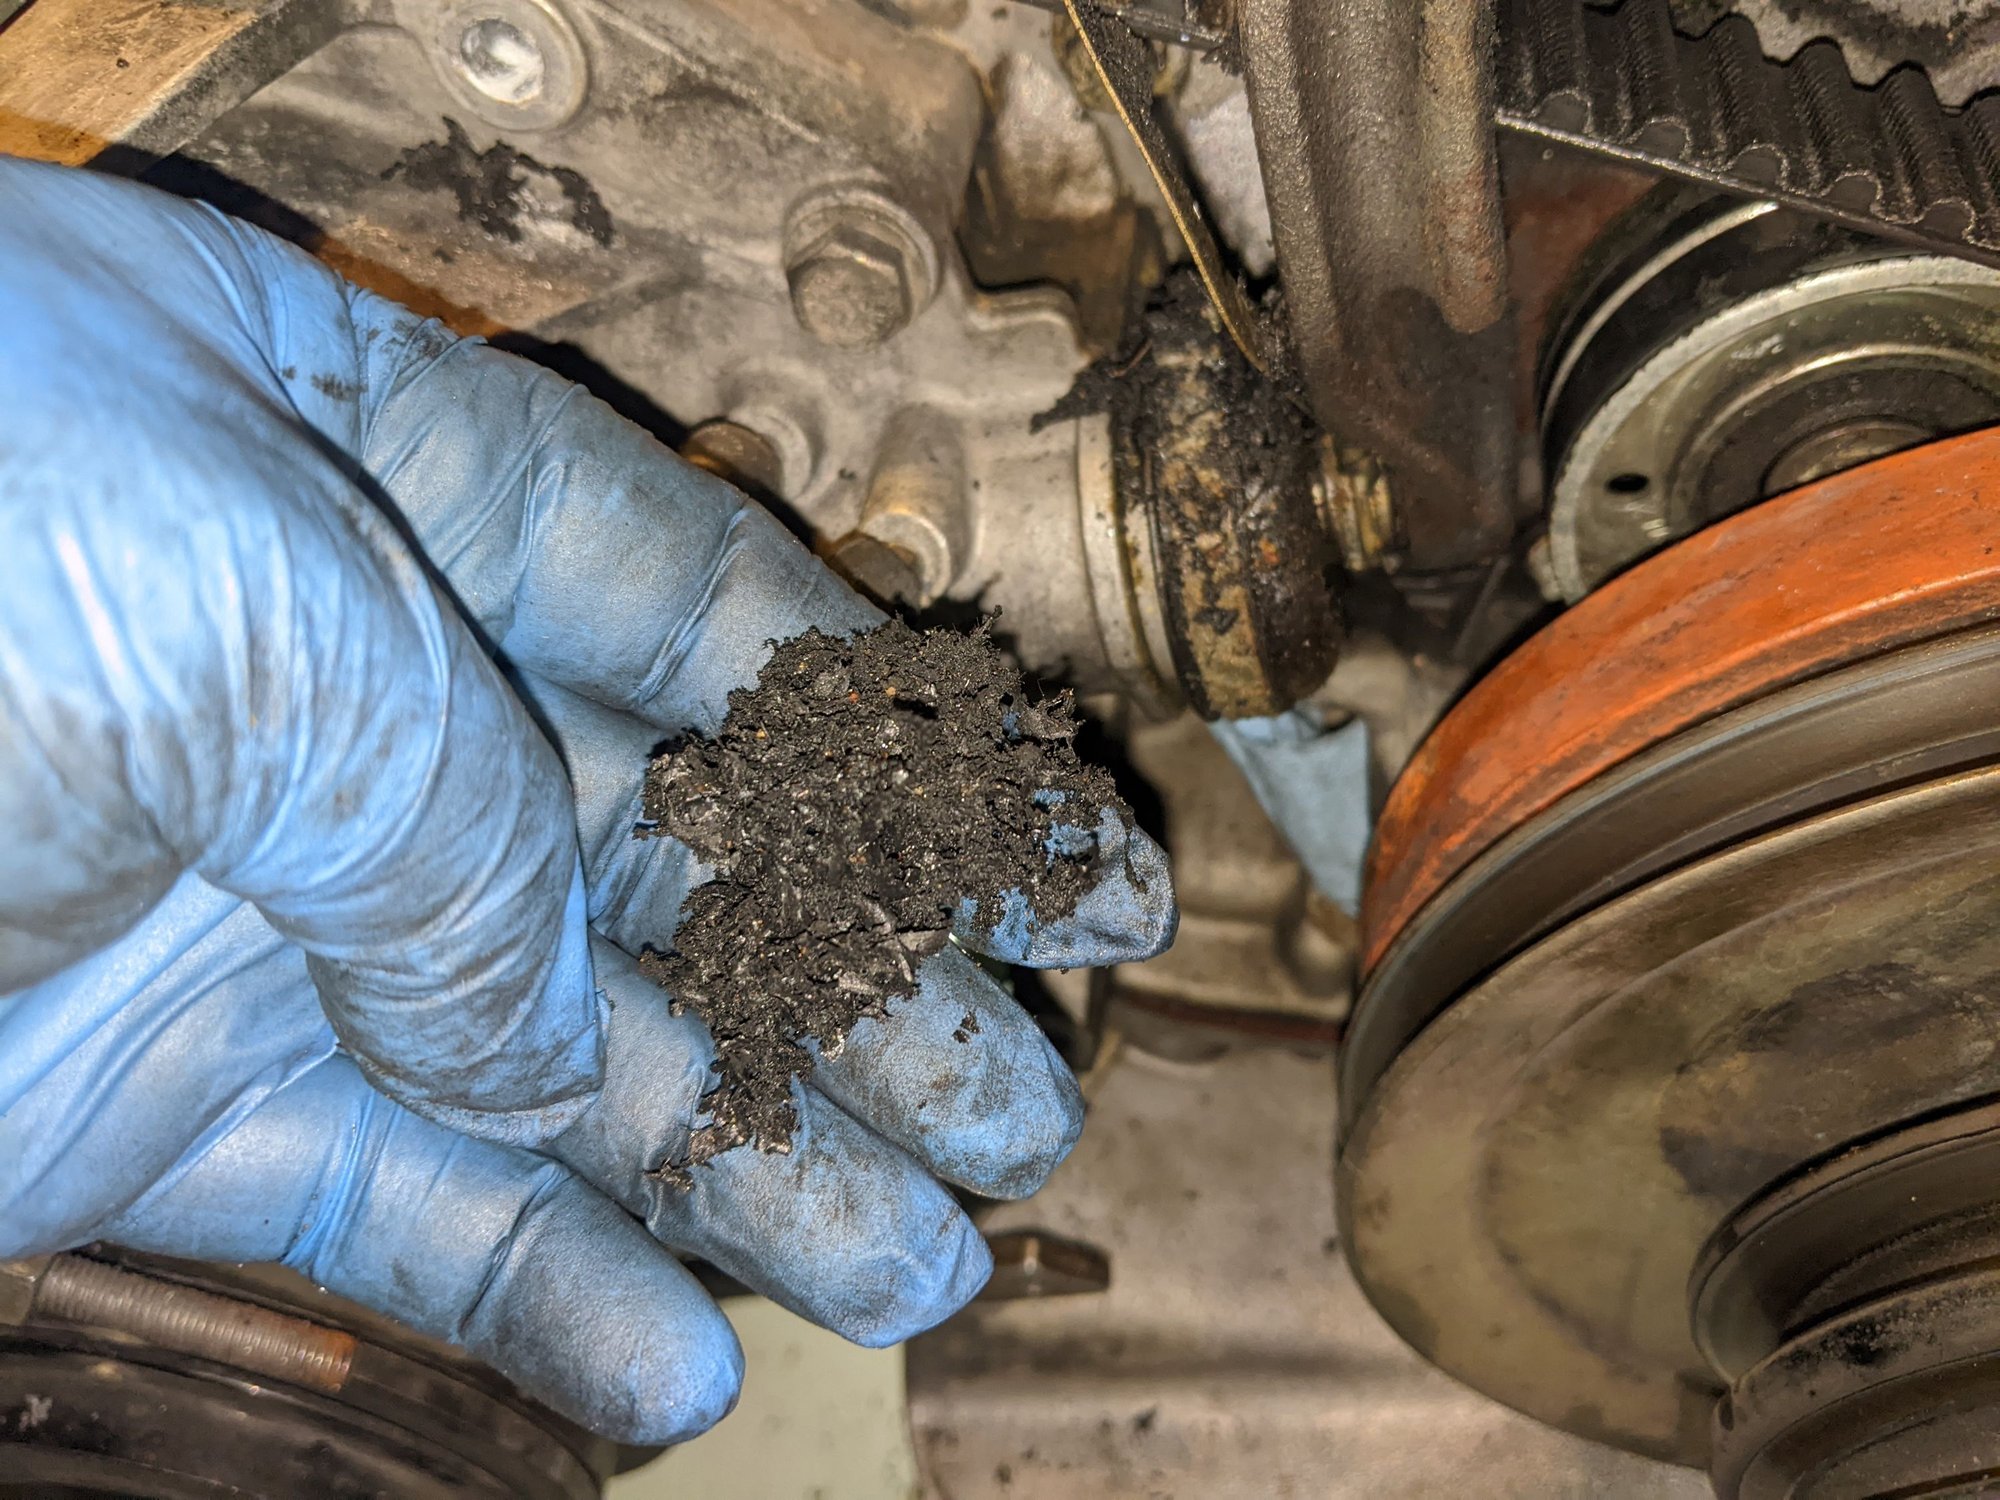
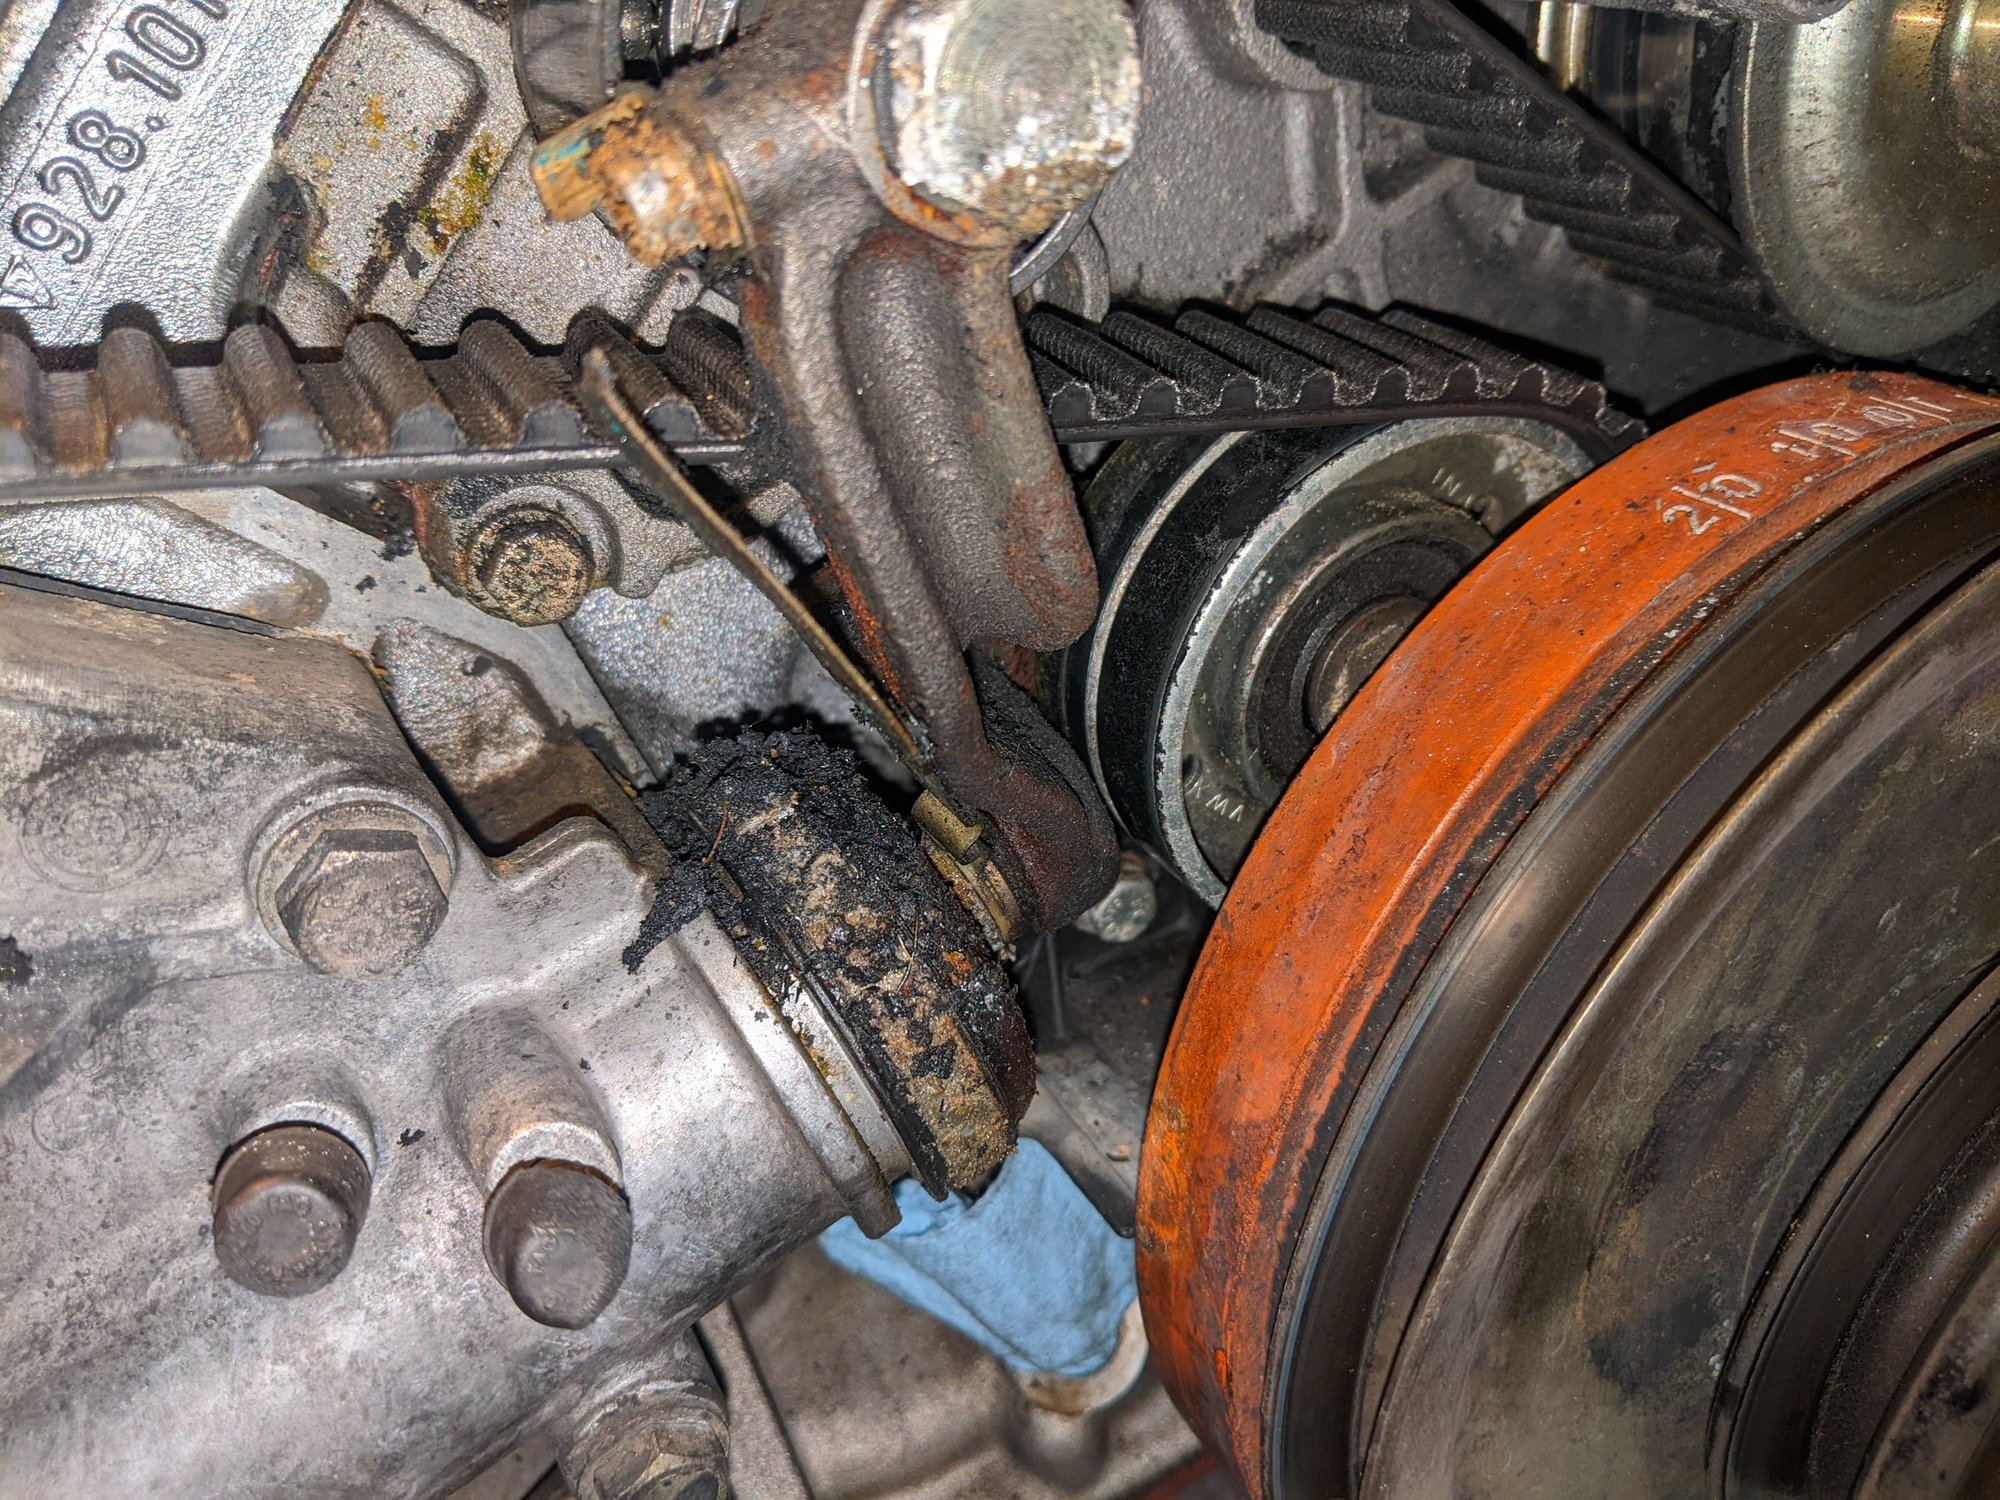
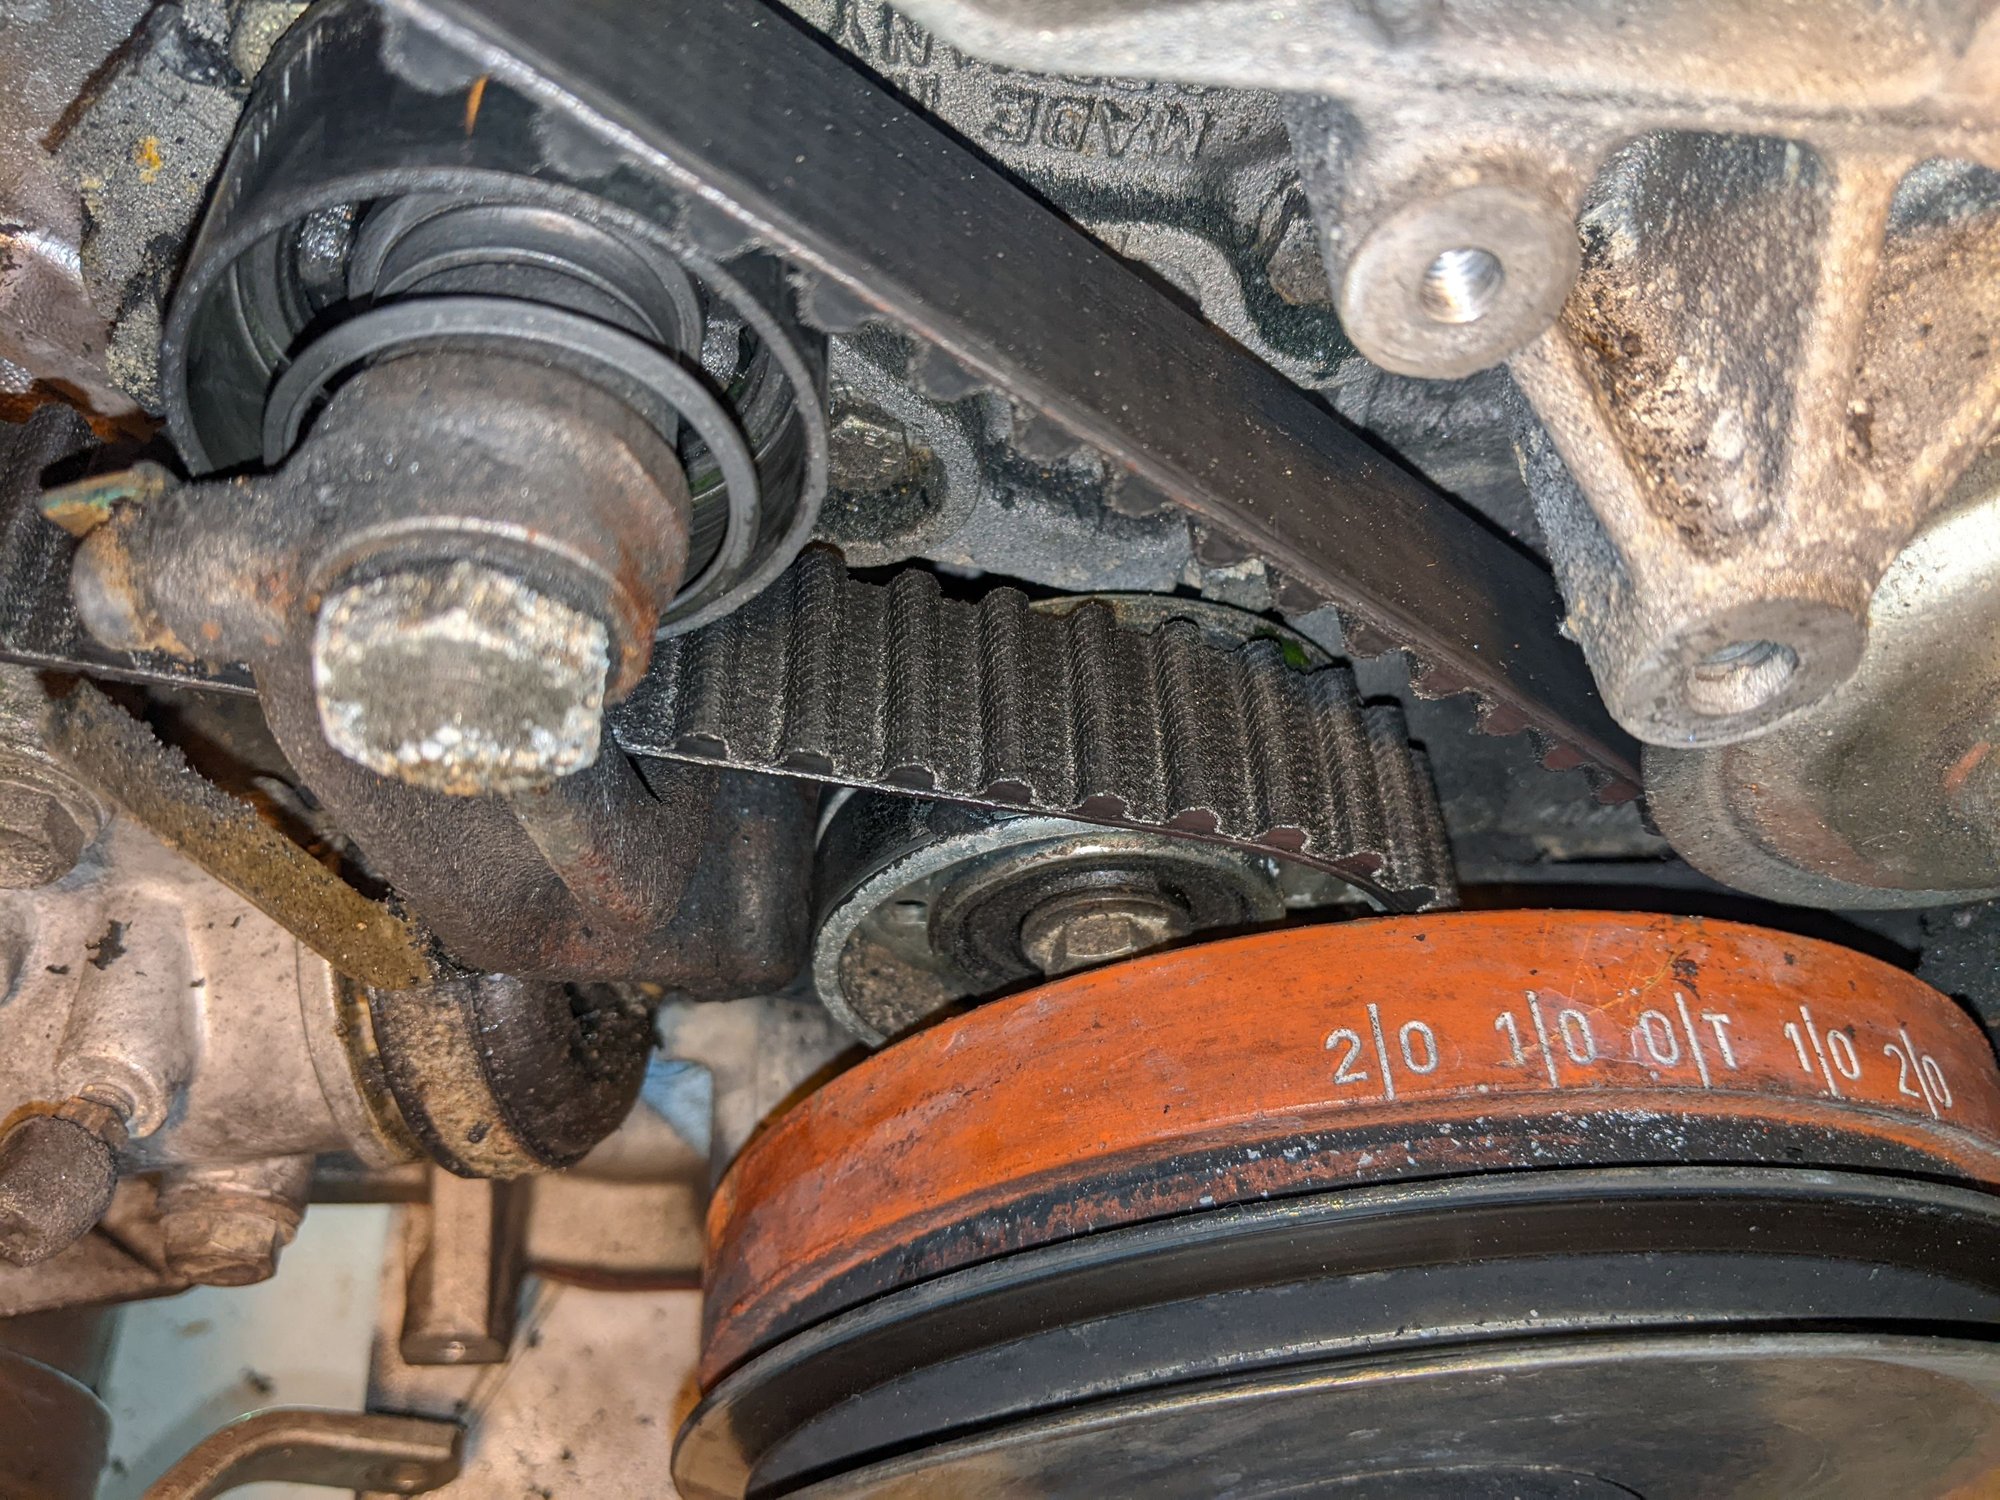
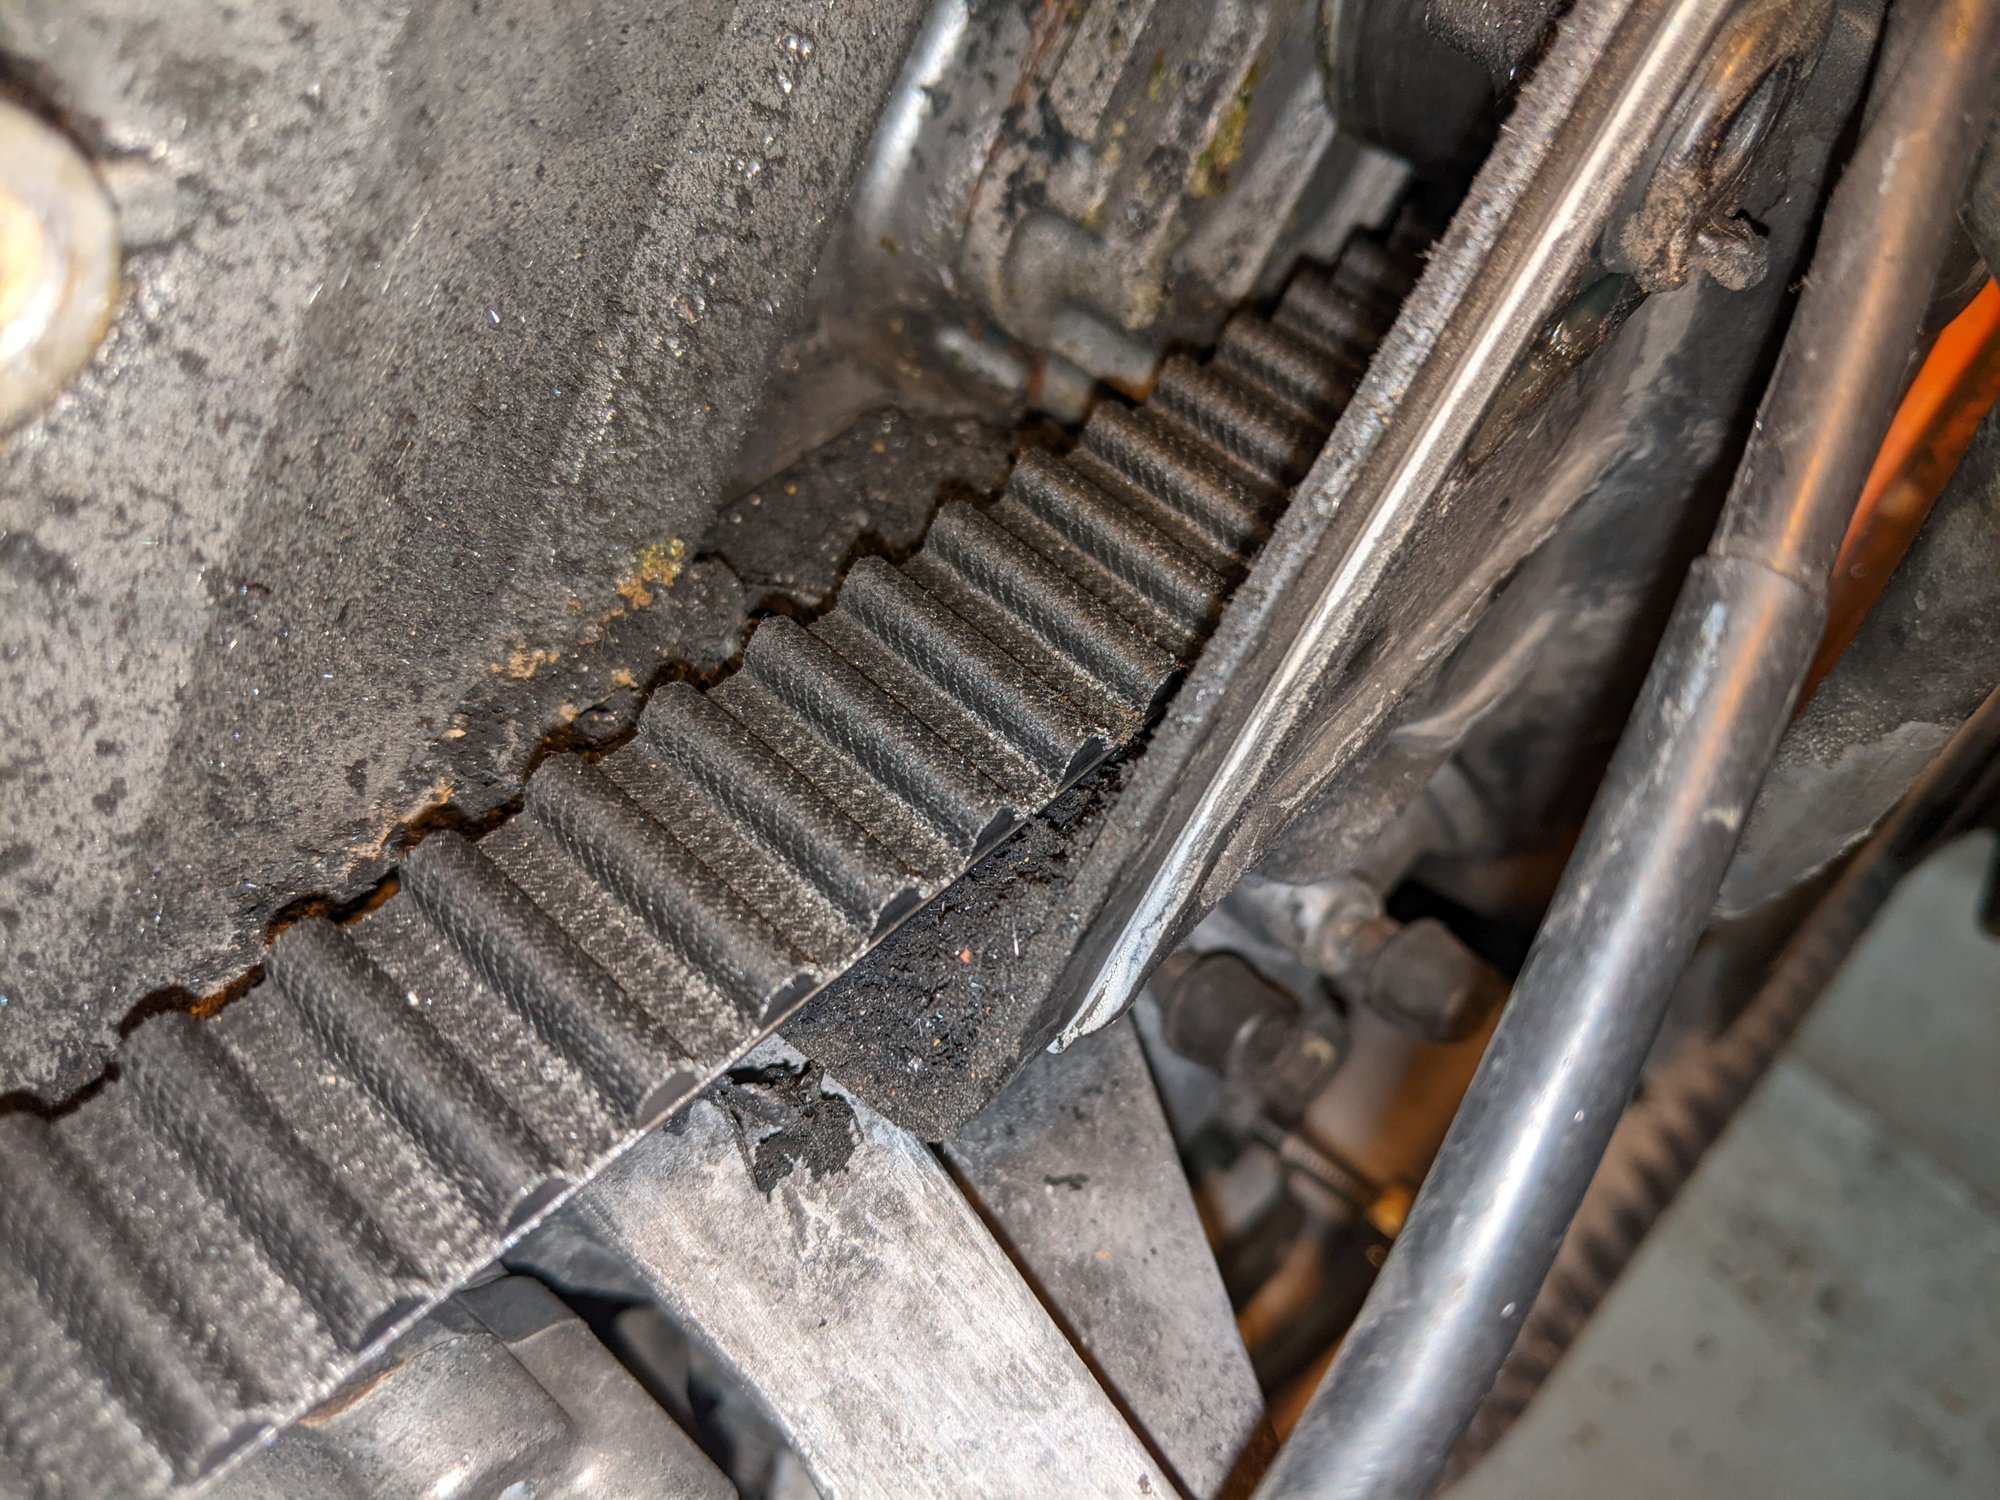
Remember all the rubber shavings? Well, I think I found the culprit. The PO said the center cover was cracked and making a racket, so he put a rubber bushing in front of it. He even showed this rubber to me, wedged between the cover and the PS bracket. Well I found 4 more pieces of random rubber wedged UNDER the center cover. I can see grove marks on this. I am pretty sure the the belt rode on one or two of these and the clockwise rotation of the belt flung most of these to the passenger side cover area, where I found it. It was quite terrible to see this. I also realized that the idler pulley's bearing has completely disintegrated and I think I managed to break the tensioner's warning light connection when taking it apart. The tensioner does not look to be rebuilt, which could also explain the wandering of the belt to the front. As you can see, it is halfway off of the tensioner pulley! The PO told me he tightened the belt "by feel", and it looks darn tight. I will need to measure it, once I get a tool.
As far as I can see, there may be a "LASO" circle on the water pump, although I am not sure at this point. If it is a 2008 LASO, I am sure it is metal impeller and it is getting replaced.
I think I managed to save this engine at the last second. If that bearing had completely gone, who knows what would have happened, or one of the rubber pieces completely flung in there. Note, it is a low mileage (37k mi) engine, only its last service was messed up. Luckily, only 3k mi since the service. I think the cam gears and the oil gear look ok and not worn.
(side note: I tried the tool to clear the thread for the AC mounting bolt. It is advertised to work on 8mm, but it didn't fit with its protective nylon on, so I didn't want to stress it. I used it gently without it on. It did seem to clear the thread, but not well enough to help. I don't want to stress this tool further. I'll get a thread chaser.)
Some of the rubber pieces stuffed under the center cover. These don't seem original. :-) The cover bolts, in order. Another piece of rubber. Notice the wear grooves! More rubber under the center cover. Oil gear looks ok. The disintegrating idler pulley. More rubber! Broken warning light metal strip. Looks to be "LASO" Notice how the belt rides completely off of the tensioner pulley.
While this looks terrible, it's fairly typical.
However, I've never seen chunks of rubber to space out a timing cover....
That's whole new level of "Home Hacking".
Thanks Greg and Ed! Yeah, now my worry is what caused the cover to rattle and why the PO decided he needed to do this. Obviously, it was making a noise. My thoughts:
1) After the bearing went - rubber piece got sucked in, the belt was flapping about a bit, hitting the cover
2) One of the drivers's side top cover bolts and the M10 bolt that goes into the PS bracket (into the long elongated hole) were missing. Maybe that extra hold would have dampened it?
Anyway, I am close to finishing the tear-down. I will be needing advice on parts to replace and parts that I can keep. Do ask for photos and I'll be glad to take any to help decide.
the best tool for making threads work is to take a bolt and cut 3 flutes in the first few threads,
this way you wont be removing additional metal from this threaded hole. Use the side edge of a shop grinding wheel.
NOTE Any tap you use has potential to enlarge the hole and remove the threads enough,
so when you reach the final tightening the bolt pulls out the remaining threads.
Thats why you should not use anything except a bolt thats made for that hole.
This specific hole is a weak mounting point ,
and removing any metal from the existing threads will almost guarantee the fastener pulls the threads.
Stan, you are the man! I made my own thread chaser the way you recommended. It took a good 10-15 runs with it through the hole, very slowly only by hand (no sockets), using lots of oil, cleaning it after each run, back and forth, but it cleaned it out. I used a long bolt, which allowed me to thread it perpendicularly, nicely, easily.
I managed to put the old bolt back in! I did clean its threads with a nut, in a similar way. It had some rough points. I am considering using a completely new bolt, when done, as the OEM is a bit dull at the ridges. The only one I managed to get at the store is 1-2 mm longer and has a 1/2in head instead of 13mm, and I don't wish to have SAE on this car. Having a fresh bolt would help with the tightening for sure.
Anyway, thanks for the tip! A $2 bolt with cuts in it works better than a $60 tool. Ridiculous.
-Andras
Cleaning grooves cut Chaser in, hand tightened only OEM bolt back in.

 02-09-2022, 10:24 PM


 The PO told me he tightened the belt "by feel", and it looks darn tight. I will need to measure it, once I get a tool.