When you click on links to various merchants on this site and make a purchase, this can result in this site earning a commission. Affiliate programs and affiliations include, but are not limited to, the eBay Partner Network.
1990 S4 - RHD - ex Japan. 142,000 km.
I have started on my long put-off engine pull to replace the head gaskets, install some cams and check / replace rod bearings. Along the way planned items are :
New 24lb injectors,
new harmonic balancer.
Re condition driveshaft with black sea developments 25mm shaft, bearings & clamp.
New PS lines & auto trans lines.
New suspension bushings / shocks etc.
Update auto trans with new parts / supersedes & upgrades. (If i can ever get the parts vendor to respond).
Improved oil control / breathing bits to install.
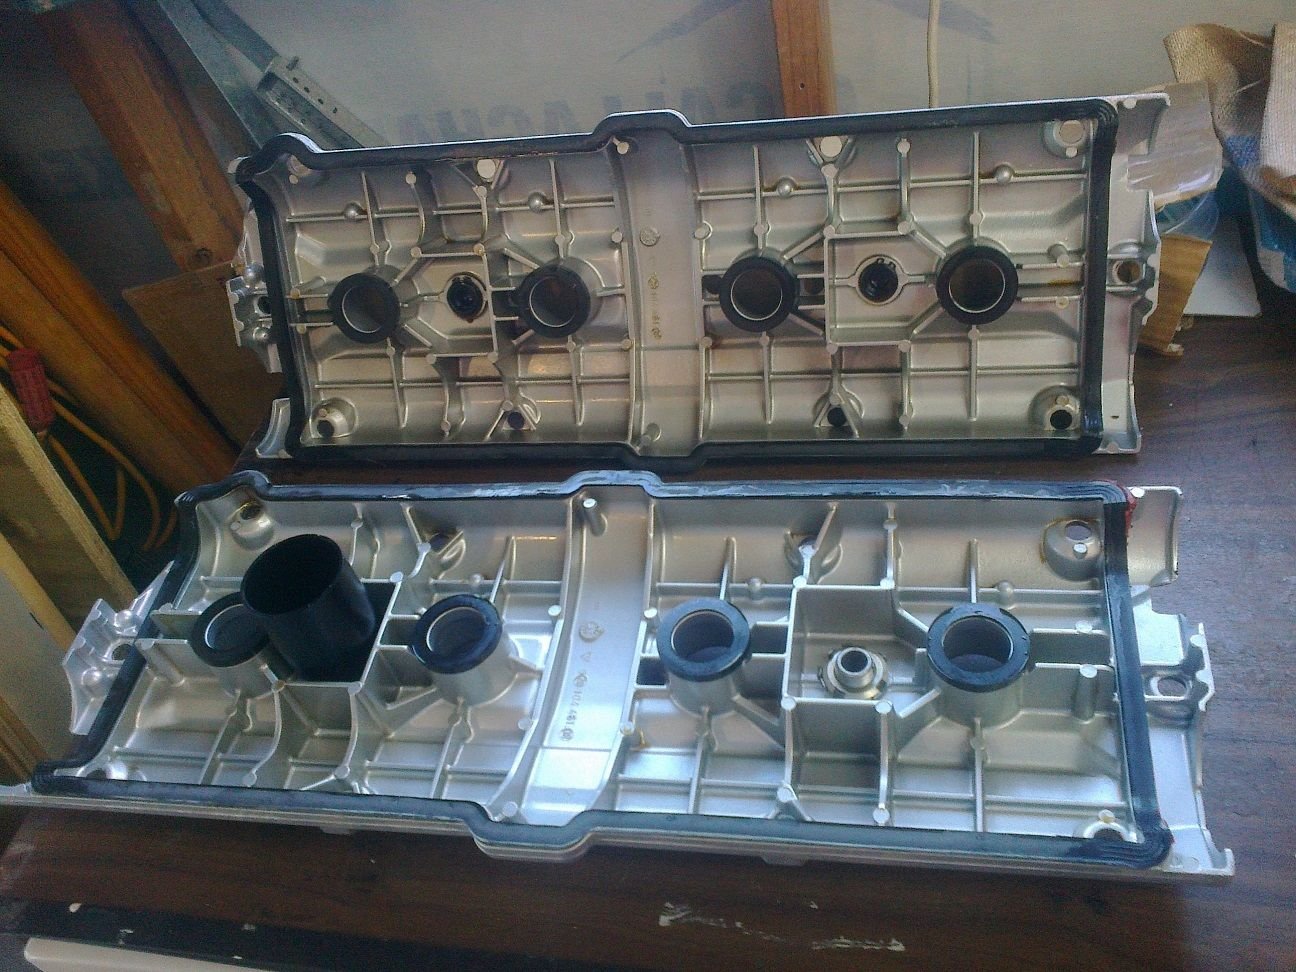
I did a top end 'intake' refresh in 2012 so most of that stuff is not too bad. A that time I had the intake and cam covers coated. After taking off the cam covers today, the inside sheds oil readily and looks as good as it did when installed 9 years ago. The outside of the covers & intake also look like new apart from a little mechanical damage.
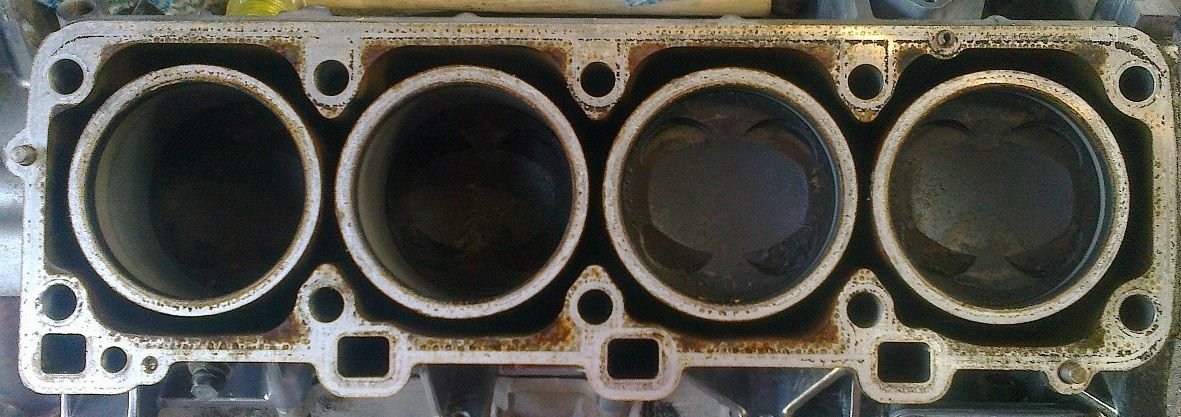
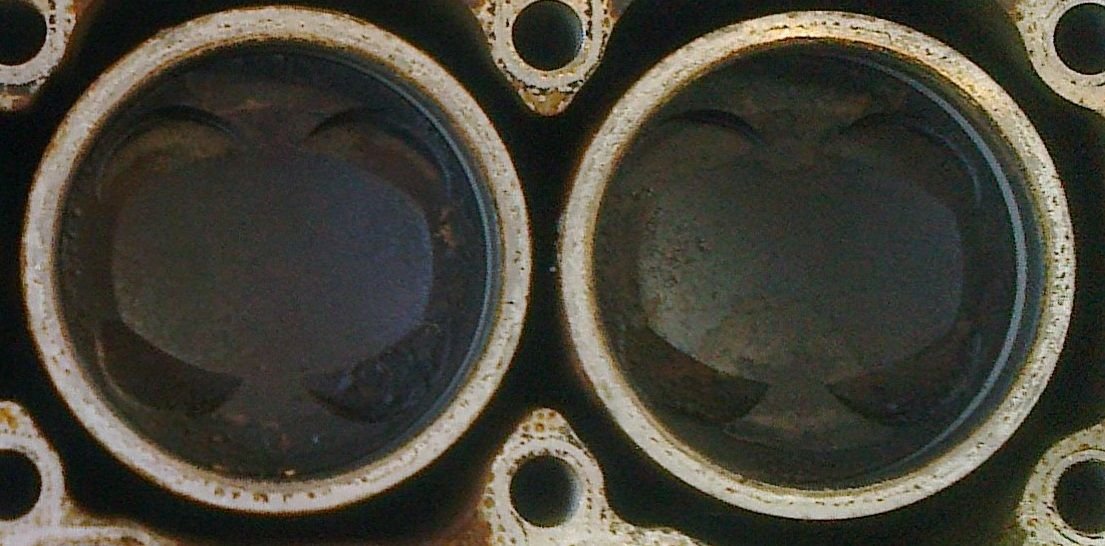
Bores looked almost perfect - even matt gray with just a little rubbing from no8 piston & some slight extent of ring travel marks from no 4 piston. Nothing able to be felt with a fingernail. No discernible lip.
The waterpump was a Porsche plastic impeller with a 1990 casting date on the body. I have not changed it in my tenure (2006+) so suspect it is original.
Along the way of removing the engine & heads I have managed to avoid any broken bolts or stripped threads. Most hardware looked in very good condition.
The 5-8 cam gear still looked good. The 1-4 cam gear was well worn into the aluminum. Tensioner still had oil in it. Still had aluminium oil pump gear which looked to be in excellent condition.
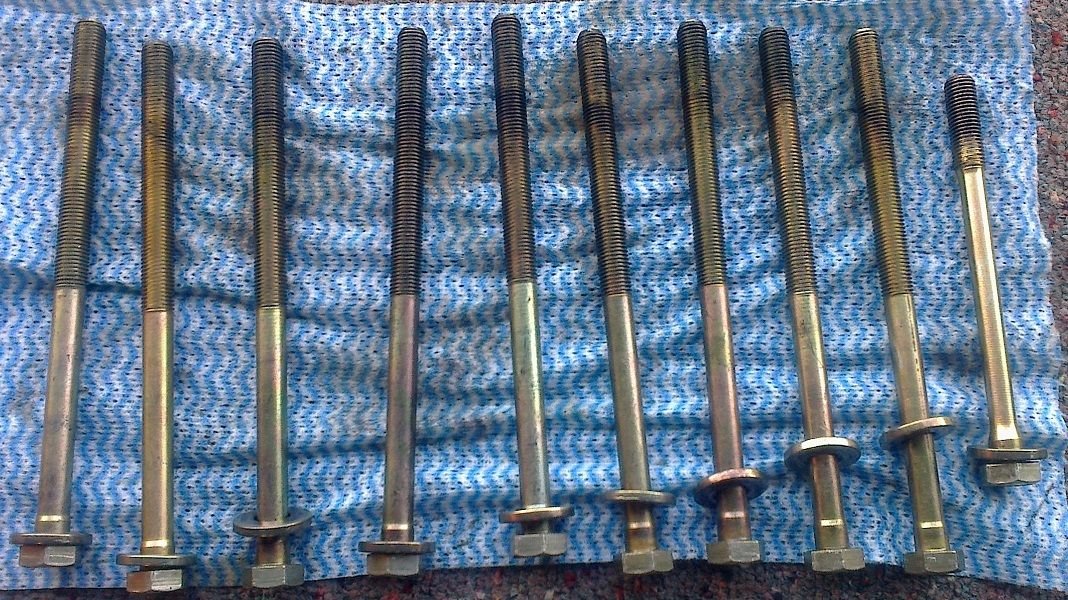
Head bolts were TIGHT.
There was a slight initial & silent turn then some 'tinkling' as more pressure was applied the a loud 'crack' as the bolts released. The short bolts looked new, others had faded slightly. (Both head bolt sets looked the same). Any thoughts on 'hydrogen embrittlement' or reuse? (I have read that those not the original colour should be thrown away and a full set of new bolts used).
Head 1 - 4
Head came off easily from the block.
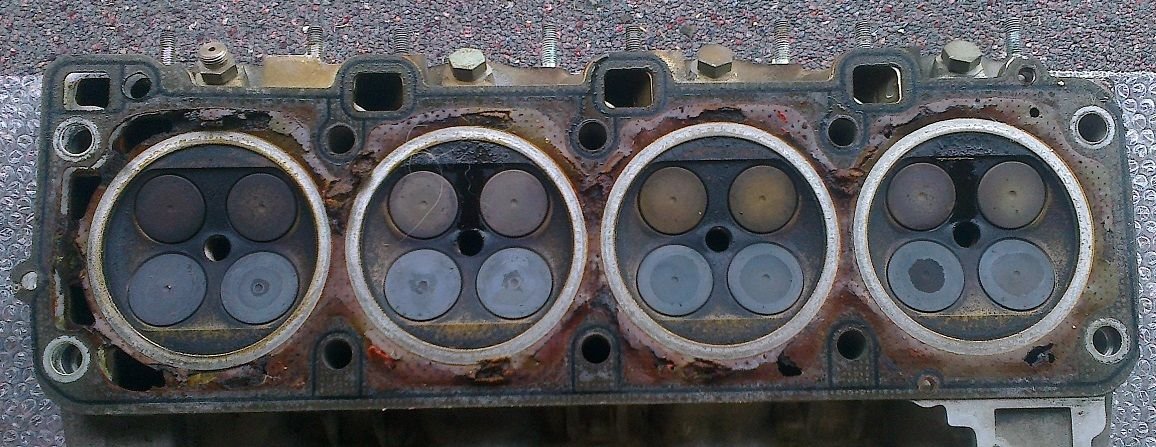
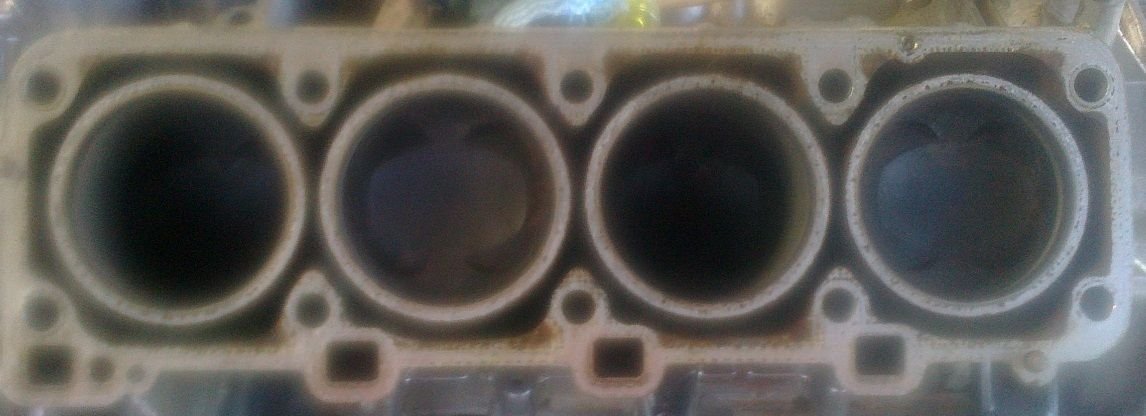
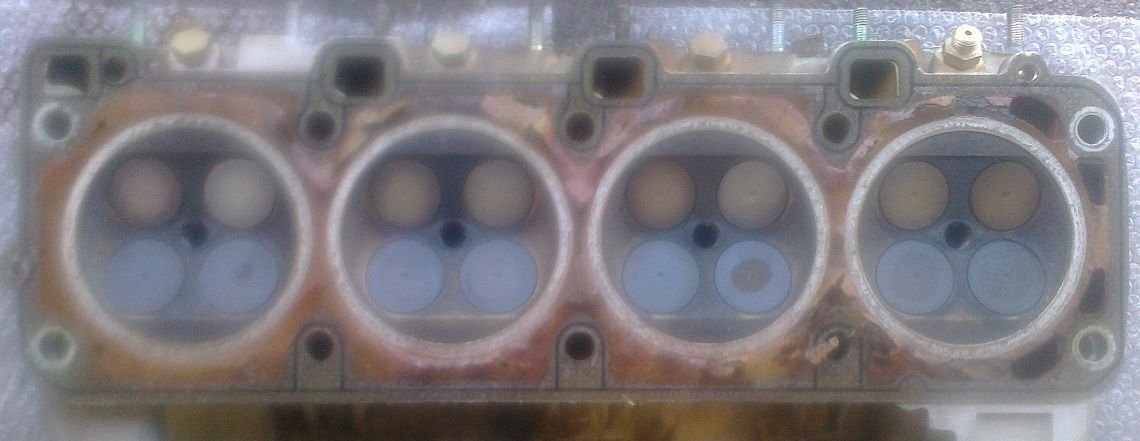
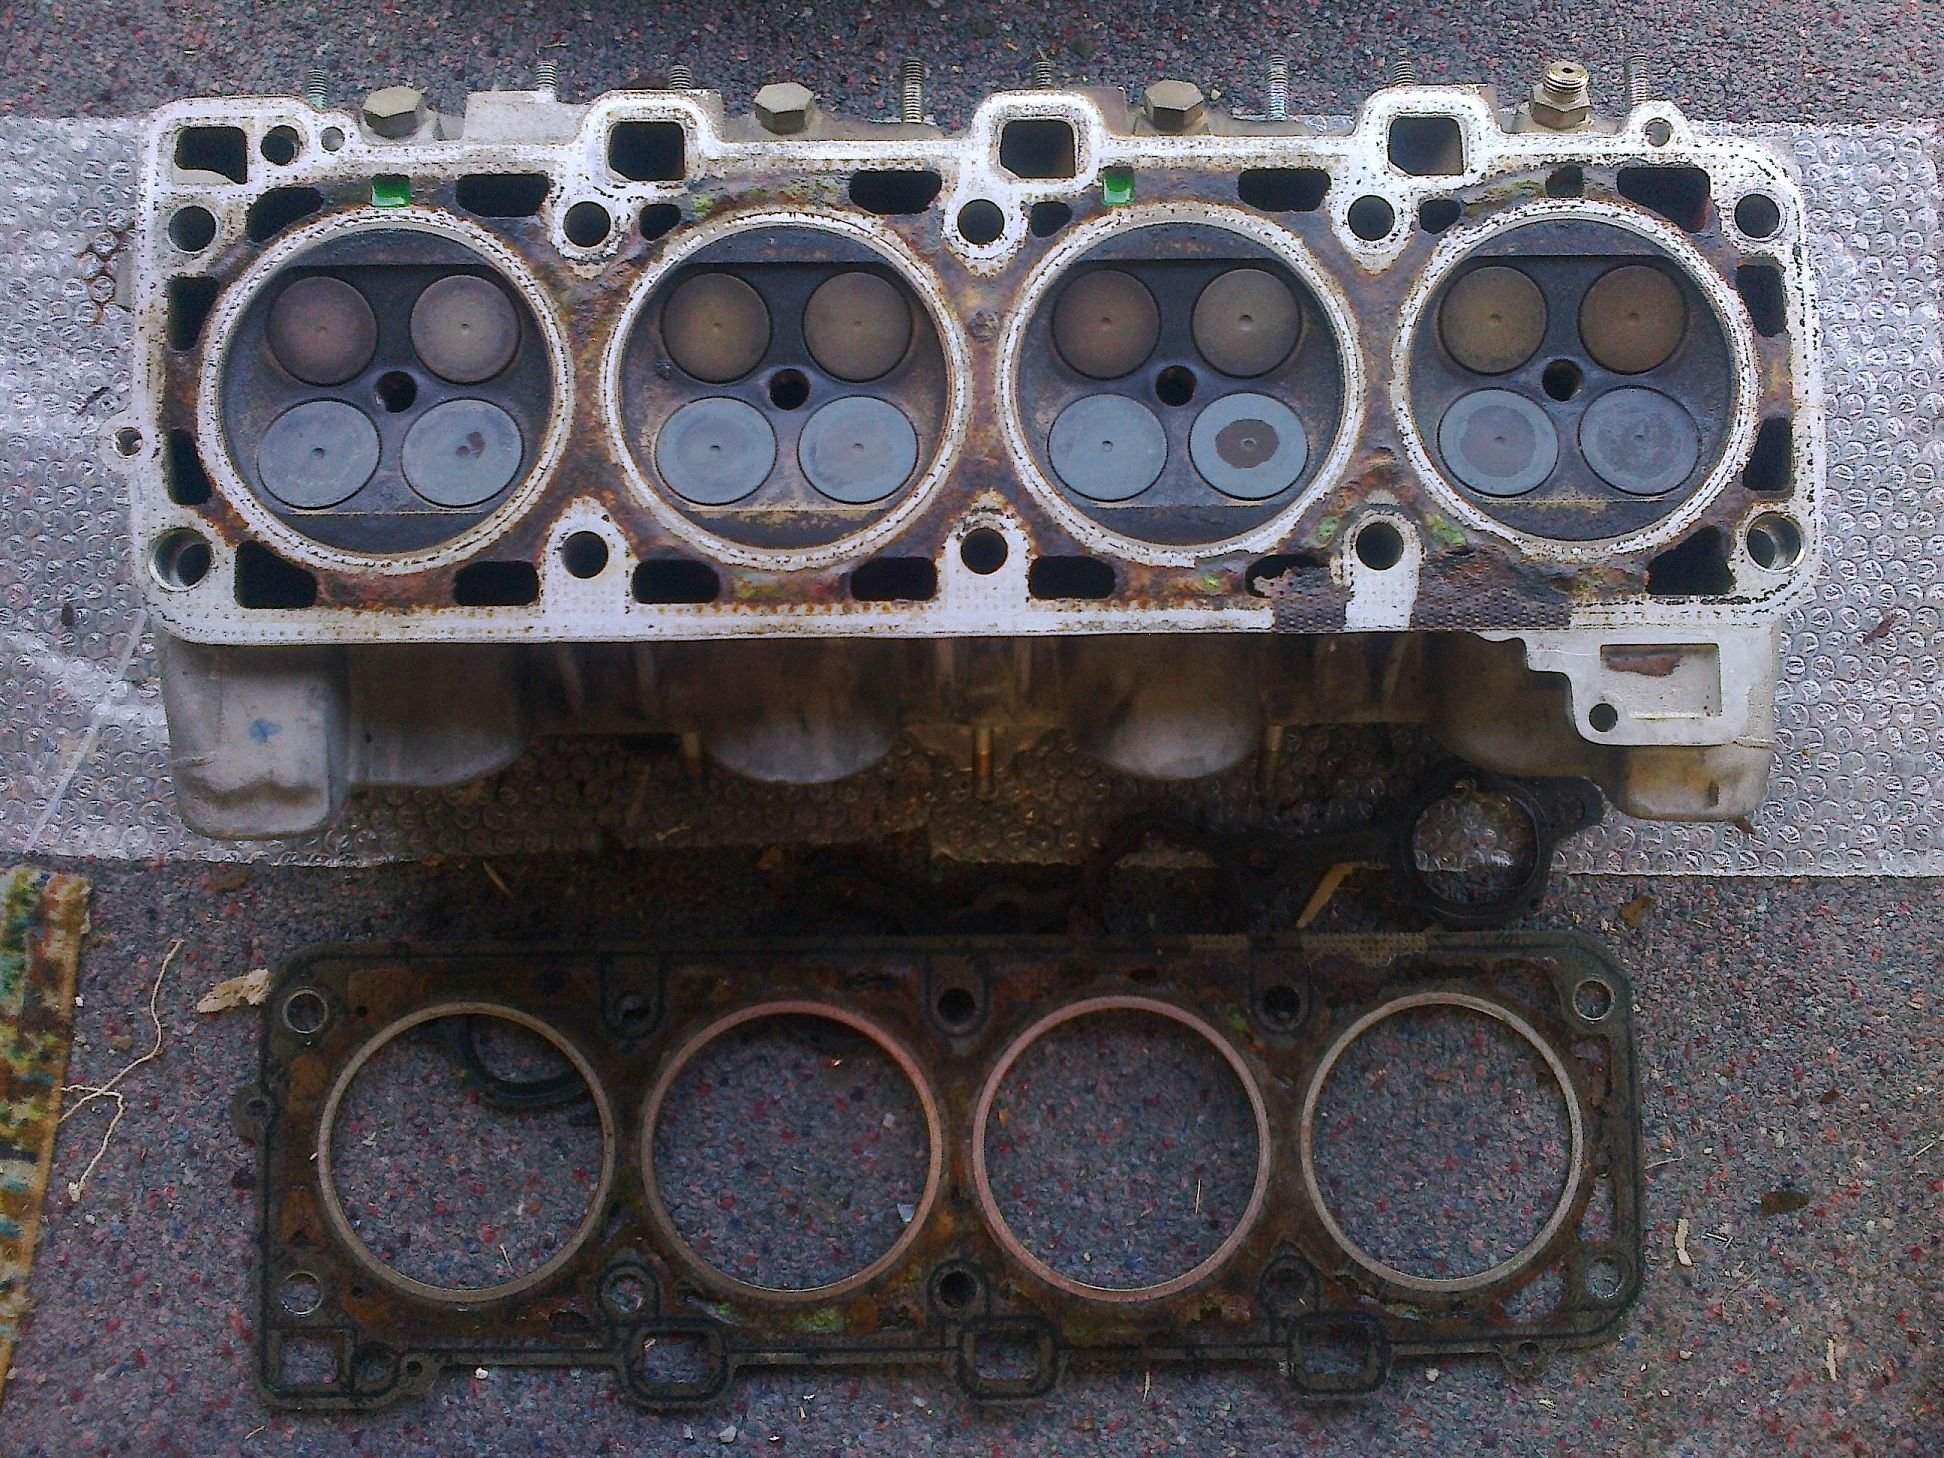
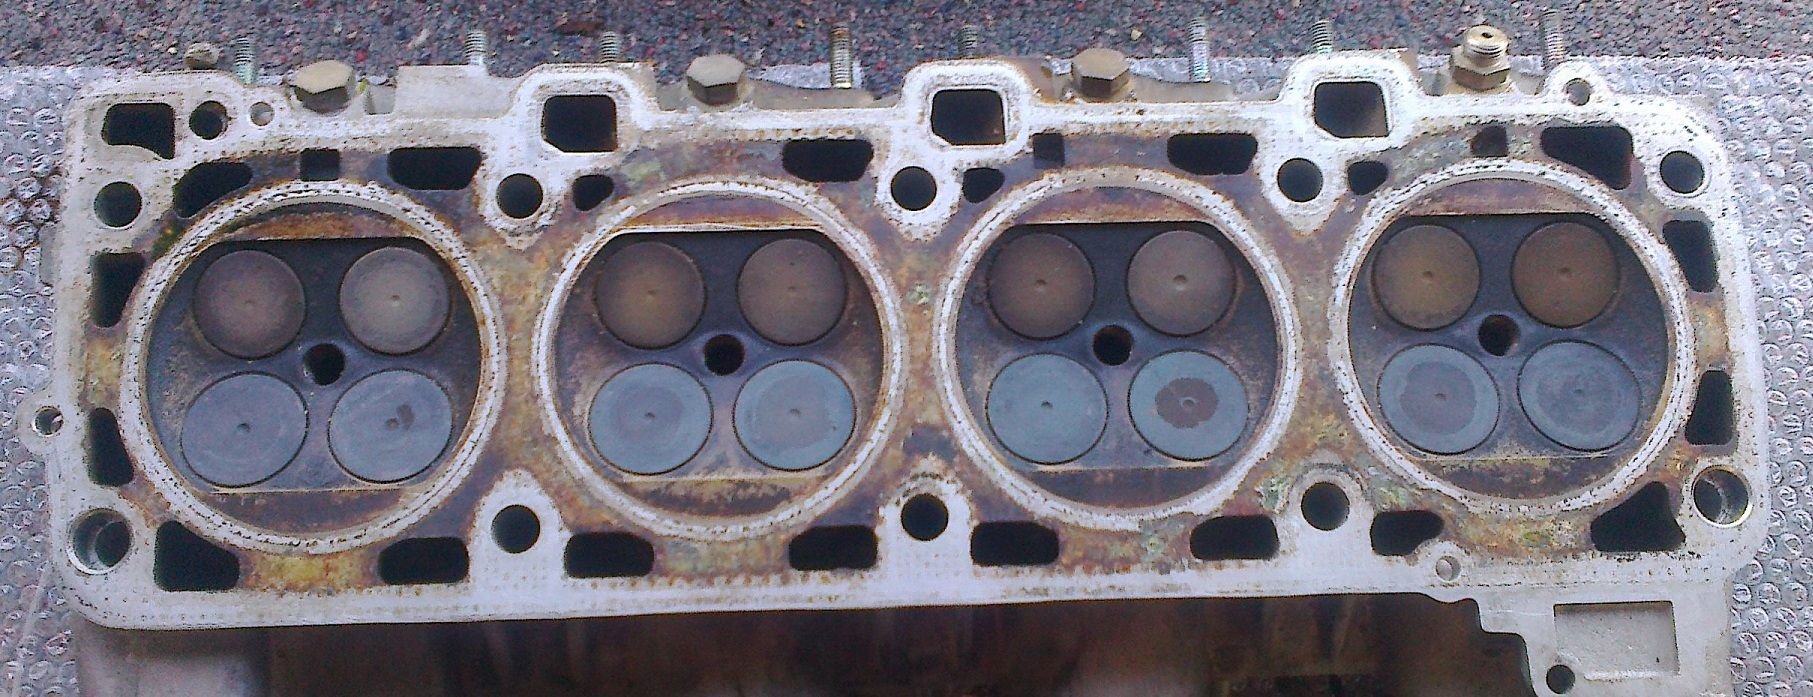
Pictures below are: Block then head gasket (block side) then 'raw' head the head after light scrape and head side of gasket. Looks like head work is in my future. Fortunately YouTube is full of DIY head planing videos ..........
Definitely some 'recessed' areas away from the firing rings but most sealing surfaces don't look too bad ( to me). Any comments?
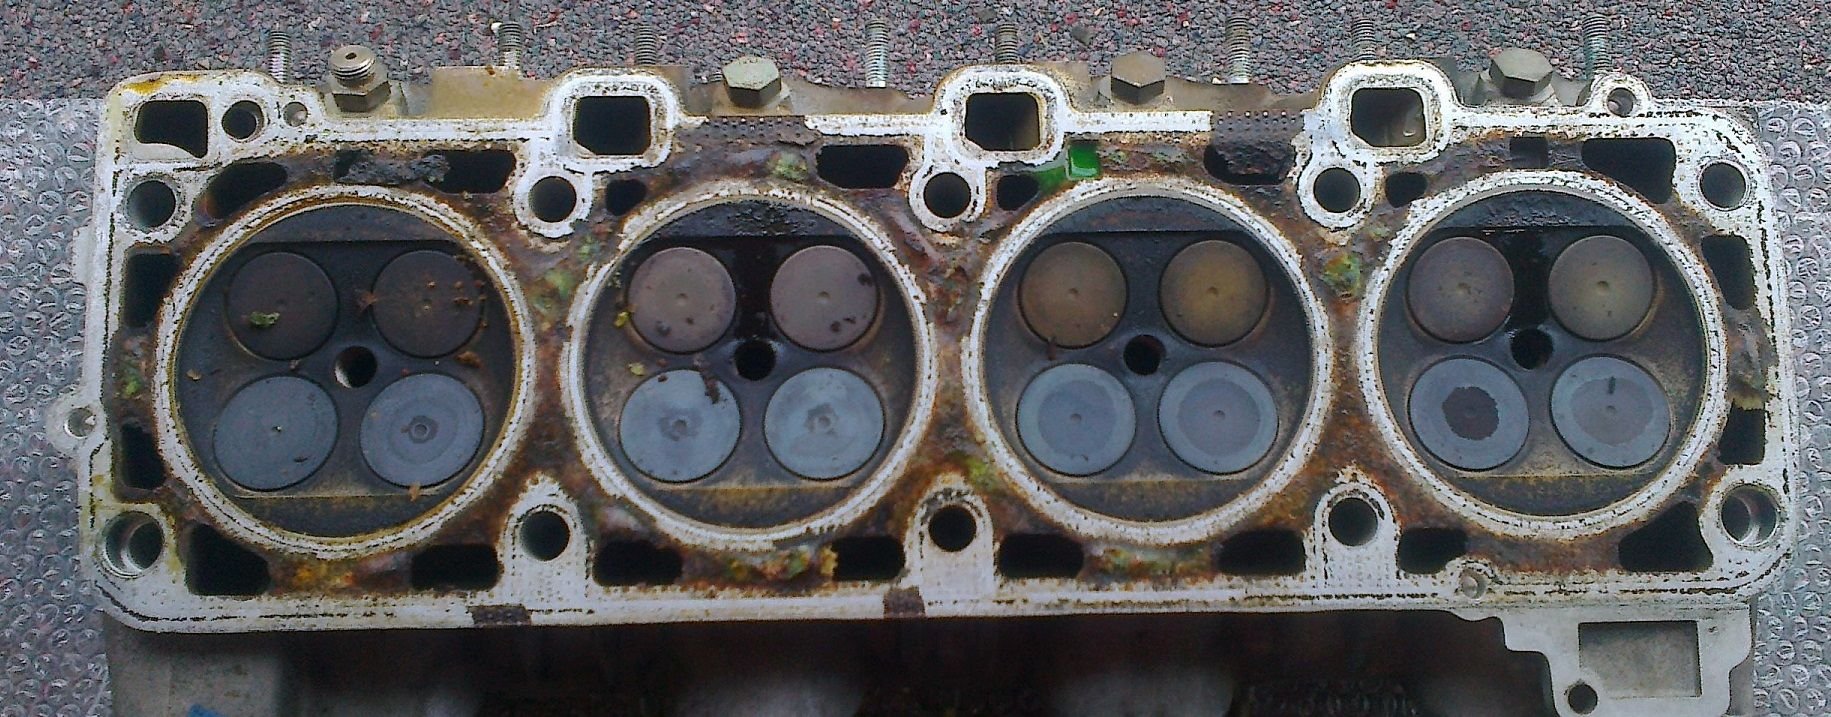
Head 5 - 8 side.
Very similar to remove to 1-4 side.
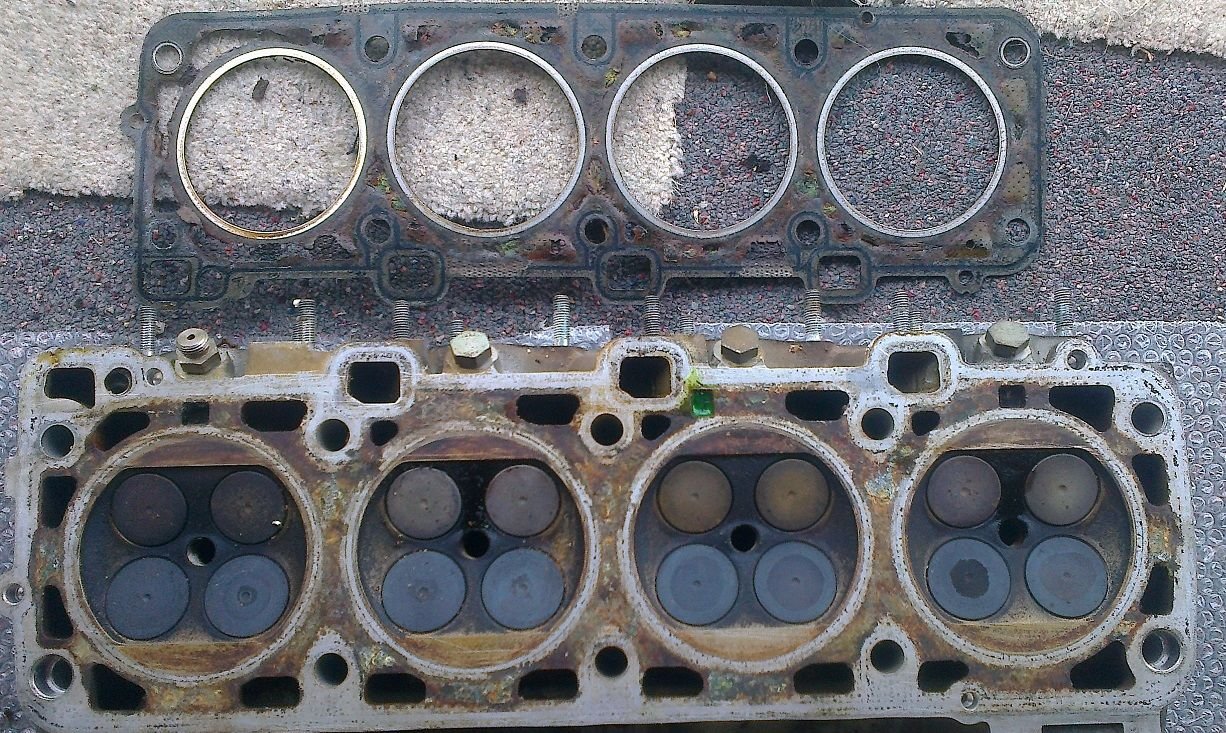
Pictures below are: block side, block side of gasket, 'raw' head with head side of gasket and lightly scraped head. Sorry about the quality of the first 2 pictures - something must have got on the lens.
For reference, all 8 piston tops looked like this:
Engine turns over evenly & smoothly by hand.
Congratulations on successful removal of the heads. A first glance suggests that what you have is in as good a condition as can be expected given the attrition we typically see these days.
Some preliminary observations:
1. I note you have been using green coolant- presumably original spec IAT formulation. Which brand were you using and what change intervals did you typically deploy?
2. To make half decent photos it helps if the pieces can be placed one at a time on a white background in well illuminated areas- the flash mode helps illuminate recessed surfaces.
3. Your head bolts look to be in excellent condition and up until about a week ago i might have said re-use them- following GB comments about hydrogen embrittlement I am no longer so sure about this. I will comment further about this in a separate post to your thread a bit later.
4. The cylinder top surfaces look fine- no need for further comment. I cannot see from your photos how the water bath and cylinder chimneys look- I assume they will be as clean as a whistle with no signs of scale deposition.
5. I cannot read much from the gasket photos. Clearly they have taken some attrition and have to some small degree experienced what I refer to gasket cancer. Perhaps you can confirm that they have taken attrition from the head side of the gasket. I like to see clear pictures of the gaskets. What I expect to see is that where the gasket is eaten away more severely the heads typically take a more severe beating. Once the heads are cleaned up one should expect to see some signs of mild pitting corrosion.
6. I am assuming this engine has never been dismantled previously. Considering some of the train wrecks we see your motor superficially looks to be in excellent condition and you should be well pleased. The heads may need a light skim- please post some more pics when you have managed to clean them up some.
Congratulations on successful removal of the heads. A first glance suggests that what you have is in as good a condition as can be expected given the attrition we typically see these days.
Some preliminary observations:
1. I note you have been using green coolant- presumably original spec IAT formulation. Which brand were you using Whatever I could get locally rated for alloy engines with 5+ year life. and what change intervals did you typically deploy? 2 - 4 years (a bit slack at times)
2. To make half decent photos it helps if the pieces can be placed one at a time on a white background in well illuminated areas- the flash mode helps illuminate recessed surfaces. Only white background are servicable bed linin (not an option to use). Will need to dig out old digital camera.
3. Your head bolts look to be in excellent condition and up until about a week ago i might have said re-use them- following GB comments about hydrogen embrittlement I am no longer so sure about this. I will comment further about this in a separate post to your thread a bit later. Looking forward to it. Thinking of a way to compare each bolt for reference. May make up a jig to torque them in using the factory 3-step method and compare torque to achieve this.
4. The cylinder top surfaces look fine- no need for further comment. I cannot see from your photos how the water bath and cylinder chimneys look- I assume they will be as clean as a whistle with no signs of scale deposition. They look fine, as does the inside of all water passages except the heads where they were against the gaskets. Cooling hose trapped water areas are corroded.
5. I cannot read much from the gasket photos. Clearly they have taken some attrition and have to some small degree experienced what I refer to gasket cancer. Perhaps you can confirm that they have taken attrition from the head side of the gasket. Had been pushed away from the head by corrosion build up. Appear rusty where perished. I like to see clear pictures of the gaskets. What I expect to see is that where the gasket is eaten away more severely the heads typically take a more severe beating. Once the heads are cleaned up one should expect to see some signs of mild pitting corrosion. Definitely some corrosion. Have lightly scraped the heads with a razor blade and checked with straight edge. All clean surfaces of head are well within tolerance. Corroded areas (before cleaning) are up to 0.1mm so I expect them to deepen as cleaned out.
6. I am assuming this engine has never been dismantled previously. Considering some of the train wrecks we see your motor superficially looks to be in excellent condition and you should be well pleased. The heads may need a light skim- please post some more pics when you have managed to clean them up some. Will do. I do have a spare set of heads if necessary.
I was surprised that the heads were still true. Unable to get a 0.0015" feeler gauge (thinnest I have) between my precision (+/- 0.0021mm) straight edge and anywhere on the 1-4 head that was not corroded.
I was surprised that the heads were still true. Unable to get a 0.0015" feeler gauge (thinnest I have) between my precision (+/- 0.0021mm) straight edge and anywhere on the 1-4 head that was not corroded.
Will update as things progress.
Myles
Myles,
Doubtless you will get an excellent result and it seems you have a good platform to work with. I firmly believe the MY90 motor is as good a 928 platform as there is. I had the heads off my MY90 motor some 16 years ago and then it was perfect.
Regarding coolant change intervals there is a lot of misleading info flying about. Changing it every 2 years for sure will do no harm but the notion that if you do not do this will cause "doom" is also a crock. Coolant life is functionally dependent on run hours or more to the point time spent with the coolant at a temperature above 50C- this [as best I can tell] is what consumes the chemical additive package. The coolant you are using is the original IAT formulation the engine was designed to use and as I am concerned is still the best coolant to use. If you have ever touched this stuff you will notice it feels slippery- this is because it is buffered to be alkali with a pH of less than 9. As the coolant ages the pH drops and if and when it gets down to pH7 crap starts to happen in that the glycol will start to break down and form organic acids- not good. I have a tub of fish tank test strips that I use to monitor pH. I also use Prestone coolant and have done for the last 21 years as did my previous owner.
The coolant manufacturers usually print on the bottle the expected service life in terms of duration or mileage simply because no one can effectively monitor run hours to enforce warranty issues. The small print on IAT coolant bottles typically states 2 years or 60k miles. If you have any of the coolant you removed hanging about take a sample and test the pH. I can almost guarantee it will be in the 8 to 8.5 region. Now the Prestone coolant I use says 5 years or 150,00 miles- the stuff I recently removed had little mileage and 4 years in service- the pH was still 8.5.
Bottom line- you have done nothing untoward with your coolant!
When you do get the heads cleaned up and assuming you do find areas of corrosion look carefully at the surface. Besides missing material invariably you will see small holes known as "pits" in the corrosion business. The pits can take a long time to develop and it is thought that they form in areas of surface/material imperfections. Once the pit has formed from thereon corrosion can sometimes take off dramatically and burrow into the material and determining where it ends can be rather tricky. Sometimes after machining the heads look OK but if a few dots are visible there will be a tendency to call it quits. The trouble with this is that if there is the tail end of a pit still there it means there is a residual weakness that may induce a further future corrosion attack prematurely. I hope to stimulate some discussion about this shortly.
Watching and following from across the ditch.
I'm not planning as much as you - just heads, gaskets and front of the engine. I'm at the heads off stage.
Cheers
Dawid
Head 5 - 8 side.
Very similar to remove to 1-4 side.
Pictures below are: block side, block side of gasket, 'raw' head with head side of gasket and lightly scraped head. Sorry about the quality of the first 2 pictures - something must have got on the lens.
For reference, all 8 piston tops looked like this:
Engine turns over evenly & smoothly by hand.
Will update when more progress made.
Cheers
Myles
At the bottom of the two combustion chambers on the right hand side of this head (cylinders 7 and 8), there appears to be some significant erosion under the fire ring.
Unless this is a "camera trick", you were very close to having water in your combustion chambers.
You "caught" this, in the "Nick of Time!
Your heads are going to require some serious welding....make sure your machine shop knows exactly how to do this repair.
Head bolts were TIGHT.
There was a slight initial & silent turn then some 'tinkling' as more pressure was applied the a loud 'crack' as the bolts released. The short bolts looked new, others had faded slightly. (Both head bolt sets looked the same). Any thoughts on 'hydrogen embrittlement' or reuse? (I have read that those not the original colour should be thrown away and a full set of new bolts used).
Head 1 - 4
Head came off easily from the block.
Pictures below are: Block then head gasket (block side) then 'raw' head the head after light scrape and head side of gasket. Looks like head work is in my future. Fortunately YouTube is full of DIY head planing videos ..........
Definitely some 'recessed' areas away from the firing rings but most sealing surfaces don't look too bad ( to me). Any comments?
Myles
Very "nasty" erosion under the fire rings for #2 and #3.
I'm not sure that you can get much closer to having coolant getting to the combustion chamber than on the upper right side of combustion chamber #2.
There's barely any sign of any remaining fire ring area, right here!
You are "paying the price" for using that green coolant, which turns acidic very quickly.
My initial thought is that if you have a better set of spare heads (which are 3R-5R castings), you might be better off using those heads....
These appear to be awful, if I'm interpreting your pictures correctly.
Looking at your pistons, your ring sealing looks terrific.
And fortunately, the corrosion does not appear to have done damage to the tops of the cylinders.
Your head bolts are somewhat unique for the condition of the heads.
It will be interesting to see how much torque it takes to get to the proper angle torque, if you reuse these bolts.
Your heads are going to require some serious welding....make sure your machine shop knows exactly how to do this repair.
Hi Greg,
preliminary measurements on the 1-4 head shows erosion up to 0.8mm depth in places and also some erosion approaching the fire rings area. I have not cleaned up the 5-8 head yet.
Being in the middle of a sparsely populated part of the world with no population centre over 20,000 population within 2.5hrs drive, what 's the chances of having anyone who has ever even worked on these heads before, let along had to weld them.
Any tips you could give me (either in this thread or by PM if you prefer) in asking the right questions / having the right answers would be most appreciated. If it all becomes too hard, I will have to look into using my spare set of heads.
Any thoughts on the correct torque the head bolts should see, using the factory 3 step method, out of interest? I will probably make up a jig to test them, primarily out of interest.
Cheers
Myles
Myles:
What are the casting numbers on your spare heads?
Are they in better condition than these heads?
If they are the correct head, in better condition, and have not been on an engine that severely overheated (meaning they are still fairly flat), I'd think they might be a better choice....the pictured heads are pretty ugly and it will take some talent/experience to repair them.
That being said, I'd be happy to give you any/all clues about this process that I know.
Yes, it would have to be by Email or PM...I'm getting tired of educating the world, only to get a mouthful.
Greg,
you had much useful input into the thread discussing whether I should buy them. https://rennlist.com/forums/928-foru...tos-added.html I believe you had first right of refusal on them if they were not used by me.
I would like to see what's involved in saving these heads first, before I consign them to the bin, especially as good heads are only going to get more difficult to obtain and someone with heads beyond saving could use them instead.
Please PM or email me what you know about the repair process. (You have my email address in your system as I am on the waiting list for parts from you).


 09-05-2021, 02:45 AM


 ..........