When you click on links to various merchants on this site and make a purchase, this can result in this site earning a commission. Affiliate programs and affiliations include, but are not limited to, the eBay Partner Network.
Hey guys, I need a little confirmation here. Logic seems to be right but I do not want to screw the pooch, as they say.
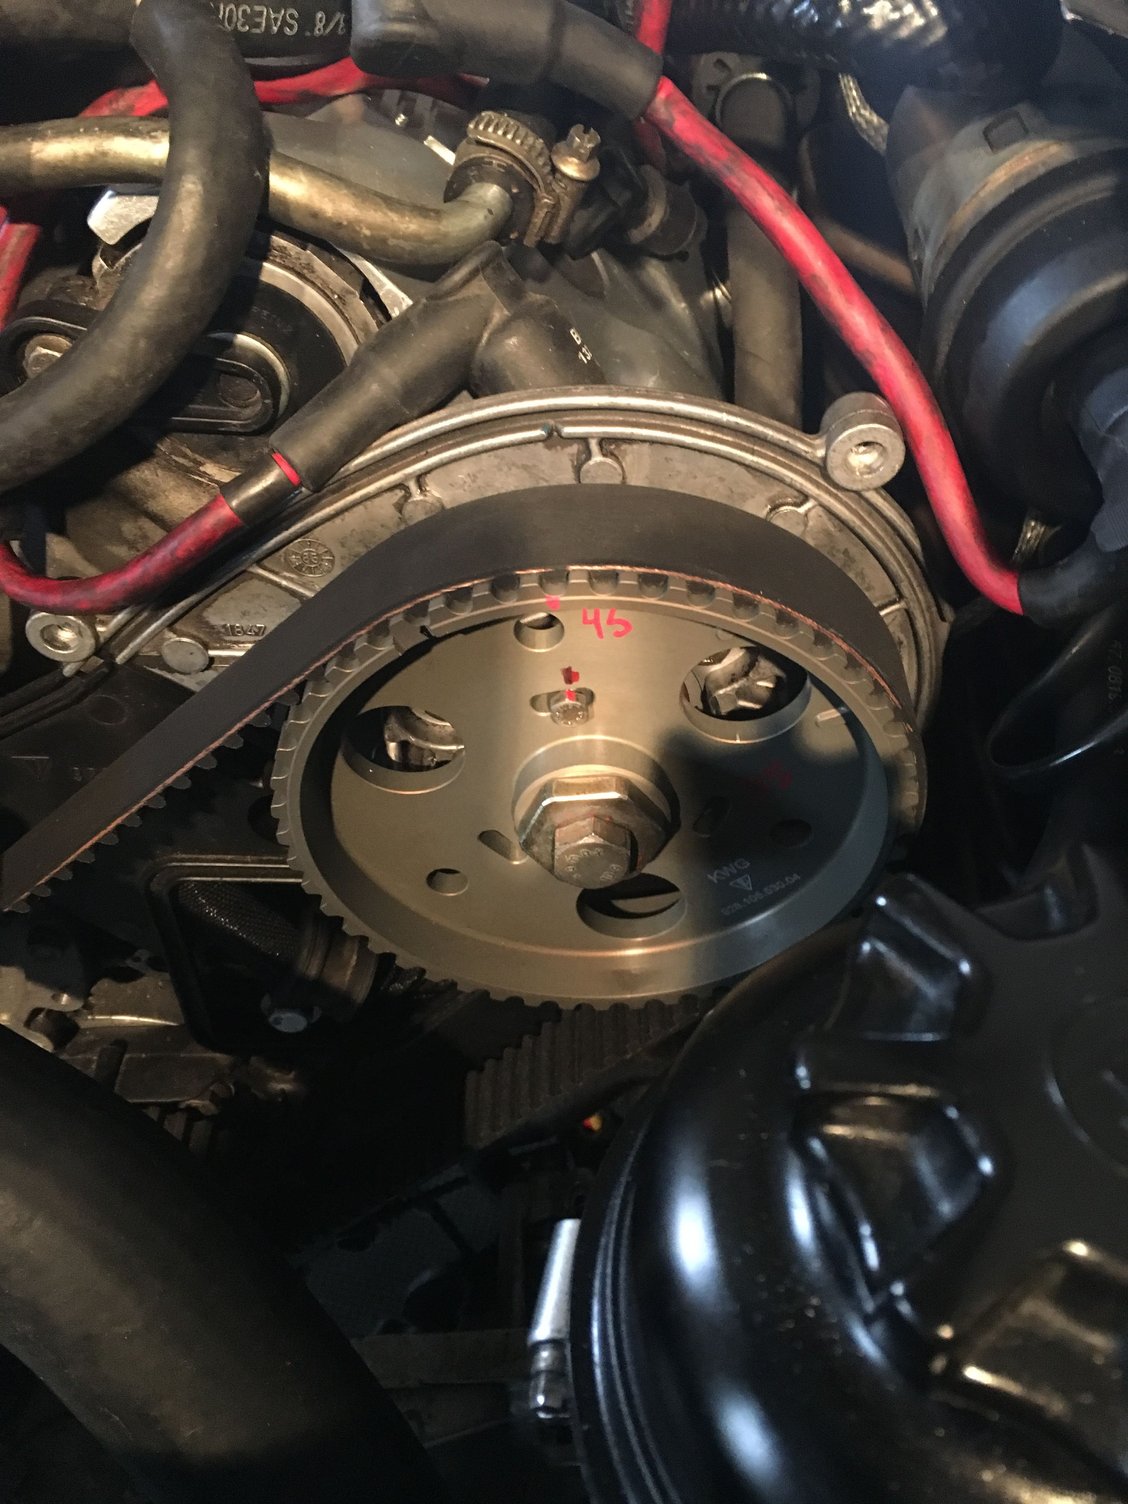
So I removed TB to change cam gears.
I did that at 45 BTDC and locked flywheel, and then took pictures at every angle before I took the old gears off.
Put on and marked new gears, then torqued gear to cam bolts at 47 ft. lbs -- which I read to be spec.
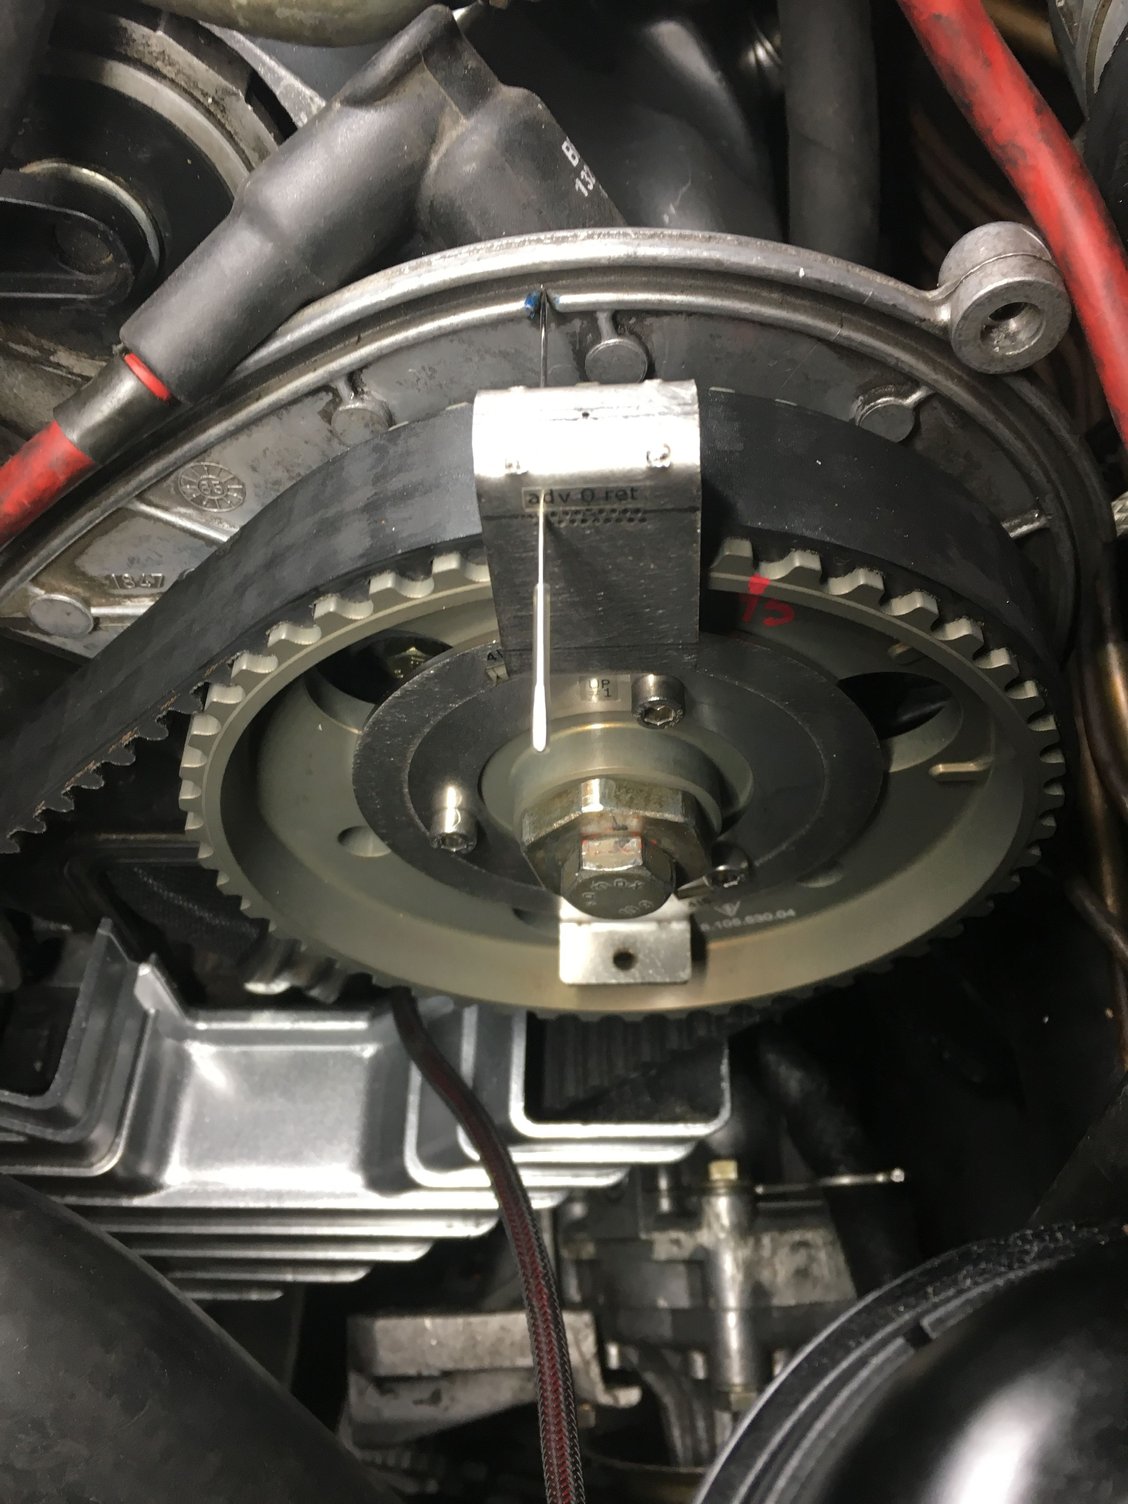
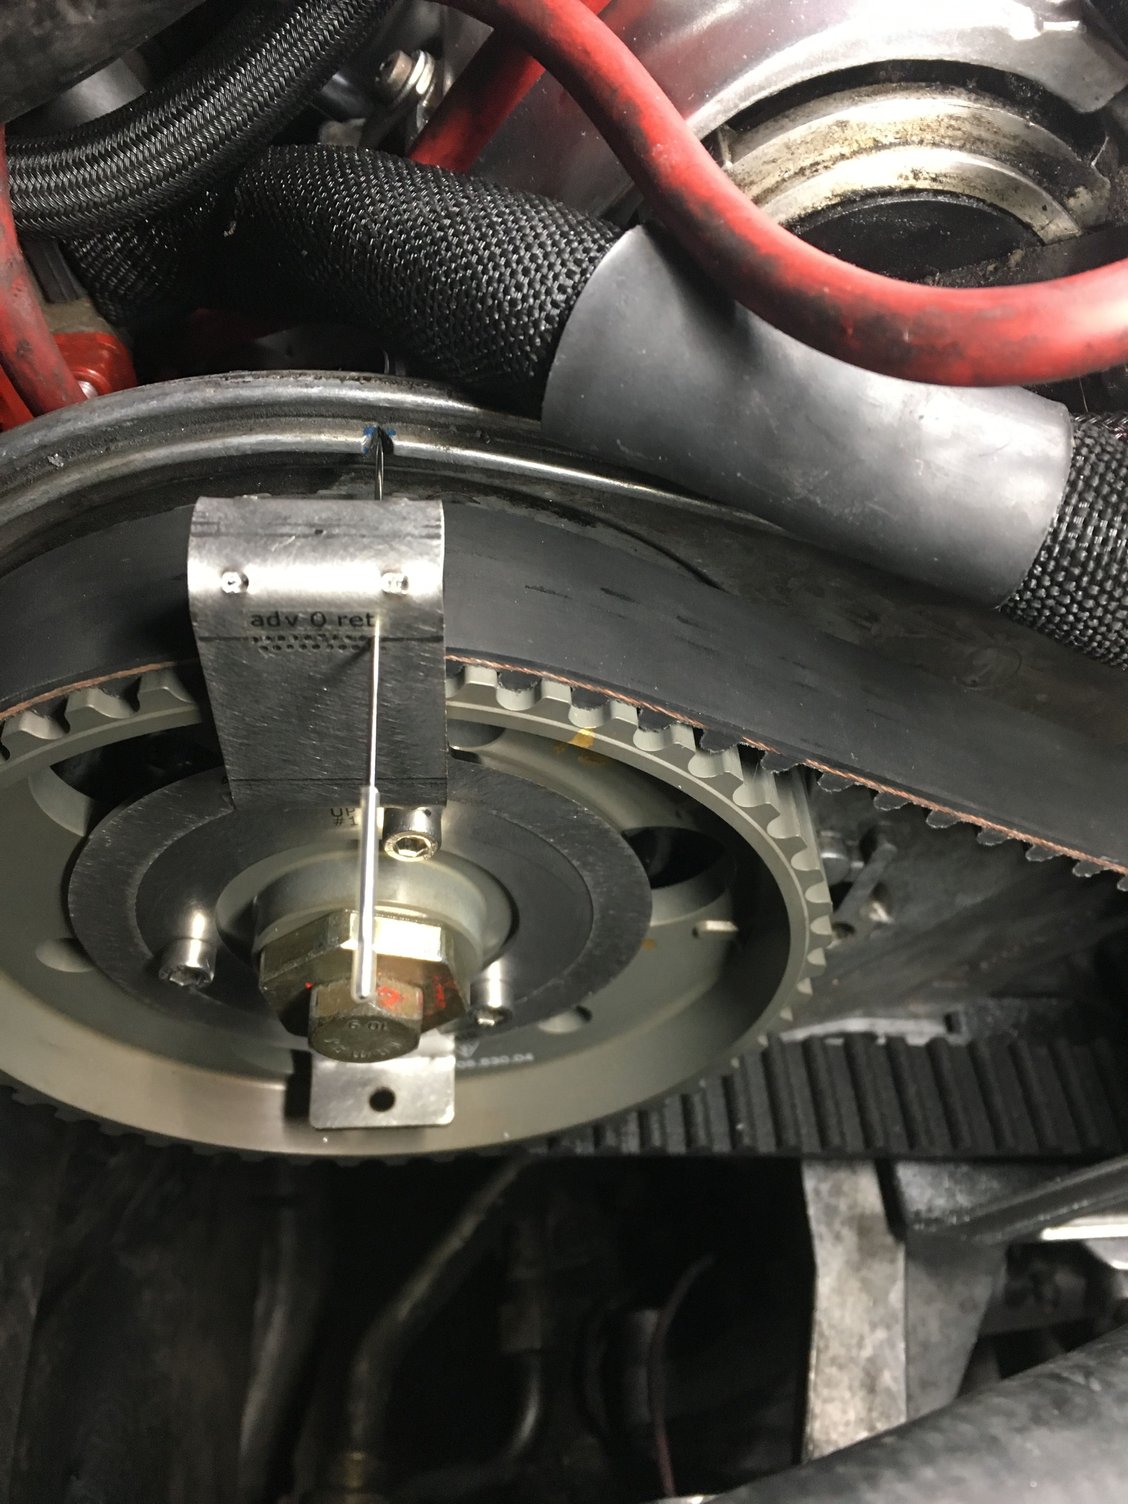
My plan was to put new belt on, re-tension at TDC, then use 32vr and bump stick to set timing.
As I was putting on new belt, the drivers side cam fell over another 3-4 teeth.
It also felt like the gear face tried to come loose and shift under the washer, which made me pucker a little.
So at his point, with the belt still off, I took the cam around clockwise by itself to 45 BTDC again.
I took the cam gear back off to check my placement of the notch on the cam arm to the gap on the gear itself.
It was problematic to torque counter holding washer and not letting gear move in relation to it's position on the cam notch.
So, at his point all marks match 45 BTDC as before, gears are on and torqued, and belt is back on.
I guess my real question is, it shouldn't matter that I had to take the drivers cam around several times by itself to do it right?
Last edited by Crumpler; 02-04-2018 at 01:13 PM.
Reason: pics
With the crank at 45 BTDC you can turn the cams around as many times as you want independently. Not sure I understand what your issue was. For sure the cam can jump position due to spring pressure. If it jumps you can simply move the cam back to where it should be [in either direction]. What you should not do is move the entire train backwards with the belt strung. Cam timing can be done at either the 45 BTDC position or at TDC. Belt tension has to be done with No1 at TDC. For the final cam timing check spin the engine using the starter motor for a couple of revolutions then check timing.
Did you clean the threads on the cams and cam bolts? Backside of the hex washer clean?
You are supposed to use the three ‘helper’ bolts (through the gear to the ‘rotor spider’ keyed to the cam) to help keep the gear in position while you torque to spec. You have one ‘helper bolt’ in your picture. Hopefully that was a temporary situation?
It was problematic to torque counter holding washer and not letting gear move in relation to it's position on the cam notch.
Dave,
When I do this, once the belt is back in position I crank the belt tension up to the slack end of the window in the Kempf tool whilst at 45 BTDC and do the initial cam timing there and then with the 32VR tool. Once I have the timing where I want it, I lock the cam bolt using the bumpstick tool and then remove the crank lock tool and rotate the engine forwards to TDC No1 turning the motor by hand at least two crank revolutions. At that point I check and if necessary adjust the belt tension, bump the motor with the starter motor and then check the cam timing again. If it is slightly out I then do it again, bump the motor and test until it is where I want it to be. The bumpstick tool ensures the cam timing cannot change whilst torquing the cam bolt.
In your case, even if the cam timing had slipped as you attempted to tighten cam bolt initially to move the engine forwards, it is of no consequence as the timing can only slip by about 10 crank degrees either way and that is not going to cause any valves to clout the pistons.
With the crank at 45 BTDC you can turn the cams around as many times as you want independently. Not sure I understand what your issue was. For sure the cam can jump position due to spring pressure. If it jumps you can simply move the cam back to where it should be [in either direction]. What you should not do is move the entire train backwards with the belt strung. Cam timing can be done at either the 45 BTDC position or at TDC. Belt tension has to be done with No1 at TDC. For the final cam timing check spin the engine using the starter motor for a couple of revolutions then check timing.
Thank you Fred, and thanks for the quick response and affirmation that I was not going to anything insane.
I will use your above mentioned timing technique as well.
Cheers.
Originally Posted by worf928
Did you clean the threads on the cams and cam bolts? Backside of the hex washer clean?
You are supposed to use the three �helper� bolts (through the gear to the �rotor spider� keyed to the cam) to help keep the gear in position while you torque to spec. You have one �helper bolt� in your picture. Hopefully that was a temporary situation?
Man Dave, I'm still dangerous to myself sometimes! Everything was clean but I "discovered" the use of helper bolts after the initial set back
Originally Posted by NoVector
Sorry I can't help, but where did you get your gears? I'm doing this job next month with tb/wp. Thank you
These are from Roger, I had them in the vault for a year or so. While I watched the originals get slowly worse.
Set belt tension and took baseline timing readings with the 32'vr which look pretty crappy.
PS (1-4) -8 retard
DS (5-8) +8 advance
Using the socket and bumpstick, I advanced timing on PS (1-4) from -8 to -2.
My intent is zero (which -2 on this side with cold engine).
On the drivers side 5-8, I need to retard the timing from 8 to zero...
My 32'vr manual says I need to do this at 20 BTDC: rotating engine crank until 32'vr arm aligned with V -- then holding cam bolt, loosen 3 ring bolts and rotate engine to TDC. Then retighten ring bolts and go from there.
BUT, and this is where I'm fuzzy, the Bumpstick manual does not specify the need to set crank at 20 BTDC to retard timing...kinda just mentions moving to desired position with bumpstick.
Meaning: can I retard timing at TDC with bumpstick? or does it have to happen at 20 BTDC because the valve springs will not allow me to do so at TDC?
The belt is probably one tooth off on both gears (one tooth is 7.5�). Remove the 32V'r rings and check the position of the distributor rotor bolt holes in the slots. You will likely find they are (nearly) max'ed out one way or the other after making those adjustments. If so, you should restring the belt with the rotor holes centered (one is offset).
The Bumpstick directions supercede the 32V'r directions used by itself. Check and adjust at T/0 #1.
Once you have the correct tooth on both gears, set the timing to zero on both sides with a new belt. Recheck again at 1000 miles or so (after the belt stretches).
Since the belt makes a straight run across the top (from DS to PS), a count of this span is useful as a rough gauge of the belt being on the correct tooth, IF you mark belt and tooth and count prior to removal of old belt and count teeth between cams. Installation of a new belt usually requires backing the PS gear 1/2 tooth to get a new one on even if it has not moved at all. The number is written on my Kempf instruction sheet which is packed away, so I can't tell you now. YMMV. I would count at the outset anyway, as a backup. As a disclaimer, you should make your own count. "rough gauge" means just that (like the mark on rear of gear), getting to the correct tooth before putting tension on and having to go back and start over. Then 32 valver.
Last edited by SteveG; 02-05-2018 at 05:18 PM.
Reason: accurate
Ok......this maybe a stupid question but why can't the belt have timing marks on it somewhere?
It could have if you would've marked them on the crank-gear and belt, and each cam-gear before pulling the belt off.
For the cam gears, I mark the belt at both 45 degrees before and 0 degree positions in red, and white markers. The crank/belt is in red too since it's at 45 degrees before.


 02-04-2018 | 12:57 PM