
My first timing belt/water pump/PK-Tensioner job. Worklog. 92 GTS.
 01-31-2018, 10:08 AM
#16
Drifting
Yes, I noticed that too; nice catch!
 01-31-2018, 12:40 PM
#17
Rennlist Member
A few simple recommendations to follow if you are going to dabble with removing cam sprockets for whatever reason.
1. The marks on the cam sprockets are approximate timing marks. If you look where the rotor arm mount screws penetrate you will see a small arc that the cam sprocket can move through for a given tooth position. This arc permits an adjustment of about plus or minus 10 crank degrees. The starting point for cam timing should be mid range but as that is going to be adjusted it is not that critical.
2. The 32VR cam timing tool is an after market piece of kit and those of us who use it highly rate it and its associated kit called the PK Bumpstick that makes cam timing adjustments very simple. The only caveat here is that there has been debate about how accurate it is model to model. The WSM method for setting up the cams involves the use of a dial gauge set. My cams were set up with the dial gauges and when I acquired the 32VR kit the valve timing was spot on according to the instructions. Personally I would not be without it and highly recommend it.
3. When working on cam sprocket removal or changing the timing belt always do this at 45 Degrees before TDC- no exceptions. With the 32VR kit you can do the cam timing in this position as it is calibrated for both TDC and 45 BTDC. There is no harm to be done changing the timing belt at TDC but do something silly in an absent minded moment and you can get into deep trouble very quickly so why bother? Lock the crank at 45 BTDC and forget any valve problems.
4. When checking timing belt tension you will need a tool to do this- many of us use the Jay Kempf tool and as I am concerned it works very well. Jut be mindful that when checking belt tension it must be done with the crank at TDC on number 1 firing stroke. If in doubt about which firing stroke cycle the crank is on always fit the rotor arms and note that when on TDC No1 cylinder the spark discharge blade of the rotor arm will point to the 3 o'clock position on both banks.
5. Cam timing is best done with a stretched belt. If it has to be done with a new belt the 32VR kit gives a recommendation as to how to compensate for this initial stretch factor. On the 32VR kit there is a difference of two degrees between the passenger side bank and the driver side bank but as I am aware this is because of the different dynamic tension in the belt given the driver side sprocket is also pulling the passenger side cams.
01-31-2018, 02:23 PM
#18
Pro
Thread Starter
A few simple recommendations to follow if you are going to dabble with removing cam sprockets for whatever reason.
1. The marks on the cam sprockets are approximate timing marks. If you look where the rotor arm mount screws penetrate you will see a small arc that the cam sprocket can move through for a given tooth position. This arc permits an adjustment of about plus or minus 10 crank degrees. The starting point for cam timing should be mid range but as that is going to be adjusted it is not that critical.
2. The 32VR cam timing tool is an after market piece of kit and those of us who use it highly rate it and its associated kit called the PK Bumpstick that makes cam timing adjustments very simple. The only caveat here is that there has been debate about how accurate it is model to model. The WSM method for setting up the cams involves the use of a dial gauge set. My cams were set up with the dial gauges and when I acquired the 32VR kit the valve timing was spot on according to the instructions. Personally I would not be without it and highly recommend it.
3. When working on cam sprocket removal or changing the timing belt always do this at 45 Degrees before TDC- no exceptions. With the 32VR kit you can do the cam timing in this position as it is calibrated for both TDC and 45 BTDC. There is no harm to be done changing the timing belt at TDC but do something silly in an absent minded moment and you can get into deep trouble very quickly so why bother? Lock the crank at 45 BTDC and forget any valve problems.
4. When checking timing belt tension you will need a tool to do this- many of us use the Jay Kempf tool and as I am concerned it works very well. Jut be mindful that when checking belt tension it must be done with the crank at TDC on number 1 firing stroke. If in doubt about which firing stroke cycle the crank is on always fit the rotor arms and note that when on TDC No1 cylinder the spark discharge blade of the rotor arm will point to the 3 o'clock position on both banks.
5. Cam timing is best done with a stretched belt. If it has to be done with a new belt the 32VR kit gives a recommendation as to how to compensate for this initial stretch factor. On the 32VR kit there is a difference of two degrees between the passenger side bank and the driver side bank but as I am aware this is because of the different dynamic tension in the belt given the driver side sprocket is also pulling the passenger side cams.
1. The marks on the cam sprockets are approximate timing marks. If you look where the rotor arm mount screws penetrate you will see a small arc that the cam sprocket can move through for a given tooth position. This arc permits an adjustment of about plus or minus 10 crank degrees. The starting point for cam timing should be mid range but as that is going to be adjusted it is not that critical.
2. The 32VR cam timing tool is an after market piece of kit and those of us who use it highly rate it and its associated kit called the PK Bumpstick that makes cam timing adjustments very simple. The only caveat here is that there has been debate about how accurate it is model to model. The WSM method for setting up the cams involves the use of a dial gauge set. My cams were set up with the dial gauges and when I acquired the 32VR kit the valve timing was spot on according to the instructions. Personally I would not be without it and highly recommend it.
3. When working on cam sprocket removal or changing the timing belt always do this at 45 Degrees before TDC- no exceptions. With the 32VR kit you can do the cam timing in this position as it is calibrated for both TDC and 45 BTDC. There is no harm to be done changing the timing belt at TDC but do something silly in an absent minded moment and you can get into deep trouble very quickly so why bother? Lock the crank at 45 BTDC and forget any valve problems.
4. When checking timing belt tension you will need a tool to do this- many of us use the Jay Kempf tool and as I am concerned it works very well. Jut be mindful that when checking belt tension it must be done with the crank at TDC on number 1 firing stroke. If in doubt about which firing stroke cycle the crank is on always fit the rotor arms and note that when on TDC No1 cylinder the spark discharge blade of the rotor arm will point to the 3 o'clock position on both banks.
5. Cam timing is best done with a stretched belt. If it has to be done with a new belt the 32VR kit gives a recommendation as to how to compensate for this initial stretch factor. On the 32VR kit there is a difference of two degrees between the passenger side bank and the driver side bank but as I am aware this is because of the different dynamic tension in the belt given the driver side sprocket is also pulling the passenger side cams.
2. In other words I need this PK kit, or a dial gauge set to replace the sprockets? There is no "easy" way just off with old on with new in same position?
3. Good to know.
4. I am switching from stock tensioner to PKT-S.
5. Since I am installing new belt and PKT-S, I guess I will have to do the cam timing with a new belt.
01-31-2018, 02:39 PM
#19
Team Owner
get the 32valver kit from Porken.
Swapping out the cam gears isnt difficult but you will find that the timing system is better when the gears are properly adjusted .
I would suggest to keep the factory tensioner .
Its easy to rebuild and works well,
NOTE you can use the money you didnt spend on a new set of bilstien shocks.
NOTE use the old belt to set the timing of the cam gears then swap in the new belt,
the new belt will stretch to the right place after its run
01-31-2018, 03:49 PM
#20
Pro
Thread Starter
get the 32valver kit from Porken.
Swapping out the cam gears isnt difficult but you will find that the timing system is better when the gears are properly adjusted .
I would suggest to keep the factory tensioner .
Its easy to rebuild and works well,
NOTE you can use the money you didnt spend on a new set of bilstien shocks.
NOTE use the old belt to set the timing of the cam gears then swap in the new belt,
the new belt will stretch to the right place after its run
Swapping out the cam gears isnt difficult but you will find that the timing system is better when the gears are properly adjusted .
I would suggest to keep the factory tensioner .
Its easy to rebuild and works well,
NOTE you can use the money you didnt spend on a new set of bilstien shocks.
NOTE use the old belt to set the timing of the cam gears then swap in the new belt,
the new belt will stretch to the right place after its run
 There are so many opinions on this tenisoner subject, but I like the idea of non static tension, and no need for retensioning, and no issues with leaky tensioners. I think I will proceed with my choice.
NOTE 2; Ok, So first replace the cam gears, then put on the old belt and set timing, then put on the new belt?
01-31-2018, 03:56 PM
#21
Team Owner
#1 personal preference thats my suggestion to use the stock tensioner
#2 That is the correct sequence for using the original tensioner system, *
* NOTE However with a new tensioner system ask Porken what his thoughts are.
#2 That is the correct sequence for using the original tensioner system, *
* NOTE However with a new tensioner system ask Porken what his thoughts are.
01-31-2018, 04:32 PM
#22
Inventor
Rennlist Member
Rennlist Member
NOTE 1; I have already bought the PKT-S. I have just fitted new Bilstein shocks so I don't need another set, lol There are so many opinions on this tenisoner subject, but I like the idea of non static tension, and no need for retensioning, and no issues with leaky tensioners. I think I will proceed with my choice.
NOTE 2; Ok, So first replace the cam gears, then put on the old belt and set timing, then put on the new belt?
There are so many opinions on this tenisoner subject, but I like the idea of non static tension, and no need for retensioning, and no issues with leaky tensioners. I think I will proceed with my choice.NOTE 2; Ok, So first replace the cam gears, then put on the old belt and set timing, then put on the new belt?

2: Using the old belt will be fine IF you are replacing it with a new one of the exact same brand/type.
PK32V'r manual tips:
- If using a new belt, set the timing to zero on both sides. Recheck at 1500+KM for 1-4:-2�, 5-8:0�. (As the belt 'seasons' the 1:4 retards to about -2�.)
- Spin the engine with the starter to settle the belt and then rotate the engine by hand to T/0 #1. (Rotating the engine by hand only will produce inconsistent results using a dial indicator or a 32V'r, factory or PKT.) Do this again after any adjustments.
01-31-2018, 04:52 PM
#23
Team Owner
Thanks Ken for adding in your info, straight from the the designer
01-31-2018, 04:52 PM
#24
Pro
Thread Starter
Second attept; I have now turned the engine to correct 45 BTDC and marked the gears and old belt over again. Still waiting for flywheel lock tool.
Also attached photos of the gear wear. PS just through coating some places, DS well throug coating.
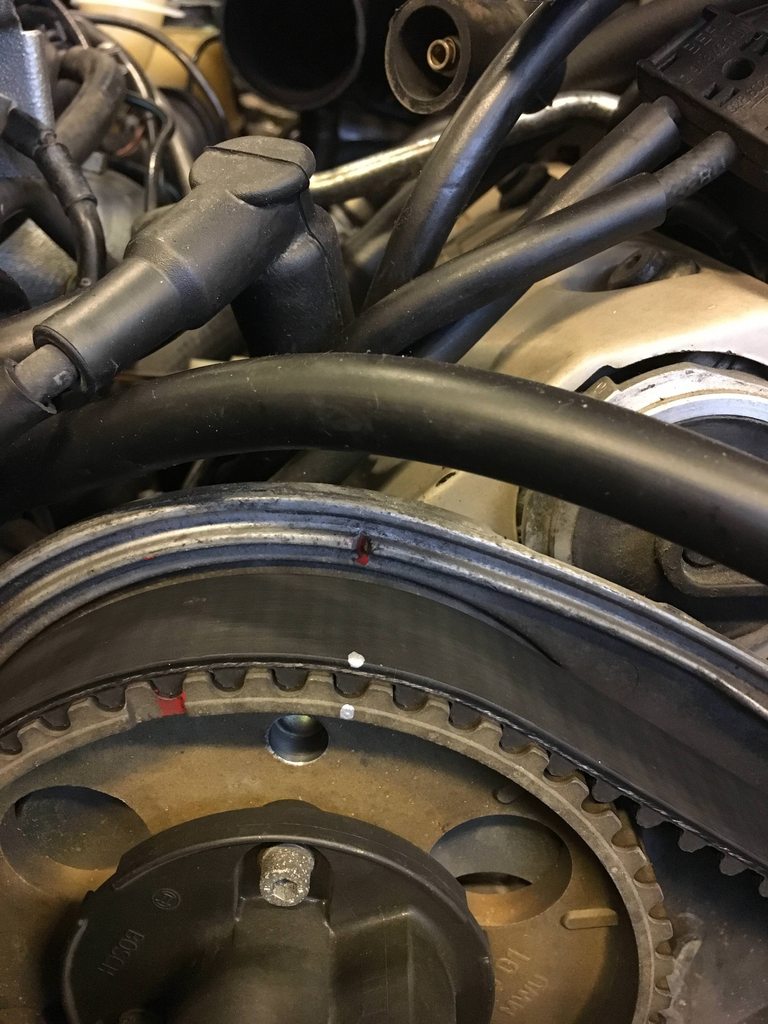
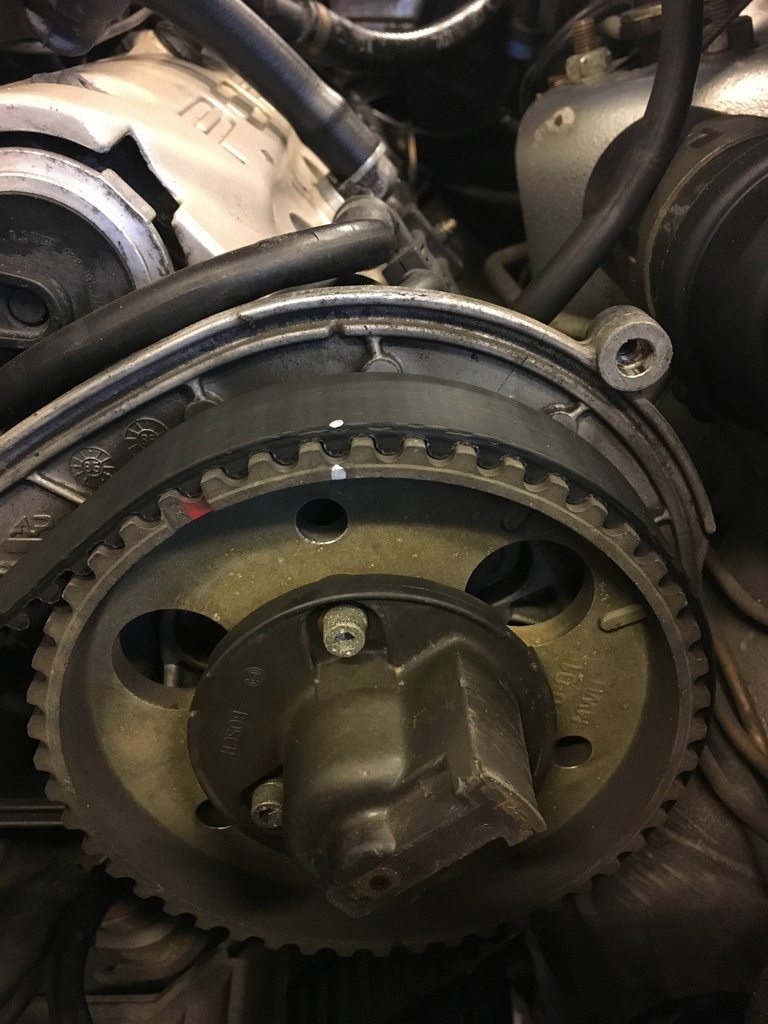
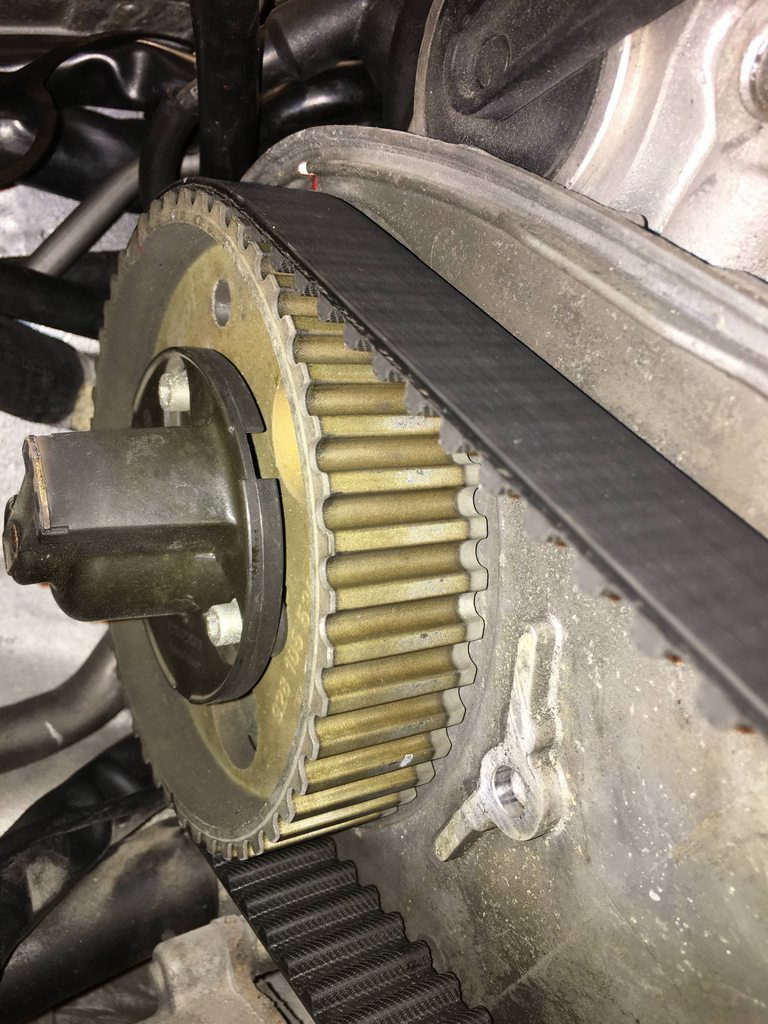
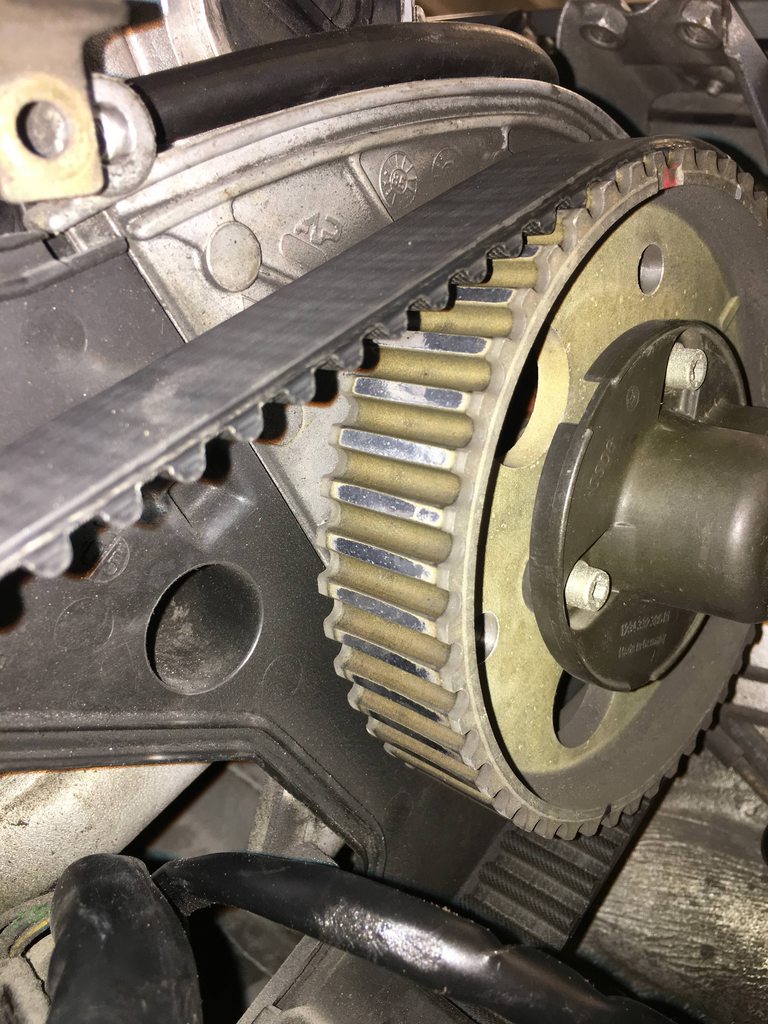
Also attached photos of the gear wear. PS just through coating some places, DS well throug coating.
Last edited by paalw; 01-31-2018 at 05:13 PM.
02-01-2018, 01:46 AM
#25
Rennlist Member
Passenger side I�m sure will be just fine. Other side though should probably be replaced. You have such a beautiful car that is definitely worth a considerable amount of money - would be worth every penny to replace this gear. Just my $0.02c
02-01-2018, 02:25 PM
#26
Pro
Thread Starter
PK32V'r manual tips:
- If using a new belt, set the timing to zero on both sides. Recheck at 1500+KM for 1-4:-2�, 5-8:0�. (As the belt 'seasons' the 1:4 retards to about -2�.)
- Spin the engine with the starter to settle the belt and then rotate the engine by hand to T/0 #1. (Rotating the engine by hand only will produce inconsistent results using a dial indicator or a 32V'r, factory or PKT.) Do this again after any adjustments.
I got the flywheel lock today so I will be able to do some progress.
02-01-2018, 02:42 PM
#27
Inventor
Rennlist Member
Rennlist Member
You could install the gears with the rotor holes centered in the gear slots (two of them, the third is offset), then check/reset the timing later.
The timing will not be perfect but you probably won't notice it while driving.
The timing will not be perfect but you probably won't notice it while driving.
02-01-2018, 03:09 PM
#28
Pro
Thread Starter
Aha okay. That's a relief, then I might continue all the way already I am having a bit of a hard time picturing how these things work as I have never removed this stuff before, it will be interesting to learn. I guess when I see things with my own eyes and in front of me, it will be more obvious. Thanks again.
I am having a bit of a hard time picturing how these things work as I have never removed this stuff before, it will be interesting to learn. I guess when I see things with my own eyes and in front of me, it will be more obvious. Thanks again.
02-01-2018, 03:15 PM
#29
Pro
Thread Starter
Thank you. I have two new ones so I'm replacing both. I read something about recoating the old ones if they are not too bad. Mine could be candidates for that I guess. If I can find someone to do it.
02-02-2018, 02:47 AM
#30
Chronic Tool Dropper
Lifetime Rennlist
Member
Lifetime Rennlist
Member

Take the rotors off so you can see the ends of the cams in the drive hubs. Take Pictures before you remove the gears. The handy paint marks you make on the old gears will be on the bench with the old gears as you reassemble, not so much help. Pictures are better.
With the gears off, there's a case for replacing the Hall sensor behind the passenger-side gear if it hasn't been replaced prior. The caking plate behind the gear is easy to remove with the sensor, much easier to do this on the work table than with the sensor wedged in at the front of the cam cover. The connector support is at the lift eye, easy to R&R while the wiring harness clamp is out of the way.
Have fun! You've chosen two of the major "right of passage" projects to share with us. Darned if I can remember the secret handshake and fist-pump that one learns on initiation to the Brotherhood. Hint -- don't get talked into the roasted Garlic Wharf Rat appetizer at the initiation dinner. Way too much garlic!