When you click on links to various merchants on this site and make a purchase, this can result in this site earning a commission. Affiliate programs and affiliations include, but are not limited to, the eBay Partner Network.
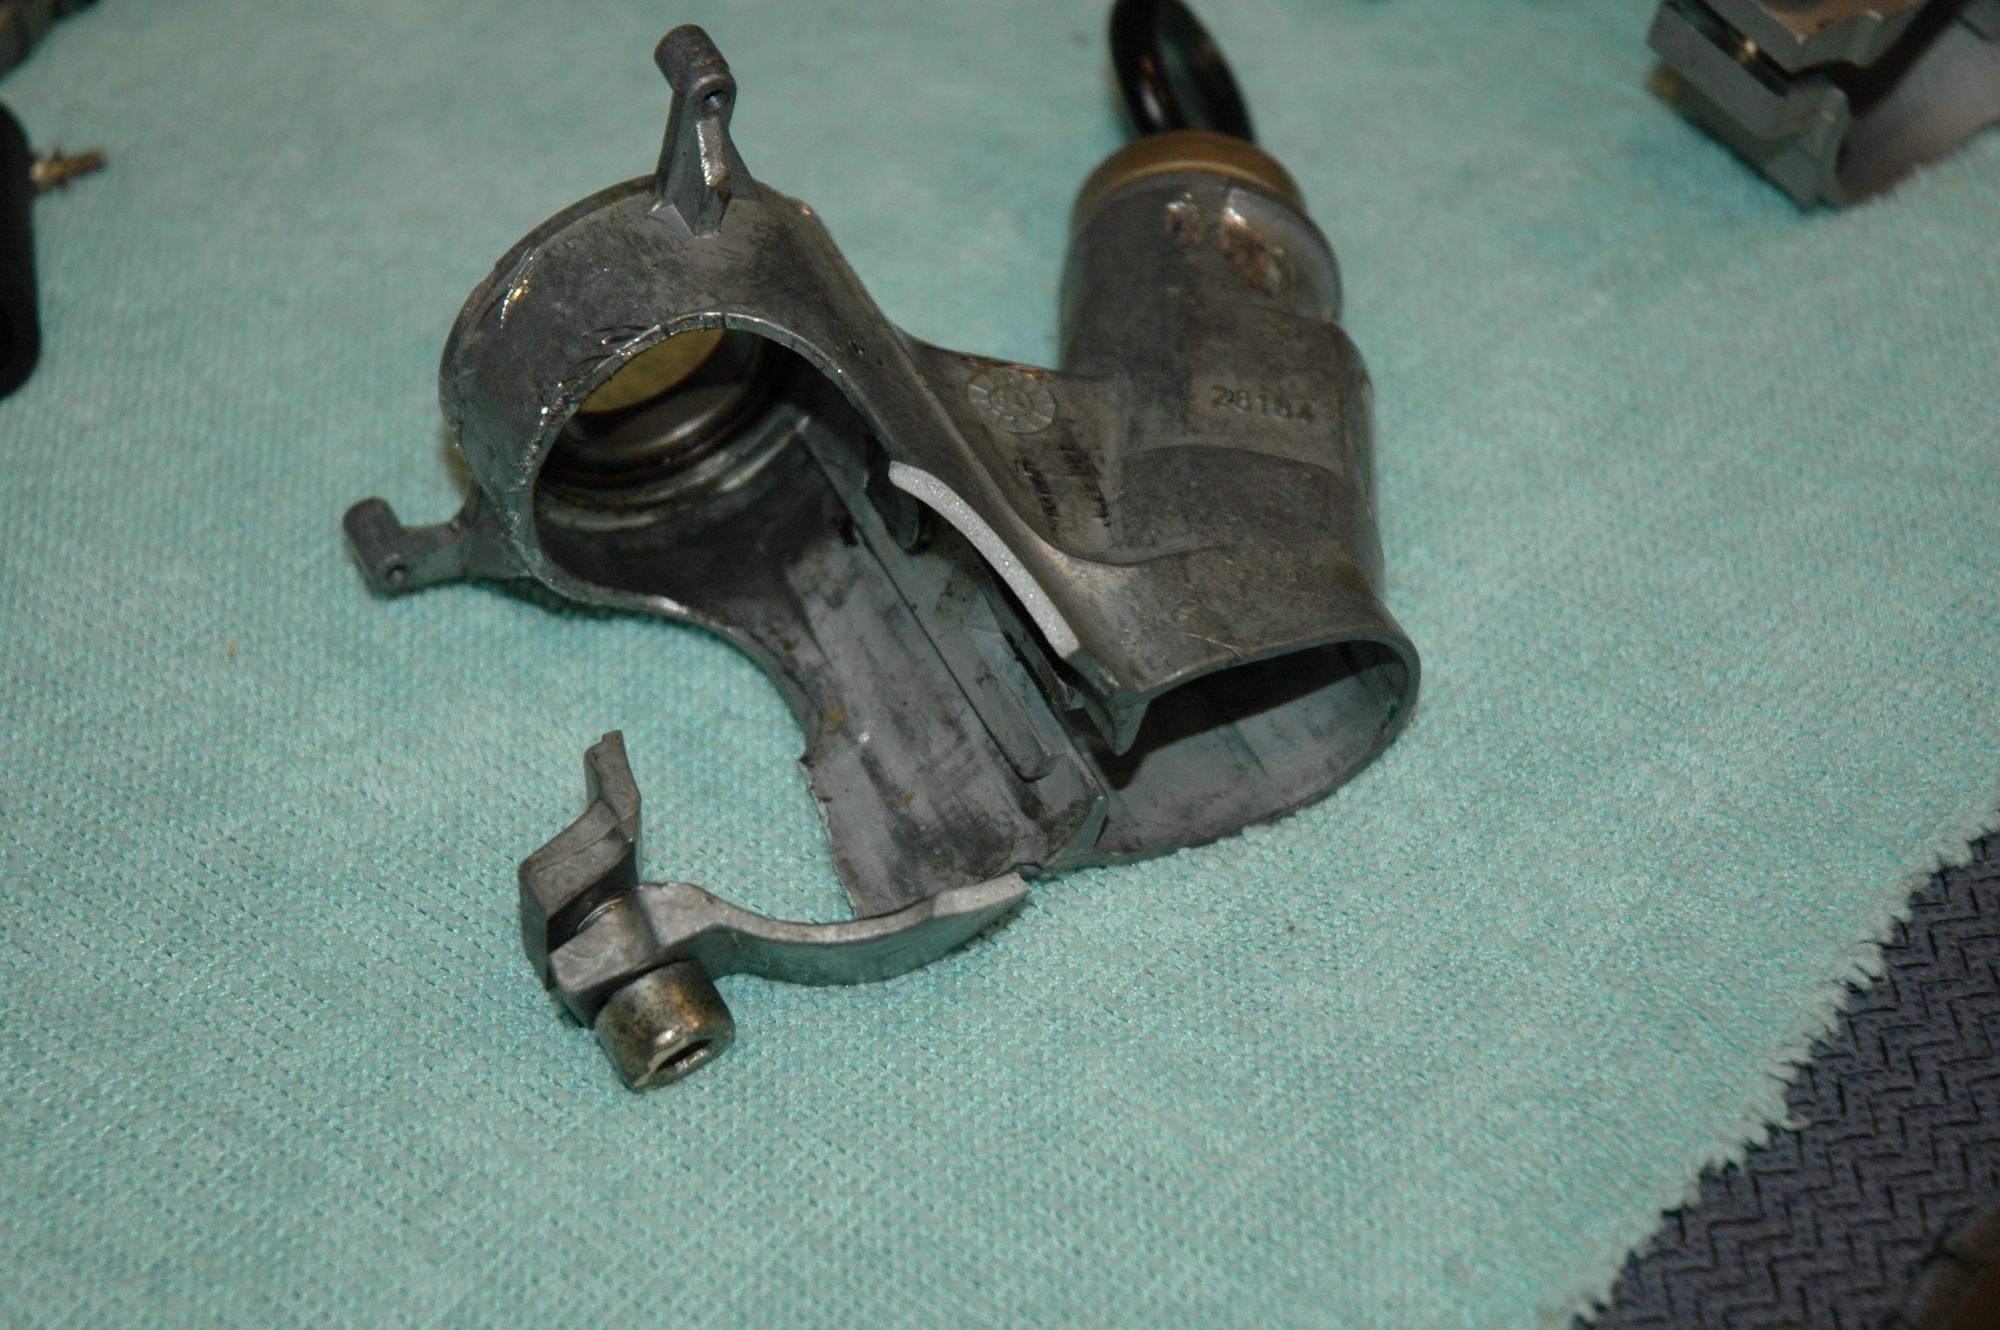
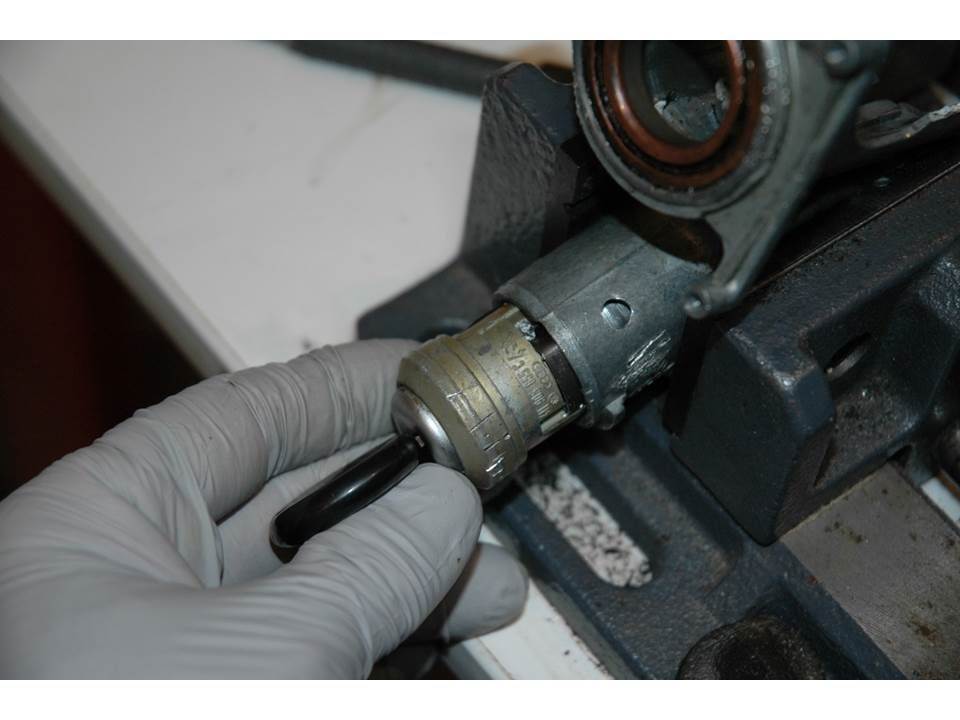
Things have been running smoothly with the Flamingo for a while. That is until my ignition switch decided to sizzle a bit while trying to start her about 6 miles from home. An easy fix, right? Typically, it's a 15 minute job but she decided to fight me on this one. The lock assembly was stuck on the steering column shaft and, while trying to pry it out, this happened (the threaded hole for the securing nut was already broken off but held the assembly in place just fine up to now):
Since I didn't want to have two different keys, I figured that I would swap out the key tumbler into the new lock assembly. Unfortunately, all my research came up empty... Until, that is, I had a conversation with Steve at 944Online. He was kind enough to give me some insight (and the parts) so here goes:
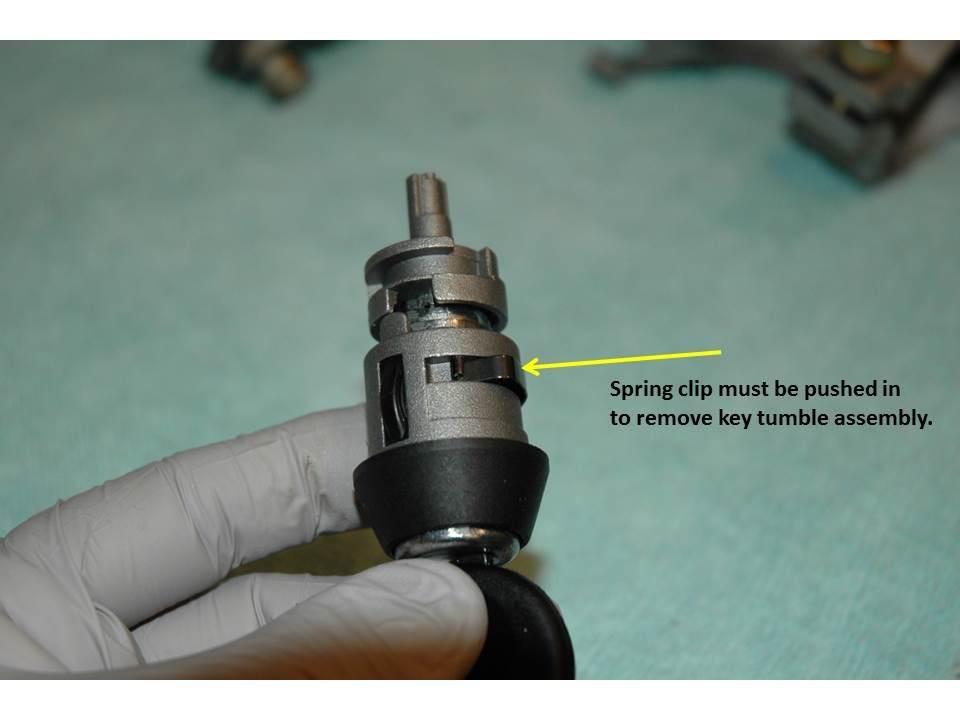
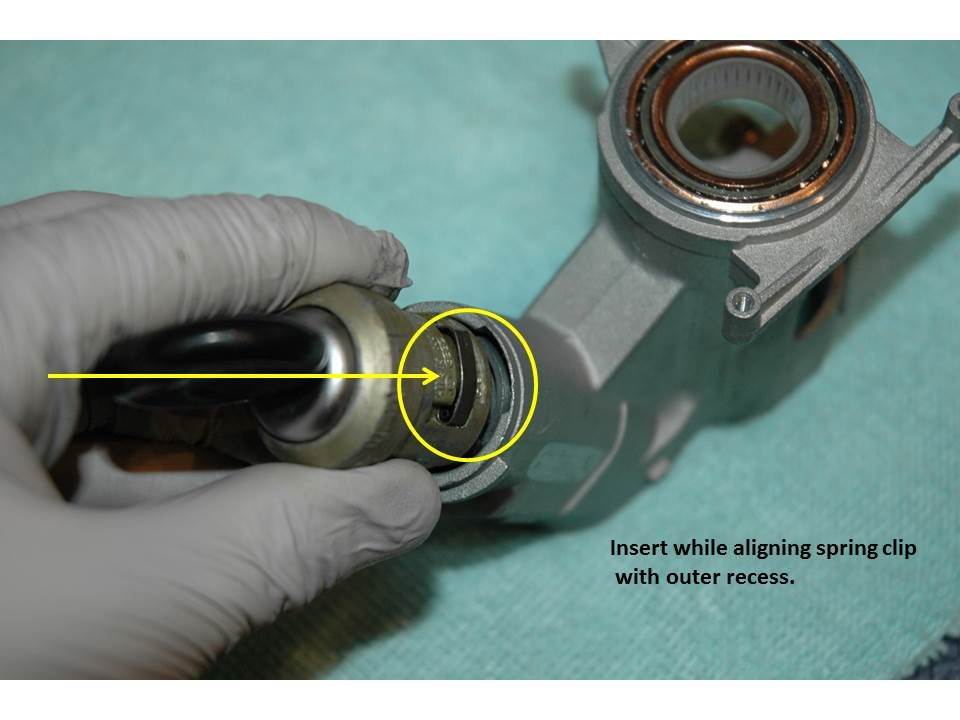
There is a spring clip that rests in the housing recess, which needs to be pushed in in order to remove the tumbler assembly.
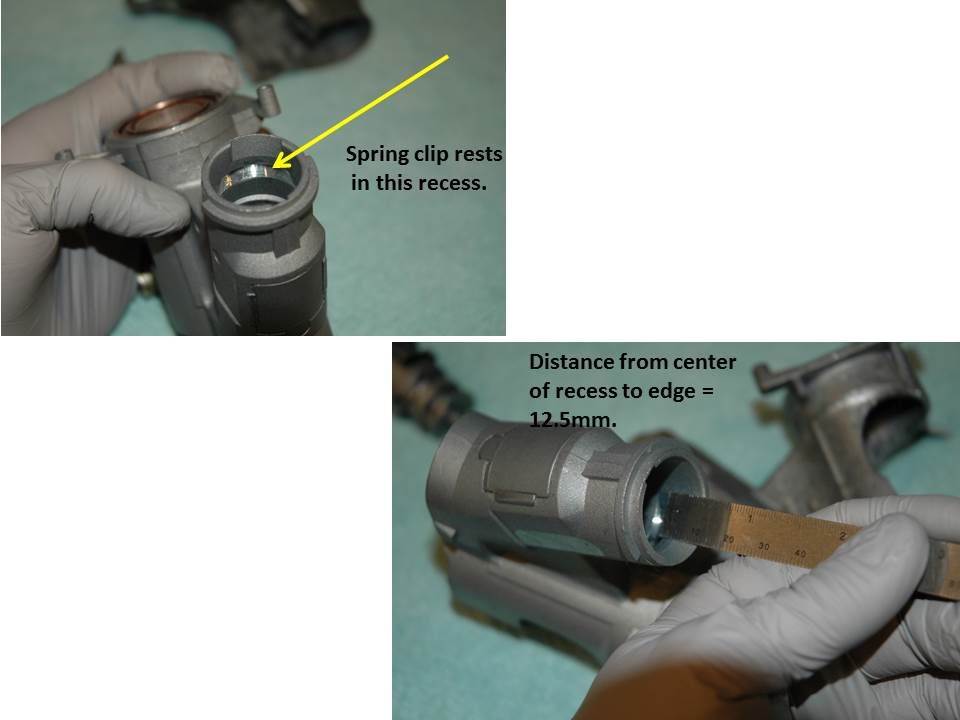
I measured a distance of 12.5mm between the center to outer edge...
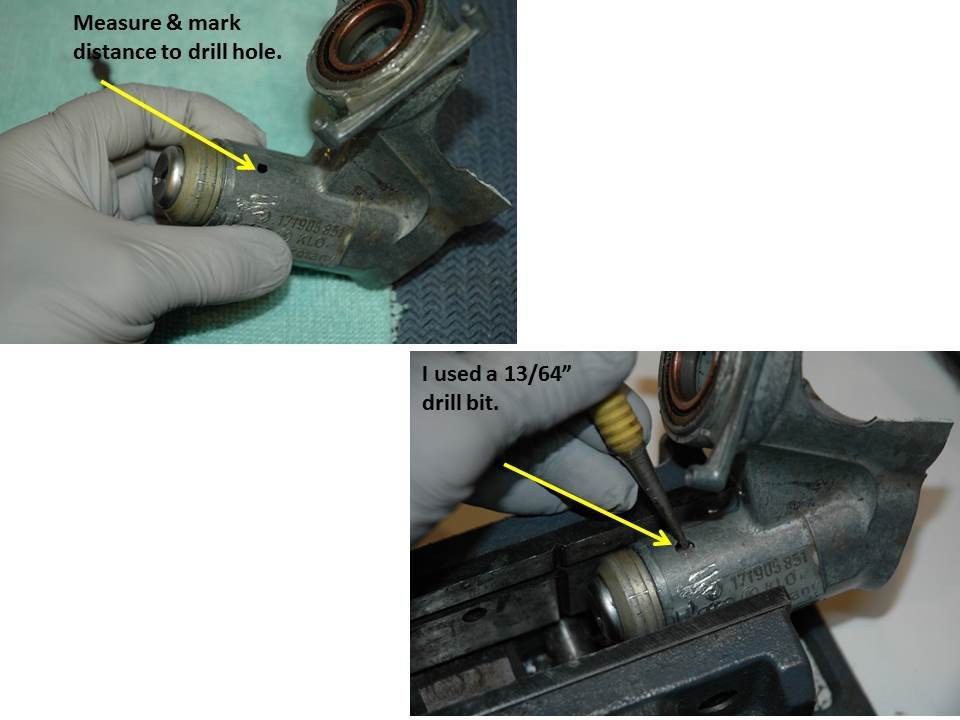
Mark the spot as shown and carefully drill through the outer metal housing. Then use a center punch (or other appropriate tool) to press in the spring clip.
Please note: I recommend securing the lock assembly in a vice as the key must be turned back and forth (depending on the tumbler position in the assembly) while pushing in the spring clip, as well as pulling the tumbler out. I think the key should be in the "Run" position initially, then turned to "Off" when pulled out a bit. I used a pair a Channel locking pliers initially, then twisted a large flathead screwdriver between the tumbler lip and lock housing to pull it out.
Once removed, align the original key tumbler spring clip to the new housing's out recess, as shown. You may have to twist the tumbler back and forth a bit in order to fully seat it into the housing.
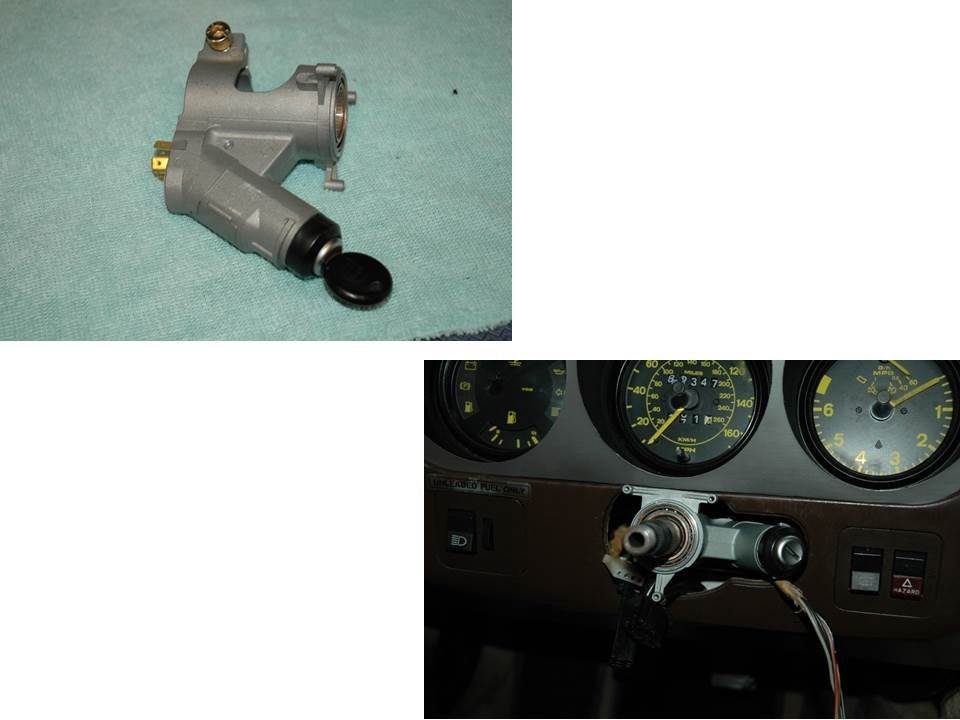
Re-assembled and installed... Hope this is of some use to the group. Until next time.
I wish to share my next chapter in the 944 experience.
Is it an early car? Yes!
Is it red? Well, yes (pinkish-red, for now).
So why another one? Well, truth be told, a good friend of mine reached out me me a few weeks ago and offered his car for sale. I accepted and a deal was made within moments. Some of you may have seen the YouTube Channel "SpencerDog944"; a series of videos published over the past 6-7 years that profiled various in-depth repair tutorials pertaining to our beloved early models. David and I met online (by chance) years ago as we were both restoring our respective steel fuel tanks and have become good friends thanks to the 944 Community. I've actually had the opportunity to drive his 84 while down in Florida a couple years ago.
David has performed many repairs during his ownership and I feel honored to have him pass the baton to me as caretaker. Many people in our community perhaps don't share the same enthusiasm as I do when it comes to the early cars, but I've really come to appreciate the thoughtful engineering Porsche poured into them. While not fast or powerful, they are simple in design (compared to later cars with ABS/air bags, etc.) and most anyone with some mechanical ability can maintain these cars to a respectable standard. I will admit that I enjoy working on them as much (maybe a bit more) than being behind the wheel.
As with my last build thread "Ok, This is a Disease", highlighting a safari build & restoration, I would to take you all along for another ride into the wonderful world of 944 restoration. The intent of this exercise will be to simply bring the car to a point of mechanical reliability, such that anyone could drive her across the country without (too much) concern. The format will most-likely remain the same, in that I will attempt to photo-document each step will providing descriptive captions. I think this method keeps the reader engaged, without too much droning on (I hope I haven't started yet). My intended goal will be to have her ready for the 944 Helen, GA Meet in June. It's a 2,600 mile journey that I taken the past two years and hope to continue to participate in the future.
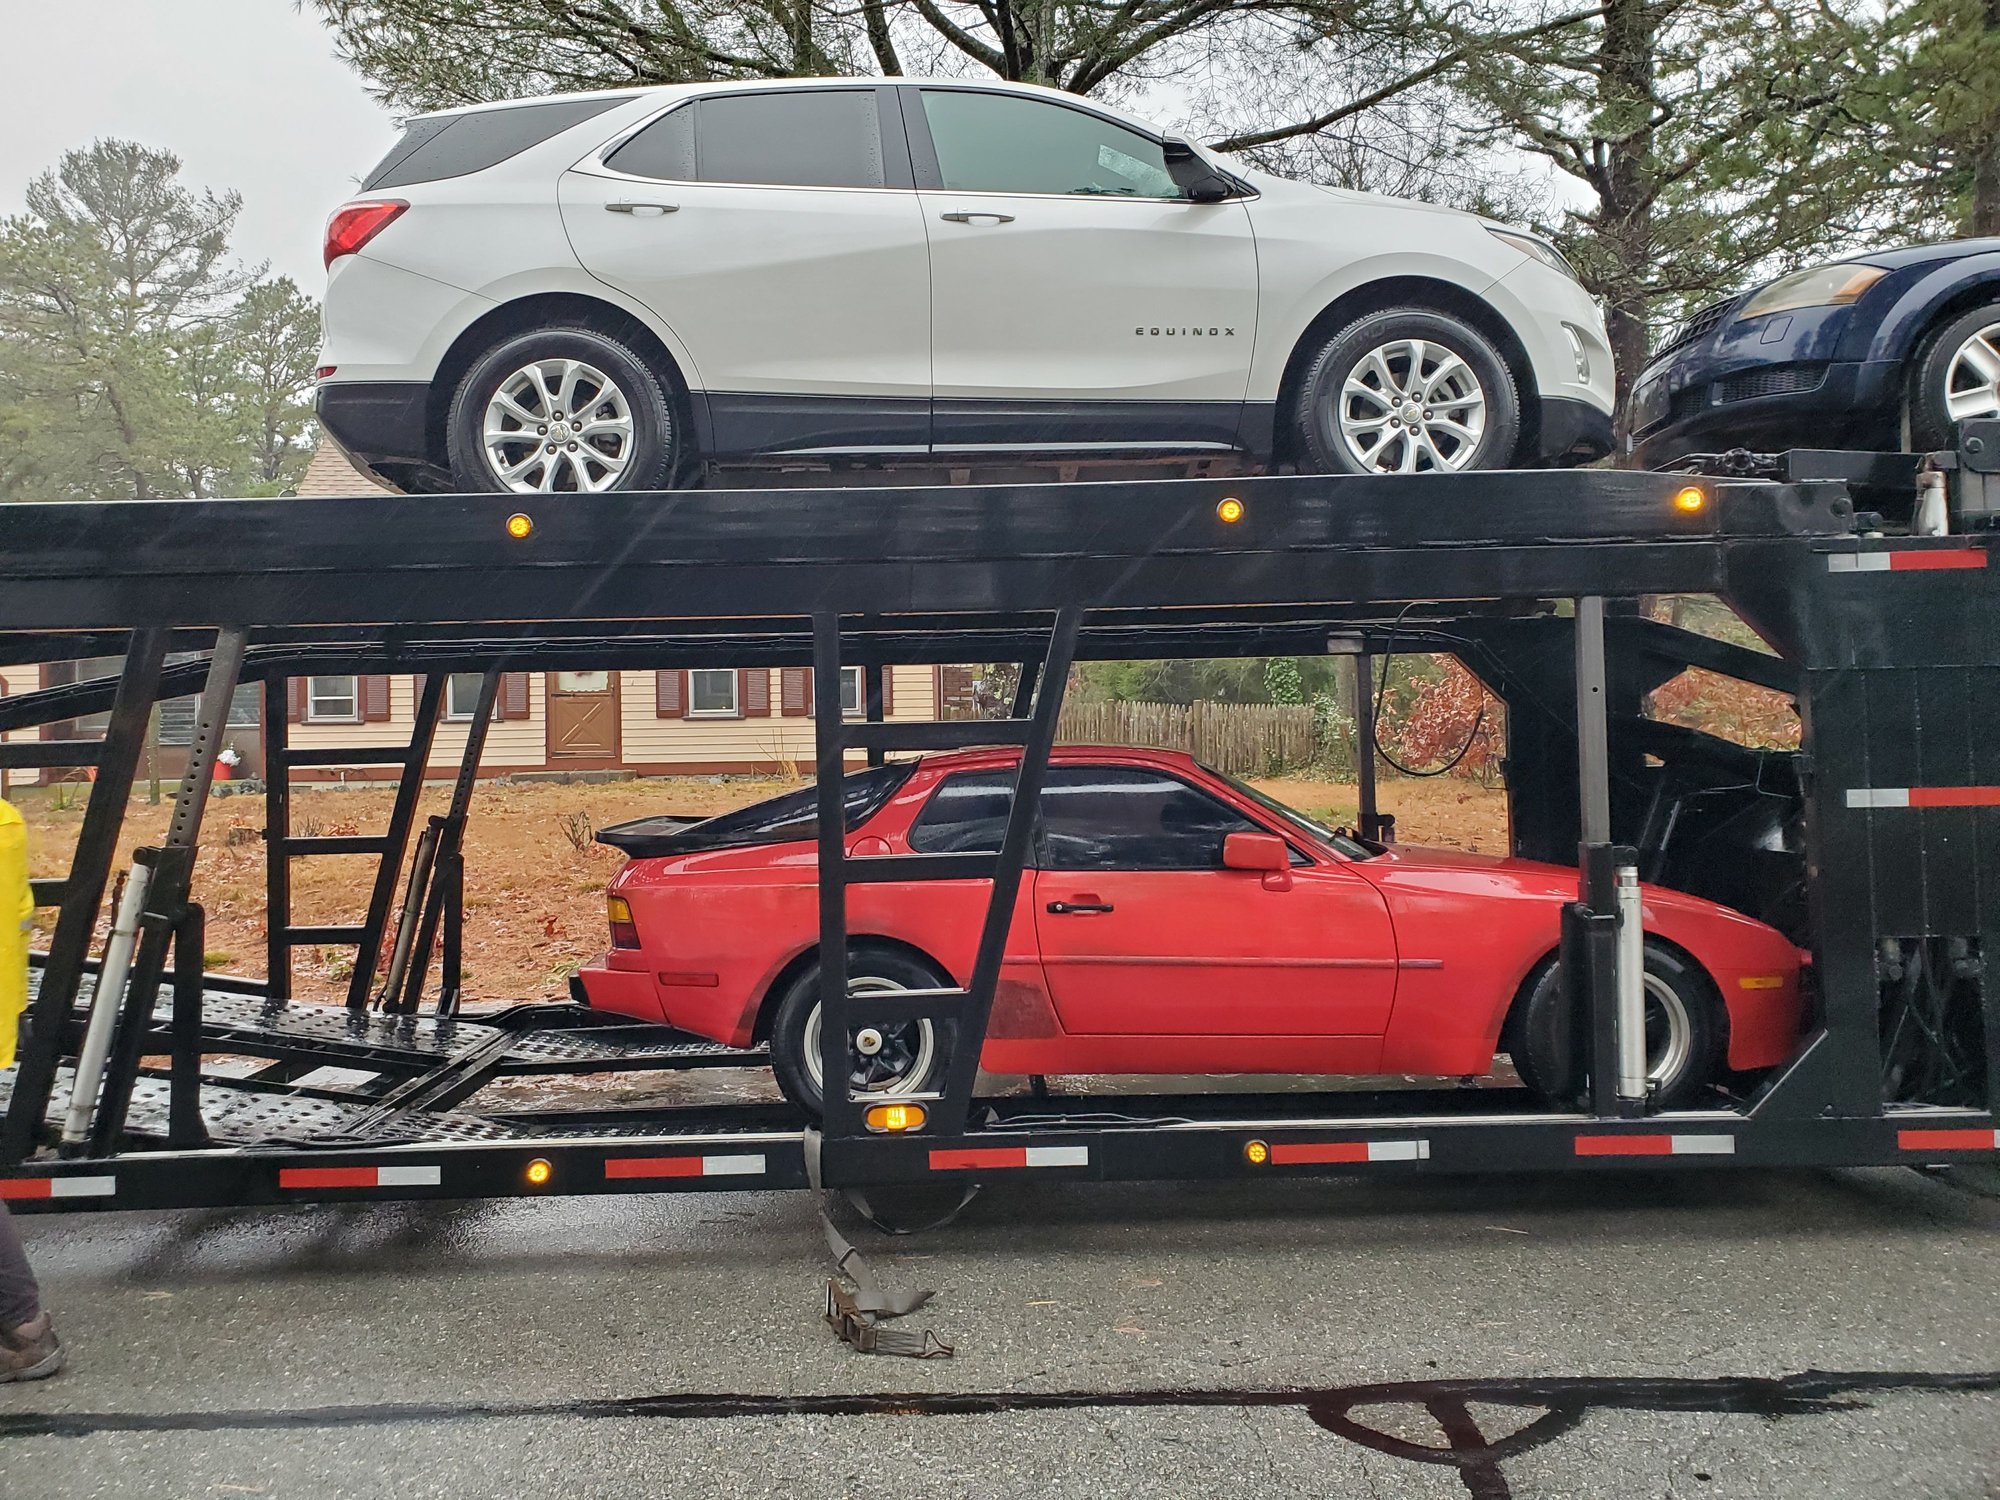
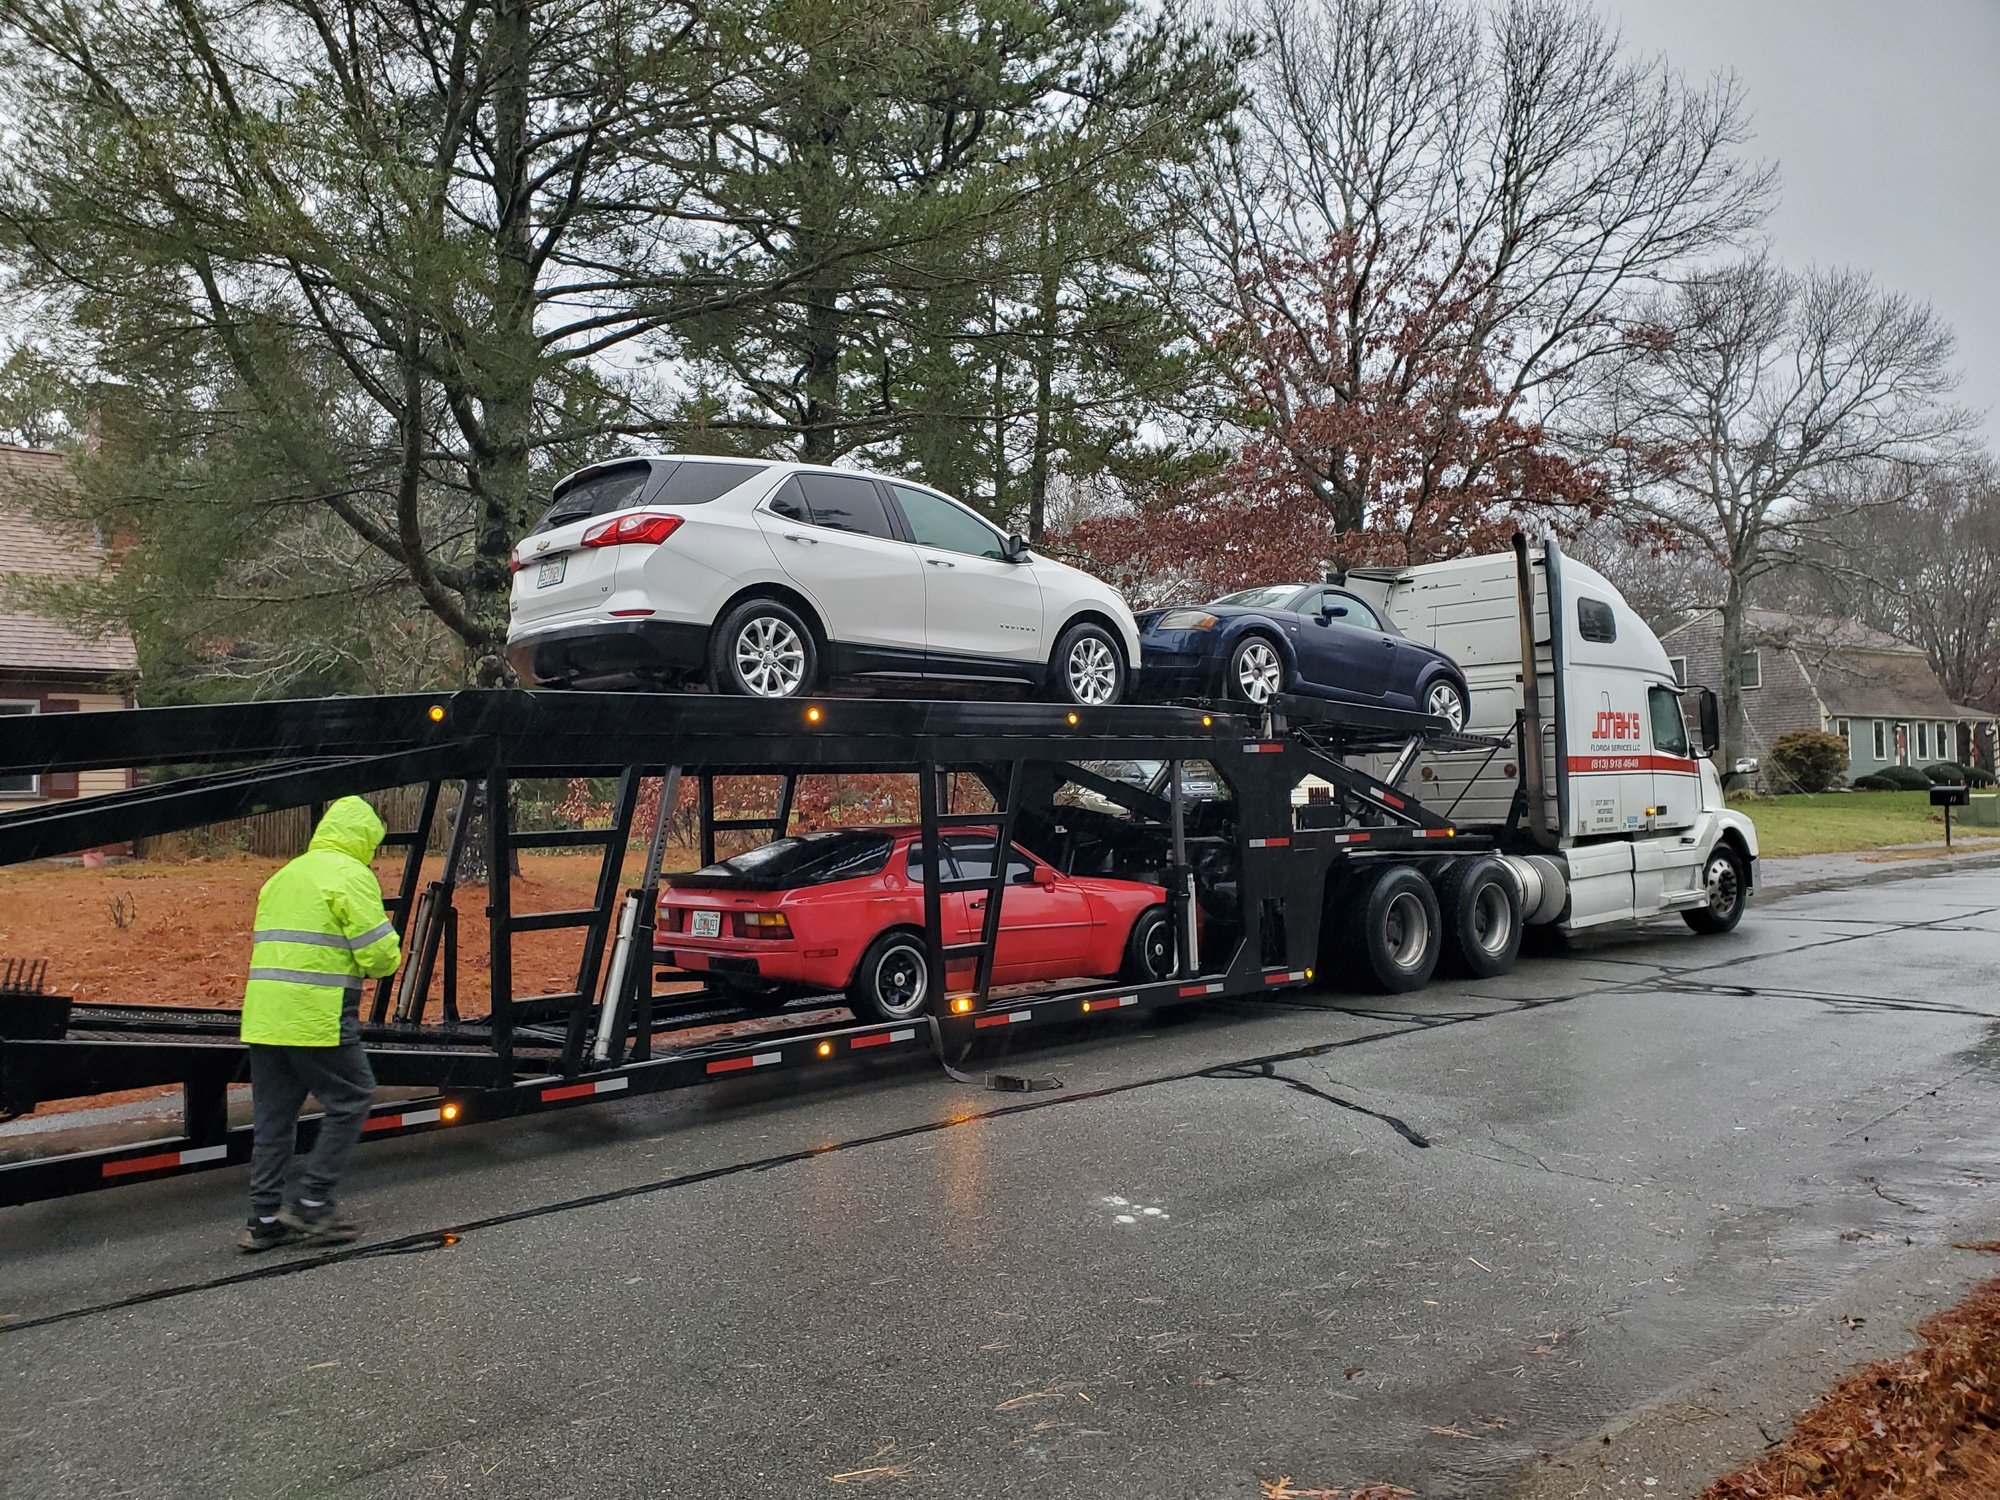
Anyway, here she is arriving by truck to my home this afternoon:
The weather didn't cooperate at all - we had gale weather conditions all day so I only had a small window to take these two pictures. Many more to come...
Unfortunately, something happened to the starter motor so we had to push her off the truck and up my driveway. There's my 1st unexpected project already!
My god man! Now I have a complete roadmap to bring my 84 back to proper life, so I will be following your progress closely. My car is a maroon colour with brown/beige interior like your new one. I have been dicking around with mine for many years. Had it on the road a few years ago, but then started doing some body work. Haven't done much in that regard though, but now I want to get it on the road again. I emptied the gas tank and realized how dismal the interior of the tank is and found Spencerdog's video. I had replaced the screen and fuel filter a few years ago, but the tank definitely needs to be addressed. I have a feeling that the job to remove the tank will lead to a bunch of big jobs while I am in there.
I got the engine running again yesterday and have been trying to address some power steering leaks. While running it today I noticed that the driver's side cooling fan doesn't run in slow speed so I am following Clark's troubleshooting, but needed your old photo to find the fan resistor behind the tachometer..
I have never taken apart the instrument cluster, but today was the day. Unfortunately, instead of unplugging the hi beam/wiper stalk I dismantled the switch and need help to get it back together. A little plastic wishbone and spring need a home yet. But now I have a few jobs while I am in there, to upgrade the dash lights and fix the odometer.
I have so many questions that I feel that your posts will answer, so I am looking forward to continuing this journey following in your footsteps.I have tried to address many other things under the hood, but the exhaust fumes are still not that pleasant, but that will be another thing to sort out. Good thing that I am retired so I have lots of time to play with Project 560. $560 is how much it cost me in 2015 (yikes that's a long time ago!). Thanks for listening!
When tinkering around with the turn signal switch, be especially watchful of the plastic pellet that is spring loaded. This pellet will leap out into the ether and never be seen again. This pellet keeps the stalk in its desired location when you want to turn. Once you find it and reassemble the switch assembly, tape it all together until you re install it. HTH😀
 11-18-2023, 05:53 PM