When you click on links to various merchants on this site and make a purchase, this can result in this site earning a commission. Affiliate programs and affiliations include, but are not limited to, the eBay Partner Network.
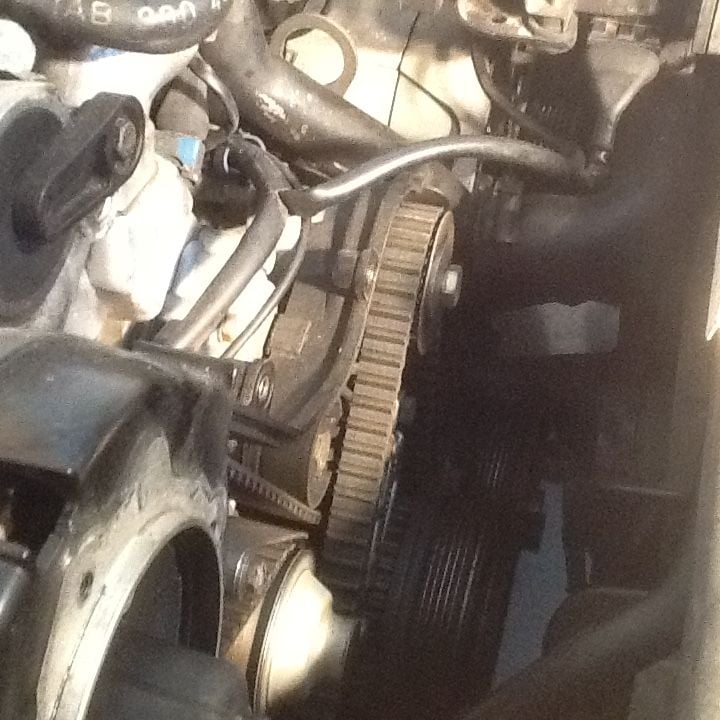
I've got the cover off my timing and balance shaft belts and looking at them, they seem almost new. I don't have records for the car and I've never met the owner, he's in Sarasota Florida, or at least was three years ago.
Comparing the installed belts to me new ones, the new ones have a bit of a shine on them. That's about the only difference.
I'm wondering if these need to be replaced? Opinions?
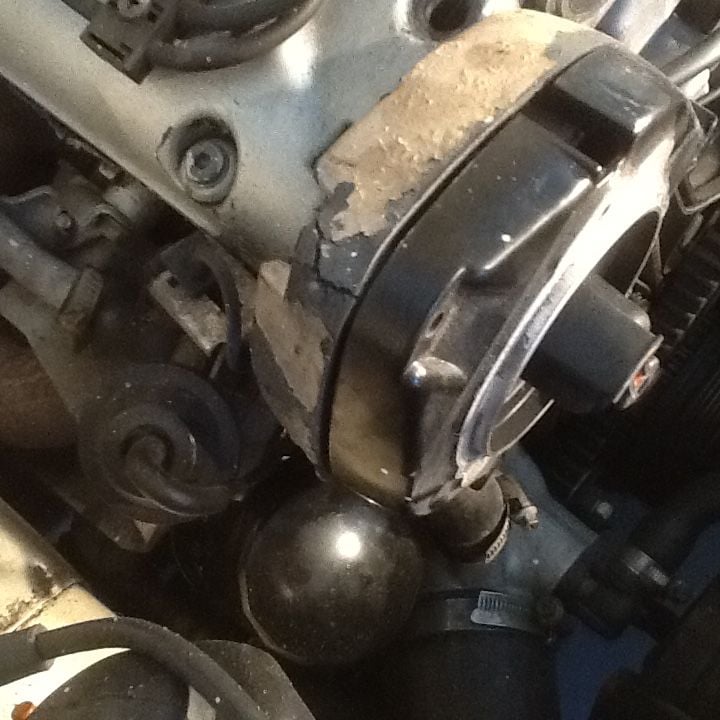
One thing that does bother me, in the last picture you can see a crack in the rear cover the distributor mounts to. Does this look like something that needs immediate attention?
Thanks,
Last edited by Otto Mechanic; 03-23-2018 at 07:45 PM.
Reason: Clarified project
if you don't know when they were last done, or know that it was at least 3 years ago, it's time to do them.
with your skills and equipment available it's a 2-3 hour job.
Thanks Thomas & Spencer. Now my problem is finding instructions for the S2. Clarks doesn't match what I'm seeing, he talks about removing the alternator and P/S sprockets, neither seem involved in the S2 belts.
I'm trying an advanced google search on this site to see if there's something about the S2 here somewhere.
- jack up car and put on stands/blocks (or lift)
- disconnect battery cable
- set engine to TDC
- remove starter and install flywheel lock
- OPTIONAL remove radiator fans, not necessary but gives you a ton more working room for hands/tools
- remove PS belt, remove alternator belt. (2x 13mm wrenches + 2x 17mm wrenches required to break loose each tensioner rod)
- break loose crankshaft bolt (24mm head, it is torqued to 155 lbfts so get a big breaker bar and a cheater pipe, be prepared to curse, and **** yourself when you hear the bolt break loose *CRACK*)
--- take a beer break
- remove crank bolt and PS drive pulley from crankshaft
- remove accessory drive pulley from crankshaft (4 or 8 M6 screws, either cap screws or "allen head")
- remove upper-outer timing cover (7 bolts with 10mm head)
- remove lower-outer timing cover (4 bolts with 10mm head)
- remove plug wires from distributor cap
- remove distributor cap (3 screws, 10mm head)
- remove "front cam gear cover" ((3 screws, 10mm head, one is on top visible, bottom two were hidden by upper-outer timing cover)
--- beer break
- buy/make skinny (jaws about 3/16" wide or so) 27mm wrench to counter-hold various rollers while you break loose the 17mm nuts/bolts holding them to the engine (all torqued to 33lbft so get a decent breaker bar)
- remove balance belt idler (grey, eccentric hole, near water pump)
- remove balance belt tensioner (black, bottom left-most toothed roller)
- remove balance belt
- remove balance belt drive gear from crank
--- half a beer break
- remove timing belt idler (black with orange center, attached to water pump)
- remove timing belt guard (chrome shiny plate held onto water pump by 2x 10mm nuts)
- loosen 13mm nut and 13mm head bolt on timing belt tensioner arm
- engage holes in timing belt tensioner "arm" with balance shaft pin-spanner tool, apply pressure counterclockwise as much as you can to remove tension from belt
- with your other hand, tighten down the 13mm nut and bolt on the tensioner again to lock it in "loose position"
- remove small auxiliary timing belt roller from bottom of timing belt tensioner arm assembly (grey roller with 1x 17mm bolt)
- remove timing belt from cam gear and feed it backwards around water pump and crank pulley so it hangs down
- remove timing belt tensioner arm assembly from engine (3x 13mm nuts, kind of hard to see)
--- finish your beer
- swap toothed rollers on tensioner arm (17mm wrench and 17mm socket on the other side helps, torque bolt/nut to 33lbft)
- slide tensioner arm back onto its studs, route one side of the timing belt behind the arm before you tighten down the 3x 13mm nuts to 12-15 lbft
- feed timing belt around crank gear, around cam gear, over water pump
- loosen 13mm nut/bolt on tensioner arm so that arm swings to "tension", tighten bolt/nut to hold it still for now.
- install new aux. tb roller to tensioner arm assembly, tighten 17mm bolt to 33lbft
- install timing belt guard (chrome bar thing) with its 2x 10mm nuts (6 lbft or tight by hand strength on ratchet/wrench)
- check actual tension of belt using either timing belt tool 9201, krikit, or the "90 degree twist method" as you prefer and adjust/lock down the tensioner arm to that position. 13mm bolt/nut to 15 lbft
- install new timing belt idler roller, 17mm bolt to 33lbft
---beer break
- ensure that upper balance shaft sprocket has it's "0" stamp visible thru the round hole in the front washer at roughly an 11'oclock position with the TDC notch lined up on the gear/belt cover
- " " " lower BS sprocket "0" at roughly 5 o clock position visible thru the "long rectangular slot" in the front washer
- slide balance shaft drive gear back onto crankshaft (little bit of oil on the ID of the gear helps get it onto the woodruff key)
- route new balance belt from crank around upper and lower balance shaft sprockets, there will be a loose "loop" where the BS tensioner goes
- slide the BS tensioner onto its stud and catch the teeth of the BS belt, might take a few tries but it'll go on. thread the 17mm nut down the stud but don't tighten it.
-- MAKE SURE THE BALANCE SHAFT SPROCKETS HAVE NOT COME OFF THEIR TDC MARKS
- turn the BS tensioner clockwise to put a little tension on the belt and snug the nut to hold the tensioner still.
-- MAKE SURE THE BALANCE SHAFT SPROCKETS HAVE NOT COME OFF THEIR TDC MARKS
- check balance belt tension via belt tool 9201, krikit or twist method as preferred, use your skinny 27mm wrench to adjust the BS tensioner until satisfied
-- MAKE SURE THE BALANCE SHAFT SPROCKETS HAVE NOT COME OFF THEIR TDC MARKS
- use 27mm skinny wrench to counterhold the BS tensioner while you tighten the 17mm nut to 33lbft
- install balance belt idler (eccentric) onto its stud, thread nut down, adjust eccentric until roller is ~ 0.5mm (roughly credit card thickness) away from balance belt, tighten 17mm nut to 33lbft
--- beer
- reinstall cam gear cover + plastic belt covers
- reinstall distributor cap + plug wires
- reinstall accessory drive gear to BS drive gear
- reinstall PS pulley (make sure it's centered) and tighten crank bolt to 155 lbft
- reinstall AC/PS belts and tension
- remove flywheel lock and reinstall starter (and rad fans if you removed them)
- reconnect battery and lower car
--- beer, nap
that should be about it.
i'm at work so i might've missed a step but i think it's complete.
Detailed timing & Balance belt removal instructions elided for brevity
Thanks Spencer, more detailed than what I've found so far. I've been looking at the 16V WSM for things like a belt routing diagram but haven't found anything about the timing belt there yet. Any idea if it's in there somewhere with a few pictures? I think I've read the whole section on replacing the cam and there isn't much about the belt. After digging through 928 WSMs in the past I know I'm just looking in the wrong place, or it's in some supplement I don't have, or maybe only described in the 8V manual (which wouldn't make a lot of sense but who knows?)
My other problem is I don't have a 15/16 or 24 mm deep socket for my 3/4" breaker bar. I've got the socket for the 928 crank, but not for the 944. Small tooling issue. Looking at Amazon. 155 ft. lbs. is too big for any of my 1/2" bars.
 01-30-2018, 06:09 PM