When you click on links to various merchants on this site and make a purchase, this can result in this site earning a commission. Affiliate programs and affiliations include, but are not limited to, the eBay Partner Network.
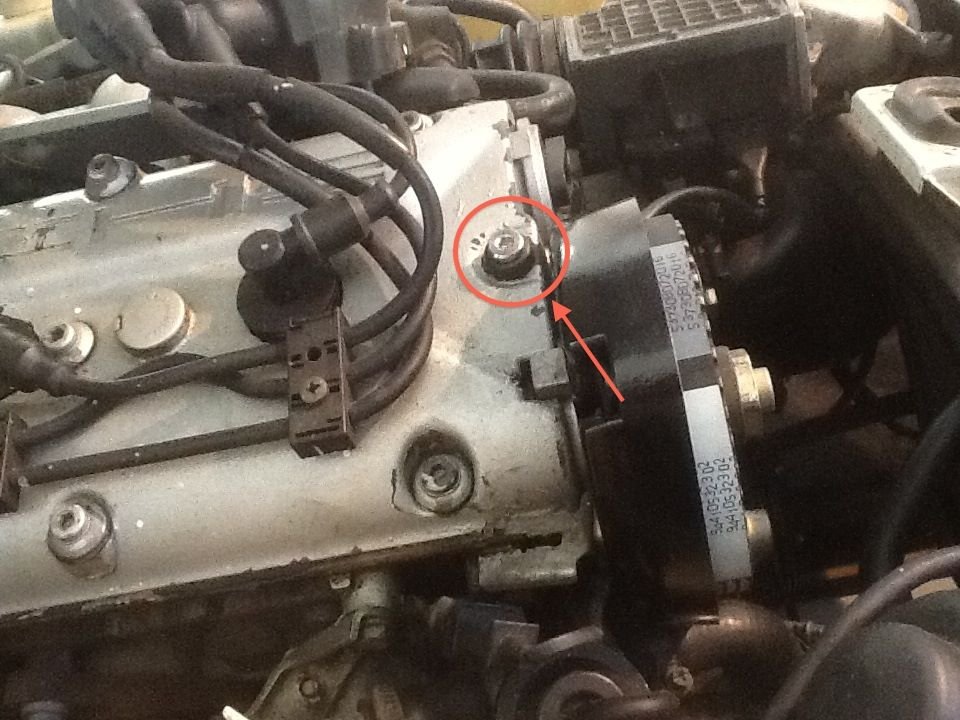
the valve cover gasket is on the inboard side of that fastener.
Thanks for confirming that Thomas. I found a video that shows the top of the engine with the cover removed and, just as you say, the front bolt is outside the sealed part of the cam tower. The video is here:
Today I got the new Renbay aluminum rear cam cover installed along with the Hall sensor:
As you can see, the cam marks aligned perfectly, although advanced (I think that's correct, further to the right?) about 1/2 tooth from the position it was in before removal. I suppose I'll find out if this is important when I start the engine, but if my experience with the 928 has any relevance, 1/2 tooth is pretty meaningless, there's more imprecision in the belt placement than that. I can say there really isn't a lot of room for adjustment as far as I can tell. The play between the spider and the cam gear, which are both keyed to the cam shaft, is less than 1/16th of an inch; it's almost imperceptible.
The rear cover is back on and I've threaded the belt. The next step this evening will be to re-install the tensioner. Tomorrow I hope to complete the project by re-installing the new balance shaft sprockets and belts, fans, then a test start. If all goes well I should have it buttoned up by the end of the day on Sunday.
Baring any April Fools jokes the universe intends to play on me of course
you might have the cam advanced a degree from looking at the other pictures but that might give you a little more coming out of the corners and less in the flats/straights. I see a little shadow on the hall trigger on the 1 o'clock bolt in your last picture. it might give you a Peter Gregg advantage)) lol
I think those magnesium covers puff up with stray secondary voltage. also, the ozone from the spark isn't kind to rubber. I believe the design guys realized this when the deleted the belt cover to air box hose that actually pulled that through the housing.
Well, I got the T-belt on with only a little cussing.
It turns out having the cam mark line up almost perfectly with the new cover mark was a mistake; I needed to roll the cam gear back a half tooth to get the belt on. That puts in exactly the same place it had been before I removed it to replace that cover. Since the crankshaft was locked during the entire procedure I think using it as the reference was the best course of action. Of course, the proof will come in a few weeks when I try starting the engine.
Unfortunately I have to leave my shop for a few weeks and won't be able to finish until I get back. Meanwhile, thanks to everyone for all the help. Tune in next month for the next installment of "As the Camshaft Turns"
the back side of the distributor rotor or rotor button should have three small barrel spacers.
Sigh!
Yep, got those. I did take them off briefly to use the distributor bolts to hold the spider, but as soon as I got to a hardware store I replaced them with M5x20 bolts and put them (and the spacers) back in the distributor.
You had me worried for another moment. this past week my resting pulse has jumped from an average of 80 to an average of 130. I think it's either:
1 - too much caffeine in my decaf French Roast
2 - General Anxiety over this silly TB replacement.
OK, I searched for the post that had warned me I should maybe expect that front cam cover bolt was stripped. I thought for sure it was on this thread but can't find it. Oh well. To the person who dropped that little bug bomb on me, it wasn't stripped !
BTW: That's a long bolt rather than Short. Might save someone $4 if it happens to them. Thanks to Rennbay for providing the correct bolt and Pelican for providing the correct seal. I paid more in shipping than I did for the parts to fix this.
Last edited by Otto Mechanic; 04-14-2018 at 06:26 PM.
Reason: Corrected photo attachment
Finally got all the parts, tools and time together and have the rear cover, new spindles, rollers and belts installed on the S2 so I'm getting ready to close it up today but have another question.
It seems like there's some debate over the tensioning procedures for a car equipped with a spring tensioner, with some authors suggesting the previously locked spring tensioner just be installed, then the lock nuts released and relocked after moving the tensioner back and forth a bit to let it settle on the designed spring tension. Others (Clark's) suggest rotating the crank shaft through a few cycles (at least two) back to TDC then checking and adjusting tension using one of "the special tool", a krikit or the 90 degree belt twist method.
I suppose the two approaches will remain at odds with each other until there are no more of these cars in service, but my question is, what are the correct kriket readings for the two belts? None of the docs I've seen translate the "special tool" readings (which appear to be unitless) to kriket readings.
After removing the flywheel lock and rotating the engine twice back to TDC, the cam mark was 1 tooth behind the rear cover mark (retarded one tooth).
I release the tension on the belt with the pin spanner and locked the spring tensioner then was able to slip off the belt. After that I used a cheeshead wrench to move the cam sprocket as close to the rear cover mark as possible while still being able to align the belt teeth. After a few minutes of wiggling it back and forth the belt teeth lined up with the gear, the belt slipped back on and the marks were aligned better, but still not perfect. Less than half a tooth difference.
 03-30-2018, 11:06 PM