

How to replace your fuel pumps - including how to install an 044 pump
 09-16-2007, 09:04 AM
#1
Supercharged
Rennlist Member
Rennlist Member
Thread Starter
Join Date: May 2002
Location: Back in Michigan - Full time!
Posts: 18,925
Likes: 0
Received 63 Likes
on
36 Posts
Recently, my external fuel pump seized up on me. This was precipitated by a POS in-tank pump. If you have an in-tank pump, chances are you have the same failure as me, and you're living on borrowed time until your external pump ingests a hunk of rubber or other debris and jams the impeller.
Anyway, here's the writeup.
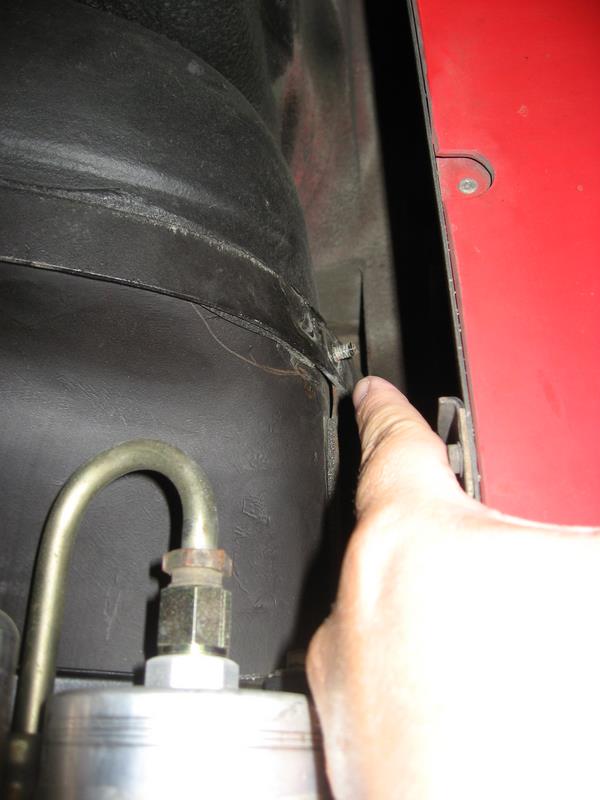
1. Disconnect the batter. Remove the fuel pump cover which is on the bottom of the gas tank. There are two nuts that hold the cover on. Remove these and pull the cover off.
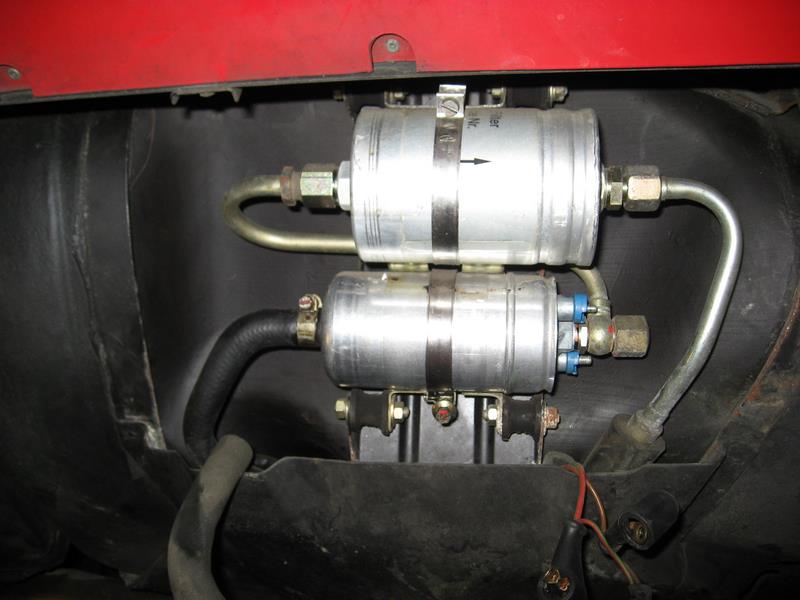
2. You can now see the (from top to bottom) fuel filter and external fuel pump. In this picture I have already disconnected the electrical connections to the fuel pump. At this point, if you still have gas in the tank, you can disconnect the hose that goes to the external pump and drain the tank. I used a 5-gal pail and then siphoned it from that into a gas can and filled up my minivan with the excess gas.
3. Once the gas has been drained you can disconnect the fuel filter and the fuel pump. If you have the internal pump or if you are going to replace the in-tank filter, you will need to remove three bolts that hold the straps that hold up the gas tank. The gas tank will not come down, so don't worry. There are 2 bolts on the rear bumper and one near the transmission. Sorry, no pic of these.
4. When you have dropped down the straps, you'll be able to get at the in-tank pump. If you have a 36mm socket, you'll finally be able to use it here. I didn't have one so I used an adjustable crescent wrench and had no problems.
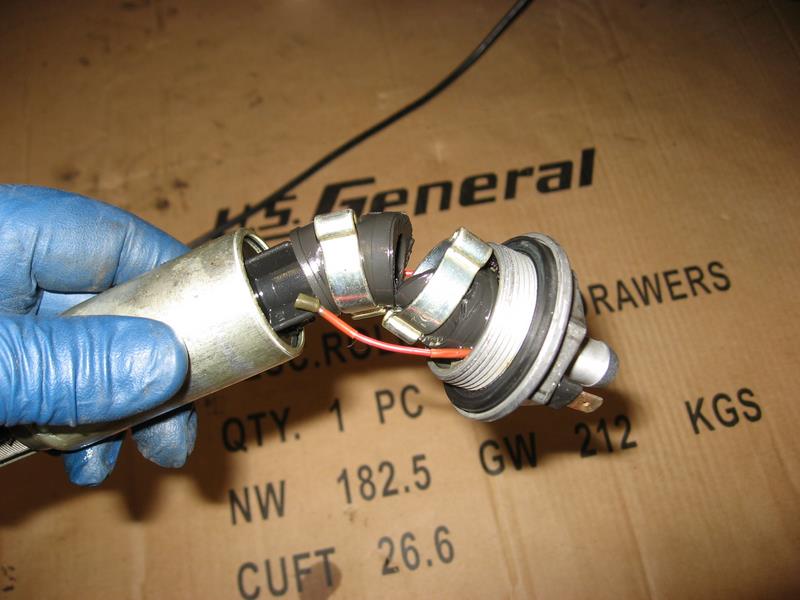
5. This is what I found when I pulled my in-tank pump. there is a small section of rubber hose that fails. You might be able to replace the hose with a small section of 1/2" i.d. fuel hose. to make a better repair. I decided to go ahead and replace mine and I'll fiddle with my old pump at a later date.
6. Install the new in-tank pump with a new gasket. Don't over tighten. Reconnect the hose.

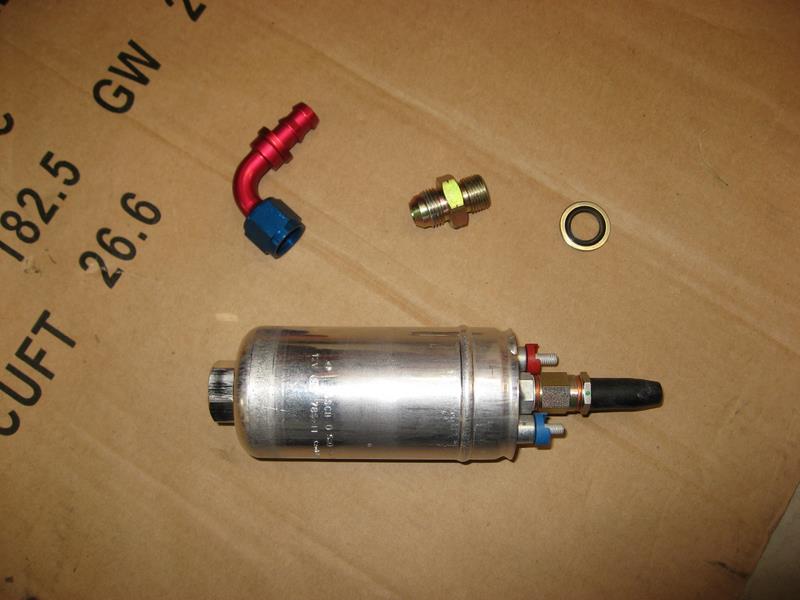
7. If you are going to install an 044 pump, this is what you will need:
The pump, wiring kit (not pictured), from left to right : 8AN 90* push-loc hose-end, 8 an MF x 18mm 1.5m (steel), washer o-ring for 18mm threads.
I got the pump and wiring kit from jayracing.com for about $230. The other bits can be obtained from Kinsler Fuel Injection (kinsler.com) in Troy, MI 248-362-1145. Part #s are:
1 part #6192 : fitting; 8 an MF x 18mm 1.5m, steel $13.20
1 part # 6133: washer o-ring; for 18mm threads $2.70
1 part # 6910: hose end; 8an, 90 degree, push-loc. $14.30
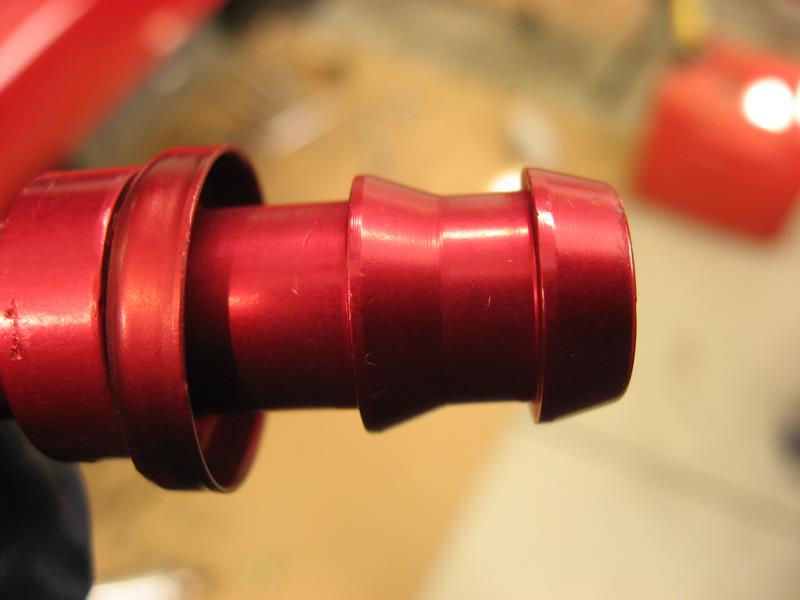
8. You will need to remove the hose barbs. I used a wheel grinder and then use some sandpaper to smooth out. The second pic is before I used the sand paper. I went up to 400 grit to make it as smooth as possible.

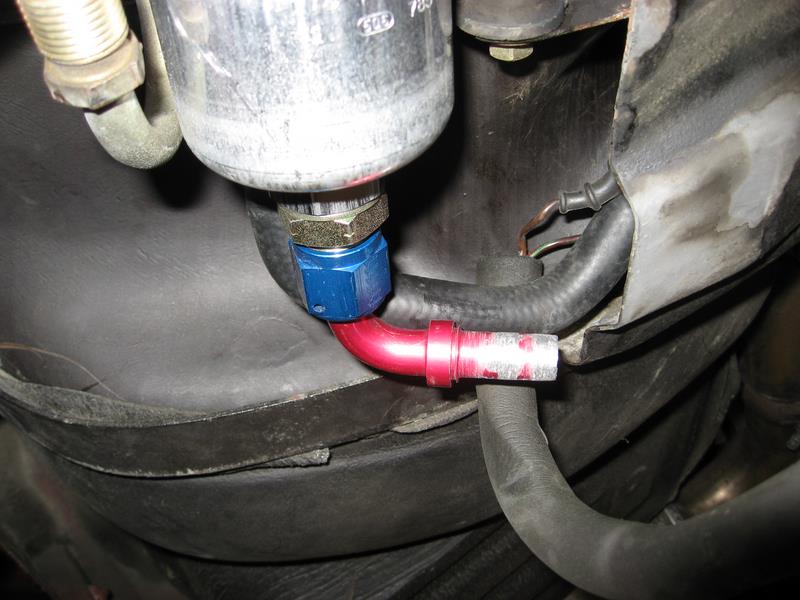
9. Assemble the bits to the fuel pump as pictured and then mount the fuel pump into position. As you can see in the 2nd picture the fuel hose is too long. I marked the fuel hose and cut it so it would fit and re-fitted the line that goes from the pump to the filter as shown in the 3rd pic.

10. The wiring kit is really a nice little kit. This is needed because the stock wiring isn't quite up to the task of feeding the pump's electrical needs. It's a little mickey mouse to hook up but not too bad. I don't have everything documented, but the wiring kit comes with direction albeit a little difficult to follow. Here's how I routed some of the wires.
12V+ to relay

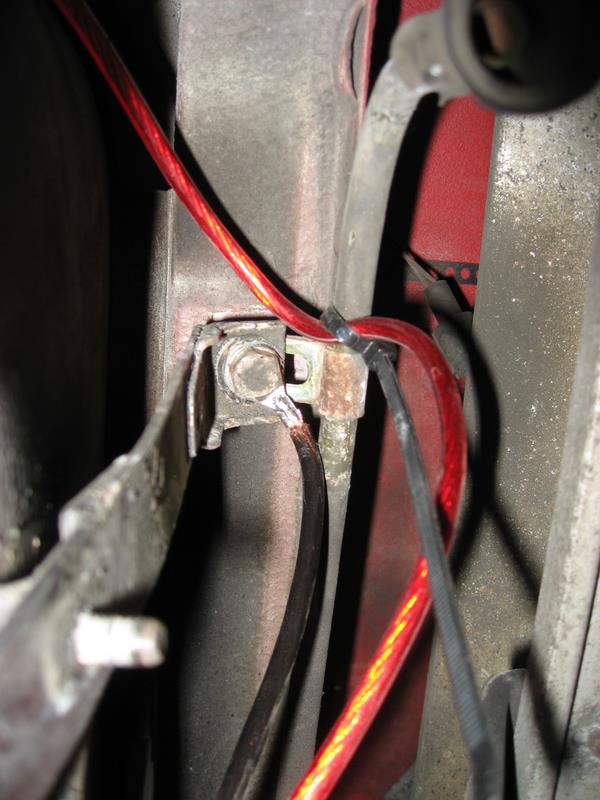
I used the bolt for the gas tank strap as the ground for the relay.
At ths point I have a lead from the fuel pump's + side to the relay.

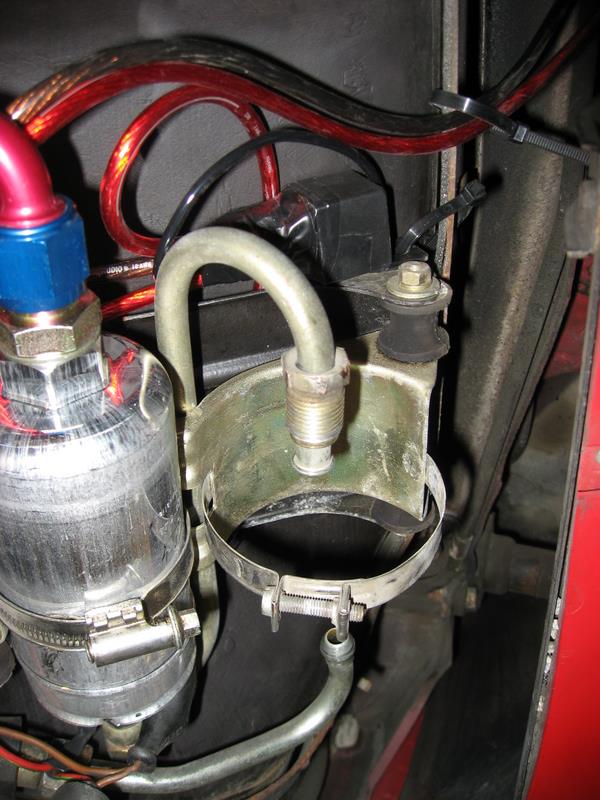
When I had everything routed, here's where the relay ended up. I wrapped it up in some electrical tape to make sure nothing could short out.
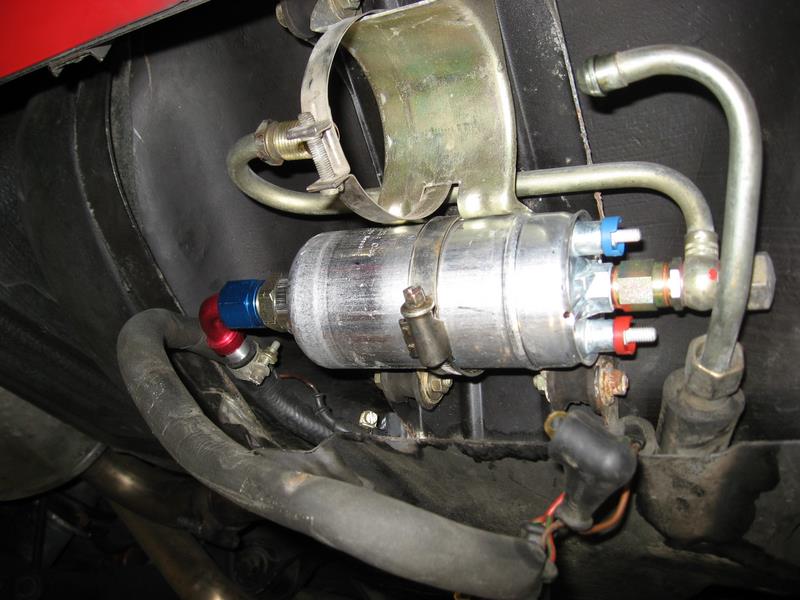
11. Now you can install the fuel filter and snug everything up. When you're done it should look something like this.

Then just snug up the bolts for the tank straps. At this point I would add some fuel, look for leaks, and if none are present try starting the can and check for any other leaks. I didn't have any leaks. So I re-installed the cover and took it for a spin.
Added search terms: Bosch 044 pump upgrade
Anyway, here's the writeup.
1. Disconnect the batter. Remove the fuel pump cover which is on the bottom of the gas tank. There are two nuts that hold the cover on. Remove these and pull the cover off.
2. You can now see the (from top to bottom) fuel filter and external fuel pump. In this picture I have already disconnected the electrical connections to the fuel pump. At this point, if you still have gas in the tank, you can disconnect the hose that goes to the external pump and drain the tank. I used a 5-gal pail and then siphoned it from that into a gas can and filled up my minivan with the excess gas.
3. Once the gas has been drained you can disconnect the fuel filter and the fuel pump. If you have the internal pump or if you are going to replace the in-tank filter, you will need to remove three bolts that hold the straps that hold up the gas tank. The gas tank will not come down, so don't worry. There are 2 bolts on the rear bumper and one near the transmission. Sorry, no pic of these.
4. When you have dropped down the straps, you'll be able to get at the in-tank pump. If you have a 36mm socket, you'll finally be able to use it here. I didn't have one so I used an adjustable crescent wrench and had no problems.
5. This is what I found when I pulled my in-tank pump. there is a small section of rubber hose that fails. You might be able to replace the hose with a small section of 1/2" i.d. fuel hose. to make a better repair. I decided to go ahead and replace mine and I'll fiddle with my old pump at a later date.
6. Install the new in-tank pump with a new gasket. Don't over tighten. Reconnect the hose.
7. If you are going to install an 044 pump, this is what you will need:
The pump, wiring kit (not pictured), from left to right : 8AN 90* push-loc hose-end, 8 an MF x 18mm 1.5m (steel), washer o-ring for 18mm threads.
I got the pump and wiring kit from jayracing.com for about $230. The other bits can be obtained from Kinsler Fuel Injection (kinsler.com) in Troy, MI 248-362-1145. Part #s are:
1 part #6192 : fitting; 8 an MF x 18mm 1.5m, steel $13.20
1 part # 6133: washer o-ring; for 18mm threads $2.70
1 part # 6910: hose end; 8an, 90 degree, push-loc. $14.30
8. You will need to remove the hose barbs. I used a wheel grinder and then use some sandpaper to smooth out. The second pic is before I used the sand paper. I went up to 400 grit to make it as smooth as possible.
9. Assemble the bits to the fuel pump as pictured and then mount the fuel pump into position. As you can see in the 2nd picture the fuel hose is too long. I marked the fuel hose and cut it so it would fit and re-fitted the line that goes from the pump to the filter as shown in the 3rd pic.
10. The wiring kit is really a nice little kit. This is needed because the stock wiring isn't quite up to the task of feeding the pump's electrical needs. It's a little mickey mouse to hook up but not too bad. I don't have everything documented, but the wiring kit comes with direction albeit a little difficult to follow. Here's how I routed some of the wires.
12V+ to relay
I used the bolt for the gas tank strap as the ground for the relay.
At ths point I have a lead from the fuel pump's + side to the relay.
When I had everything routed, here's where the relay ended up. I wrapped it up in some electrical tape to make sure nothing could short out.
11. Now you can install the fuel filter and snug everything up. When you're done it should look something like this.
Then just snug up the bolts for the tank straps. At this point I would add some fuel, look for leaks, and if none are present try starting the can and check for any other leaks. I didn't have any leaks.
So I re-installed the cover and took it for a spin.Added search terms: Bosch 044 pump upgrade
Last edited by AO; 07-16-2008 at 02:09 PM.
 09-16-2007, 09:20 AM
#2
Addict
Rennlist Member
Rennlist Member
Nice work.
On digital dash cars this is also good time to reset fuel gage. Dash has feature where it can be reset once tank has exact amount of fuel in it. IIRR needed amount is 15 liters.
On digital dash cars this is also good time to reset fuel gage. Dash has feature where it can be reset once tank has exact amount of fuel in it. IIRR needed amount is 15 liters.
09-16-2007, 09:52 AM
#3
Drifting
The o-ring in the adapter you used is not rated for gasoline. Use an aluminum or copper crush ring of the appropriate size instead as it will degrade and provide you with a sizeable leak...
Also since you are already running wires into the battery box, why not just extend the ground wire to the terminal instead of a potentially intermittant dirty ground that you connected to?
Also since you are already running wires into the battery box, why not just extend the ground wire to the terminal instead of a potentially intermittant dirty ground that you connected to?
09-16-2007, 11:19 AM
#4
Supercharged
Rennlist Member
Rennlist Member
Thread Starter
Join Date: May 2002
Location: Back in Michigan - Full time!
Posts: 18,925
Likes: 0
Received 63 Likes
on
36 Posts
The o-ring in the adapter you used is not rated for gasoline. Use an aluminum or copper crush ring of the appropriate size instead as it will degrade and provide you with a sizeable leak...
Also since you are already running wires into the battery box, why not just extend the ground wire to the terminal instead of a potentially intermittant dirty ground that you connected to?
Also since you are already running wires into the battery box, why not just extend the ground wire to the terminal instead of a potentially intermittant dirty ground that you connected to?
As to the o-ring... I can't say for sure if it's fuel rated or not, but it appear to be the same type of o-ring used on the fuel filters, so I think it will be okay, but should it begin to leak I'll use copper.
And as to the ground line, the wiring kit's black wire isn't long enough to run to the battery.
 09-16-2007, 11:34 AM
#5
AO,
I got my pump from jayracing too. I have the same o-ring (crush ring?) as you have and it has not failed yet (since SITM). The place that sold it knew it was for a fuel pump so assume its safe.
I got my pump from jayracing too. I have the same o-ring (crush ring?) as you have and it has not failed yet (since SITM). The place that sold it knew it was for a fuel pump so assume its safe.

Trending Topics
09-16-2007, 04:46 PM
#8
Rennlist Member
Andrew, great write up! Thanks 
I will extend both the power wire and the ground wire to put the relay in the battery compartment. I don't like the relay down were you don't have easy access and where it is exposed to all the wet/dirt/grime etc. 
Jim Mayzurk
93 GTS 5-spd
Also since you are already running wires into the battery box, why not just extend the ground wire to the terminal instead of a potentially intermittant dirty ground that you connected to?
Jim Mayzurk
93 GTS 5-spd
09-16-2007, 05:18 PM
#9
Drifting

Glad you got it done. What's the difference in flow rates with the new pump?
Why didn't you mount the relay in the battery compartment or tire well where it is relatively dry? Now you have two fuel pump relays operating (one where you mounted it and the one on the CE panel).
Can you take apart the old in-tank pump and show us the shape of the internals?
Why didn't you mount the relay in the battery compartment or tire well where it is relatively dry? Now you have two fuel pump relays operating (one where you mounted it and the one on the CE panel).
Can you take apart the old in-tank pump and show us the shape of the internals?
09-16-2007, 05:23 PM
#10
Addict
Rennlist Member
Rennlist Member
Chad, it is a high output bosch pump that fits pretty nicely with minimal modifications. On the SC'd cars, add enough boost, you just run out of fuel. No real need unless heavily boosted or high output stroked.
Andrew, nice pics, looks very familiar!
I did put my relay in the battery box though.
Jim
Andrew, nice pics, looks very familiar!
I did put my relay in the battery box though.
Jim
03-09-2009, 01:01 AM
#13
Archive Gatekeeper
Rennlist Member
Rennlist Member
Finally attacked this on my car today- The PO replaced the external pump and fuel filter 15K miles ago but didn't touch the internal pump.
To add a few observations:
I got my range indicator down to about 18 miles, and got about 1.5 gallons of gas out:

One does not need to drop the fuel tank support straps all the way out- you can undo the two rear bolts all the way, and then drop the front bolt about 1-1.5 inches (don't take it out, it'd be a PITA to re-thread up in there- I needed a 13 mm socket on a U-joint and a 20" extension to reach it....):

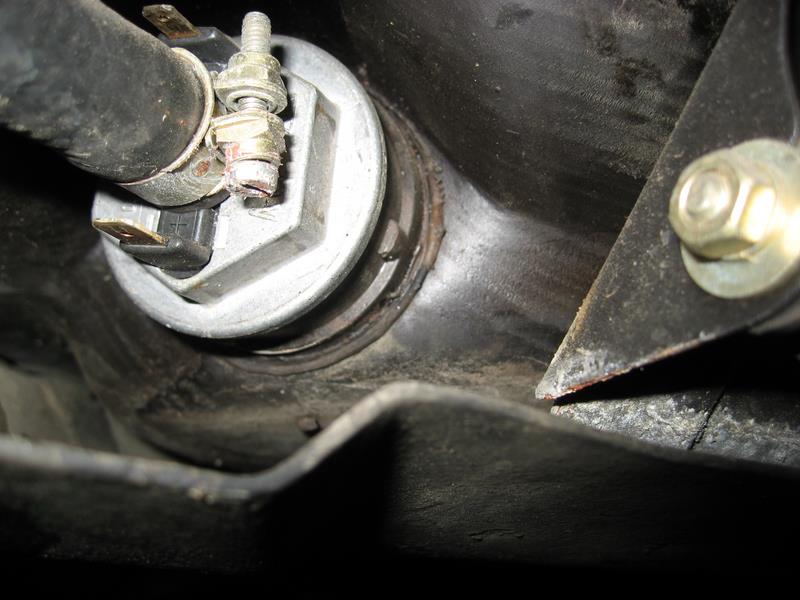
You only need to drop the straps an inch or so, in order to get at the pump connections and clamps. Here's the 36mm socket on the pump, using a 6" extension threaded between the strap and tank:

Once out, here's the old pump- failed exactly as many others have shown previously. I wonder if this is what killed the first external pump:

New pump, looking a little better. For those that want to fix the old pump, the clamps used are Oetiker 20-23 (7/8") dual ear clamps. The hose is ~12.5 mm ID and 5 mm wall thickness, so OD is ~25 mm.
The torque spec on the pump is 25 Nm, FWIW.
As an aside, there's a rather large job number printed on the rear of my tank- I wonder what it refers to? Erkka?

To add a few observations:
I got my range indicator down to about 18 miles, and got about 1.5 gallons of gas out:
One does not need to drop the fuel tank support straps all the way out- you can undo the two rear bolts all the way, and then drop the front bolt about 1-1.5 inches (don't take it out, it'd be a PITA to re-thread up in there- I needed a 13 mm socket on a U-joint and a 20" extension to reach it....):
You only need to drop the straps an inch or so, in order to get at the pump connections and clamps. Here's the 36mm socket on the pump, using a 6" extension threaded between the strap and tank:
Once out, here's the old pump- failed exactly as many others have shown previously. I wonder if this is what killed the first external pump:
New pump, looking a little better. For those that want to fix the old pump, the clamps used are Oetiker 20-23 (7/8") dual ear clamps. The hose is ~12.5 mm ID and 5 mm wall thickness, so OD is ~25 mm.
The torque spec on the pump is 25 Nm, FWIW.
As an aside, there's a rather large job number printed on the rear of my tank- I wonder what it refers to? Erkka?
03-09-2009, 01:22 AM
#15
Rennlist Member
I replaced my internal pump just a few years ago and recently took it out to find the exact same problems as everyone else...bad design...I'm going to see if I can repair...
My concern would be the electrical connections. Is there a special heat shrink wrap for this type of connection?
My concern would be the electrical connections. Is there a special heat shrink wrap for this type of connection?