When you click on links to various merchants on this site and make a purchase, this can result in this site earning a commission. Affiliate programs and affiliations include, but are not limited to, the eBay Partner Network.
Are you planning on replacing anything on the clutch side/flywheel area? I ask because I'm not too far behind you in my rebuild and am ordering parts soon.
It's definitely more expensive to purchase individually priced yellow zinc plated stuff - I think I spent close to $400 just in fasteners.
Justin -
I just stumbled back onto your thread, I wish I'd done the same and kept everything together the way you have. I ended up posting lots of it in individual threads since I had questions along the way. I should be finishing up the first "phase" of my build in the next few days, maybe we can celebrate key turning together?
I also bought all my replacement hardware from Bell Metric, 8.8 yellow zinc. It's a good look.
How many more miles do you think the original rod and main bearings, and piston rings would have gone? And the head gasket?
I ask because as much as I'd like to do a complete teardown, time and other life factors just get in the way. Thanks!
The mains and rods looked almost brand new. I actually felt almost bad changing them, but again, WYIT for peace of mind.
The old rings I didn't look at too closely since new ring sets were so cheap. I did a compression test ahead of time, but not a leak down test. While the compression test just made the numbers per the manual before the tear down, I can say the engine seems to have much more compression to turn over by hand than it had prior.
As for the head gasket, I think the back of it around cylinder #4 was starting to go out since there was some discoloration there inconsistent with the rest of the gasket.
Are you planning on replacing anything on the clutch side/flywheel area? I ask because I'm not too far behind you in my rebuild and am ordering parts soon.
I replaced the clutch and flywheel back in 2013 but have only put 20k miles on the car since then, so I figured I'd leave them alone for now. Everything looked fine when I had it apart so I should be in good shape.
I should be finishing up the first "phase" of my build in the next few days, maybe we can celebrate key turning together?
I also bought all my replacement hardware from Bell Metric, 8.8 yellow zinc. It's a good look.
You've done a great job with this!
Perhaps we can! Though I attempted to reinstall the motor today and did not have much luck. I recall it being a pain in the *** to remove as well, so not sure why I was thinking the installation would be any different.
I'm having clearance issues getting the engine far enough forward to so I can get the torque tube installed. Right now it feels like I'm miles away. I think the plan of attack is to lower the cross-member so I can get plenty of clearance for the oil pan and slide the motor farther forward to get everything to line up. We'll see.
Thanks again for the kind words. I've always enjoyed watching other people's threads like this so I'm glad I can contribute to the forum like this.
Really nice job Justin!, I have been following your thread from the beginning, you have put the extra effort into it and it really shows! The new Bel Metric bolts and bead blasting make it look show quality.
I started my '88 engine rebuild project about 9 months ago and I put the engine back in about 3 weeks ago, from the bottom with cross member removed, had a friend helping and it was tough getting the splines lined up on drive shaft had to re-position the chain on the cherry picker a couple times to get the engine balanced just right for it to slide on. Used a combination of Cherry picker and Strut Beam engine support to get the job done.I only have time one day a week to work on it so I am still finishing hooking everything up.
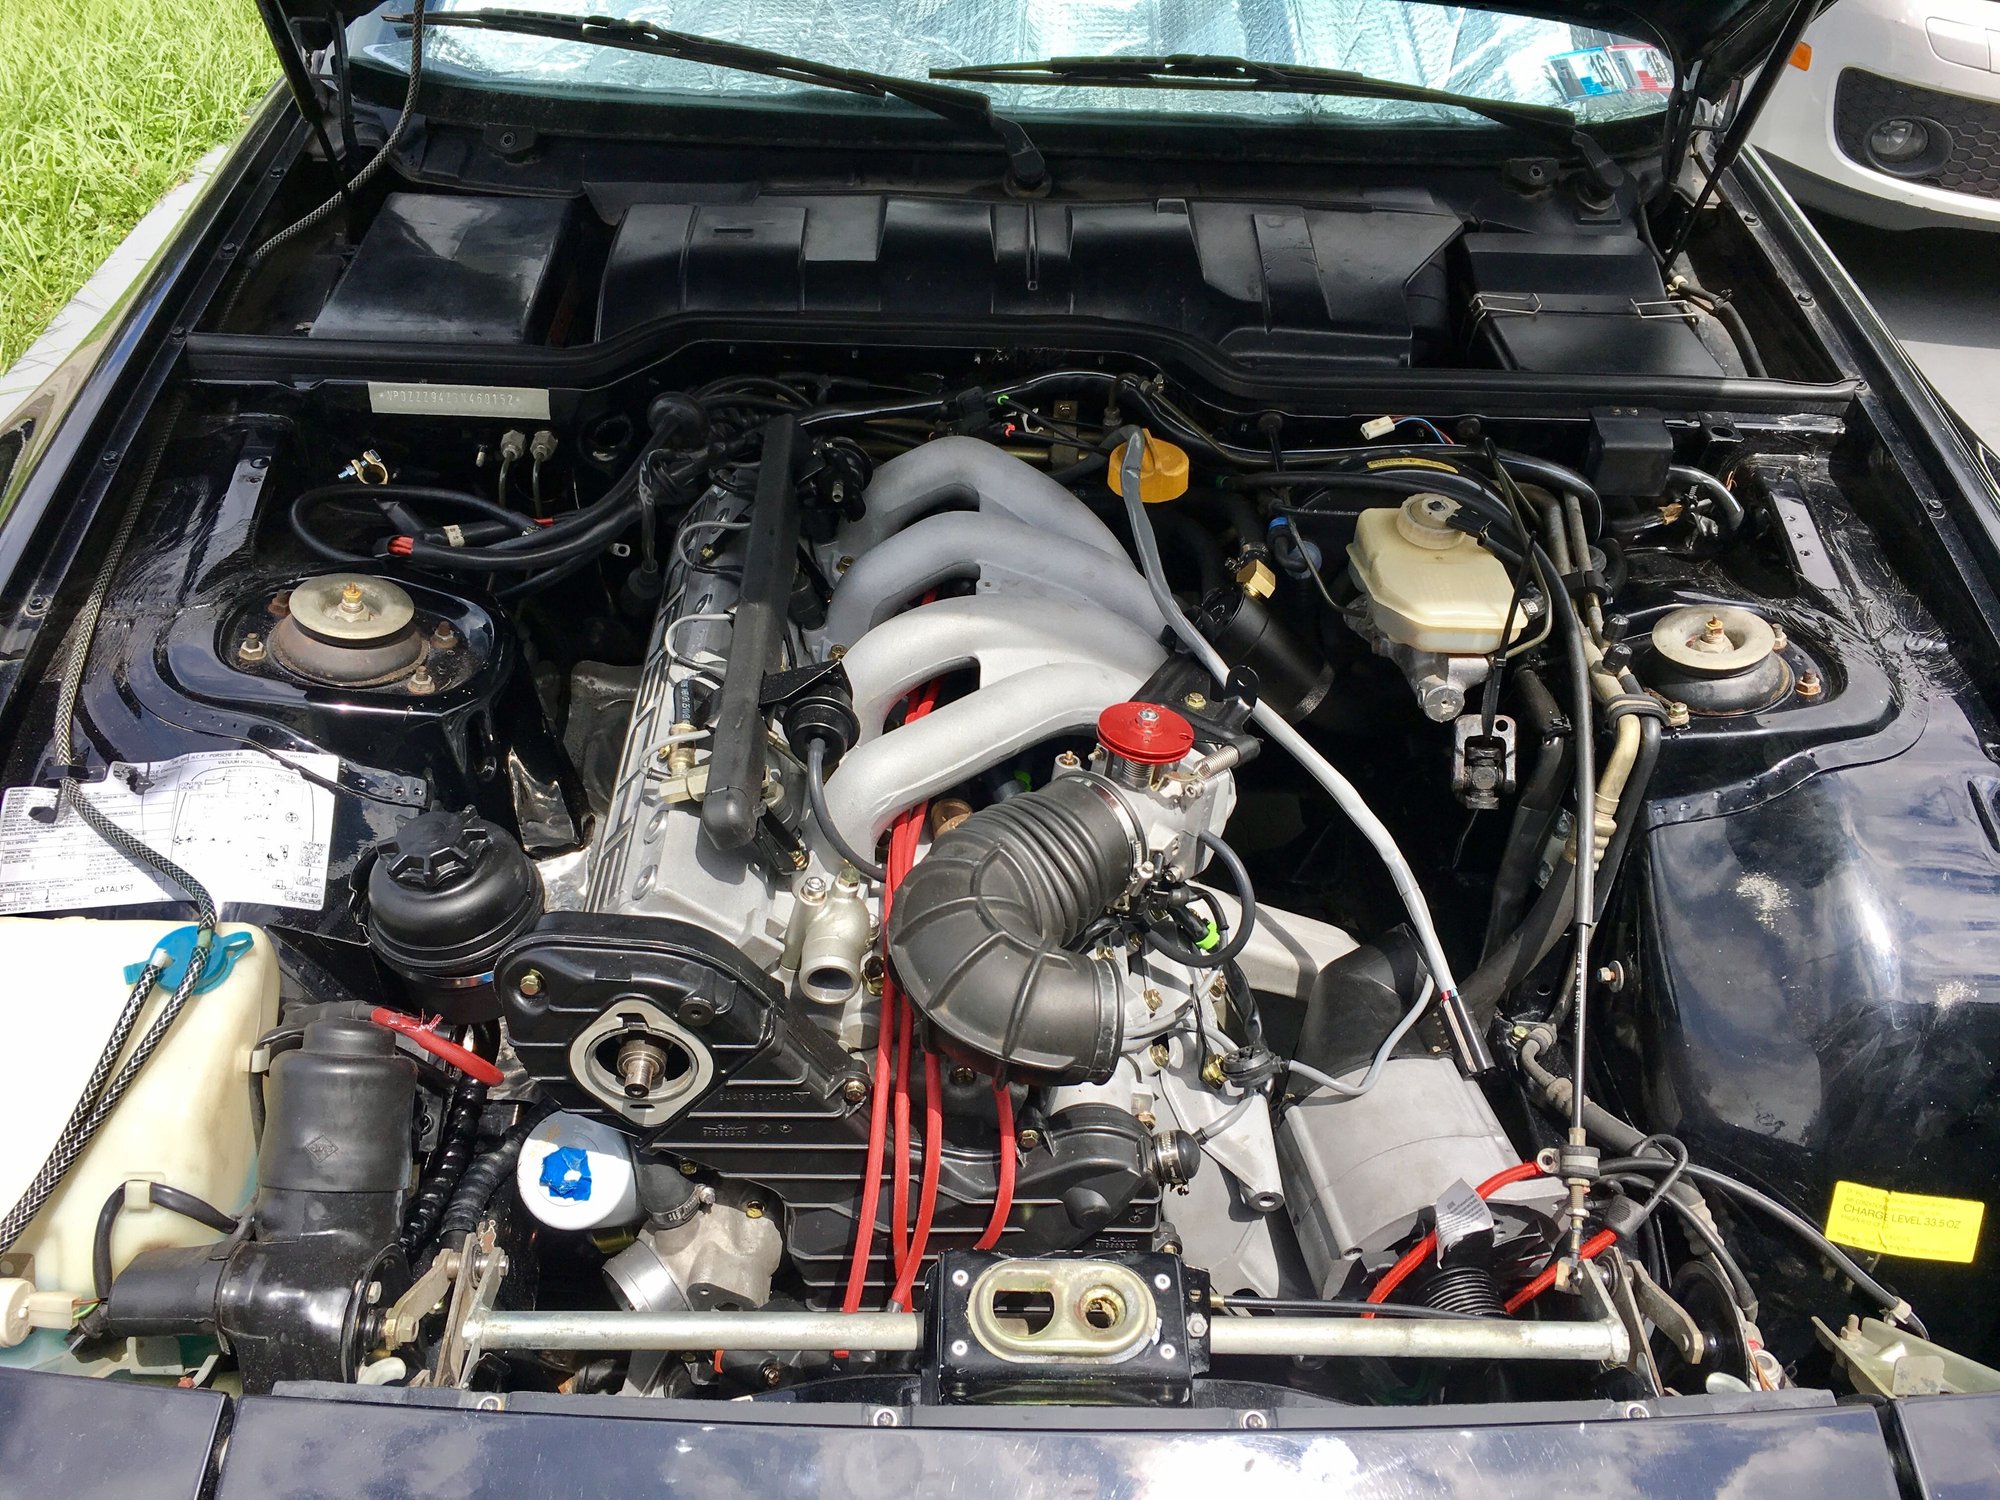
Wahoo! Managed to get the engine in and bolted to the torque tube. I say "in" and not "installed" because of course there's plenty of crap to still do before I'm close to turning the key. But of course, a photo:
So, to get this thing in I ended up completely disconnecting the subframe from the car. This gave me enough oil pan clearance that I could slide the motor forward where the radiator normally resides and then slide it back into place aligned with the torque tube. Jesus F'ing Christ that was difficult by myself.
Now is the annoying part I suppose, reconnecting all the wires, hoses, etc. I forgot how little clearance there is in some spots...like the back of the motor where the heater control valve is located. Woof.
A couple of things I've learned so far:
1. Don't use the brakes when the slave cylinder is not connected to the bellhousing. Duh. Though I kind of had to use them in moving the car around from PA to FL, but now I need a new cylinder because it's waaaaay over-extended.
2. My catch can placement did not work. The fittings hit the brake booster. An easy fix though by mounting under the brake booster and using longer hoses.
3. Don't swing the steering shaft out of the way and then not reinstall it prior to connecting the driver side engine mount. I now can't get the shaft past the mount so I guess I need to jack up the motor and disconnect that side. Argh.
4. Keep the alternator disconnected when installing the motor from the top for extra clearance. The damn thing kept hitting the frame as I was trying to properly position it.
5. Learn how to install engines better. A bunch of my refinished parts got scratched (and are continue to get scratched) in the process as I reconnect stuff. Kudos to you guys & gals who make engine replacements look so easy!
I guess that's pretty much it. Not sure if I'll get any time on it in the evenings this week or not and next week I'm headed to Maine for vacation. It'll be done eventually I suppose...
I'm not sure if that link above will work or not since it's a video. It's too big to upload directly and I know some people use YouTube for that stuff but I don't feel like figuring out how to do that currently.
Bottom line - it runs. Started up after maybe 15-20 seconds of cranking to get fuel up to the engine. I have a pretty nasty fuel leak at the fuel feed line in the wheel well so I need to get that sorted before I run it any longer. I replaced the rubber fuel lines but reused my push lock fittings and it appears the feed fitting might be leaking at the swivel. Time for some Lindsey Racing stainless steel fuel lines?
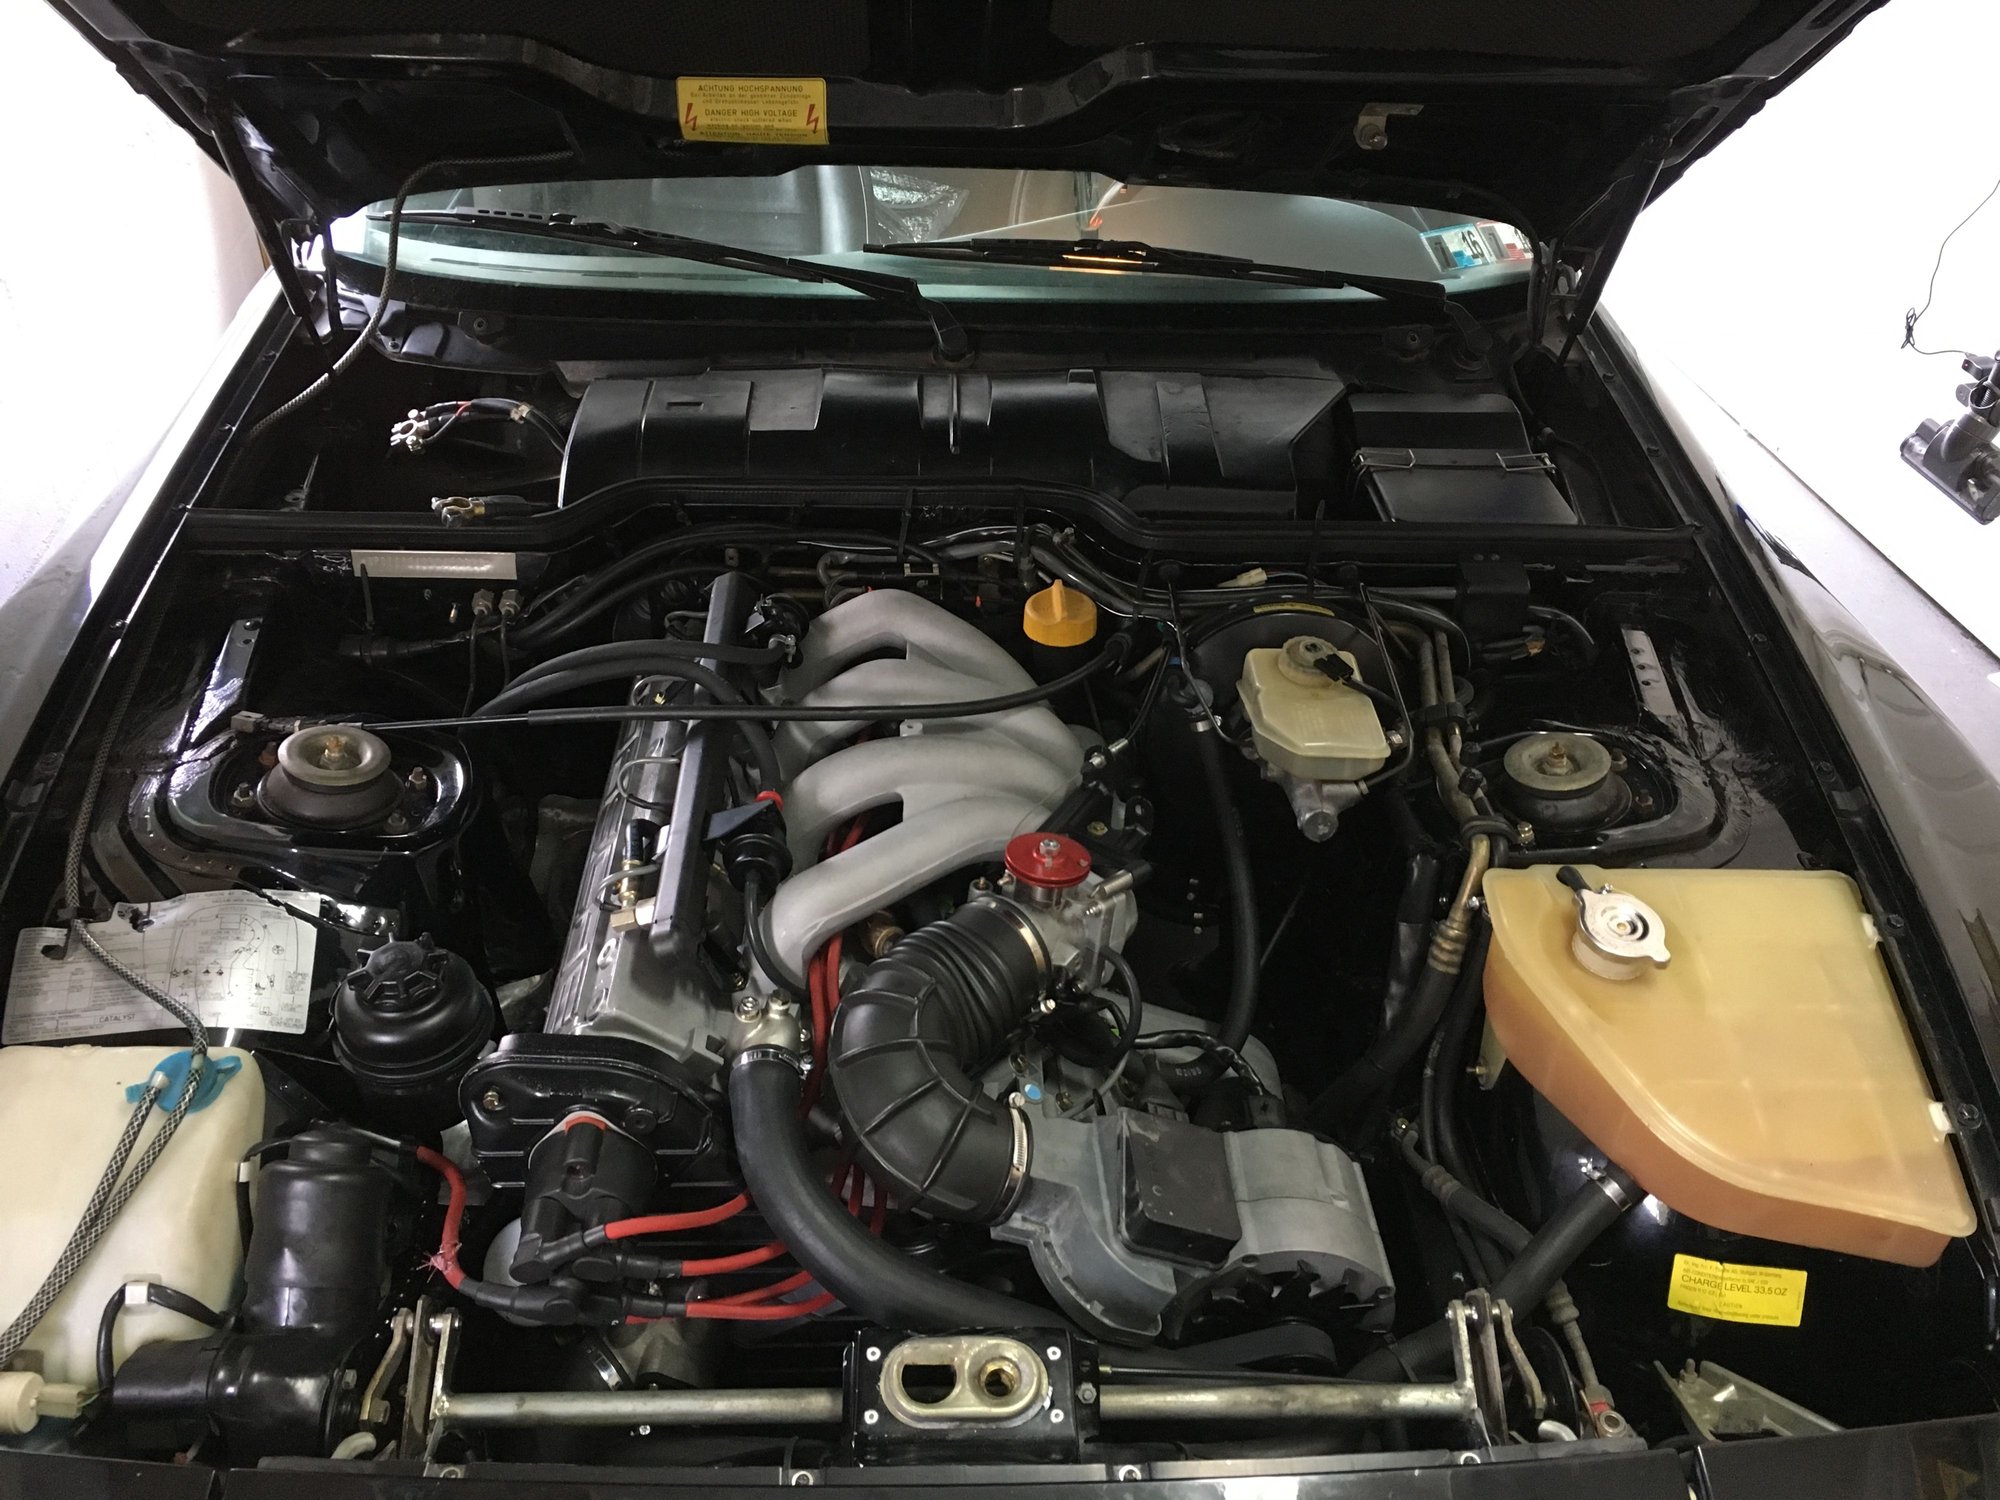
Here's a picture of the 98% completed engine bay since the video quality isn't great:
I still need to sketch up an adapter for the intake so I can connect a new air filter and support the AFM at the same time. I also need to run a fuel vent line from the firewall to the intake adapter since I deleted the control valves and the charcoal canister.
I will definitely need to eventually buy a new coolant reservoir since mine is so yellow, but I really wanted to just get this thing up and running before throwing any more parts at it. We'll get there...
I'm in Ohio for work this week so I won't get back to this guy until the weekend. Hopefully by then the fuel smell will be gone from the garage...
So I got my fuel leak sorted out. Some new Lindsey Racing fuel lines did the trick. The quality is great and they definitely help make the engine bay look nicer.
One leak sorted, but then some more show up, naturally. I have a small leak at the DME temperature sender. It's torqued completely (in fact at this point it's probably too tight) but I'm still weeping a little bit. Maybe I need a new crush washer even though it was a brand new sensor and washer already.
I also have an oil leak at the front crankshaft seal. Enough that it can drip while the engine is running and make a little puddle under the car. The oil pressure is still pegged over 5 BAR on the gauge even though I've had the engine up to temperature for about 10-15 minutes. Do we think the leak at the crank seal could be due to the high oil pressure? The OPRV worked fine previously and it was installed by hand, easily sliding in and out, so I don't think it's stuck (but who knows).
It's cool that I can now pull the car in and out of the garage under its own power for the first time in 16 months.


 08-18-2017 | 11:04 PM