When you click on links to various merchants on this site and make a purchase, this can result in this site earning a commission. Affiliate programs and affiliations include, but are not limited to, the eBay Partner Network.
There seem to be so few threads here dealing with 997.1 C2/S and tracking... wanted to put some useful content that i have scavenged from the forum and other sources for my own build and share that journey for others that decide to take up the same as these cars become more reasonably priced for track toys over garage queens.
Back in 2007? i bought a E46M3 for a conversion into a track car in NASA ... AutoX, then HPDE, then GTS3 as was the natural progression.
Along the way i learned quite a lot about converting a street car into a full-on track car, in phases that ran from " i'll probably DD this thing for a while ", to " i am paying a shop to maintain and transport the vehicle and spares to events and competing at the National level ".
That chapter ended after 2013 NASA nationals, placed 4th in GTS3. Then sold the car and everything associated with it to a friend that continued racing it locally. Went back to school for my MBA, started and sold a company and now am having time again to play with cars.
Found a pretty mint 2007 C2S Areo/6MT/<40Kmi last March... drove it in the mountains out here in Colorado, some autox with BMWCCA last year - super fun, not scary at the limit.
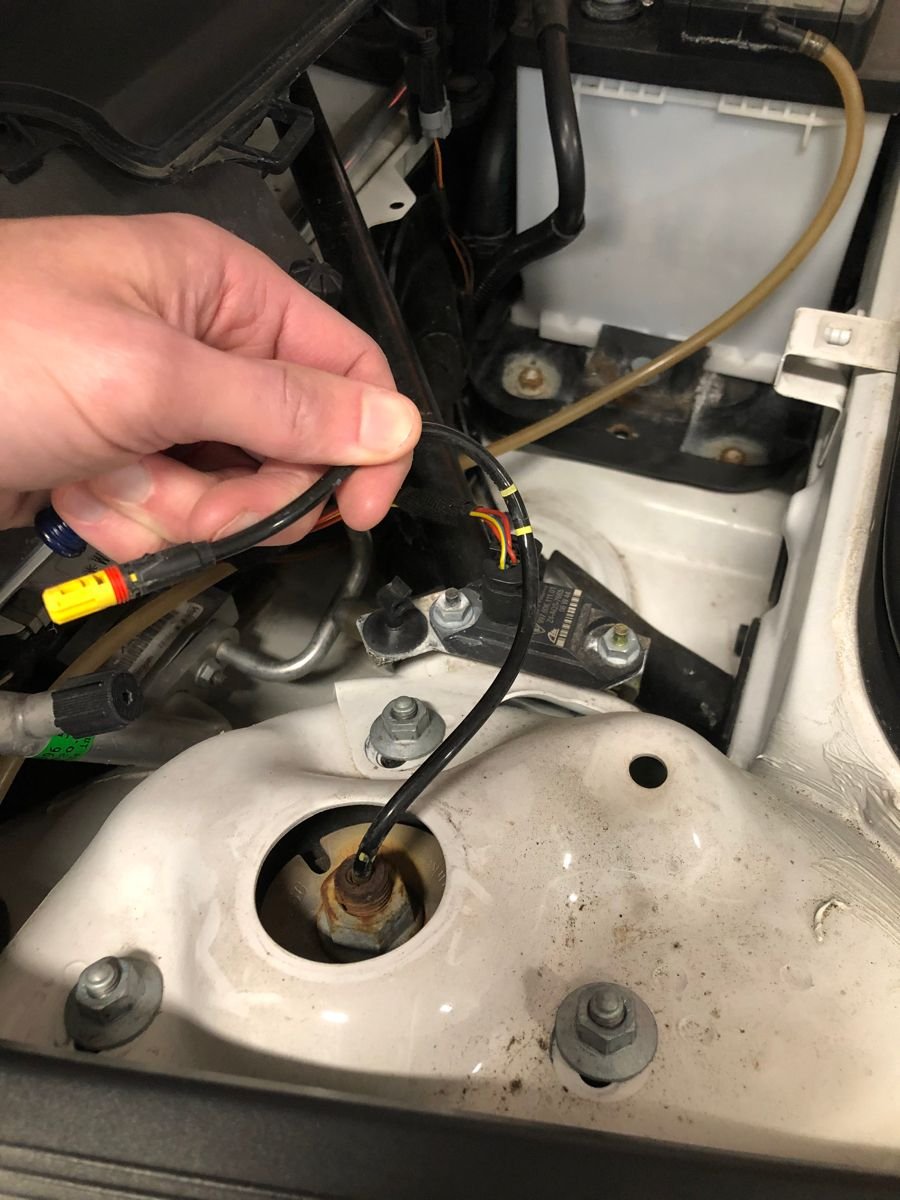
Small issues were resolved around weak brake pedal feel, noisy power steering, and weak crank start.
Addressed with a change of brake fluid and bleed, PS fluid level correction and cleaning the post and cable between the batter and chassis. Much happier now.
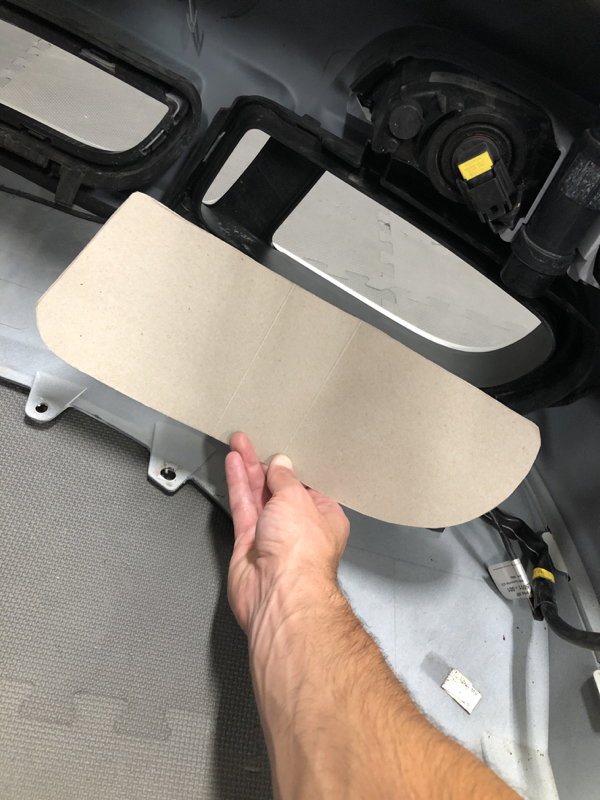
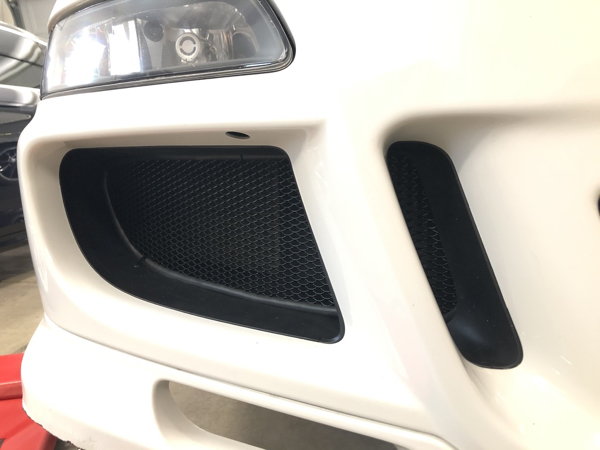
Also cleaned the front end out of all road debris and rubbish, then fabricated some guards for the front-side intakes... rads and condensers also happier now.
So, what now ?
I want to build a reliable car that can (for now) pull double duty ... weekend drives in the mountains, plus the occasional jaunt to the office PLUS be competent and reliable at the track with minimal overhead between these two duties.
My MO is manage the [known] issues proactively, this meant dealing with aging bushings and managing heat (the root of most failures IMHO).
PHASE ONE
1 - Engine and trans mounts/bushings - make the connection less sloppy, less movement relative to chassis - i went with Function First trans bushing inserts (yellow) and their upgraded OEM (semi-solid) engine mounts
(no photos, pretty straight forward and boring process, 2hour job that takes 1.5 hours of taking off/putting back on the underbody panels)
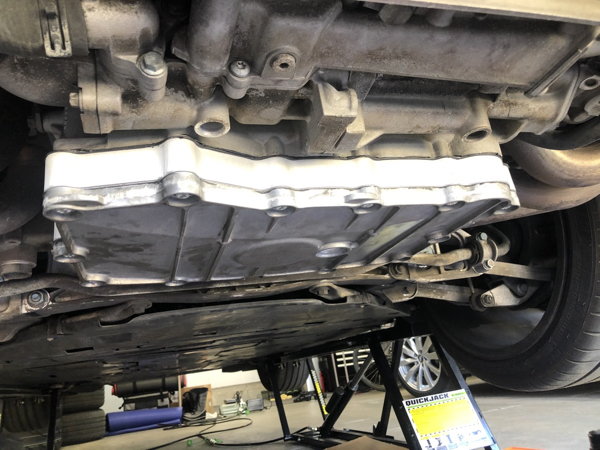
2 - +2qt deep oil pan and baffle kit - add more oil and better anti-slosh/baffling for the G-loads expected at the track - Bilt Racing kit is pretty legit, comes with everything needed to get the job done. You will need an E10 socket to get the OEM pan bolts and pickup tubes off though.
This also provided a great opportunity to give a thorough cleaning to the bottom of the pan, a thin layer of black slime covered some of the pan cover... it all easily wiped off, make me feel better having done it. gross pan spacer, anti-slosh and baffle swirl pot with spacer all buttoned up and awaiting curing
Once the sealant is cured, i'll add fresh oil +2qt, and a new filter... then drive if a bit to ensure it isn't leaking before installing a skid plate, as this thing is pretty low now. My hope is that the added 2qts and baffles will help keep things oiled better and extend the questionable life of the IMS... this car has the upgraded larger bearing from Porsche, but it's not failure-proof like the 997.2 or Mezger, so this weighs heavily on my mind.
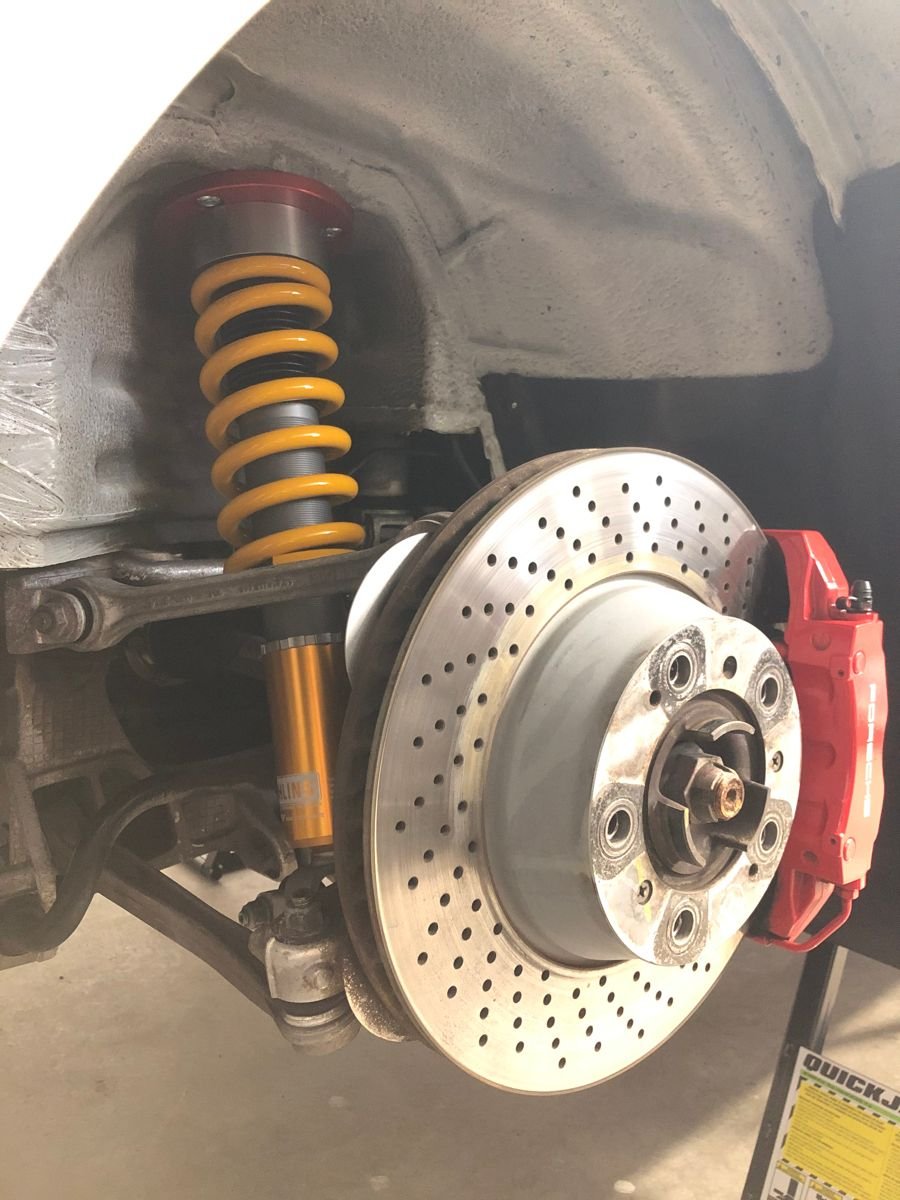
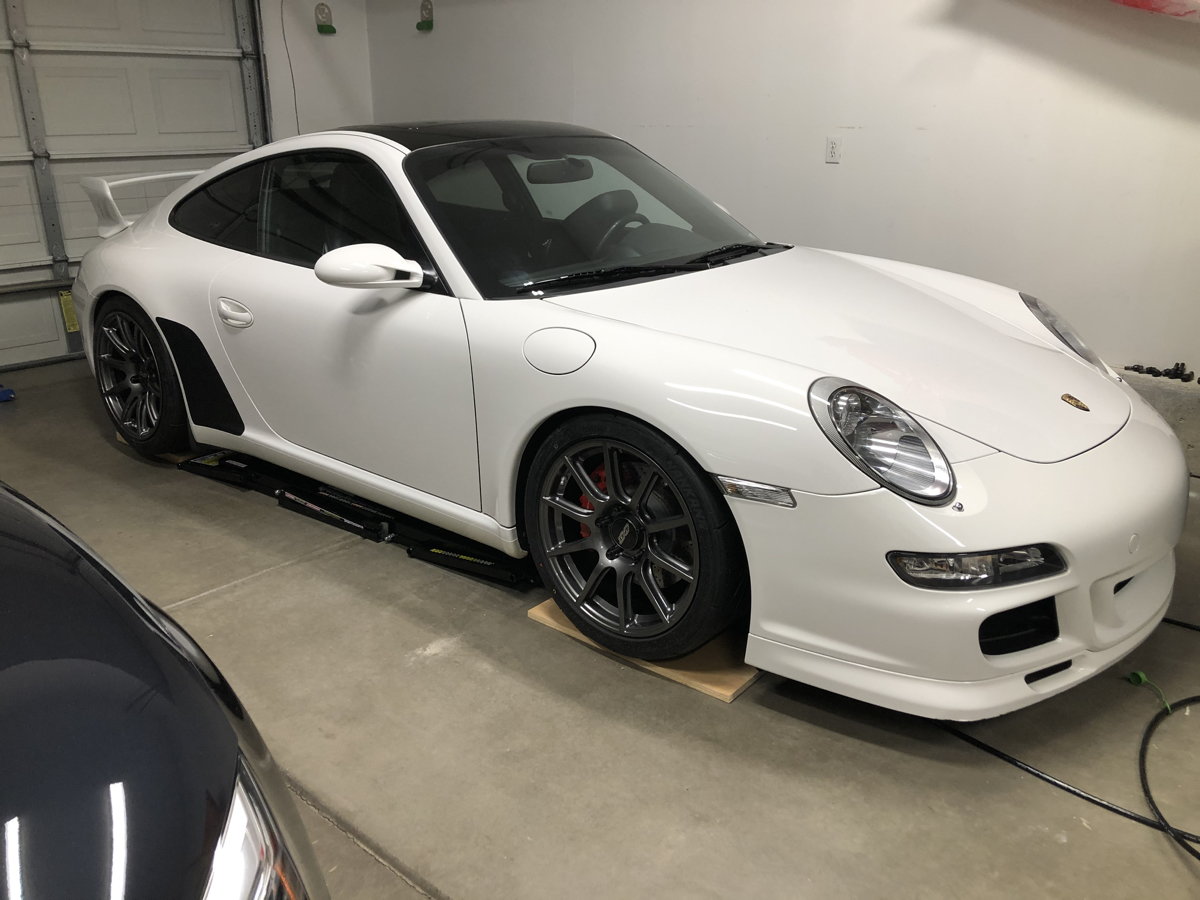
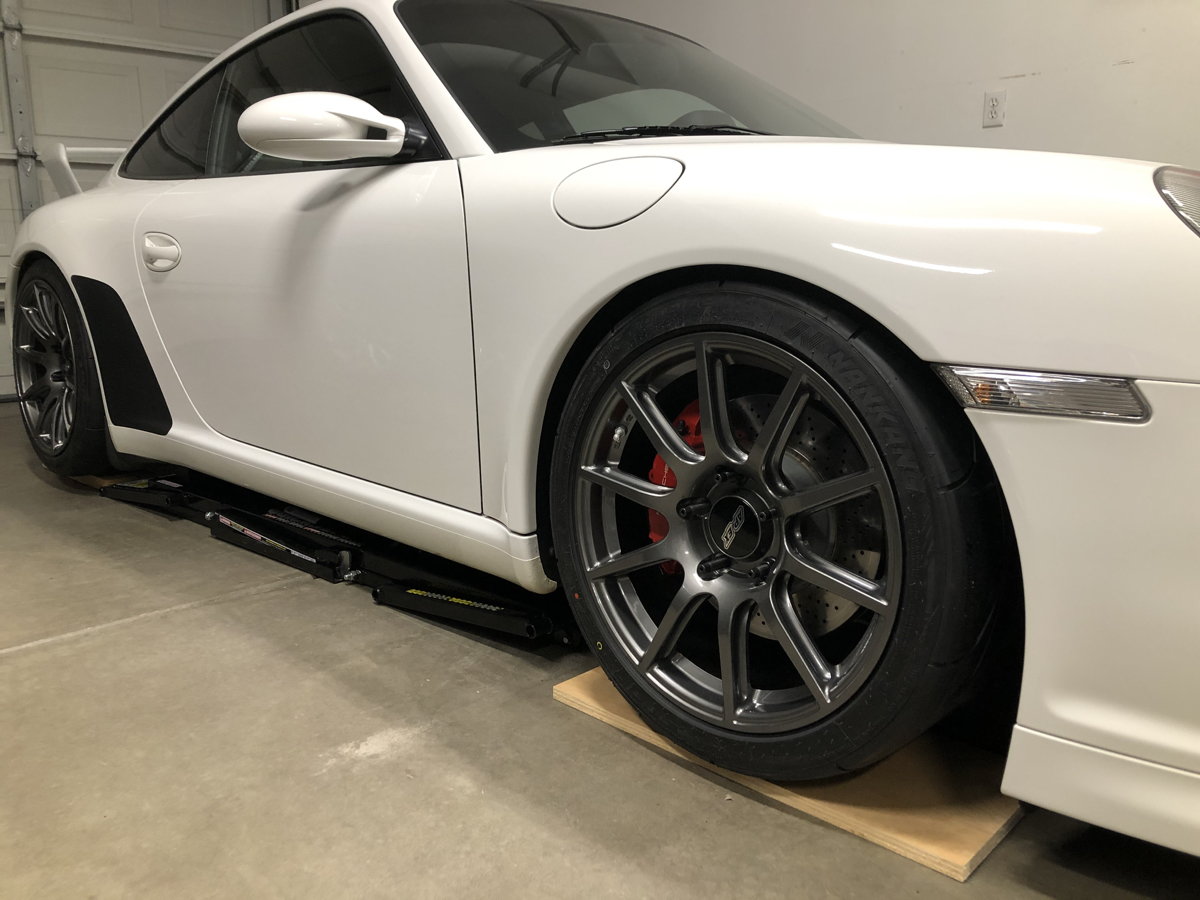
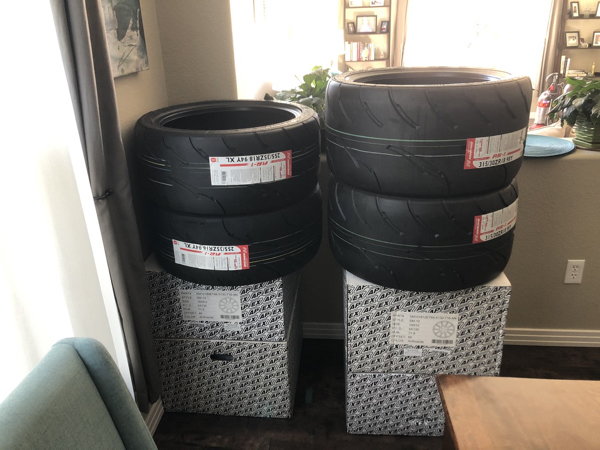
3 - Grip-up ... wider everywhere, 9x18F and 12x18R with 255 and 315 respectively ... probably will go to 335 in rear if i can manipulate the fenders slightly
these will NOT fit without more camber... which this macpherson setup needs anyway... which is a segue to...
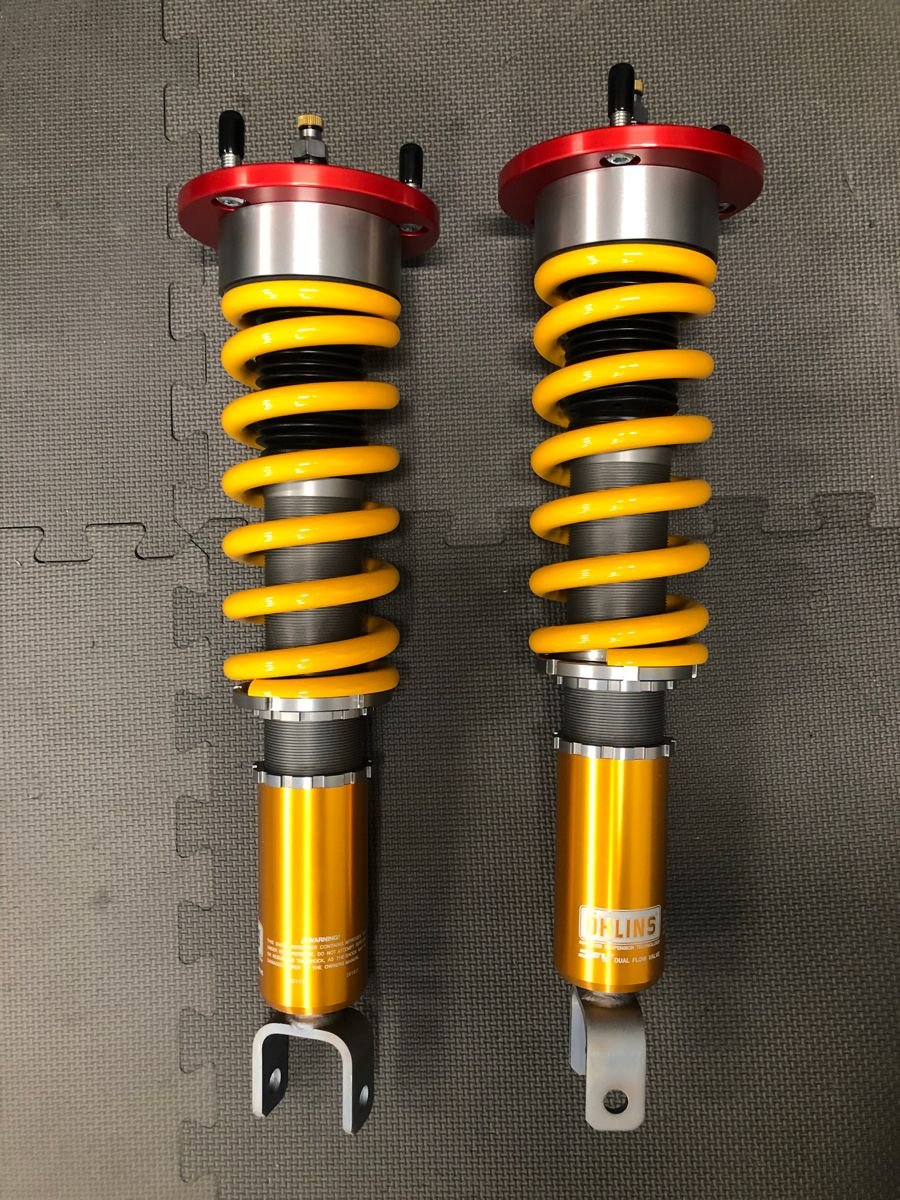
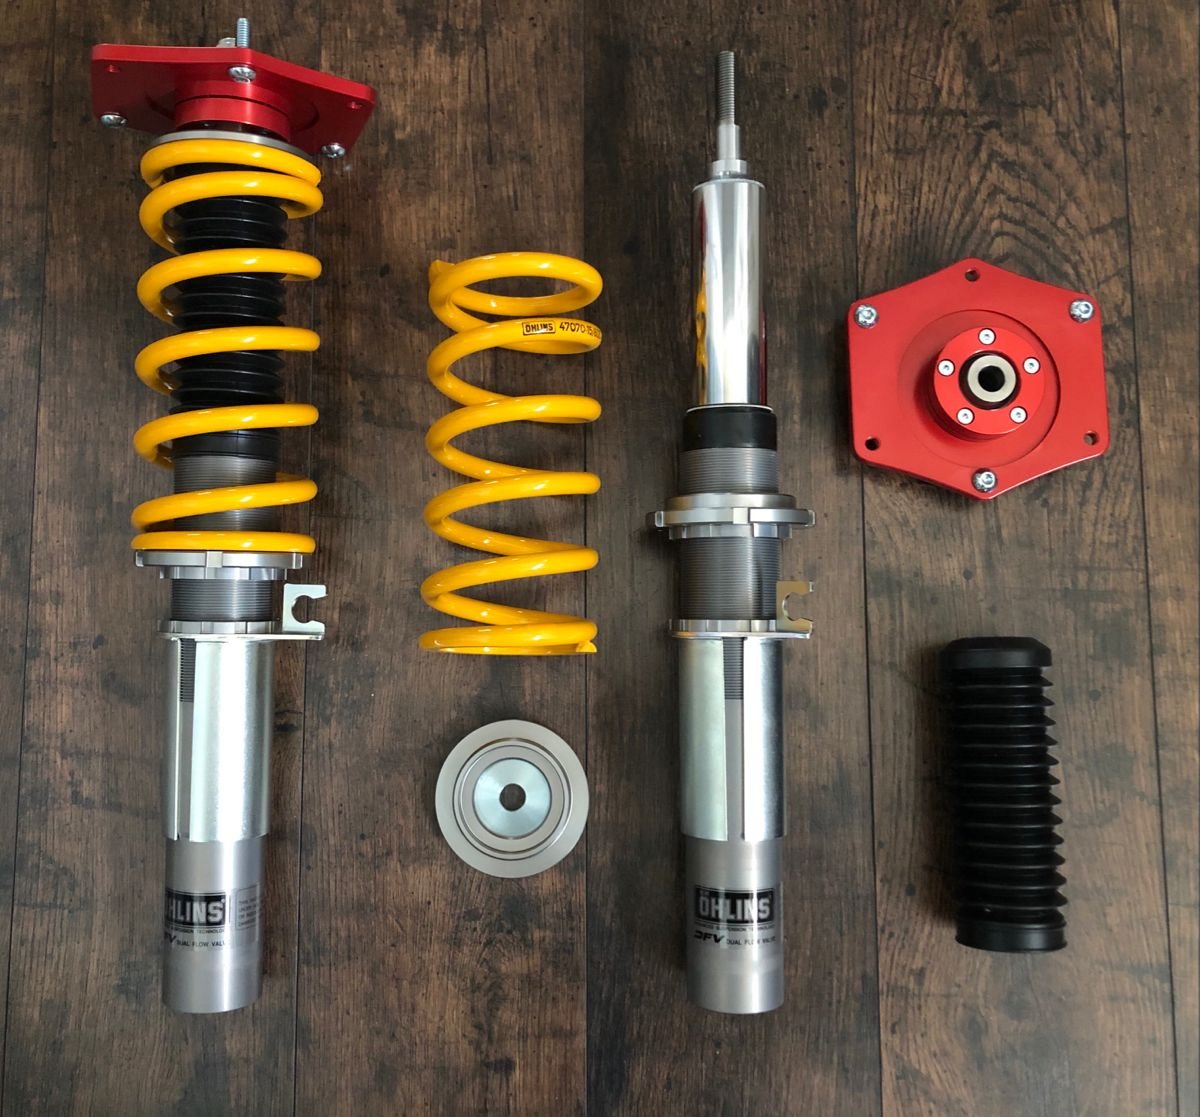
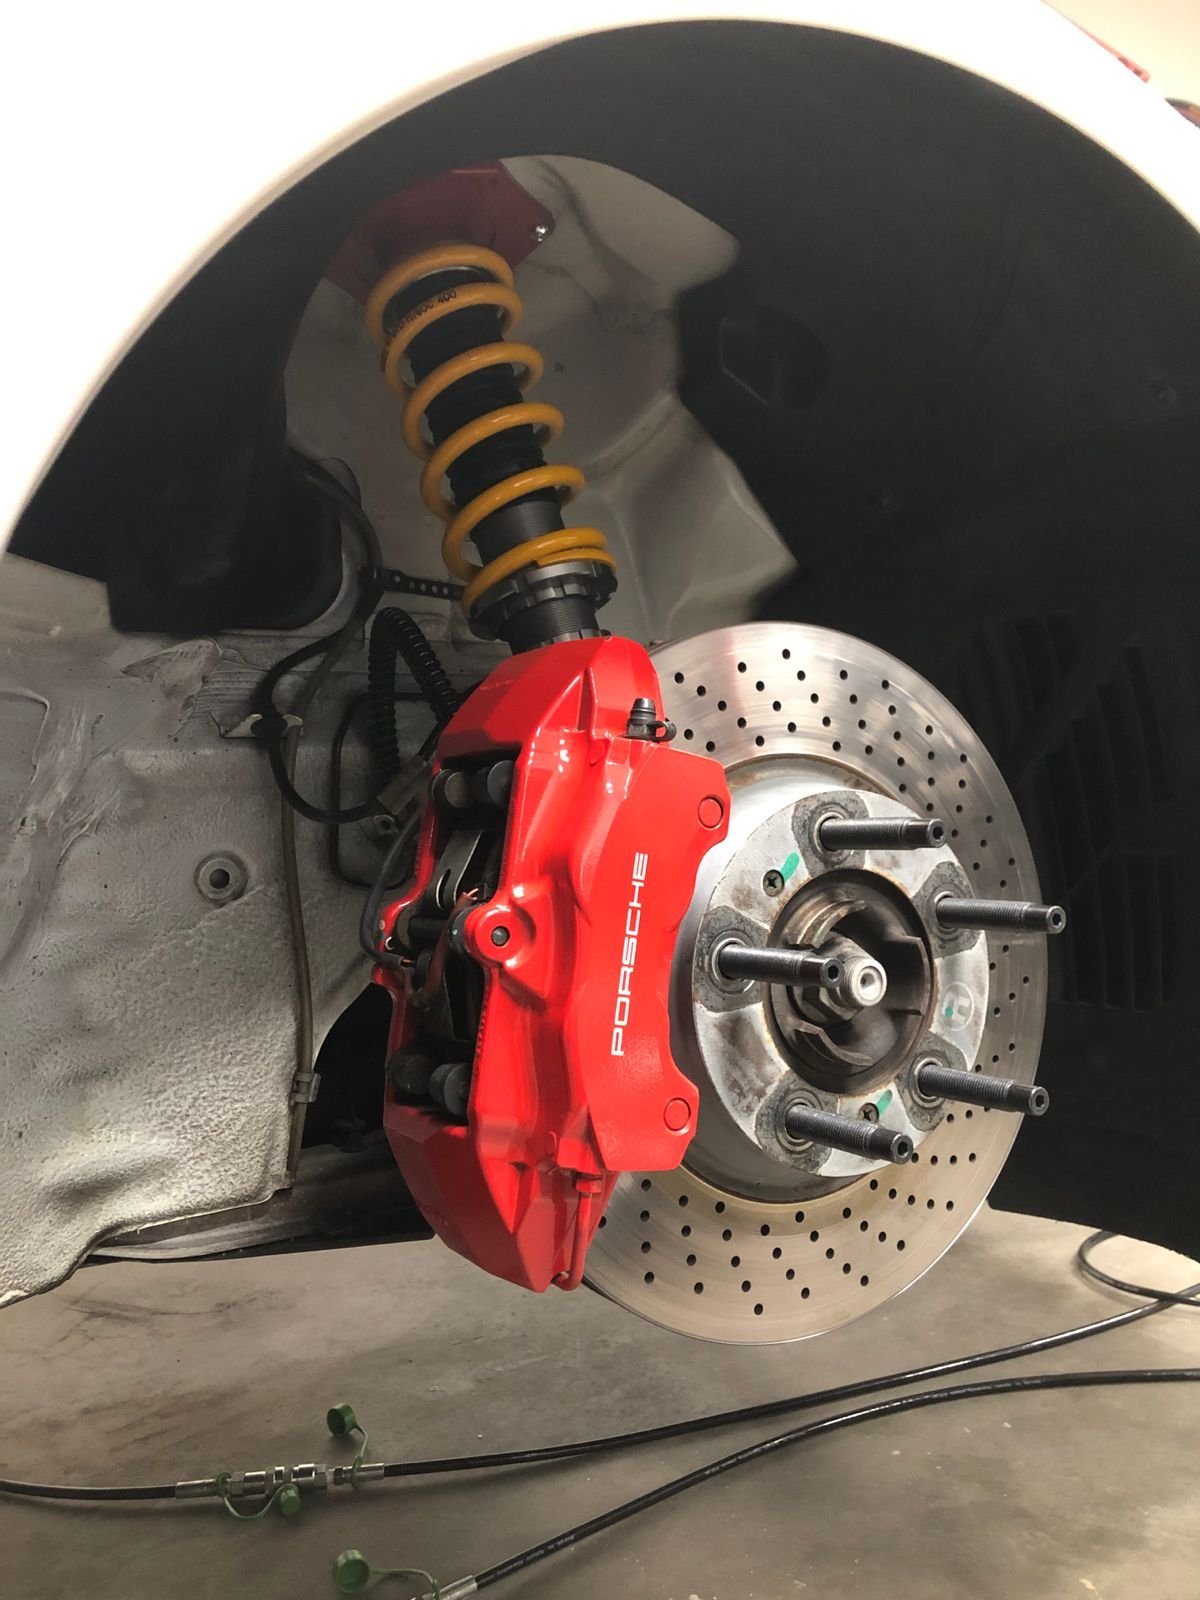
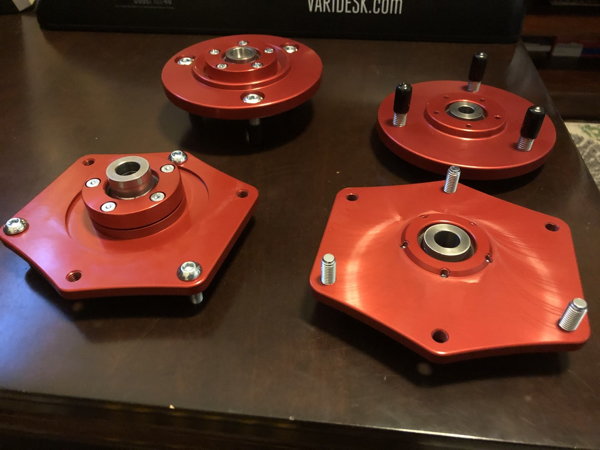
4 - Suspension and mounts - went for Ohlins R&T for an interim solution ... should be streetable and trackable and good enough for the level i am looking at for this year. Had issues with Rennline upper mounts and the Ohlins... the do NOT play together, those mounts are on their way back for refund. Supposedly Tarett's uppers are the solution, on order - not arrived yet, so more to come on that still. But new parts are pretty, so pictures off the car for now.
5 - Studs and nuts over bolts... hate bolts, i don't get why OEM spec bolts, makes mounting such a PITA
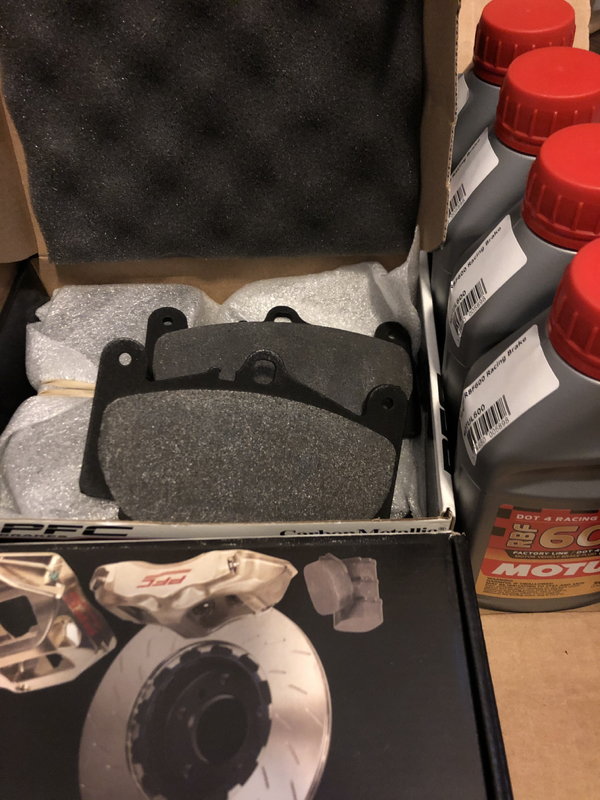
6 - Brakes - new lines, fluid and pads (ran PCF pads on the BMW race car... no reason not to here as well - these are the 08 compound)
after all this is done, a good motorsport alignment and corner balance and then off to the track for some shake down !
So, we're in for a few feet of snow this weekend... yay spring time in Colorado
Managed to refill the engine with oil now that the sealant is cured and took it out for a test drive... no leaks !
I also go my new upper mounts from Tarett delivered today and from what i see on pre-fitting the parts, looks like we should be in business.
So, i'll get started with teardown tonight.
Tarett monoball uppers rears in background, fronts in foreground
Got a much later start than envisioned... plus i forgot to borrow the spring compressors from my buddy, so i spent a couple hours cleaning.
i'll be spending a fair amount of time in here, so might as well make it less gross, was surprised how much brighter it is inside the wheel well now, that's a bonus.
should be able to dedicate this weekend mostly... updates soon.
engage hover-mode front before after, no filter just elbow grease rear before after
We got about 2' of snow... which was good and bad.
Good was that we need it badly (drought) and i don't have any where i needed to go in the next few days (yay work from home), bad was that i spent a lot of time shoveling !
On Saturday i had a very frustrating experience removing the front shocks... well really just the passenger's side... for the Ohlins R&T you're supposed to reuse the parts that comprise the thrust bearing below the upper mount. No problem, normally... but turns out this car was not just from FL like the Carfax and dealer said... it spent life in NJ ... long enough to accumulate junk under the passenger seat to show receipts and a notebook with proof (plus copious amounts of Hershey's candies and water bottles (i guess i totally forgot to clean under the pass side seat).
Anyway, all this resulted in many of the suspension parts being rusted in place, including the top fixing nut for the strut. Since this car has the PASM that means that i had to use (or in my case - make) a tool to hold the shaft by the threaded shaft while trying to loosen the top nut with a wrench because the EDC cable comes out of the top of the shock... non-PASM cars you can use a hex wrench to hold the shaft from spinning. This essentially resulted in a terrible situation of galled threads which, once i got the nut freed and moving, meant the nut would not make it through the bunged up threads... stuck, shoot.
Decided to go a different route and rather than try to reuse these upper thrust bearings, i ordered a set of ohlins upper sprint seats from a different kit (hopefully they will work out) if that fails i'll just try to order the porsche parts new.
Setting that distraction aside, i got started on the rears on Sunday.
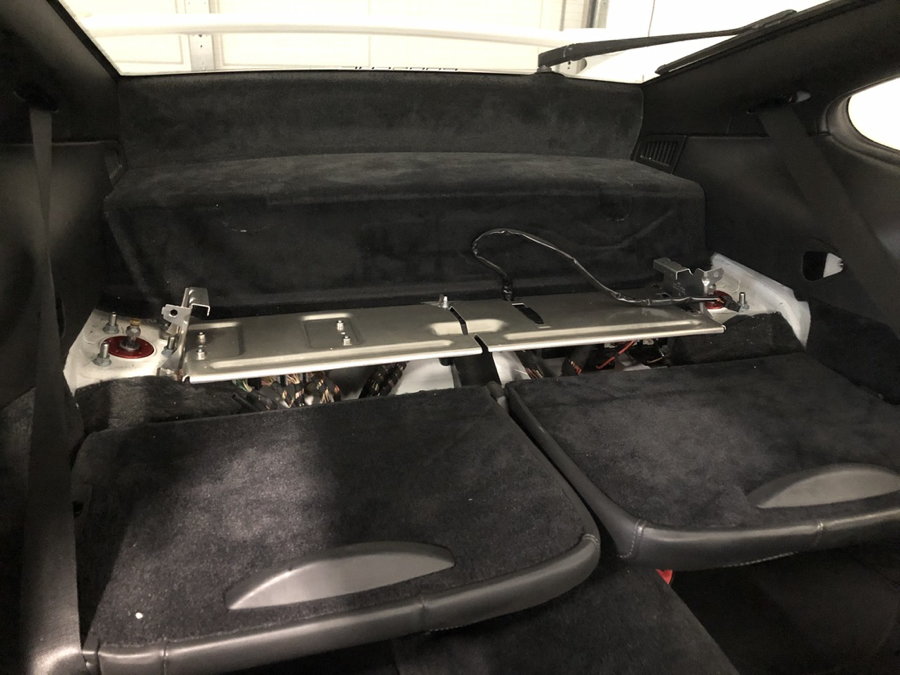
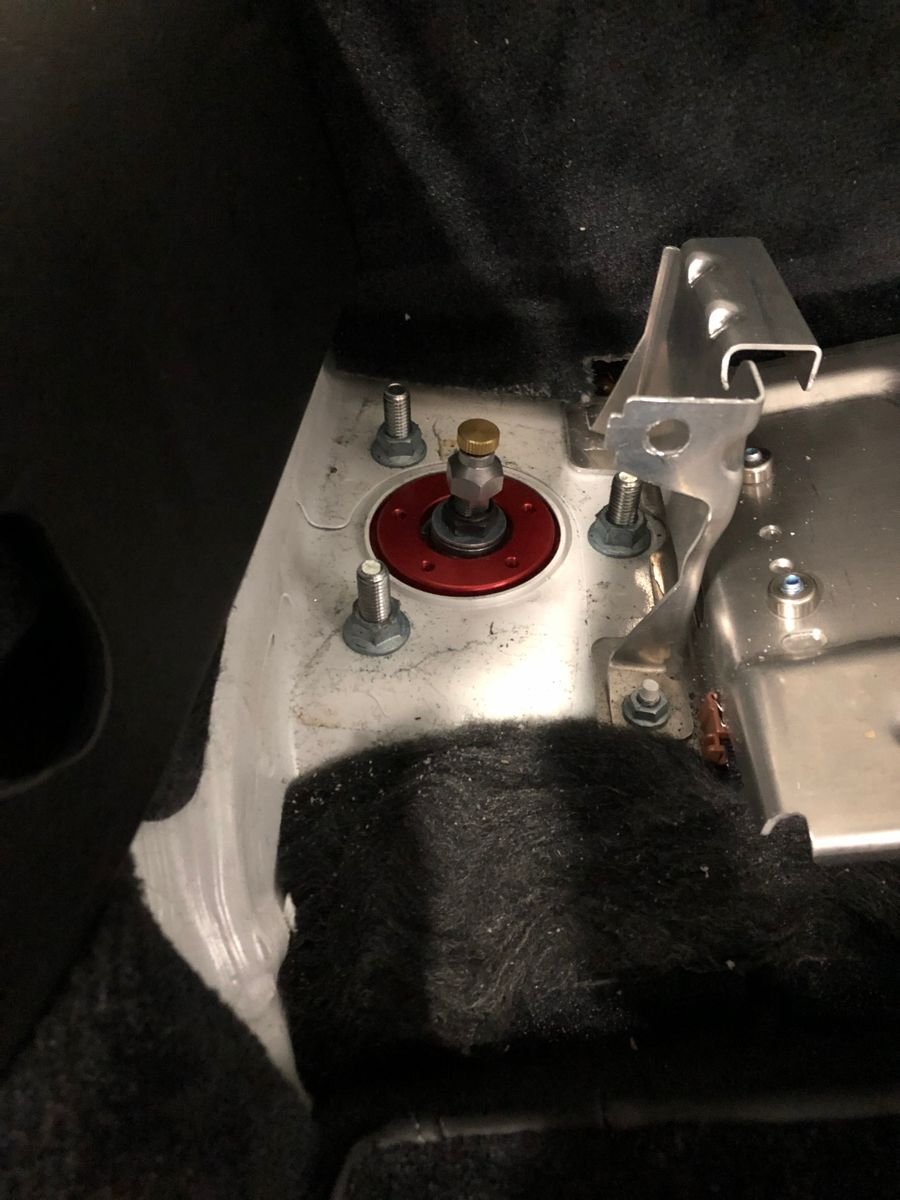
Removing them was pretty easy, really the only difficult part was removing the interior to access the top nuts and PASM connectors.
Installing the new parts was even easier.
Anyway, all this resulted in many of the suspension parts being rusted in place, including the top fixing nut for the strut. Since this car has the PASM that means that i had to use (or in my case - make) a tool to hold the shaft by the threaded shaft while trying to loosen the top nut with a wrench because the EDC cable comes out of the top of the shock... non-PASM cars you can use a hex wrench to hold the shaft from spinning. This essentially resulted in a terrible situation of galled threads which, once i got the nut freed and moving, meant the nut would not make it through the bunged up threads... stuck, shoot.
Hi Del,
I'm loving the thread!
Just a note on removing the top nut, the dished plate under the shaft nut is keyed to the shaft via a machined groove in the threaded section.
The slots in the dished plate are to accept a tool to prevent the top plate and subsequently the shock shaft.
The manual recommends using something very similar to a pin wrench to stop top plate from turning.
shows shock out of car, but anything to prevent top plate from turning does the trick!
THAT !
That is super helpful... i don't know how i failed to learn that ... dang... coulda saved me a bunged up thread... but this puts me back in the running for using my OE thrust bearings if the spring hats don't work out ! THANK YOU
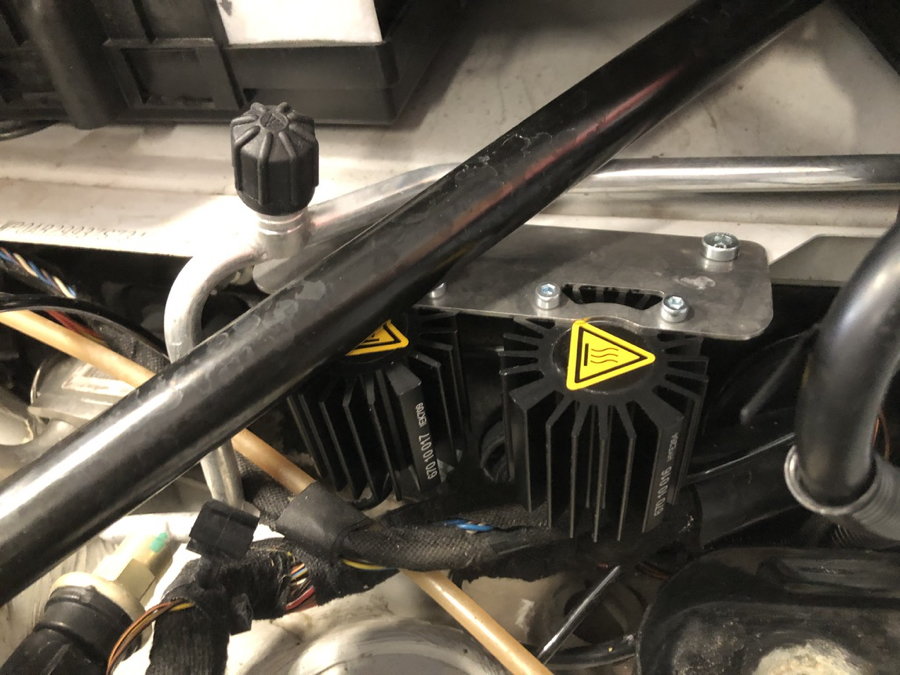
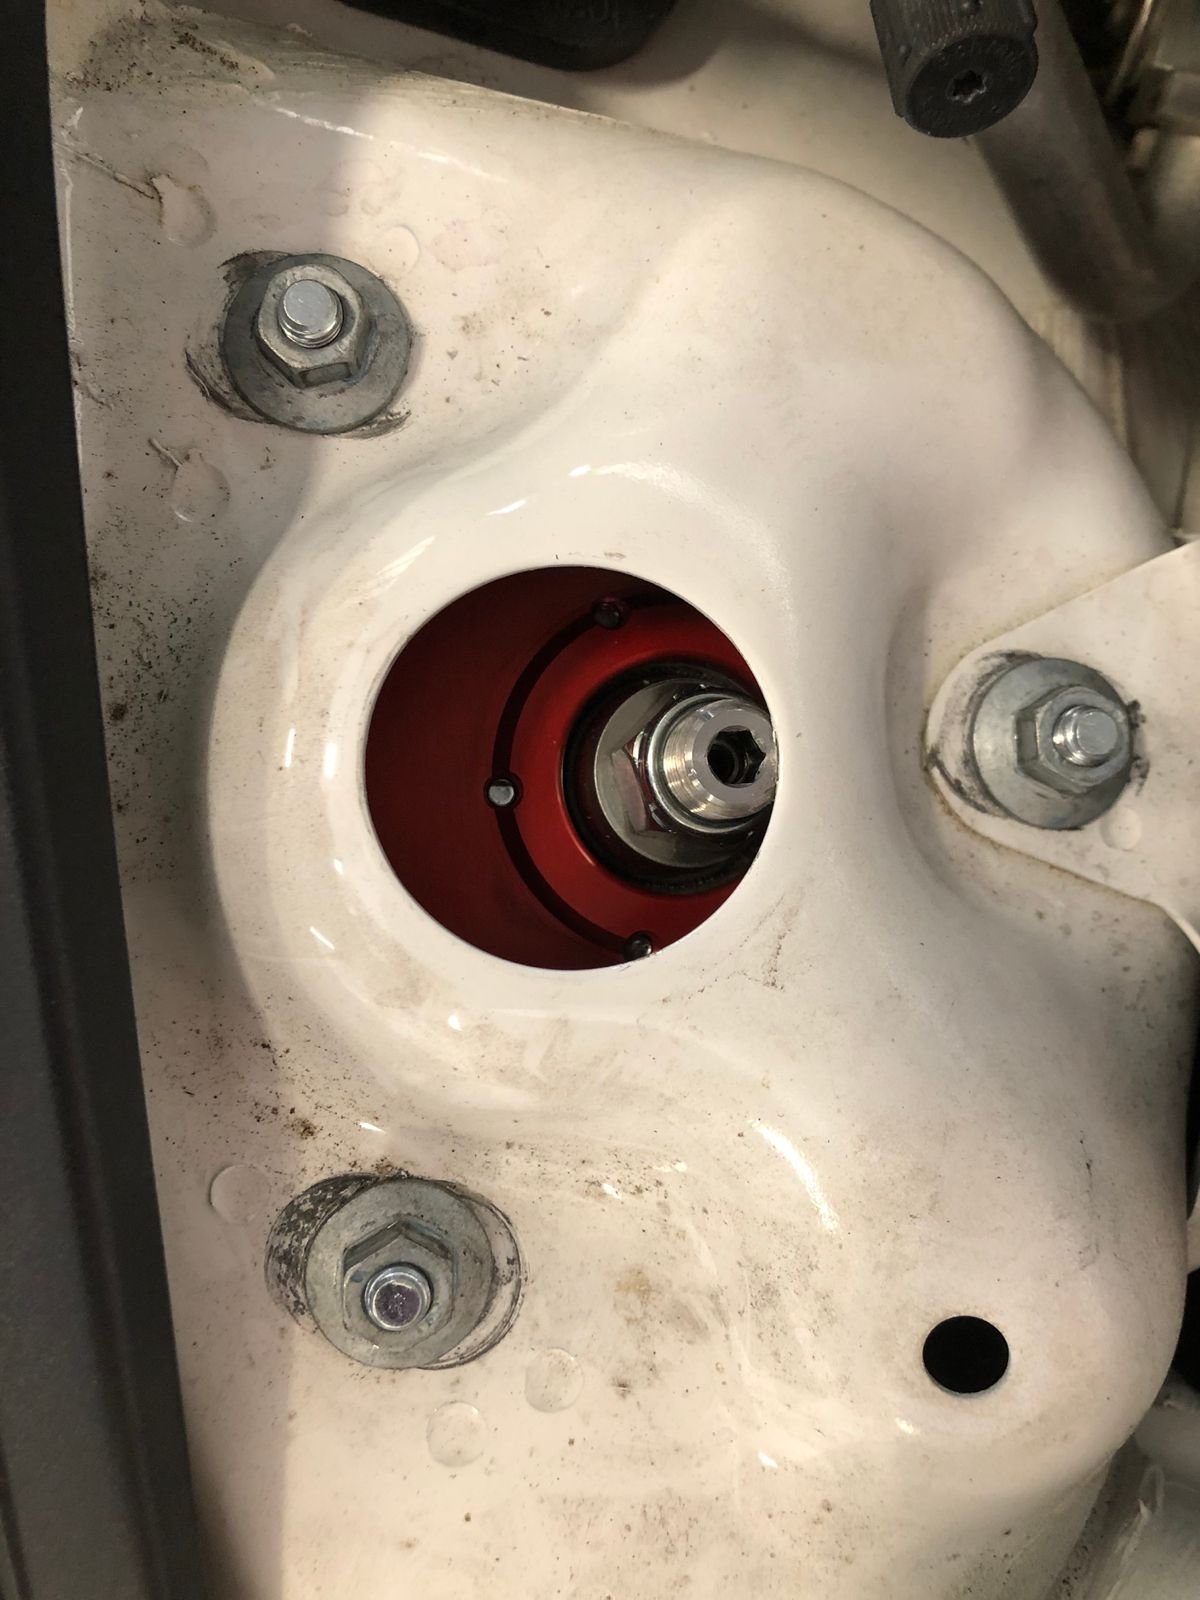
While i am waiting on those spring hats to drop ship from Ohlins, i got the PASM cancelation installed for fronts and rears.
These heat sinks aren't too bulky but not sure about placement... not much airflow, but we'll see how hot they actually get, also, not sure what sort of issue it could even cause if they do overheat.
Front came with a handy little mounting bracket that uses factor holes
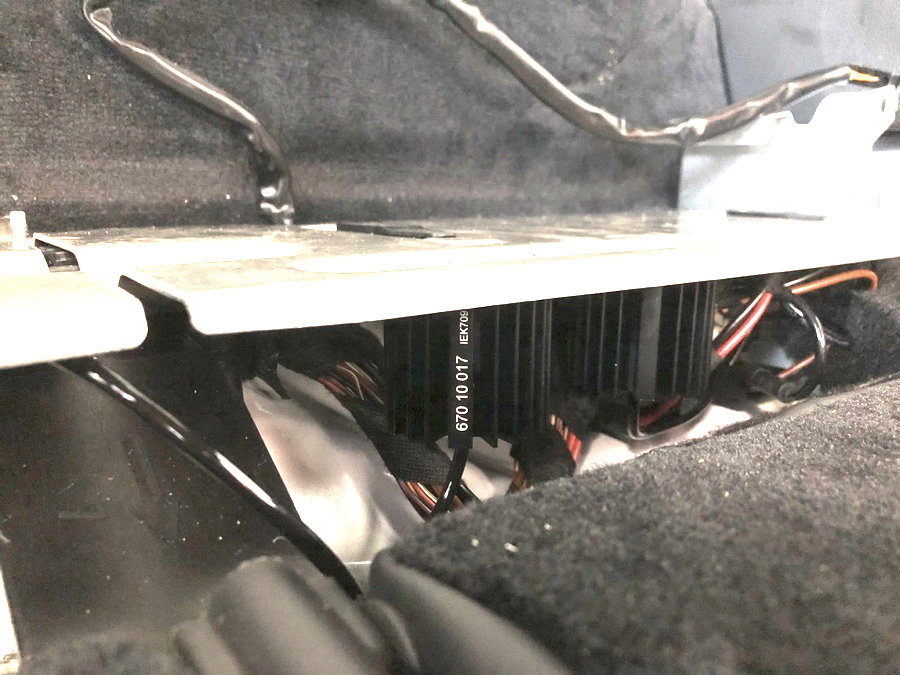
Rears were suggested to mount on the ECU tray, which is pretty much required since the PASM cables are really short from here
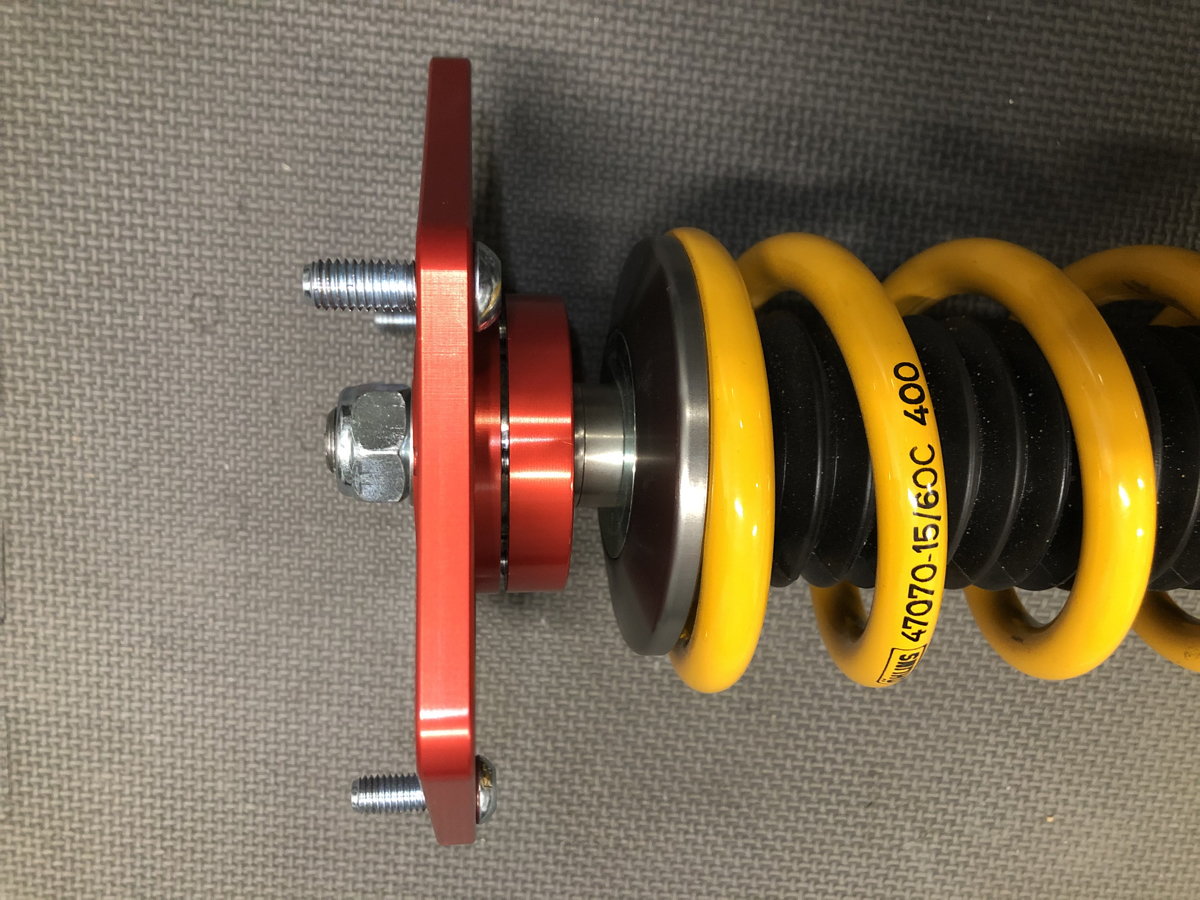
Upper spring seats arrived today from Ohlins... they're nice, but as expected a little narrower than these springs would have been spec'd with if there was a part like this for this kit. But i feel there is enough coverage on the OD to be usable.
These seats are 84mm OD and my springs are 90mm OD.
With these upper seats installed i had to drop the lower seats really low to fit the full length of the spring on the shock without any preload... so i hope i don't need to adjust them lower once the car is on the ground, as i'll need to customize the ABS bracket so it is out of the way.
Here's what they look like before going on the car... which i hope to get done tomorrow night.
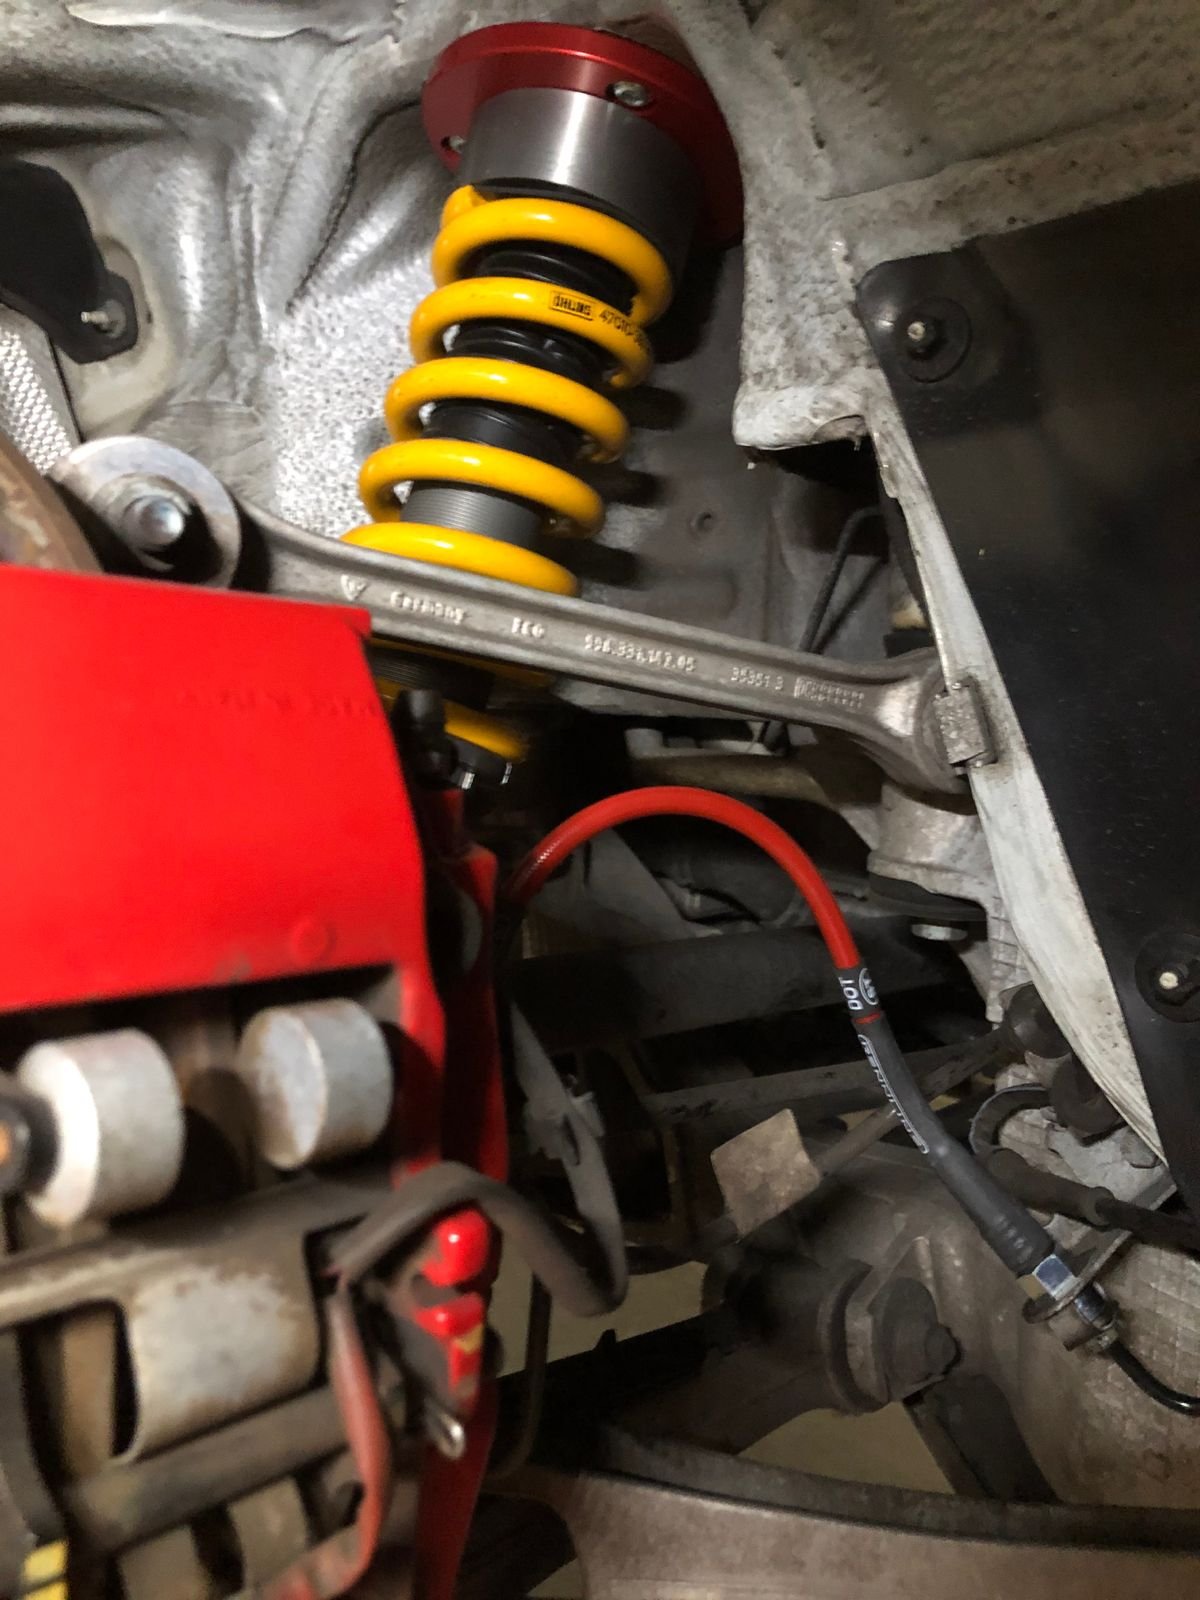
Got these fresh parts installed and everything put back together + added the studs to replace the damn bolts.
Had to drop the fronts almost down to the ABS bracket - so i'll probably need to modify that depending on how much it settles.
Learned that my car is now lower than my QuickJack ... had to prop some wood under each tire - lame.
Oh gosh, been way overwhelmed at work and have barely had time to work on the car.
But i bring good news and insight today.
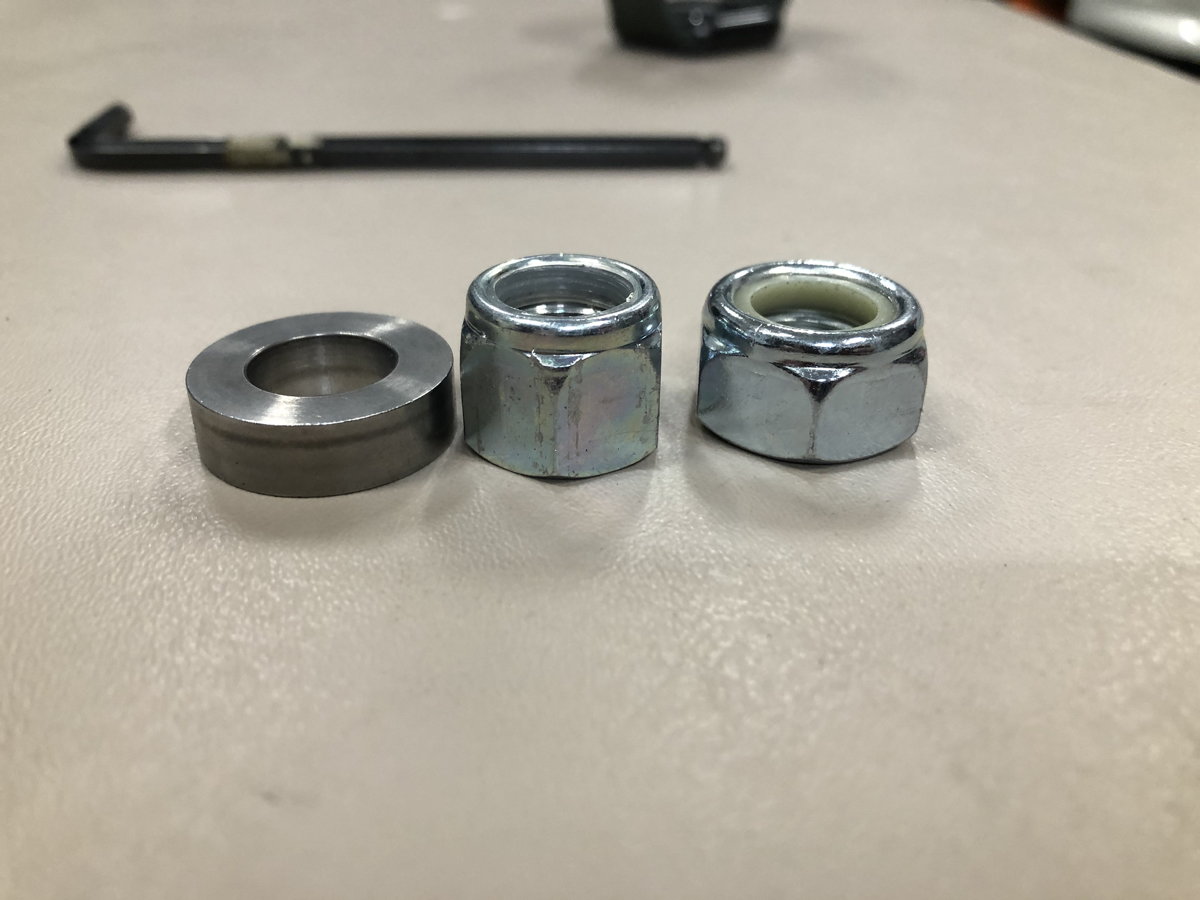
With the fronts installed as shown in the pictures above, i had to eliminate one of the washers because it would have left 2-3 threads too few on the top nut.
But in doing so the threaded shaft protruded too far above the top lock nut and came into contact with the body when the upper camber mount was installed in the high-camber setting. This limited the range of adjustable camber available to ~70%.
As such i needed to either find or make a mid-sized spacer/washer or locate a shorter lock nut.
I ended up going the latter route.
Here are the parts in question and their stack heights... from left to right Ohlins provided spacer, top nut and my ACE Hardware top nut ... both are nylock type M14-1.50 threaded.
With this setup i get about 1.5-2 threads above the nylock.
Next up was to install the new brake lines front and rear ... these are from Rennline and were an easy swapperoo.
Flushed and bled the fluid.
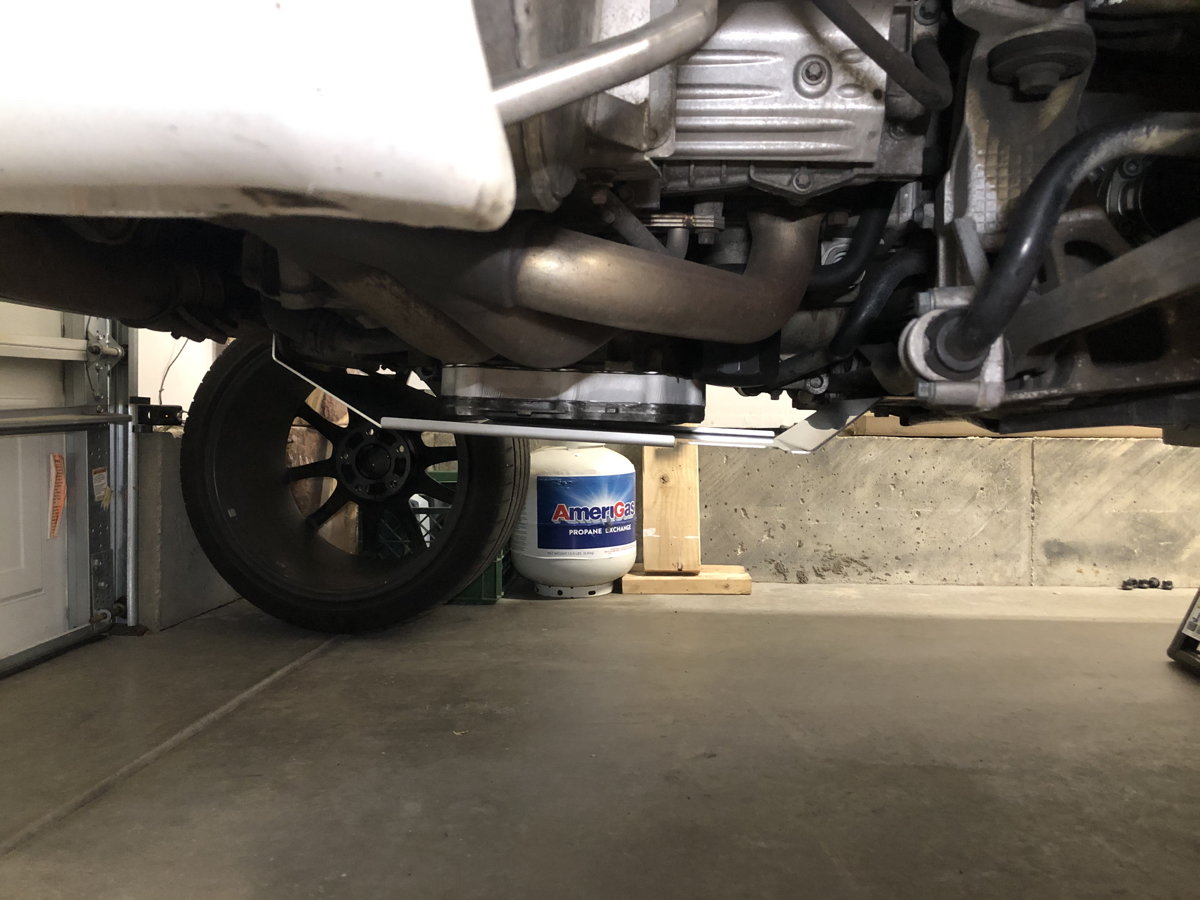
Final step before taking the car for a drive was to install the oil pan guard... now that the +2 Qt pan is installed and the car is lowered i am extra worried about a speed bump or curbing ending my track day/motor.
The part is made by Bilt Racing and was super easy to install and it is of high quality material and fit. My only concerns are limited or restricted oil cooling (not like this pan had cooling fins on it) as less airflow will directly meet the pan now... we'll see what the temp gauges say at the track.
From here, the test drive confirmed my suspicions ... the alignment is wildly out of whack.
Super sketchy on any pavement imperfections.
Got it 100% sorted out after a corner balance and alignment at my trusted motorsports shop, SCR Performance in Loveland, CO.
They reported that adjustable swaybar endlinks are needed to neutralize the bar, as it has some preload right now due to the lowered height... i have some on order, but might not be here in time... so i will take that into consideration during testing.
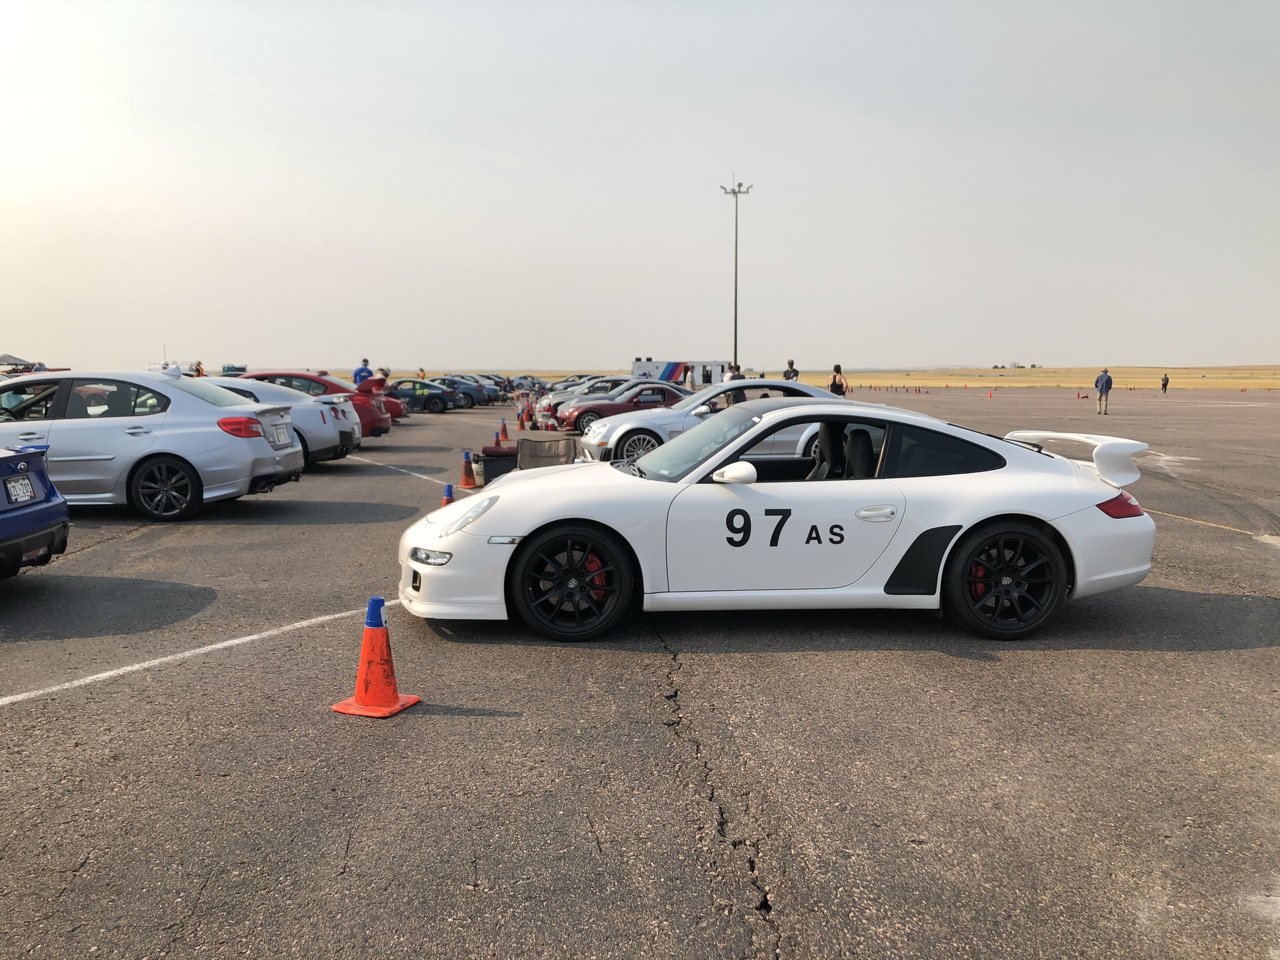
I'll be swapping in some PFC 08 pads F+R and throwing on the track wheel+tires and heading out to High Plains Raceway this Sunday for a shake down.
Alright... got the car on track and it was a blast to be back out there.
Ran really well and strong. I was not able to get the swaybar droplinks in time, but they're here now, and i'll have them installed before the NASA event i plan to attend the weekend of 24/25th.
Only issue i had was that the brake fluid was not up to the task... i decided to do a flush with fresh ATE to see if that would be okay enough, turns out it wasn't. I managed to heed the signs and shorten my session and do a full cool-down lap before bringing it in... except for the 4th session of the day, and i went long off the end of the front straight as i couldn't get the car slowed down enough to turn in for T1. Zero issues with the runoff and coming back on... drove the car home as well. I'll replace the fluid with the RBF 600 i have on hand already and i'm adding brake cooling ducts for the rear as well.
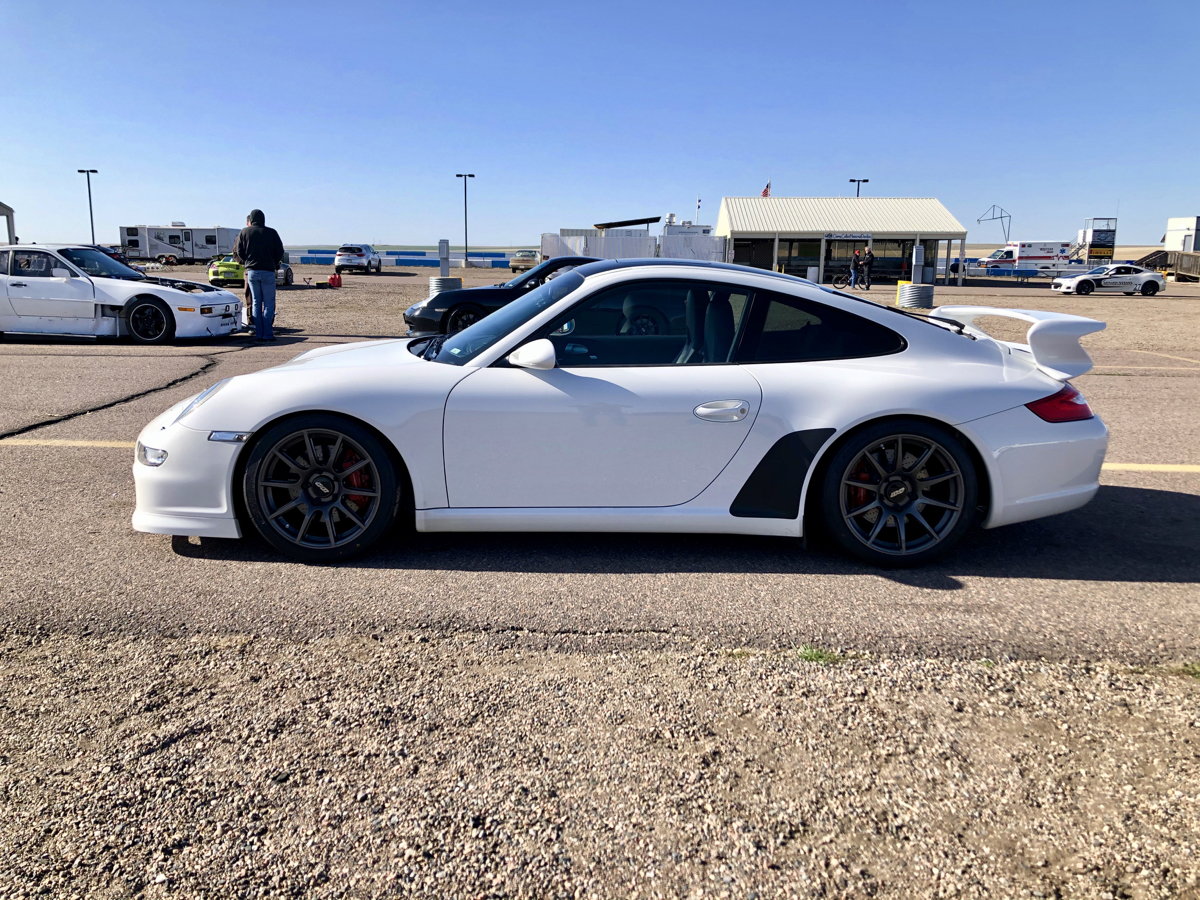
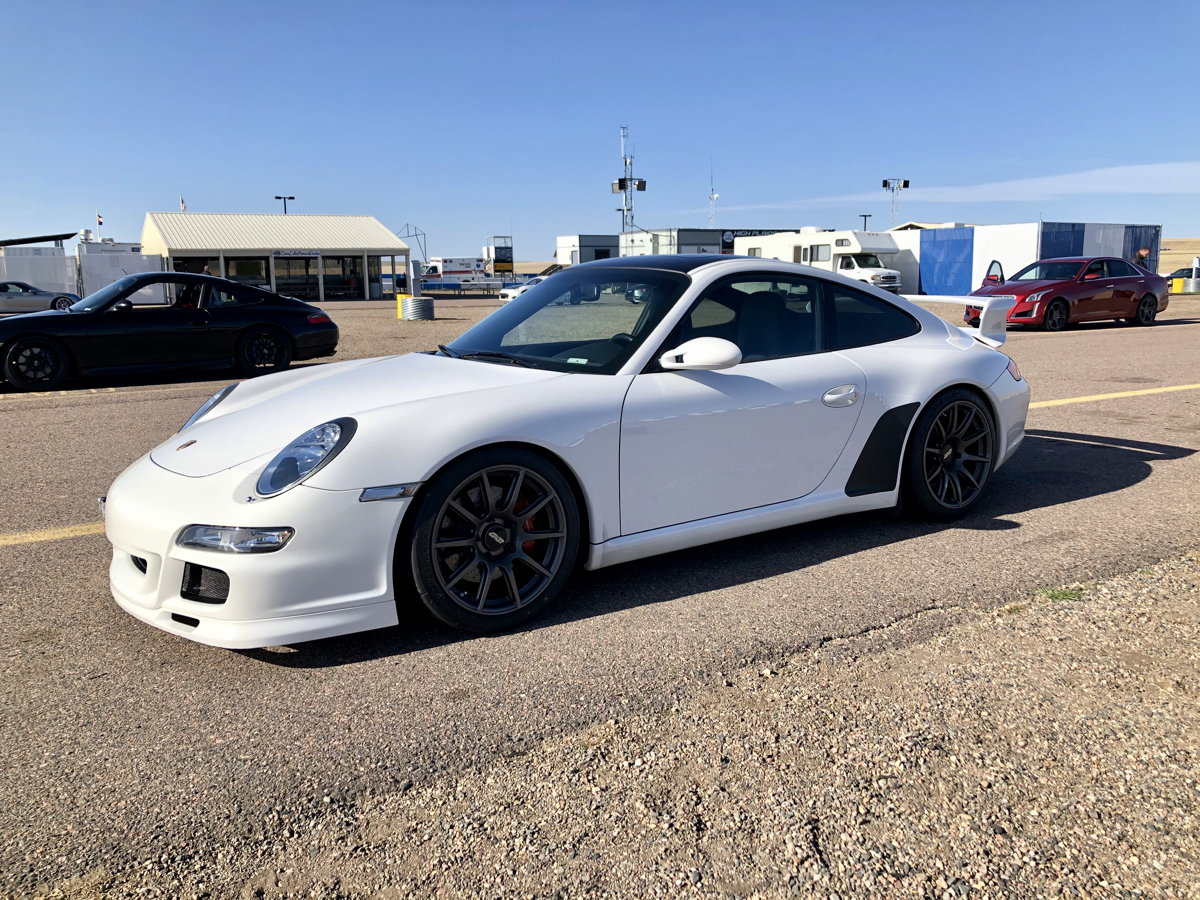
It was pretty cold and windy (the latter is a staple of HPR) ... so i barely spent much time outside the car, but did grab a couple of photos from the early morning session.
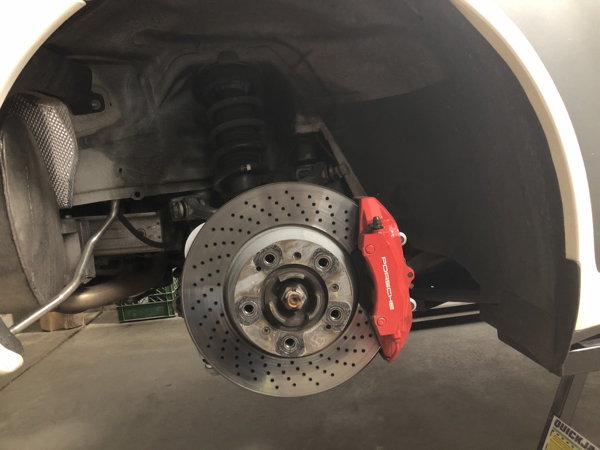
Ride heights are not ridiculous either... doesn't scrape on my driveway any more... only thing i do hear scuffing is the air deflector in front of the front wheel well openings.
Great write up. Thanks for that. I’ve had a 997.1 since 2006 and tracked it all over the world. Lots of stories to tell with mods and weight loss regimen. Will get to it eventually.
Yep, i spent a year just enjoying the car, in stock form... but i am a mod'er at heart and always over do the safety/prevention stuff when headed out on track.
Nothing worse than ending your weekend early due to something you could have prevented. Now i get to focus on driving and learning this platform vs. worrying about things i could/should do.
Thanks for the write-up! I just started tracking my car this year (4 DE’s so far) and decided to buy Ohlins R&T coilovers and RSS semi-solid engine mounts.
How do you like the Ohlins so far? Did you have to buy wheel spacers?
 03-09-2021, 08:28 PM


 (i guess i totally forgot to clean under the pass side seat).