When you click on links to various merchants on this site and make a purchase, this can result in this site earning a commission. Affiliate programs and affiliations include, but are not limited to, the eBay Partner Network.
Tools needed:
- Trim removal tools
- Torx T20 screwdriver
- Small sturdy flat head screwdriver to unclip the strut
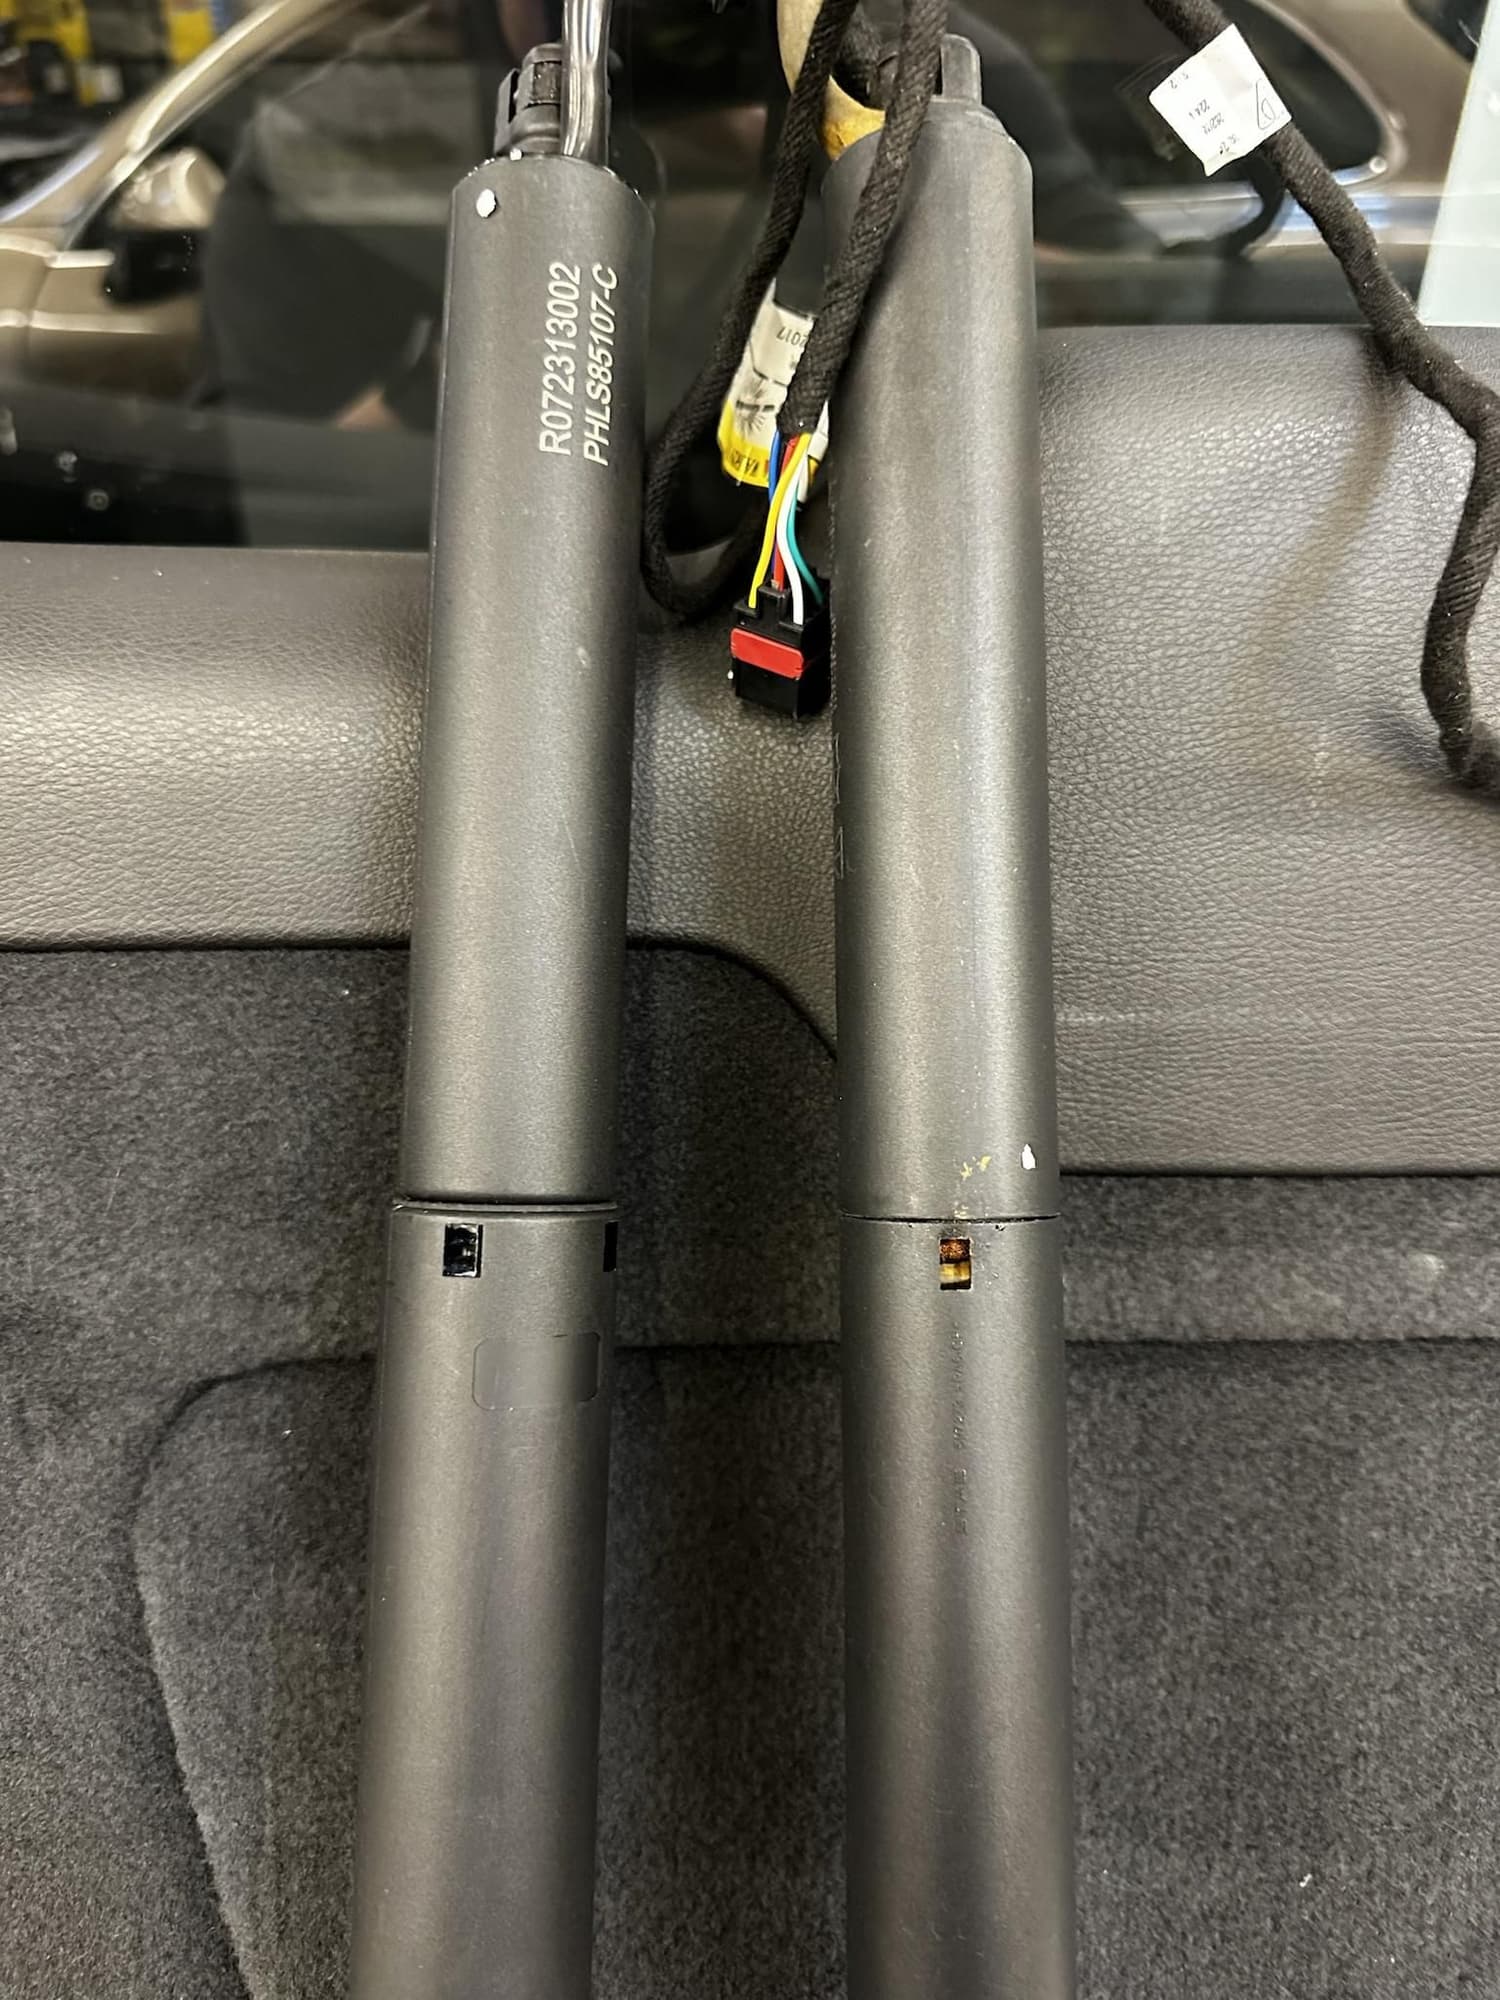
2011s seem to come with the strut part number 95851285104 (7P5827851C) but the dealer only sells the updated part 95851285106. Parts are not interchangeable so if you're replacing 95851285104, you got to do both struts. 95851285105 is interchangeable with 95851285106. The strut is not serviceable, it contains a compressed spring and the caps are stamped.
1. Open the door in the middle of the liner and remove the 2 T20 screws behind (red arrows).
2. Using a trim removal tool, pop the cover off the latch.
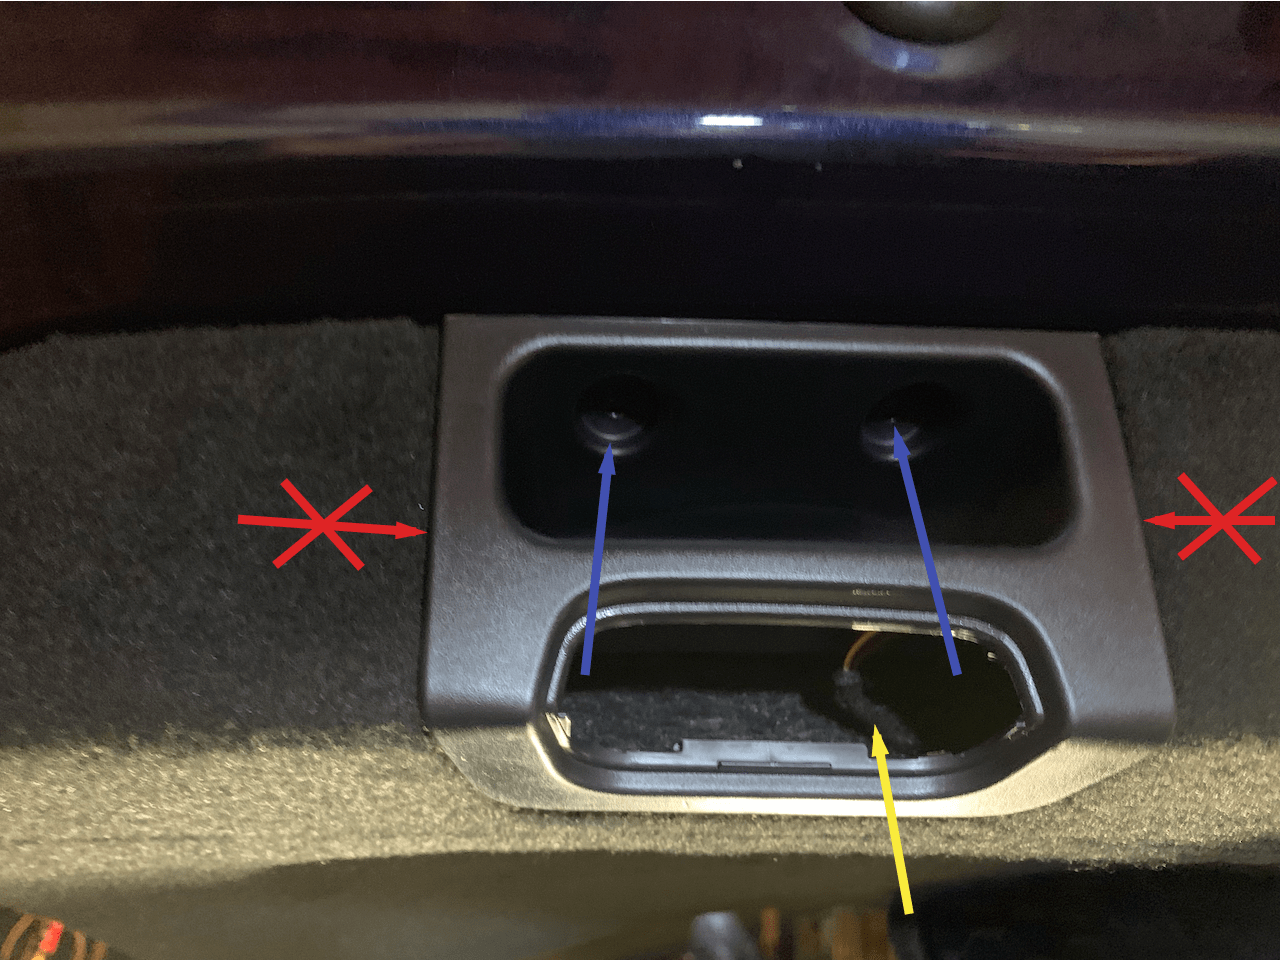
3. Move to the left handle. Remove the 2 T20 screws (blue arrows) and then unclip the light using the trim removal tools (yellow arrows). Disconnect the light by squeezing the 2 nipples sticking out and pulling back. Don't try remove the entire plastic piece (red arrows), it's glued to the liner.
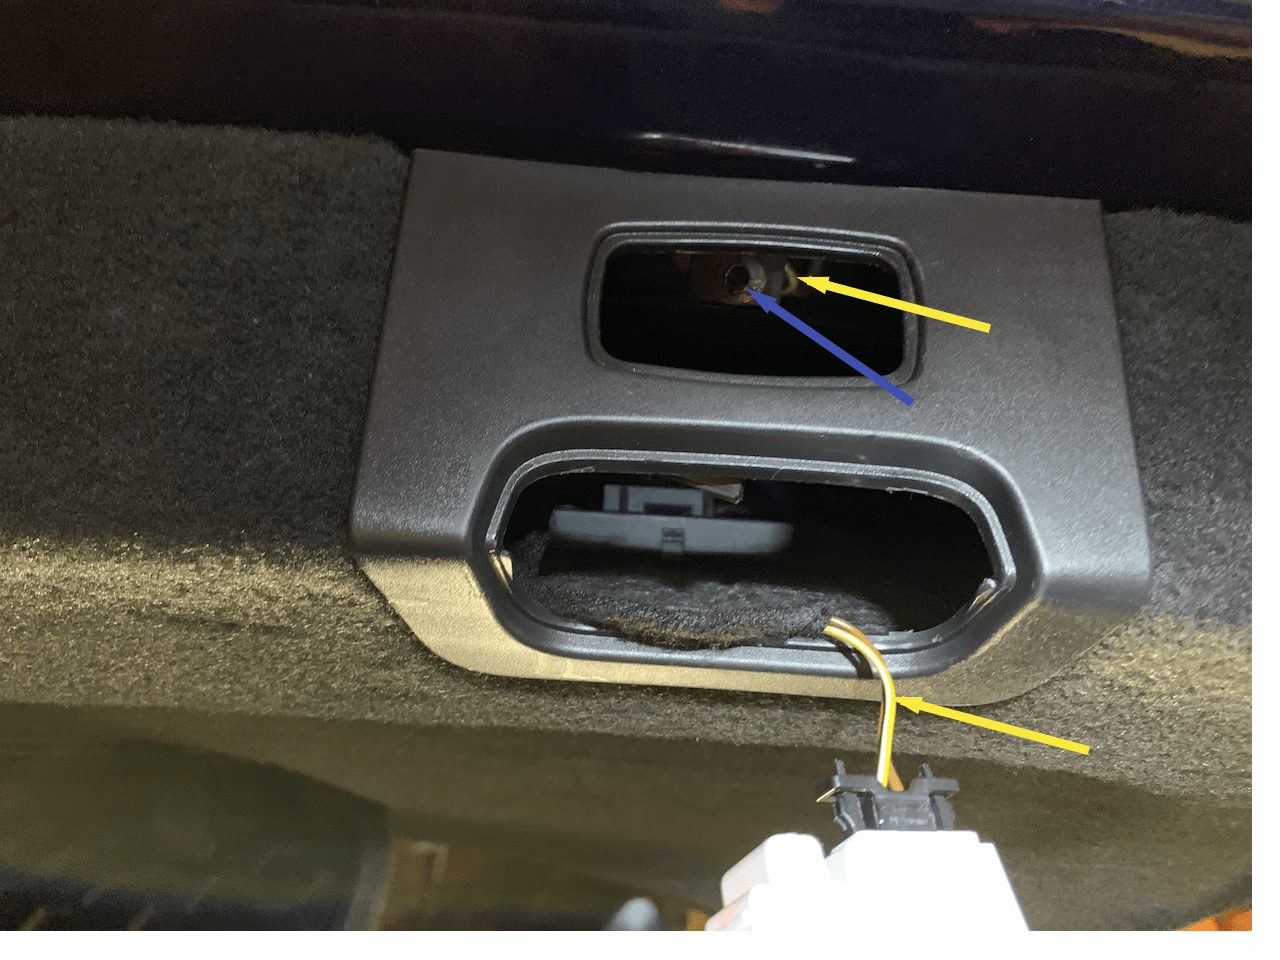
4. Move right. Pop close button using the trim removal tools and then disconnect it (top yellow arrow) and remove the single T20 behind it (blue arrow). Also pop the light and disconnect it (bottom yellow arrow).
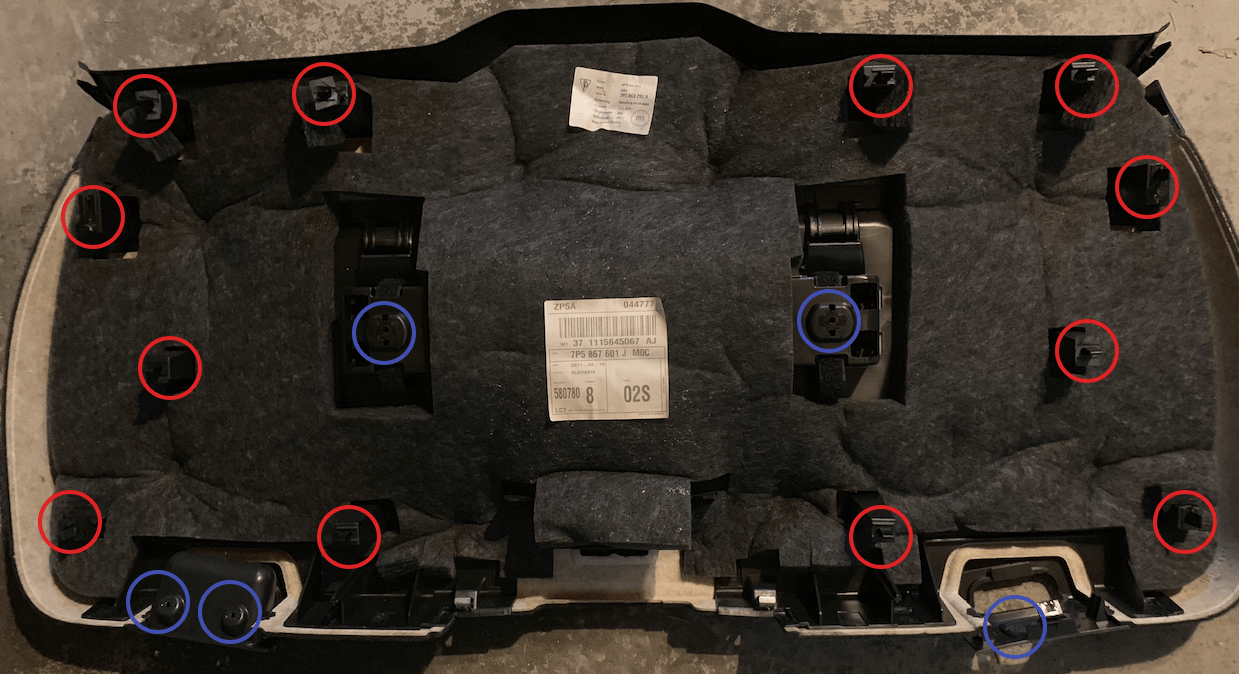
5. At this point, the liner is held by the dozen clips (red circles) because you removed all 5 screws (blue circles). Either with your hands or using the trim tools, start popping the clips. It's a lot scarier than it looks but you're not likely to break those metal clips.
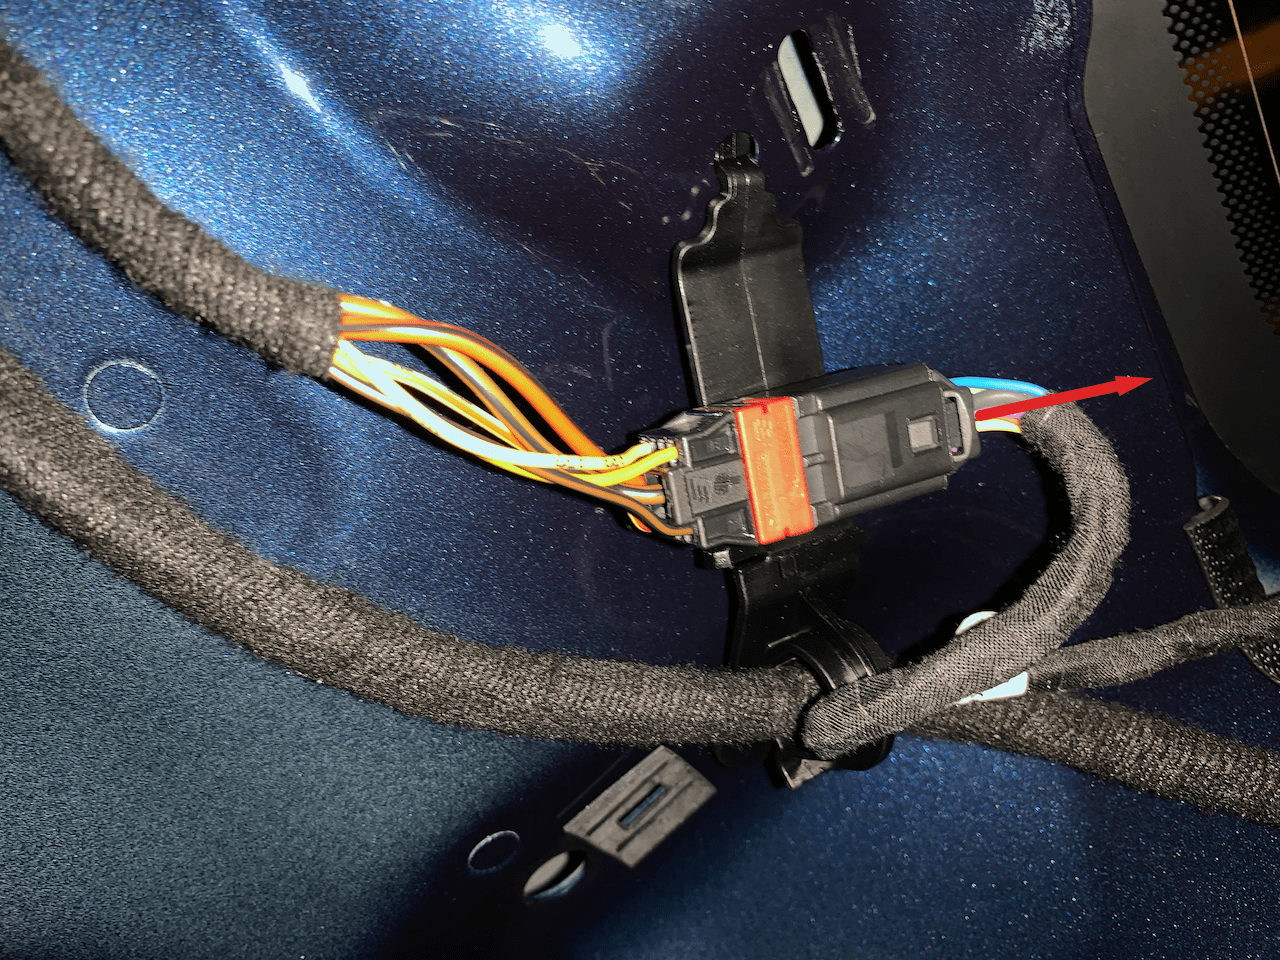
6. Unclip the connector to the both struts and pull it away (red arrow). Pull the whole harness outside of the tailgate.
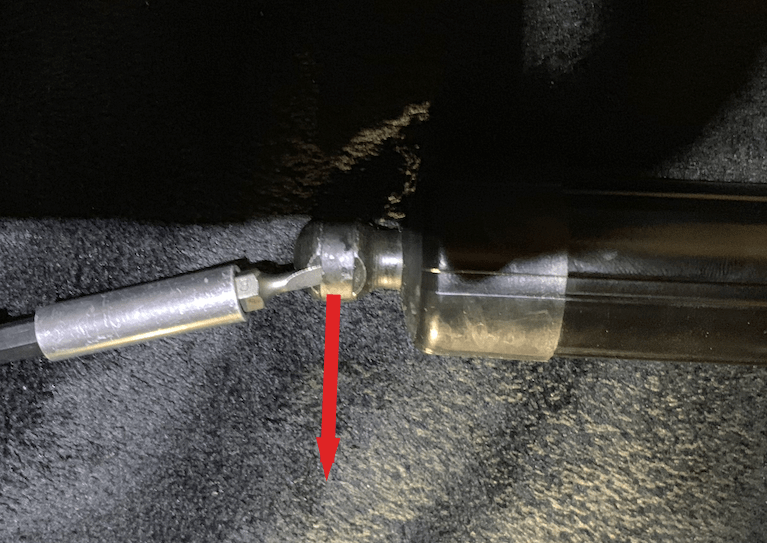
7. The struts are held in place by the metal clips in the pic. Using a flat head screwdriver, push up the clip to disconnect it (red arrow). I've found that pushing the clip all the back or forth also disengages it. If you pop off the clip completely, don't worry, just push it back on. After the clips have been dealt with, you can pull the strut off. You could use help for this step. When you remove one of the struts, the hatch will want to close. You can do it alone though, if have the new strut unclipped and near by.
8. Reverse all the steps to put everything back together. After putting it all back together, close the tailgate by hand and let it latch. It should start working normally after that.
Last edited by dbv1; 06-30-2019 at 09:03 PM.
Reason: extra info
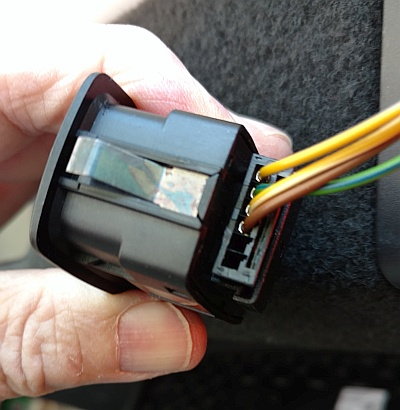
OK, what stymied me - getting the damn electrical connector off the close switch. Without that - I couldn't drop it since the switch won't go through the hole it mounts in..
Some pics of the connector - maybe you have a clue for me..
Thanks again for your DIY.. I'm sure people will find it quite useful!
Hey Don, thanks, another 2 DIYs are coming (got some pics).
As for the switch, grab by those nipples at the end, pull down and back. If it's stubborn, put something thin (and preferably soft) just behind the connector and gently lift up while pulling back. It's hard to take a pic while popping it off.
Thanks, very helpful. I think the only two things I ran into when doing this install were:
1. The plastic holder for the close button either came loose in the process, or was already loose. Going to wait until I can put some plastic epoxy on it before I put the panel back on.
2. I was a bit stumped because my struts seemed longer and I couldn't compress them. Finally realized you just need to lift the hood up.
I did this myself and you should definitely plan on the hatch lowering if you only have one strut attached. It wasn't too difficult to just have the new strut ready to pick up. You do have a trunk in front of you The new struts clipped on pretty easy with one hand.
Does anyone have the part number for the OEM struts they used? The only ones I can find on FCPEuro state that they�re for a Macan and don�t confirm whether or not they fit the 958.
Does anyone have the part number for the OEM struts they used? The only ones I can find on FCPEuro state that they�re for a Macan and don�t confirm whether or not they fit the 958.
958-827-851-A
Pelican Parts is a great place, and they'll confirm fitment. I paid about $750 for the set and was able to do it in a couple hours taking my time. Easy install. Helps to have a friend to hold the hatch open. Or a stick if you don't have friends
For what it's worth, I purchased two from Sunset Porsche online last year and the total was $685.
And to reiterate, a 6 foot step lader works great to hold the hatch open!
Well don't throw stones at me, but I gawked at the idea of spending almost $800 for two trunk struts! Especially when my ideal solution would've been to remove a power liftgate altogether (I've always hated them for the most part).
So I went with an aftermarket option and have not looked back yet. I found a website/brand called A-Premium and they offer a replacement Power Hatch Lift Support for our vehicles for $170 ea, though I got them on sale for $136 ea. They have a very nice website that's very easy to navigate and provides very nice product pictures, descriptions, a 2 year warranty, and free shipping. Couldn't find anything about these specifically, but was able to find enough general reviews of A-Premium's other products like fuel pumps, etc that I was at least confident enough to give them a shot.
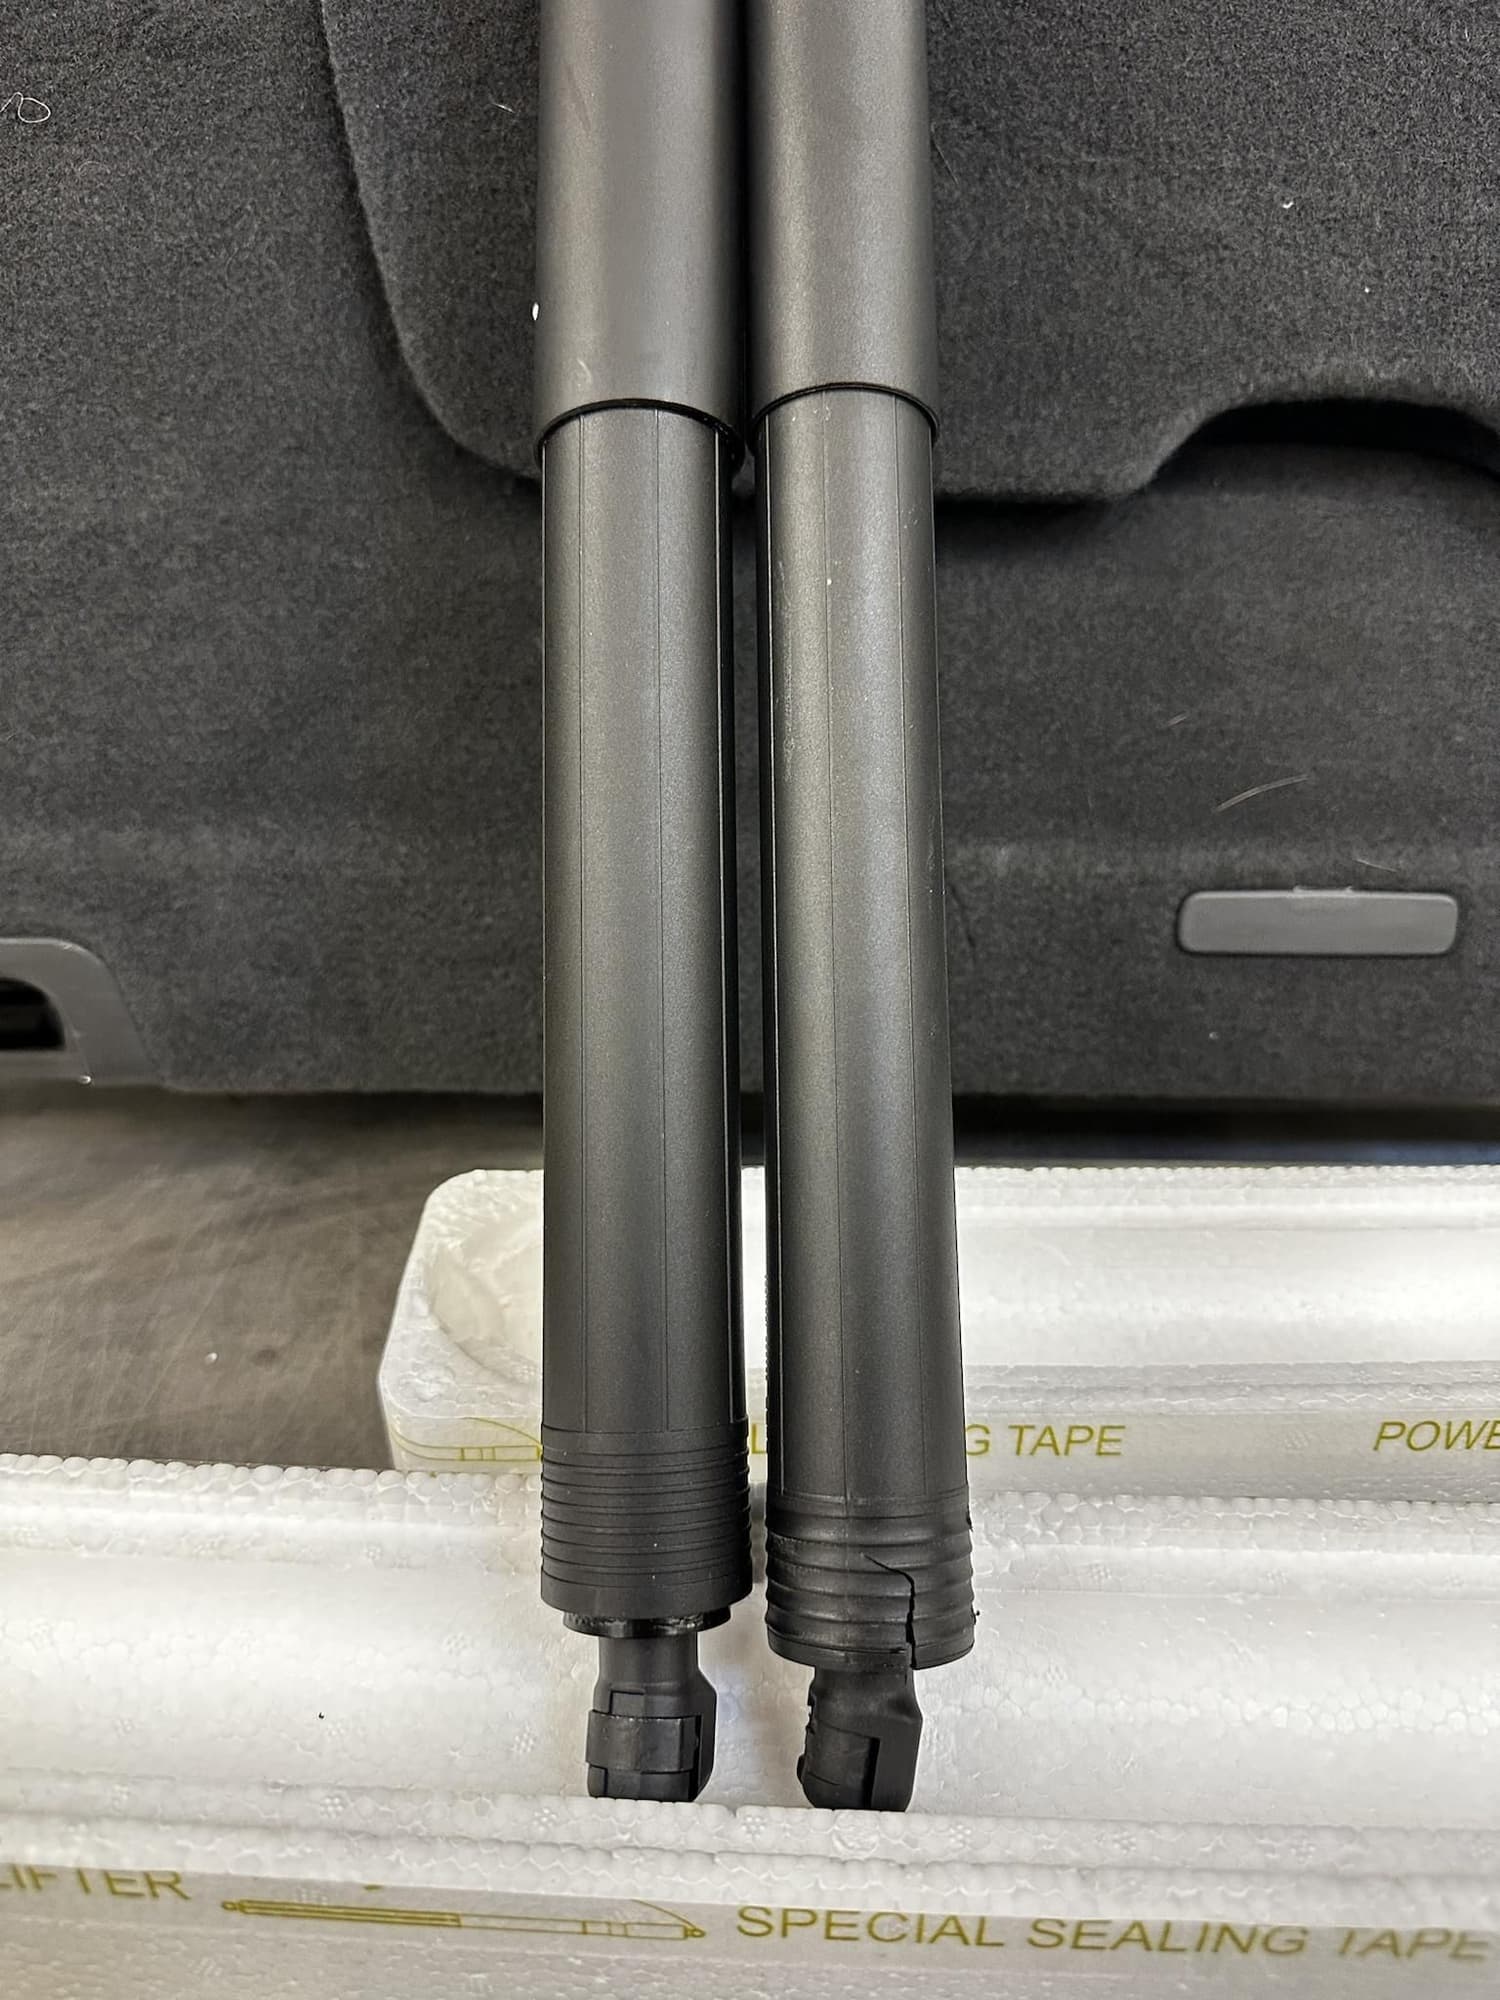
These are Chinese and A-Premium appears to be a Chinese company, so if you're deadset on wanting something built in Romania then by all means go with OEM. But from my initial impressions of build quality, these are very solid and are high quality. They shipped from Georgia, shipped in very nice packaging, and shipped within a day of ordering. They aren't identical to the OEM strut, but I don't think that's really a bad thing. They function perfectly (so far, of course) and they'll have a very good opportunity in the next couple of weeks to prove they're okay since the PNW is expected to get into single digit Fahrenheit overnight temps, and this is frankly what did my original struts in. They'd freeze overnight since it was around 20F and of course wouldn't open in the mornings. Pretty detrimental issue when you're roadtripping 2,500 miles across the Western US. But as can be seen in some of my pictures, the especially problematic strut was cracked at the bottom and I wouldn't be surprised if this was allowing for a bit of extra moisture to seep in and cause more damage as it froze.
A-Premium on left, OEM on right
A-Premium on left, OEM on right
I'll try to remember to circle back here and give some updates as to how they're doing, but as of now I'm very pleased with the product. Time and abuse will tell the story best of course. This guide was super helpful in getting these installed very quickly. I did the job by myself and if I weren't going back and forth to my computer to double check everything, I could've done it in 30 minutes or less. Thanks for all the help!
Forgot to come back and update on the A-Premium struts, but they've been flawless. Lots of freezing/wintery weather that was constantly giving my OEM struts fits with sticking and even reliably closing/latching. I wouldn't even think twice to buy these again or recommend them to anyone. Great quality replacement option.
if you dont mind my asking. why did you replace them? i have a 2013 gts and they just dont open all the way. enough, but not enough to not hit my head on them. which i did for the previous 6 years with my last vehicle. no more! i am wondering, i have no other 2013 to compare this to, how far are they supposed to open?
Ok, update on the A Premium struts. They are working like they should, except for the fact that they can't hold up the rear hatch until the hatch is about half way up. I used to be able to crack the rear hatch when washing the car so I could get the wash mitt across the top of the bumper. Tried it yesterday and nope! The rear hatch falls back to a closed position. I think it's a telling sign of how long these will eventually last. I give them about 2 years.


 06-30-2019, 08:16 PM


 The new struts clipped on pretty easy with one hand.
 But as can be seen in some of my pictures, the especially problematic strut was cracked at the bottom and I wouldn't be surprised if this was allowing for a bit of extra moisture to seep in and cause more damage as it froze.