When you click on links to various merchants on this site and make a purchase, this can result in this site earning a commission. Affiliate programs and affiliations include, but are not limited to, the eBay Partner Network.
For a while now the right rear passenger door on my 2011 CS has not always unlocked with the fob or the internal dash button. It does unlock from the internal door handle. The only diagnostic info from the iCarScan is a DTC 000843 Central locking closing unit, implausible signal. In cold weather is seems like it never works so that may be some sort of a clue.
Wondering if there's any way to isolate this further? Based on the prior and current behavior it seems like it has to be either the control module or the actuator. Is there a simple test to confirm which? I can tell by the sound that the actuator isn't working but that doesn't give the reason as it could be either a bad actuator or it's not being told to move.
The iCarScan probably (I seem to recall it) offers the option to activate the locking mechanism. You might try doing that - and see if any error code pops up..
No error other than the same fault. I tried it several times and it definitely behaves different than the left rear door. On the right rear, every once in a while it seems like there might be some noise from the mechanism when running the diagnostic but it's hard to tell. The window does go up/down via iCarScan control but I haven't looked to see if that's controlled by the same door module - though I'd guess it probably is.
In all likelihood it's probably the actuator that's bad since that has moving parts.
I picked up a used actuator to install but decided to do some more investigation prior to spending a couple of hours tearing into the door. It seems that with the door open, based on the sound, it locks/unlocks every time. However when I manually close the latch using a screwdriver it only locks/unlocks some of the time. I've adjusted the child lock with no effect. It almost seems like it might be a lubrication issue but since the actuator is a sealed unit I'm not sure how that could be. Any other ideas are welcome.
I guess if I do perform the replacement I'll open up the original unit to see what''s going on and if I find something I may keep it as a spare.
Jobs done. Took longer that expected as even with the AllDataDIY instructions there is some info missing. Also had to improvise on a special tool for the exterior door handle,
Oddly, the replacement unit doesn't make any noise when unlocking the door but it works perfectly. Cost me $55 via eBay and I figure the job at the dealer would have been $600-$800.
I don't use that door at night very often so I made a discovery while removing the screw on the bottom of the panel that I'm missing the red lens cover for the Courtesy Lamp - 958-632-411-00. Not sure if I can find just the lens cover but the whole unit still is only about $20, so not too bad.
Great information. The right rear door on my 2011 CS is having the same issues. Can you send me a link to the actuator you bought? I think I might give this a try.
I got mine off eBay by searching for the actuator number, 8K0839016A. The one I purchased from seller qualityporscheparts via "Make Offer" came off a Panamera so I had to swap out the bowden cables as the styles/lengths are different. I'm guessing the 'A' suffix isn't as important so a newer version should probably work as well. However it may be worth checking a dealer site like Sunset Porsche, etc., to confirm a correct cross reference. It also appears that new clones from China may be available now as I don't recall seeing them when looking the other day.
Just a few words of warning... this took me 5+ hours to do the entire thing. Some of that time was double checking instructions, etc. in order to make sure I wasn't going to break something which would turn out to be really costly or to figure out how to get around using a special tool. Now that I've done it once it would probably only take 2 hours from start to finish. The tricky parts for me were the exterior door handle and making sure the window was lowered 200mm (+- 2mm) before releasing the clamps and then taping it in the fully up position. That last bit is needed in order to remove interior sub-frame. Removal of the outer door panel took a lot of force and I found this video helpful, even though it's not in English.
BTW - the door lock uses a triple square so be sure to have a set on hand before starting and you'll also need an e-Torx socket to release the window clamps (left handed thread).
Hello, Tom I�m trying to replace my door actuator, I followed the video you shared but I�m stuck. I follow every steps but some reason my window clamp does not release. Everytime I try to remove the internal panel my window moved together, had no idea which part I missed out I had repeated the video again and again. Can you share me experience how release the window clamp?
I followed the instructions on AllDataDIY for the actual replacement of the actuator. I only used the video to confirm how to remove the interior bits. The one bit of info is that the threads on the window clamps are left hand so turn clockwise to loosen.
If you don't have a subscription for AllDataDIY.com it's well worth it if you do your own work. You can find discounts codes to reduce the subscription cost to $15/yr or so.
I replaced the right rear door lock actuator on my 2013 CTT last weekend. Because the door wasn't looking the car would not chirp when I looked it. I wrote up the following to help anyone else who wants to attempt the repair, which took a long time, but wasn't that difficult.
TOOLS: 1/4 torque wrench, 1/4 ratchet, w/ 4� extension, E6 female triple square, 6 mm triple square, 13mm 1/4� drive socket, T30 socket with 1/4 adaptor, Screwdriver with T20,T25,T30 bits, screwdriver, special hook tool, trim removal tools, tape measure, tape.
REMOVAL:
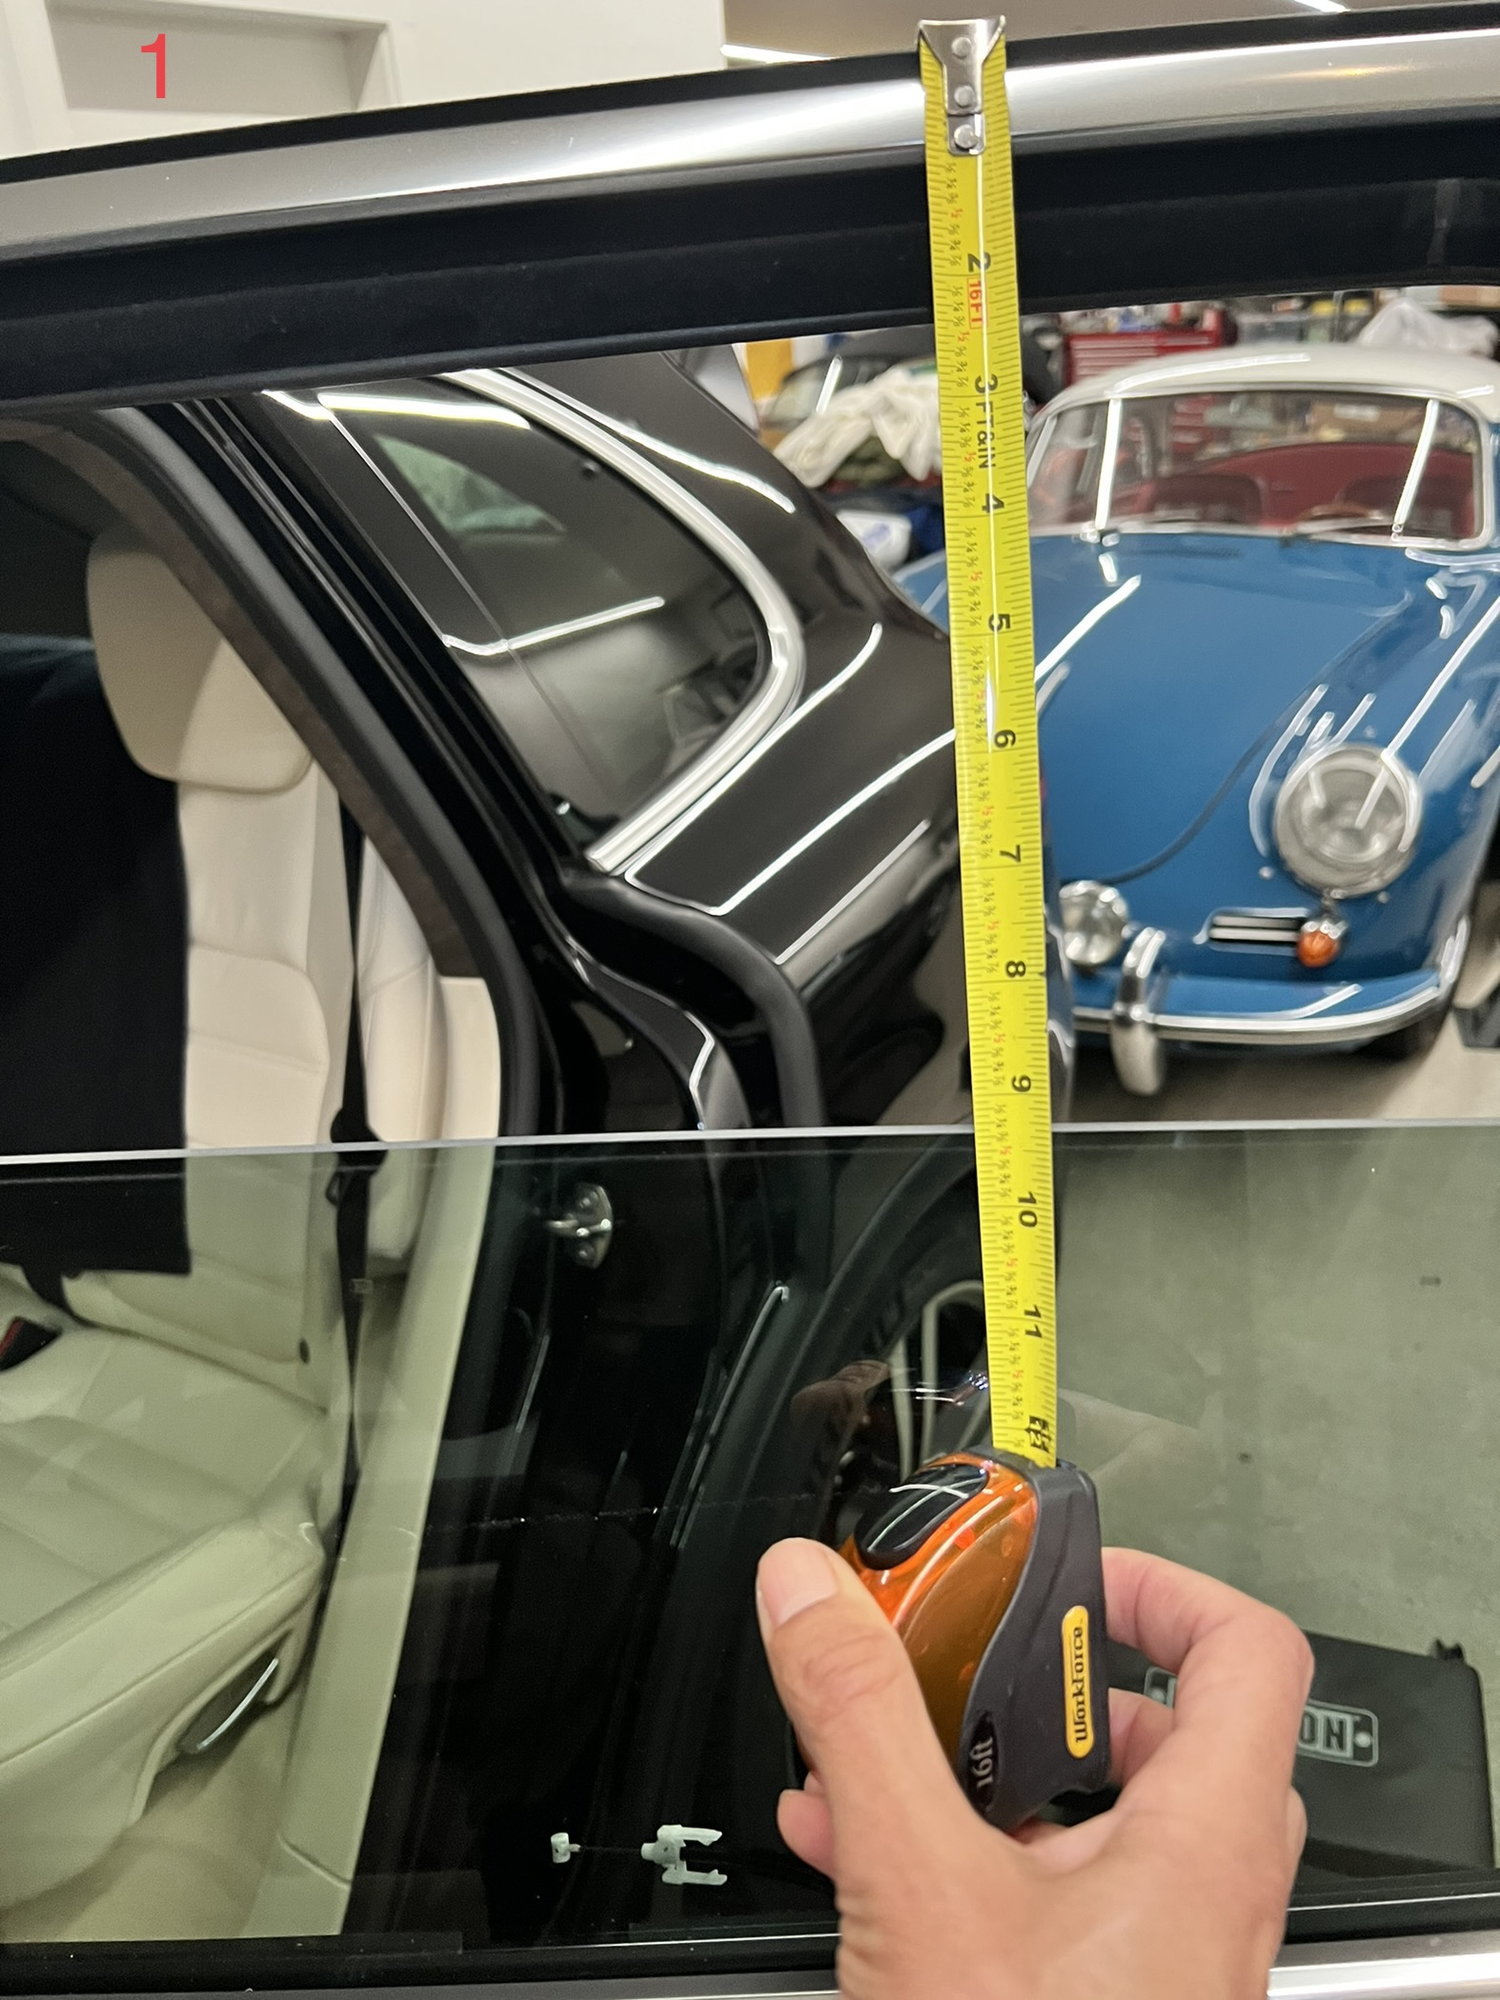
1) Roll rear window down 9". Measured from the top of the upper door rubber the top of the window glass. 9" will expose the window fastening bolts in the subframe.
2) Unplug door wire harness at the door hinge.
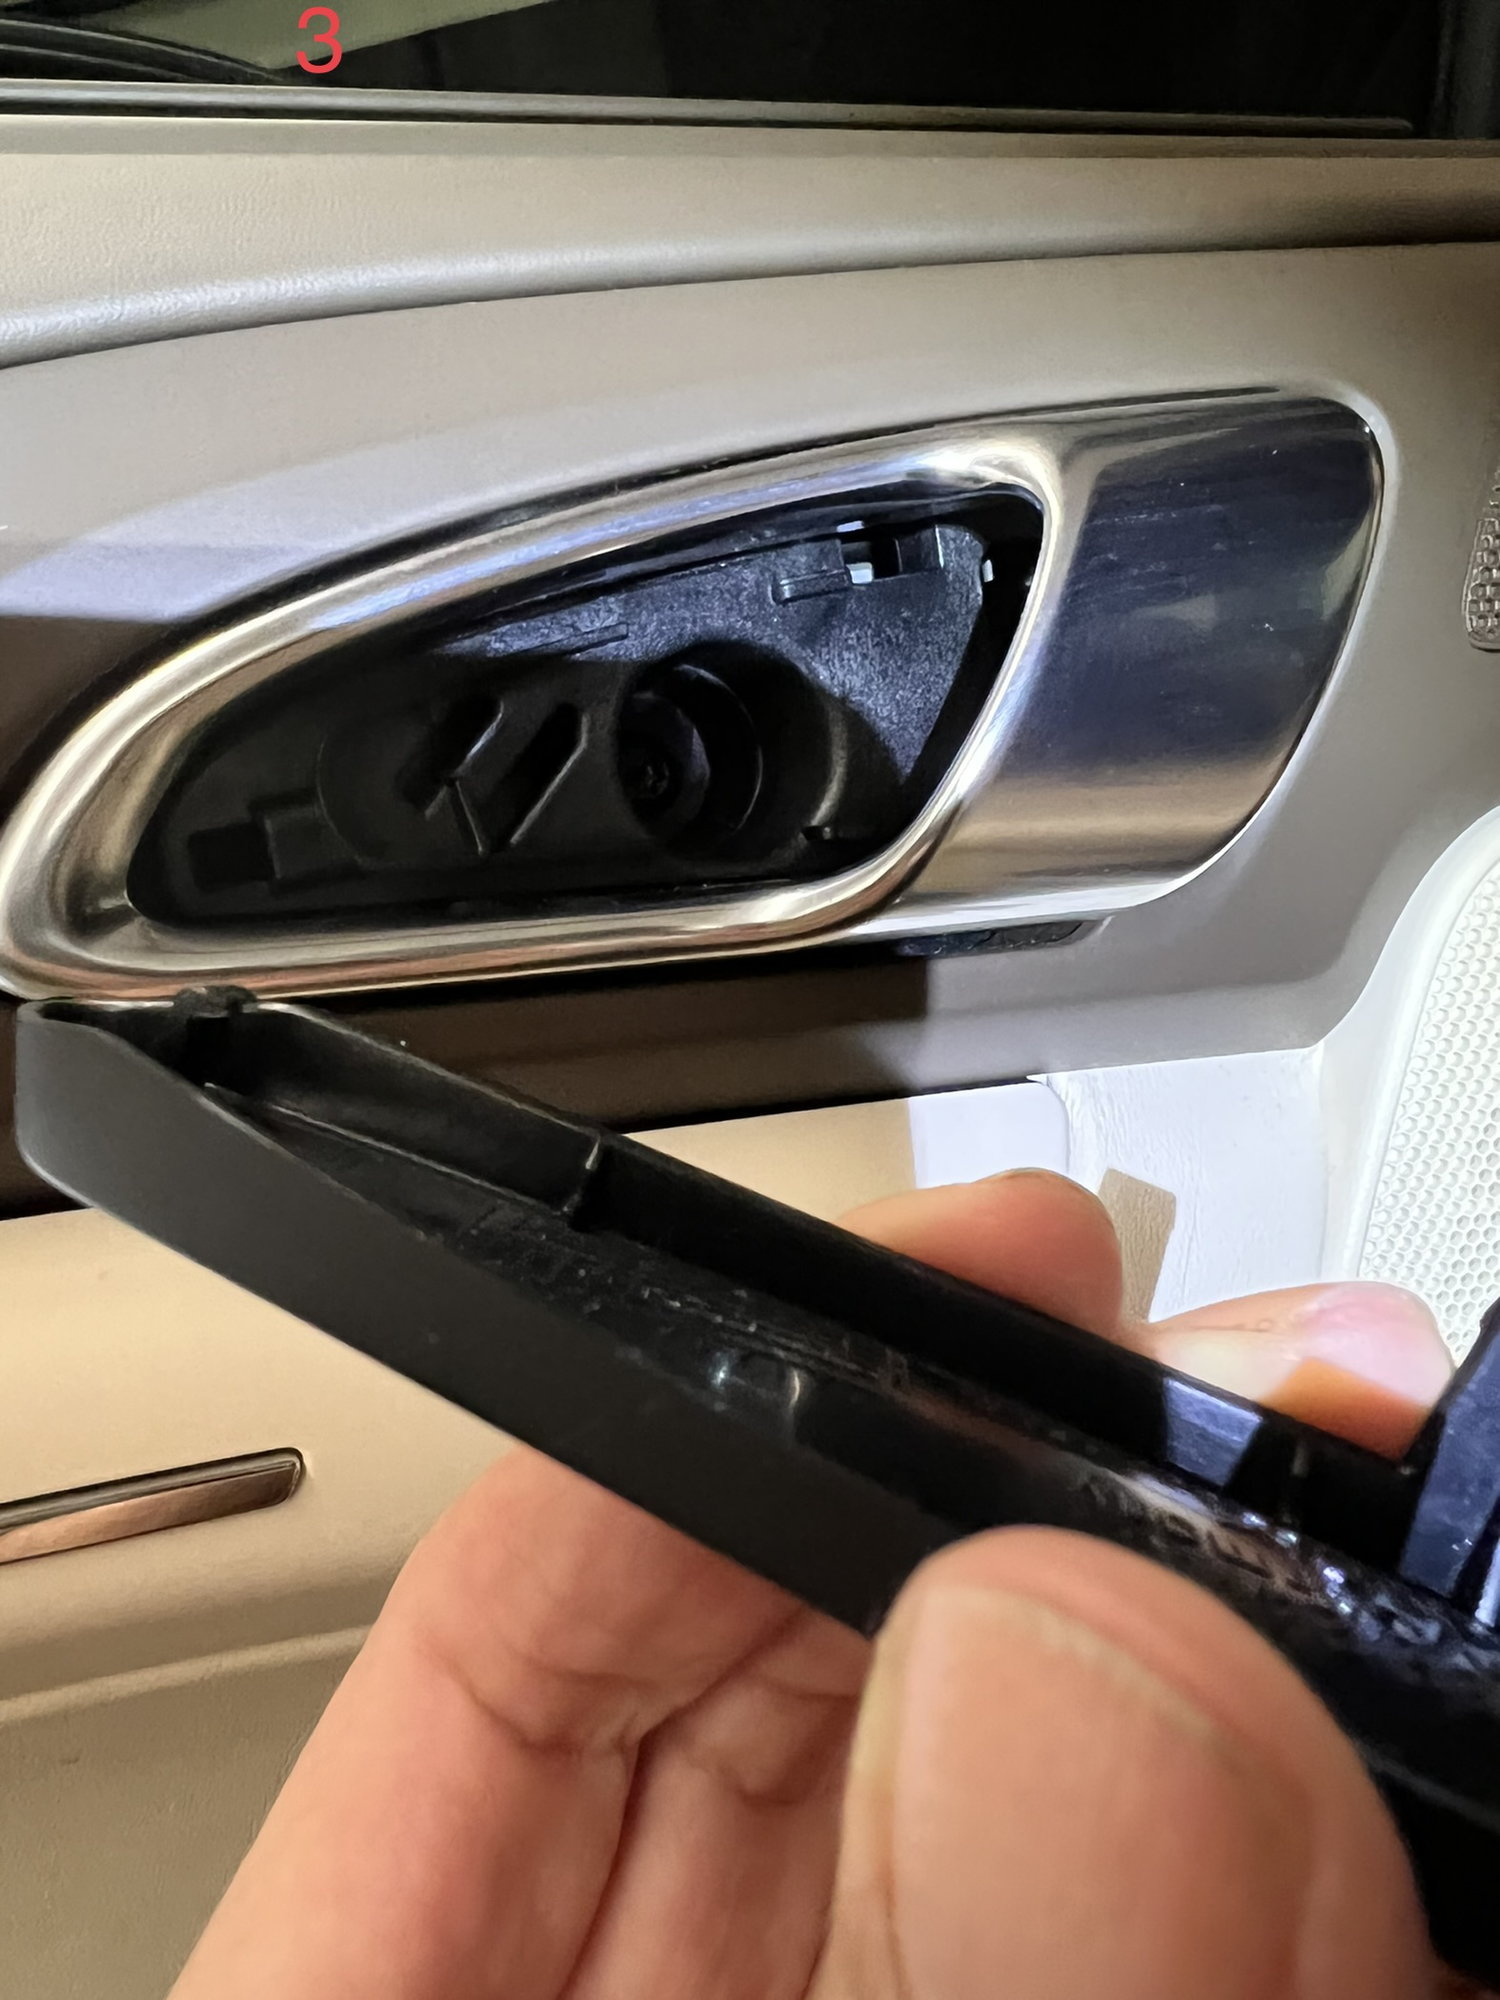
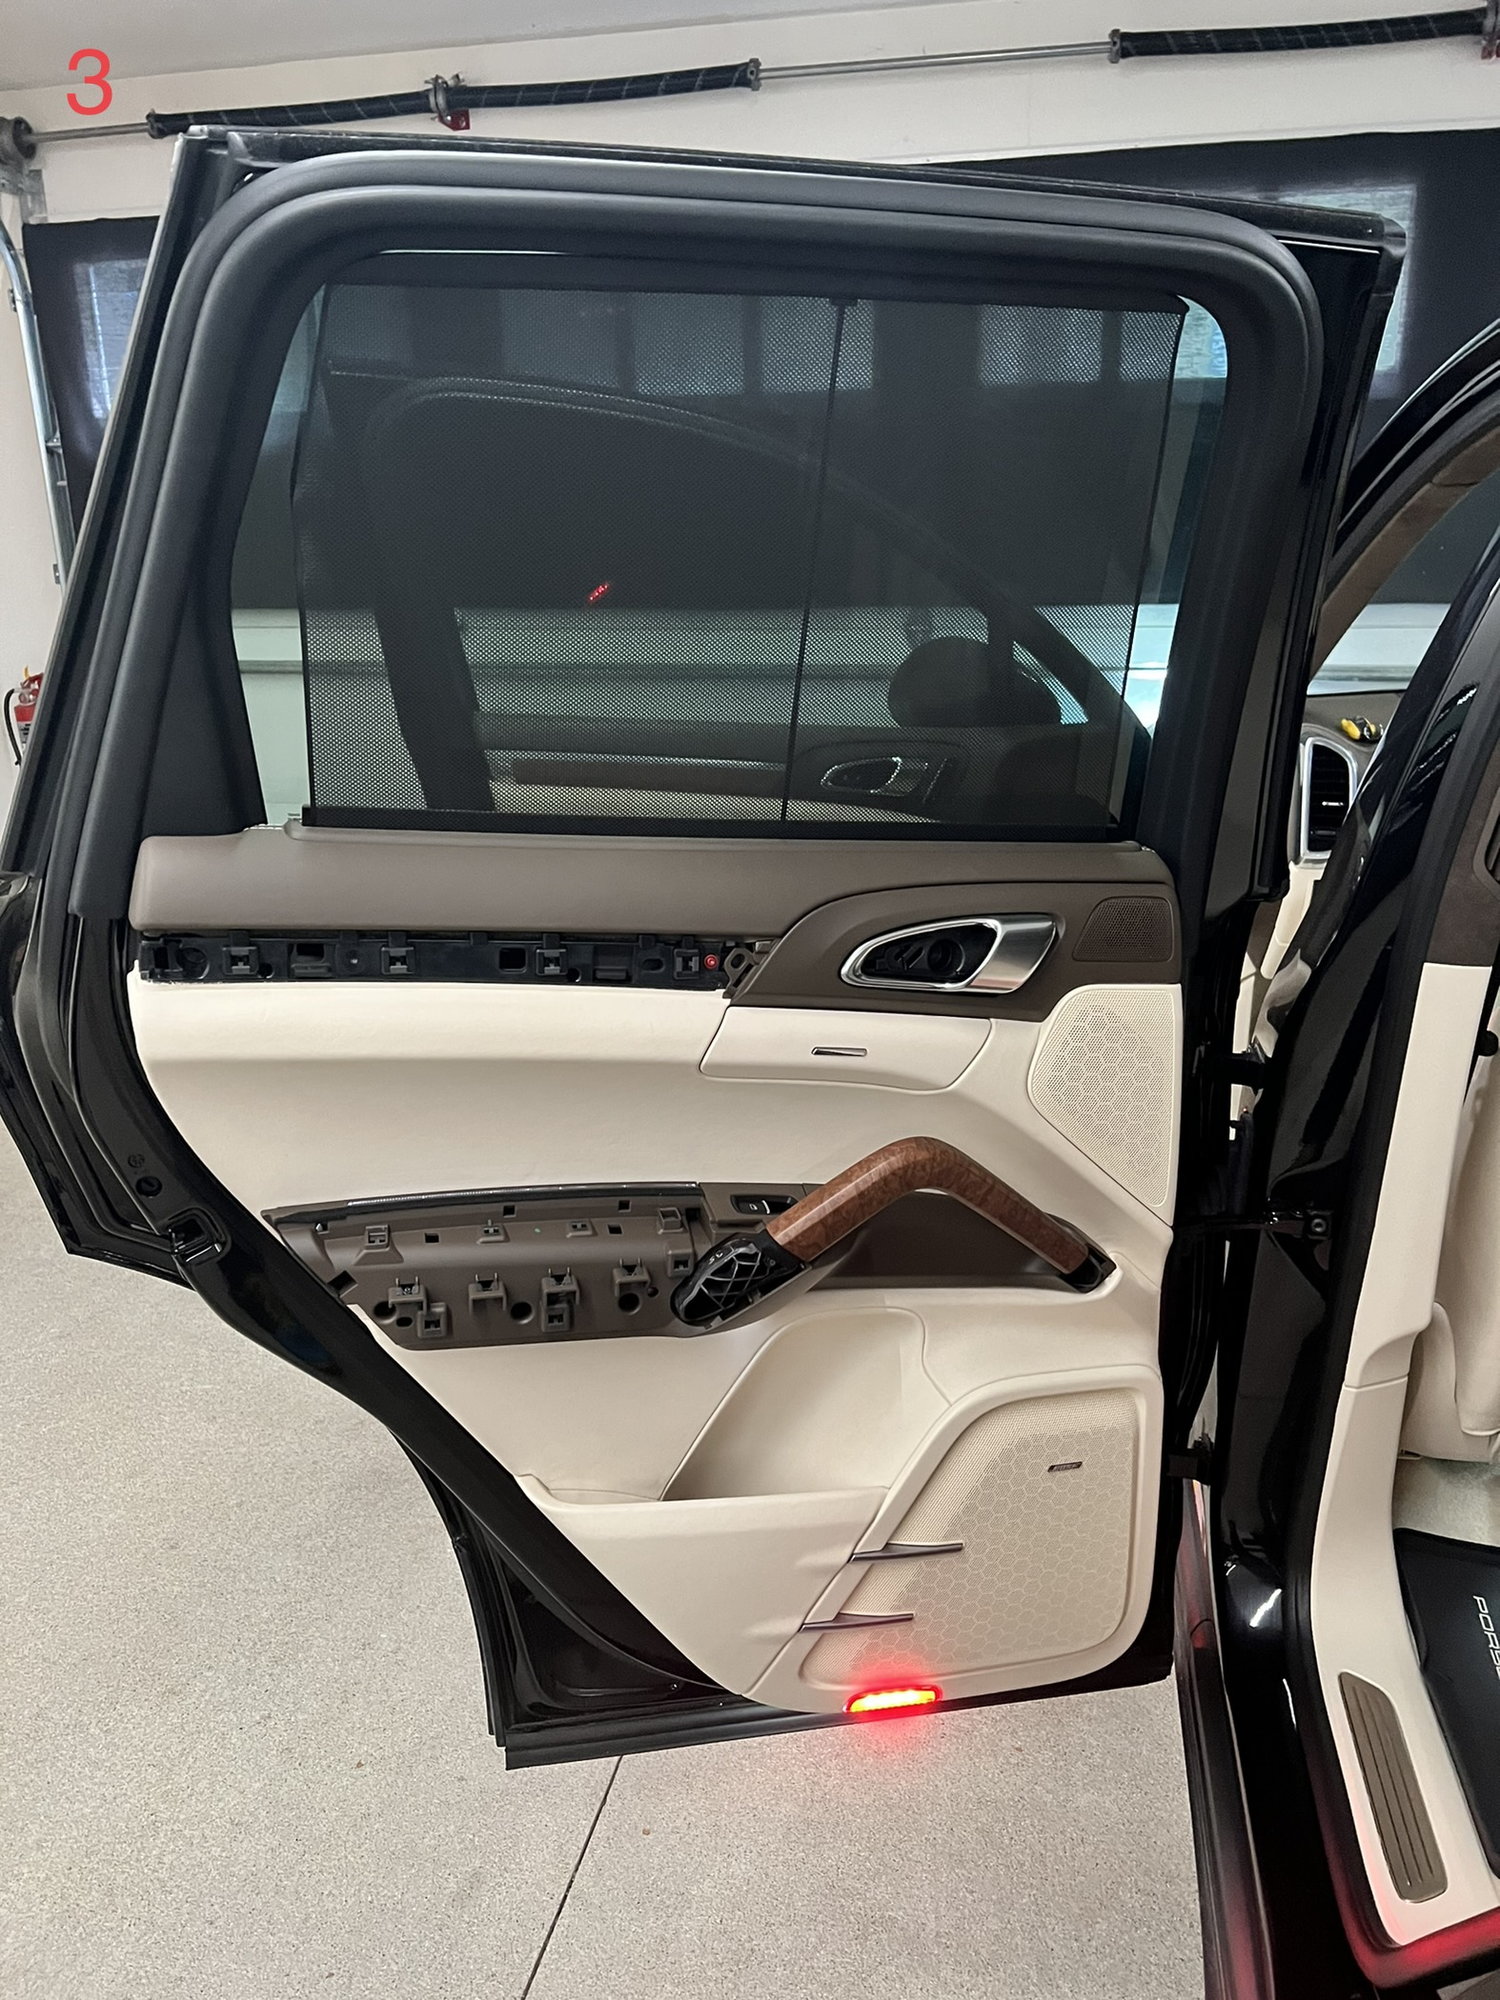
3) Remove the armrest by pulling straight up. Remove the plastic trim piece below the armrest by pulling it outwards. Remove the door pull handle by pulling off the small front cap at the front of it. Remove the two T30 screws that hold the handle to the door panel. Remove the plastic behind the interior door handle. It has a catch on the left-hand side. To get it out push it towards the rear of the door and pull out. Behind it is a T30 screw that will need to be removed. Remove the upper trim to the left of the door handle, by pulling it away from the door. There is one T30 screw behind that trim and another screw to the left of the light at the bottom of the door. It is a T25. Once all those screws have been removed pry the door panel away from the door frame starting at one of the bottom corners and working up along the sides. Use pry tools to make room to fit your fingers and use your hands to pull the door panel off.
4) Before removing the door panel the sun shade needs to be extended by pulling it up. Be sure to keep it along along the inside of the window frame as far as pull it up. Once it's up as far as it will go, pull the door panel up and away from the door frame. The goal is to pull the sunshade rod up and out of the rod-guide that is in the door frame.
5) Disconnect the 3 cables that attached to the outer door panel.
6) Remove the sunshade rod guide at the top of the door frame.
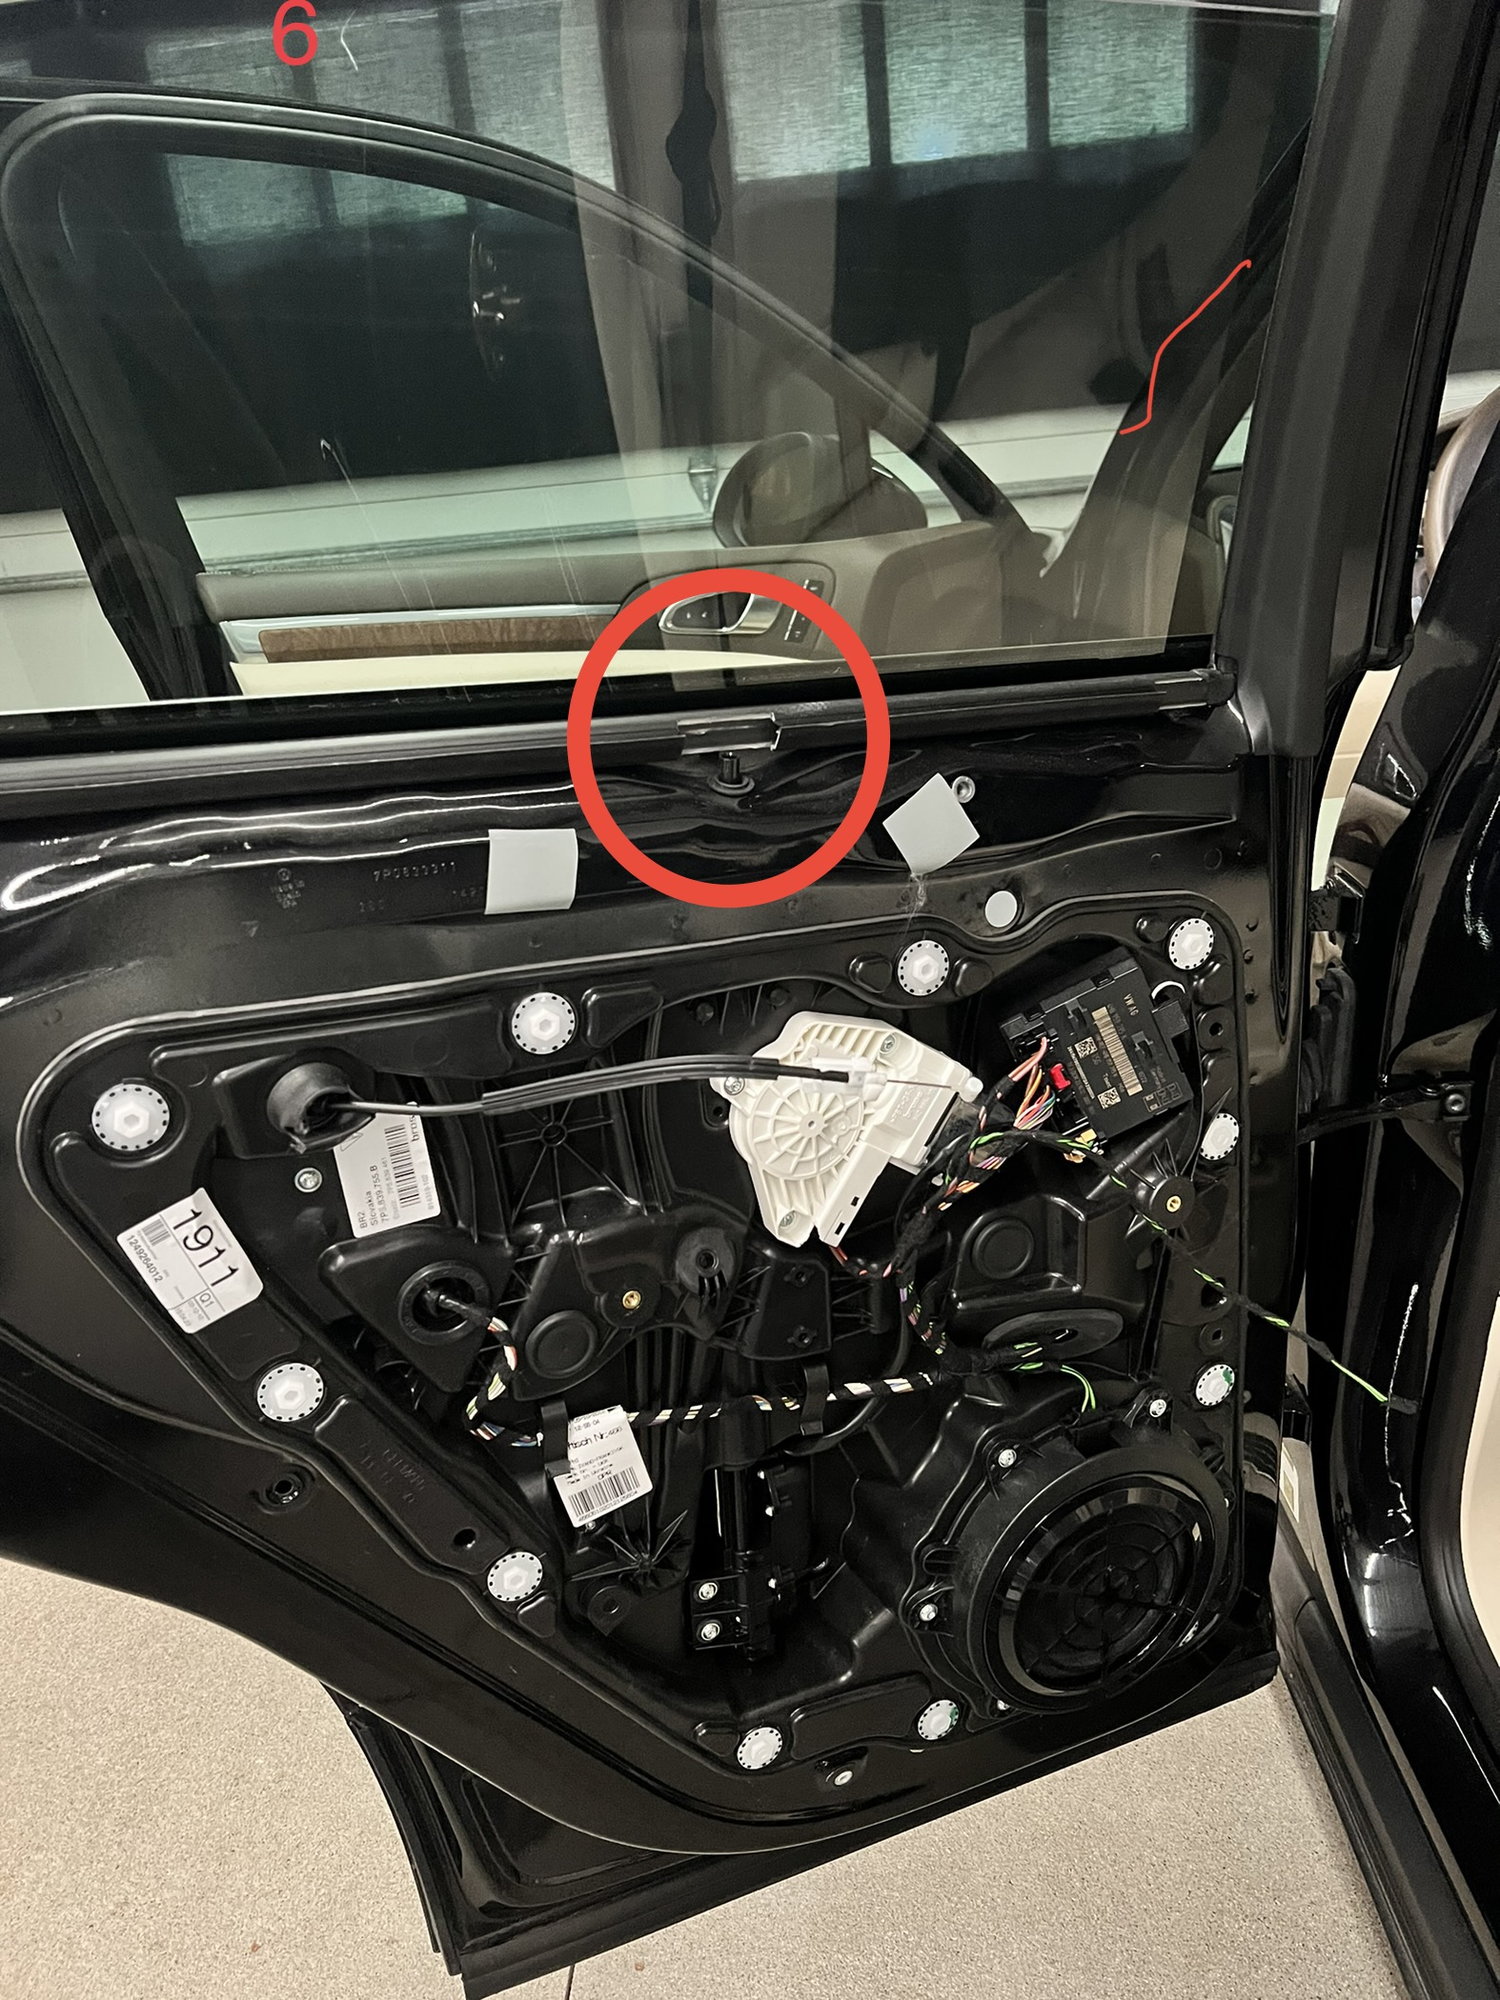
7) Remove the two rubber plugs in the middle of the door sub panel. Behind the rubber plugs are the screws for the fastening clamps of the window. Use a female E6 triple square socket. They are reverse thread. Turn the screws clockwise to loosen them until you can slide the window up. Use two pieces of tape to secure the window in the up position.
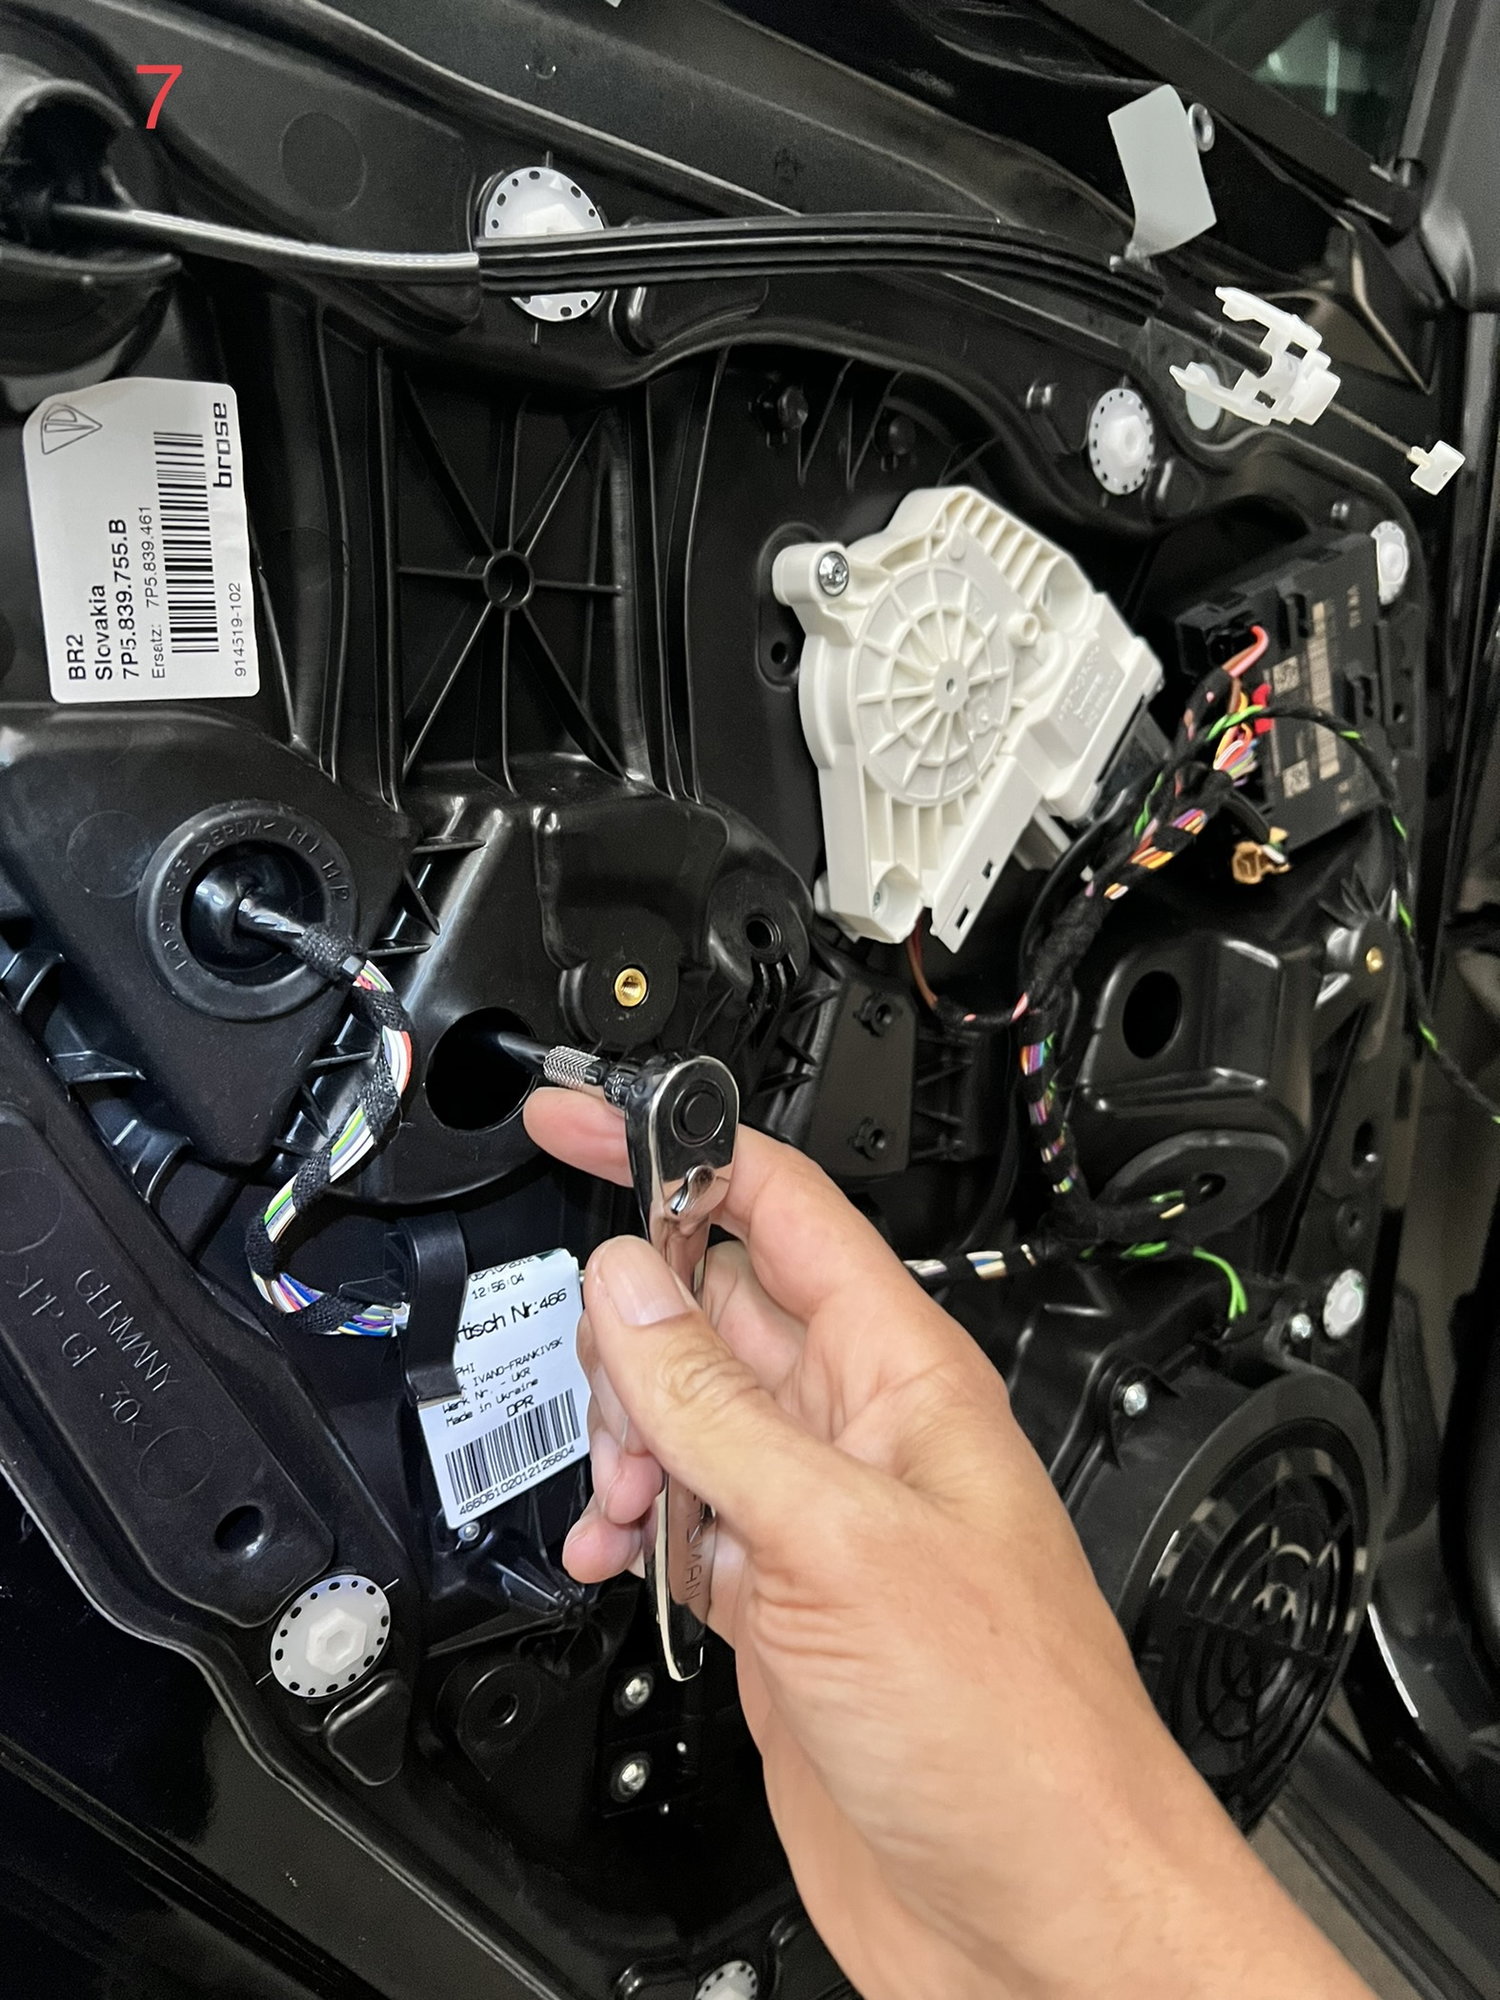
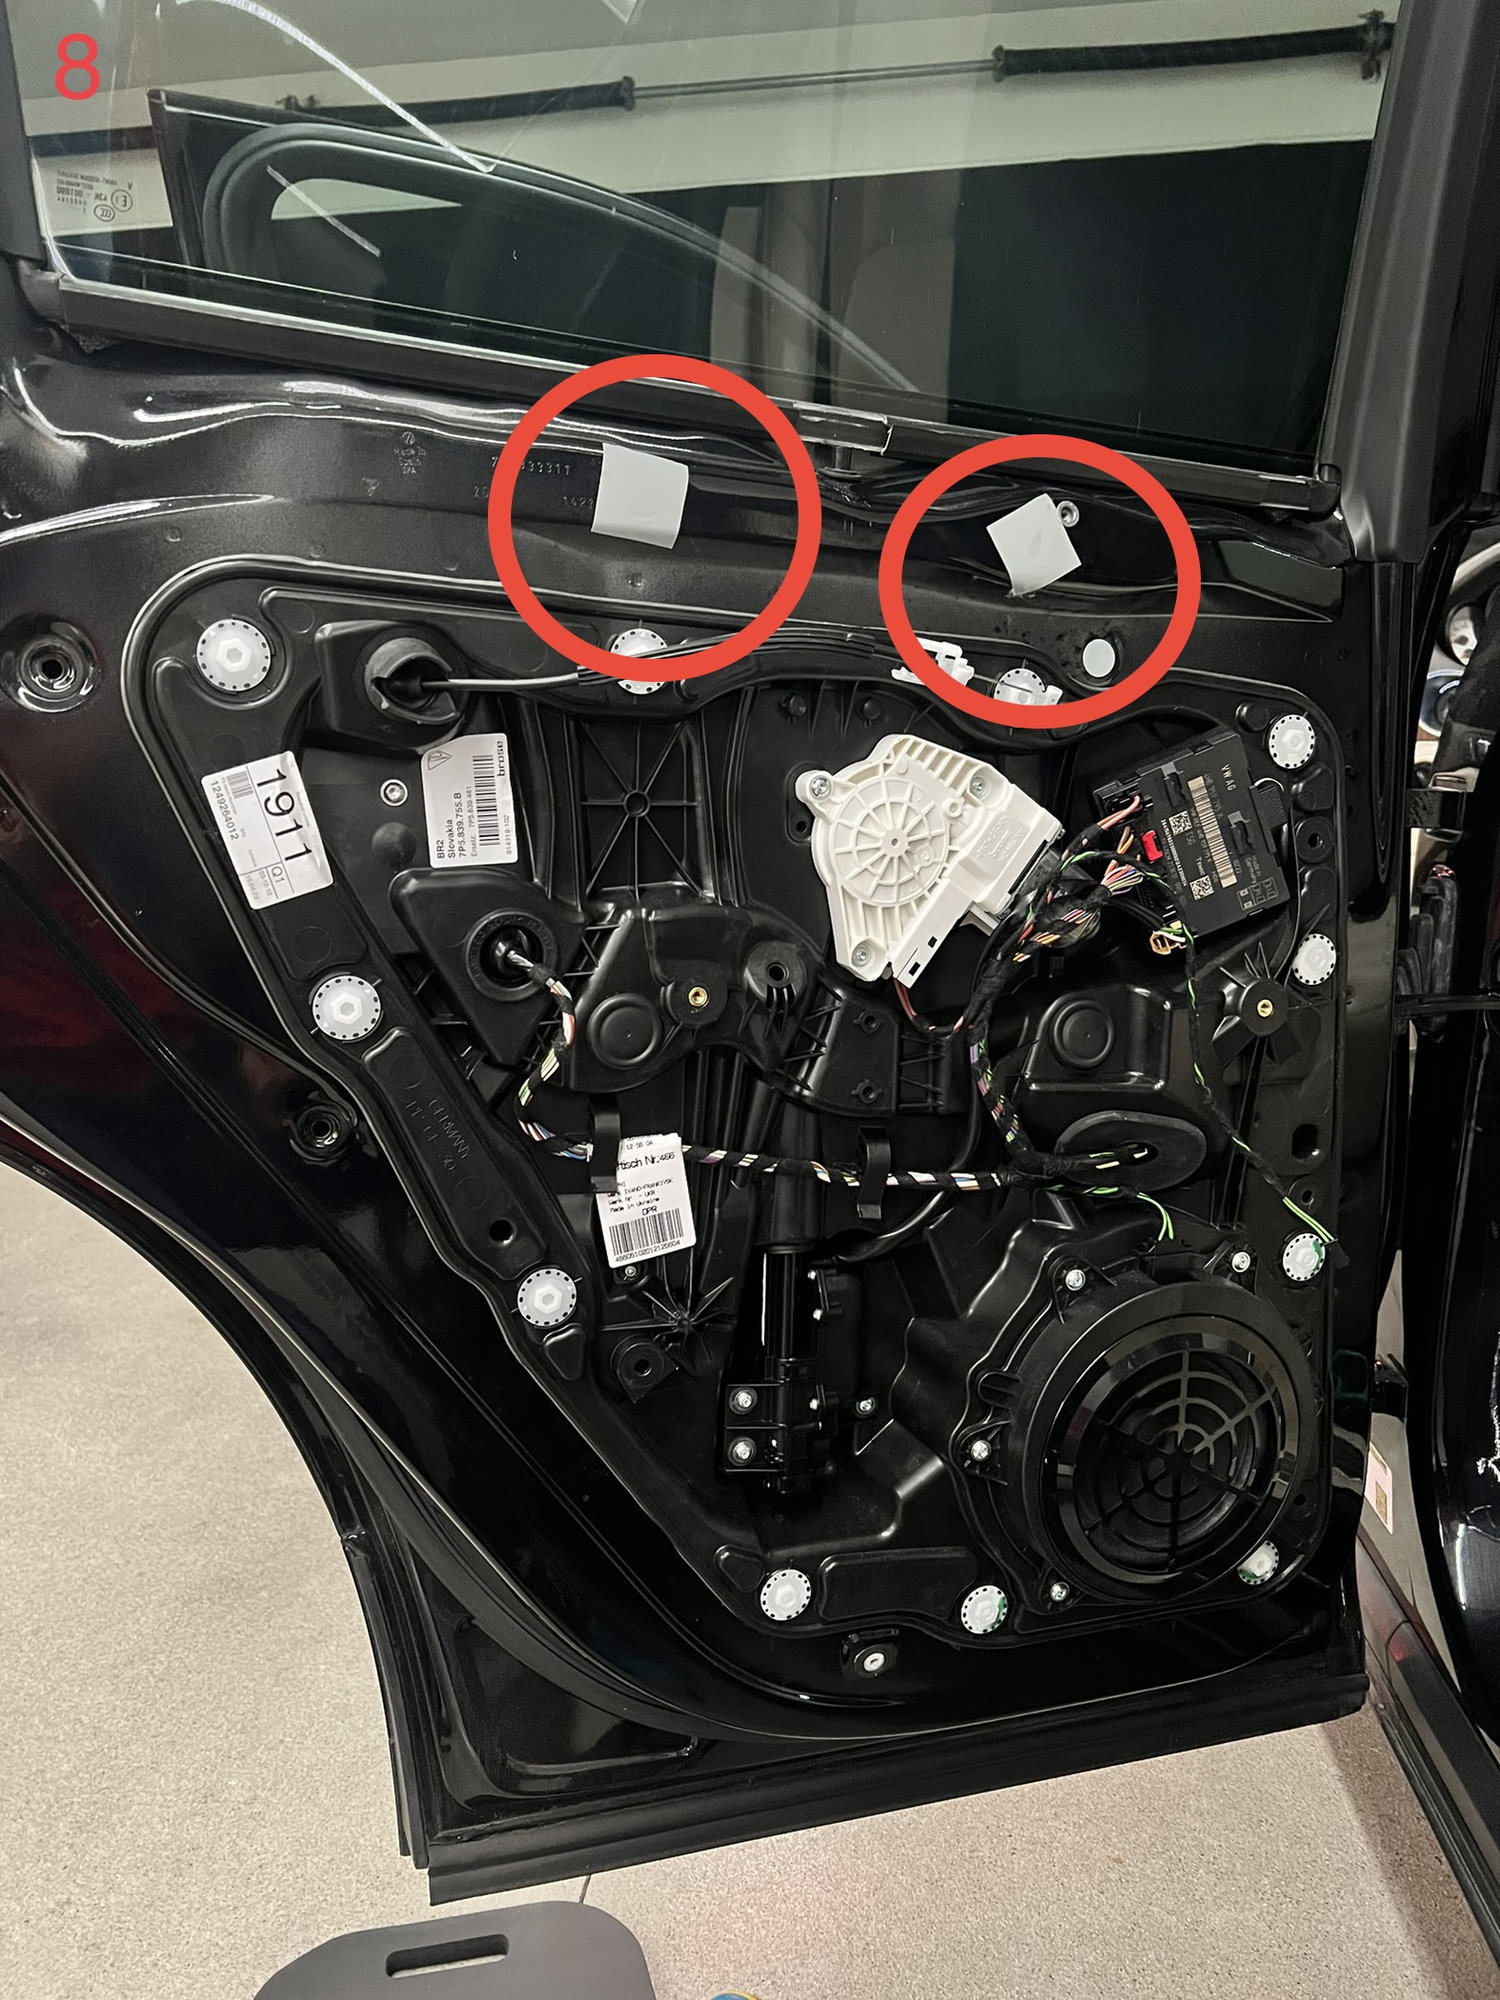
8) Remove the 2 cloth tape covers along the top of the door frame to expose the bolts that hold the window mechanism. Remove the T30 bolts.
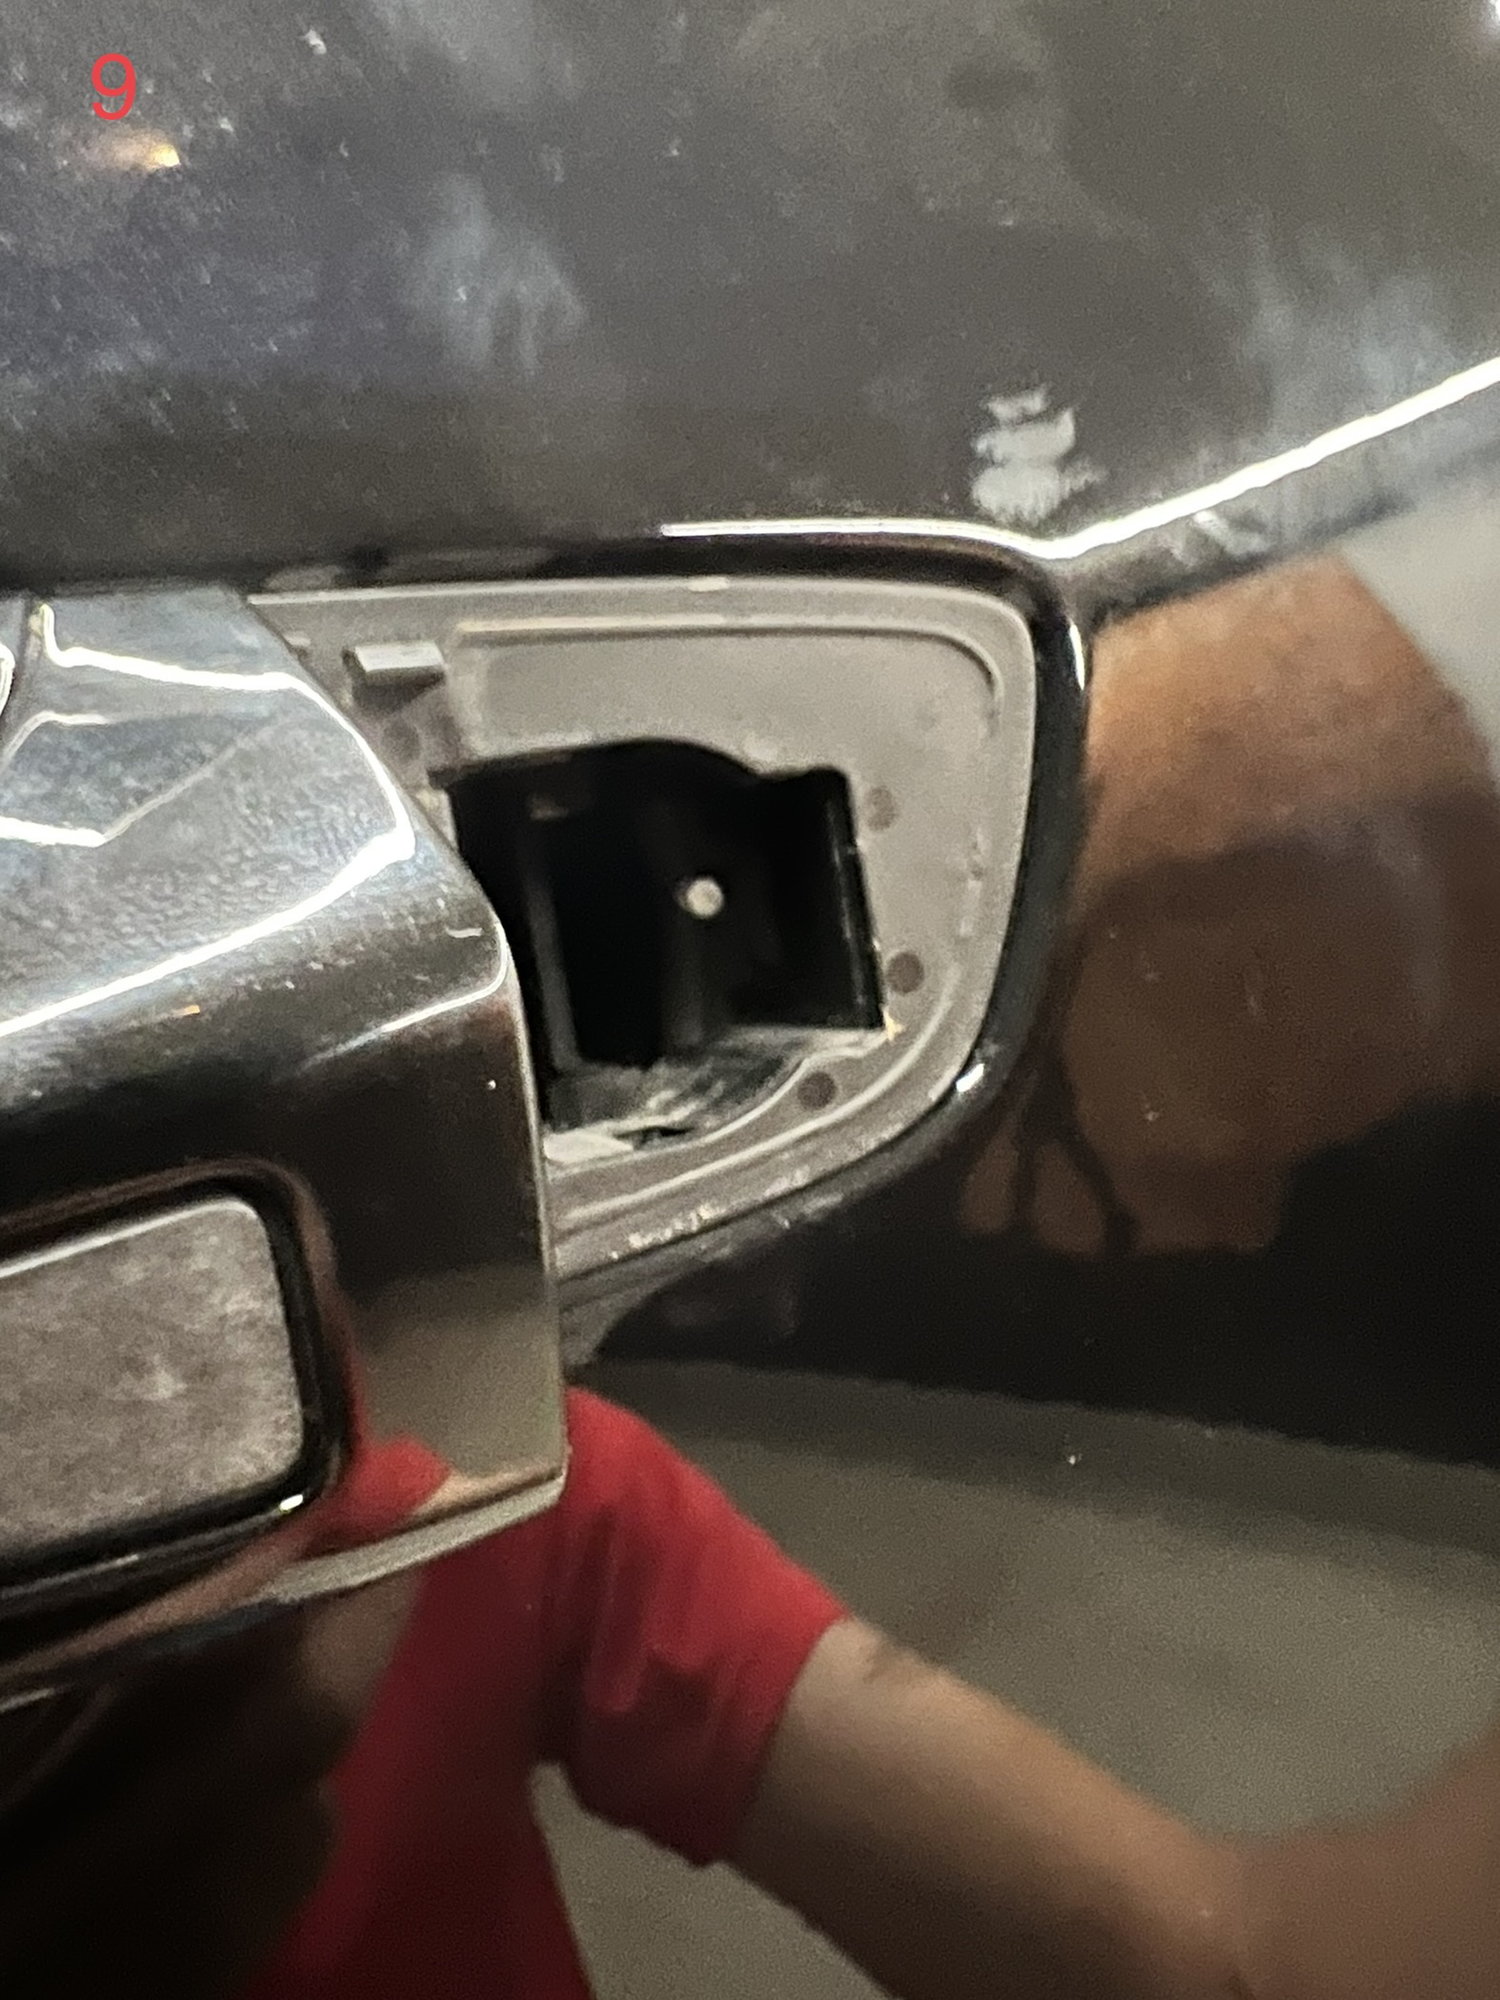
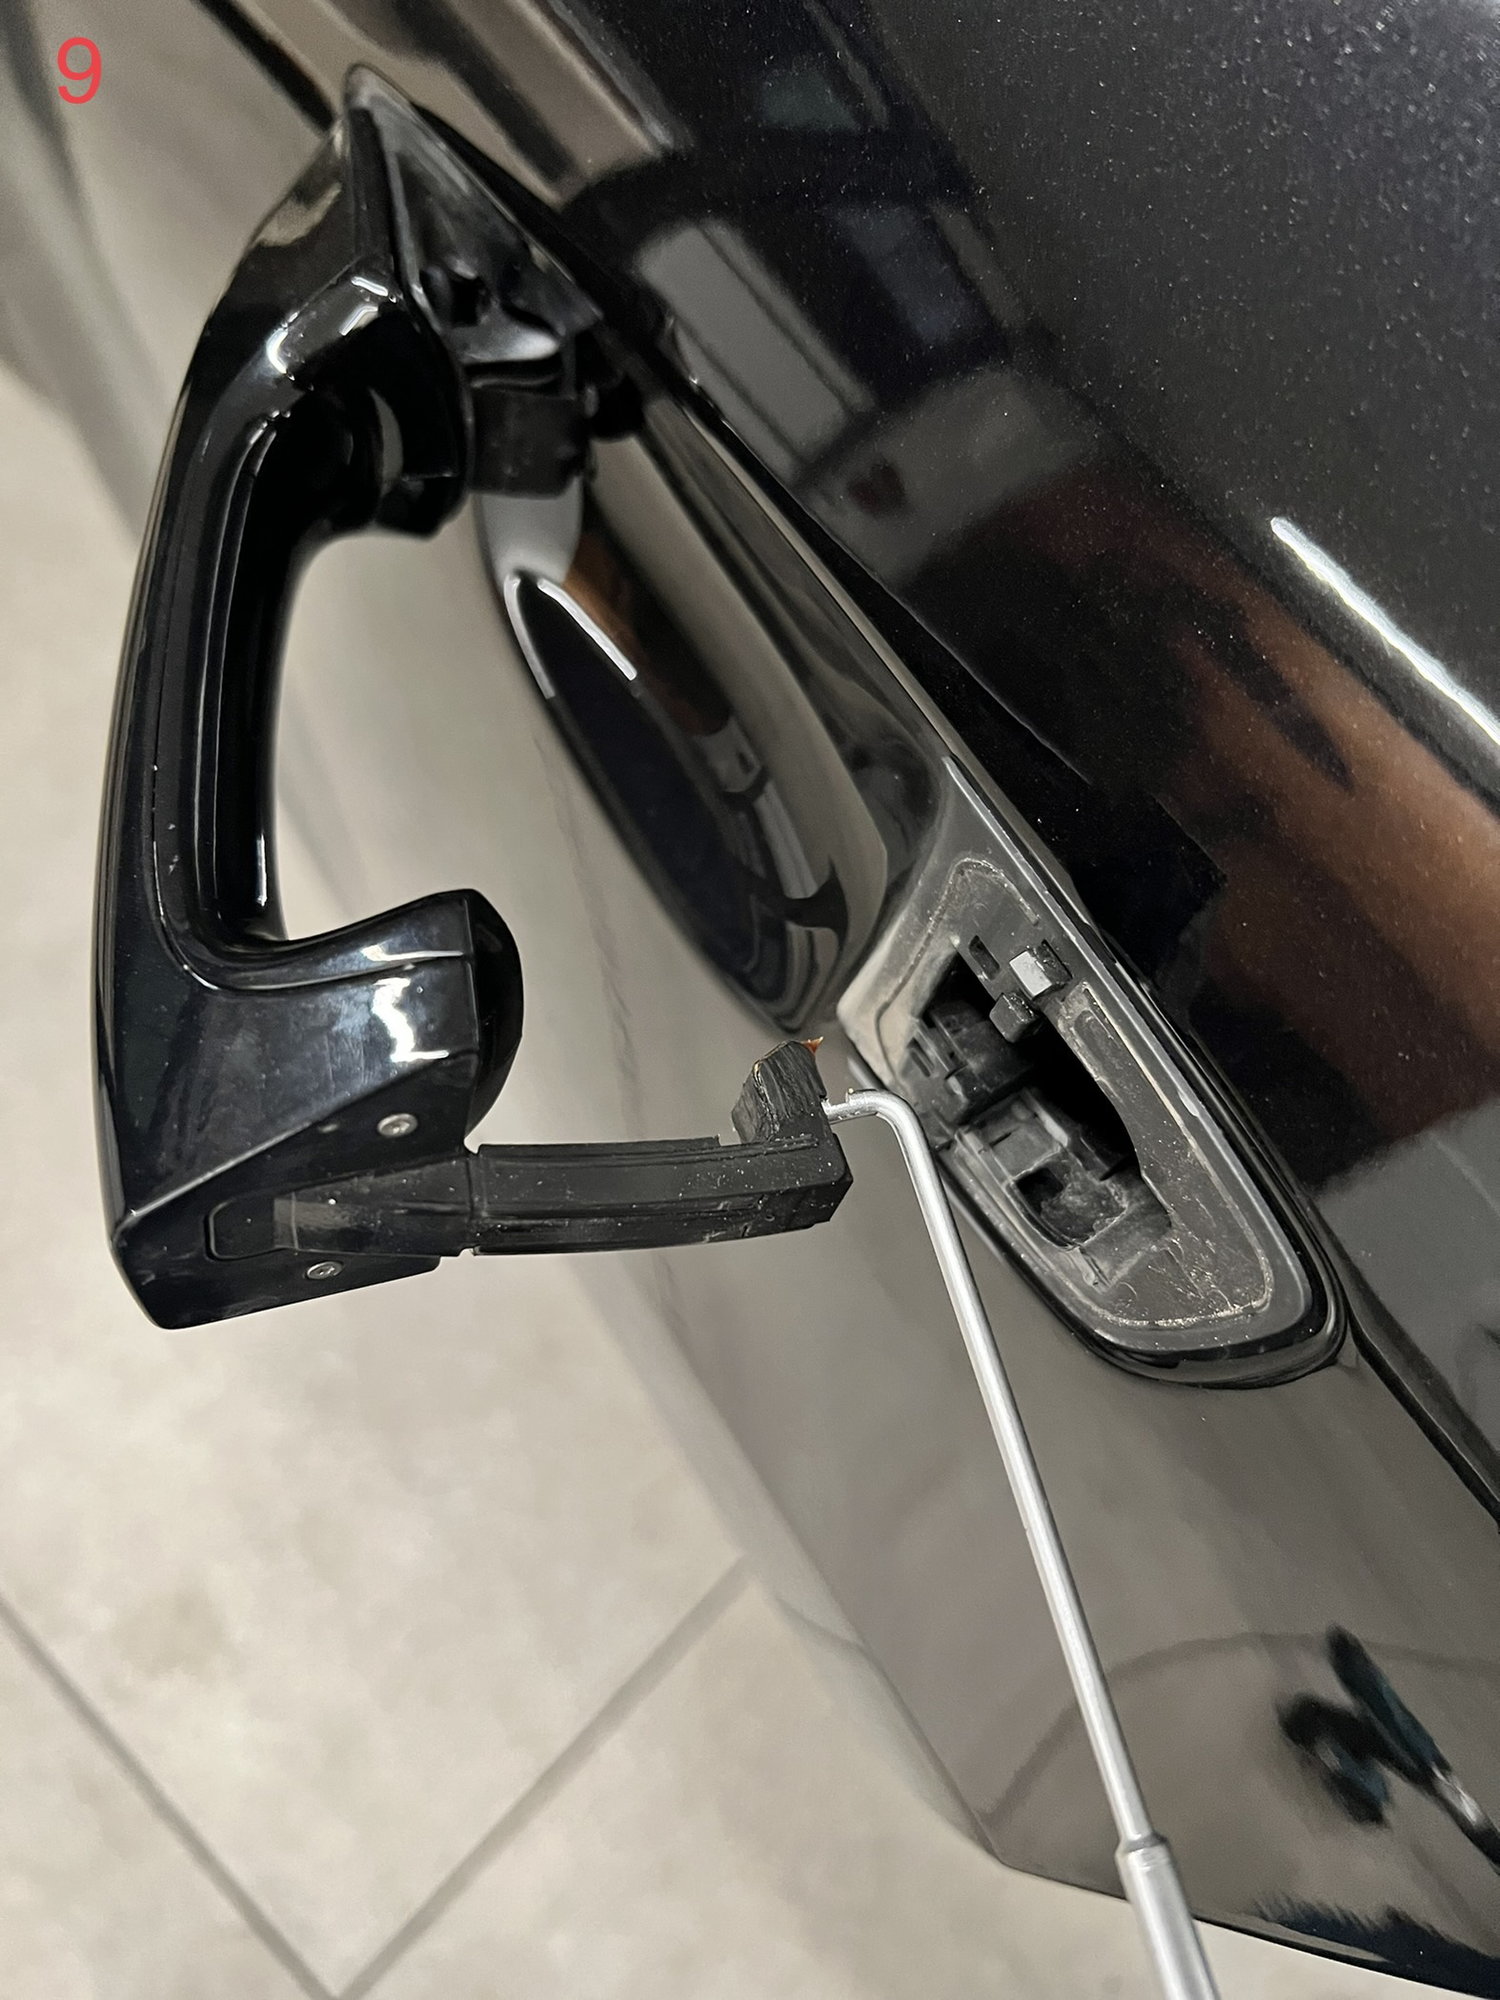
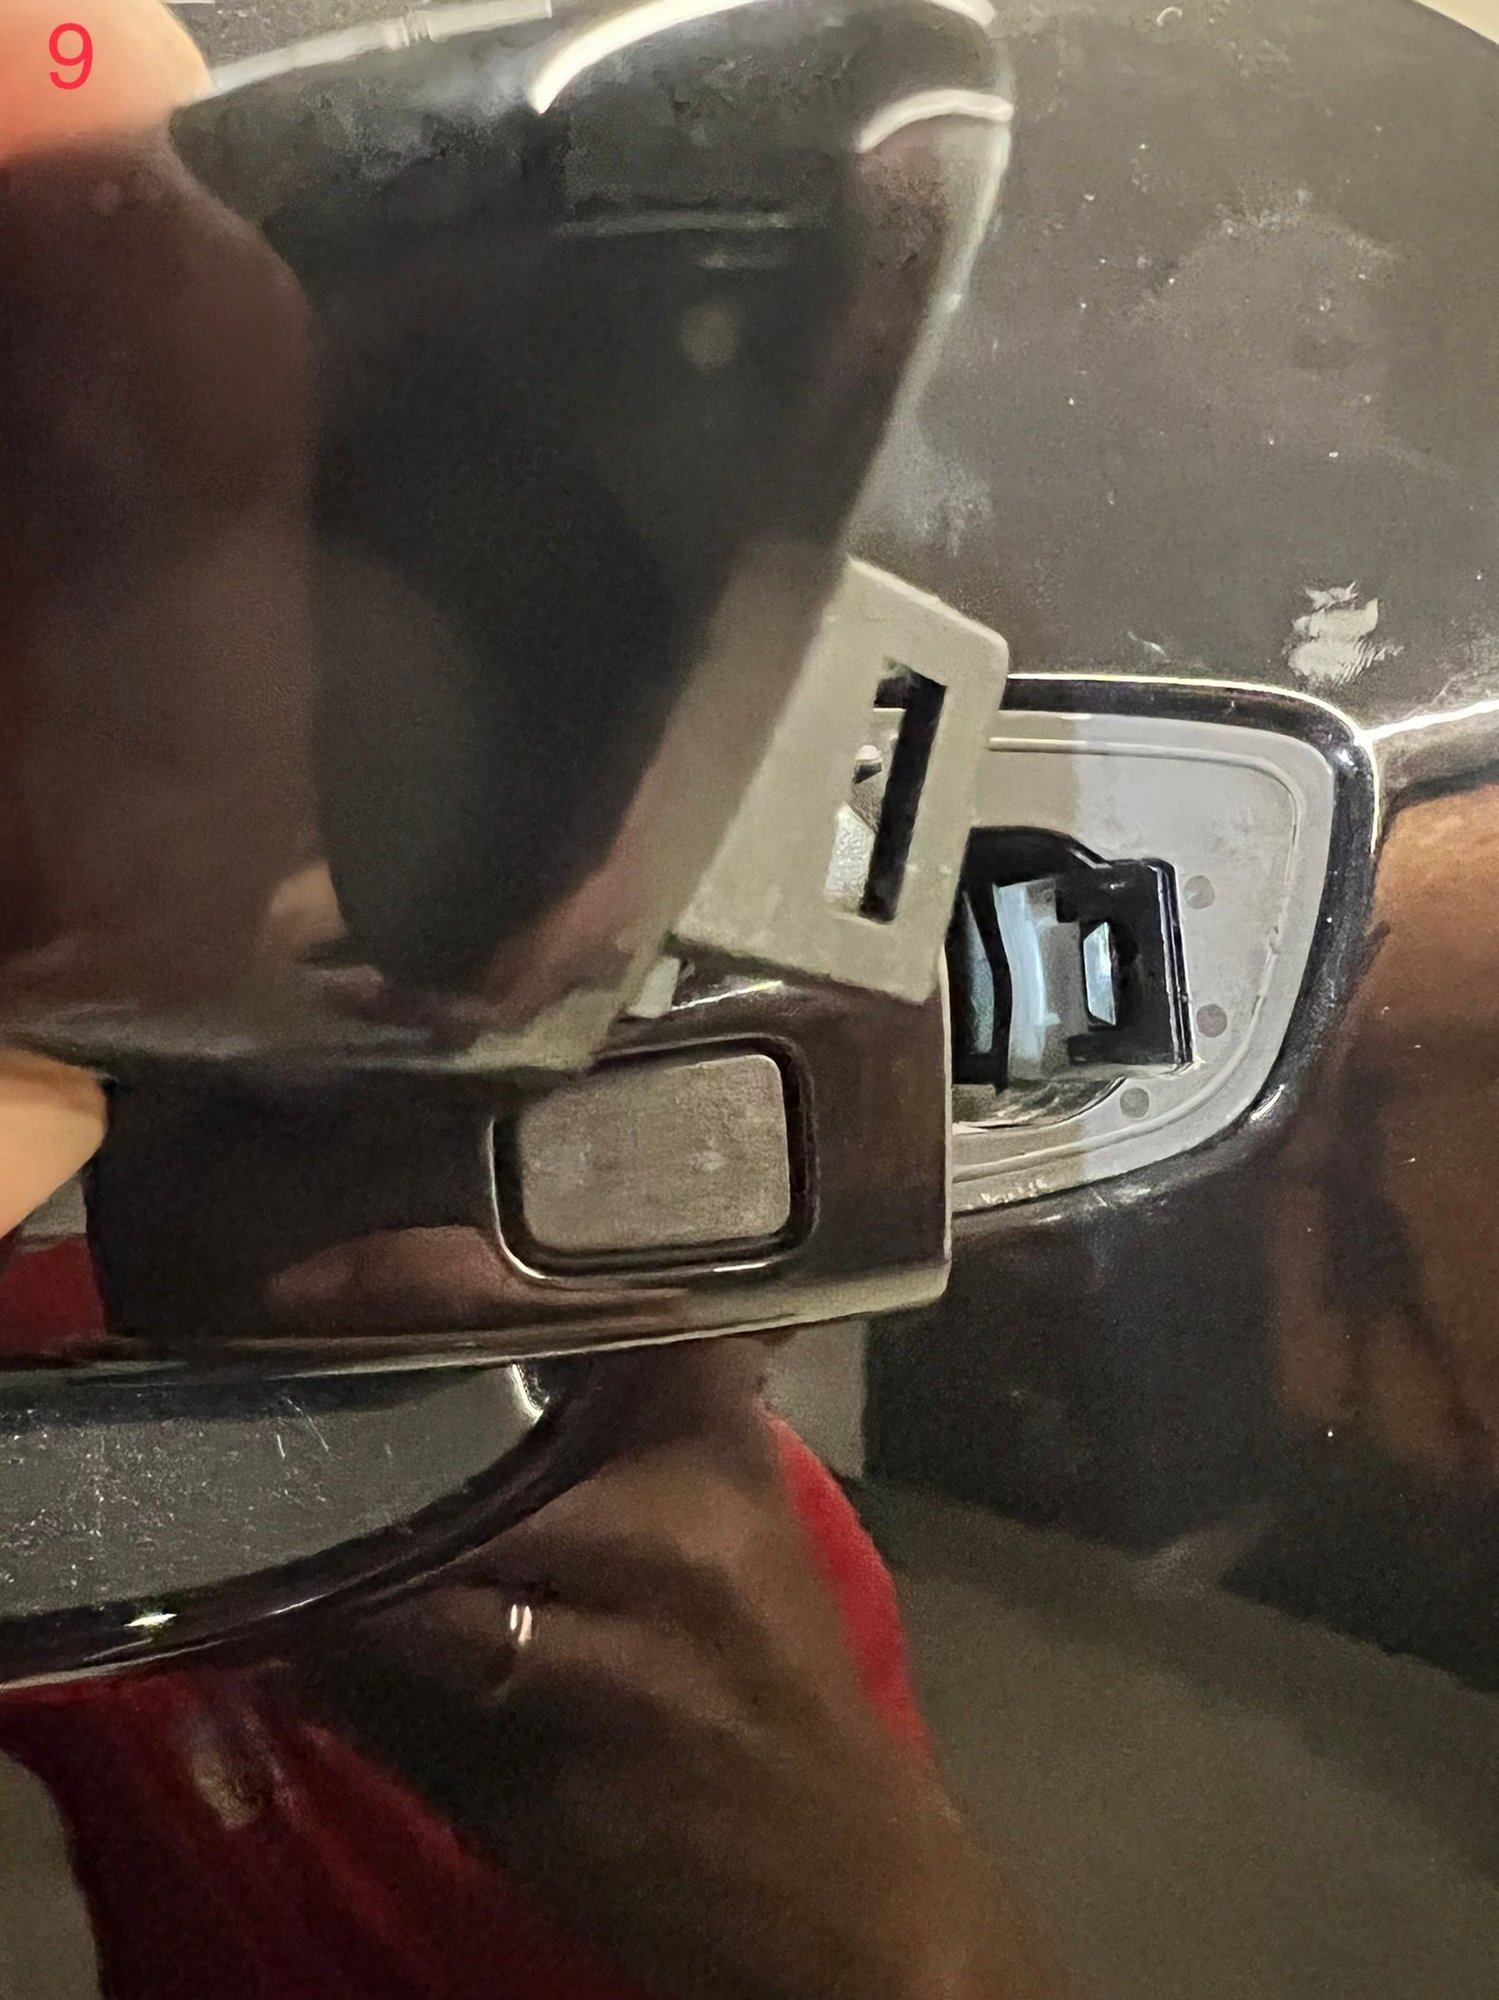
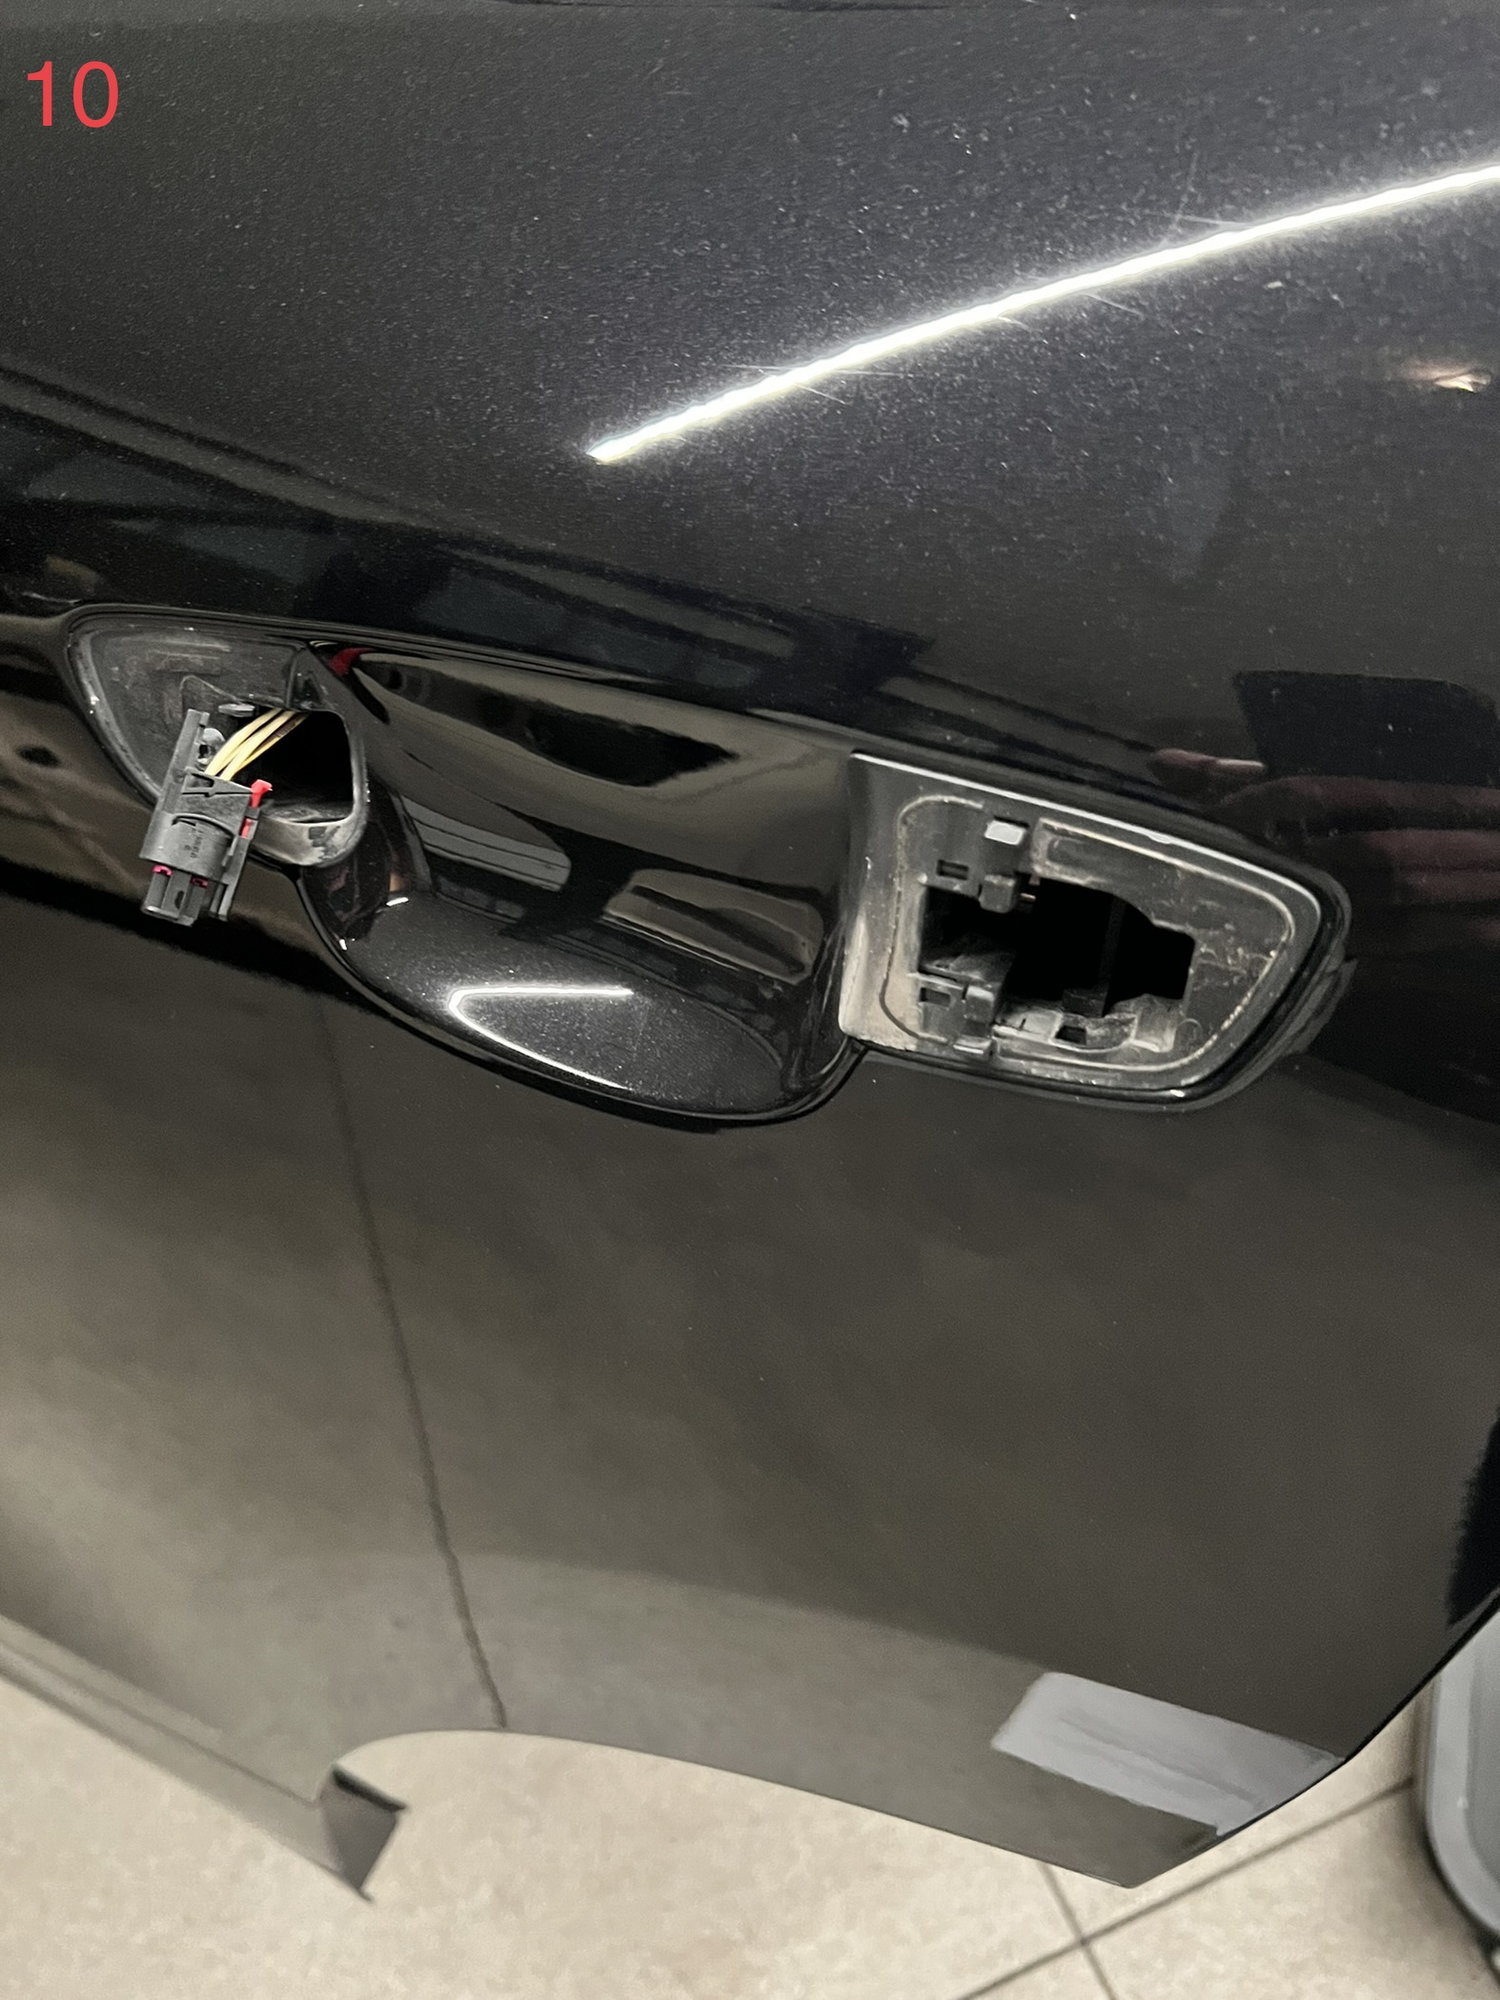
9) Remove the outer door handle. Remove the rubber plug in the door frame above the door latch and use the special hook tool to pull back the plastic tab that holds the end piece of the door handle. If you don�t have the special tool, any tool with a hook will work. You just need to be able to reach to the doorhandel. Once the tab is pulled back the square piece of the door handle can be slid out and removed. Remove the handle by inserting the hook tool again and catching the end of it to release it from the tab. Remove the handle and unplug the plug at the end of it. Remember to feed this plug through the hole when re installing the door sub panel.
10) Remove the T20 screw that holds the inner plastic behind the door handle, slide the plastic to the back of the door and push it in to release the little hooks from the door skin.
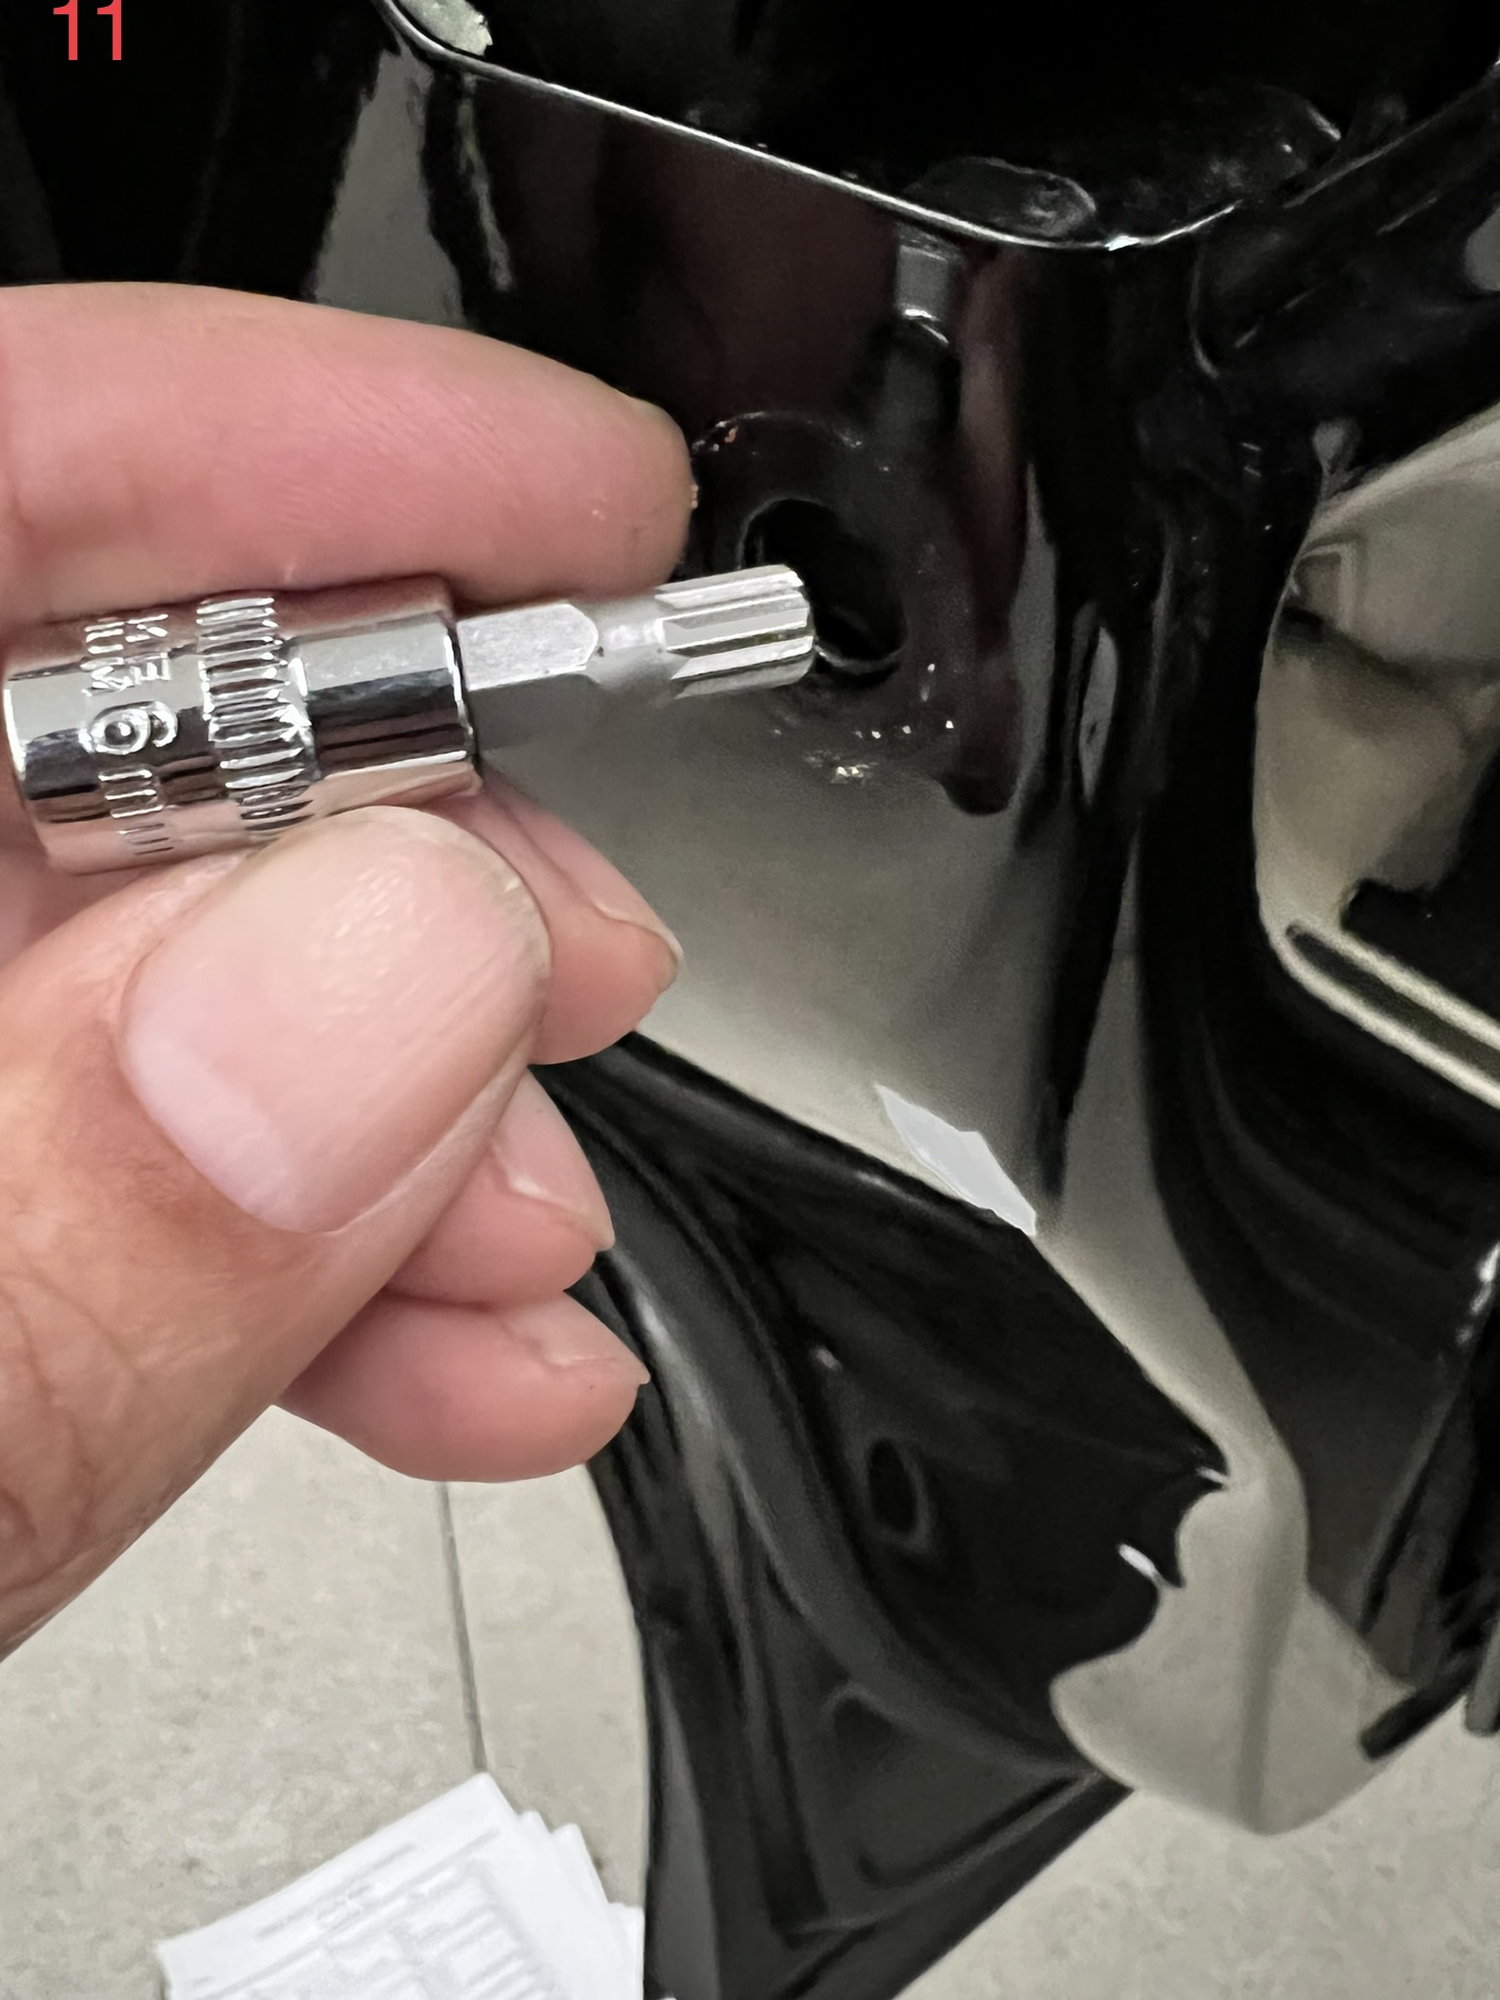
11) Note the latch position from two sides. Remove the two door latch screws. They are 6 mm triple square screws.
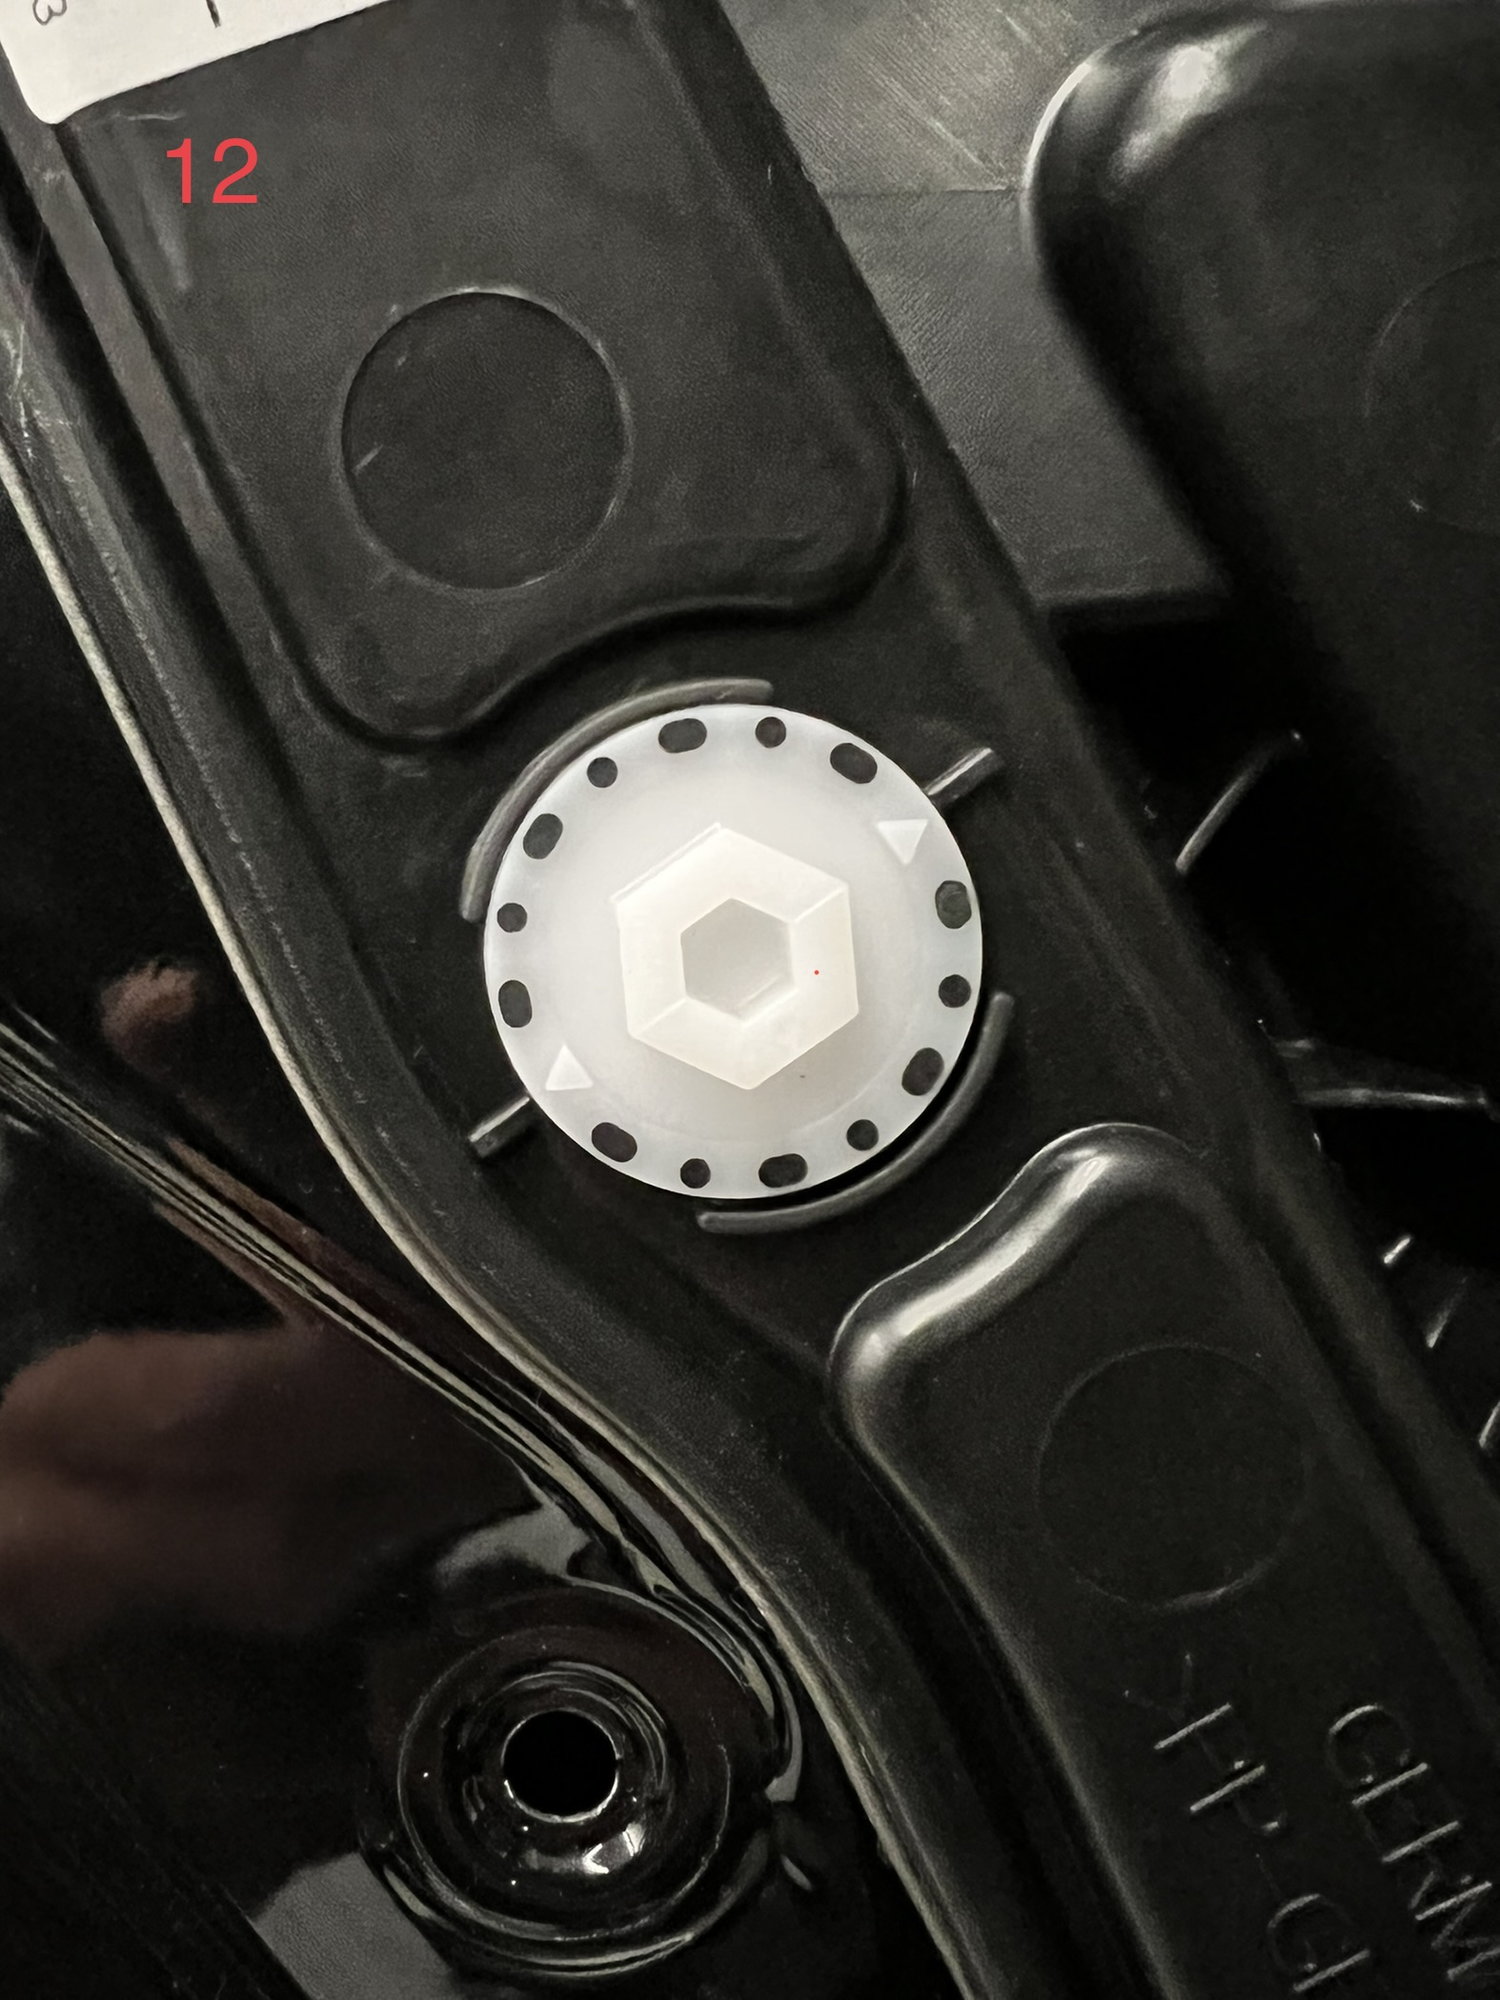
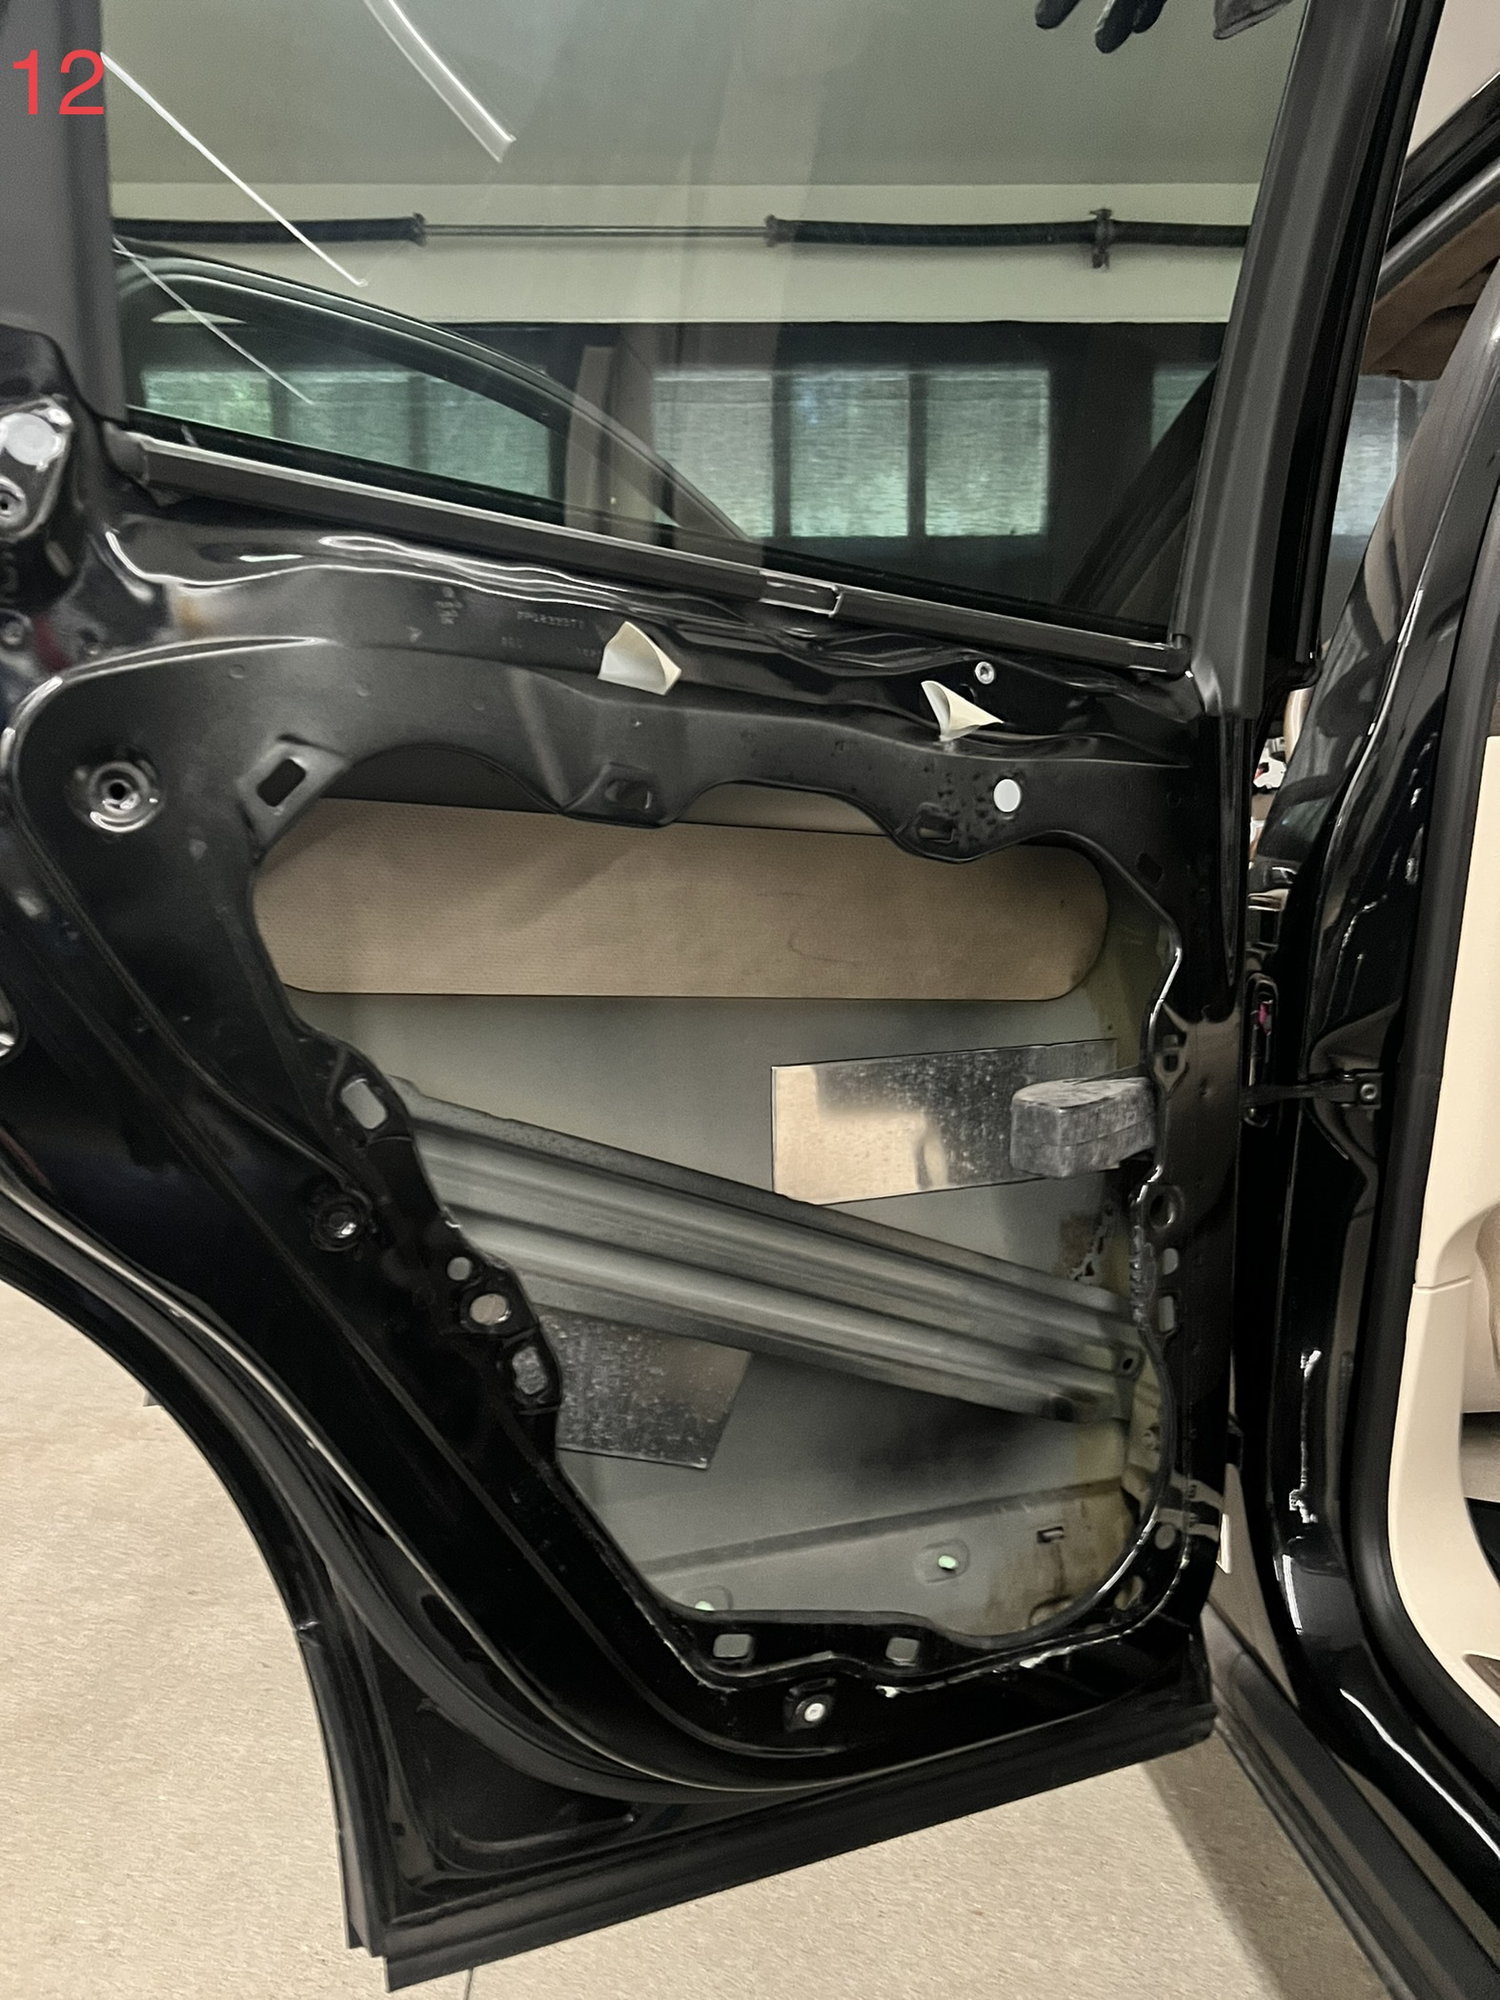
12) Feed the electric connection through the door frame so the door subframe can be removed. Remove the door subframe by turning the white plastic clips 90� with a 13 mm socket. Once turned they need to be pulled back a little to release. Now slide the subframe up outwards then inwards.
INSTALLATION:
1) Push the wiring harness through the vehicle door to the B pillar.
2) Guide in door lock with mounting bracket and move door subframe into installation position.
3) Make sure the door handle plug is positioned through the door lock hole in the door shell..
4) Guide the locking hooks of inner part of exterior door handle through the door skin and press inner part of door handle forward to secure the hooks in the door skin. Fasten the T20 screw to secure the inner part of door handle. Install the door handle and plug.
5) Align the latch and fasten the two bolts to 15 ft lbs.
6) Fit white clips from the door subframe to the vehicle door and turn them 90�. Connect the wiring harness.
7) Tighten fastening screws on the upper window mechanism support to 6 ft lbs. These are the two T30 bolts behind the fabric tape. Secure the fabric tape back into place.
8) Remove the tape holding the glass and guide the glass down into the mounting. The glass must be perfectly level. Measure both ends of the glass to make sure. Tighten the fastening screws to 4.5 ft lbs. starting from the left.
9) Softly close door to test latch alignment.
10) Test the window to ensure smooth operation. Then lower the window all the way down to facilitate installation of the sunshade rod. Install the rod guide then install the inner door panel by pulling up the sunshade and guiding the sunshade rod into the guide hole.
10) Attach Bowden cable and electrical plugs.
11) Push outer door panel into door frame and 3 replace fastening screws.
12) Test operation of the sunshade.
13) Reinstall remaining trim pieces inner pull handle.
PICTURE NUMBERS CORRESPOND TO THE REMOVAL PARAGRAPH NUMBERS
You should have put this in its own thread. Actually you still can and then it can be added to the DIY Subforum. It's a pretty thorough writeup. thanks for taking the time to do this.
Theon Goes Full Carbon Fiber With Stunning New Build
Slideshow: Built around a carbon-bodied 964 and a naturally aspirated 4.0-liter flat-six, this bespoke commission highlights how far the restomod formula has evolved.
Tuner Is Converting Porsche 911s Into Shooting Brakes
Slideshow: A Polish Porsche specialist is moving ahead with one of the most unusual 911 conversions in recent memory: a shooting brake version of the 991-generation sports car.
This Coachbuilt Creation Is A Modern Take on the Legendary Porsche 917
Slideshow: A Porsche Carrera GT has been transformed into a one-off coachbuilt machine that blends analog supercar engineering with styling inspired by the legendary 917 race cars.
Is This Convertible Cayenne A Steal, Or A Returnless Investment?
Slideshow: A heavily modified Porsche Cayenne convertible with faux wood trim and a long list of flaws recently sold at auction for surprisingly little money.
Porsche's Top 5 Most Questionable Naming Decisions
Slideshow: For a company obsessed with engineering precision, Porsche has occasionally named its cars in ways that left even loyal enthusiasts scratching their heads.
Pogea Racing's 964 Porsche 911 Reimagination Stands Out in a Crowded Field
Slideshow: Pogea Racing's latest Porsche 964 project blends carbon-fiber construction, modern chassis upgrades, and up to 500 horsepower while keeping the air-cooled 911 experience firmly analog.