When you click on links to various merchants on this site and make a purchase, this can result in this site earning a commission. Affiliate programs and affiliations include, but are not limited to, the eBay Partner Network.
I shaved down all the existing rubber on both the bearing and the housing.
I wasn't able to get the assembly (hoses secured to housing) over the bearing.
I smothered both the shaft and bearing in dilectric grease, still ... no chance.
I removed one of the 1.5" pieces, still no chance.
Eventually I had to remove 3 of the 1.5" pieces, was able to get the housing with the 5 pieces over the bearing.
Then one by one I was able to force the remaining three 1.5" pieces into the housing over the bearing and secured the pieces to each other and onto the housing.
Test drove it and it works but I think the 5-then-3 method of putting the 1.5" pieces into the housing once it's over the bearing is going to be way faster than trying to force all 8 1.5" pieces over the bearing al at once.
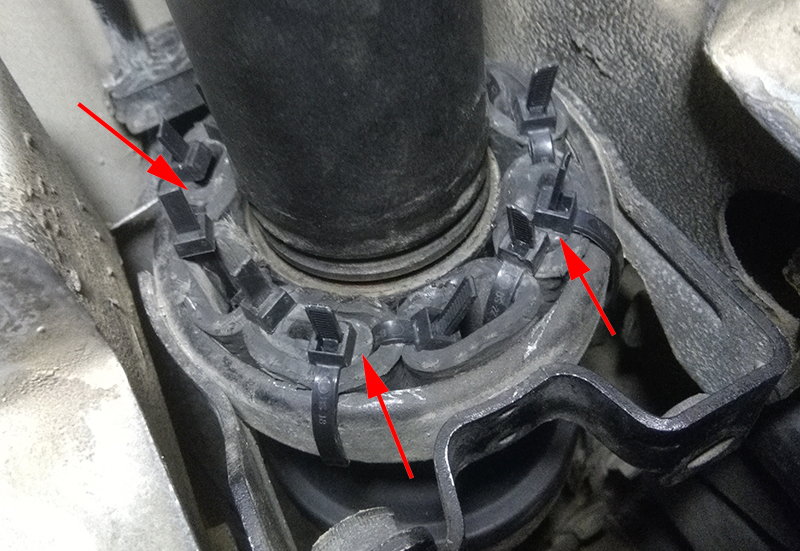
Do 4 hose slices on the upper portion to the bearing carrier ring first. Zip-tie them to the carrier ring at #1 and #4 slices. Join together semi-tight only... no need to further ovalize the slices, the weight of the shaft itself will already do that. Then, one-by-one insert the remaining 4 slices until they join closed.
Do 4 hose slices on the upper portion to the bearing carrier ring first. Zip-tie them to the carrier ring at #1 and #4 slices. Join together semi-tight only... no need to further ovalize the slices, the weight of the shaft itself will already do that. Then, one-by-one insert the remaining 4 slices until they join closed.
That's exactly what I did, the only difference is I inserted 5 slices into the upper portion of the bearing carrier instead of 4 and 5 went on fairly easily. Great fix! saved tons.
I was able to get them in all at once by sliding the outer support out of the way, then wrapping the hose pieces around the bearing. To slide them together, I put the hose pieces with the ends about at the center of the center bearing, which made the other ends able to be more easily squeezed together to slide the outer support back over. Once all pieces were on the bearing and in the support, I just worked them all into place, generally one at a time about an 1/8" at a time. Overall, a very easy and effective fix.
I would mention that the key is to use soft wall heater hose and high quality bands. Home Depot has bands in the electrical dept with metal tabs for extra security.
Zak, I love this. You've now tuned a "Jimi fix".. wonderful!
Hah! Thanks - I will have to stand behind it now, as I am going to take it on a 7000 km trip in a few weeks. Going to bring a spare chain of tubes just in case. Btw I installed them exactly as you did Avec.
So since I am going to trust it for a long haul I wanted to see exactly how it performs under load, so my new project is to video it in action. First attempt didn’t work too well, but I have an LED light source to add and I am going to reposition the GoPro. But it was fun! Will post a better version during the week.
Edit - seems I didn't embed this correctly for all browsers, so here is the link:
I just did my jimmy. I was having a little noise at idle and a bit of the armrest clunking 05 cayenne S 150,000
Over the last 2 years had two CEL"s for camshaft position sensors, bank 1 last year and bank 2 this year. I got a full diagnosis done and they said my camshaft adjuster sloenoids were failing, thus the incorrect symptom for cps.
The only noise I have left before today was a little bit of armrest knocking after coming to a stop occasionally so I quit putting it off and I got in there.
My bushing seemed completely intact at first. When I flexed it I could see it was entirely cracked and shedding pieces of rubber. I cut it out and it seemed intact but falling to pieces and installed the jimmy. I only took it out a few blocks and it seemed quieter but I did slip trying to get into 3rd gear.
Correct procedure would be to tighten the two bolts holding the bushing then the 6 on the bracket right?
incorrect positioning would only produce noise and vibrations right, or would it relate to acceleration and shifting?
Thought I’d add a long term report and mod for the fix. I ran the standard fix for about 10,000 kms, when I started to get a slight vibration between 80-90 kph. Taking the fix apart I found the hose was a lot softer than when it started (no surprise). Rather than making a new ring, I added smaller tubing inside 4 out of the 8 hose sections. It was still flexible enough to get in there, but by having 4 points less compressible, the shaft is held more firmly. Vibrations disappeared and all is good again.
Outer tubing is 5/8” Continental Fuel tubing, the 4 inside ones are 3/8” of the same. Glad to say that I just got back from my 7,800 km road trip, high speeds and off-roading included and no problems whatsoever.
Kind of responding to my own post 3 up, yea car runs great now.
I really appreciate how accessible it is to check on occasion and I personally see the value.
I love "rebuildable" high quality parts on cars. I really want to believe that the ownership of this vehicle can actually be close what other people pay for their cars if you are willing to buy parts online, in advance, and spend a decent amount of time.
had my 06 S for 2 years now and I fell like it is running probably almost as good as day 1 thanks to the long list of things I have done to her.
What I most appreciate about all of this is that it expanded my automotive mechanical comprehension and ability.
This sorta reminds me.. I bought a replacement center bearing mount assembly (bearing, rubber, mount) back when I owned a 955. When mine went I used a Vertex rebuilt shaft (worked fine) - and this bearing has been sitting around in my garage since then.
It's up for grabs. If you feel like buying me a case of beer - fine. If not - fine. It gets shipped at your expense, but I think (have to check) that it will fit in a USPS flat-rate box - the medium size one.
First come - first serve as they say..
It won't get shipped for a week or so, I'm off tomorrow on my motorcycle for a New England fall ride - and from the looks of the weather I might be gone for a week.
About three weeks ago I felt a rumble/tremor from the rear while accelerating hard around a corner. It progressively got worse over then next couple hundred miles, but only when accelerating hard. I finally realized it was the cardan shaft issue when I felt the hammering through the armrest.
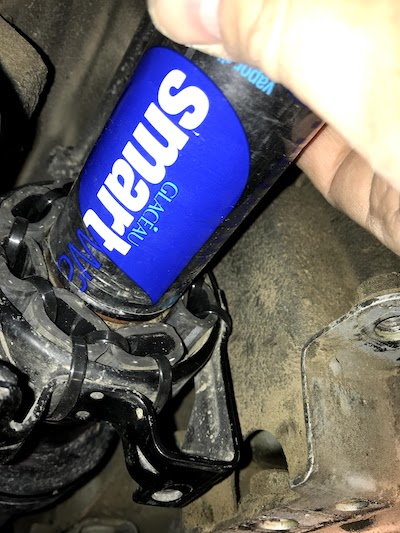
After getting the heater hose into the retaining ring, I cut a section from a water bottle, and wrapped it around the shaft and bearing. That made sliding the Jimi fix onto the bearing super easy.
Drives smooth as glass at full acceleration and around curves now. Thank you to all in this thread for very clear instructions on how to do this.
Last edited by dustinsc; 09-29-2017 at 02:18 AM.
Reason: shrink image
After getting the heater hose into the retaining ring, I cut a section from a water bottle, and wrapped it around the shaft and bearing. That made sliding the Jimi fix onto the bearing super easy.
Drives smooth as glass at full acceleration and around curves now. Thank you to all in this thread for very clear instructions on how to do this.
Thank you for the valuable addition to the thread - the bottle was a great idea!
A few posts up, someone mentioned lubing the rubber tubes to ease assembly. Oil-based lubes attack rubber, a good trick is to use KY jelly instead. I use it when replacing sway-bar bushings, it makes them go together very easily and it just rinses away with water without softening the rubber. HTH. c
A few posts up, someone mentioned lubing the rubber tubes to ease assembly. Oil-based lubes attack rubber, a good trick is to use KY jelly instead. I use it when replacing sway-bar bushings, it makes them go together very easily and it just rinses away with water without softening the rubber. HTH. c
Depends a bit on the rubber used - Viton is quite oil resistant.. and the oil shouldn't be slathered on. A water based personal lubricant might also be used..
Oh, also some detergent mixed with water will work fine, and will dry up and go away rather quickly.

 08-06-2017, 08:25 PM