When you click on links to various merchants on this site and make a purchase, this can result in this site earning a commission. Affiliate programs and affiliations include, but are not limited to, the eBay Partner Network.
The right way to install wireless CarPlay, wireless charging and a backup camera
I bought a 2004 Porsche Cayenne Turbo earlier this year — amazing car. The stock PCM is ancient, and I wanted to upgrade to wireless Apple CarPlay (with full steering wheel controls), wireless iPhone charging, and a backup camera. I created the perfect setup through some trial and error over the past few quarantined months, and I thought I'd share it here:
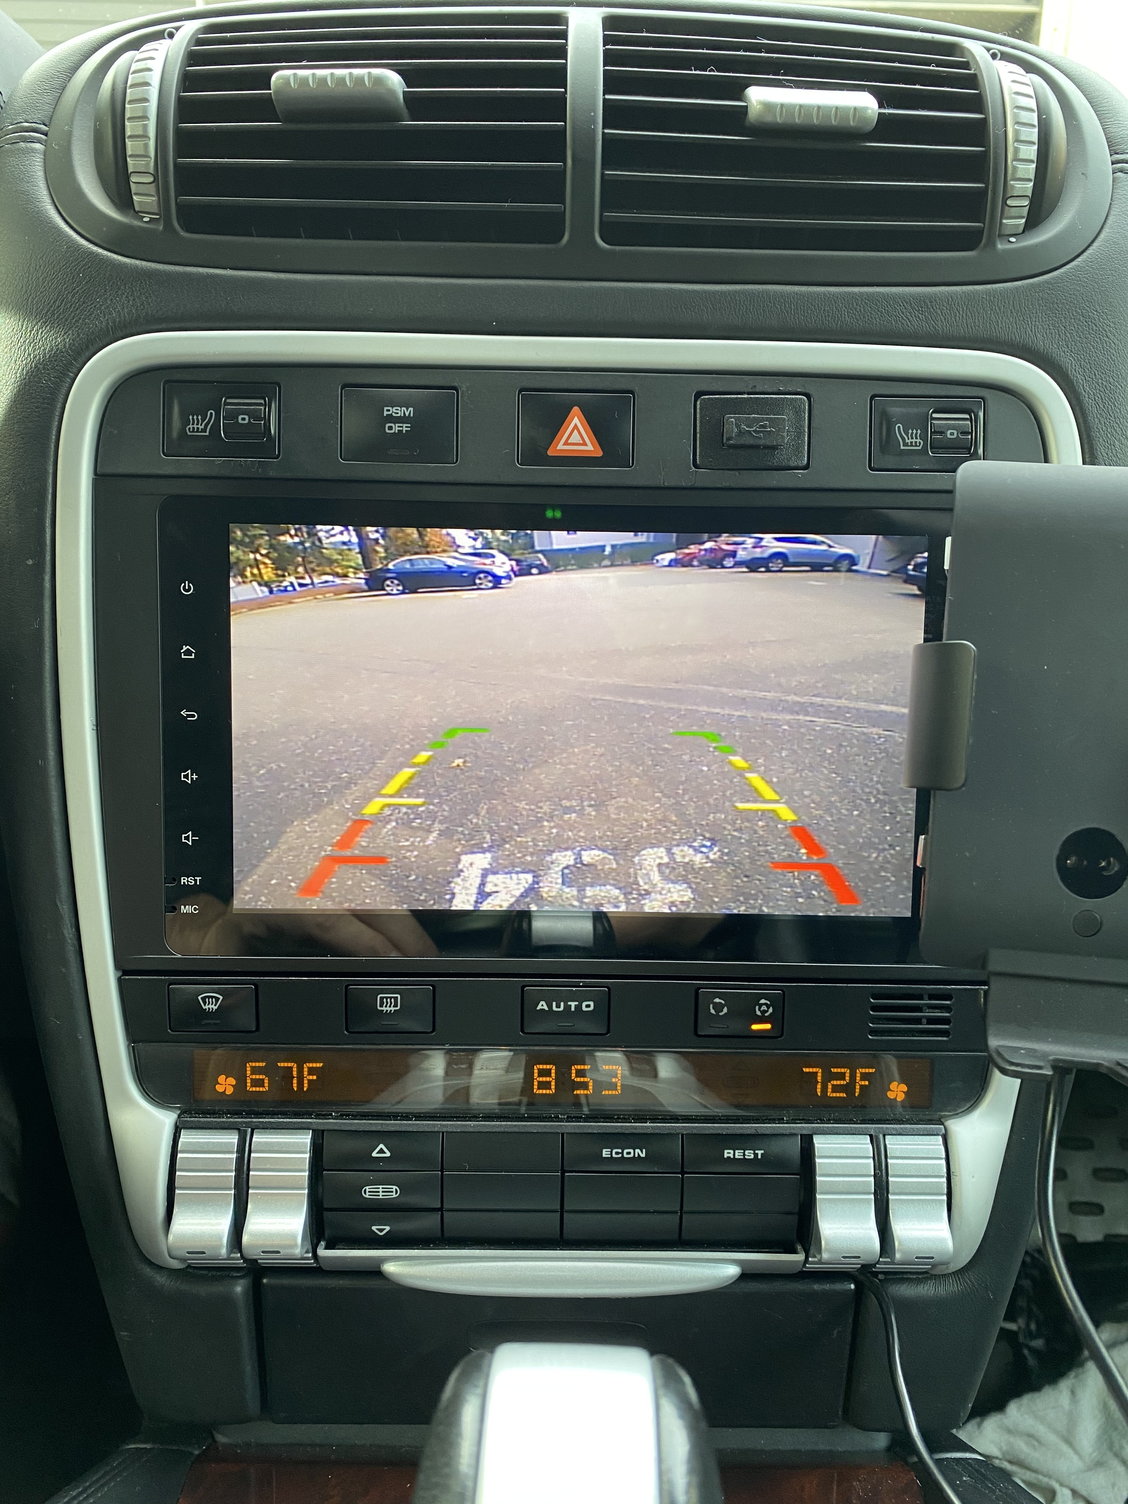
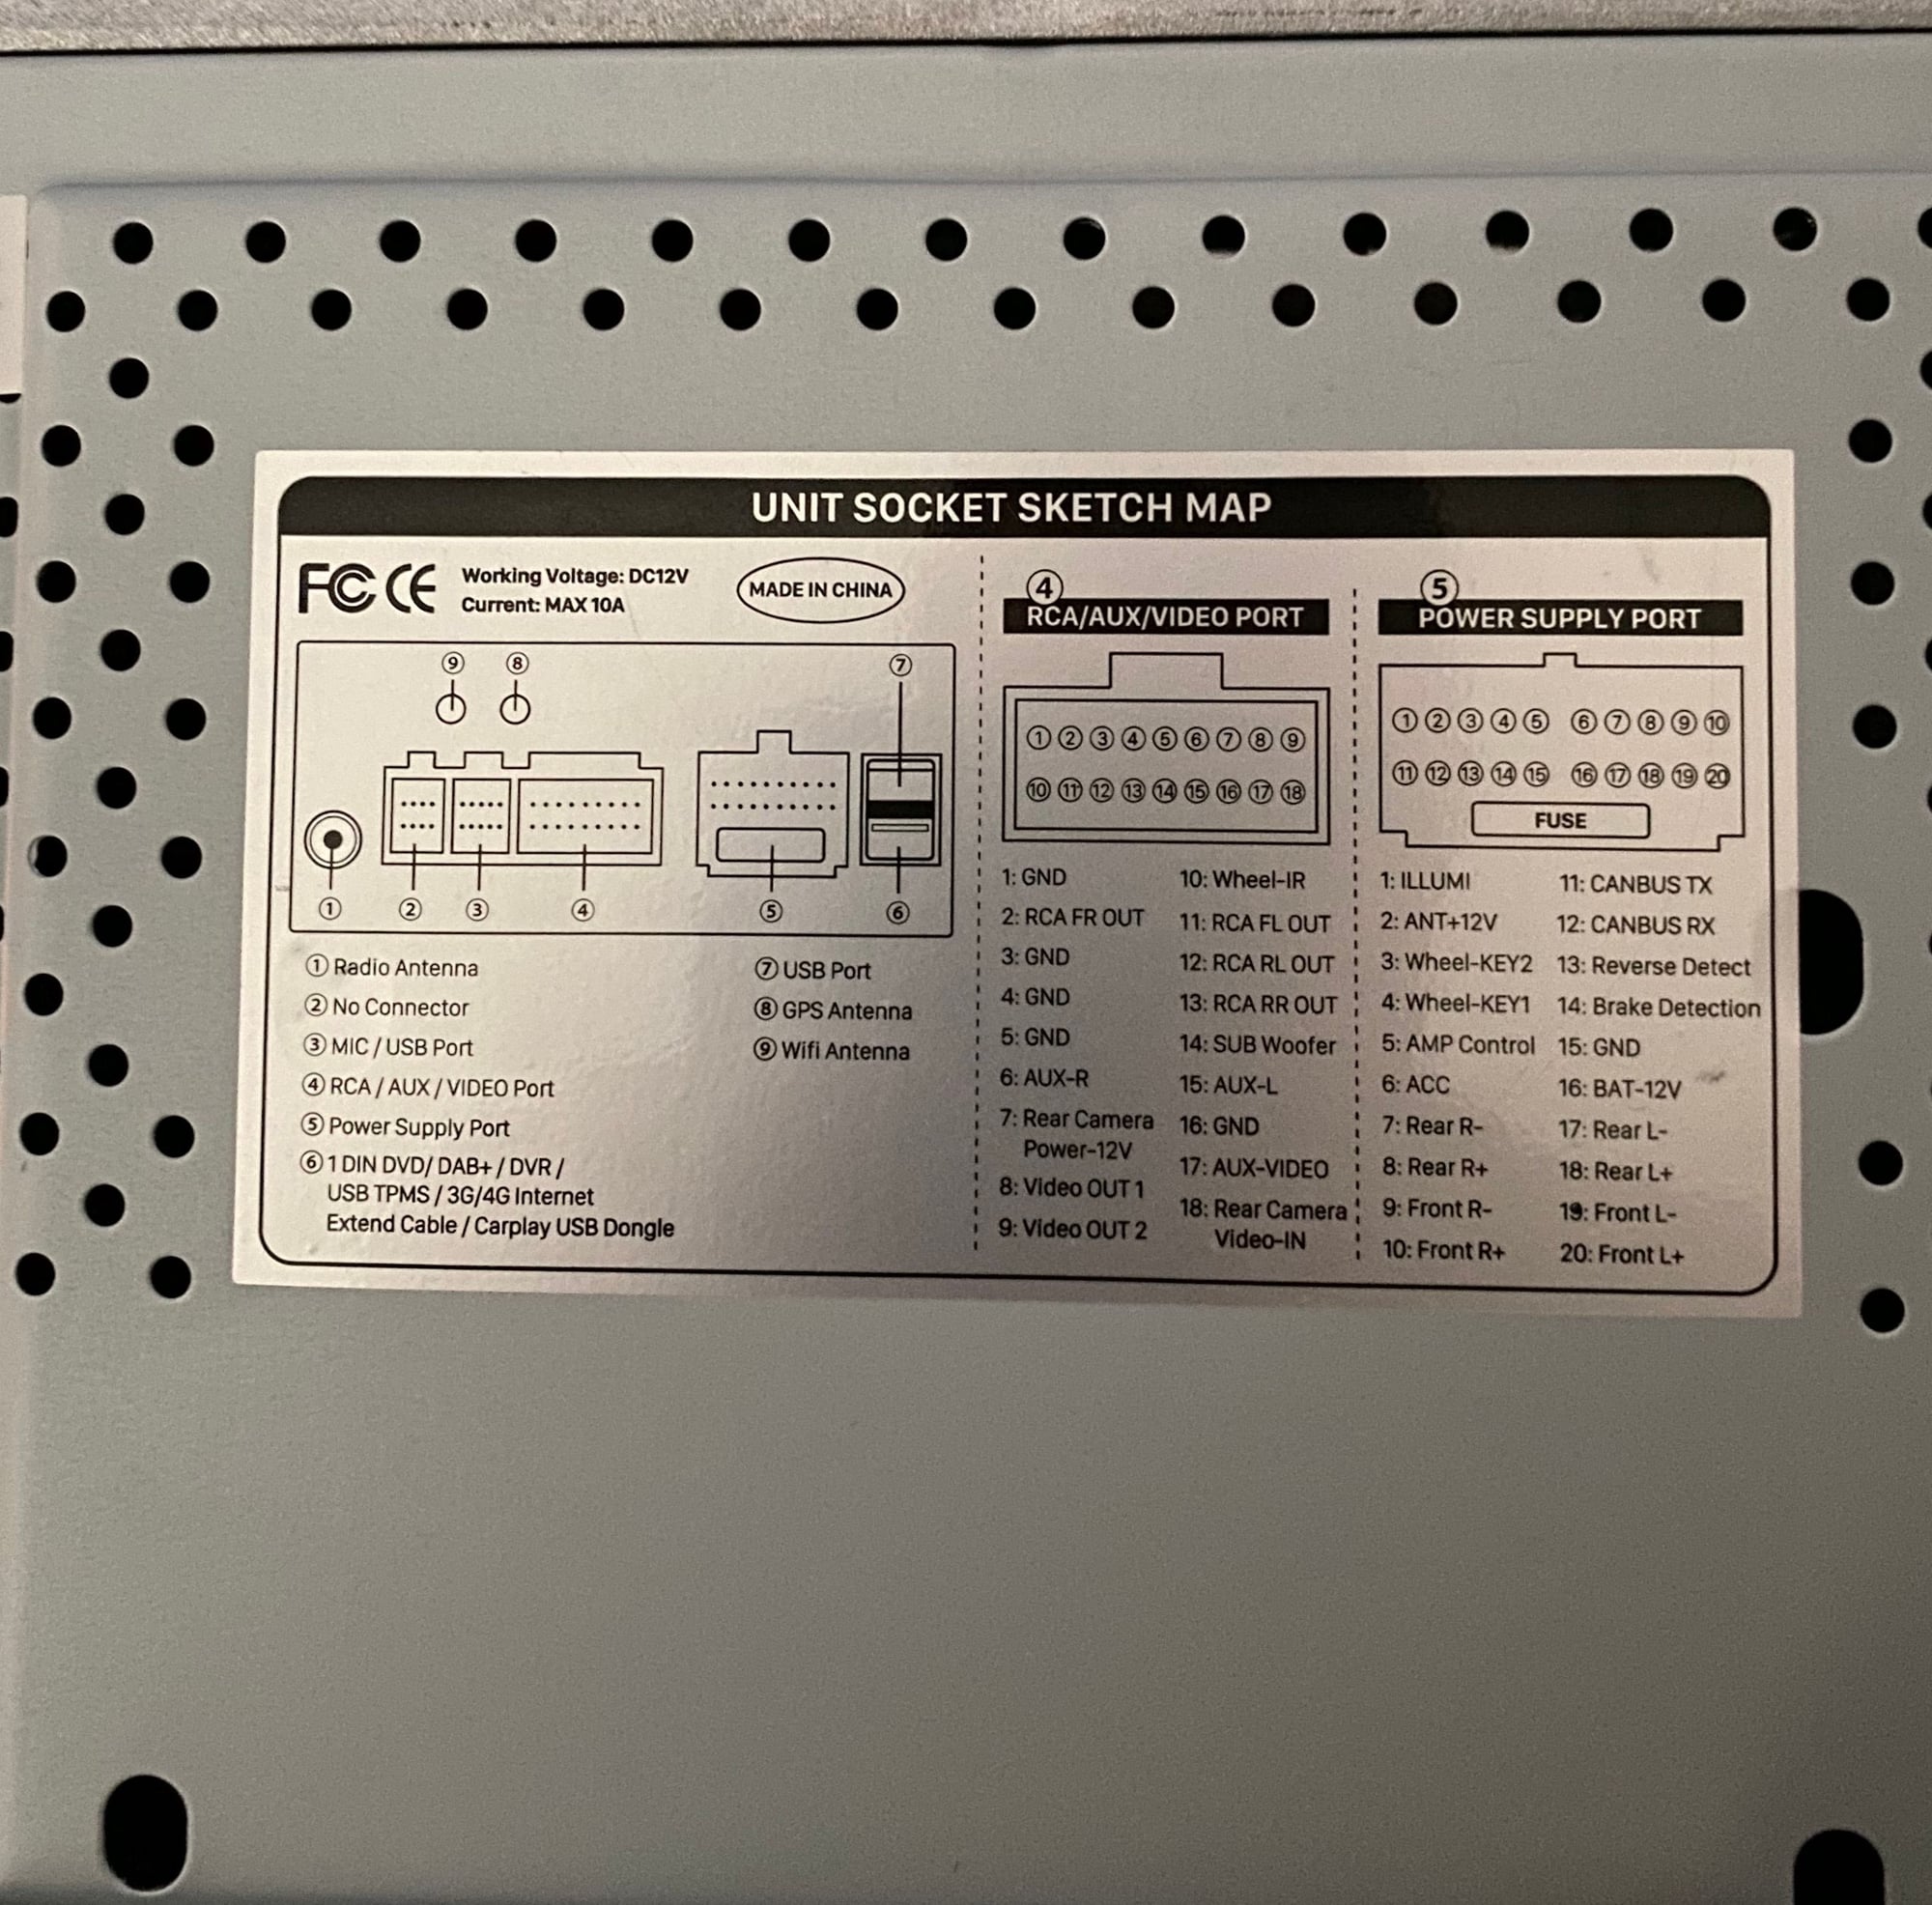
Backup camera, USB port on dashboard, cell phone mount with USB-C power from ash tray. Seicane head unit pinout. Tap into the black-and-blue wire (in the rear left storage compartment in the trunk) for reverse detect. The finished product.
I didn’t care about any of the Android radio features — there are better CarPlay app alternatives to local radio stations and crummy Android apps.
I picked up this Seicane Android head unit. The ‘Porsche Canbus Decoder’ that comes with this unit causes more issues than it solves: The time on the car’s clock was always incorrect; the LCD display behind the steering wheel always showed a (partially offscreen) ‘?DIO OFF’ message; and nothing other than the volume and mute buttons on the steering wheel ever worked.
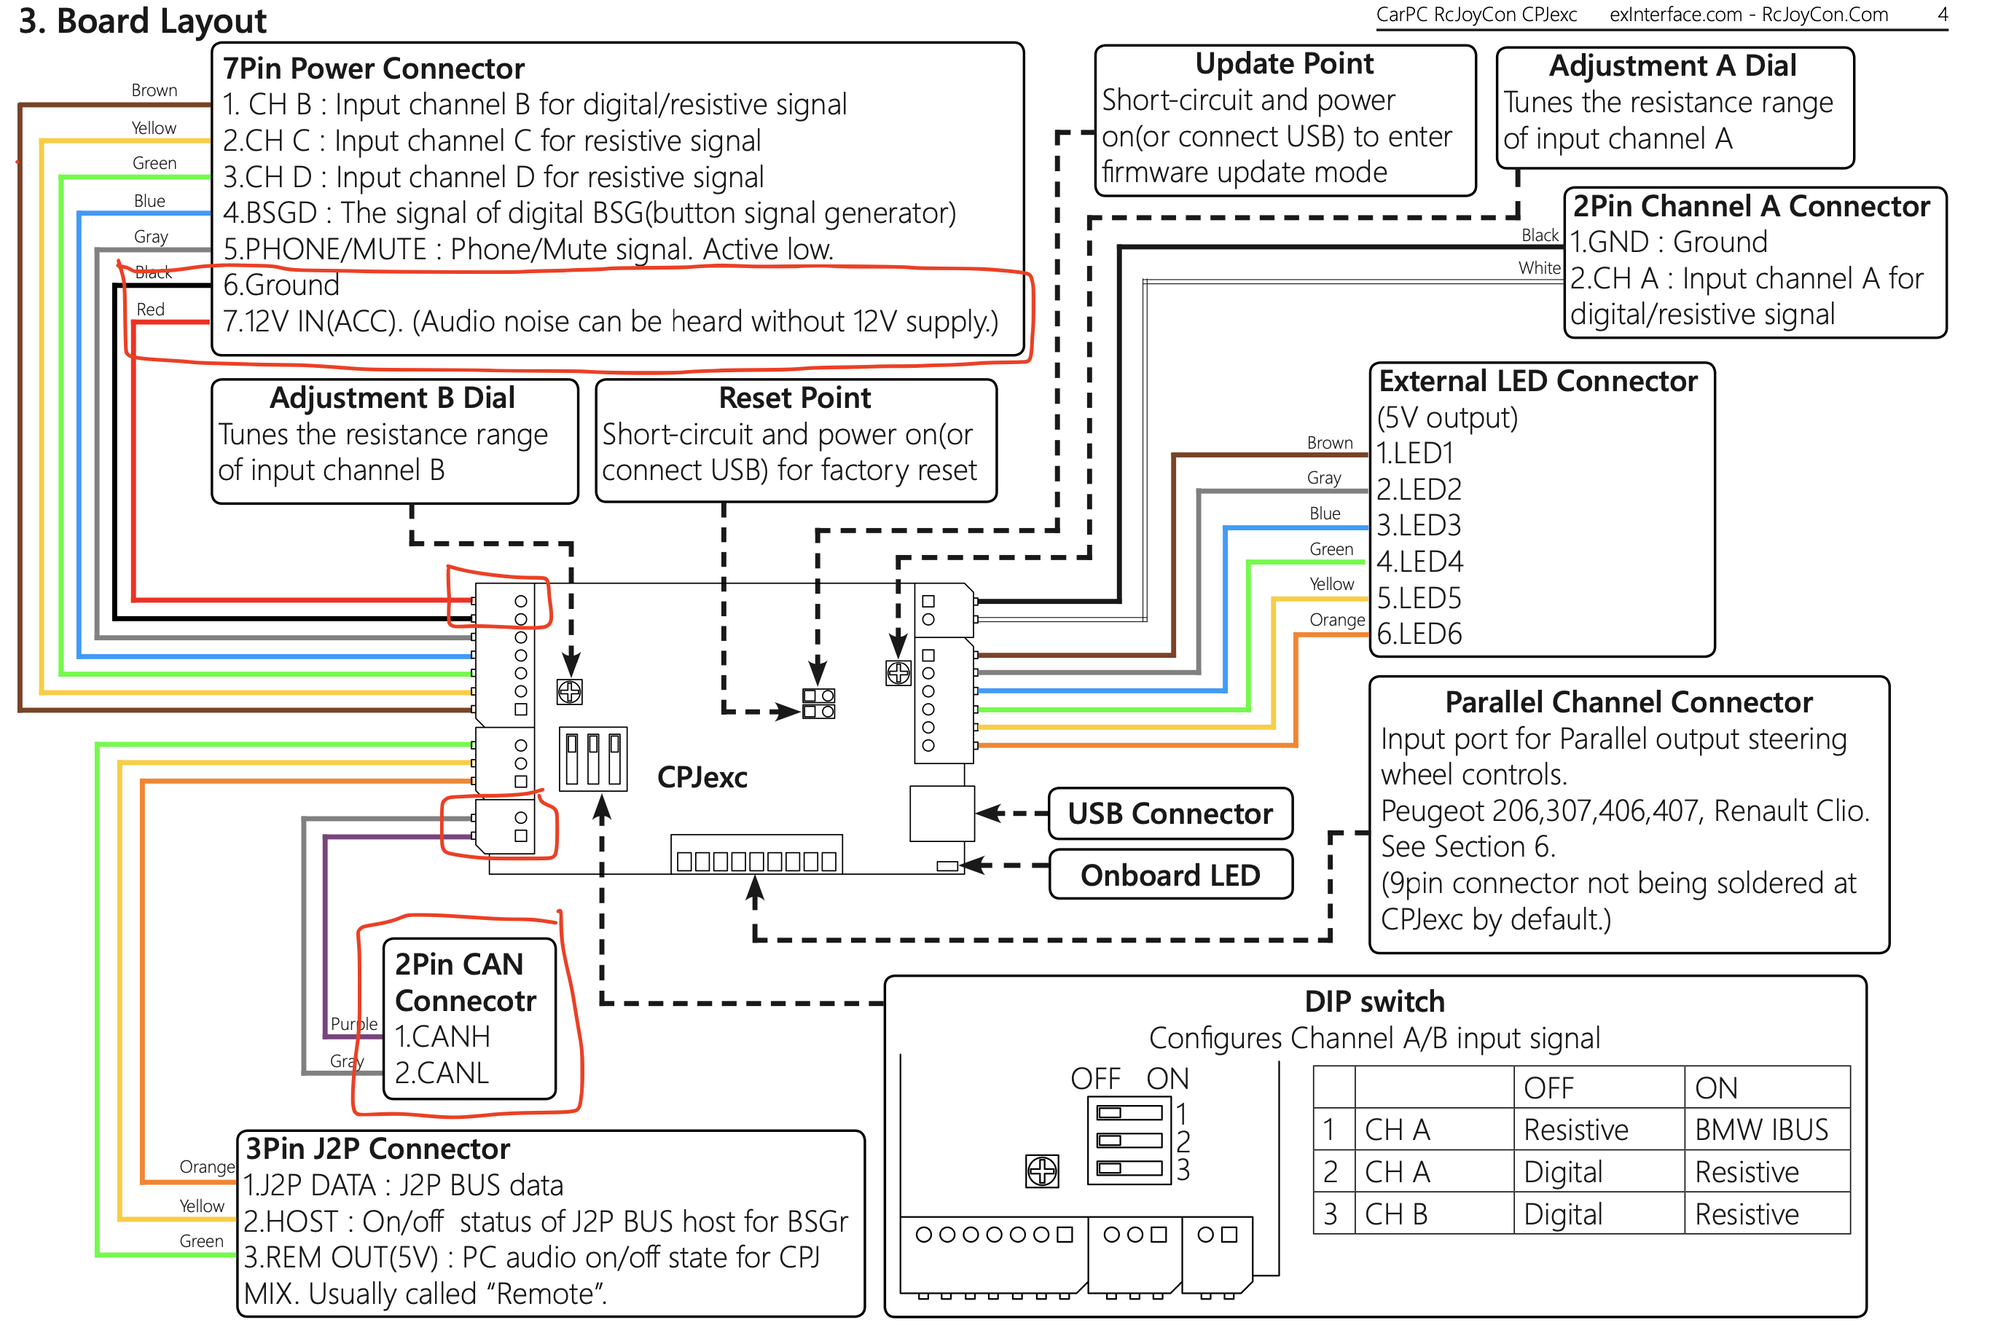
I ended up not using the Canbus decoder — I bought a CPJexc instead (It turns your steering wheel buttons into a USB keyboard, essentially)
You hook the unit into the PCM CANBUS wires (Yellow plug, CANH and CANL), and plug the USB side into the Android head unit.
You have to program it to listen to CANBUS messages from the steering wheel buttons, and it generates USB keyboard button presses that the Android head unit listens to.
For my car I had to listen to CANBUS messages with ID 1475 (aka 0x5C3); with no buttons I get a FF0000 message periodically.
Through some trial and error I found the right messages for all my steering wheel buttons:
MAN button = FF 15 00 (I mapped it to F1 keyboard button on the virtual CPJExc USB keyboard)
+ button = FF 06 00 (I mapped it to ‘Volume Up’ media button)
– button = FF 07 00 (I mapped to ‘Volume Down’)
Mute button = FF 0E 00 (I mapped to ‘Volume Mute/Unmute’)
Scan = FF 14 00 (I mapped it to F2)
Up = FF 02 00 (I mapped it to F3)
Down = FF 03 00 (I mapped it to F4)
Music = FF 0D 00 (I mapped it to F5)
Your steering wheel Volume Up, Down, Mute work in all apps - including the CarPlay app.
. Update the AutoKit app and the dongle firmware (the update functionality is in the AutoKit app itself). After the update, you can assign CarPlay actions to steering wheel buttons in the AutoKit app.
I mapped the MAN(F1) button to Siri.
I mapped SCAN (F2) to the CarPlay ‘back’ button, so I can flip between music and map views.
I mapped Up and Down to Next / Previous (song).
I mapped ‘Music’ to Play / Pause (useful to pause a podcast)
You can of course map any of the buttons to any of the CarPlay functions. This setup works great — when I get in the car, I can ask Siri for directions, ask her to play the latest news, or any music, etc.
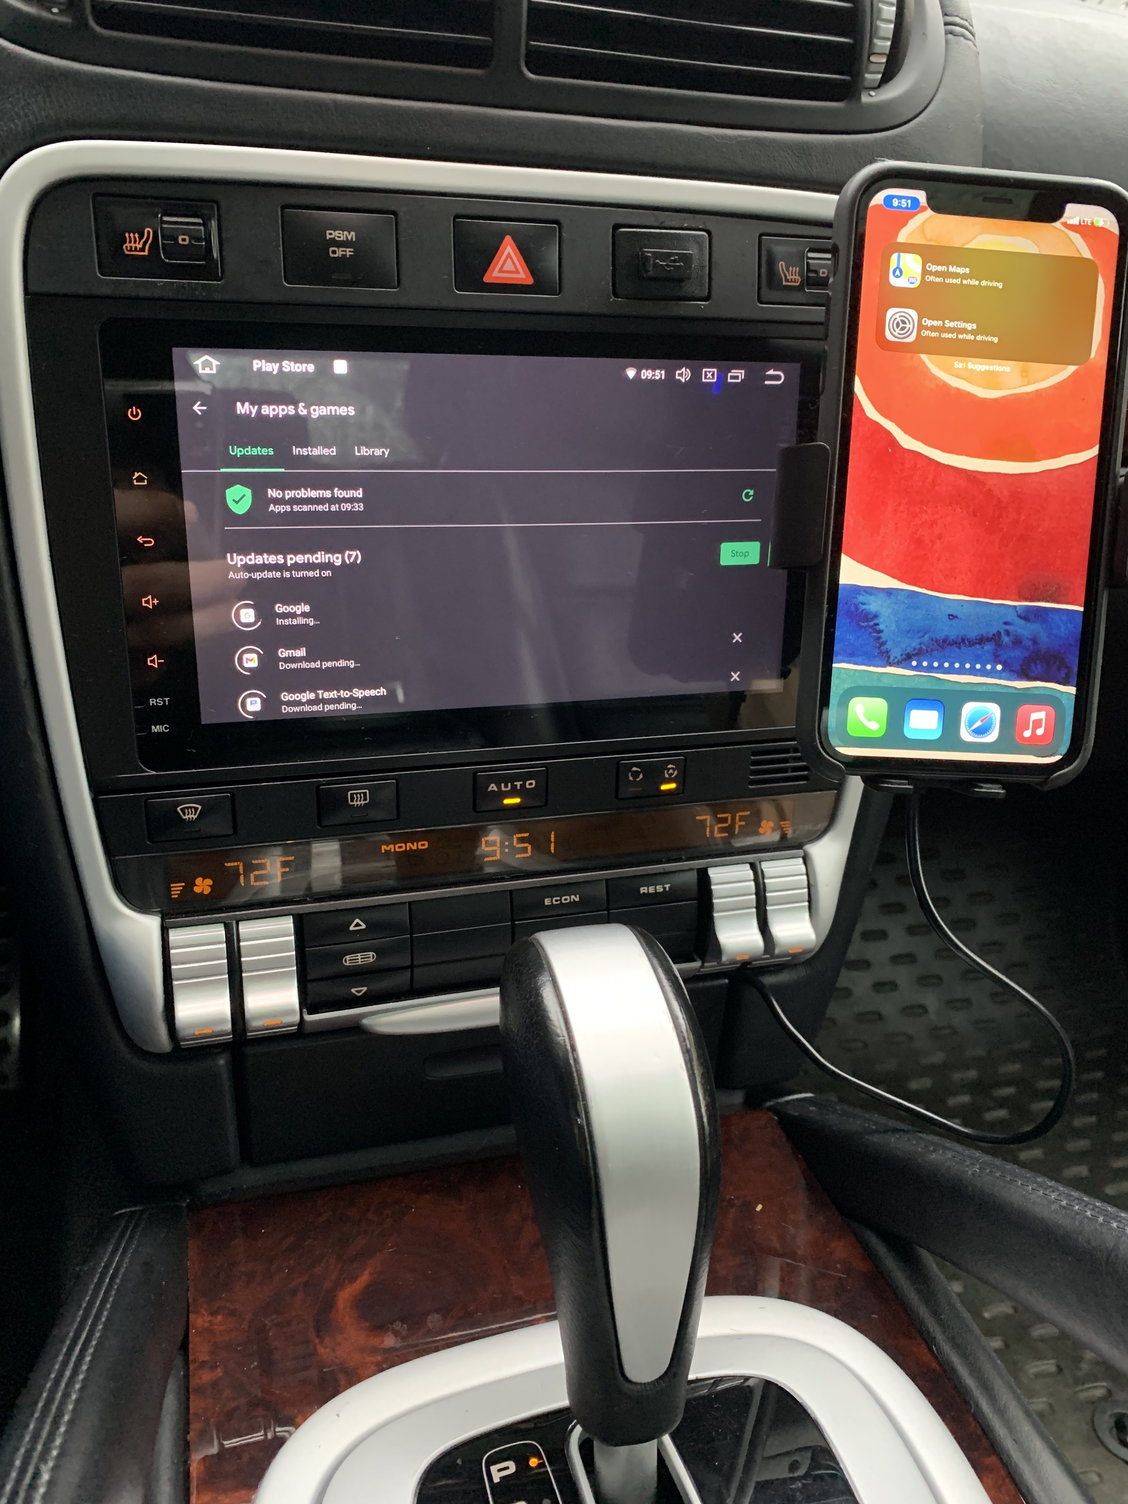
The phone mount automatically holds on to your phone when you bring it close to the mount, charges it via wireless charging, and the wireless CarPlay auto-connects pretty reliably.
To power on the Seicane radio (a job usually done by the CanBus Decoder), I used
from the CarPlay dongle (useful for guest passengers who want to use CarPlay from their phone)
Remember to connect to Wi-Fi and install updates for the head unit and all apps — it seems to help with reliability.
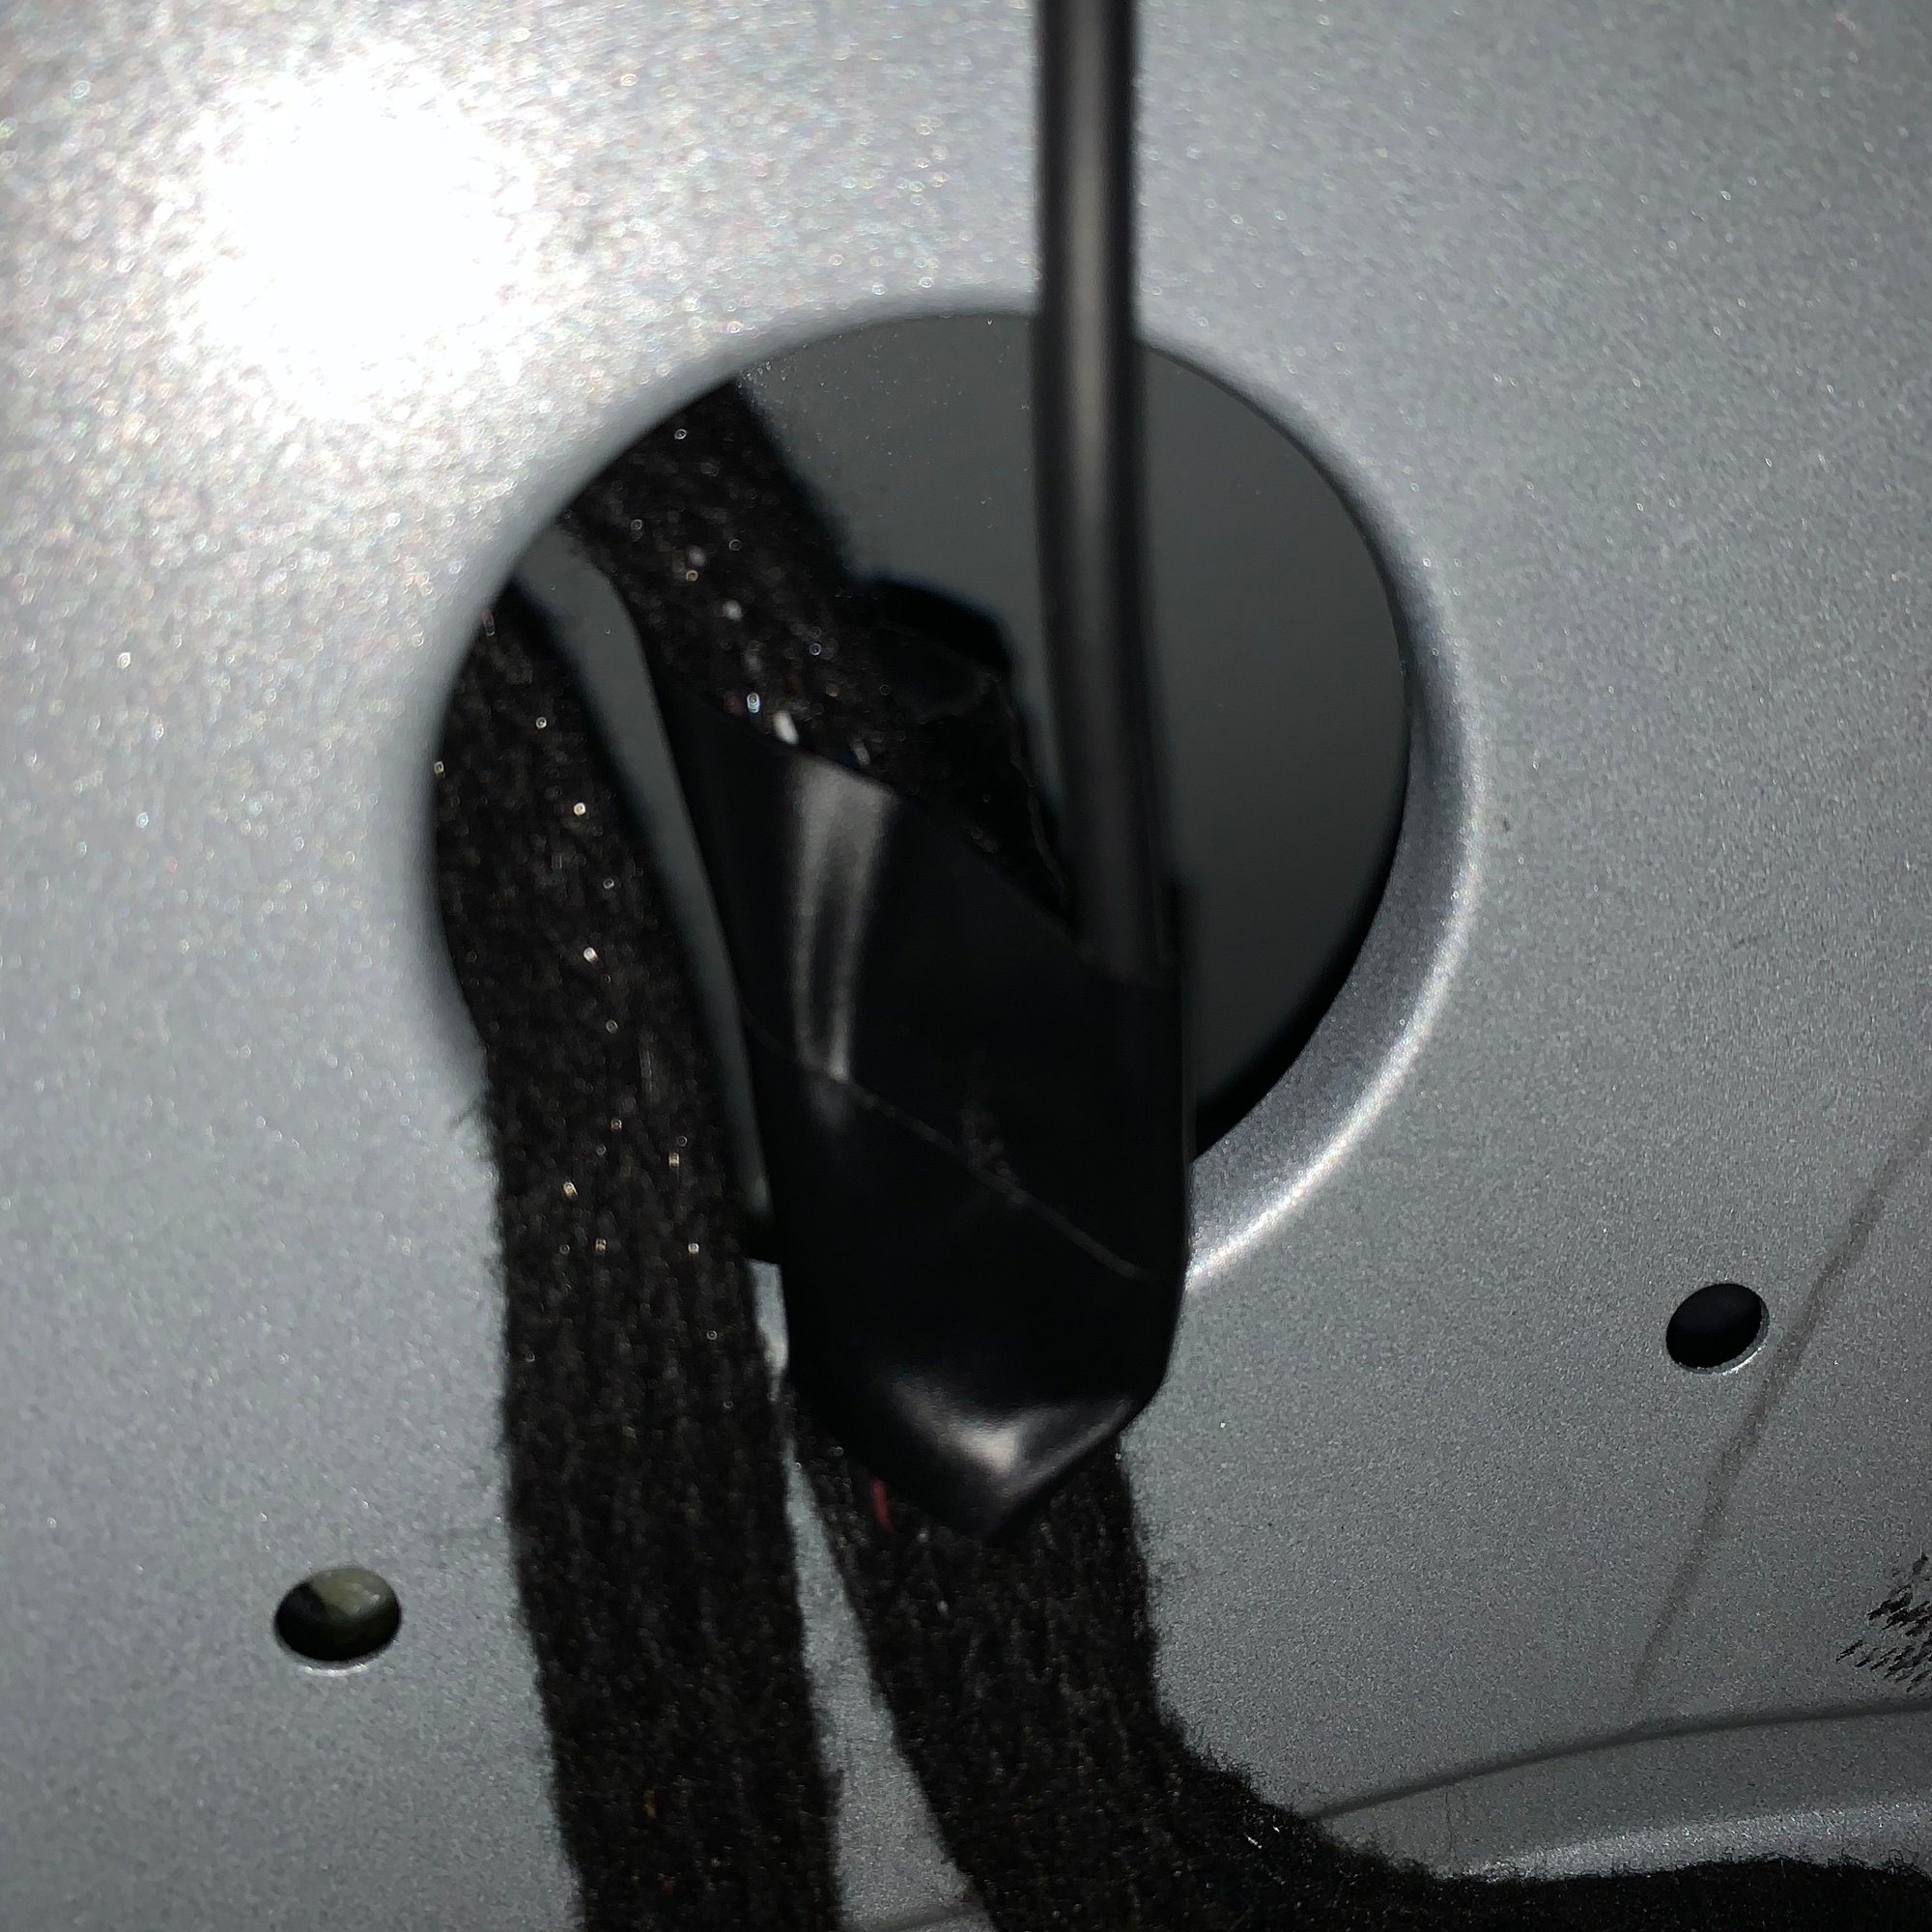
I installed a wired backup camera by running the cable from behind the Android head unit all the way back to the rear hatch. I hooked up the ‘reverse detect’ wire of the Android head unit to the reverse light in the rear left of the car - open the storage compartment in the left of the trunk, open the shielded wires going back to the tail light, and splice into the blue and black wire.
Great write up and congrats! I’ve been trying to find a solution to the getting the steering wheel buttons to work in CarPlay and your solution looks like it will work for me as well.
Couple of questions about the setup:
1- Where on the CPJexc device do you connect to the CAN H and CAN L wires? Does the existing connector work or do you need to solder?
2- Do you think is it possible to leave the CANBUS module connected to the head unit and splice the CAN H and CAN L wires to the device separately? This would keep power-on to the headunit as well as other CANBUS data that works on the head unit (outside temp, etc.)
Thanks,
1 - The CPJexc device comes with bare wires with connectors that you plug in to the CPJexc board. You need to connect the red, black, purple and grey wires to the car.
I bought a radio wiring harness, stripped it down to parts, and connected the red plug to the the grey and purple wires coming out of the CPJexc. I used solder seal wire connectors to join the wires - much easier than actual soldering.
2 - You should be able to splice into the existing CANBUS without any issues (that's what I did initially); CANBUS is pretty much designed to do exactly that (it is just a bunch of wires 'spliced' off of a main bus). I'd recommend buying this harness and splicing that - that way you don't have to cut any wires on the Porsche.
Thanks for sharing your experiences and the great writeup. This is a project that I have considered tackling for some time, and your post is very appeciated.
This is great info. Thanks for taking the time to answer my questions. I ordered a CPJexc board, and will let you know how my install goes.
Thanks again,
Originally Posted by odfijoij
1 - The CPJexc device comes with bare wires with connectors that you plug in to the CPJexc board. You need to connect the red, black, purple and grey wires to the car.
I bought a radio wiring harness, stripped it down to parts, and connected the red plug to the the grey and purple wires coming out of the CPJexc. I used solder seal wire connectors to join the wires - much easier than actual soldering.
2 - You should be able to splice into the existing CANBUS without any issues (that's what I did initially); CANBUS is pretty much designed to do exactly that (it is just a bunch of wires 'spliced' off of a main bus). I'd recommend buying this harness and splicing that - that way you don't have to cut any wires on the Porsche.
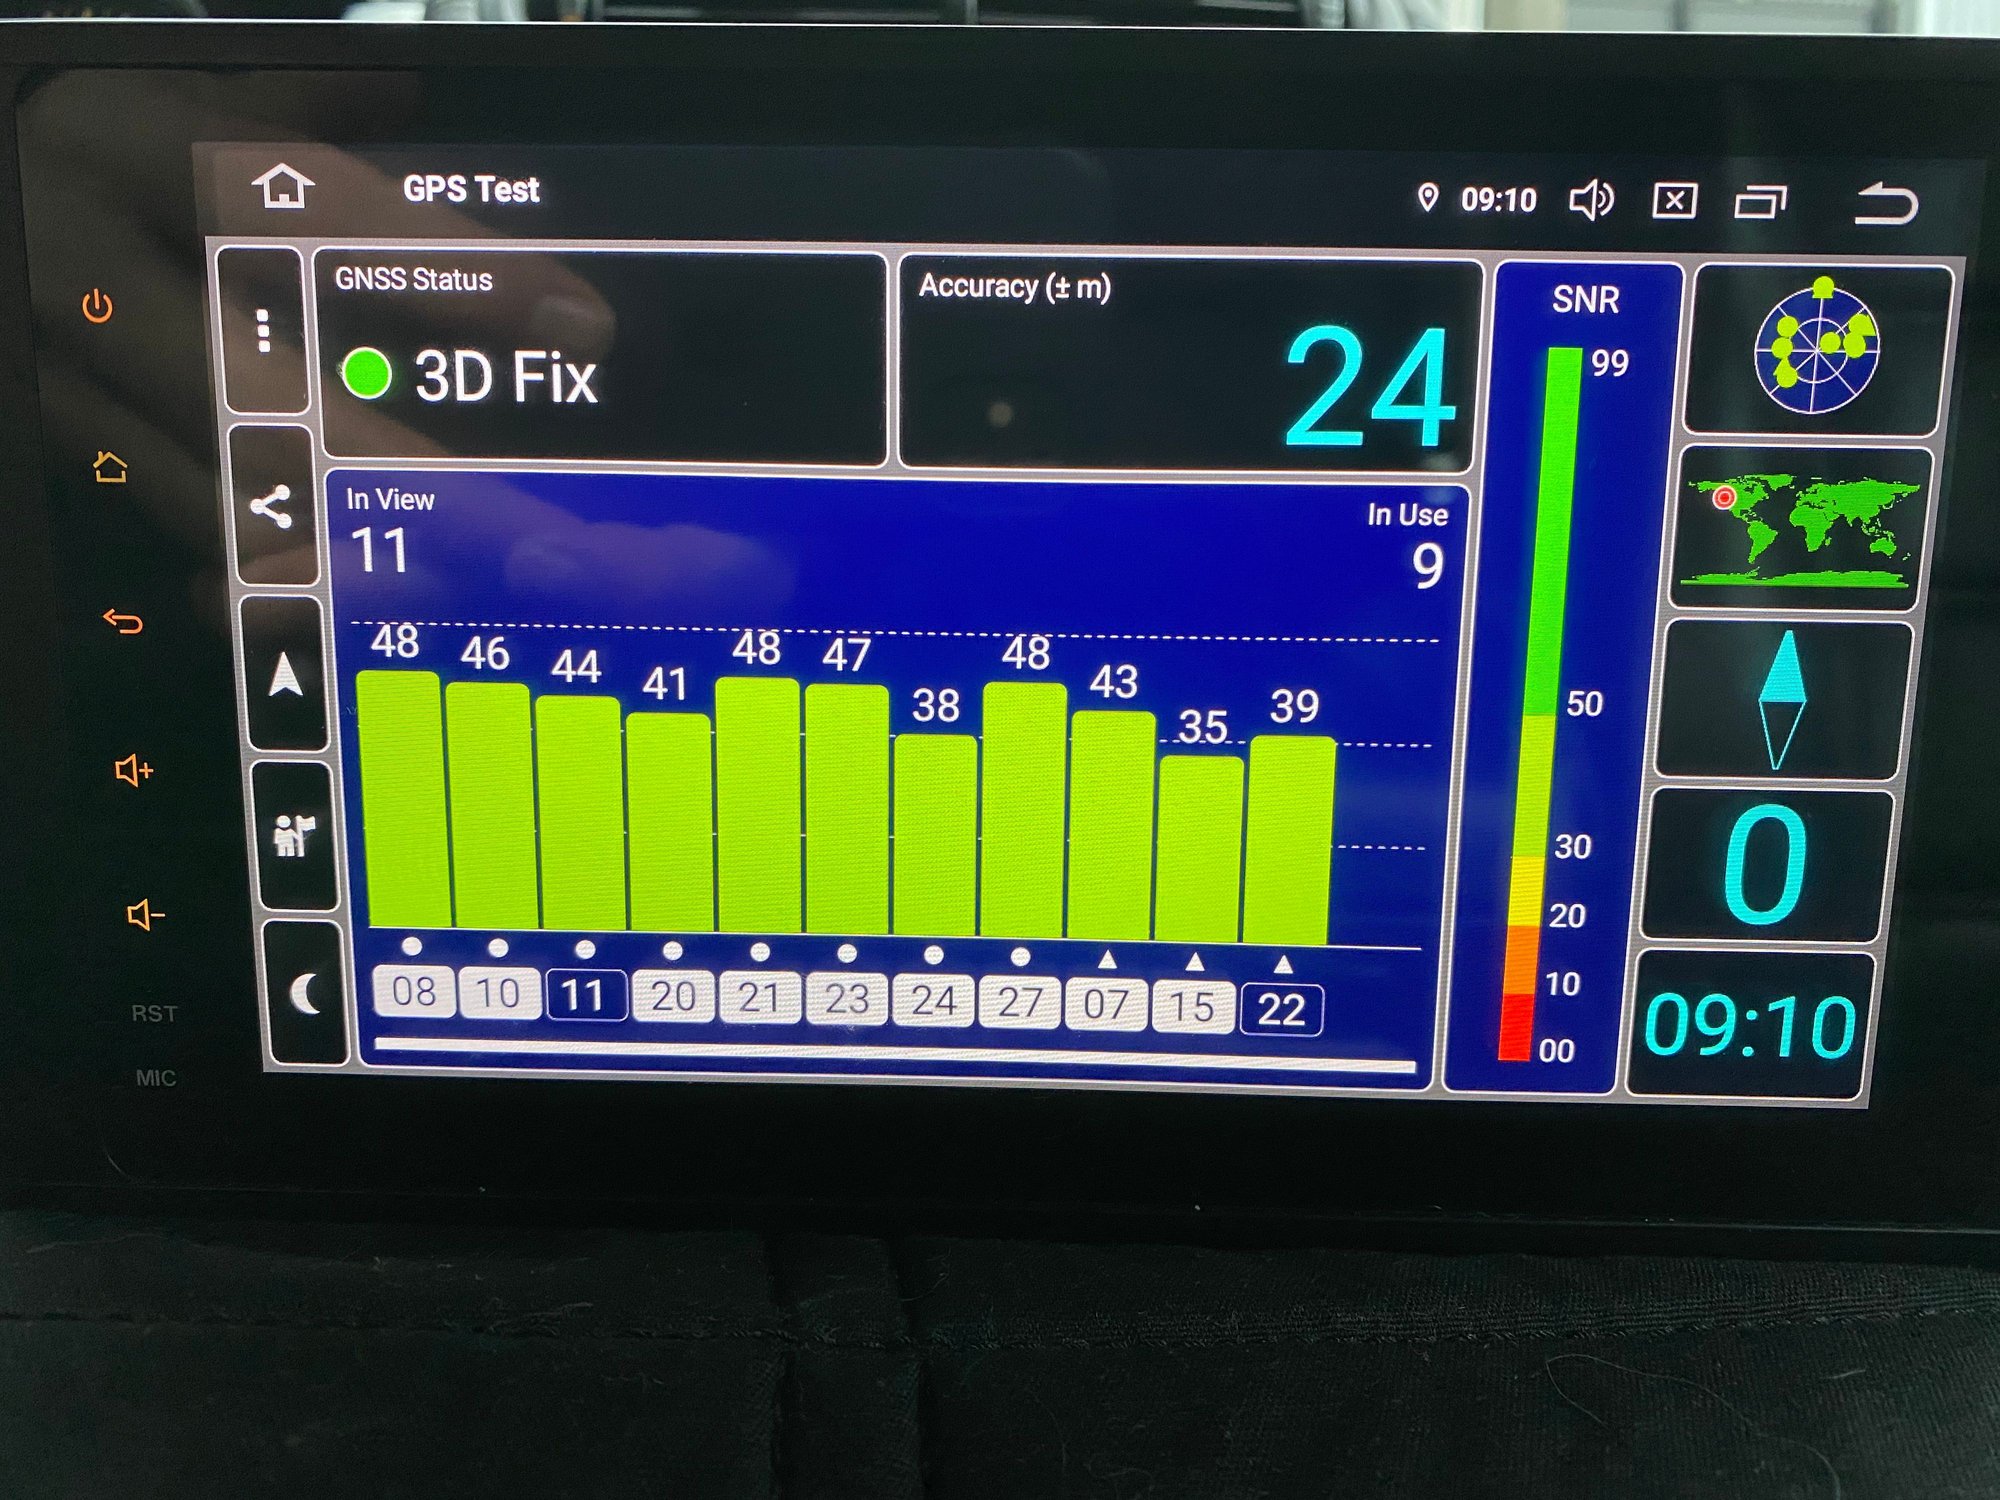
to connect to the GPS antenna built into your Porsche (connect to the blue Fakra plug that used to plug into the PCM) — no need to buy and install an aftermarket GPS antenna under your dashboard.
This doesn't matter much for CarPlay, as it can use your phone's GPS - but the clock on your Android Head Unit should always be correct if you do this.
Which of the many options that the Seicane order page offers did you select? These Seicane head units are entirely new to me, as is my 05 CT, and this thread has inspired me to follow your footsteps. haha
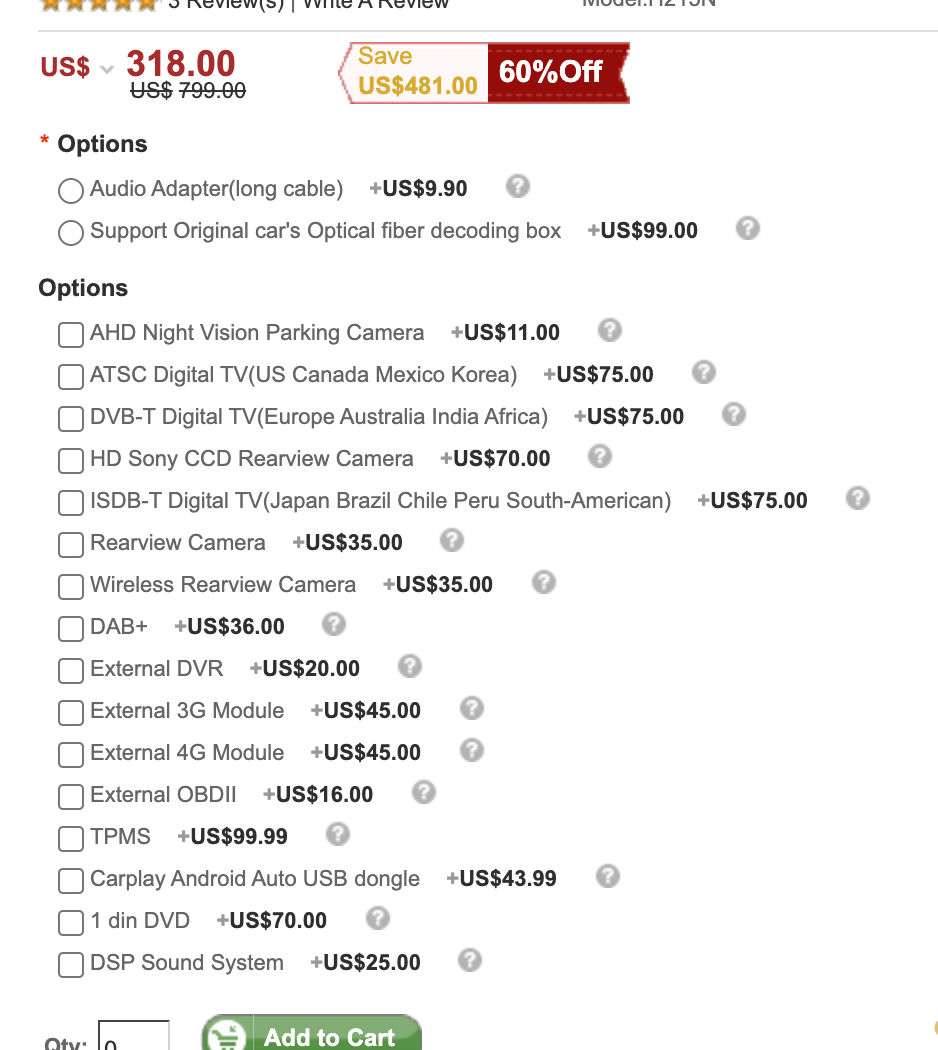
2003-2010 PORSCHE Cayenne 8 inch HD Touch Screen Android 9.0 Radio GPS Navigation System WiFi Bluetooth Music Mirror Link OBD2 1080P Video
Options
Support Original car's Optical fiber decoding box
Options
External OBDⅡ, Carplay Android Auto USB dongle
my Cayenne Turbo has a Bose sound system - so I need the optical fibre decoding box.
I didn't end up using the "External OBDⅡ" (It doesn't work in the 2004 model year), or the "Carplay Android Auto USB dongle" (I bought a wireless version off of Amazon instead).
Thanks odfijoij. Amazon should send you a kick-back check considering I ordered the phone setup you mentioned. Otherwise I'm 95% of where you are at now.
QUESTION, any chance of sharing instructions for the rear view camera install? I have the camera and want to "gut" the old camera out. Debating on best approach?
2003-2010 PORSCHE Cayenne 8 inch HD Touch Screen Android 9.0 Radio GPS Navigation System WiFi Bluetooth Music Mirror Link OBD2 1080P Video
Options
Support Original car's Optical fiber decoding box
Options
External OBDⅡ, Carplay Android Auto USB dongle
my Cayenne Turbo has a Bose sound system - so I need the optical fibre decoding box.
I didn't end up using the "External OBDⅡ" (It doesn't work in the 2004 model year), or the "Carplay Android Auto USB dongle" (I bought a wireless version off of Amazon instead).
Thanks for this! Going to be ordering pretty much the exact same setup thanks to you. I have an 05 Turbo with the Bose so I can pretty much follow exactly what you did. Minus the reverse camera.
How long do you think the overall process took?
Does the Head Unit itself come pre-installed in the Dash Kit? I was thinking about painting the matte black plastic surround of the Dash Kit, and above it with the Emergency Lights, a gloss black.
1 -
2 - You should be able to splice into the existing CANBUS without any issues (that's what I did initially); CANBUS is pretty much designed to do exactly that (it is just a bunch of wires 'spliced' off of a main bus). I'd recommend buying this harness and splicing that - that way you don't have to cut any wires on the Porsche.
You said you did this initially....Why did you not keep it this way? Pros Cons of keeping versus doing away with it as you did? Just curious because all of my parts came in. I am trying to prepare myself for tackling this next weekend. I feel this is going to be much more difficult for myself than I initially expected haha.
[finally got the time to sit down and write a reply - Patrick, let me know if you have any other questions before/during the install!]
You have two choices for installing the Android Head Unit:
1: Use all their stuff (including the CAN BUS decoder) and setup instructions - the easiest route.
2: Or, going for a more home-built approach, which is what I did (as I didn’t like that the CAN BUS decoder caused the strange ‘?DIO OFF’ message on the LCD display behind the steering wheel. If you don’t see that message / don’t care… using the CAN BUS decoder & following the provided instructions is the easiest way to go.
Either way: You (probably) need to add the CPJExc as well to make all the steering wheel controls work.
The CANBUS decoder listens to messages from the car on the CAN bus, then sends 12V signals to the Android head unit to make it do stuff. See the “Unit Socket Sketch Map” picture in my first post. The decoder sends 12V signals to:
Wire 1 (ILLUMI) when the headlights are on (So that the Android head unit can light up the buttons on the front panel at night)
Wire 6 (ACC) when the car ignition is on - to turn the Android Head Unit on / make it go to sleep
Wire 13 (Reverse detect) - to switch between displaying Android apps and the rear view camera feed (Connector 18 (yellow) on the RCA/AUX/VIDEO PORT socket)
Wire 14 (Brake detection) - for dash camera support, I guess?
If you plug in the CAN BUS decoder, it listens to the CAN bus and then sends the 12V signals down the right wires at the right times.
Apparently the can bus decoder is also supposed to make the steering wheel controls work (in all apps) - but I never got that to work, which is why I got the CPJExc.
If you are not going to use the CAN BUS decoder, you can to snip the Seicane wiring harness into bits and recreate the functionality:
Wire 1 (ILLUMI) - I didn’t bother with this (In the Android Head Unit settings, I enabled the ‘Always light up front panel button lights’ setting), but you can connect a wire to some other 12V lightbulb wire in the console (There are three wires going to the cigarette lighter under the AC control; I think one of them is the night illumination wire, so you can tap into that if you care)
Wire 6 (ACC) - tap a fuse in the right fuse box, and run a wire from there - and then behind the glove box - to the back of the head unit.
Wire 13 (Reverse detect) - I hooked it up to the black-and-blue wire in the trunk (see earlier post) that powers the reverse lights.
The wired reverse camera kit I got had a very long cable that had yellow RCA camera connectors & red wires (on both ends). You run the cable all the way from the camera in the back of the car to head unit in the front of the car (see other posts on this website… it is pretty easy).
You hook up the yellow RCA connector to the camera in the trunk, and on the other end, you hook it up to Connector 18 on the back of the head unit.
You can use this single red wire for reverse detect and/or power to the reverse camera. Either way: connect the cable's red wire to the red wire on the camera, and the camera’s black wire to black/ground on some other light in the back of the car. (or you can ground it to the chassis).
If you are going the CAN BUS decoder route (with the Seicane head unit I ordered) - you hook the cable’s red wire to “Rear Camera Power - 12V” on the head unit. So, when you put the car in reverse, the can bus decoder detects the message indicating reverse gear has been selected, and it sends power from the head unit all the way through the cable to the camera at the back of the car.
If you are *not* using the CAN BUS decoder: Tap into the black-and-blue wire in the trunk space (see earlier post) - run a single wire to the camera near the license plate, and hook it up to the 12V red wire on the camera *and* the red wire in the cable going back to the head unit. At the head unit, wire the red wire of the cable into the “13: Reverse Detect” wire on the head unit.
The black-and-blue reverse light wire then serves as camera power, and ‘reverse detect’ signal at the head unit.
[If you decide to do your own wiring (the not-can bus decoder route) - be careful to not wire anything to the always-on wire (16: Bat-12V at the head unit) that goes to your battery; you’ll drain it. Ask me how I know. Use a right fuse box tap instead to provide +12V power to the CPJExc and anything else that only needs to be on when the ignition is on.]
QUESTION, any chance of sharing instructions for the rear view camera install? I have the camera and want to "gut" the old camera out. Debating on best approach?
I kinda made up my own rear view camera install. I tapped the black-and-blue in the rear-left trunk compartment.
How long do you think the overall process took?
Well… I futzed with it multiple times. You can probably get this all done in one long morning. Be prepared to install / reinstall everything a few times to get it perfect. I’d recommend leaving the the USB cables exposed initially so that you can program the CPJexc as needed - it takes a few tries to dial it in.
Does the Head Unit itself come pre-installed in the Dash Kit? I was thinking about painting the matte black plastic surround of the Dash Kit, and above it with the Emergency Lights, a gloss black.
The unit I ordered is a perfect fit / replacement for the PCM - you slide out the PCM, and slide in the Android head unit.
I'd recommend buying this harness and splicing that - that way you don't have to cut any wires on the Porsche.
You said you did this initially....Why did you not keep it this way? Pros Cons of keeping versus doing away with it as you did? Just curious because all of my parts came in. I am trying to prepare myself for tackling this next weekend. I feel this is going to be much more difficult for myself than I initially expected haha.
I got the harness because I didn’t want to cut Porsche wires, and I initially wanted to hook up both the CPJExc and the Seicane can bus decoder. I tapped into the can bus wires on the harness to provide can bus data to the CPJExc, and plugged the male connector of the wiring harness into the Seicaine wiring harness that goes to the can bus decoder.
(Essentially - I was trying to connect two things (CPJExc and can bus decoder) to the *one* can bus plug (that one plug that initially only went to the PCM).
I decided to no longer use the can bus decoder, so I sniped the harness to bits, and run the can bus wires to the CPJExc only.
I only used the CPJexc because the Seicane can bus decoder didn’t actually do a good job of listening to the steering wheel can bus messages. I bought that harness when I was going to use the CPJExc *and* the can bus decoder.
Post some photos of all the stuff you bought, and I’ll draw up a wiring diagram.
Thank you, thank you for starting this amazing thread. I recently purchased an 2008 CGTS with the non-smoker option which means I currently have have no way to charge the mobile phone in what use to be the cigarette lighter charging port. after reading the thread I am seriously thinking this install could solve a multitude of issues with the outdated PCM 2.1 that while functional, is rather cumbersome to use compared to the touch screens we have grown accustom to. I assume I could add a female USB receptacle for charging separately or would this Sony unit have that capability built in?
I have the stock backup camera, but it just seems to point down to the ground just below the tailgate rather than projecting the broad angle in your photos and what we normally see in a modern setup. Do you think I could incorporate the the current wiring and possibly a better camera lens with the Sony head unit? - Thanks Rob

 11-03-2020, 03:50 PM