

DIY: Cayenne Instrument cluster brightness repair
 02-03-2019, 01:24 AM
#1

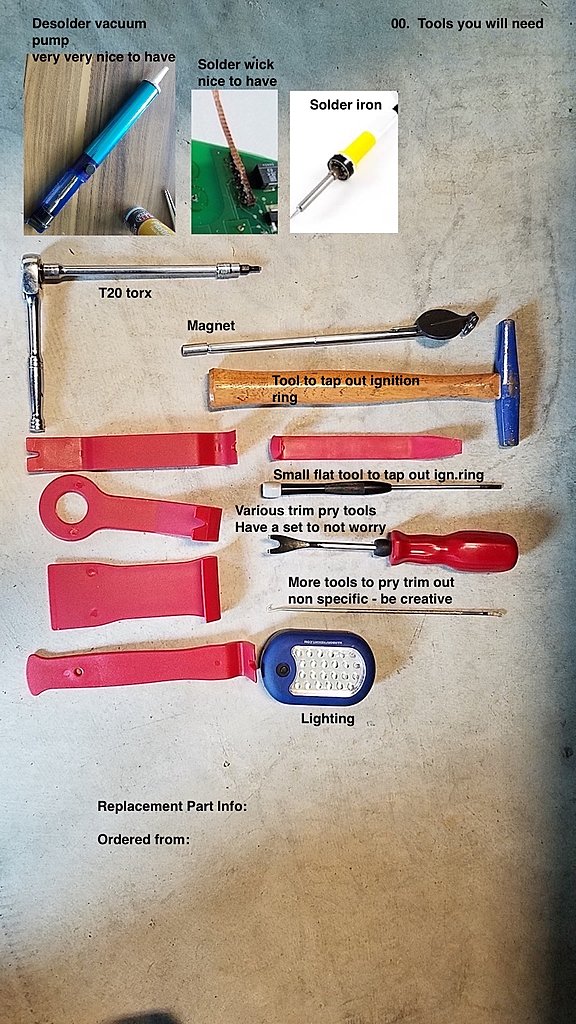
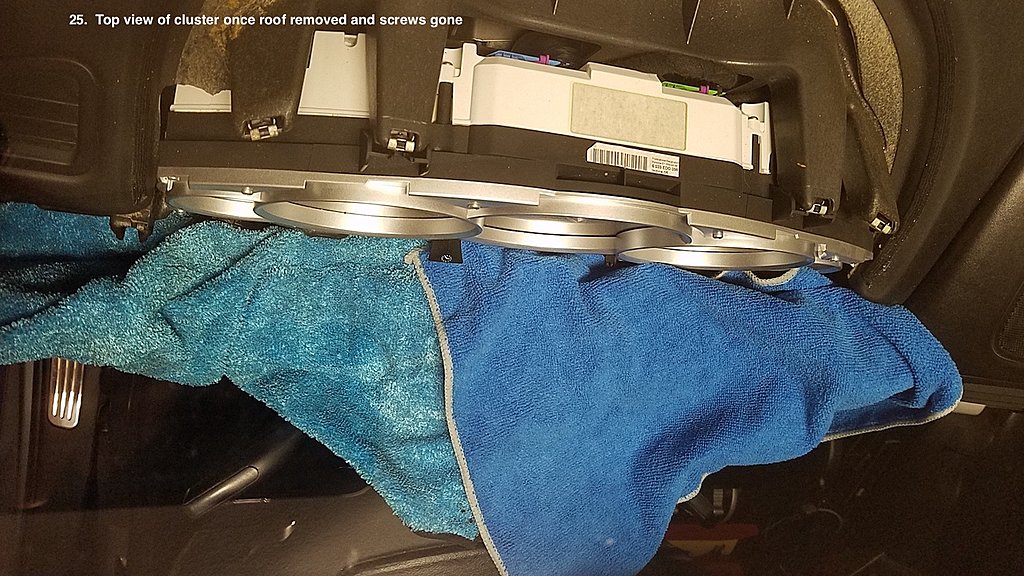
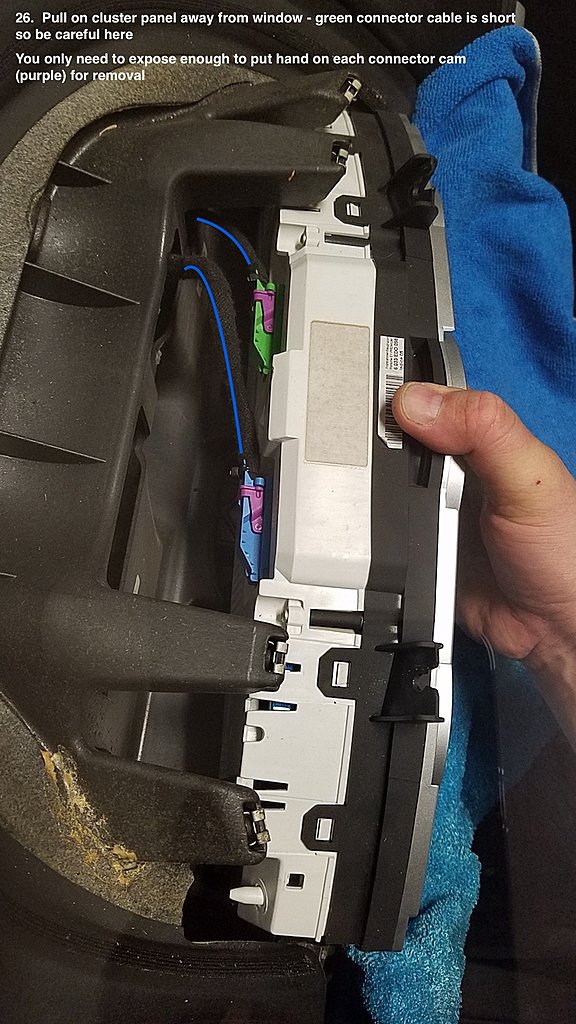
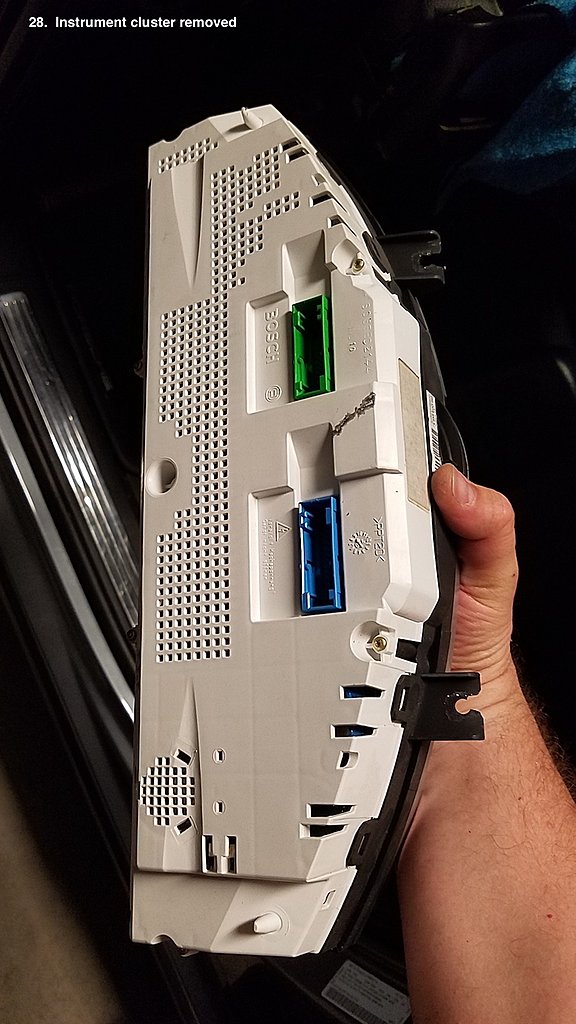
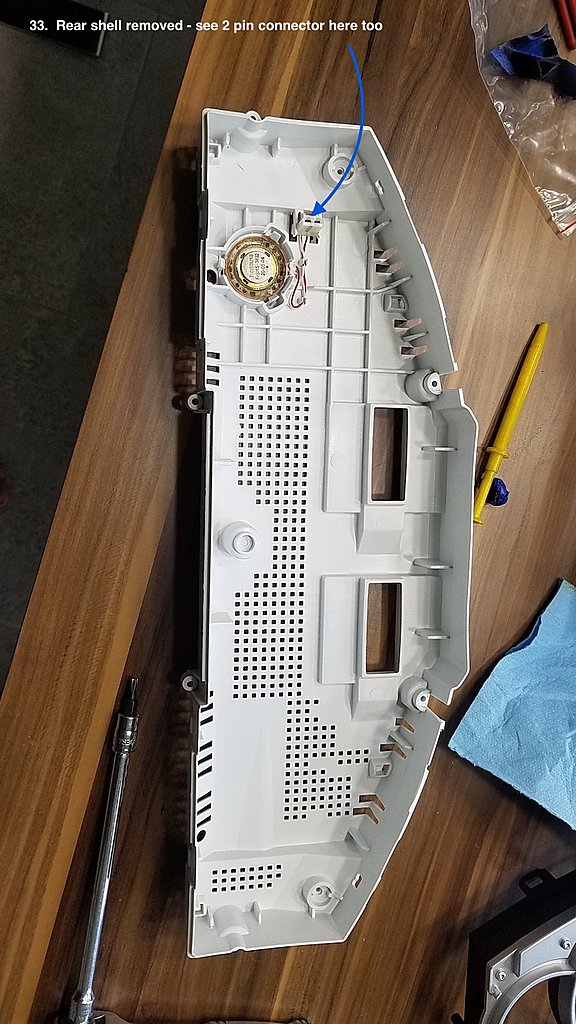
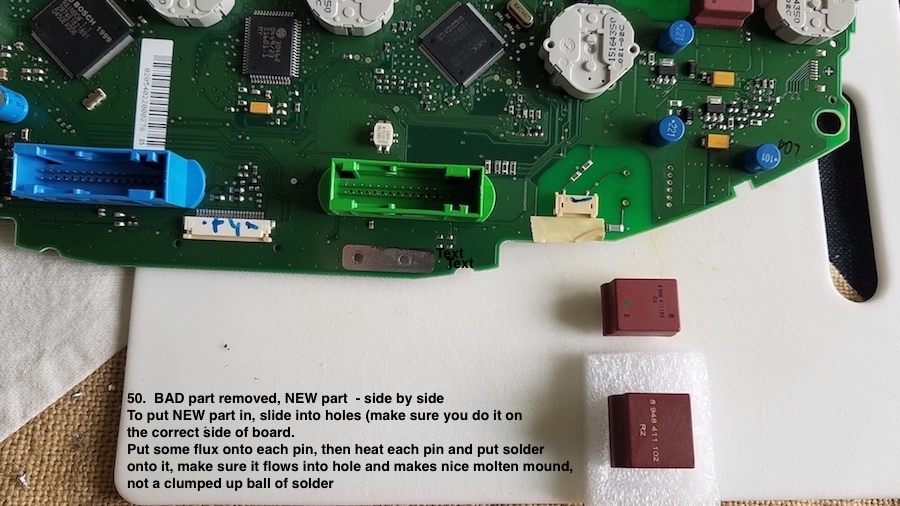
Symptom: Your LCD display inside your instrument cluster is very dim, or was dim before, but now you cannot see anything at all on it. So you are left with only the analog dials (needles) to rely on, for information. This prevents you from accessing settings for the car. This DIY will help you fix this issue. Most of the time, the issue is a transformer located on the main board of cluster, that becomes defective. Remedy is to replace it. Below info will show you every step of the way, from trim removal, taking cluster apart, doing solder rework and putting it all back together.
Pictures are very self explanatory. I just completed this, after collecting information from multiple sources. Collected so that one can do it all from one place. Hope this helps.
Each pic has instructions for ease of use.
Do yourself a favor, review entire DIY before you start, so you know what you will need, what you will need to do, etc.
PART INFO:
Description/PN: Transformer for Volkswagen Touareg / Porsche Instrument Cluster Illumination Repair
Item# A44002
Price: part - $25.90 USD. Shipping $23.00 USD.
Total: $48.90 USD arrived within 1 week.
Ordered from: http://www.keyecu.com/index.php?rout...;search=A44002
Ordered from this place for $25.90 plus about 23 bucks for shipping. If you plan to replace both transformers (one for LCD, another for analog dials brightness), order two and replace both.
If you are not sure you can tackle this, get someone that can solder.
Good luck.
Last edited by ciaka; 11-01-2021 at 11:17 PM.

The following 4 users liked this post by ciaka:
The following users liked this post:
ekstroemtj (06-22-2024)

 02-03-2019, 04:50 PM
#4
Banned

Join Date: Mar 2011
Location: Spring Lake, NJ, US of A
Posts: 10,085
Received 1,160 Likes
on
767 Posts
Very nice. It will be added to the DIY subforum. Thanks!
And - there it is.. Thanks again! https://rennlist.com/forums/cayenne-...ng-repair.html
And - there it is.. Thanks again! https://rennlist.com/forums/cayenne-...ng-repair.html
02-03-2019, 08:33 PM
#5
Excellent write up. Thank you again and for the perfect timing. I will let you know how this goes when I get my new transformers in!
@Don, is there any way we can get the pictures numbered in proper sequence to get it a little easier to follow?
@Don, is there any way we can get the pictures numbered in proper sequence to get it a little easier to follow?
02-03-2019, 11:31 PM
#6
Banned
Join Date: Mar 2011
Location: Spring Lake, NJ, US of A
Posts: 10,085
Received 1,160 Likes
on
767 Posts
Meanwhile - to see them in order and only one at a time horizontally see: https://rennlist.com/forums/cayenne-...ng-repair.html
02-04-2019, 12:00 PM
#7
OK, I was able to go into this thread and organize the pics, to have them show sequentially.
If you are still observing pics side by side, make your browser window more narrow and all pics will appear one under the other.
All seems to be in order. Enjoy.
If you are still observing pics side by side, make your browser window more narrow and all pics will appear one under the other.
All seems to be in order. Enjoy.
Trending Topics
The following users liked this post:
deilenberger (11-14-2019)
11-14-2019, 08:29 PM
#9
Rennlist Member
Join Date: Aug 2005
Location: I should be in TNT for Carnival!
Posts: 10,249
Received 329 Likes
on
264 Posts
Got to thank ciaka for this thread!
This helped me a lot on my '05 Touareg.
Good news the part was even cheaper at $15 (free shipping) from China
Thanks a bunch!
This helped me a lot on my '05 Touareg.
Good news the part was even cheaper at $15 (free shipping) from China
Thanks a bunch!

The following users liked this post:
jo-hans (11-15-2019)
03-29-2020, 08:01 PM
#10
Burning Brakes
Hi. I'm home due to the pandemic and came across this thread.
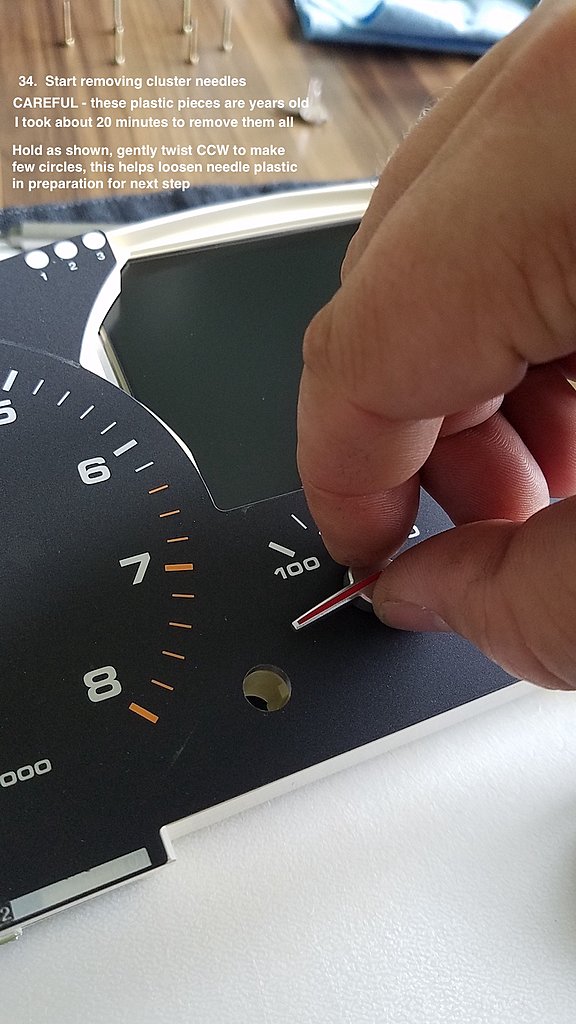
I don't know if OP is still around to reply but, I would strongly advise against touching those gauge needles.
I tried a similar repair on my e38 BMW and, -those things are put on my magic elves. It doesn't matter how new or old the cluster is, if you yank on those things (or pry them carefully) the gauge will never work right again.
One thing not mentioned is how to "re-time" the needle to the shaft. This IS important.
Anyway, instead of just being negative... I was an electronics technician for Sears for 8 years in the 90's and, in cases that warrant it like this, although ugly, it is possible to replace parts from the top if you just destroy the old part.
I haven't done this or anything but with the old part out of the way, you can piggy-back the new part on top with some ingenuity. (spreading the legs out, etc)
Also my issue is not the display but the back light of the whole cluster (for night driving only). The needles still light up red and display works fine.
Last thing, my gong has stopped working. -More of a motivation to look at things back there. I wonder how this is related.
The following users liked this post:
deilenberger (06-20-2020)
 06-20-2020, 01:48 PM
#12
Banned
Join Date: Mar 2011
Location: Spring Lake, NJ, US of A
Posts: 10,085
Received 1,160 Likes
on
767 Posts
Hi. I'm home due to the pandemic and came across this thread.
I don't know if OP is still around to reply but, I would strongly advise against touching those gauge needles.
I tried a similar repair on my e38 BMW and, -those things are put on my magic elves. It doesn't matter how new or old the cluster is, if you yank on those things (or pry them carefully) the gauge will never work right again.
One thing not mentioned is how to "re-time" the needle to the shaft. This IS important.
Anyway, instead of just being negative... I was an electronics technician for Sears for 8 years in the 90's and, in cases that warrant it like this, although ugly, it is possible to replace parts from the top if you just destroy the old part.
I haven't done this or anything but with the old part out of the way, you can piggy-back the new part on top with some ingenuity. (spreading the legs out, etc)
Also my issue is not the display but the back light of the whole cluster (for night driving only). The needles still light up red and display works fine.
Last thing, my gong has stopped working. -More of a motivation to look at things back there. I wonder how this is related.
The following users liked this post:
thesteve (06-20-2020)
10-25-2021, 04:02 PM
#13

Great writeup: pro-tips below... Before we get there. My display was totally black for the past 3 months. I replaced both components and had a nice clean soldering install. Now the display works! That's the good news. I am however having an issue with heat. When the cluster gets warm (after 30 mins of driving or in hot sun) the display goes dim again. Did I get a bad power supply chip? or do I have a LCD that is creating too much heat? As I said, it went from not working at all to working normally when cold. Dim when hot.
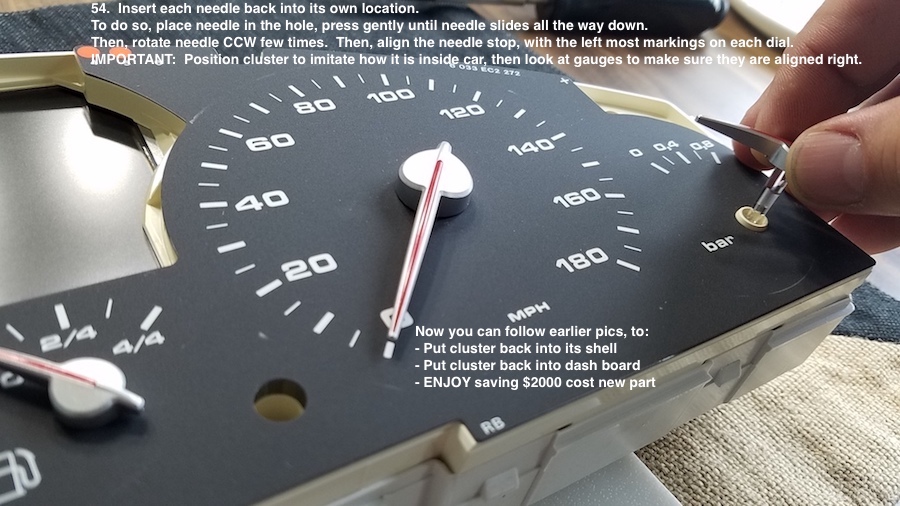
Pro-tips: I completed the repair over the weekend. All and all it was pretty simple thanks to these instructions. A few pro-tips for anyone contemplating doing this. "Clocking the needles," is a non-issue. Yes, the needles must be removed from the display, and care must be taken when reinstalling to ensure proper alignment. To align them simply rotate the needle counterclockwise until the stepper motor hits the stop. Then ensure the needle is aligned to the zero point for each scale. If you over shoot and your needle is sitting in the negative range (-5 mph for example), then rotate fully clockwise past 180mph and use the clockwise stop to rotate the needle, then recheck the alignment at the zero stop. There are plenty of videos online that show the process (google: replacing stepper motor GMC).
Pro-tips: I completed the repair over the weekend. All and all it was pretty simple thanks to these instructions. A few pro-tips for anyone contemplating doing this. "Clocking the needles," is a non-issue. Yes, the needles must be removed from the display, and care must be taken when reinstalling to ensure proper alignment. To align them simply rotate the needle counterclockwise until the stepper motor hits the stop. Then ensure the needle is aligned to the zero point for each scale. If you over shoot and your needle is sitting in the negative range (-5 mph for example), then rotate fully clockwise past 180mph and use the clockwise stop to rotate the needle, then recheck the alignment at the zero stop. There are plenty of videos online that show the process (google: replacing stepper motor GMC).
The following users liked this post:
thesteve (10-25-2021)
10-25-2021, 05:58 PM
#14
Pro
I assume you are referring to the monochrome center display in the cluster? If so, then you need to replace the LCD screen itself. I replaced mine with this one:
https://www.taninautoelectronix.com/...er-lcd-screen/
It fit great, was a perfect color match, and was easy to install. That solved my problem of the display dimming in hot weather.
https://www.taninautoelectronix.com/...er-lcd-screen/
It fit great, was a perfect color match, and was easy to install. That solved my problem of the display dimming in hot weather.
